Pipeline Processing
Pipelines control how data is processed in Stroom. Typically you’re going to want to do a lot of the same stuff for every pipeline, i.e. similar transformations, indexing, writing out data. You can actually create a template pipeline and inherit from it, tweaking what you need to for this or that feed. We’re not doing that now because we want to show how to create one from scratch.
Create a pipeline
-
Create a pipeline by right-clicking our
Stroom 101folder and selecting: -
Call it something like
CSV to XML pipeline. -
Select Structure from the top of the new tab. This is the most important view for the pipeline because it shows what will actually happen on the pipeline.
We already have a Source element.
Unlike most other pipeline elements this isn’t something we need to configure.
It’s just there to show the starting point.
Data gets into the pipeline via other means - we’ll describe this in detail later.
Add a data splitter
Data splitters are powerful, and there is a lot we can say about them. Here we’re just going to make a basic one.
Create a CSV splitter
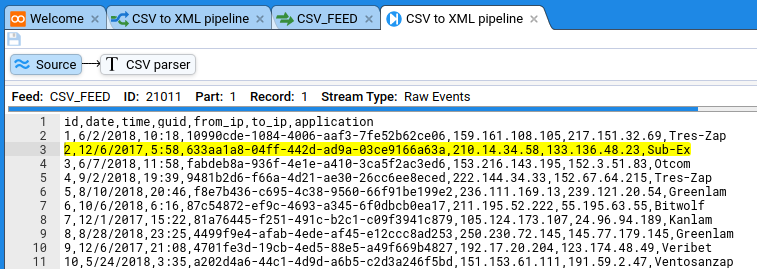
We have CSV data in the following form:
id,guid,from_ip,to_ip,application
1,10990cde-1084-4006-aaf3-7fe52b62ce06,159.161.108.105,217.151.32.69,Tres-Zap
2,633aa1a8-04ff-442d-ad9a-03ce9166a63a,210.14.34.58,133.136.48.23,Sub-Ex
To process this we need to know if there’s a header row, and what the delimiters are. This is a job for a Data Splitter.
The splitter is actually a type of Text Converter , so lets create one of those:
-
Right click on our
Stroom 101folder and selecting: -
Call it something like
CSV splitter.
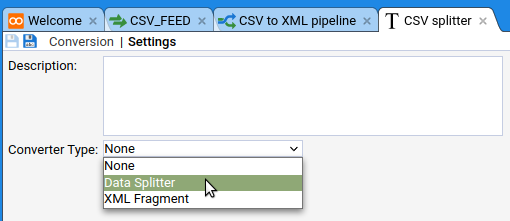
In the new tab you need to tell the Text Converter that it’ll be a Data Splitter:
Click the Settings sub-tab then select Data Splitter in the Converter Type drop-down.
Now go to the Conversion tab. What you need to put in here is specific to the built-in Data Splitter functionality, so I’m just going to tell you what you’re going to need:
<?xml version="1.1" encoding="UTF-8"?>
<dataSplitter
xmlns="data-splitter:3"
xmlns:xsi="http://www.w3.org/2001/XMLSchema-instance"
xsi:schemaLocation="data-splitter:3 file://data-splitter-v3.0.xsd"
version="3.0">
<!-- The first line contains the field names -->
<split delimiter="\n" maxMatch="1">
<group>
<split delimiter="," containerStart=""" containerEnd=""">
<var id="heading" />
</split>
</group>
</split>
<!-- All subsequent lines are records -->
<split delimiter="\n">
<group>
<split delimiter="," containerStart=""" containerEnd=""">
<data name="$heading$1" value="$1" />
</split>
</group>
</split>
</dataSplitter>
This guide assumes you are running the stroom_core_test stack which has the data_splitter-v3.0.xsd schema pre-loaded.
Save it by clicking the save button .
So we now have a configured, re-usable data splitter for CSV files that have headers. We need to add this to our pipeline as a filter, so head back to the pipeline’s Structure section and add a DSParser.
-
Right-click the Source element and select:
-
Call it CSV Parser and click OK.
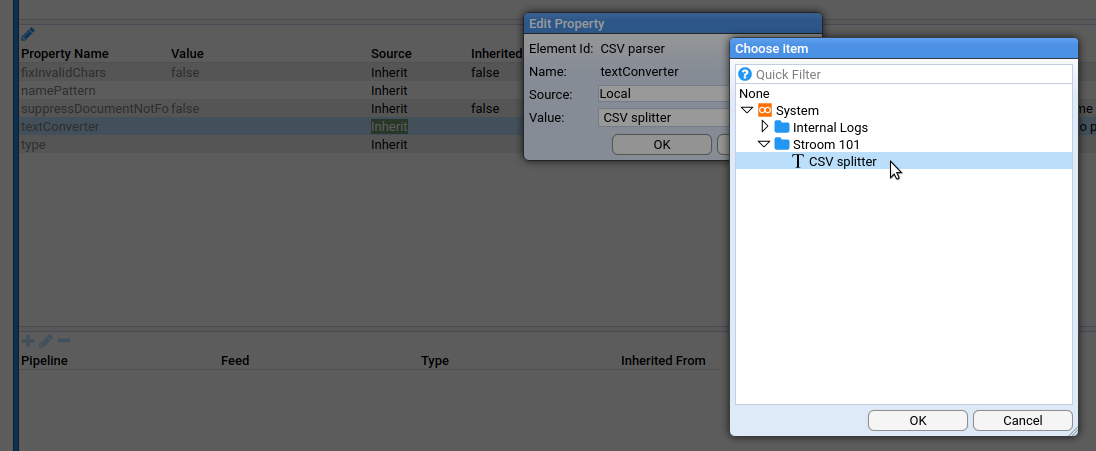
We need to tell the new CSV parser to use the TextConverter (CSV splitter) we created earlier.
- Click on the CSV Parser element and the pane below will show its properties.
- Double click the
textConverterproperty and changeValueto our CSV splitter entity.
Now save the pipeline by clicking the add button .
Test the CSV splitter
So now we have CSV data in Stroom and a pipeline that is configured to process CSV data. We’ve done a fair few things so far and are we sure the pipeline is correctly configured? We can do some debugging and find out.
In Stroom you can step through you records and see what the output is at each stage.
It’s easy to start doing this.
The first thing to do is to open your CSV_FEED feed, click on the
Stream
Stream
A Stream is the unit of data that Stroom works with and will typically contain many Events.Click to see more details... in the top pane then click the big blue stepping button at the bottom right of the bottom data pane.
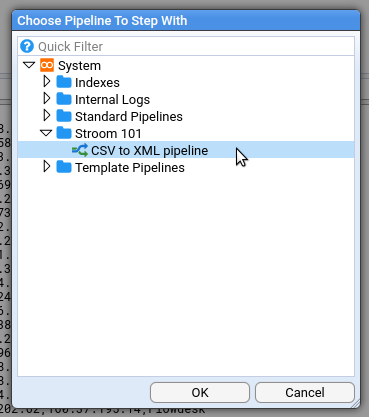
You’ll be asked to select a pipeline:
Now you get a view that’s similar to your feed view, except it also shows the pipeline. The Stepper allows you to step through each record in the source data, where a record is defined by your Data Splitter parser. The Stepper will highlight the currently selected record/event.
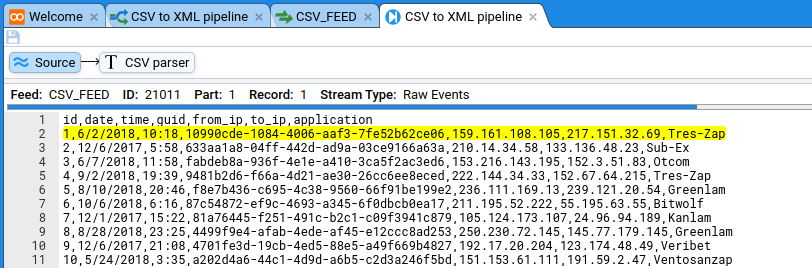
The Stepper also has stepping controls to allow you to move forward/backward through the source data. Click the green step forward button .
You should see the highlighted section advance to the next record/event.
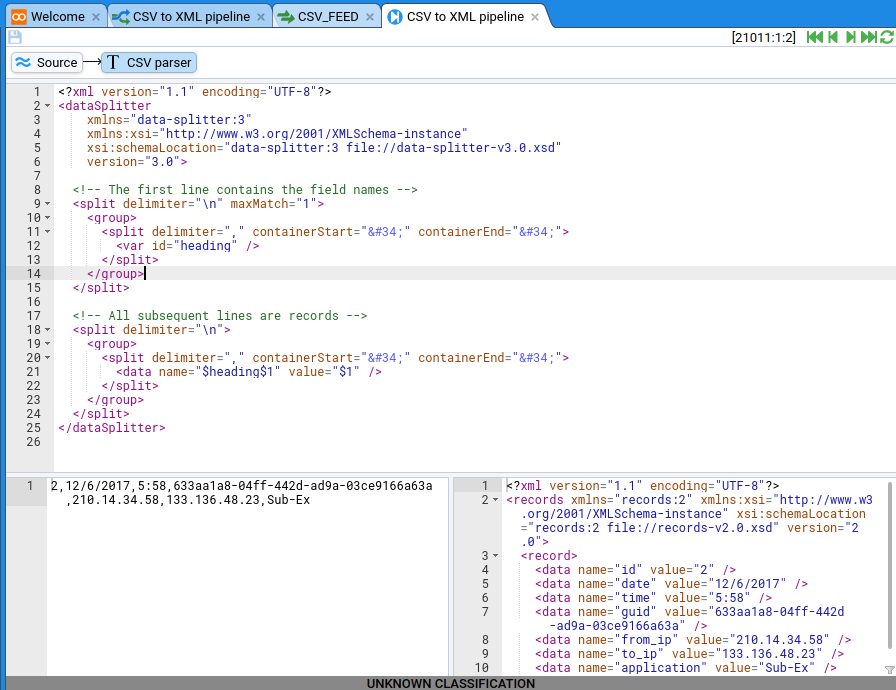
Click on the CSV parser element. You will now see the stepping view for this element that is split into three panes:
- Top pane - this shows the content of your CSV parser element, i.e. the TextConverter (CSV splitter) XML. This can be used to modify your TextConverter.
- Bottom left pane - this shows the input to the pipeline element.
- Bottom right pane - this shows the output from the pipeline element.
The output from the Data Splitter is XML in records format.
You can see the schema for records in the
XML schemasfolder.
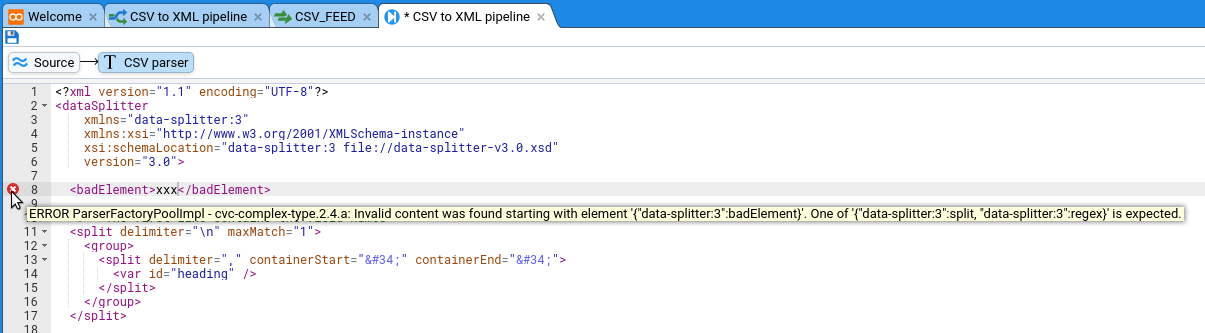
If there are any errors then you will see an error icon in the gutter of the top pane. In the example below, an invalid XML element has been added to the Data Splitter content to demonstrate an error occurring.
Add XSLT to transform records format XML into something else
XSLT XSLT Extensible Stylesheet Language Transformations is a language for transforming XML documents into other XML documents. XSLTs are the primary means of transforming data in Stroom.Click to see more details... is the language used to transform record/event data from one form into another in Stroom pipelines. An XSLTFilter pipeline element takes XML input and uses an XSLT to transform it into different XML or some other text format.
Create the XSLT filter
This process is very similar to creating the CSV splitter:
- Create the XSLT filter
- Add it to the pipeline
- Step through to make sure it’s doing what we expect
To create the new XSLT entity do the following:
-
Right click the Stroom 101 folder in the Explorer tree Explorer tree The left hand navigation tree. The Explorer Tree is used for finding, opening, creating, renaming, copying, moving and deleting Documents.Click to see more details... and select:
-
Name it XSLT.
-
Click OK.
This will open a new tab for the XSLT entity.
On the new tab ensure the XSLT sub-tab is selected.
This is another text editor pane but this one accepts XSLT.
This XSLT will be very basic and just takes the record data from the split filter and puts it into fields.
The XSLT for this is below but if you’d like to tinker then go ahead.
<?xml version="1.1" encoding="UTF-8" ?>
<xsl:stylesheet
    xpath-default-namespace="records:2"
    xmlns:stroom="stroom"
    xmlns:xsl="http://www.w3.org/1999/XSL/Transform"
    xmlns:xsi="http://www.w3.org/2001/XMLSchema-instance"
    version="2.0">

  <xsl:template match="records">
    <Events>
      <xsl:apply-templates />
    </Events>
  </xsl:template>
  <xsl:template match="record">
    <xsl:variable name="id" select="data[@name='id']/@value" />
    <xsl:variable name="guid" select="data[@name='guid']/@value" />
    <xsl:variable name="from_ip" select="data[@name='from_ip']/@value" />
    <xsl:variable name="to_ip" select="data[@name='to_ip']/@value" />
    <xsl:variable name="application" select="data[@name='application']/@value" />

    <Event>
      <Id><xsl:value-of select="$id" /></Id>
      <Guid><xsl:value-of select="$guid" /></Guid>
      <FromIp><xsl:value-of select="$from_ip" /></FromIp>
      <ToIp><xsl:value-of select="$to_ip" /></ToIp>
      <Application><xsl:value-of select="$application" /></Application>
    </Event>
  </xsl:template>
</xsl:stylesheet>
Make sure you save it by clicking the save button .
Go back to the Structure sub-tab of the pipeline and add an XSLTFilter element downstream of the CSV parser element. Call it something like XSLT filter.
Select the XSLT filter element and configure it to use the actual XSLT you just created by double-clicking xslt in the properties pane at the bottom:
In the dialog make sure you select the XSLT filter in the Stroom 101 folder.
Save the pipeline.
Test the XSLT filter
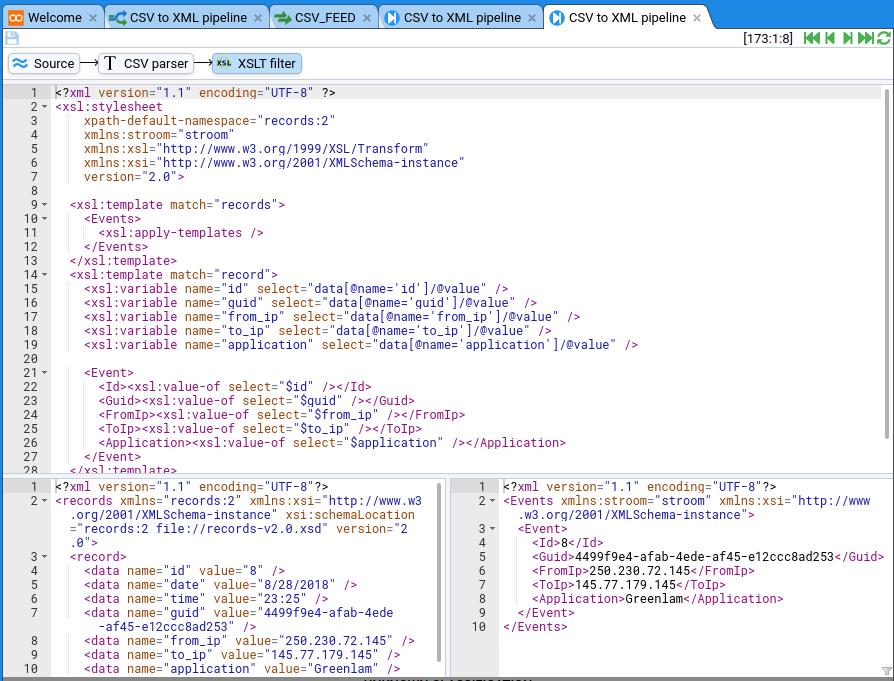
We’re going to test this in the same way we tested the CSV splitter, by clicking the large stepping button on the feed data pane. Click the step forward button a few times to make sure it’s working then click on the XSLT element. This time you should see the XSLT filter there too, as well as the basic XML being transformed into more useful XML:
There’s a few more things to get this pipeline ready for doing this task for real. We need to get this data to a destination.
Outputting the transformed data
The XSLT filter doesn’t actually write XML but instead it just outputs XML events to the next element in the pipeline. In order to write these XML events out to a destination you need a writer. If your transformation is producing XML then you need an XMLWriter , if it is producing JSON then you need a JSONWriter and for plain text you need a TextWriter .
Our XSLT filter element is outputting XML so we will create an XMLWriter.
Create the XML writer
You don’t need to create one outside the pipeline (in the way you did with the CSV splitter and the XSLT filter).
Just do the following:
-
Right click on the XSLT filter element and select:
-
Name it XML writer.
-
Click OK.
That’s it, no other configuration necessary.
Create the destination
We need to do something with the serialised XML. We’ll write it to a Stream Stream A Stream is the unit of data that Stroom works with and will typically contain many Events.Click to see more details.... To do this we create a StreamAppender :
-
Right click on the XML Writer element and select:
-
Name it Stream appender.
-
Click OK.
Streams only exist within feeds and have a type. We could set the feed that the stream will be written into but by default the StreamAppender will write to the same Feed as the input stream. We must however set the type of the Stream to distinguish it from the Raw Events Stream that we POSTed to Stroom.
To set the
Stream Type
Stream Type
All Streams must have a Stream Type. The list of Stream Types is configured using the Property stroom.data.meta.metaTypes.Click to see more details... do the following:
- Click on the Stream appender pipeline element and the pane below will show its properties.
- Double click the
streamTypeproperty and changeValueto the Events stream type.
Test the destination
We can test the XML writer and the streamAppender using the same stepping feature.
Make sure you’ve saved the pipeline and set a new stepping session running.
If you click on the stream appender you’ll see something like this:

Set the pipeline running
Obviously you don’t want to step through your data one by one. This all needs automation, and this is what Processors Processor A Processor belongs to a Pipeline. It controls the processing of data through its parent Pipeline using one or more Processor Filters.Click to see more details... and Processor Filters Processor filter A Processor Filter is used to used to find Streams to process through the Pipeline associated with the Processor Filter. A Processor Filter consists of an expression tree to select which Streams to process and a tracker to track the what Streams have been processed.Click to see more details... are for. The processor works in the background to take any unprocessed streams (as determined by the Processor Filter and its Tracker Tracker A Tracker is associated with a Processor Filter and keeps track of the Stream that the Processor Filter has already processed.Click to see more details...) and process them through the pipeline. So far everything on our EXAMPLE_IN feed is unprocessed.
Create a processor and filter
Processors are created from the Processors sub-tab of the pipeline.
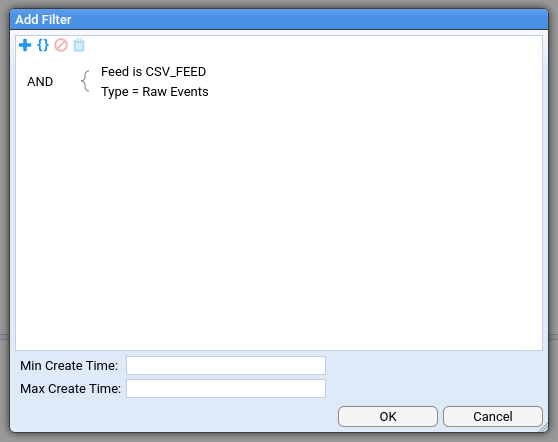
Click the add button and you will be presented with a Filter Expression tree Expression tree A tree of expression terms that each evaluate to a boolean (True/False) value. Terms can be grouped together within an expression operator (AND, OR, NOT).Click to see more details.... To configure the filter do the following:
- Right click on the root AND operator and click Add Term.
A new expression is added to the tree as a child of the operator and it has three dropdowns in it (
Field
Field
A named data Field within some form of record or entity, and where each Field can have an associated value. In Stroom, Fields can be the Fields in an Index (or other queryable Data Source or the fields of Metadata associated with a Stream, e.g. Stream ID, Feed, creation time, etc.Click to see more details...,
Condition
Condition
A Condition in an query expression term, e.g.
=,>,in, etc.Click to see more details... and value). - Create an expression term for the Feed:
- Field:
Feed - Condition:
is - Value:
CSV_FEED
- Field:
- Create an expression term for the Stream Type:
- Field:
Type - Condition:
= - Value:
Raw Events
- Field:
You only need to set the incoming feed and the stream types:
You will now see the newly created processor and its filter.

Ensure that both the processor and its filter are enabled by clicking the checkbox at the left of the row. This is it, everything we’ve done is about to start working on its own, just like it would in a real configuration.
If you keep refreshing this table it will show you the processing status which should change after a few seconds to show that the data you have uploaded is being or has been processed.
The fields in the filter row will have been updated to reflect the new position of the Filter Tracker.
Once this has happened you should be able to open the destination feed CSV_FEED and see the output data (or errors if there were any).
If the CSV_FEED tab was already open then you will likely need to click refresh on the top pane.
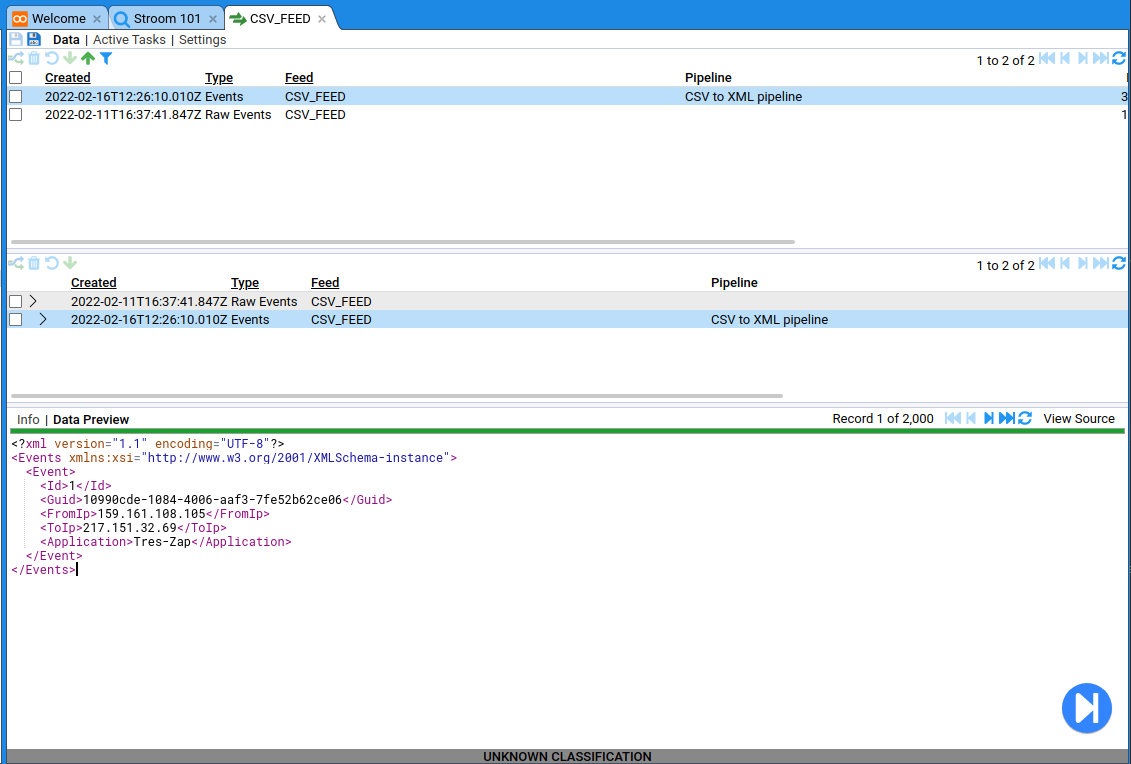
You can see that there are the Raw Events and the processed Events.
If you click on the Events then you can see all the XML that we’ve produced.
Now you’ve processed your data you can go ahead and index it.