Installation
Assumptions
The following assumptions are used in this document.
- The user has reasonable RHEL/Centos System administration skills.
- Installations are on Centos 7.3 minimal systems (fully patched).
- The term ’node’ is used to reference the ‘host’ a service is running on.
- The Stroom Proxy and Application software runs as user
stroomuserand will be deployed in this user’s home directory - Data will reside in a directory tree referenced via
/stroomdata. It is up to the user to provision a file system here, noting sub-directories of it will be NFS shared in Multi Node Stroom Deployments - Any scripts or commands that should run are in code blocks and are designed to allow the user to cut then paste the commands onto their systems
- In this document, when a textual screen capture is documented, data entry is identified by the data surrounded by
<____>. This excludes enter/return presses. - Better security of password choices, networking, firewalls, data stores, etc. can and should be achieved in various ways, but these HOWTOs are just a quick means of getting a working system, so only limited security is applied
- Better configuration of the database (e.g. more memory, redundancy, etc.) should be considered in production environments
- The use of self signed certificates is appropriate for test systems, but users should consider appropriate CA infrastructure in production environments
- The user has access to a Chrome web browser as Stroom is optimised for this browser.
Introduction
This HOWTO provides guidance on a variety of simple Stroom deployments.
for an environment where multiple nodes are required to handle the processing load.
for extensive networks where one wants to aggregate data through a proxy before sending data to the central Stroom processing systems.
for disconnected networks where collected data can be manually transferred to a Stroom processing service.
for when one needs to add an additional node to an existing cluster.
Node Name Nomenclature
For simplicity sake, the node names used in this HOWTO are geared towards the Multi Node Stroom Cluster deployment. That is:
- the database node name is
stroomdb0.strmdev00.org - the processing node names are
stroomp00.strmdev00.org,stroomp01.strmdev00.org, andstroomp02.strmdev00.org - the first node in our cluster,
stroomp00.strmdev00.org, also has theCNAMEstroomp.strmdev00.org
In the case of the Proxy only deployments,
- the forwarding Stroom proxy node name is
stoomfp0.strmdev00.org - the standalone node name will be
stroomp00.strmdev00.org
Storage
Both the Stroom Proxy and Application store data. The typical requirement is
- directory for Stroom proxy to store inbound data files
- directory for Stroom application permanent data files (events, etc.)
- directory for Stroom application index data files
- directory for Stroom application working files (temporary files, output, etc.)
Where multiple processing nodes are involved, the application’s permanent data directories need to be accessible by all participating nodes.
Thus a hierarchy for a Stroom Proxy might be
/stroomdata/stroom-proxy
And for an Application node
/stroomdata/stroom-data/stroomdata/stroom-index/stroomdata/stroom-working
In the following examples, the storage hierarchy proposed will more suited for a multi node Stroom cluster, including the Forwarding or Standalone proxy deployments. This is to simplify the documentation. Thus, the above structure is generalised into
/stroomdata/stroom-working-p_nn_/proxy
And
/stroomdata/stroom-data-p_nn_/stroomdata/stroom-index-p_nn_/stroomdata/stroom-working-p_nn_
Where nn is a two digit node number. The reason for placing the proxy directory within the Application working area will be explained later.
All data should be owned by the Stroom processing user. In this HOWTO, we will use stroomuser
Multi Node Stroom Cluster (Proxy and Application) Deployment
In this deployment we will install the database on a given node then deploy both the Stroom Proxy and Stroom Application software to both our processing nodes. At this point we will then integrate a web service to run ‘in-front’ of our Stroom software and then perform the initial configuration of Stroom via the user interface.
Database Installation
The Stroom capability requires access to two MySQL/MariaDB databases. The first is for persisting application configuration and metadata information, and the second is for the Stroom Statistics capability. Instructions for installation of the Stroom databases can be found here. Although these instructions describe the deployment of the databases to their own node, there is no reason why one can’t just install them both on the first (or only) Stroom node.
Prerequisite Software Installation
Certain software packages are required for either the Stroom Proxy or Stroom Application to run.
The core software list is
java-1.8.0-openjdkjava-1.8.0-openjdk-develpolicycoreutils-pythonunzipzip- MariaDB or MySQL client
Most of the required software are packages available via standard repositories and hence we can simply execute
One has a choice of database clients. MariaDB is directly supported by Centos 7 and is simplest to install. This is done via
One could deploy the MySQL database software as the alternative.
To do this you need to install the MySQL Community repository files then install the client. Instructions for installation of the MySQL Community repository files can be found here or on the MySQL Site . Once you have installed the MySQL repository files, install the client via
Note that additional software will be required for other integration components (e.g. Apache httpd/mod_jk). This is described in the Web Service Integration section of this document.
Note also, that Standalone or Forwarding Stroom Proxy deployments do NOT need a database client deployed.
Entropy Issues in Virtual environments
TODO
This section is likely out of date due to changes in the Linux kernel and how SecureRandom is implemented. Unless you are experiencing delays, there is no need to installhaveged.
Both the Stroom Application and Stroom Proxy currently run on Tomcat (Version 7) which relies on the Java SecureRandom class to provide random values for any generated session identifiers as well as other components. In some circumstances the Java runtime can be delayed if the entropy source that is used to initialise SecureRandom is short of entropy. The delay is caused by the Java runtime waiting on the blocking entropy source /dev/random to have sufficient entropy. This quite often occurs in virtual environments were there are few sources that can contribute to a system’s entropy.
To view the current available entropy on a Linux system, run the command
A reasonable value would be over 2000 and a poor value would be below a few hundred.If you are deploying Stroom onto systems with low available entropy, the start time for the Stroom Proxy can be as high as 5 minutes and for the Application as high as 15 minutes.
One software based solution would be to install the haveged service that attempts to provide an easy-to-use, unpredictable random number generator based upon an adaptation of the HAVEGE algorithm.
To install execute
For background reading in this matter, see this reference or this reference .
Storage Scenario
For the purpose of this Installation HOWTO, the following sets up the storage hierarchy for a two node processing cluster. To share our permanent data we will use NFS. Accept that the NFS deployment described here is very simple, and in a production deployment, a lot more security controls should be used. Further,
Our hierarchy is
- Node:
stroomp00.strmdev00.org /stroomdata/stroom-data-p00- location to store Stroom application data files (events, etc.) for this node/stroomdata/stroom-index-p00- location to store Stroom application index files/stroomdata/stroom-working-p00- location to store Stroom application working files (e.g. temporary files, output, etc.) for this node/stroomdata/stroom-working-p00/proxy- location for Stroom proxy to store inbound data files- Node:
stroomp01.strmdev00.org /stroomdata/stroom-data-p01- location to store Stroom application data files (events, etc.) for this node/stroomdata/stroom-index-p01- location to store Stroom application index files/stroomdata/stroom-working-p01- location to store Stroom application working files (e.g. temporary files, output, etc.) for this node/stroomdata/stroom-working-p01/proxy- location for Stroom proxy to store inbound data files
Creation of Storage Hierarchy
So, we first create processing user on all nodes as per
And the relevant commands to create the above hierarchy would be
- Node:
stroomp00.strmdev00.org
- Node:
stroomp01.strmdev00.org
Deployment of NFS to share Stroom Storage
We will use NFS to cross mount the permanent data directories. That is
- node
stroomp00.strmdev00.orgwill mountstroomp01.strmdev00.org:/stroomdata/stroom-data-p01and, - node
stroomp01.strmdev00.orgwill mountstroomp00.strmdev00.org:/stroomdata/stroom-data-p00.
The HOWTO guide to deploy and configure NFS for our Scenario is here
Stroom Installation
Pre-installation setup
Before installing either the Stroom Proxy or Stroom Application, we need establish various files and scripts within the Stroom Processing user’s home directory to support the Stroom services and their persistence. This is setup is described here.
Stroom Proxy Installation
Instructions for installation of the Stroom Proxy can be found here.
Stroom Application Installation
Instructions for installation of the Stroom application can be found here.
Web Service Integration
One typically ‘fronts’ either a Stroom Proxy or Stroom Application with a secure web service such as Apache’s Httpd or NGINX. In our scenario, we will use SSL to secure the web service and further, we will use Apache’s Httpd.
We first need to create certificates for use by the web service. The following provides instructions for this. The created certificates can then be used when configuring the web service.
This HOWTO is designed to deploy Apache’s httpd web service as a front end (https) (to the user) and Apache’s mod_jk as the interface between Apache and the Stroom tomcat applications. The instructions to configure this can be found here.
Other Web service capability can be used, for example, NGINX .
Installation Validation
We will now check that the installation and web services integration has worked.
Sanity firewall check
To ensure you have the firewall correctly set up, the following command
should result in
public (active)
  target: default
  icmp-block-inversion: no
  interfaces: enp0s3
  sources:
  services: dhcpv6-client http https nfs ssh
  ports: 8009/tcp 9080/tcp 8080/tcp 9009/tcp
  protocols:
  masquerade: no
  forward-ports:
  sourceports:
  icmp-blocks:
  rich rules:
Test Posting of data to the Stroom service
You can test the data posting service with the command
which WILL result in an error as we have not configured the Stroom Application as yet. The error should look like
<html><head><title>Apache Tomcat/7.0.53 - Error report</title><style><!--H1 {font-family:Tahoma,Arial,sans-serif;color:white;background-color:#525D76;font-size:22px;} H2 {font-family:Tahoma,Arial,sans-serif;color:white;background-color:#525D76;font-size:16px;} H3 {font-family:Tahoma,Arial,sans-serif;color:white;background-color:#525D76;font-size:14px;} BODY {font-family:Tahoma,Arial,sans-serif;color:black;background-color:white;} B {font-family:Tahoma,Arial,sans-serif;color:white;background-color:#525D76;} P {font-family:Tahoma,Arial,sans-serif;background:white;color:black;font-size:12px;}A {color : black;}A.name {color : black;}HR {color : #525D76;}--></style> </head><body><h1>HTTP Status 406 - Stroom Status 110 - Feed is not set to receive data - </h1><HR size="1" noshade="noshade"><p><b>type</b> Status report</p><p><b>message</b> <u>Stroom Status 110 - Feed is not set to receive data - </u></p><p><b>description</b> <u>The resource identified by this request is only capable of generating responses with characteristics not acceptable according to the request "accept" headers.</u></p><HR size="1" noshade="noshade"><h3>Apache Tomcat/7.0.53</h3></body></html>
If you view the Stroom proxy log, ~/stroom-proxy/instance/logs/stroom.log, on both processing nodes, you will see on one node,
the datafeed.DataFeedRequestHandler events running under, in this case, the ajp-apr-9009-exec-1 thread indicating the failure
...
2017-01-03T03:35:47.366Z WARN  [ajp-apr-9009-exec-1] datafeed.DataFeedRequestHandler (DataFeedRequestHandler.java:131) - "handleException()","Environment=EXAMPLE_ENVIRONMENT","Expect=100-continue","Feed=TEST-FEED-V1_0","GUID=39960cf9-e50b-4ae8-a5f2-449ee670d2eb","ReceivedTime=2017-01-03T03:35:46.915Z","RemoteAddress=192.168.2.220","RemoteHost=192.168.2.220","System=EXAMPLE_SYSTEM","accept=*/*","content-length=1051","content-type=application/x-www-form-urlencoded","host=stroomp.strmdev00.org","user-agent=curl/7.19.7 (x86_64-redhat-linux-gnu) libcurl/7.19.7 NSS/3.21 Basic ECC zlib/1.2.3 libidn/1.18 libssh2/1.4.2","Stroom Status 110 - Feed is not set to receive data"
2017-01-03T03:35:47.367Z ERROR [ajp-apr-9009-exec-1] zip.StroomStreamException (StroomStreamException.java:131) - sendErrorResponse() - 406 Stroom Status 110 - Feed is not set to receive data -
2017-01-03T03:35:47.368Z INFO  [ajp-apr-9009-exec-1] datafeed.DataFeedRequestHandler$1 (DataFeedRequestHandler.java:104) - "doPost() - Took 478 ms to process (concurrentRequestCount=1) 406","Environment=EXAMPLE_ENVIRONMENT","Expect=100-continue","Feed=TEST-FEED-V1_0","GUID=39960cf9-e50b-4ae8-a5f2-449ee670d2eb","ReceivedTime=2017-01-03T03:35:46.915Z","RemoteAddress=192.168.2.220","RemoteHost=192.168.2.220","System=EXAMPLE_SYSTEM","accept=*/*","content-length=1051","content-type=application/x-www-form-urlencoded","host=stroomp.strmdev00.org","user-agent=curl/7.19.7 (x86_64-redhat-linux-gnu) libcurl/7.19.7 NSS/3.21 Basic ECC zlib/1.2.3 libidn/1.18 libssh2/1.4.2"
...
Further, if you execute the data posting command (curl) multiple times, you will see the load balancer working in that,
the above WARN/ERROR/INFO logs will swap between the proxy services (i.e. first error will be in stroomp00.strmdev00.org’s
proxy log file, then second on stroomp01.strmdev00.org’s proxy log file, then back to stroomp00.strmdev00.org and so on).
Stroom Application Configuration
Although we have installed our multi node Stroom cluster, we now need to configure it. We do this via the user interface (UI).
Logging into the Stroom UI for the first time
To log into the UI of your newly installed Stroom instance, present the base URL to your
Chrome
browser. In this deployment, you should enter the URLS
http://stroomp.strmdev00.org, or https://stroomp.strmdev00.org or https://stroomp.strmdev00.org/stroom, noting the first URLs
should automatically direct you to the last URL.
If you have personal certificates loaded in your Chrome browser, you may be asked which certificate to use to authenticate yourself
to stroomp.strmdev00.org:443. As Stroom has not been configured to use user certificates, the choice is not relevant, just choose one
and continue.
Additionally, if you are using self-signed certificates, your browser will generate an alert as per
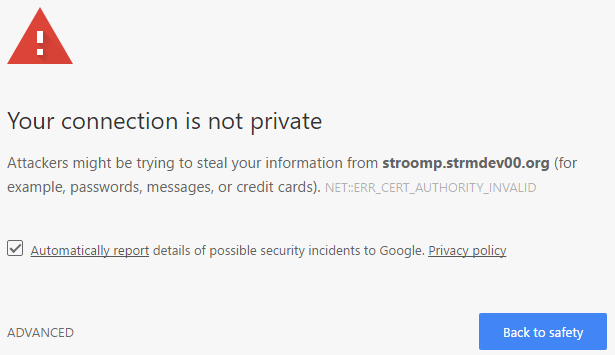
To proceed you need to select the ADVANCED hyperlink to see
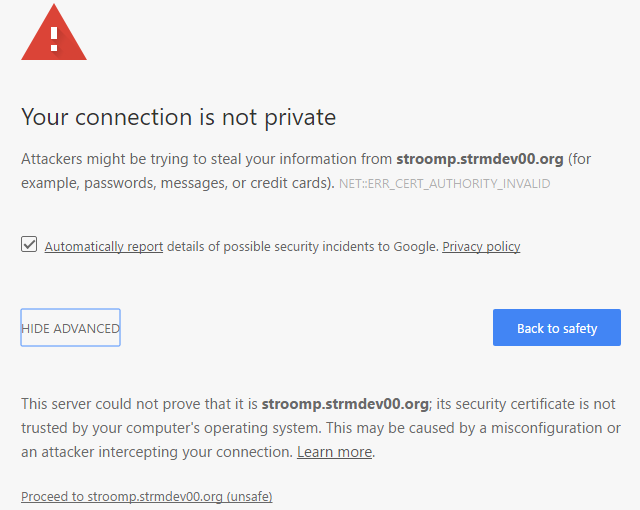
If you select the Proceed to stroomp.strmdev00.org (unsafe) hyper-link you will be presented with the standard Stroom UI login page.
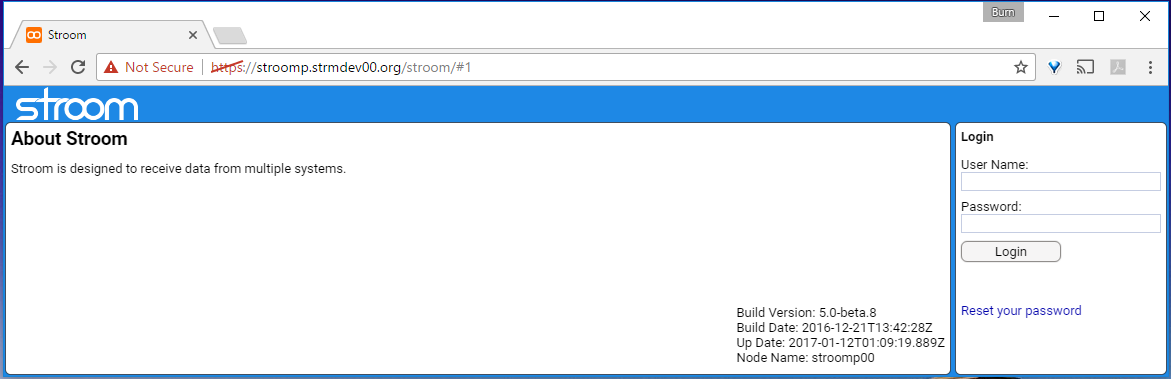
This page has two panels - About Stroom and Login.
In the About Stroom panel we see an introductory description of Stroom in the top left and deployment details in the bottom left of the panel. The deployment details provide
Build Version:- the build version of the Stroom application deployedBuild Date:- the date the version was builtUp Date:- the install dateNode Name:- the node within the Stroom cluster you have connected to
Login with Stroom default Administrative User
Each new Stroom deployment automatically creates the administrative user admin and this user’s password is initially set to admin.
We will login as this user which also validates that the database and UI is working correctly in that you can login and the password is admin.
Create an Attributed User to perform configuration
We should configure Stroom using an attributed user account.
That is, we should create a user, in our case it will be burn (the author) and once created, we login with that account then perform the initial configuration activities.
You don’t have to do this, but it is sound security practice.
Once you have created the user you should log out of the admin account and log back in as our user burn.
Configure the Volumes for our Stroom deployment
Before we can store data within Stroom we need to configure the volumes we have allocated in our Storage hierarchy. The Volume Maintenance HOWTO shows how to do this.
Configure the Nodes for our Stroom deployment
In a Stroom cluster, nodes are expected to communicate with each other on port 8080 over http. Our installation in a multi node environment ensures the firewall will allow this but we also need to configure the nodes. This is achieved via the Stroom UI where we set a Cluster URL for each node. The following Node Configuration HOWTO demonstrates how do set the Cluster URL.
Data Stream Processing
To enable Stroom to process data, it’s Data Processors need to be enabled. There are NOT enabled by default on installation. The following section in our Stroom Tasks HowTo shows how to do this.
Testing our Stroom Application and Proxy Installation
To complete the installation process we will test that we can send and ingest data.
Add a Test Feed
In order for Stroom to be able to handle various data sources, be they Apache HTTPD web access logs, Microsoft Windows Event logs or Squid Proxy logs, Stroom must be told what the data is when it is received. This is achieved using Event Feeds. Each feed has a unique name within the system.
To test our installation can accept and ingest data, we will create a test Event feed.
The ’name’ of the feed will be TEST-FEED-V1_0.
Note that in a production environment is is best that a well defined nomenclature is used for feed ’names’.
For our testing purposes TEST-FEED-V1_0 is sufficient.
Sending Test Data
Before testing our new feed, we should restart both our Stroom application services so that any volume changes are propagated. This can be achieved by simply running the following on both nodes.
It is suggested you first log out of Stroom, if you are currently logged in and you should monitor the Stroom
application logs to ensure it has successfully restarted. Remember to use the T and Tp bash aliases we set up.
For this test, we will send the contents of /etc/group to our test feed. We will also send the file from the cluster’s database machine. The command to send this file is
We will test a number of features as part of our installation test. These are
- simple post of data
- simple post of data to validate load balancing is working
- simple post to direct feed interface
- simple post to direct feed interface to validate load balancing is working
- identify that the Stroom Proxy Aggregation is working correctly
As part of our testing will check the presence of the inbound data, as files, within the proxy storage area.
Now as the proxy storage area is also the location from which the Stroom application
automatically aggregates then ingests the data stored by the proxy, we can either turn off the
Proxy Aggregation task,
or attempt to
perform our tests noting that proxy aggregation occurs every 10 minutes by default. For simplicity, we will
turn off the Proxy Aggregation task.
We can now perform our tests. Follow the steps in the Data Posting Tests section of the Testing Stroom Installation HOWTO
Forwarding Stroom Proxy Deployment
In this deployment we will install a Stroom Forwarding Proxy which is designed to aggregate data posted to it for managed forwarding to
a central Stroom processing system. This scenario is assuming we are installing on the fully patch Centos 7.3 host, stroomfp0.strmdev00.org.
Further it assumes we have installed, configured and tested the destination Stroom system we will be forwarding to.
We will first deploy the Stroom Proxy then configure it as a Forwarding Proxy then integrate a web service to run ‘in-front’ of Proxy.
Prerequisite Software Installation for Forwarding Proxy
Certain software packages are required for the Stroom Proxy to run.
The core software list is
java-1.8.0-openjdkjava-1.8.0-openjdk-develpolicycoreutils-pythonunzipzip
Most of the required software are packages available via standard repositories and hence we can simply execute
Note that additional software will be required for other integration components (e.g. Apache httpd/mod_jk). This is described in the Web Service Integration for Forwarding Proxy section of this document.
Forwarding Proxy Storage
Since we are a proxy that stores data sent to it and forwards it each minute we have only one directory.
/stroomdata/stroom-working-fp0/proxy- location for Stroom proxy to store inbound data files prior to forwarding
You will note that these HOWTOs use a consistent storage nomenclature for simplicity of documentations.
Creation of Storage for Forwarding Proxy
We create the processing user, as per
Then create the storage hierarchy with the commands
Stroom Forwarding Proxy Installation
Pre-installation setup
Before installing the Stroom Forwarding Proxy, we need establish various files and scripts within the Stroom Processing user’s home directory to support the Stroom services and their persistence. This is setup is described here. Although this setup HOWTO is orientated towards a complete Stroom Proxy and Application installation, it does provide all the processing user setup requirements for a Stroom Proxy as well.
Stroom Forwarding Proxy Installation
Instructions for installation of the Stroom Proxy can be found here, noting you should follow the steps for configuring the proxy as a Forwarding proxy.
Web Service Integration for Forwarding Proxy
One typically ‘fronts’ a Stroom Proxy with a secure web service such as Apache’s Httpd or NGINX. In our scenario, we will use SSL to secure the web service and further, we will use Apache’s Httpd.
We first need to create certificates for use by the web service. The SSL Certificate Generation HOWTO provides instructions for this. The created certificates can then be used when configuring the web service. NOTE also, that for a forwarding proxy we will need to establish Key and Trust stores as well. This is also documented in the SSL Certificate Generation HOWTO here
This HOWTO is designed to deploy Apache’s httpd web service as a front end (https) (to the user) and Apache’s mod_jk as the interface between Apache and the Stroom tomcat applications. The instructions to configure this can be found here. Please take note of where a Stroom Proxy configuration item is different to that of a Stroom Application processing node.
Other Web service capability can be used, for example, NGINX .
Testing our Forwarding Proxy Installation
To complete the installation process we will test that we can send data to the forwarding proxy and that it forwards the files
it receives to the central Stroom processing system.
As stated earlier, it is assumed we have installed, configured and tested the destination central Stroom processing system and thus we will have a test Feed already established - TEST-FEED-V1_0.
Sending Test Data
For this test, we will send the contents of /etc/group to our test feed - TEST-FEED-V1_0.
It doesn’t matter from which host we send the file from.
The command to send file is
Before testing, it is recommended you set up to monitor the Stroom proxy logs on the central server as well as on the Forwarding Proxy server.
Follow the steps in the Forwarding Proxy Data Posting Tests section of the Testing Stroom Installation HOWTO
Standalone Stroom Proxy Deployment
In this deployment will install a Stroom Standalone Proxy which is designed to accept and store data posted to it for manual forwarding to
a central Stroom processing system. This scenario is assuming we are installing on the fully patch Centos 7.3 host, stroomsap0.strmdev00.org.
We will first deploy the Stroom Proxy then configure it as a Standalone Proxy then integrate a web service to run ‘in-front’ of Proxy.
Prerequisite Software Installation for Forwarding Proxy
Certain software packages are required for the Stroom Proxy to run.
The core software list is
java-1.8.0-openjdkjava-1.8.0-openjdk-develpolicycoreutils-pythonunzipzip
Most of the required software are packages available via standard repositories and hence we can simply execute
Note that additional software will be required for other integration components (e.g. Apache httpd/mod_jk). This is described in the Web Service Integration for Standalone Proxy section of this document.
Standalone Proxy Storage
Since we are a proxy that stores data sent to it we have only one directory.
/stroomdata/stroom-working-sap0/proxy- location for Stroom proxy to store inbound data files
You will note that these HOWTOs use a consistent storage nomenclature for simplicity of documentations.
Creation of Storage for Standalone Proxy
We create the processing user, as per
then create the storage hierarchy with the commands
Stroom Standalone Proxy Installation
Pre-installation setup
Before installing the Stroom Standalone Proxy, we need establish various files and scripts within the Stroom Processing user’s home directory to support the Stroom services and their persistence. This is setup is described here. Although this setup HOWTO is orientated towards a complete Stroom Proxy and Application installation, it does provide all the processing user setup requirements for a Stroom Proxy as well.
Stroom Standalone Proxy Installation
Instructions for installation of the Stroom Proxy can be found here, noting you should follow the steps for configuring the proxy as a Store_NoDB proxy.
Web Service Integration for Standalone Proxy
One typically ‘fronts’ a Stroom Proxy with a secure web service such as Apache’s Httpd or NGINX. In our scenario, we will use SSL to secure the web service and further, we will use Apache’s Httpd.
We first need to create certificates for use by the web service. The SSL Certificate Generation HOWTO provides instructions for this. The created certificates can then be used when configuring the web service. There is no need for Trust or Key stores.
This HOWTO is designed to deploy Apache’s httpd web service as a front end (https) (to the user) and Apache’s mod_jk as the interface between Apache and the Stroom tomcat applications. The instructions to configure this can be found here. Please take note of where a Stroom Proxy configuration item is different to that of a Stroom Application processing node.
Other Web service capability can be used, for example, NGINX .
Testing our Standalone Proxy Installation
To complete the installation process we will test that we can send data to the standalone proxy and it stores it.
Sending Test Data
For this test, we will send the contents of /etc/group to our test feed - TEST-FEED-V1_0. It doesn’t matter from which host we send the file from.
The command to send file is
Before testing, it is recommended you set up to monitor the Standalone Proxy logs.
Follow the steps in the Standalone Proxy Data Posting Tests section of the Testing Stroom Installation HOWTO
Addition of a Node to a Stroom Cluster Deployment
In this deployment we will deploy both the Stroom Proxy and Stroom Application software
to a new processing node we wish to add to our cluster. Once we have deploy and configured the Stroom software, we will then integrate a web
service to run ‘in-front’ of our Stroom software, and then perform the initial configuration of to add this node via the user interface. The
node we will add is stroomp02.strmdev00.org.
Grant access to the database for this node
Connect to the Stroom database as the administrative (root) user, via the command
and at the MariaDB [(none)]> or mysql> prompt enter
Prerequisite Software Installation
Certain software packages are required for either the Stroom Proxy or Stroom Application to run.
The core software list is
java-1.8.0-openjdkjava-1.8.0-openjdk-develpolicycoreutils-pythonunzipzip- MariaDB or MySQL client
Most of the required software are packages available via standard repositories and hence we can simply execute
In the above instance, the database client choice is MariaDB as it is directly supported by Centos 7. One could deploy the MySQL database software as the alternative. If you have chosen a different database for the already deployed Stroom Cluster then you should use that one. See earlier in this document on how to install the MySQL Community client.
Note that additional software will be required for other integration components (e.g. Apache httpd/mod_jk). This is described in the Web Service Integration section of this document.
Storage Scenario
To maintain our Storage Scenario them, the scenario for this node is
- Node:
stroomp02.strmdev00.org/stroomdata/stroom-data-p02- location to store Stroom application data files (events, etc.) for this node/stroomdata/stroom-index-p02- location to store Stroom application index files/stroomdata/stroom-working-p02- location to store Stroom application working files (e.g. tmp, output, etc.) for this node/stroomdata/stroom-working-p02/proxy- location for Stroom proxy to store inbound data files
Creation of Storage Hierarchy
So, we first create processing user on our new node as per
Then create the storage via
As we need to share this new nodes permanent data directories to the existing nodes in the Cluster, we need to create mount point directories on our existing nodes in addition to deploying NFS.
So we execute on
- Node:
stroomp00.strmdev00.org
And on
- Node:
stroomp01.strmdev00.org
Deployment of NFS to share Stroom Storage
We will use NFS to cross mount the permanent data directories. That is
- node
stroomp00.strmdev00.orgwill mountstroomp01.strmdev00.org:/stroomdata/stroom-data-p01and,stroomp02.strmdev00.org:/stroomdata/stroom-data-p02and,
- node
stroomp01.strmdev00.orgwill mountstroomp00.strmdev00.org:/stroomdata/stroom-data-p00andstroomp02.strmdev00.org:/stroomdata/stroom-data-p02
- node
stroomp02.strmdev00.orgwill mountstroomp00.strmdev00.org:/stroomdata/stroom-data-p00andstroomp01.strmdev00.org:/stroomdata/stroom-data-p01
The HOWTO guide to deploy and configure NFS for our Scenario is here.
Stroom Installation
Pre-installation setup
Before installing either the Stroom Proxy or Stroom Application, we need establish various files and scripts within the Stroom Processing user’s home directory to support the Stroom services and their persistence. This is setup is described here. Note you should remember to set the N bash variable when generating the Environment Variable files to 02.
Stroom Proxy Installation
Instructions for installation of the Stroom Proxy can be found here. Note you
will be deploying a Store proxy and during the setup execution ensure you enter the appropriate values for NODE stroomp02
and REPO_DIR /stroomdata/stroom-working-p02/proxy. All other values will be the same.
Stroom Application Installation
Instructions for installation of the Stroom application can be found here.
When executing the setup script ensure you enter the appropriate values for TEMP_DIR /stroomdata/stroom-working-p02 and NODE stroomp02.
All other values will be the same. Note also that you will not have to wait for the ‘first’ node to initialise the Stroom database as this would have already been done when you first deployed your Stroom Cluster.
Web Service Integration
One typically ‘fronts’ either a Stroom Proxy or Stroom Application with a secure web service such as Apache’s Httpd or NGINX. In our scenario, we will use SSL to secure the web service and further, we will use Apache’s Httpd.
As we are a cluster, we use the same certificate as the other nodes. Thus we need to gain the certificate package from an existing node.
So, on stroomp00.strmdev00.org, we replicate the directory ~/stroomuser/stroom-jks to our new node.
That is, tar it up, copy the tar file to stroomp02 and untar it.
We can make use of the other node’s mounted file system.
Then on our new node (stroomp02.strmdev00.org) we extract the data.
Now ensure protection, ownership and SELinux context for these files by running
This HOWTO is designed to deploy Apache’s httpd web service as a front end (https) (to the user) and Apache’s mod_jk as the interface between Apache and the Stroom tomcat applications. The instructions to configure this can be found here. You should pay particular attention to the section on the Apache Mod_JK configuration as you MUST regenerate the Mod_JK workers.properties file on the existing cluster nodes as well as generating it on our new node.
Other Web service capability can be used, for example, NGINX .
Note that once you have integrated the web services for our new node, you will need to restart the Apache systemd process on the existing two nodes so that the new Mod_JK configuration has taken place.
Installation Validation
We will now check that the installation and web services integration has worked. We do this with a simple firewall check and later perform complete integration tests.
Sanity firewall check
To ensure you have the firewall correctly set up, the following command
Should result in
public (active)
  target: default
  icmp-block-inversion: no
  interfaces: enp0s3
  sources:
  services: dhcpv6-client http https nfs ssh
  ports: 8009/tcp 9080/tcp 8080/tcp 9009/tcp
  protocols:
  masquerade: no
  forward-ports:
  sourceports:
  icmp-blocks:
  rich rules:
Stroom Application Configuration - New Node
We will need to configure this new node’s volumes, set its Cluster URL and enable its Stream Processors. We do this by logging into the Stroom User Interface (UI) with an account with Administrator privileges. It is recommended you use a attributed user for this activity. Once you have logged in you can configure this new node.
Configure the Volumes for our Stroom deployment
Before we can store data on this new Stroom node we need to configure its volumes we have allocated in our Storage hierarchy. The section on adding new volumes in the Volume Maintenance HOWTO shows how to do this.
Configure the Nodes for our Stroom deployment
In a Stroom cluster, nodes are expected to communicate with each other on port 8080 over http. Our installation in a multi node environment ensures the firewall will allow this but we also need to configure the new node. This is achieved via the Stroom UI where we set a Cluster URL for our node. The section on Configuring a new node in the Node Configuration HOWTO demonstrates how do set the Cluster URL.
Data Stream Processing
To enable Stroom to process data, it’s Data Processors need to be enabled. They are NOT enabled by default on installation. The following section in our Stroom Tasks HowTo shows how to do this.
Testing our New Node Installation
To complete the installation process we will test that our new node has successfully integrated into our cluster.
First we need to ensure we have restarted the Apache Httpd service (httpd.service) on the original nodes so that the new workers.properties configuration files take effect.
We now test the node integration by running the tests we use to validate a Multi Node Stroom Cluster Deployment found
here noting we should
monitor all three nodes proxy and application log files. Basically we are looking to see that this new node participates in the
load balancing for the stroomp.strmdev00.org cluster.