Applicable Stroom version: “7.12”
Documentation generated on: 29 Jun 2026, 01:38 UTC
Documentation release version: stroom-docs-v3878To see the documentation for other versions of Stroom click the version drop-down at the top of the screen.
This is the multi-page printable view of this section. Click here to print.
Documentation
This documentation covers the installation, configuration, administration and use of Stroom and its related applications.
- 1: Quick Start Guide
- 1.1: Running Stroom
- 1.2: Feeds
- 1.3: Pipeline Processing
- 1.4: Indexing
- 1.5: Dashboards
- 2: Stroom Architecture
- 3: Installation Guide
- 3.1: Single Node Docker Installation
- 3.2: Configuration
- 3.2.1: Stroom and Stroom-Proxy Configuration
- 3.2.1.1: Common Configuration
- 3.2.1.2: Stroom Configuration
- 3.2.1.3: Stroom Proxy Configuration
- 3.2.2: Nginx Configuration
- 3.2.3: Stroom Log Sender Configuration
- 3.2.4: MySQL Configuration
- 3.3: Installing in an Air Gapped Environment
- 3.4: Upgrades
- 3.4.1: Minor Upgrades and Patches
- 3.4.2: Upgrade from v5 to v7
- 3.4.3: Upgrade from v6 to v7
- 3.5: Setup
- 3.5.1: MySQL Setup
- 3.5.2: Securing Stroom
- 3.5.3: Java Key Store Setup
- 3.5.4: Processing Users
- 3.5.5: Setting up Stroom with an Open ID Connect IDP
- 3.5.5.1: Accounts vs Users
- 3.5.5.2: Stroom's Internal IDP
- 3.5.5.3: External IDP
- 3.5.5.4: Tokens for API use
- 3.5.5.5: Test Credentials
- 3.6: Stroom 6 Installation
- 3.7: Stroom Installation
- 3.8: Java
- 3.9: Kubernetes Cluster
- 3.9.1: Introduction
- 3.9.2: Install Operator
- 3.9.3: Upgrade Operator
- 3.9.4: Remove Operator
- 3.9.5: Configure Database
- 3.9.6: Configure a cluster
- 3.9.7: Auto Scaler
- 3.9.8: Stop Stroom Cluster
- 3.9.9: Restart Node
- 4: How Tos
- 4.1: General
- 4.1.1: Enabling Processors
- 4.1.2: Explorer Management
- 4.1.3: Feed Management
- 4.1.4: Raw Source Tracking
- 4.1.5: Task Management
- 4.2: Administration
- 4.2.1: System Properties
- 4.3: Authentication
- 4.3.1: Create a user
- 4.3.2: Login
- 4.3.3: Logout
- 4.4: Installation
- 4.4.1: Apache Httpd/Mod_JK configuration for Stroom
- 4.4.2: Database Installation
- 4.4.3: Installation
- 4.4.4: Installation of Stroom Application
- 4.4.5: Installation of Stroom Proxy
- 4.4.6: NFS Installation and Configuration
- 4.4.7: Node Cluster URL Setup
- 4.4.8: Processing User setup
- 4.4.9: SSL Certificate Generation
- 4.4.10: Testing Stroom Installation
- 4.4.11: Volume Maintenance
- 4.5: Event Feeds
- 4.5.1: Writing an XSLT Translation
- 4.5.2: Apache HTTPD Event Feed
- 4.5.3: Event Processing
- 4.6: Reference Feeds
- 4.6.1: Use a Reference Feed
- 4.6.2: Create a Simple Reference Feed
- 4.7: Indexing and Search
- 4.7.1: Elasticsearch
- 4.7.2: Apache Solr
- 4.7.3: Stroom Search API
- 4.8: Event Post Processing
- 4.8.1: Event Forwarding
- 5: User Guide
- 5.1: Application Programming Interfaces (API)
- 5.1.1: API Specification
- 5.1.2: Calling an API
- 5.1.3: Query APIs
- 5.1.4: Export Content API
- 5.1.5: Reference Data API
- 5.1.6: Data Download API
- 5.1.7: Authentication Proxy
- 5.1.8: Explorer API
- 5.1.9: Feed API
- 5.2: Background Jobs
- 5.2.1: Scheduler
- 5.3: Concepts
- 5.3.1: Streams
- 5.4: Data Receipt
- 5.4.1: Feed Status Checking
- 5.4.2: Data Receipt Rules
- 5.4.3: Feed Name Generation
- 5.4.4: Content Templates
- 5.4.5: Data Feed Identities
- 5.5: Data Retention
- 5.6: Data Splitter
- 5.6.1: Simple CSV Example
- 5.6.2: Simple CSV example with heading
- 5.6.3: Complex example with regex and user defined names
- 5.6.4: Multi Line Example
- 5.6.5: Element Reference
- 5.6.5.1: Content Providers
- 5.6.5.2: Expressions
- 5.6.5.3: Variables
- 5.6.5.4: Output
- 5.6.6: Match References, Variables and Fixed Strings
- 5.6.6.1: Expression match references
- 5.6.6.2: Variable reference
- 5.6.6.3: Use of fixed strings
- 5.6.6.4: Concatenation of references
- 5.7: Event Feeds
- 5.8: Indexing data
- 5.8.1: Elasticsearch
- 5.8.1.1: Introduction
- 5.8.1.2: Getting Started
- 5.8.1.3: Indexing data
- 5.8.1.4: Exploring Data in Kibana
- 5.8.2: Lucene Indexes
- 5.8.3: Solr Integration
- 5.9: Nodes
- 5.10: Pipelines
- 5.10.1: Pipeline Recipes
- 5.10.2: Parser
- 5.10.2.1: XML Fragments
- 5.10.3: XSLT Conversion
- 5.10.3.1: XSLT Basics
- 5.10.3.2: XSLT Functions
- 5.10.3.3: XSLT Includes
- 5.10.4: File Output
- 5.10.5: Reference Data
- 5.10.6: Context Data
- 5.11: Properties
- 5.12: Searching Data
- 5.12.1: Data Sources
- 5.12.1.1: Lucene Index Data Source
- 5.12.1.2: Statistics
- 5.12.1.3: Elasticsearch
- 5.12.1.4: Internal Data Sources
- 5.12.2: Dashboards
- 5.12.2.1: Queries
- 5.12.2.2: Internal Links
- 5.12.2.3: Direct URLs
- 5.12.3: Query
- 5.12.3.1: Stroom Query Language
- 5.12.4: Analytic Rules
- 5.12.5: Search Extraction
- 5.12.6: Dictionaries
- 5.13: Security
- 5.13.1: Deployment
- 5.13.2: Credentials
- 5.13.3: User Accounts
- 5.13.4: Users and Groups
- 5.13.5: Application Permissions
- 5.13.6: Document Permissions
- 5.14: Tools
- 5.14.1: Command Line Tools
- 5.14.2: Stream Dump Tool
- 5.15: User Content
- 5.15.1: Content Store
- 5.15.2: Editing Text
- 5.15.3: Naming Conventions
- 5.15.4: Documenting content
- 5.15.5: Git Repo
- 5.15.6: Finding Things
- 5.15.7: Content Import and Export
- 5.16: Viewing Data
- 5.17: Volumes
- 6: Reference Section
- 6.1: Cron Syntax
- 6.2: Dates & Times
- 6.3: Documents
- 6.4: Editor Completion Snippets
- 6.5: Expression functions
- 6.5.1: Aggregate Functions
- 6.5.2: Cast Functions
- 6.5.3: Date Functions
- 6.5.4: Link Functions
- 6.5.5: Logic Funtions
- 6.5.6: Mathematics Functions
- 6.5.7: Selection Functions
- 6.5.8: String Functions
- 6.5.9: Type Checking Functions
- 6.5.10: URI Functions
- 6.5.11: Value Functions
- 6.6: Background Jobs
- 6.7: Templating
- 6.8: Keyboard Shortcuts
- 6.9: Pipeline Elements
- 7: Sending Data to Stroom
- 7.1: Event Data Formats
- 7.1.1: Character Encoding
- 7.1.2: Event XML Fragments
- 7.2: Header Arguments
- 7.3: Response Codes
- 7.4: Payload Formats
- 7.5: SSL Configuration
- 7.6: Example Clients
- 7.6.1: curl (Linux)
- 7.6.2: curl (Windows)
- 7.6.3: event-logging (Java library)
- 7.6.4: send_to_stroom.sh (Linux)
- 7.6.5: Simple C# Client
- 7.6.6: Simple Java Client
- 7.6.7: stroom-log-sender (Docker)
- 7.6.8: VBScript (Windows)
- 7.6.9: wget (Windows)
- 7.7: Token Authentication
- 7.8: Java Keystores
- 8: Stroom Proxy
- 8.1: Stroom Proxy Installation
- 8.2: Proxy Configuration
- 8.3: Proxy Functions
- 8.4: Proxy API
- 8.5: Receipt ID
- 8.6: Proxy Architecture
- 9: Glossary
- 9.1: A
- 9.1.1: Account
- 9.1.2: API
- 9.1.3: API Key
- 9.1.4: Application permission
- 9.2: B
- 9.2.1: Byte order mark
- 9.3: C
- 9.3.1: Character encoding
- 9.3.2: Condition
- 9.3.3: Content
- 9.3.4: Context data
- 9.3.5: Cron
- 9.3.6: CSV
- 9.4: D
- 9.4.1: Dashboard
- 9.4.2: Data source
- 9.4.3: Data splitter
- 9.4.4: Dictionary
- 9.4.5: Doc Ref
- 9.4.6: Document
- 9.4.7: Document permission
- 9.5: E
- 9.5.1: Elasticsearch
- 9.5.2: ELFF
- 9.5.3: Entity
- 9.5.4: Event
- 9.5.5: Events
- 9.5.6: Explorer tree
- 9.5.7: Expression tree
- 9.6: F
- 9.6.1: Feed
- 9.6.2: Field
- 9.6.3: Filter
- 9.6.4: Fully Qualified Domain Name (FQDN)
- 9.7: G
- 9.7.1: Git
- 9.7.2: Group (users)
- 9.8: H
- 9.9: I
- 9.9.1: Identity Provider (IDP)
- 9.9.2: Index
- 9.9.3: IP address
- 9.9.4: ISO 8601
- 9.10: J
- 9.11: K
- 9.12: L
- 9.13: M
- 9.14: N
- 9.14.1: Namespace
- 9.15: O
- 9.16: P
- 9.16.1: Parser
- 9.16.2: Pipeline
- 9.16.3: Pipeline element
- 9.16.4: Processor
- 9.16.5: Processor filter
- 9.16.6: Property
- 9.17: Q
- 9.17.1: Query
- 9.18: R
- 9.18.1: Raw Events
- 9.18.2: Re-processing
- 9.18.3: Records
- 9.18.4: REST
- 9.19: S
- 9.19.1: Search extraction
- 9.19.2: Searchable
- 9.19.3: SQL
- 9.19.4: Stepper
- 9.19.5: Stream
- 9.19.6: Stream Type
- 9.19.7: StroomQl
- 9.20: T
- 9.20.1: Table
- 9.20.2: Transport Sayer Security (TLS)
- 9.20.3: Token
- 9.20.4: Tracker
- 9.21: U
- 9.21.1: Unix Epoch
- 9.21.2: User
- 9.21.3: Coordinated Universal Time (UTC)
- 9.21.4: UUID
- 9.22: V
- 9.22.1: Visualisation
- 9.22.2: Volume
- 9.22.3: Volume group
- 9.23: W
- 9.24: X
- 9.24.1: XML
- 9.24.2: XML Schema
- 9.24.3: XPath
- 9.24.4: XSLT
- 9.25: Y
- 9.25.1: YAML
- 9.26: Z
- 9.26.1: ZIP
1 - Quick Start Guide
How to setup an instance of Stroom and get started processing data.
In this quick-start guide you will learn how to use Stroom to get from a file that looks like this:
id,date,time,guid,from_ip,to_ip,application
1,6/2/2018,10:18,10990cde-1084-4006-aaf3-7fe52b62ce06,159.161.108.105,217.151.32.69,Tres-Zap
2,12/6/2017,5:58,633aa1a8-04ff-442d-ad9a-03ce9166a63a,210.14.34.58,133.136.48.23,Sub-Ex
3,6/7/2018,11:58,fabdeb8a-936f-4e1e-a410-3ca5f2ac3ed6,153.216.143.195,152.3.51.83,Otcom
4,9/2/2018,19:39,9481b2d6-f66a-4d21-ae30-26cc6ee8eced,222.144.34.33,152.67.64.215,Tres-Zap
5,8/10/2018,20:46,f8e7b436-c695-4c38-9560-66f91be199e2,236.111.169.13,239.121.20.54,Greenlam
6,10/6/2018,6:16,87c54872-ef9c-4693-a345-6f0dbcb0ea17,211.195.52.222,55.195.63.55,Bitwolf
7,12/1/2017,15:22,81a76445-f251-491c-b2c1-c09f3941c879,105.124.173.107,24.96.94.189,Kanlam
8,8/28/2018,23:25,4499f9e4-afab-4ede-af45-e12ccc8ad253,250.230.72.145,145.77.179.145,Greenlam
9,12/6/2017,21:08,4701fe3d-19cb-4ed5-88e5-a49f669b4827,192.17.20.204,123.174.48.49,Veribet
10,5/24/2018,3:35,a202d4a6-44c1-4d9d-a6b5-c2d3a246f5bd,151.153.61.111,191.59.2.47,Ventosanzap
11,10/11/2018,16:06,73bf0fde-091c-41eb-9ef5-c6a742b447a6,112.210.36.45,89.113.178.178,Sub-Ex
12,3/22/2018,2:29,3f54a04f-3045-4400-927e-fa211c61daf6,22.113.244.30,213.13.252.165,Solarbreeze
13,11/26/2017,19:47,925ff706-ebd3-4045-a8c1-a938a196ba39,239.76.244.27,50.1.42.87,Stronghold
14,10/7/2018,1:21,71b37372-4498-47fa-bc7b-611c3dd6bd30,21.138.176.238,155.255.71.235,Cookley
15,5/26/2018,2:57,24e9e4d4-ae47-4d8d-8a24-58f6d4085329,246.103.138.18,73.162.117.95,Lotstring
16,4/27/2018,18:49,1778d0e7-5fae-4d48-b754-700d0e26fcc7,20.8.184.2,244.134.213.31,Veribet
17,10/7/2017,6:27,fa061c82-5f3d-4ab8-b1b3-ab7e8c206501,206.244.196.39,96.199.17.147,Zontrax
18,9/10/2018,11:06,99ea62f8-f13a-4730-af9a-aa9dbf515bd5,229.232.8.245,151.187.41.141,Sonair
19,10/11/2017,10:38,020c8302-a220-4f0c-b3e9-5704dafc2c6c,210.3.18.238,7.24.182.123,Veribet
20,10/8/2018,21:01,9f697626-dbf7-44cf-8304-bc23d270f9a4,79.91.164.95,65.228.111.8,Kanlam
21,12/14/2017,19:24,ecf60fc1-ed96-4689-a437-8cb021527910,230.75.202.62,160.37.195.14,Flowdesk
22,10/8/2017,15:22,54aa9db5-6dab-4180-aae0-9bc23b6d9a90,176.69.103.171,181.151.216.246,Stim
23,9/20/2018,23:35,eef29e7e-3ed6-4eed-8c04-d1f6bdd95c11,6.188.94.84,84.2.105.82,Lotlux
24,2/26/2018,6:14,75a63921-0319-4a1d-980a-dc9477ba3810,83.232.182.156,98.95.4.218,Tin
25,10/28/2018,12:50,8a6beaf1-c0b7-4f91-bcc0-586f4ac55ea6,167.227.0.230,34.218.236.86,Tampflex
26,6/13/2018,15:17,ed6434f8-7bda-4a40-92f7-3096a5b39d3e,23.75.75.27,153.54.203.153,Temp
27,12/28/2017,12:22,9bb67784-35a6-44a1-b2c4-46a1de49ef2e,17.22.178.242,193.74.181.212,Flexidy
28,4/8/2018,21:31,24d3706b-9f4a-4a0d-abf2-f398502a660e,22.7.145.209,227.22.142.54,Duobam
29,5/7/2018,21:24,aeb57761-9cef-48d9-87bf-2d053332e8d4,213.170.238.130,94.29.64.34,Sub-Ex
30,11/26/2017,21:45,9be35bf3-9607-4d3b-97fe-c6f1d787fd5e,96.155.134.182,45.208.223.58,Fixflex
31,3/3/2018,21:07,b5431a46-322c-4d61-b620-173bf80a9cc0,22.60.155.34,75.176.116.70,Treeflex
32,9/14/2018,19:30,2322cb82-8e79-469b-8de6-adace7947030,66.6.112.48,134.222.225.40,Y-Solowarm
33,10/23/2018,22:18,ade11826-fac9-4e06-ac2e-f32c82b643b5,35.102.108.189,255.67.89.29,Daltfresh
34,8/27/2018,16:13,42d4d562-e5cb-4504-8a2a-fee0d619117c,210.78.202.27,191.42.123.3,Bamity
35,8/29/2018,22:55,4e6d67b0-20f2-49e5-903a-2fc1a8de08a3,155.153.56.139,151.77.207.194,Biodex
36,12/26/2017,1:50,c0a4497f-2e6f-402b-bd88-c3adb86da85f,23.3.148.82,10.179.79.149,Bamity
37,11/28/2017,8:22,5f4f41ef-f7c9-4c41-9df8-f6ecf0634c33,245.209.118.240,48.28.91.123,Temp
38,6/29/2018,22:21,59d0bf23-80af-49d5-b216-398ce24cbf30,201.192.177.176,169.46.125.48,Alpha
39,10/16/2018,4:07,70a97207-0d71-4785-aa9c-3fcc2f0ebdab,183.15.192.131,23.94.228.168,Fix San
40,1/31/2018,20:11,eef84f7d-22fe-44c3-9681-d870949de034,150.117.217.147,147.20.93.58,Flowdesk
41,4/11/2018,10:16,66dfc774-873d-4f2a-9a0f-3600dc152dd7,101.227.202.214,53.157.66.129,Zoolab
42,11/28/2017,8:12,ddad6b94-c5c8-49a8-abca-505cdaf62332,101.21.101.124,234.107.46.72,Matsoft
43,2/23/2018,5:02,0963372f-b583-41d4-b2f5-f5db91a7ef64,155.149.83.56,209.206.127.59,Veribet
44,1/1/2018,15:22,9610cbed-14e5-4c69-a742-c224b9862e00,37.20.231.133,200.159.90.16,Cardguard
45,10/13/2017,14:39,eff31a8d-2942-4b9f-8a0f-4624466b61fa,52.252.121.31,137.195.3.132,Aerified
46,1/2/2018,13:48,a14aac0c-ff78-4b16-9fb6-dd3033a91131,18.91.250.133,89.124.11.172,Bigtax
47,6/8/2018,2:24,1896d637-bc27-4d49-b801-8a46a5a3b564,150.24.100.244,81.227.172.244,Y-Solowarm
48,10/26/2017,17:12,bca0aa24-5940-42b2-8993-0852ff510c29,141.1.48.101,214.87.149.212,Zontrax
49,12/21/2017,22:55,0ac743a4-88bd-4570-81e0-df46707a1b5c,124.224.230.100,238.250.63.80,Rank
50,12/23/2017,19:24,168770b9-3933-49c2-bde3-887207912b24,156.47.16.83,230.73.19.38,Treeflex
51,5/9/2018,17:38,83d8927c-ebdd-4219-ae11-e28db5faab31,102.120.152.228,174.180.251.72,Regrant
52,7/19/2018,3:19,8b991347-2be9-417b-8048-4396f9de115a,38.0.78.235,187.73.115.229,Ventosanzap
53,10/7/2017,0:24,8bd7db7e-4d36-4f41-b1a9-636d5a2eb1ef,8.253.72.127,82.88.214.98,Fixflex
54,5/7/2018,21:58,2b7337a4-e245-45c1-b15b-d182ddf7a446,199.15.196.199,150.132.238.116,Bitchip
55,11/23/2017,19:31,03ed4c11-783c-4208-8d85-71bc72838a74,71.84.168.61,184.203.62.40,Veribet
56,4/28/2018,7:21,c7acc412-7490-459d-9208-b9f4aa1c5c0a,126.35.238.179,0.51.223.13,Alphazap
57,3/29/2018,17:33,900a715e-96f2-470a-bbbf-76048fb8b77f,140.228.247.238,116.178.79.7,Tin
58,12/15/2017,19:15,296ff789-5b10-416a-acef-318dc8f666f2,226.217.207.110,171.94.142.208,Kanlam
59,6/11/2018,6:58,6037a7ae-df3d-489d-b5d1-a7faca916073,212.241.212.170,206.146.52.55,Latlux
60,8/23/2018,19:20,e46a4e65-79b8-457e-9860-008e49cc599c,99.46.226.254,67.81.66.1,Ventosanzap
61,8/17/2018,15:13,52c11e8a-ab45-4e95-b0b5-7d27b700c48f,44.195.55.31,211.84.161.160,Zoolab
62,11/26/2017,11:46,e72f2af8-cc39-4356-a463-671b8ed8bcff,25.92.147.157,44.140.226.157,Sub-Ex
63,8/28/2018,18:42,51daa082-308d-46a2-962a-b29ade9d8d17,134.90.134.103,105.215.16.119,Tempsoft
64,6/27/2018,21:36,a7f8e970-5b16-4175-b99b-df6ecf415d1d,191.31.234.129,109.226.93.112,Tres-Zap
65,7/18/2018,15:48,2267ece0-1f6d-4395-b728-fcb63294f7c6,54.28.24.238,227.112.143.253,Y-find
66,10/24/2018,0:17,f0d8a4f6-82d2-485a-a148-95460143fdf7,117.37.136.20,204.241.25.107,Cardify
67,12/27/2017,2:07,d9bdb997-7720-428a-96ea-945968634c4a,48.148.4.245,251.90.120.127,Sub-Ex
68,6/15/2018,1:20,55bc6e1f-5395-4c8c-ad4c-2d912175f643,211.41.36.194,21.56.236.232,Cardguard
69,9/6/2018,13:43,290a7c64-327b-4455-8141-1c172b576098,250.252.31.201,95.252.30.224,Redhold
70,1/19/2018,13:25,9781f97e-78ad-4a06-aeba-92d1f92d798c,94.253.197.169,29.246.50.135,Cardguard
71,1/11/2018,23:42,ac4e7281-de0f-46f7-a5bb-e44947d7fca3,103.223.119.34,21.238.189.98,Stronghold
72,3/31/2018,14:47,0aeb36d0-dbd0-4267-a142-21065473a3d7,143.89.28.63,111.150.218.124,Lotstring
73,3/12/2018,15:02,3140d07e-9db5-4e80-a1b5-6f11f2bfb4d3,80.48.160.166,170.89.37.90,Andalax
74,1/30/2018,17:00,0e912b71-5ef9-4435-9885-405cfe4afb36,81.218.97.44,46.42.61.99,Viva
75,5/13/2018,5:57,7ededbe9-c06f-4dbb-baf1-7242703f1a61,224.184.137.64,96.79.149.56,Opela
76,9/23/2018,21:55,703e3fea-1ece-4ef5-98ed-ea75658ac85f,192.229.153.21,1.207.209.27,Y-Solowarm
77,4/21/2018,1:35,f92db754-9898-4892-8317-b5c729094f04,171.218.41.176,39.123.55.10,Duobam
78,10/14/2018,10:46,95ed36a1-0664-4e4b-b7b2-e667ff84d365,25.90.242.94,141.119.146.29,Fintone
79,6/13/2018,18:08,a763008a-1d87-4be7-9ce2-aeecd4fa6c96,122.146.189.181,111.183.241.129,Regrant
80,12/2/2017,21:12,dd951713-31ff-4979-a7e7-3d885fe107bf,151.251.152.121,102.191.159.182,Regrant
81,5/23/2018,12:14,d963c509-5bc1-495b-a5c3-0c06876a49a0,44.186.148.218,50.220.247.240,Veribet
82,10/27/2017,1:06,dbc9b56e-bd77-4c40-90e4-d8939bd70f06,147.70.41.96,147.73.163.219,Bytecard
83,12/8/2017,8:36,fdd77368-9ec4-4adb-9c30-27ea35c9921c,25.84.90.75,252.15.3.183,Greenlam
84,2/10/2018,8:02,cdbc1785-294f-437c-9b0b-4e3a23574003,161.169.248.79,112.152.50.119,Redhold
85,8/27/2018,11:40,e28c6cec-525d-49cc-9960-f36773b71899,253.14.95.138,43.252.156.5,Bitchip
86,10/15/2017,7:29,773020e3-e501-4f44-b645-f48d3a870c06,170.143.86.114,221.96.158.107,Bigtax
87,7/11/2018,20:38,47a868ad-d264-4600-9ae3-bc726aba33cb,34.38.157.106,78.216.31.16,Solarbreeze
88,7/25/2018,8:23,418c7837-8511-4005-91a0-ecb1a305bc2a,185.239.181.119,213.56.32.1,Zathin
89,6/8/2018,7:06,9415d1c4-b821-4afa-8e59-72d5ce2e1ec0,227.131.149.25,203.122.150.8,Asoka
90,3/1/2018,2:43,263e689f-671c-4385-88b6-77479c5a905c,4.240.204.191,48.105.128.192,Overhold
91,1/31/2018,10:34,169522d6-1d62-4986-9d6c-89155a7cec38,229.141.65.124,178.60.253.94,Holdlamis
92,11/28/2017,6:32,ac5e8061-2a2d-48b1-ab1a-f3c63d8b4a90,155.14.247.251,203.228.183.148,Stringtough
93,12/24/2017,2:34,3dc0cc3f-95f4-4dbd-82f9-b891d7c900f6,88.131.197.5,223.60.102.11,Temp
94,7/8/2018,13:47,bba331ac-6bf9-4f9a-a638-936cbc46ef07,63.143.250.154,117.102.62.65,Redhold
95,12/14/2017,22:54,2ae48b9c-e5fb-4d88-8271-d9fcad65d9db,192.175.242.183,171.42.116.122,Bitwolf
96,10/1/2018,7:14,d5c13a4c-f8ee-4f1d-8491-8ee06342bf35,152.242.18.39,53.63.137.55,Duobam
97,2/11/2018,22:50,368da884-82b1-422c-a8ad-3e706d6c352b,56.196.99.77,29.124.101.139,Tresom
98,10/11/2018,14:10,f4e91b49-e9ed-4f68-ae78-32dcc7041390,85.105.54.201,42.28.93.183,Treeflex
99,10/11/2018,8:38,a881cb66-619e-4208-a37f-8be92c34cc17,198.15.225.66,140.186.190.29,Y-find
100,9/6/2018,9:38,97d87472-84ea-450c-bd22-06c34122ba54,165.193.100.176,204.7.185.150,Asoka
101,7/28/2018,13:08,6d6c1a8b-30bc-44c7-94ce-72b3625a72c0,171.117.220.80,85.157.194.63,Ventosanzap
102,10/25/2018,3:52,1455d1f4-0d6a-41bc-b6e2-2bd00dfd79f5,56.164.213.39,194.218.185.51,Bigtax
103,1/7/2018,6:37,8b19f201-528e-4a94-a328-27789f965149,14.105.155.22,199.108.108.152,Bamity
104,11/8/2017,0:30,e9f54eaa-b59a-4e90-a062-c8fc695d900d,193.4.171.203,55.126.99.98,Treeflex
105,8/7/2018,10:06,6f0ba07f-5308-4698-b5dc-72452c756012,236.203.140.239,149.64.29.243,Ventosanzap
106,5/7/2018,19:37,50938c35-1285-4ef8-ae06-fb6234219e1b,231.27.98.18,112.137.231.24,Home Ing
107,8/12/2018,20:58,c58d0088-6e16-4972-97bd-f00fea80c494,162.156.90.66,1.226.76.49,Gembucket
108,7/19/2018,8:22,3e037d4c-15e0-4b76-a68c-88935eeb7aea,251.42.126.121,192.110.197.53,Asoka
109,10/18/2018,18:47,86cc9595-c852-411c-9174-ab028185fb47,203.115.146.213,103.239.238.183,Regrant
110,8/4/2018,22:01,e3c84025-ee81-466a-b9db-949309a1e633,34.208.243.55,127.55.221.130,Mat Lam Tam
111,11/16/2017,14:07,bf87c3f6-78a2-4fba-b8db-b2cfe3e36f86,242.198.18.21,77.60.173.221,Lotlux
112,10/25/2018,15:32,6c406adc-197c-4ca7-b62a-5449977e5dd8,86.204.47.125,212.192.229.255,Stim
113,4/30/2018,14:08,8ea345f4-0bcf-484b-a83f-f5af0d027fa3,25.105.254.65,219.29.26.67,Subin
114,2/23/2018,6:18,473e50ed-13cc-4b6c-9658-21e5b82d9300,94.28.70.70,243.205.48.94,Tin
115,6/12/2018,21:05,37b1f7c2-030a-4f83-8429-a58b6ddb3575,201.212.156.41,169.244.172.122,Zontrax
116,11/26/2017,16:40,31f587e8-daae-44f7-bed2-9c53b6ebaa00,141.72.101.242,35.20.0.167,Cardify
117,7/13/2018,15:43,98115be1-7da7-4b18-ae1b-7232e4ce2c2e,112.116.179.227,212.202.61.141,Fixflex
118,3/31/2018,7:03,0a1170d9-b48f-4d27-930f-9887b011a064,237.115.43.201,31.193.195.36,Tres-Zap
119,10/2/2017,0:28,7bd02228-ba30-4d14-881f-c081d543e2ef,135.154.0.183,167.230.86.152,Pannier
120,5/22/2018,18:11,d1725895-2f56-469c-9165-4f79385b887f,220.252.81.137,227.185.62.161,Voltsillam
121,1/16/2018,14:45,45cb4853-a375-4783-a799-349114ef5de1,124.43.199.166,156.112.235.79,Zontrax
122,5/15/2018,10:31,459ea39f-6981-4a9f-8d1b-b8f9da12e0d6,213.244.144.70,232.36.50.128,Bitchip
123,10/6/2017,11:48,0207b462-3451-418b-aa57-4e10b66b6552,104.217.5.54,23.5.26.56,Y-Solowarm
124,10/22/2018,13:22,91ebf411-ae6a-43d2-89be-50787f10df86,217.101.201.176,211.74.194.81,Konklux
125,5/30/2018,21:34,bb2e20ab-a601-460e-945a-2dd24beb3785,227.187.108.133,42.78.225.230,Zathin
126,5/27/2018,9:15,6416271d-429f-4f72-a39b-55da7486c1eb,222.59.61.127,122.224.197.213,Zathin
127,3/22/2018,15:09,bad4c34b-a66a-444b-8866-25d25235a372,217.187.208.201,106.168.213.95,Cardify
128,4/7/2018,21:23,b4ec1e60-2ad7-4f01-a23e-8dc85fda0551,65.32.206.114,27.137.7.42,Zontrax
129,11/3/2017,22:32,a7d79619-ea5c-4284-8f0d-d7945addd2f8,15.121.168.158,102.178.97.10,Sub-Ex
130,9/9/2018,11:29,f6969107-b641-4a08-b5c9-51e290e9b436,35.247.115.234,7.91.15.103,Job
131,6/3/2018,21:49,053beae1-8f2b-4bd9-887f-d5531e40d042,241.102.48.179,133.218.199.41,It
132,4/23/2018,5:59,24850aba-5837-4b18-bc26-910c426e76df,199.198.5.234,28.247.147.246,Lotlux
133,10/21/2017,1:32,4a9bd9e4-af7e-4141-b807-54fb223d0738,40.25.69.75,240.55.180.125,Wrapsafe
134,7/3/2018,16:55,82ca0c3e-7fbc-41d4-a63d-f5b441d34491,53.59.127.129,102.183.11.218,Zoolab
135,5/6/2018,14:41,3025d1e5-896f-404b-a2f7-1890eb998bff,95.21.68.78,184.71.119.135,Mat Lam Tam
136,11/28/2017,5:08,ee9dbd0c-4291-4c39-8cda-e760f5517371,182.65.11.157,83.121.65.126,Job
137,10/19/2018,6:23,9bdc9e0c-4428-454b-b36e-88cf71311aac,237.113.238.178,96.144.8.214,Biodex
138,9/1/2018,3:11,217dcec5-2b5e-4be3-a4f6-4539915203c9,184.106.251.76,80.255.170.1,Bigtax
139,12/27/2017,23:46,79357c9a-7cf6-4752-a0fb-465df9077d6d,59.111.68.32,132.223.200.49,Redhold
140,2/13/2018,18:07,26aafe92-a6b0-42ce-9d13-e7b9c5f9d2e8,212.116.96.151,11.226.115.251,Konklab
141,3/14/2018,7:18,e91f510d-0f5d-4ed9-bcb1-c4e9dc02ff56,141.217.79.91,124.81.26.133,Stringtough
142,6/25/2018,1:06,0583c58d-27a7-45e1-8b0e-c89b31743738,234.39.214.221,238.170.243.26,Tempsoft
143,10/18/2018,1:27,2b33e5c8-0594-4895-90f1-94c8bcbf6ae4,113.124.104.238,252.174.136.66,Otcom
144,7/16/2018,19:20,eb05bfc4-9227-4683-a427-979063e20634,193.184.110.236,97.253.186.88,Subin
145,4/20/2018,16:28,77b8ae10-0fd9-4a2f-8b9e-4b9b84ade131,234.221.22.3,235.28.137.139,Holdlamis
146,1/1/2018,3:49,dc78c943-bdd0-4aa8-860c-f71c6ae64b5e,195.54.238.112,105.148.134.102,Andalax
147,8/16/2018,17:16,b89c686d-b6f1-4121-a3ca-ae6829293b5e,220.80.106.255,14.41.179.72,Greenlam
148,10/9/2017,11:43,0ad79c16-33e9-47d7-a3aa-75c19de7f26d,32.255.206.52,25.196.125.173,Flexidy
149,12/9/2017,3:11,6a6065b6-f480-4d51-b356-41e48e92adfa,184.127.106.30,52.121.56.176,Tin
150,11/22/2017,2:17,765b7ff2-0834-43c7-8647-7f0894217a93,39.128.149.70,111.8.169.145,Ronstring
151,8/7/2018,13:55,78cba361-ddcd-4b0f-9ab6-33a58d65b4aa,101.188.108.89,21.89.207.83,Trippledex
152,2/21/2018,14:49,aa8ffeb2-8d50-468a-93da-c0de3b675f68,188.238.208.25,214.69.87.114,Tresom
153,12/8/2017,13:09,ba0e78ed-6fad-4c2e-a67a-ad95ddf56db4,8.109.31.147,99.95.109.248,Tampflex
154,6/17/2018,7:25,8f6e86b4-95a9-4c03-8f2e-bdb92b082663,137.5.174.180,76.151.57.148,Voltsillam
155,8/4/2018,15:46,4becd2f7-ecb7-4590-9243-3f1840eb6949,183.83.212.201,252.245.181.198,Trippledex
156,11/14/2017,5:02,cc0e08dd-c7dd-4455-9e9c-cb3455f25391,170.152.44.49,241.14.74.130,Transcof
157,7/20/2018,20:44,74d3dc40-35d1-4230-88ce-089e7d87449f,7.47.125.183,10.127.43.169,Veribet
158,10/21/2017,20:26,78100f77-e26f-4317-a745-1513d876424d,34.166.201.83,179.90.130.39,Tempsoft
159,3/21/2018,3:23,f289b727-bc14-4118-ab00-a91eb19b7f0f,77.226.128.159,64.39.95.54,Duobam
160,10/8/2017,15:06,843eeb19-6a05-4019-bbf8-17e852b0bb33,17.18.153.27,109.238.89.42,Quo Lux
161,8/22/2018,21:50,65894008-6b4e-4815-ab0f-bd8399c86dda,153.193.198.29,38.42.31.35,Quo Lux
162,12/2/2017,19:40,00d74ac0-3da6-48b7-acd0-2620a27c5a48,243.224.135.148,99.158.204.102,Sub-Ex
163,7/25/2018,3:41,8f024ccc-25d0-4220-9796-b9589fb743b0,166.79.89.62,14.247.10.93,Sonsing
164,7/6/2018,9:33,c9024d5f-644a-47d8-b626-e5d50dcce248,246.118.142.77,147.244.20.77,Latlux
165,7/25/2018,15:53,22f8308e-e81f-47ec-a492-73fa46de07b3,146.124.72.13,213.13.178.141,Alpha
166,12/24/2017,8:43,51b6fd0c-ccfe-4e84-9207-d6f278eacd79,240.47.116.155,108.68.203.184,Cardify
167,5/27/2018,6:46,2a5396a5-e8a9-47a8-9b61-d14ff146713f,5.95.195.21,110.148.226.230,Bitwolf
168,7/6/2018,14:39,e89191b3-ad35-4103-bf71-8d42d08e4e26,43.86.242.207,15.225.62.35,Tres-Zap
169,4/5/2018,0:42,54c34e58-e2d0-4445-92c5-3bbffc2a9c30,57.12.210.118,25.116.51.166,Zaam-Dox
170,2/16/2018,9:20,d8baef66-7cb5-473f-b1ad-4472727b9f9d,17.218.246.254,161.165.208.200,Treeflex
171,5/23/2018,1:25,cc594af0-add0-470a-8510-d1a2b359168e,110.110.255.30,98.144.196.212,Treeflex
172,9/22/2018,5:56,462a316a-6097-40c9-b981-20d31c7a5a0c,47.93.206.95,219.106.197.48,Andalax
173,12/20/2017,7:36,8bb95161-cb0d-4cc6-84f0-90930b72cfcd,244.141.30.73,234.113.249.160,Viva
174,3/8/2018,4:45,8706289c-a080-433f-a822-f308b2e4061a,15.40.244.54,161.40.240.172,Span
175,6/28/2018,12:39,0873f2e9-8e8b-4e32-8125-ef28e5cf9bf6,91.113.224.147,137.249.156.3,Voltsillam
176,9/23/2018,2:13,95a2c8e3-ac1f-4b6a-a558-c400fcb58160,87.155.251.229,100.16.2.220,Hatity
177,12/10/2017,16:14,46a9ca5e-cba4-4794-9b62-251ce6f26218,100.164.14.11,232.197.42.38,Cardguard
178,11/25/2017,0:10,b9695949-042f-4391-8ea4-fe64e6090c86,219.224.42.202,239.141.39.103,Bamity
179,6/16/2018,15:51,8e237828-bb33-4dda-8916-f6daa6d15709,126.186.49.199,51.95.222.6,Stronghold
180,11/14/2017,10:56,bc223509-7163-4df8-b596-6e8c8431ff4d,38.17.99.97,217.146.56.139,Domainer
181,12/31/2017,19:07,ab4dee6a-67df-4e42-9ae3-ee12e203af28,87.10.120.66,93.86.41.0,Fintone
182,5/17/2018,22:21,c06c5e32-b7c5-4d7b-b43b-8304d97e4601,153.239.99.181,239.108.8.155,Konklab
183,1/9/2018,10:35,4f0571db-9333-45cb-851b-5996c8303370,2.110.64.80,110.160.112.125,Bigtax
184,10/11/2018,13:39,8cf36f7a-8342-4ca2-bc58-6abc94d8cc5f,169.94.246.143,117.182.133.105,Hatity
185,12/25/2017,15:00,e3dbbe95-2390-4344-9bb8-b289d0a02c9b,107.248.191.155,58.186.45.243,Zontrax
186,10/28/2018,21:39,0e83a23c-da1f-4e7b-b68c-ff9588f16a55,55.95.51.38,57.142.121.81,Redhold
187,3/28/2018,13:17,37f7ef6b-b4ef-4e43-aaf9-899c0acd7d89,64.5.59.101,189.85.164.110,Bytecard
188,4/5/2018,16:12,1348d73b-0050-478b-9800-cb1171c2ce56,83.206.48.154,32.152.230.214,Lotstring
189,3/12/2018,13:47,cb3de50e-1f47-444f-a0a2-d49db0ecbc7c,254.108.162.133,89.132.82.29,Cardify
190,9/27/2018,18:21,6058c749-3695-4298-a7e4-bbe6c9274254,152.109.136.236,228.20.77.117,It
191,8/2/2018,9:40,83fbea99-a7bb-407f-80c2-e44e400b3fd0,85.86.153.15,206.214.127.221,Wrapsafe
192,11/6/2017,3:08,0bf92182-1f59-40d2-8cb8-bf55f6e95ab8,131.78.230.183,104.62.97.221,Zamit
193,10/17/2017,10:07,e7e54895-77c6-4f99-81bb-4b9c21f29ce4,43.34.201.182,82.192.116.57,Rank
194,5/5/2018,17:58,bc321c25-389f-4eb4-b23b-c2eee8239aee,137.57.154.147,250.136.242.163,Home Ing
195,4/5/2018,1:26,4d204d97-be07-48de-81ee-1de376ef929e,115.97.174.195,209.198.0.208,Ventosanzap
196,10/29/2017,20:52,2c44193e-0ea1-48f8-8ea9-5827d934375e,117.44.191.183,104.77.192.21,Zoolab
197,8/5/2018,9:50,40f83f26-2aeb-4a37-aa0f-b9b1ea09fcab,80.18.164.60,124.155.7.128,Home Ing
198,3/29/2018,10:44,a61f2073-936f-45d7-8cac-f3d22ce33478,163.202.22.5,185.57.186.177,Redhold
199,11/22/2017,19:30,914de123-cde1-48c5-b140-346be2c3cc55,54.51.22.140,186.181.223.34,Treeflex
200,4/29/2018,11:07,2c0ef936-ee46-4573-b6b8-b1439f68c185,34.78.254.181,226.16.24.51,Opela
201,9/15/2018,5:53,d39fd7e4-97f5-49f5-9579-813aaee20fce,177.63.198.175,59.90.177.23,Wrapsafe
202,7/10/2018,17:35,ca991087-486e-4cb5-8cc8-044291778837,189.72.169.222,127.43.200.131,Pannier
203,4/16/2018,12:45,0ba20de7-bb3a-44bc-8202-a0fe9a98c58a,197.193.79.141,19.245.205.192,Tampflex
204,3/22/2018,6:30,0392bda2-c40a-46de-8c8b-54f554cb3b44,156.164.0.177,175.181.143.66,Toughjoyfax
205,4/21/2018,18:58,c944fbc5-19e4-4d46-a2f3-fc6e4992efee,59.31.209.62,74.205.130.71,Fintone
206,9/23/2018,10:38,9da18fb8-125c-47a5-a93e-cf56bdc88b3d,135.58.69.93,155.125.122.254,Lotstring
207,8/23/2018,17:01,098a7fc7-bb98-4532-b3fd-3390bec6bb7f,127.152.118.167,175.29.241.181,Job
208,7/7/2018,5:38,5c482d69-2cd4-44e0-9a36-d46c16657c43,201.91.20.214,205.158.19.116,Sonair
209,8/22/2018,20:48,bc3b2e1e-de3a-4dbc-8ff9-4de36f9d0db2,58.236.64.247,65.35.176.83,Konklab
210,2/26/2018,19:53,b91daa3f-2e6d-4117-bb65-0e19bd50b225,116.237.190.171,218.174.241.6,Temp
211,10/29/2018,11:20,92f306ab-71bb-484f-bf54-70eaba4e9d25,137.139.155.143,246.218.193.153,Flexidy
212,9/16/2018,2:39,14274166-fb89-4a8e-b0f6-646a3a53ece8,121.242.119.210,193.104.112.90,Ronstring
213,5/16/2018,19:27,c68dc8c3-d2c7-4432-a0e6-aede0aa9867e,166.74.204.52,218.223.78.56,Biodex
214,12/22/2017,1:48,a9473cff-6a1d-4059-8527-8cc414cd45c6,157.4.88.142,101.251.125.94,Sub-Ex
215,12/13/2017,4:15,cc7ce72c-c95c-44d0-a72a-92d4ef6eef73,104.234.25.80,30.36.99.85,Rank
216,10/17/2017,13:48,74d3fc0b-5b8d-403a-8bd0-84c83918693d,57.238.249.30,97.71.100.77,Zontrax
217,10/15/2018,15:51,25095d5e-629d-4d2f-b4f5-57060807f888,32.79.137.153,103.24.141.160,Duobam
218,5/15/2018,4:52,19c13a1e-2cbb-4801-bd3a-6ba91e02392e,81.28.79.27,39.49.68.167,Duobam
219,8/5/2018,4:36,6841c126-a7bf-4672-81e0-9aa4ce08368d,218.98.245.180,236.244.145.163,Span
220,9/7/2018,16:37,0debfbf5-076d-4fcf-a9b4-0033e10b075d,246.62.203.25,66.9.95.235,Tres-Zap
221,8/28/2018,13:04,960b8811-b3db-4796-9155-87cf9d34bf30,231.251.130.148,254.23.167.81,Rank
222,9/6/2018,3:21,1f516c2e-ba0b-4e42-93cc-469a0e59fc17,113.182.133.235,208.151.158.70,Cardguard
223,7/4/2018,18:31,44b436c6-d5ee-449b-9d0a-b0060a9adfc6,195.82.10.79,242.51.114.24,Voltsillam
224,10/1/2017,20:15,01ac9527-98a3-4527-9faa-f2a1fbcf3903,188.98.228.136,4.198.29.75,Kanlam
225,12/2/2017,16:07,f705d062-8ea7-4d1f-b434-fd87083546e4,151.180.115.123,225.142.116.180,Cardguard
226,4/30/2018,10:10,ed13639c-57b8-42d6-b590-97e359a05fb7,218.27.72.171,206.47.104.82,Y-Solowarm
227,8/4/2018,3:02,f560d268-73b7-48cf-8445-e6274fc6733c,239.106.173.192,161.49.189.160,Trippledex
228,9/24/2018,20:40,a03f325f-df50-4cd4-9ad5-9797dbb03275,224.137.237.195,125.149.130.91,Job
229,12/12/2017,21:16,325b304f-4939-4435-bf92-c2e18a74dc83,239.158.92.73,103.81.197.155,Cardguard
230,1/27/2018,18:26,34a58e28-07b1-4488-9a4f-0685ba2ad344,201.172.61.8,96.40.59.226,Subin
231,10/23/2017,13:41,176c906b-6ca2-47cf-9598-d6999eb3e122,238.200.134.8,155.25.15.204,Tresom
232,1/6/2018,21:30,96a281f5-e128-4660-aaac-f25afc496145,31.20.180.181,20.35.89.153,Cookley
233,9/27/2018,19:34,58b1c3e4-f634-46eb-b907-23b8406f013e,36.164.202.250,249.255.99.45,Namfix
234,6/14/2018,13:32,e2327b7d-fa2f-4e3f-b3a9-fbab8b598038,14.37.131.198,51.43.52.13,Span
235,10/30/2018,1:43,0d07bd12-7d49-4572-8ae0-06e021dd447b,142.24.52.237,7.208.87.9,Stronghold
236,10/28/2018,5:29,f280e9b5-d39a-4390-9c30-4fb8b2404fa7,31.88.186.151,131.191.170.7,Zathin
237,9/30/2018,9:44,96943b56-8250-4486-8e25-1947a527886e,22.221.1.143,126.83.14.128,Y-Solowarm
238,6/24/2018,14:20,71eb2943-c986-4b40-89b7-f0ecdc61c64a,170.242.55.129,175.175.54.106,Cookley
239,12/30/2017,11:42,227d04d8-30c3-4b30-84ab-80911a5c8c1d,5.252.108.10,159.29.69.112,Cardify
240,3/14/2018,17:56,34214faa-bae5-4378-8c00-b0d936197bac,217.183.171.86,140.229.108.193,Greenlam
241,5/25/2018,7:06,42562049-fe7e-48a0-885a-488ed997a805,237.150.248.213,185.220.242.148,Flexidy
242,12/15/2017,19:06,32daa691-22d3-4ef4-9545-12205a832279,69.87.13.101,116.245.47.109,Stringtough
243,4/18/2018,15:46,e7b9aed2-df17-4cba-a15f-4096f86b31da,148.7.93.196,156.41.77.240,Pannier
244,11/14/2017,0:10,698e46d6-dc87-4a84-8e52-7d72b1ef0c73,155.160.129.109,71.197.128.139,Lotlux
245,12/9/2017,9:56,49a2a01b-ec68-44a8-873c-10b66b928867,241.59.181.154,58.215.239.180,Veribet
246,4/16/2018,1:28,e73f80bb-b090-4591-bdf2-dc23a6e43ad1,150.42.94.199,175.126.65.179,Flexidy
247,10/25/2017,12:09,e78a59ab-9dd5-4009-8095-1b21eeafd87c,4.69.58.153,223.226.253.19,Cookley
248,12/8/2017,10:27,f650475a-881d-4871-9ac8-f1fc897831d4,185.230.227.100,214.98.110.57,Tampflex
249,12/24/2017,11:20,523086e5-ee02-4db5-abb4-8acb5a5cfed4,102.243.63.246,25.242.66.214,Duobam
250,2/21/2018,9:28,de54ff9a-6818-49e4-a776-a6bba5b3708e,197.43.103.63,172.46.49.148,Bytecard
251,8/13/2018,2:40,f5464f40-f0dd-4a55-8c1b-131e5ae16838,26.222.211.175,25.20.16.167,Fix San
252,7/18/2018,1:25,0ecc72ed-7164-432c-98fe-ce560e549839,2.101.24.94,220.211.123.187,Subin
253,8/26/2018,23:32,f5fbe33a-5c2e-49e4-b745-83697fb02859,150.77.163.1,107.79.83.191,Matsoft
254,10/10/2018,12:23,f04048ff-a988-44a2-a299-36e791700ec8,166.143.68.85,58.212.232.15,Biodex
255,9/22/2018,22:30,60df66d1-42c3-495f-9484-767a8297c008,166.43.87.22,235.111.18.137,Voyatouch
256,5/10/2018,8:24,cfed3cf3-615d-430c-8462-affe51496a17,70.138.252.4,211.142.151.122,Otcom
257,7/24/2018,20:04,8b724ea8-dfac-48b9-86c5-295c4ce0cf49,208.160.88.27,89.68.43.49,Voyatouch
258,8/27/2018,7:30,bffd1182-af7f-4e6d-9c24-009587bc1580,96.91.64.74,224.119.205.99,Pannier
259,1/20/2018,4:36,9e1c42c9-18d2-480b-98d2-e7fa0f253a97,43.167.166.246,126.4.25.218,Bamity
260,1/5/2018,22:01,33c5072c-a49d-4a23-924e-7c81ea44155f,70.100.57.100,152.41.206.110,Cardguard
261,10/15/2018,19:58,85f87752-a8c2-4f30-866f-151bc334ff24,158.35.140.116,154.148.248.163,Ronstring
262,11/10/2017,5:04,43571845-9033-4e9a-bcdb-c611272e8494,129.91.160.178,72.146.168.76,Bamity
263,4/4/2018,18:29,0158bcb2-b388-4dc0-b02b-fc30433669e1,231.23.191.183,39.246.130.167,Alphazap
264,10/11/2018,6:03,8499a22d-f542-40ab-9032-e89d553cfd39,207.118.108.11,193.219.177.124,Kanlam
265,3/6/2018,20:34,a1ce3f9c-01c1-46b1-92ee-f5595ec0480f,147.129.137.16,45.194.146.254,Gembucket
266,1/11/2018,3:04,d6be6f0b-19b0-444f-aebb-4597f826ff54,86.119.78.82,68.155.208.57,Solarbreeze
267,10/7/2018,3:52,6c360994-6592-4593-9818-94337e245231,108.37.141.193,52.160.52.225,Overhold
268,1/25/2018,22:57,8467602f-b884-4188-957d-27811cc2c04e,138.104.66.221,18.124.214.101,Tempsoft
269,6/23/2018,12:31,19058a43-8bf9-4637-8503-44987c81714f,141.29.192.22,16.52.156.70,Tempsoft
270,9/29/2018,9:30,7067d360-8b7e-4c21-8a0a-b455b9eaa69f,2.183.121.48,117.93.127.186,Vagram
271,3/28/2018,4:17,23d07958-e5fe-4fd6-a25d-285626d7f073,21.211.214.35,131.184.197.4,Quo Lux
272,11/26/2017,13:15,55d60a89-a944-4745-a6b0-d9490d1c3ef6,240.59.100.221,247.243.155.185,Alphazap
273,8/5/2018,20:16,405367db-d5d3-4aeb-80f6-64b5161ccca2,238.215.118.161,158.157.9.147,Cookley
274,6/26/2018,14:55,462402fa-5b74-4d20-954d-79c63a9609d2,35.181.96.172,162.50.227.183,Voyatouch
275,10/10/2018,0:23,fcb612af-0601-49a4-83ad-ec7f4d984292,229.205.133.43,90.72.84.72,Trippledex
276,5/30/2018,12:34,f80335c2-8aef-4dd6-99ea-0549fa0f3e76,25.232.8.76,211.184.201.165,Tresom
277,12/22/2017,15:46,e629ac44-a62d-47d4-a5a4-28d8fa64f827,233.208.25.137,203.130.73.198,Lotstring
278,6/20/2018,1:30,51696a07-017b-4180-8dcc-371f889f6604,11.135.18.35,168.56.122.142,Cardguard
279,4/5/2018,7:56,a1da43e2-ed9d-420b-8625-cdf6a2ab41bb,46.207.178.21,125.84.229.113,Job
280,6/27/2018,1:02,32427042-a64d-4554-a0f0-60b0307036ac,140.193.81.134,216.247.114.46,Temp
281,2/24/2018,5:44,be851bc1-5d5e-4d5b-87e6-4da6bf29c7d0,247.93.163.160,80.216.54.40,Voyatouch
282,9/2/2018,3:49,5b76efc4-4d04-469b-ad36-ec9a16d7ba10,80.9.215.221,81.0.227.94,Vagram
283,12/22/2017,5:32,99db40a9-f65b-4c0c-a046-0b10d4625209,227.216.234.80,40.212.57.42,Cardify
284,1/31/2018,3:41,d8a17ba3-70eb-4600-98ee-bb64681ba07c,154.15.14.189,132.242.42.13,Trippledex
285,10/25/2017,13:48,f2924a63-5b4b-49e6-8c22-275bd241b90a,147.202.35.88,239.254.189.5,Bigtax
286,2/28/2018,21:51,96027ba7-7b39-437e-bf11-f510b4bc1b5b,101.167.219.150,202.58.140.94,Tin
287,9/5/2018,22:07,04b63167-f249-4fc5-b5b2-41c37c8d98aa,80.223.171.49,170.252.11.196,Fix San
288,5/18/2018,5:53,d4f94982-9332-4afc-a561-9debedbbd657,2.173.12.163,67.170.92.148,Temp
289,8/9/2018,1:52,047cb186-fc2f-4b17-a87f-f85f2776fb94,89.56.2.31,108.201.188.254,Stronghold
290,4/11/2018,4:10,723b1976-0ada-4ba2-96f5-64eab7d7a6c9,83.8.72.185,94.173.181.220,Overhold
291,10/8/2017,6:58,b4d27f1c-49ff-4455-8edc-5cb81aa407fb,253.89.235.126,161.36.244.182,Job
292,10/6/2017,15:45,b8afb996-58b8-4a1c-97e4-18e2109cd8a5,23.60.103.108,118.223.242.144,Opela
293,1/6/2018,7:13,579857e3-ff4c-4a45-b48c-de316f3dd90b,19.91.236.110,52.173.110.145,Temp
294,10/24/2018,9:59,5b63200f-d42c-4373-b3cd-1abe55ba4ed6,204.39.94.169,60.190.205.39,Lotstring
295,2/9/2018,10:25,3196d2f2-deec-4515-8afd-b6800755d0aa,163.240.196.236,7.4.189.108,Quo Lux
296,8/18/2018,6:03,25e2d1a7-5b3d-4386-9f42-0978299e8d2f,63.235.23.53,4.20.62.55,Zoolab
297,12/14/2017,12:46,f13f929a-5b1d-4dca-b1e5-e9f27f709eb1,15.231.30.135,44.143.215.133,Vagram
298,8/19/2018,9:37,49506ac3-4d80-4673-a036-47263cc4ceae,21.57.177.251,17.70.244.86,Keylex
299,3/6/2018,10:16,d221fa32-9490-4061-946a-416a6c4356c5,97.252.92.83,69.79.187.234,Otcom
300,4/9/2018,1:36,a3d327f2-4eeb-4e88-bf06-d532fafb2318,118.7.167.180,167.195.223.75,Sonair
301,12/19/2017,20:51,b0ef4abb-817f-41a0-a6d4-39ea686d4126,21.118.47.148,214.10.138.134,Zathin
302,3/9/2018,7:16,87cf5a27-8e7d-4d0a-89e0-285d321af262,87.155.196.172,99.33.150.143,Regrant
303,5/19/2018,7:49,49e2eecf-2d1b-4ca7-90e1-1b8c67553195,221.8.4.82,165.8.198.157,Zontrax
304,11/15/2017,11:18,99a79801-f40e-4932-ac4f-a5952ebe4bfe,124.150.8.216,75.75.71.240,Subin
305,6/21/2018,7:04,4130bd95-f224-40a5-8b6c-002418184242,110.189.118.185,90.104.251.44,Mat Lam Tam
306,12/1/2017,5:12,0515b954-44bd-4551-8b83-7af420e88776,199.198.43.147,155.53.106.159,Zaam-Dox
307,1/11/2018,14:04,10b4a20d-3dc7-4860-85d9-f1fd6c2b665f,9.251.13.22,251.183.101.66,Matsoft
308,11/24/2017,23:24,2fec5dea-75d1-4bdb-9461-6d5d83c0faec,238.240.22.251,52.5.2.175,Lotlux
309,11/20/2017,18:14,d499a247-52c6-4b3e-add7-15d56bf11373,129.113.156.214,56.39.33.42,Zaam-Dox
310,9/2/2018,17:22,4af42402-fc3d-443f-9b32-e374ac7cc958,52.28.41.31,0.57.71.173,Bitwolf
311,2/27/2018,8:18,a53b06ee-1cd8-4fd6-b174-29591eb99d45,154.10.141.167,148.153.70.17,Andalax
312,10/14/2017,6:07,5d0ad2af-34b7-4dbb-ab53-4cdac9e05d0a,70.110.151.225,212.202.230.61,Stronghold
313,6/23/2018,12:58,7bb7d4b3-0607-42cf-b311-fe0f89fbfe51,21.128.178.165,221.59.225.199,Quo Lux
314,9/29/2018,6:16,4fcfcb09-204b-47b3-bd1f-a233b3665dc5,106.194.14.177,4.237.207.37,Otcom
315,9/16/2018,23:45,449a3dbc-f92e-4869-ae0b-ee05b0f750b9,198.243.80.21,200.14.248.86,Latlux
316,2/23/2018,9:08,58cb9eda-d0af-4062-adab-191e30e6048b,239.188.7.139,223.63.52.188,Viva
317,5/30/2018,1:32,43be237e-c8f4-4bd2-91f3-4d628738d9d0,177.29.245.27,53.25.196.61,Lotlux
318,8/30/2018,3:28,289b0ff3-a8f2-4883-8dae-351764c227e0,15.102.252.22,44.60.157.25,Stronghold
319,2/24/2018,17:10,bc490627-f0b5-451c-85af-cbf2906a641b,240.103.221.147,236.142.77.72,Span
320,7/26/2018,15:14,35592471-634d-489d-bc77-19edcbabd960,70.77.169.30,150.72.232.24,Andalax
321,6/22/2018,2:45,09d81d7f-efb7-406f-a984-1cea0142d7a9,205.79.186.86,92.74.79.16,Hatity
322,11/23/2017,3:43,1e0d916a-8950-4130-bbdf-ede9ec948f55,238.32.149.44,112.232.181.188,Rank
323,1/6/2018,6:00,9bb5db80-e751-44ef-8f44-022cb49a4a7e,189.34.136.55,215.189.145.144,Mat Lam Tam
324,11/2/2017,23:49,7172c006-48f2-4caa-8aab-6de202edd990,185.112.90.178,29.179.48.159,Holdlamis
325,12/10/2017,13:09,8d89820f-1f34-4169-988b-d099ffd4d85b,14.112.253.57,90.178.153.27,Biodex
326,2/26/2018,12:40,621201bc-b28f-4e43-8051-dc9359a416cc,210.245.84.9,22.100.233.53,Lotlux
327,12/24/2017,23:54,8e0cd302-2e6d-485f-972f-092d44bd18ca,254.63.19.156,32.164.159.10,Andalax
328,1/11/2018,9:03,5fb1f41c-35df-4375-a236-9352acca9238,149.106.205.41,75.113.173.236,Asoka
329,11/5/2017,8:04,b5897e1b-5299-406f-b800-d57a5e2ddb60,100.167.43.56,120.48.129.250,Voltsillam
330,3/30/2018,23:04,c939bb32-e36a-4b18-960c-0c3a598a1541,187.82.148.150,102.111.144.166,Cookley
331,4/9/2018,22:25,556b4b02-3d11-4ea6-9723-4b9d6e0b38b9,156.63.104.177,160.227.213.150,Bamity
332,1/19/2018,5:26,1feedb86-7940-485e-8aaa-b7700e53fe88,113.81.213.92,80.67.63.111,Opela
333,8/31/2018,13:01,87cd50cd-e62e-41c8-843b-2928b3d0d582,163.216.175.250,88.201.63.60,Bitwolf
334,7/25/2018,23:12,52cba144-d7af-403f-b030-bd116cc12948,243.176.254.91,253.196.83.132,Otcom
335,10/6/2017,19:46,1d724165-0c05-4fe1-9b34-73cb98eaa4d4,203.145.119.158,154.18.60.165,Keylex
336,9/28/2018,14:20,6f40f642-8874-4f30-85ae-dc6d70a82762,37.40.98.64,253.224.99.29,Tampflex
337,12/23/2017,6:47,58cdae84-1b21-4782-9155-b4b1c01f8359,4.174.17.229,194.210.145.191,Domainer
338,8/8/2018,9:48,10f8ba4c-83d5-4437-9b1e-7ab32d0b5da9,226.248.143.48,216.221.164.141,Kanlam
339,10/16/2017,7:16,83933c28-9bad-43a1-bfd0-15b77caf2363,141.19.180.217,47.187.140.156,Zathin
340,3/30/2018,18:08,0fe84282-560f-4711-9e77-be75e543ca76,124.156.78.188,102.104.8.7,Zoolab
341,1/5/2018,17:16,509c659d-c53d-46ee-a255-cdca0a9683a4,78.192.254.165,81.97.183.237,Namfix
342,12/17/2017,4:14,1e906431-9d6e-4fb1-b487-6067fd81761a,85.250.56.197,29.124.117.184,Stringtough
343,7/26/2018,4:02,3e92a3d9-5428-434b-adb3-58994dab152e,112.33.203.229,105.105.73.188,Ronstring
344,6/7/2018,14:09,60f00e81-fde5-4393-b6f5-6a80cc93ecf5,101.137.35.49,194.5.219.13,Cardguard
345,4/28/2018,18:24,e68ca68e-b74e-4375-b909-31204d27e6de,134.19.193.84,249.253.77.45,Zamit
346,10/25/2017,0:23,25e04e02-69d1-41d1-a069-feb8c084fb9f,72.74.202.81,38.56.206.189,Keylex
347,10/12/2018,4:14,1a8b5ec2-bbde-4a8c-a903-c6ffb8baaca9,130.48.69.24,129.233.112.21,Tresom
348,3/20/2018,1:11,51f56e09-cc19-43f2-b0cb-6c2b5329ec73,187.157.235.106,48.27.41.253,Zoolab
349,6/20/2018,8:17,3e84506f-8b6c-46d9-93af-a562ab0386f7,158.143.45.231,0.161.229.230,Bitchip
350,6/6/2018,16:09,02a22e0d-ac0c-4f06-a4e3-678a6b2bdbef,201.204.252.236,5.108.254.118,Alphazap
351,10/24/2018,18:09,d596fa81-7ece-4617-a457-2283751bf6b7,21.237.238.88,31.212.247.96,Hatity
352,10/20/2018,19:20,dfb94fe6-9025-4cae-87bd-ac5f29d7d299,99.184.77.16,196.65.241.224,Kanlam
353,10/22/2017,5:56,bb1d93dc-88dd-4f47-b16e-b3e31765f0e0,144.137.77.60,133.221.206.219,Solarbreeze
354,4/12/2018,11:02,56523b16-cfa0-4455-9d91-ed36410b1d85,175.69.164.42,35.83.118.110,Job
355,11/7/2017,15:26,d2642a34-d2f9-4933-8876-2071693c0f96,7.131.91.145,238.226.126.210,Flexidy
356,10/17/2018,0:18,b59dfb30-eb21-4878-a0c8-a1b1eeb2b799,205.24.243.21,244.232.52.242,Y-Solowarm
357,1/15/2018,10:44,352d2e56-636b-4739-8f38-9150ad08a63b,222.9.45.67,192.236.77.64,Trippledex
358,10/8/2017,3:50,18d35d83-bcc4-4ea6-8f03-d8c4f2de035e,206.31.233.43,143.52.168.172,Tin
359,4/18/2018,15:58,1afaa258-cbe8-467f-9f24-79f639f66919,177.18.67.142,196.207.225.156,Viva
360,10/10/2017,8:13,e21fc3d9-4fbb-47c3-9f9c-2ae476fd407f,170.228.160.104,76.154.161.64,Bigtax
361,8/8/2018,19:21,541eb3ed-6923-439d-ba7b-441574ac755f,145.143.71.181,17.82.177.0,Domainer
362,5/29/2018,3:36,f0076a5b-fde0-4b7e-9e6a-63bb84399fff,195.253.61.17,73.184.190.183,Trippledex
363,7/21/2018,11:39,abb5c12b-2b88-4174-a275-9e8b281822b7,228.106.241.186,238.76.117.88,Y-Solowarm
364,5/13/2018,14:47,e72d07d7-50b2-471e-8f5b-b171fd7f009f,13.230.4.249,228.149.10.156,Pannier
365,4/28/2018,13:09,d84ecf5c-8645-4d33-9674-560d874013b1,108.127.142.243,209.82.117.163,Subin
366,10/23/2018,18:51,df6d4bbb-809b-4876-8849-8d3ce356e5ec,70.208.148.191,53.48.252.22,Temp
367,4/10/2018,7:26,1fafb890-3335-4947-8896-430b26285782,180.104.33.235,126.134.66.101,Flowdesk
368,9/15/2018,8:54,3f278b58-f513-4e8d-b86e-7ad1e3b9bc5d,203.216.130.133,217.231.34.132,Konklab
369,7/19/2018,16:14,3d668bb6-7f99-489d-9b4e-2e8e7d161533,15.241.121.133,111.73.67.196,Alphazap
370,8/3/2018,12:59,39bbf389-382a-4378-a422-d9ba9b925929,167.39.64.212,103.244.119.109,Bytecard
371,2/28/2018,5:37,484527a1-cdd2-4493-81ca-6e6e767d55b4,95.201.240.167,220.178.29.108,Latlux
372,9/5/2018,1:19,6b8e636c-24d1-4782-a480-f5fb55318be6,15.37.115.61,144.125.187.92,Opela
373,1/5/2018,13:05,baf2e73c-ca4f-4713-bcfd-7d706c8a98d5,225.24.249.9,42.117.144.26,Bitchip
374,9/15/2018,21:33,7ec86b29-a3df-428a-9fb6-1b7608e071c9,128.80.195.57,80.12.125.31,Holdlamis
375,3/21/2018,21:14,f03db504-913d-438f-8133-7a479270fce0,17.153.142.150,200.13.243.106,Job
376,3/12/2018,17:15,3c82be38-1b3d-48f4-956a-04e8dfd66433,163.253.214.83,47.219.57.175,Y-Solowarm
377,10/30/2017,15:11,edfc8ee9-af20-4899-bb64-6227df1ea95d,102.129.161.28,52.208.201.217,Quo Lux
378,10/23/2017,18:12,ab5311fb-8c8e-44c9-8b09-1a1023bb6675,72.223.12.72,162.118.220.28,Domainer
379,10/11/2017,2:53,b8e97488-963d-45d2-a788-6ea9721a06da,192.142.132.236,140.207.168.33,Tampflex
380,10/29/2018,10:00,f2df7056-d924-45f2-95cb-fcfe72f7e468,205.23.192.141,15.73.69.234,Home Ing
381,7/10/2018,20:22,b4273cf0-199f-4d9a-91d8-0f38dc001524,126.59.37.70,195.94.115.39,Zamit
382,4/13/2018,16:39,4e779906-ce7a-42e0-9b27-237b2b7831ab,102.151.250.171,251.155.129.79,Bytecard
383,2/11/2018,22:58,67611663-3369-4773-af13-d0b145b332c9,41.148.236.95,231.93.153.72,Sonsing
384,1/8/2018,3:27,85d58d97-358a-48f8-94ec-a3656aecca25,137.141.235.134,10.105.102.36,Span
385,3/23/2018,16:48,26da8751-6328-4a44-a1ee-7e7026cf975f,121.173.142.31,237.240.107.229,Tampflex
386,4/10/2018,17:12,f435e756-ba5e-461e-b89a-26a0068dd764,0.70.79.115,93.188.21.253,Zaam-Dox
387,10/23/2018,1:37,6488aecb-4d93-451b-a03c-3ad5a63f343a,249.128.79.50,37.128.21.99,Transcof
388,6/26/2018,3:18,176b50a9-a1cf-4c33-a8a0-4358b050f6ea,173.34.87.173,76.21.101.10,Alphazap
389,1/27/2018,5:36,e8c3b1eb-c5b2-4067-9e72-0b73388bd1b3,122.85.31.12,122.197.93.251,Domainer
390,1/4/2018,15:35,a8b546f7-747a-4859-8783-31a43779d2d5,46.222.209.47,138.74.149.179,Voltsillam
391,4/28/2018,17:12,ad4582f2-356f-45a7-b5c6-caafa915261c,178.77.40.173,15.147.233.10,Zontrax
392,8/2/2018,23:07,78626fe5-eed1-4333-bab6-e61e93cfc391,114.225.92.140,45.61.211.42,Cookley
393,1/17/2018,22:23,9d2337e3-0684-4704-a6df-4a1f9f50f0fc,139.77.101.78,33.213.36.206,Pannier
394,10/21/2018,1:22,5fb5d6a8-ec94-46ac-9660-0fab507eeeb8,43.17.79.245,148.96.80.228,Overhold
395,6/26/2018,9:34,df8d9341-316d-43d7-ae29-c774f20536d2,217.248.128.46,94.67.17.172,Overhold
396,12/21/2017,22:46,5a3db57a-ca8f-49a1-b62f-bc1bd19516ab,68.77.63.61,170.236.146.207,Quo Lux
397,4/16/2018,18:41,bd390908-bf84-4dc0-a8ae-07d60dfceeef,110.66.5.163,245.150.50.243,Tin
398,10/8/2017,4:36,18bc28c3-65ea-4ea0-b025-f1514def1e78,1.11.42.229,254.229.145.167,Otcom
399,10/5/2017,16:56,06fa2ff0-018c-4846-91a4-cdf8a1c5877f,143.183.107.165,232.215.161.212,Alphazap
400,2/15/2018,3:23,1741b7b8-05fb-4b48-8839-03abc1265dcf,103.220.198.154,243.226.165.36,Toughjoyfax
401,1/6/2018,8:22,930ed695-4ab8-4a93-a95a-dd15edbdaeeb,44.163.23.255,157.37.249.204,Tempsoft
402,7/14/2018,23:10,483094cb-7602-4748-9d64-768f72eb3f5a,205.109.21.64,245.123.108.246,Domainer
403,8/14/2018,1:59,4fb06cbf-5884-4fde-aab7-dba25019603a,12.171.47.221,188.83.134.108,Mat Lam Tam
404,10/23/2017,3:02,b821adf3-2032-4342-ae0f-54278d219c10,197.17.153.232,213.18.114.209,Job
405,1/17/2018,4:12,a6a0967a-cbf2-48fb-a38a-94faeff50e24,187.3.240.101,249.126.124.237,Veribet
406,3/14/2018,14:09,faa07c25-925b-4748-bca5-747763f515ba,69.5.149.35,180.251.76.49,Treeflex
407,7/24/2018,13:19,b52de898-6e95-4fc7-ae08-0a97bf0a4730,58.200.173.160,2.49.158.177,Domainer
408,10/1/2017,20:43,4ef648b8-7324-49b4-8b0d-fa57b3d9bf9e,101.155.124.32,4.153.41.159,Voyatouch
409,5/8/2018,0:52,7dada472-a129-49fd-a06a-94c928b45e8b,43.80.201.103,157.216.116.47,Vagram
410,6/11/2018,7:11,03e63f7e-6461-4c0d-8fc8-c06e9b9f3c64,248.66.60.141,18.243.248.193,Daltfresh
411,6/20/2018,17:37,f637744c-89aa-49ba-a5f0-143122d07803,236.123.147.67,16.241.86.244,Quo Lux
412,4/22/2018,16:19,c4871956-36a5-4da6-be27-b3fc66d25775,237.145.35.5,42.77.71.29,Bytecard
413,6/2/2018,0:37,3b85fe9f-49da-414b-b924-b6ce3c098c30,134.231.20.101,242.178.106.91,Gembucket
414,5/15/2018,12:52,be285ea1-3085-4550-8628-672f9bfa932a,189.253.209.220,208.164.22.97,Holdlamis
415,5/11/2018,18:34,abcbdb2b-e0ba-45b0-9f07-23c4358ce7cb,44.231.230.151,80.6.132.101,Solarbreeze
416,4/21/2018,21:22,281686f7-61f4-44ea-a92f-bea9d3a6f894,196.35.168.0,142.132.135.75,Fintone
417,12/21/2017,2:59,d5382cc6-f5ca-49b5-8a97-8dcfce714859,123.114.47.65,244.134.176.207,Zathin
418,11/28/2017,2:10,6c57c9ab-cc8c-4405-aec7-eeece9bb443f,89.144.228.69,190.23.217.81,Aerified
419,5/14/2018,10:30,d015b9de-7c6b-4b79-97ac-fcffb5183ff3,78.161.122.120,193.4.54.105,Pannier
420,12/13/2017,18:02,798d0cb8-99fe-4e00-a83d-99882a1ab43a,49.186.28.124,119.252.228.250,Quo Lux
421,9/14/2018,17:58,ba1b68bc-954f-4df8-8626-9373cfec5da4,110.75.109.14,91.24.128.106,Kanlam
422,5/20/2018,13:33,5d3a32f3-1335-4a17-91fd-18c995663d21,178.223.93.168,118.154.154.55,Konklux
423,10/25/2017,11:25,95db4107-0304-4abe-ad89-eee70a505a6a,197.41.153.57,161.141.103.193,Matsoft
424,11/2/2017,6:27,14387400-82e7-439c-bcb5-cf89ecc3b486,182.74.74.150,240.67.84.74,Biodex
425,10/18/2018,13:06,55171006-36f9-404c-995a-3aa7c61924d0,148.181.15.149,146.224.79.118,Daltfresh
426,10/16/2017,22:23,3406875e-a1a1-4a07-8764-92dff4cff524,44.103.27.135,225.34.42.147,Regrant
427,8/8/2018,10:35,61592440-7bb2-41ac-909e-6aeac34fde66,235.120.205.142,12.36.212.187,Stringtough
428,6/4/2018,5:29,fde007a3-a8af-43e0-bd70-8319289e7f5e,147.97.47.118,174.88.168.66,Voyatouch
429,6/2/2018,22:48,94d8da1c-ad06-4570-8d51-584a5d2d42ae,228.57.76.228,6.38.124.60,Bytecard
430,8/20/2018,7:21,75dfab4e-a77d-4b35-930b-11f443b0bea0,191.92.7.247,33.81.101.42,Bytecard
431,7/12/2018,0:02,681173d9-43e0-4d7f-a1bd-2b5304babf95,51.144.153.199,78.8.64.33,Fixflex
432,9/17/2018,17:29,bdd5e8fa-525c-4933-93b8-c12468ed22f0,32.154.124.54,206.81.95.24,Holdlamis
433,6/17/2018,8:57,1233adfd-f7a7-45ba-8282-f412adf923eb,223.92.155.220,230.197.195.180,Ronstring
434,6/20/2018,20:29,2ad96e98-3fb1-46a4-82ef-5aa1db3c101b,108.228.115.180,170.23.8.139,Gembucket
435,2/20/2018,2:15,887b6fe9-53b0-49c6-a33f-8b7f34447505,150.240.153.210,149.62.140.232,Transcof
436,12/15/2017,1:49,7f0e9714-9747-4304-8b8f-b3a8b653e78a,98.201.244.27,23.163.219.89,Hatity
437,5/26/2018,6:31,67857d73-eec0-43e1-96cf-991c11db9ca6,14.156.170.54,134.86.104.59,Konklux
438,7/2/2018,15:59,98258d1c-ed81-4982-9b1d-5effee6321fa,249.248.10.140,9.147.222.146,Sonair
439,10/27/2017,22:44,11f0ec03-0edc-43e7-b1a4-7378bd65357a,204.136.121.180,177.27.110.124,Mat Lam Tam
440,3/17/2018,10:28,becb105f-5651-496e-995e-99da0a40bb5d,217.164.233.188,36.168.34.203,Daltfresh
441,7/27/2018,5:07,994a7b4d-fba6-472a-98c1-7cf974a0637f,49.224.23.223,101.90.255.70,Zathin
442,2/15/2018,0:53,cf44a620-2b7c-46a2-ae09-2f57a8f3dd6a,60.106.133.230,54.166.226.161,Toughjoyfax
443,1/28/2018,10:01,a6cd485b-bba4-47ef-a3ac-e29a3191ced3,179.85.241.53,205.180.146.55,Trippledex
444,8/31/2018,9:51,27fc8a05-af58-4637-80f5-96396c4f727c,250.75.211.37,210.63.127.185,Sonsing
445,11/15/2017,18:12,bc203dc7-4197-4074-9cbf-27838e28fe3b,211.29.168.111,156.4.36.160,Y-Solowarm
446,1/14/2018,9:14,718aafd8-fefe-4859-b010-b263ddbb3e99,219.219.187.88,70.123.206.185,Voyatouch
447,3/13/2018,2:33,e8b2711f-9522-4d5e-a9b6-023c5a9a5c65,238.25.162.117,2.117.21.142,Flowdesk
448,12/24/2017,7:32,16fdf1b5-8757-4d96-8172-5b36a55cf5a5,93.43.42.128,186.172.16.7,Alphazap
449,11/12/2017,7:48,a256afe9-709b-45ad-a1c1-f30eccc196be,166.72.24.21,190.141.154.213,Opela
450,6/12/2018,19:28,3be103f1-c262-40ce-82e9-de52cceae69e,73.89.175.161,128.170.174.170,Zoolab
451,8/19/2018,16:09,82027a68-b200-4232-917b-9ccc5c6250a7,207.167.238.86,93.44.141.158,Sub-Ex
452,12/9/2017,0:45,3c444b20-a726-4e0a-81e4-cbb155ee1ffd,208.254.232.175,226.70.247.29,Zaam-Dox
453,8/1/2018,6:02,bc8ca63c-f8e2-470c-89bb-a387ec303c40,2.45.4.249,191.245.69.3,Y-find
454,8/11/2018,5:07,3b865baa-9c59-4b37-b8da-bf092c76c30b,246.57.67.212,217.250.180.137,Bytecard
455,2/7/2018,19:28,c85f27ba-b2e1-4834-94cc-38139b8a0711,221.28.240.181,169.104.139.118,Bitchip
456,3/23/2018,14:10,cd110f6a-f570-4df2-a67c-709b14b4f08a,94.128.228.119,85.92.0.19,Zathin
457,1/20/2018,22:46,ced40628-f75d-44c1-bdc3-7735ff82c044,218.176.79.62,160.180.245.229,Cookley
458,8/12/2018,11:00,290c51d4-1d15-4787-bf22-cd52c261917c,221.101.173.1,40.173.28.161,Lotstring
459,11/24/2017,12:51,559df49c-cd51-40cf-973f-116233e67fcb,172.140.239.41,11.213.74.109,Flowdesk
460,9/23/2018,5:03,d11d6c59-c7e1-4054-afc7-63dd9f8e7e35,0.22.180.239,79.136.223.222,Veribet
461,12/26/2017,4:29,a6f5ab6f-ea08-43de-9666-1a17d18d5834,62.96.41.239,76.227.64.107,Transcof
462,2/5/2018,6:16,27e4af56-91a2-4045-8027-cd09538cded2,20.118.141.92,108.252.102.85,Daltfresh
463,11/17/2017,8:23,3ce60eea-426e-4b6e-a2a3-5a09374fcb17,89.11.103.184,146.240.252.197,Transcof
464,11/29/2017,20:19,448e4ad1-36c0-4ff5-95b1-ff92a660f808,100.223.241.7,82.176.43.134,Hatity
465,5/12/2018,10:04,a9ed539f-8f59-4770-87bb-0be0267c1d5c,145.169.56.214,37.154.147.88,Daltfresh
466,3/22/2018,1:29,5e531fde-3992-4a37-a920-0392b6665be0,48.153.223.182,239.145.40.195,Domainer
467,7/17/2018,20:57,f9bf81c9-1dc9-4fdd-be81-82499179ccd9,129.220.216.188,61.156.63.203,Sonair
468,11/6/2017,17:10,68c20949-2613-46b1-bdb8-02881d16b322,193.246.118.14,238.28.120.44,Fix San
469,5/15/2018,15:26,218ed02c-8aea-40f6-bf10-de677645ee34,83.79.162.185,57.148.82.74,Lotlux
470,7/4/2018,18:57,3c626350-897c-45d2-a509-10510270f163,216.240.180.147,127.94.224.66,Temp
471,3/13/2018,9:41,01cb73d9-24fe-4ad2-8d13-897ff0a0b4ad,96.119.190.193,81.49.32.32,Zoolab
472,10/25/2017,0:28,5fb37437-194f-421f-9903-9450a307b5fe,232.115.104.20,207.61.73.206,Tresom
473,8/25/2018,10:20,176823f3-b4de-46b1-ba48-603f4069f0b5,117.15.101.48,195.63.164.177,Bitwolf
474,5/8/2018,19:51,02c03c8a-f841-41dd-8bed-5af75b9a9407,150.60.89.61,74.89.251.190,Holdlamis
475,6/30/2018,14:46,d19b3a0e-4237-4094-85e2-4b8a188f93be,193.107.86.66,75.40.171.68,Fintone
476,10/16/2018,7:50,78457821-8919-4568-beb2-a3645cf07401,57.133.101.244,102.134.117.145,Stronghold
477,9/10/2018,6:12,9a81b7cd-e0a6-43f8-aae6-f1823a3244d0,174.194.162.156,161.248.41.184,Overhold
478,2/24/2018,9:27,8ddb6bb7-cf9f-48d3-805e-752568bc3d0d,113.134.179.248,139.211.234.224,Sub-Ex
479,5/24/2018,0:00,d182226f-d65e-419c-ae5f-89dcb4621500,93.241.52.254,95.187.25.90,Sub-Ex
480,8/2/2018,17:02,9e2e73ff-8159-4992-8aca-e511e94fae05,63.160.218.2,163.25.80.88,Cardify
481,8/26/2018,1:51,b781f99f-7e38-4bb4-bf1b-afd9fb7b3326,131.110.52.114,246.48.43.76,Solarbreeze
482,7/2/2018,7:37,da78399c-8cd0-4b8b-a7da-a3462a8df25c,8.32.68.212,128.243.134.94,Sonair
483,10/18/2018,15:45,e56783e8-31ab-4f53-b61d-b46ee94b50cd,172.201.253.192,73.175.34.121,Daltfresh
484,6/1/2018,18:53,5a2e8859-17b2-4922-9711-648ca714caf7,23.14.21.231,179.135.215.217,Fix San
485,10/24/2017,18:02,b9478067-830e-40f8-8997-34b1703ad7b9,213.12.25.131,125.106.239.77,Kanlam
486,10/18/2017,0:53,f236799b-5240-4041-8636-f9ee0de5d984,101.207.103.168,103.141.207.214,Temp
487,10/16/2017,22:19,ab374930-8260-4146-a74c-306daaefdffd,157.210.189.111,164.110.212.220,Voltsillam
488,11/20/2017,22:11,fa9677b4-4cf2-4a05-a145-8f8420eff070,7.211.99.139,30.41.35.191,Konklab
489,5/24/2018,14:28,cf1bd83b-2c66-4804-a5dd-a22d0dfa38e9,10.15.173.90,185.8.155.61,Bitwolf
490,9/22/2018,10:23,bb316440-1d96-4875-8d48-319506953c72,248.187.166.121,137.155.100.57,Transcof
491,7/25/2018,0:24,a7af5767-d073-4bdf-b2ec-4e44428991fa,163.199.105.135,24.15.56.186,Wrapsafe
492,10/15/2018,3:04,022d3d4e-21cf-4a22-939a-41af992c964f,78.48.237.31,47.139.108.247,Treeflex
493,8/11/2018,20:51,7dedff8a-e4bf-4fbe-97a1-c0514d51f009,227.86.181.70,189.68.249.249,Namfix
494,7/27/2018,15:49,e1102fd8-bcbe-4091-a39c-c98a4c4a1e3e,55.221.218.93,74.178.23.205,Cookley
495,3/30/2018,4:45,9a8fbcfe-d619-4ab8-b9c5-062afaf76855,26.56.146.247,29.193.118.175,Lotstring
496,3/20/2018,6:33,374d389c-10e4-470d-9546-99f19255e76c,12.233.142.78,150.172.247.231,Biodex
497,3/18/2018,4:21,21c79176-3c29-430f-80fb-3872d8b3611e,25.52.111.88,168.138.105.8,Y-find
498,5/27/2018,3:54,1b7e89e3-d700-4cd5-ad41-41bfa8b8aa44,242.108.151.46,214.88.44.135,Matsoft
499,10/10/2018,21:31,02e05335-b275-4b89-bd15-4a1b6bd407fa,146.67.193.59,61.93.124.14,Cardguard
500,3/31/2018,8:57,2b95e8f7-8c03-475e-abf1-ea43c34cc11e,66.197.232.247,70.74.243.0,Y-Solowarm
501,6/19/2018,1:12,aa1006b5-f080-4d60-9c9e-f6ccd17bfac2,26.106.206.240,157.69.109.39,Job
502,8/19/2018,5:23,1eb851ae-fc5d-4820-881e-c80ed73eb5fa,150.209.66.250,70.46.42.29,Zamit
503,2/7/2018,2:48,49d503f1-b7a7-471f-bfd6-afca854b8b7d,10.198.125.21,152.53.119.71,Tin
504,9/19/2018,9:07,c1b49781-bf9a-4b38-a03c-ccef911a93ae,122.139.80.20,248.168.98.217,Opela
505,10/14/2018,17:16,ad72ccff-0d23-4285-a958-886d5ef44ab4,123.90.152.157,25.49.228.157,Quo Lux
506,6/15/2018,7:58,119fad16-4ff1-4acd-bbd2-c890ebe6acea,240.71.165.4,90.188.114.86,Tempsoft
507,4/27/2018,15:26,4f7df3e5-35c9-444b-8e5e-e4be1add6d0d,52.84.24.159,114.141.117.92,Sonair
508,12/7/2017,16:35,c67f4d9d-9c13-4197-9f89-7af11a1a1e93,96.48.69.63,224.137.2.45,Opela
509,7/14/2018,12:06,b6a29560-6c05-44f1-92d0-0d9109b7419b,146.102.15.171,21.58.228.137,Zontrax
510,8/9/2018,13:03,7f9f74de-995e-4679-a6de-7a1a93501284,129.168.223.244,133.31.215.70,Trippledex
511,5/27/2018,0:28,4d66484b-7c0c-4691-a352-74950c096e39,173.161.123.107,174.46.29.51,Cardguard
512,4/18/2018,15:26,72a58166-80fa-4d5f-a9c5-164d044506e4,145.44.215.44,110.254.220.148,Temp
513,7/21/2018,8:06,6eb87dfd-747b-4b3b-9756-c421e0232646,170.39.153.205,67.149.177.112,Bigtax
514,4/12/2018,6:20,10393479-2273-4edc-99b0-ce1347b2c820,186.114.115.22,84.3.56.177,Andalax
515,3/22/2018,2:35,cb0cb027-492e-4ced-8737-8d5bf48cea6a,246.122.117.157,96.38.92.201,Y-find
516,3/26/2018,5:51,903ccd85-a2ed-4e18-94ad-9e0db054b7bc,89.63.214.135,241.123.210.143,Cardguard
517,9/18/2018,3:04,459660a4-8394-4c34-804c-09aa9d82718b,179.79.81.233,152.172.117.230,Greenlam
518,6/8/2018,23:18,c23131d8-592d-44ec-81d1-7ed4e8975179,95.91.29.241,136.88.132.193,Y-Solowarm
519,10/21/2018,7:06,9a293499-c629-4ec0-89de-edb3ec78a15f,171.148.15.34,16.133.210.220,Quo Lux
520,10/14/2017,6:40,e40b379d-8880-4791-a0af-9288dd495b37,236.94.12.187,182.46.238.179,Asoka
521,11/18/2017,18:19,825599b9-fe19-4f87-8784-671b9838c566,226.159.207.196,7.185.209.57,Rank
522,9/5/2018,12:04,04ef70b3-ae86-4d70-8dff-4fbc64b429ca,208.83.42.162,126.165.178.105,Voyatouch
523,7/3/2018,21:09,b9b2708e-b2f9-4d68-93f9-9705e6db20e4,244.14.221.143,94.170.246.238,Greenlam
524,10/16/2018,23:28,d7b7ab87-ac69-4c73-b5ba-01cad6bf36dc,172.136.47.122,59.67.130.19,Sonsing
525,5/11/2018,23:25,6919d894-dc22-462a-b5de-7881849ee313,194.57.88.230,126.135.218.135,Solarbreeze
526,7/23/2018,2:51,9386f984-e938-4e6a-9379-918eef5f76f5,111.112.217.205,203.227.192.178,Aerified
527,8/22/2018,9:54,e0454b2c-f613-4098-beeb-be2aca546431,108.146.127.21,103.231.243.62,Bamity
528,4/21/2018,1:59,c3200308-f5bf-4d1c-b82d-10e79f271b81,153.5.199.229,56.152.119.110,Latlux
529,1/9/2018,0:35,f0e57f3b-f59b-48b1-9e95-89427bedd45e,75.182.251.35,167.32.114.134,Matsoft
530,8/22/2018,4:15,f7113fac-5ccb-4c4f-b989-5863fd6d567b,63.130.6.142,192.123.54.196,Biodex
531,7/15/2018,17:15,f4325403-aff6-448f-bc22-dcc8a123c6d7,175.49.149.242,86.5.23.127,Bitchip
532,11/21/2017,3:29,8e5d52ec-9a33-49a9-8a95-a74ba771634a,75.215.96.88,141.15.195.61,Cardify
533,6/2/2018,5:10,1861d05d-522d-4c26-b349-861632c63887,136.51.197.78,29.56.27.210,Regrant
534,10/21/2017,17:47,906ab0fb-1786-4fe3-a1bd-574840fdc900,65.26.124.38,250.104.148.252,Sonair
535,3/12/2018,10:52,07d80190-93c0-4caf-be1e-e580d1bd382f,175.90.130.65,196.39.84.164,Overhold
536,2/10/2018,9:45,9d139d5b-40d4-40e2-ad07-1523c864c392,78.223.84.116,196.165.239.101,Zamit
537,3/28/2018,5:56,2e51cc18-657b-4736-8200-33d2e935b078,121.213.118.140,185.208.126.235,Veribet
538,10/11/2017,1:55,72f6017b-5b0c-4af5-bca0-8a4560d8c5d3,12.240.224.93,144.131.29.218,Hatity
539,2/1/2018,16:49,7d94af74-96eb-4fca-b0ac-d03bf27b04b1,52.96.28.169,33.76.33.177,Fintone
540,6/8/2018,11:04,51d06cac-34ab-4a99-a4d3-9694db9d8646,85.172.81.88,154.49.6.43,Andalax
541,12/7/2017,4:28,b43c9c6c-b673-415e-b0bd-ffd655dbac69,122.234.31.153,39.76.185.178,Span
542,9/6/2018,12:47,7f047510-a399-4531-8b0d-0d0771e5a19d,153.197.62.187,8.189.241.196,Tin
543,6/18/2018,15:50,99da7c8f-71cd-4393-9078-a50b098d47a0,127.156.197.154,113.123.163.156,Andalax
544,5/30/2018,8:16,f8f24108-494b-46b4-9a92-a1b4e251fbcf,148.23.253.47,203.241.167.77,Tempsoft
545,6/12/2018,0:55,ec2382ee-9ee5-4938-a232-90c31fa9a870,39.174.235.240,55.69.47.49,Lotstring
546,3/29/2018,3:31,8e932c9f-4314-46c7-977d-085f0d98be8b,35.242.243.181,77.155.30.94,Redhold
547,12/16/2017,11:06,b2df888e-a2f9-486a-98c9-2447372e7e1a,23.119.184.149,23.80.220.144,Konklab
548,10/8/2018,7:01,709d9c51-7dca-431f-8ecd-0a49f45e9586,252.91.226.136,130.140.126.203,It
549,5/20/2018,12:03,0ed225a7-e2a2-4d6c-b8ea-4df01e2b7aa2,190.10.145.42,38.232.16.215,Zoolab
550,8/31/2018,1:53,e04c369e-747e-4f14-bc6f-43bf58836780,179.233.226.6,41.84.219.233,Zathin
551,7/26/2018,12:56,3c6e0fde-0076-424d-8836-ed8a3e3a59f0,43.63.48.124,251.243.189.4,Temp
552,11/9/2017,13:05,176ca553-6f07-4f37-9a13-f1ebf5ce68d2,80.12.230.34,73.203.8.52,Domainer
553,10/27/2017,11:02,e8e6bea3-e0b3-4392-8657-480af1d746a7,51.9.36.146,176.67.40.146,Mat Lam Tam
554,3/30/2018,20:28,d14eb30a-4f7a-4067-8e25-6402475aa9aa,144.185.101.10,113.45.64.221,Sub-Ex
555,8/17/2018,23:55,cf1a4642-a55e-4e99-9d3a-e0da9f5639a0,27.173.203.236,81.235.217.184,Span
556,4/9/2018,22:08,0ee35ace-e79c-4023-bfbd-1bbc27fc6185,103.29.80.176,122.126.20.235,Pannier
557,10/7/2018,3:34,99d7603f-58ba-4c74-84b1-338e4863d1a5,9.113.90.102,106.194.32.223,Transcof
558,4/14/2018,6:18,08df70d7-7440-4b35-8ede-1454c1a2d30c,128.146.168.190,35.213.148.142,Prodder
559,3/5/2018,7:58,a6c2c375-5315-41e7-bb2a-450976321573,252.85.146.104,179.94.178.66,Sonair
560,10/9/2018,12:24,7a4c9821-449a-4784-a253-6c2ef0eaf2fb,248.105.58.191,30.151.233.97,Transcof
561,10/25/2017,3:01,b5cd5b9b-2f3d-4646-bac6-ccc3516d8d6b,158.204.82.139,143.73.64.55,Namfix
562,10/27/2017,4:54,61e5306a-395e-4cda-a3b1-c9a64efd5f59,140.111.35.48,56.87.62.90,Cardify
563,10/20/2018,21:59,71770e82-ab26-4741-88e4-1f6727ae3b75,212.245.108.46,48.67.42.41,Hatity
564,12/2/2017,15:51,1d265b58-7620-407b-9800-9030ff852f5d,5.248.226.54,123.50.59.190,Lotlux
565,1/4/2018,9:39,876efe78-60a7-4221-8ff9-0e2c51827a1c,52.29.132.134,81.64.18.220,Rank
566,2/14/2018,22:53,a07dbead-f33f-403b-b06b-e72f13d14e1a,150.131.240.214,84.199.244.228,Keylex
567,2/28/2018,5:37,a9f789e6-4bb4-4a29-9d72-62599fee6b0c,172.240.25.14,95.134.216.254,Ventosanzap
568,12/28/2017,6:34,4dcead5c-1f37-4cd7-bb43-c17d5f6c8a41,89.13.71.49,119.60.12.112,Viva
569,8/22/2018,5:28,8555e052-f822-4374-a062-0f990adab7d3,7.8.129.179,8.43.167.127,Matsoft
570,6/27/2018,5:30,8e19bbcc-694c-4431-bd59-f6fa28fd754a,65.166.50.231,105.185.11.47,Rank
571,7/26/2018,1:27,eb70f42b-0f73-4c36-b332-719ddccd0711,226.255.153.43,155.192.47.254,Redhold
572,10/15/2018,17:12,dad9f0a3-a0df-436f-8279-f6516b6f37bc,143.161.112.183,60.71.11.14,Otcom
573,10/8/2017,7:00,456afd16-354e-4be6-b535-c9a07efb5ffc,165.22.23.168,14.240.84.105,Mat Lam Tam
574,6/12/2018,20:41,297120bf-46cb-418f-ae99-1e1e9d854dba,69.7.58.205,37.243.14.155,Tampflex
575,2/16/2018,2:58,22d14540-a441-4642-82ad-1b34c64ebf76,72.100.116.216,38.199.69.89,Gembucket
576,10/14/2018,2:52,1d67cd11-79e9-4556-ae56-3c9781ba9efe,59.103.134.14,193.81.74.193,Quo Lux
577,8/31/2018,23:13,14090de0-dd97-4c1a-a30b-cbd60d20eb97,54.18.147.190,91.252.112.146,Ventosanzap
578,5/24/2018,6:11,c9e643e0-abe1-4691-9504-70da8071949a,79.220.147.155,20.152.48.97,Aerified
579,10/5/2018,23:24,a41e5196-a6e2-45fe-a102-d199bba47a5a,255.167.68.177,249.222.7.11,Cardify
580,12/12/2017,8:46,211f5bdb-9b5c-4837-9600-f76e94f6769b,70.13.179.48,195.41.44.190,Pannier
581,4/8/2018,13:07,7971638f-b0cd-4ee5-b548-adf940242ee4,218.32.194.8,137.76.221.255,Prodder
582,6/12/2018,19:22,4588ac92-e601-470f-bc69-b03a69957666,244.161.231.0,254.108.49.229,Job
583,10/5/2017,21:16,4b34dff8-6c35-489c-b580-d121b53f7c13,20.121.28.46,237.199.32.88,Stronghold
584,4/16/2018,13:31,41c6a31e-b8b7-4b10-a065-ca6493dd4054,136.180.95.28,241.179.127.54,Voltsillam
585,10/11/2018,10:33,6a03f4f1-eab0-404a-a7b1-8e7961391104,235.227.205.139,99.51.14.125,Holdlamis
586,12/10/2017,20:00,85013f08-db95-4654-aa6e-e81776108604,253.42.147.39,230.221.203.158,Alpha
587,3/2/2018,4:30,b1a6e095-b438-4f87-a7c2-dc9bc8e757f6,158.227.93.222,0.137.63.232,Bitchip
588,12/4/2017,3:46,ccb4c284-06ec-465d-9552-0ddb881e2999,236.71.154.68,23.189.109.171,Alpha
589,12/9/2017,11:29,78356b6d-e424-403a-a129-2f47a0bb54c7,177.95.204.215,13.74.22.216,Zaam-Dox
590,6/14/2018,19:51,b5ac15a4-163a-4a6c-8927-90958e73af19,174.63.24.13,255.145.228.80,Tin
591,4/30/2018,22:53,5c37a6c5-ad74-4aab-81d0-d15186af809f,8.203.107.88,228.59.111.124,Job
592,1/12/2018,1:54,24d16c91-5e94-4f4d-87c2-b45167fcbee7,108.105.222.247,250.18.8.157,Tres-Zap
593,2/22/2018,17:20,4aa39801-6f3c-4483-a529-ef45e67ef160,11.40.167.215,27.153.119.230,Duobam
594,10/31/2017,11:17,7b9fac00-467e-4ef8-909d-563164a40359,173.85.82.236,177.106.108.112,Fixflex
595,12/25/2017,0:06,f7bd91c0-6e93-4108-8004-377427a92d7b,86.34.254.67,240.122.232.9,Cookley
596,10/21/2018,13:08,afc4aed0-bd15-48b2-b7a9-737002cf3a0f,92.159.47.6,150.224.17.144,Stringtough
597,12/4/2017,11:37,af659b6e-03a4-4a10-869d-48ebee58691d,196.214.44.66,117.36.41.166,Lotlux
598,1/20/2018,14:12,28d9381f-63f0-4b5d-8c33-7fe9aada359b,14.199.31.157,225.205.181.39,Flowdesk
599,10/8/2017,6:17,4a228199-cac0-470e-a60b-80ce06204403,82.69.9.244,226.106.151.21,Pannier
600,10/25/2018,21:02,db5b1369-47f7-416b-94a1-9c06304bc6d7,82.123.202.105,87.94.126.255,Veribet
601,6/20/2018,9:20,890dad49-801c-4922-b531-a87d7f01c8b2,198.88.234.157,254.89.198.65,Sonair
602,11/11/2017,8:45,32be1e84-7c23-4b21-a07f-a012ccd48c1c,225.141.198.175,127.202.240.4,Bytecard
603,9/2/2018,1:31,bc809e08-c45f-45df-a546-94fecf16ea90,91.100.51.169,180.16.61.248,Zoolab
604,8/19/2018,11:42,4ad4edef-afe2-41aa-9e27-968ab56a6cd4,210.114.216.60,245.218.10.237,Sub-Ex
605,8/22/2018,5:10,b6cd8477-313a-43ca-bdc4-f7e8c7ff6385,39.131.144.195,180.226.128.242,Trippledex
606,10/2/2018,13:05,76c97070-6ab5-4997-b47e-8ff35af99877,227.190.248.94,130.250.40.244,Otcom
607,5/11/2018,21:35,a97ad925-8ec9-4768-8056-11b2bccfab5b,111.201.43.154,113.69.248.36,It
608,1/25/2018,0:12,003edde0-03ce-4228-aae4-921e0a80dfb1,9.180.10.146,69.186.39.83,Veribet
609,4/20/2018,15:24,2c3c8278-d3ca-492c-951f-176081f0cd48,156.4.48.231,203.43.63.33,Matsoft
610,5/14/2018,0:47,01345fb5-cd1b-4e41-be72-a284386a81c3,248.233.130.196,133.88.228.52,Zathin
611,8/24/2018,20:09,7f12e202-ce26-4f80-ad30-bf8f0402e124,126.1.92.220,97.136.247.119,Daltfresh
612,2/18/2018,22:26,84fed4c1-79b4-458b-b006-d41d345d7385,249.132.38.62,204.219.245.64,Tempsoft
613,12/1/2017,7:54,f0b68581-a201-4b73-9510-f329278cf6f0,6.138.153.243,237.230.241.239,Ronstring
614,10/20/2018,21:23,0bad0d6f-de9e-4bfb-aee0-6c8a0a33e1ca,91.13.122.114,44.77.12.255,Zaam-Dox
615,6/5/2018,19:23,9837d2eb-1e7b-41a2-8549-7ffe3d554131,124.148.202.186,164.102.190.55,Bitwolf
616,8/10/2018,14:00,52ee6ead-25c4-4614-8503-9c34de5dae90,3.166.247.32,60.64.245.97,Bamity
617,12/11/2017,12:24,e39730ca-14e7-4562-b394-e32dcd54bb9f,173.159.157.85,205.77.139.84,Overhold
618,4/27/2018,22:45,95bc6c44-c982-43a3-92f4-41509e30f6d3,168.53.204.66,36.141.221.162,Konklux
619,9/18/2018,1:01,66a7a579-9c0b-43e9-a089-25dfb6d4b212,170.18.53.171,20.12.222.33,Alpha
620,11/18/2017,17:03,0c55772c-612c-4cba-86dc-e4374aa45668,19.17.114.29,148.75.253.40,Cookley
621,4/5/2018,15:20,af2bf0e9-c482-4f2c-ae8e-65522e9b1d9e,68.226.253.24,136.215.143.25,Fixflex
622,5/31/2018,9:49,43b6e547-be34-46a7-a4f1-75dac2946fb6,85.138.7.59,252.143.52.156,Bitchip
623,11/26/2017,14:13,9aa7067a-d783-4291-b984-3d296d3ae8af,153.18.143.151,255.77.75.22,Duobam
624,11/17/2017,9:26,3e6cf359-6386-41c0-91e3-cb062fc5b462,201.235.55.121,65.28.213.146,Trippledex
625,12/19/2017,22:38,2aaea825-7000-407c-9625-6860d1ee8c17,116.20.58.102,202.162.210.118,Treeflex
626,3/9/2018,12:25,91d5a342-76e3-4d2c-ae39-1e419df400f7,229.51.91.46,130.204.102.170,Konklux
627,1/10/2018,4:02,d8764706-49a0-41d5-b9a3-12f42a21563a,253.62.131.9,244.45.132.51,Ronstring
628,2/20/2018,2:12,5865de27-3971-49a3-80b2-cf234f7dae07,50.201.181.219,220.165.145.212,Subin
629,6/24/2018,3:33,6aa084f4-c21f-4634-932c-2715c9a87aa5,210.45.169.39,231.157.149.103,Konklux
630,4/25/2018,2:07,9bcf089e-c3c0-4b02-8a1e-f397015751d2,113.205.126.143,170.123.208.164,Namfix
631,10/11/2017,1:53,5b43a5da-5eaa-4ade-8b7a-9624a32010ee,82.65.67.49,68.224.0.62,Zaam-Dox
632,8/4/2018,0:40,de2e0e2e-6eb7-4983-98f5-bd1618d2d32e,0.204.143.232,78.233.62.6,Regrant
633,10/23/2018,10:31,3ee1577f-1fba-4cd4-abe6-b61cfd0eb46c,101.55.168.222,40.7.89.41,Lotlux
634,3/24/2018,16:04,48a544c8-7f26-4494-bcb4-d598934d9fcf,27.111.66.97,223.96.210.188,Trippledex
635,9/26/2018,20:45,57c61d1b-2bce-4f65-b554-a322407522a9,78.102.22.236,130.18.150.191,Stringtough
636,4/16/2018,11:31,ead3d5f2-93ef-4470-9478-5d02847caba3,198.185.227.2,219.6.184.199,Konklab
637,10/28/2018,20:01,38393e04-a8ae-4e59-a79c-8a8d59cdc6c3,19.113.58.121,62.220.89.2,Alphazap
638,10/26/2018,6:14,cc16aeb3-b6c2-464f-a5e0-3513f4abc81c,127.126.234.58,191.169.189.68,Fixflex
639,8/7/2018,2:38,ecc2f7dc-516c-4fca-992e-2864678b47fd,186.138.135.114,71.77.20.183,Stim
640,4/22/2018,12:30,ee07b6dc-e6ec-4960-959b-205a425f5f03,95.85.130.4,218.181.119.148,Trippledex
641,5/26/2018,4:21,761baa60-855b-4ccd-8819-7db20743b0b2,122.153.181.20,234.165.168.3,Tres-Zap
642,12/5/2017,11:15,1164a357-2c6b-4c94-8cea-eacca842cdb8,81.137.40.93,70.206.31.168,Temp
643,11/20/2017,4:41,52ffbc80-bceb-44f1-8199-da3b7fac7563,51.30.67.176,35.177.112.16,Flexidy
644,10/27/2018,21:50,992e9871-cc87-436e-9985-e4d9482744b7,121.115.159.203,135.115.50.74,Bigtax
645,6/5/2018,14:15,67ceaf28-3881-44b6-93e1-2eb7c0e12daa,98.247.42.187,32.17.152.98,Tres-Zap
646,10/14/2017,23:24,54cc4834-cf9b-4b92-bbb3-58046dc16c3c,231.165.133.45,206.208.202.38,Domainer
647,10/17/2018,6:31,a90a7b22-ea29-45cd-b7ce-d28e732aa1c0,224.213.68.175,234.188.27.10,Prodder
648,1/9/2018,15:32,5ee1c57f-83dc-450d-b218-8878dd09b080,11.53.69.165,244.9.118.143,Quo Lux
649,10/4/2017,18:26,dc2cb7d4-82c7-4d21-b12b-0a0234f1771a,239.72.240.17,156.163.172.140,Konklab
650,3/3/2018,13:11,461ea836-a09a-416f-abdf-bade0905fe8c,180.141.89.215,109.90.22.110,Tres-Zap
651,5/5/2018,8:56,b73251f8-8408-4961-a90c-ff84c8bedd8b,130.89.51.22,238.183.236.71,Konklab
652,12/11/2017,21:54,993d84fc-7dbf-47ee-b676-5f6256f50ddd,96.91.62.186,165.67.27.12,Andalax
653,4/24/2018,23:54,1721d6c9-0d18-4cc4-a3a6-9e8d6e2b41ce,251.230.250.55,62.1.103.47,Fintone
654,2/24/2018,14:02,4abe9184-f925-4fd9-81c9-80c33f8314e0,240.55.199.40,183.223.60.54,It
655,11/26/2017,0:04,9fada0a2-1e1e-4fe0-975a-02151084dc51,80.143.79.133,102.48.237.50,Tampflex
656,5/19/2018,12:51,1f0d1969-1afb-408e-8935-b80ca1a73ea8,49.75.178.101,127.140.167.184,Ronstring
657,2/19/2018,0:31,c2c2c258-e6d5-4340-bae5-afa699027e4b,82.20.60.100,0.174.88.80,Zathin
658,10/12/2018,23:57,70ad2e81-2eec-4b12-86e1-74f0a2ca89bd,197.0.67.164,180.130.192.169,Voyatouch
659,9/7/2018,20:37,f55a531f-8796-4851-837c-f550f6baa06a,82.122.239.20,170.150.231.14,Treeflex
660,8/15/2018,11:02,2c337e11-f720-419e-9b34-6c91cce961fa,224.86.153.230,211.192.47.60,Overhold
661,7/29/2018,20:13,ce9f1f2a-4d7b-4534-b042-e8f7f12a35ac,231.131.96.240,179.70.238.38,Quo Lux
662,10/18/2017,14:03,cf71fd52-669e-4e4c-970a-969bc132e6ef,41.211.125.2,98.66.137.195,Sub-Ex
663,5/3/2018,3:56,62c6c17f-038b-45bc-a647-07e777e86c6d,213.21.25.132,72.201.193.175,Gembucket
664,1/14/2018,19:56,b387496e-19e7-4da6-b5b2-749c6402e31f,229.199.161.220,237.136.247.172,Stronghold
665,10/16/2017,17:43,6a3d115d-9d4d-4e53-8f92-c981ddd292a2,242.208.60.46,84.191.81.203,Ventosanzap
666,7/25/2018,22:16,6e51e9ac-28d2-42fd-928b-bff8ae565470,52.107.185.154,204.1.20.121,Bigtax
667,10/25/2018,19:25,6b78e3c4-139e-4b3d-ac1d-670755fe5e1d,74.249.220.109,187.212.65.0,Kanlam
668,12/31/2017,11:40,f8792656-e8e3-4603-933f-907a68e5dd46,92.149.144.104,217.60.12.89,Veribet
669,7/23/2018,12:23,105016d6-eac4-4bf0-b3a1-16296854681e,154.237.125.176,149.149.85.9,Zaam-Dox
670,2/17/2018,7:46,400f0895-755b-4316-8663-00342d707e19,250.81.35.217,4.127.118.180,Tin
671,10/16/2018,14:15,f75cc888-e28b-4454-bd86-40dbdfe5cb2d,132.36.237.176,100.103.97.47,Tresom
672,1/3/2018,19:02,e2bf1179-2bda-43f6-be9b-48946c932c5b,246.174.114.86,122.28.26.194,Bitchip
673,5/27/2018,0:22,6998e1e5-88a7-46ce-bc92-9b466f8f8117,203.198.210.139,121.252.183.202,Veribet
674,6/29/2018,1:08,91a58a1a-36aa-47d8-ae42-a08a86853c60,85.137.156.251,249.195.1.92,Zathin
675,3/3/2018,5:38,08359bee-7496-44d2-ad48-e595e060d48f,143.4.154.211,249.170.65.231,Duobam
676,5/26/2018,18:51,0e552ea0-0c1b-41cb-8a12-435d26e9a987,157.24.13.219,56.75.90.56,Fix San
677,8/15/2018,0:03,3a706adb-f3d6-4f4a-b19c-131c7dad0f74,175.153.112.186,26.98.193.166,Trippledex
678,3/17/2018,17:26,8c072176-3aa6-4070-8d15-44950812ea9e,163.247.153.31,19.212.59.8,Latlux
679,2/26/2018,3:05,ef775a23-a2e3-4f2c-981c-7d8ebb20e4df,201.129.103.178,69.211.156.37,Trippledex
680,6/8/2018,11:19,3c07b043-1164-4477-9396-9a41dde1e367,125.191.59.126,168.87.136.113,Cookley
681,6/15/2018,23:28,ba733d35-e5ae-4654-8972-7986aa261e5e,53.18.162.112,86.96.25.169,Bamity
682,10/28/2018,5:51,f3584d60-3939-4162-b1c2-abcb0eeefd0c,8.134.182.22,27.139.254.176,Aerified
683,8/23/2018,11:04,bafc411b-b4ec-4da6-9589-7ff9a31b6335,123.92.45.109,138.1.219.2,Alpha
684,12/2/2017,0:41,1b5eebe8-c632-4751-834e-ac3d0df5f5fe,14.220.138.54,233.38.219.191,Temp
685,2/24/2018,6:44,5faae41f-f090-4fa3-a95b-700a38d7a684,38.31.172.204,57.112.142.173,Sub-Ex
686,9/24/2018,0:44,10a50b2e-4a9b-42e2-b948-d181b2026e98,212.29.106.105,157.211.135.179,Mat Lam Tam
687,7/13/2018,9:59,fcc70b88-f129-4a0c-8398-49ec5385a84d,10.190.110.253,90.115.52.42,Fix San
688,10/26/2018,11:52,b6a03bbc-3080-4d52-b97c-d3d509476720,104.219.20.120,186.176.190.71,Tres-Zap
689,11/23/2017,21:12,73b2be55-b48e-4bf5-a751-2ca1c15a6c59,173.233.98.103,172.92.228.111,Sonsing
690,7/31/2018,3:35,6d4d7864-76e3-4658-bc99-3ed3a39b20d7,102.70.170.161,76.150.135.210,Home Ing
691,6/28/2018,14:35,b26a4936-822a-43c6-953d-732089b13401,103.66.25.240,161.176.5.73,Sub-Ex
692,8/25/2018,11:49,f47c6d1b-de35-49ec-ac07-8e1312cf749c,208.40.119.142,176.165.28.223,Holdlamis
693,10/17/2018,14:20,472eae7d-1e5f-44a0-9d4e-9a6a5e31f790,79.177.119.232,82.218.16.187,Namfix
694,12/19/2017,20:09,dddca7c3-4815-4ea0-82ca-48796afa50c3,120.68.24.240,191.221.113.242,Holdlamis
695,2/15/2018,17:41,31216a1f-923d-412b-88c0-05d2f5983644,221.239.4.43,207.72.32.47,Fix San
696,10/26/2018,2:08,38120d62-b7ab-4f27-b5e7-a4b9adea05ed,170.88.235.172,242.32.102.237,Bitchip
697,12/2/2017,23:02,f53115af-e0f8-4ba7-a8db-48ba1512df5d,72.114.100.134,162.181.246.152,Namfix
698,8/21/2018,17:34,11782064-2560-4845-a2d5-e1a36c3871a8,83.60.89.186,247.230.36.193,Asoka
699,8/28/2018,21:28,49a15a9b-8550-4d12-b647-e7c8791f2d3f,176.184.41.205,8.171.57.13,Zathin
700,11/4/2017,0:32,f2b65805-1e49-443d-a6f8-c42dfd394ff0,249.54.251.234,229.48.35.152,Rank
701,10/31/2017,5:22,17b72fac-b5fe-411f-ae8e-fa42528eac65,232.102.55.39,33.174.1.166,Cardguard
702,3/25/2018,17:28,27cb8040-5ca3-4d47-a501-4ca493a34a22,32.124.21.188,204.216.55.240,Konklab
703,3/8/2018,18:26,4ee9073b-9254-4791-93c6-5e9b9d9b9a16,183.154.157.81,234.133.109.96,Veribet
704,9/9/2018,18:21,11ca4190-00cb-4c79-a26a-1b94d4a2df9b,146.246.116.19,203.192.121.104,Sonair
705,2/27/2018,1:14,fbff2770-5a73-4ba9-95a8-014efb7914dc,36.161.251.181,239.89.77.211,Home Ing
706,6/11/2018,15:53,88bfd275-e108-46cf-9d5c-40286c413e22,18.61.120.251,135.250.0.79,Sonair
707,5/29/2018,0:06,cfef9855-4d40-46b0-b749-9121bf97acb4,162.207.62.77,56.28.244.61,Vagram
708,10/18/2018,21:17,7f836bc7-8914-4d10-8b7f-e00492374bc2,206.51.134.4,185.143.90.156,Quo Lux
709,3/15/2018,16:10,ca36245f-6535-4984-a877-73bb68b1cbb9,195.150.54.230,184.58.67.152,Daltfresh
710,9/13/2018,6:13,576fe83a-07e2-4f3a-8b6f-45b7998c0c24,197.31.202.175,237.238.65.168,Pannier
711,11/2/2017,13:26,a068510f-2530-47ae-8c6d-1158dac39f72,81.45.155.37,178.67.128.15,Veribet
712,2/11/2018,5:27,c4f211e1-680a-488a-92a1-44aa9cc0ce83,202.217.116.40,160.100.49.164,Prodder
713,7/12/2018,5:05,f96495aa-83e5-4202-84de-a57b01e25fb0,145.209.148.128,68.99.121.112,Vagram
714,5/12/2018,11:25,a15e0797-ac00-4fd9-a153-07264127074d,133.200.175.228,16.226.250.233,Keylex
715,8/31/2018,5:50,9edbb5eb-ba35-4f25-996f-11b99fb0e396,20.45.138.224,130.231.203.51,Vagram
716,5/4/2018,6:13,15e82abb-47f6-47ac-8fca-134daac5b52a,108.111.157.85,206.142.178.50,Transcof
717,4/2/2018,15:12,65793805-8598-453a-970d-a5d45cc2ab83,111.189.66.35,72.196.184.120,Gembucket
718,9/7/2018,8:16,5b80eef3-0c9a-4f34-a127-8359c8e548f8,11.176.202.9,157.74.209.93,Home Ing
719,10/20/2017,19:03,bce66ebd-fb22-4e95-ad9f-fda500e67d3b,91.187.243.14,220.227.164.149,Sonsing
720,5/21/2018,0:21,b23b0213-a49d-418c-a79e-620d8b44972a,41.188.27.5,119.171.171.237,Ronstring
721,7/27/2018,10:01,979040e7-ec01-4cae-aff7-2e1ffeea28f9,8.129.48.211,215.173.151.239,Temp
722,3/15/2018,10:25,2033b2cb-7fa0-4990-adb3-a28e8d2f96f3,113.199.93.19,172.241.124.26,Pannier
723,10/19/2017,7:55,5a66ec75-6f85-4cc2-90fb-fd021746749e,33.86.219.93,174.188.24.212,Job
724,1/31/2018,15:25,d86198ef-173e-4062-ac4d-00d6944f2b0a,140.178.4.214,232.51.138.110,Zontrax
725,7/12/2018,21:28,c9c8dd66-cdef-48b2-ade7-1148b5d10831,185.30.20.43,128.171.204.57,Zontrax
726,6/13/2018,19:36,81b18d17-d7c5-4776-8c85-0dd9645f718b,110.78.212.188,115.169.83.155,Otcom
727,5/29/2018,3:01,365f636b-5cde-48a6-8cde-9d4866e5c5ea,217.203.193.218,36.191.4.226,Viva
728,10/3/2018,7:40,765e4da7-61da-4a6b-9789-a2a255c2a50f,169.65.252.185,155.47.150.96,Bamity
729,3/12/2018,14:09,bd5e2298-eec0-4c19-8f4e-ded47139db76,7.176.119.31,226.17.210.243,Andalax
730,6/28/2018,13:10,472b1238-8b67-4d9e-96d5-8e231009c2e2,1.33.245.252,26.59.26.200,Holdlamis
731,8/19/2018,2:23,02c913b2-9ea4-4545-889e-1c50a0017545,97.157.98.244,72.222.21.17,Cardguard
732,5/30/2018,23:35,234c6f7d-a613-42a5-a8fa-336780fdbe1d,35.180.182.117,201.117.120.13,Trippledex
733,11/19/2017,1:26,10d0823e-5deb-499f-bb35-de547abb6892,235.255.105.251,138.214.71.235,Ronstring
734,6/24/2018,4:32,40fea23c-7f3a-4001-9720-1263ab0ebd22,64.190.168.81,174.133.175.182,Veribet
735,5/21/2018,17:25,6501f78b-7bf4-4b69-844f-ee119153d539,227.25.110.117,42.104.113.103,Bamity
736,1/15/2018,0:05,1ef6821d-b8af-4ede-8148-6a193e59d667,206.77.133.62,106.163.214.123,Zaam-Dox
737,10/15/2017,20:35,da7119de-4268-4f92-8dad-ee6748f4d329,155.172.8.131,126.14.129.85,Konklab
738,12/14/2017,10:42,6d213112-85d5-4c9a-90ed-070e01253b61,100.53.39.175,90.162.89.103,Stim
739,5/1/2018,18:39,7bfc775b-063b-4e8c-a292-23a96392646c,119.83.212.57,121.167.103.171,Holdlamis
740,1/23/2018,22:45,caccfeaf-4be4-46df-83d6-8ddad294855c,201.210.206.139,205.60.1.113,Ronstring
741,4/1/2018,23:22,2769321a-d483-40c3-b11d-4551683a7a66,207.153.165.237,214.151.85.201,Toughjoyfax
742,1/12/2018,3:01,69379751-0881-421f-b877-94d9710fb787,181.51.126.56,150.151.154.163,Alphazap
743,9/30/2018,20:14,e1009547-c5eb-4ddc-9e8d-ee8873de12fd,223.212.155.154,171.178.170.162,Treeflex
744,2/21/2018,4:19,c56a829c-caaa-47f7-a9e2-c08349c45ddf,217.57.14.213,102.199.87.25,Trippledex
745,7/8/2018,18:13,ee800f0c-91b3-485e-b5d1-867c8f4af894,183.140.213.194,137.57.129.43,Y-Solowarm
746,10/7/2018,20:42,ecfd3c1a-5e17-47a3-88ff-3aea1016b5f0,68.8.230.108,173.133.34.230,Regrant
747,10/16/2018,10:06,e095ea9b-33a6-4bd4-861b-81bc2d1a9e15,107.107.58.135,17.181.82.45,Domainer
748,2/27/2018,18:19,5dff9c65-90ad-4bfc-bf60-9be1cdbcd96d,20.101.125.130,154.137.151.232,Alpha
749,3/17/2018,2:13,12a1dfcc-a518-4e71-a521-3bd6957d4f06,197.148.62.142,232.170.129.183,Vagram
750,8/9/2018,6:03,dda1d2dc-9fea-4c05-b836-a956a1c86558,10.205.61.130,232.202.116.229,Holdlamis
751,2/24/2018,18:04,4a1a8f69-6634-4756-970b-ffc0c0d032f1,59.202.3.144,177.231.133.43,Tampflex
752,6/25/2018,2:50,123af915-7129-489c-b465-2047c5f5e9c9,186.209.111.95,147.225.28.143,Gembucket
753,10/13/2018,1:34,54459507-5458-4018-8d34-4cccd50d9ff6,2.242.77.206,193.48.186.251,Tresom
754,12/21/2017,12:53,4b95b85f-b2d9-4e18-9c8b-e6b1b41a1875,11.28.153.229,230.219.214.54,Bytecard
755,10/31/2017,17:45,575386e3-f3be-4cbf-9945-6aea2bed300c,100.58.190.143,211.130.193.73,Zamit
756,4/26/2018,15:17,4187a8a3-a3ec-49f3-a092-096a8db35e66,60.35.232.186,235.20.219.97,Voyatouch
757,7/26/2018,12:13,e34d571a-4ce2-402c-aa76-73125ed0da06,32.225.223.14,105.137.60.0,Zoolab
758,3/5/2018,16:38,bf996254-7daa-45d1-a5b1-332c12e70f99,141.35.229.77,207.106.162.227,Temp
759,12/22/2017,15:52,49717790-932c-4046-8deb-88b3f8aa77df,240.2.198.133,100.26.221.55,Bitchip
760,2/10/2018,22:29,056fa1f0-ae55-4d15-b1aa-637f6ae5ce6a,125.147.98.72,160.107.165.145,Tres-Zap
761,1/22/2018,11:54,ff854c5b-a735-429c-8f67-c92eb6c8dcf3,146.230.110.41,183.190.210.96,Temp
762,3/31/2018,19:33,1559e647-af18-4812-89b5-bd1f7d78296d,254.59.36.230,186.85.242.131,Konklux
763,4/3/2018,8:28,5ba204d7-5bda-4302-988e-049eb8406e5d,171.33.179.42,184.63.241.217,Toughjoyfax
764,6/18/2018,2:19,fe698379-ec0c-4370-bcdf-9ad5e9dbacc8,3.175.142.200,76.132.184.121,Voyatouch
765,2/22/2018,16:14,0082d42e-ed1c-47c2-a8dd-5323bec79a42,162.61.248.82,228.6.227.114,Tampflex
766,3/31/2018,15:04,98748efc-5fd5-42d1-b02a-48d7760b47dd,156.103.154.170,201.173.37.104,Prodder
767,5/24/2018,9:54,37bdcb0e-10d0-4283-ab48-adfe0c386dde,239.42.194.208,7.69.34.103,Voyatouch
768,1/29/2018,4:26,957df7fe-255b-45c0-8c9c-87f376bd9979,144.128.82.189,11.68.221.158,Tampflex
769,4/24/2018,21:08,741e8344-a559-4069-a136-10287ed284f6,225.236.82.215,144.225.136.107,Voltsillam
770,6/4/2018,14:27,248ce81c-f966-4e8d-8dd0-bad456fc04f0,78.82.226.190,169.238.213.63,Stronghold
771,11/9/2017,5:19,93246292-8c3d-4282-b977-9c0b65eecf5d,30.244.232.99,171.69.126.81,Stronghold
772,7/31/2018,0:50,210d643a-6491-485e-84f0-20cfb49c990f,74.193.229.76,122.52.179.112,Andalax
773,12/20/2017,9:06,917612a2-e723-4348-9e46-8fe6d4261417,86.251.233.218,35.74.204.223,Temp
774,11/5/2017,20:29,219051e2-748f-4099-81ad-8f4a6c3c7eeb,153.46.67.111,150.163.175.208,Zamit
775,5/17/2018,5:21,6249a7e9-c172-4b3b-94db-61f0e88d4f5d,35.216.53.183,45.33.74.152,Konklab
776,12/13/2017,11:09,239257d7-3a3d-4c05-831d-191b57b178d4,31.86.137.48,69.217.79.190,Pannier
777,6/30/2018,23:37,324092d5-67b8-4821-a508-25509711bd5a,192.120.56.208,122.171.229.89,Zaam-Dox
778,10/21/2017,10:08,ae86faed-a77a-408e-905f-e582a01ddd9f,255.211.50.236,47.16.79.109,Temp
779,7/19/2018,3:22,7ab08755-003c-44f6-8211-6c018c285e82,90.24.43.147,75.225.214.90,Lotlux
780,7/10/2018,23:46,169ab539-106c-4aea-8d12-31755b4c7fd1,248.141.161.148,253.251.14.254,Flexidy
781,12/27/2017,22:27,252c811b-18ec-4308-bf1d-90ddff90873a,230.198.196.81,182.202.113.63,Y-find
782,7/10/2018,15:58,861ed89e-ea15-491d-8cb7-53c2e629b39a,91.146.83.197,202.112.174.99,Sub-Ex
783,2/10/2018,6:41,4e8ae234-efbf-4030-9be8-b16bee9d5f4e,10.49.144.53,153.95.36.246,Tempsoft
784,7/29/2018,18:18,bb2fd8da-aaaa-400b-ba8c-08adfd8a33ef,147.53.242.1,41.118.160.31,It
785,5/7/2018,11:59,e181fd91-5195-41ab-a23f-9eb649db20e4,63.88.193.185,186.162.132.16,Hatity
786,12/18/2017,21:22,f201efa1-b039-47c3-8e26-feb3911d5cc8,14.138.206.247,120.238.64.224,Domainer
787,1/19/2018,3:59,be905a3a-ac58-40ac-98c3-2b2fa75ff269,182.230.85.144,8.32.200.150,Zathin
788,5/4/2018,23:34,e4d1b4b3-250e-4406-895a-0b294b61156f,134.21.217.41,9.37.165.3,Daltfresh
789,12/30/2017,9:31,c7c08edd-4fb9-48cc-aebb-0f3dc42298c5,172.113.179.244,16.157.174.182,Bytecard
790,5/7/2018,16:15,feed66e8-2893-436e-a762-53cfeee665d2,71.242.60.62,87.245.19.238,Fixflex
791,5/29/2018,7:29,cb5477bb-67d4-4f27-b8a9-ba7c32ff3737,185.151.95.96,27.156.175.159,Overhold
792,4/20/2018,19:57,4796c101-7033-4165-8569-c3a1e83249c0,209.127.108.219,170.108.199.203,Alphazap
793,9/8/2018,19:35,5b6e0a70-86ef-4106-895c-c875869f8ff1,128.130.136.217,36.231.38.4,Keylex
794,9/1/2018,4:31,c2cc0db8-69a6-4cde-a4e7-cdba172f4e45,199.129.219.107,185.223.44.37,Bamity
795,2/24/2018,6:23,34e4b2dd-3cf4-44f3-887d-cd71aecbdf96,250.199.199.64,27.235.207.220,Stronghold
796,1/6/2018,20:39,353fe0eb-7cb1-448e-823d-1c7c7d3ebd68,103.192.170.26,115.176.132.62,Veribet
797,1/16/2018,19:31,863c87fe-ef0c-4672-827e-e7a2fd66b867,7.172.158.168,68.121.17.190,Tempsoft
798,6/5/2018,4:32,47f99b5d-af22-47e6-84f5-5b594155ab1d,119.54.76.135,79.190.233.90,Zaam-Dox
799,6/7/2018,10:07,2d85ef4a-5181-4b03-a77c-eda83654bc09,23.173.192.46,174.97.186.4,Sub-Ex
800,12/20/2017,18:38,43dcd64b-1cf1-4b45-a137-b0a8f0adcd14,38.206.59.80,32.45.117.133,Fintone
801,6/27/2018,10:45,a2389b72-8023-44bb-85a8-8cb24cad1aaa,146.174.81.144,206.211.26.6,Y-find
802,5/7/2018,7:51,a52b810a-a40c-4393-9a22-c24b5d13f1c3,27.152.120.207,252.167.232.20,Tin
803,2/18/2018,23:15,a60eeeea-90e7-4365-84ea-c621243b95b3,242.255.175.166,14.155.161.78,Stringtough
804,2/21/2018,9:09,99cf1f9c-a930-4af5-a397-669acbcc449d,42.209.235.127,105.65.7.59,Transcof
805,4/2/2018,2:30,31190021-c24d-463c-b14a-96b3a7e33de4,248.135.86.209,9.177.30.230,Fintone
806,2/24/2018,13:13,08559400-1e60-433f-bbce-84fcb432e342,121.116.251.119,218.95.206.129,Stronghold
807,2/25/2018,14:54,a9e66baf-8212-4787-aee6-b0708e2d96b8,124.77.12.151,147.253.231.217,Fix San
808,12/15/2017,6:26,afe62aaf-b90b-4ce0-b11a-2f295850a7c4,20.126.209.66,175.231.171.113,Gembucket
809,5/10/2018,7:53,13f9eb01-463d-4718-9d20-5542c7f5310c,21.111.196.202,2.162.240.208,It
810,6/8/2018,13:22,72adc01f-4399-4f2c-9bcb-9d265724390f,111.83.89.174,28.219.53.223,Stim
811,9/1/2018,3:59,3044fbc2-7a8e-44f4-9dc9-44f5b624cc86,121.102.104.241,110.49.174.58,Job
812,2/3/2018,8:56,b8029479-3676-4aa8-88e2-a29768211d3e,102.184.227.5,149.47.102.250,Y-find
813,4/5/2018,19:17,d818d1e2-8184-4aca-bde3-a906c00cedd7,226.187.150.3,12.97.127.30,Gembucket
814,11/14/2017,19:12,3b8fb212-8e60-4b7e-84ef-e3a95ce7181c,255.27.145.88,51.228.247.31,Bitchip
815,3/18/2018,14:55,6ead081c-49ad-436b-97a1-dc8222a477c5,94.170.24.201,76.117.181.47,Latlux
816,9/23/2018,4:10,fad15e7c-81a0-49e3-9375-d96ebf75ec2c,51.10.100.247,103.99.67.244,Fixflex
817,10/10/2017,6:00,31d46eaf-7950-4bf8-96ee-6c2e23a937c9,70.56.59.22,183.71.179.98,Y-find
818,11/28/2017,3:36,7fa91464-50b9-4383-9046-341365c65abb,2.48.247.39,209.7.64.153,Gembucket
819,2/14/2018,1:07,62ace59b-129b-471b-9e0a-a9948b6ac5bb,80.254.30.1,138.163.114.42,Redhold
820,7/17/2018,5:58,c3838293-56dd-459f-b31e-4b70d9d68e07,253.142.164.242,231.39.134.206,Treeflex
821,10/2/2018,4:45,e0947b96-c3c9-4861-8896-0de491b6e48a,25.35.125.172,67.49.183.58,Zathin
822,9/16/2018,6:33,94e276fc-b2f5-42cc-bb3b-db478fcd2afe,24.99.252.40,241.137.140.105,Ronstring
823,5/22/2018,19:22,4d60574c-0f90-40b9-b9c9-b277ceb62162,43.22.84.235,7.185.190.120,Trippledex
824,2/8/2018,5:25,33168f0b-021f-4341-9117-b6fe71126d13,5.30.131.74,207.220.227.183,Cookley
825,6/14/2018,12:22,266d011e-5e1d-43f4-9639-503062d481ca,233.118.28.53,133.89.255.58,Konklux
826,7/23/2018,12:56,ab43dfc2-a05f-45c4-bfcd-1c94f650584e,141.79.98.21,232.207.199.61,Voyatouch
827,9/19/2018,17:57,b59c47ef-e041-42b7-b502-ca1dce1deecf,169.66.41.204,85.181.37.237,Otcom
828,5/28/2018,21:04,3c86353a-7038-4a12-b5cb-d31907200239,84.216.145.41,91.3.251.71,Sonair
829,2/9/2018,8:33,52b99c58-3d65-454f-a62a-b5c181f2384b,154.218.194.197,148.45.97.23,Tres-Zap
830,3/14/2018,2:53,d31646cb-7cea-4b88-ab34-6b94163d3388,59.164.206.201,10.79.198.171,It
831,10/6/2017,1:16,b36fe8d8-4983-4c9c-98de-9d6b8eba2ece,80.43.74.116,191.203.224.85,Asoka
832,10/8/2018,13:15,931ff8f9-ed3f-454e-b450-cc273635ea7d,138.143.212.6,232.37.209.179,Y-find
833,6/6/2018,23:16,3eb75021-cba3-4369-aca3-1f41d7dcc39b,72.223.59.211,211.180.127.153,Mat Lam Tam
834,12/15/2017,6:30,3a756499-a99c-41ec-97cd-d464036f1272,192.25.251.146,171.144.23.3,Alphazap
835,3/17/2018,19:33,7c7d43c6-f8d8-4b90-a3f2-ca0eb9fa6f46,179.22.116.64,255.40.21.200,Asoka
836,9/4/2018,4:23,7bd821b9-d909-4add-9c4b-e4b8946d5b1d,96.29.94.43,131.52.143.138,Flowdesk
837,6/9/2018,16:12,d3d3df9f-15a8-4428-a56f-dd10f8b975ad,232.117.30.209,8.193.89.216,Latlux
838,12/29/2017,10:15,d07a5270-38de-4fc0-9b01-8da59f19ac51,183.62.68.42,43.43.157.87,Fintone
839,1/21/2018,16:24,2b696d33-134a-49e1-8247-1a36e761d596,40.183.164.152,209.223.151.12,Treeflex
840,9/23/2018,15:47,f1f76582-6258-4ba3-8d0d-0acb58878a82,127.140.164.115,223.112.20.201,Sonair
841,10/14/2017,20:12,6376ed21-5114-4eeb-b8ea-fd637dcd1d4d,57.243.163.29,198.167.45.54,Job
842,2/28/2018,23:04,3adeac77-fa37-4a2f-9c61-e65e9bfefc88,91.103.64.87,220.54.242.1,Bigtax
843,4/16/2018,15:45,636f3f13-ec83-445e-acac-a7e3d1585336,101.8.181.108,99.247.156.124,Vagram
844,10/16/2017,20:05,d68b039c-0dd2-4241-bad8-7bd1932cca7b,174.162.146.10,146.82.61.56,Flexidy
845,11/26/2017,0:42,316e2592-30b7-45a9-9000-017999299c5a,129.33.149.80,63.171.24.54,Ventosanzap
846,8/22/2018,2:16,f2345e9f-0df8-42e5-a06f-2d0458525a24,118.61.233.243,155.93.100.98,Voyatouch
847,10/30/2017,7:58,1ee2b257-c40b-41ea-bf2d-d2118aab1527,84.221.187.75,130.52.225.191,Span
848,3/22/2018,18:44,12c5ca3c-0394-402d-b592-c1eddd951034,134.240.91.104,19.42.34.39,Sonsing
849,1/29/2018,13:05,fa3ac051-8d19-451a-b957-56227615ca13,43.111.37.120,2.223.92.67,Y-find
850,9/21/2018,6:09,b4b741be-bd91-44de-b6ab-78ce4b719a0a,242.246.47.11,160.31.113.206,Zaam-Dox
851,8/18/2018,12:10,2f99bcf9-9e5d-45ce-8f33-42d4b542d21b,207.230.223.79,111.251.75.14,Tres-Zap
852,9/15/2018,2:34,4cc6e4fd-13e7-4e30-b7d0-d098fc28d541,238.215.163.37,184.132.166.108,Opela
853,11/26/2017,6:37,5fc60a0e-fd39-4cb3-87c7-a8cb4388462a,166.145.21.74,89.91.17.136,Bytecard
854,2/14/2018,3:54,46a8a66b-882d-4a93-8d6a-cda3612a10a6,164.107.43.57,192.187.213.167,Zathin
855,8/24/2018,23:04,d55fa34f-23ad-4137-b89f-2e74ff95fdd1,118.251.154.1,0.130.137.38,Trippledex
856,8/17/2018,22:23,5ab7d9be-a865-4b09-911b-e14fc970dee8,19.154.95.10,171.77.10.85,Tin
857,11/28/2017,16:21,95c229d8-571b-42e1-bcbf-2a558ed0e6cc,208.44.49.38,1.239.145.34,Fix San
858,9/23/2018,4:30,2a4a3223-9269-4393-8949-5fa58663072a,82.138.204.42,81.243.136.136,Span
859,2/9/2018,15:03,783ae45e-fa91-4e3d-b8b6-4b2373b2fa5c,210.221.21.237,225.222.15.240,Stringtough
860,11/26/2017,2:54,55acbda9-acbe-47dd-a20a-0c3d313090b9,135.238.107.179,88.195.224.75,Bamity
861,12/1/2017,12:23,9ccb7ba5-ba80-4204-852e-80e4cad7db51,157.249.0.154,58.118.8.125,Home Ing
862,4/28/2018,19:30,3fe12681-f063-461d-bfd8-f44c8967aa98,145.214.235.102,165.29.45.103,Veribet
863,11/19/2017,22:21,93db4167-a384-4dc3-9c4d-e42f434dc86e,64.222.157.174,37.159.226.4,Biodex
864,8/13/2018,22:52,1e50c0bf-f9da-4671-8045-2875d2595592,248.111.216.160,26.222.131.193,Andalax
865,7/23/2018,0:44,fdc0be8c-9cdf-4997-aaa6-6d01f0d6b2ea,11.59.136.160,120.130.58.118,Aerified
866,12/24/2017,1:22,8bef793a-de76-4cde-982d-3a9c757c2396,59.207.229.186,22.190.32.33,Trippledex
867,3/19/2018,6:37,c201a7e6-422e-476e-8dfa-25ac8e5f544b,200.4.102.43,162.128.109.53,Sonsing
868,4/9/2018,15:42,90206dae-ad89-424c-b2c8-be106b6de225,205.79.142.83,68.239.66.243,Stringtough
869,5/17/2018,0:02,957c7a95-0ac9-44ed-bc4b-df9033b3c806,17.31.36.248,207.149.8.93,Fintone
870,4/30/2018,10:52,3e24ba30-95c2-4ef9-a94b-a5d58ec8bf5d,46.130.81.126,185.215.177.214,Bytecard
871,10/21/2017,17:13,72f92fe1-69f6-4839-bbdb-3fa4f7047f00,100.39.169.194,136.45.223.112,Ronstring
872,11/18/2017,22:35,b9ca7d44-3345-4fea-b437-e4188d6cf035,169.72.61.51,242.177.23.137,Hatity
873,9/20/2018,7:21,070c3aeb-63e3-4ca3-a002-1da7e01a8180,101.158.82.115,127.226.133.206,Zathin
874,8/1/2018,23:08,6d55767e-531d-4444-96f4-5ad15631660b,164.78.153.199,1.148.188.175,Tin
875,5/18/2018,10:38,0c81d127-b583-4d61-9dab-7b5c18bfd5cf,116.119.142.33,84.251.99.236,Zathin
876,10/5/2017,5:46,940d6049-c614-4c00-9689-10863f12418a,140.19.237.118,74.101.27.181,Tempsoft
877,5/8/2018,13:58,46da9586-5f9b-4201-b763-d3cf147c08ce,244.65.78.6,22.142.88.20,Ventosanzap
878,12/6/2017,23:16,46226b3a-d1de-4fdf-81c2-55ff20f15dd9,144.249.205.150,221.80.12.84,Asoka
879,11/25/2017,19:10,d685b2ef-4a40-4298-a9a8-2b56cf9aa270,115.82.189.5,208.103.130.179,Prodder
880,3/8/2018,3:52,d66bcac8-e911-473d-9202-81fb28bb7778,62.239.234.58,166.7.82.136,Duobam
881,1/10/2018,17:29,1cf7b969-2687-45da-87ab-f9a16095f479,190.33.207.171,72.59.104.250,Bitchip
882,7/25/2018,3:23,8c6f5546-8717-4973-b8c1-79781fad186f,224.99.55.175,56.160.1.21,Zaam-Dox
883,11/23/2017,12:14,694e6966-0b9e-4c44-907d-24634aaa3ced,220.204.121.207,4.39.230.226,Stringtough
884,6/18/2018,23:38,a042f8d3-9180-4362-b15e-42484946529e,248.86.222.72,169.173.24.163,Treeflex
885,4/28/2018,14:19,29893846-9524-4b30-9beb-0a07c3be1e79,12.211.204.240,222.24.218.100,Viva
886,6/22/2018,21:17,0394d8f0-62bd-4e4a-832b-0e3c2b477cfc,193.167.104.243,11.230.108.154,Treeflex
887,9/30/2018,1:08,5530233e-033c-4768-a157-a74769e9e915,132.198.186.63,16.129.17.252,Greenlam
888,10/23/2017,3:47,8d5f2a05-2318-45bd-b46d-0d624b25d755,154.38.40.146,169.153.131.29,Otcom
889,1/10/2018,10:50,6e9158ab-cf82-46d5-a64e-dd0820b92ee8,192.130.29.154,174.19.240.94,Flexidy
890,10/10/2018,17:36,3ad024fd-7a06-46df-a1da-33d7278d3509,201.195.84.93,125.149.75.200,Sonair
891,11/3/2017,13:02,de905e0c-3aad-4214-a371-6f913d53580f,208.251.71.64,213.224.197.253,Subin
892,2/2/2018,13:11,daccd6ba-9c03-4f93-aad5-7bf04a74ddec,214.183.56.78,23.102.29.69,Voyatouch
893,12/22/2017,20:18,22ca450a-edda-43a0-8c36-99c435018344,28.198.124.240,186.115.40.12,Tresom
894,9/10/2018,5:19,6938459a-d9b5-478c-930c-4cff7323faef,177.30.176.243,56.227.178.216,Pannier
895,1/15/2018,22:46,36df5d3b-c114-4980-97b8-ada28278db67,77.55.252.122,217.210.147.84,Opela
896,10/29/2017,12:59,b060a554-992a-4048-8767-20f405344cb5,28.244.163.66,249.170.160.252,Ventosanzap
897,12/20/2017,15:36,337b539e-d4c2-4f4d-963f-1addfb0348d3,184.70.3.49,79.71.101.87,Wrapsafe
898,10/13/2017,3:24,ba35535b-d641-4678-9735-4368607761f1,73.46.245.82,15.159.100.59,Transcof
899,7/22/2018,4:55,430026e0-a191-43b5-bc2c-f3f3ebc230ff,97.153.204.18,237.34.32.9,Transcof
900,9/21/2018,3:32,7cf38e87-c8b5-4686-98a0-88593a6dea09,38.147.26.229,30.223.195.100,Solarbreeze
901,10/26/2017,8:19,51c892aa-ccbb-437f-942e-62a3725951ce,166.109.136.75,233.70.163.56,Duobam
902,5/28/2018,22:40,38370fea-a722-4384-89f0-e99517756d90,70.227.125.151,101.71.135.169,Temp
903,6/27/2018,2:11,ef52b50b-9e3e-408b-bc13-1cc681237167,241.211.255.192,86.165.173.51,Tresom
904,5/18/2018,6:14,aead320e-2b88-47cc-8952-f31888fe9d02,106.80.213.236,125.140.103.6,Zamit
905,7/21/2018,14:42,957e6d8f-5c13-4a50-ae70-fc54e014974b,171.229.113.144,40.233.34.126,Redhold
906,12/21/2017,2:38,49cf7d34-73e6-4fb8-b3db-3c28d293b58a,14.212.136.169,149.248.233.116,Daltfresh
907,10/8/2018,19:54,982dd296-98ec-4ab7-b040-9fdc93c9a3be,184.81.35.227,177.93.118.130,Otcom
908,3/16/2018,2:57,2eb78ced-e31a-4a92-a97b-fa6155eea63e,129.155.6.158,248.234.84.96,Span
909,6/15/2018,21:18,7227ebbd-271d-4ec7-87f5-1b5c0b7116e8,81.7.178.181,134.210.234.196,Bigtax
910,8/24/2018,9:10,bf258f26-5f4d-4186-b55b-c0b3ad3a5884,70.116.225.78,182.47.18.89,Y-Solowarm
911,12/15/2017,17:50,01f9d3fa-23a7-473f-bb97-844e7eb1834b,106.194.100.144,168.88.98.64,Zathin
912,10/9/2017,15:41,fc582f1a-1a2a-4e0a-93f4-728c624d4cf2,176.214.1.126,10.100.77.132,Ronstring
913,12/13/2017,8:02,5ebaf880-d598-4b97-b40f-e62b72f30aba,160.15.86.42,44.157.225.58,Zaam-Dox
914,12/27/2017,7:54,e71c8000-3d24-45f2-9183-86f7d5c1524b,10.43.40.145,120.165.59.193,Bitwolf
915,4/17/2018,6:08,d0f2c823-6cf7-4212-9503-c1f9331251cc,188.193.140.126,39.163.136.176,Zaam-Dox
916,8/31/2018,23:45,2b711433-a6c3-4c77-abc7-196583f4b35f,82.85.117.9,106.104.235.140,Namfix
917,4/11/2018,13:07,2d793759-ab36-47ed-bae3-5b3308ab6295,238.208.130.135,253.80.31.100,Fix San
918,1/24/2018,18:25,4fb5b5da-3467-49d5-ac4b-5f72b1023f25,48.114.103.208,234.114.226.27,Home Ing
919,12/25/2017,15:06,31611409-9245-4ee3-8339-4c9ccca1f0bb,217.223.246.137,43.95.35.153,Redhold
920,4/15/2018,19:02,640d1060-d06e-438c-9a4f-8fa3e17b6b01,3.214.188.99,87.49.96.198,Regrant
921,7/10/2018,5:02,14b2d361-8b1e-463e-af5c-514fcba06e79,177.224.166.5,174.220.11.234,Sub-Ex
922,10/9/2018,17:22,83e4fcd0-c8da-4085-b572-9fd1809775a9,34.162.239.18,44.122.152.213,Span
923,2/7/2018,7:49,4278cdac-4905-4148-b916-1192e539b2e6,222.94.148.25,104.169.77.166,Wrapsafe
924,10/16/2017,19:59,a1efe057-a944-4fd7-8205-2a52e1eae2d4,208.40.2.141,38.10.81.113,Latlux
925,5/30/2018,4:51,2418df77-c2ad-44d1-a15a-05529b1d6eac,252.252.172.168,37.147.11.176,Andalax
926,4/13/2018,22:36,9e2fd6c6-af9e-41fa-8068-b33a8eb34d06,185.88.10.3,54.79.169.133,Duobam
927,6/22/2018,3:18,1fc4819e-44ea-464b-a7d2-d693e28990ac,84.59.45.35,27.157.91.153,Mat Lam Tam
928,9/29/2018,23:05,f0263aa7-b18f-430d-bdec-0cdfe2d6f6f9,190.246.159.130,52.74.176.198,Voyatouch
929,5/5/2018,9:16,818617a0-5f80-4c7d-a5fb-349c34b84bb1,180.179.188.252,70.85.72.21,Fix San
930,3/12/2018,2:30,b924cd69-7376-49aa-9c35-02f0ef34acf3,32.10.235.0,171.38.138.247,Fix San
931,10/4/2018,0:17,d10ae3c3-b58b-47d7-8bf2-964e61e5b2fc,183.222.93.14,62.7.41.203,Stringtough
932,3/10/2018,7:02,37bf0794-49cf-44ff-b0ea-cdc20b931964,156.49.169.42,71.215.96.93,Stim
933,12/23/2017,4:50,ced6bb5b-ebc9-4f94-8db6-7afbc7ea94c7,230.16.16.8,9.91.22.68,Tampflex
934,11/29/2017,1:20,8f818f33-9900-4698-afb1-07b06d8e9657,151.31.20.3,132.67.231.30,Bitchip
935,10/14/2018,16:17,23a3b559-04b5-4f4d-8c46-e86e39349ce9,10.202.96.20,191.239.23.127,Fix San
936,6/29/2018,9:17,b1c65e96-1545-4622-9e46-9bb710152ffd,122.120.53.91,244.255.254.37,Keylex
937,9/7/2018,14:27,f19979d5-b147-403a-8906-d350e1b00bfa,3.87.142.175,44.54.95.0,Treeflex
938,7/25/2018,12:34,69d52eb0-ae3d-4e10-bfb9-afe464cabcac,254.231.151.208,239.39.230.228,Pannier
939,9/12/2018,9:26,becedfb2-74b3-4db7-884f-6e412509342c,170.211.24.246,55.189.12.46,Redhold
940,10/30/2018,3:45,21dd6fa8-387d-40ea-8e7a-c632ba695a0e,158.7.132.51,56.59.83.215,Tres-Zap
941,7/2/2018,21:51,687568c7-e44c-4c2c-9d72-d158f0902d10,91.219.142.29,248.43.41.93,Fixflex
942,10/14/2018,2:47,c60c1614-a487-4a92-a10c-1046e1c7ebe4,104.216.153.198,237.254.100.144,Fixflex
943,5/28/2018,13:57,09a9f445-0f46-4d3a-8697-9087148118bf,210.10.128.250,149.42.174.47,Solarbreeze
944,1/30/2018,7:02,975a4e30-5dad-4c8b-9374-cc094bac9a8a,191.207.184.67,17.235.198.39,Otcom
945,10/21/2018,10:53,6ea3068b-5985-4559-8c79-c0093221c130,1.200.131.202,84.83.91.243,Greenlam
946,8/7/2018,11:34,01d67858-358f-48de-b34c-67ada21cfc41,240.92.181.172,59.253.29.147,Namfix
947,4/24/2018,23:53,14617145-142b-443e-9d74-b06d12aa8f7c,9.203.47.35,156.186.29.234,Greenlam
948,8/8/2018,20:56,0e458207-c5e2-4187-9eb5-9fa4cce7a8c9,115.184.215.14,23.194.219.148,Bitwolf
949,7/28/2018,3:07,734d1920-1e3b-4754-8548-f6eb6bdd6b0e,96.25.195.54,168.0.86.60,Zathin
950,7/7/2018,0:31,e2901c9e-ee31-451a-9291-fdb4b866b9af,76.34.159.229,147.13.144.89,Vagram
951,6/22/2018,9:34,a88027a2-b890-4e14-b638-0035a50b697d,16.249.161.48,193.16.126.252,Toughjoyfax
952,12/7/2017,11:27,86f766d5-dac9-437c-a3f0-5f3c87040c80,116.122.125.109,33.147.159.250,Flexidy
953,5/18/2018,6:51,e11e20b8-a828-4399-b8f7-6cf389f4577c,56.181.4.178,172.116.151.13,Namfix
954,1/13/2018,19:03,43333868-f4be-4c66-a04a-ecb8b608d062,105.116.32.110,27.116.73.223,Asoka
955,7/11/2018,23:52,79a78fdd-1762-488c-9350-72a42e8dd787,254.143.27.129,51.5.235.191,Konklab
956,10/2/2018,23:17,a04522ef-410d-4fd8-9b98-b6d1da2deb92,251.161.134.141,15.151.94.5,Domainer
957,7/1/2018,3:44,6a378b1f-4fce-470b-90de-360009bd21ee,196.220.124.24,116.10.45.87,Tresom
958,8/26/2018,9:27,9074f741-2980-4ed8-b110-141de0901ebb,113.108.154.28,79.22.206.38,Alphazap
959,1/27/2018,1:12,f07339da-5167-4402-bb3d-a51f40d26d31,21.111.90.111,103.138.86.162,Stringtough
960,5/19/2018,17:31,23e77926-4591-4954-b1cc-09f06dd1b2db,123.246.181.4,17.46.196.214,Tempsoft
961,9/30/2018,21:35,e6671499-19cb-4582-9d6b-c51e5f297067,213.74.143.9,197.7.133.221,Y-find
962,3/15/2018,8:23,fe1a1a35-e530-4063-9c4f-fde250adcf5f,57.94.241.41,83.42.202.92,Lotlux
963,9/17/2018,2:46,d38c84c3-a45e-4a53-9d4a-29e1f1b1ff13,32.58.233.17,213.203.164.147,Namfix
964,4/14/2018,12:10,de5d104c-64af-4607-991e-f611dd2f8554,24.107.73.39,93.246.165.215,Regrant
965,5/24/2018,3:04,2889c4cb-74a0-49c1-a218-c1c4d051fa37,183.7.19.229,184.99.17.113,Duobam
966,11/5/2017,1:32,a6615441-fa01-4d82-8f5b-b44e5e625de7,78.54.241.16,216.14.46.173,Matsoft
967,10/13/2017,4:43,77768ce9-9445-49ee-af44-f8ac96d5e8ed,105.251.191.238,131.141.191.38,Transcof
968,3/13/2018,3:48,7a650da6-cfc2-412e-aeed-d6597c61d102,170.106.90.213,253.19.60.22,Tres-Zap
969,10/26/2017,4:32,a0aeff9e-ab57-40e6-8037-961c2d8d27f4,32.132.30.72,132.131.194.189,Y-Solowarm
970,10/23/2017,16:37,6b5ffef3-b56a-4e80-b69b-e971aca4228d,135.229.108.238,174.137.253.229,Transcof
971,6/16/2018,9:04,13b9ca3a-bd57-41cb-b04a-fe2e40b7f7b2,252.126.234.108,155.66.141.11,Konklux
972,4/28/2018,21:09,1b17a509-54b5-4571-959a-b4018103f6d0,186.197.135.64,43.0.149.126,Solarbreeze
973,1/2/2018,7:59,7473297e-e972-42a1-b8e2-1feb3aaf1af9,151.138.49.232,175.233.77.254,Duobam
974,5/9/2018,13:32,fb96c7a3-f425-4beb-b214-9a0b71a636f1,195.145.131.177,77.27.127.162,Bitwolf
975,1/11/2018,19:57,0e72b58c-2c26-471a-bc5d-53b2e8ad6a0f,47.52.122.144,66.64.140.62,Sub-Ex
976,8/27/2018,12:18,fbc4f590-ef7d-4e30-8ccc-4c9247a5ed14,159.242.71.177,174.10.11.24,Flexidy
977,8/5/2018,13:10,8209c57c-5e5d-4a2c-acf5-8e4bae6aa71a,171.10.33.15,85.70.44.168,Subin
978,12/22/2017,9:58,ed738997-e50d-4ba2-a9dc-e95d9484a4a1,63.91.242.159,15.204.102.175,Vagram
979,10/4/2017,13:36,3716f566-29c0-4512-ae3e-33ba338bb78b,95.133.168.47,194.243.83.224,Zaam-Dox
980,3/16/2018,1:50,ded1e954-422f-434e-a39d-436b3f540a16,87.110.171.194,116.154.119.231,Tampflex
981,1/20/2018,8:11,0ce2be2b-f065-47b9-bc75-98c68d5ec7fb,216.227.157.108,130.241.139.223,Wrapsafe
982,2/25/2018,18:01,48d16667-5d47-40f7-ae15-6e7123410ec1,111.242.149.9,105.108.222.80,Home Ing
983,1/10/2018,8:02,6ef35c1f-5c15-4508-bb3b-4ced8a818520,73.170.51.102,142.152.73.196,Voltsillam
984,9/23/2018,5:31,84560e1a-74d0-453f-a160-eead5dd21214,249.71.106.69,150.155.5.115,Bytecard
985,5/18/2018,20:59,c8083084-415f-4efa-8d25-2f931b40587d,84.181.73.255,144.116.202.206,Fixflex
986,7/10/2018,3:50,51194317-dfd6-47cf-98b4-3642d215eeda,248.49.122.109,79.150.25.39,Sonsing
987,4/17/2018,2:44,955badd0-6e33-42d7-b3f0-7b8a451dba28,33.154.133.132,202.115.19.5,Zaam-Dox
988,6/16/2018,17:07,0a06a42f-41d8-4846-bcfc-d6c29e6eda6b,142.210.217.224,97.147.224.75,Cardify
989,2/7/2018,14:56,3cdae042-e2e4-4bfa-a84d-6490ccfe94c5,37.254.208.169,178.218.37.61,Stronghold
990,3/24/2018,6:35,3236a72c-664e-4e1e-a7d0-38fad24f9720,2.96.76.23,33.94.9.225,Domainer
991,5/11/2018,7:45,dd275bf5-f7b3-4a5a-8eff-bd3648ff50cf,244.15.142.6,153.26.4.73,It
992,8/28/2018,13:01,12616328-4ed6-45b7-a21a-6a8262d0004d,246.239.8.67,11.153.162.122,Mat Lam Tam
993,4/22/2018,11:30,9405f860-7f47-487b-99c0-6da35433b2e9,121.150.229.126,153.113.16.0,Y-Solowarm
994,3/15/2018,2:40,5b158647-533f-4618-9b09-9c615f309f7c,10.173.76.99,69.146.10.98,Fix San
995,2/23/2018,4:19,807ce5da-4c7d-4b1b-9c1c-5beb4d610154,203.160.64.119,123.17.78.166,Alpha
996,6/25/2018,21:20,390df20c-16cf-4e6e-9191-fdaf5e487ce6,207.42.222.180,102.1.118.160,Zathin
997,9/12/2018,23:26,adc17bfb-1b42-463d-8895-2fc07b018e0c,42.90.137.59,224.7.164.5,Viva
998,6/2/2018,16:07,16fa1078-5e8c-40f9-be82-5a866a780f05,244.177.84.156,65.32.219.18,Matsoft
999,4/13/2018,18:16,a5413893-0105-4501-aeb7-a0588679f1a5,118.159.28.250,132.209.191.254,Tin
1000,3/26/2018,22:21,a6b3e337-f860-4133-8096-21b49d02322c,240.146.182.84,115.131.189.18,Flexidy
1,2/5/2018,15:25,53b378b5-dcab-47d8-8ca9-873366b01c97,121.63.9.42,156.238.149.206,Flowdesk
2,6/17/2018,18:52,48721af1-38c8-4ecf-8f33-9709708ee93f,27.249.218.202,233.49.106.170,Rank
3,7/27/2018,9:41,d32979a8-61dd-477e-8757-858cee4a5d5c,190.254.223.34,32.153.159.243,Tempsoft
4,1/13/2018,14:58,e6893331-407a-4f38-bf08-2f889716c2ec,129.68.140.22,198.4.252.245,Stringtough
5,10/19/2018,7:01,70533e41-ca38-47ec-b22b-43a58aa0ed92,249.80.137.123,226.201.254.173,Aerified
6,12/11/2017,3:55,043a9d7c-b828-4ca7-a7aa-bc557fe382b6,70.134.142.119,105.161.69.182,Namfix
7,4/1/2018,6:56,6cfc71a7-41e5-4d47-b82b-97063575ec09,172.205.78.175,129.81.179.10,Treeflex
8,7/22/2018,5:38,c796769b-8f33-4bf8-9814-650f67e58c89,3.58.117.154,104.69.27.155,Subin
9,6/11/2018,1:56,63709fb9-db2b-45b8-ae97-ef3e3567c07f,82.53.245.144,165.159.155.160,Tresom
10,4/14/2018,9:40,35f53cd0-b536-4b43-b7fe-2145b6c9256c,169.2.1.87,118.33.66.107,Bigtax
11,10/22/2017,15:07,590c9d21-8068-4e76-8c4b-ab68fba674ed,134.26.31.36,60.248.191.248,Solarbreeze
12,6/14/2018,23:09,c28b91cd-5952-422f-920a-9b0c8340af41,11.213.169.53,42.83.66.33,Tres-Zap
13,7/16/2018,21:15,397a865e-effa-4c28-8616-e777e401c3a7,96.47.21.181,205.203.96.123,Bitwolf
14,10/7/2018,20:51,1fd93956-0aa9-4f11-8dd2-21ae1698d153,197.248.50.144,127.114.210.16,Zaam-Dox
15,5/7/2018,17:06,e2f9cef8-0bb9-462a-9ccd-d36c108fc33d,88.121.113.153,137.47.100.56,Sonair
16,1/29/2018,8:20,794bc79d-b665-47aa-9a4e-da62ac0be6b4,187.11.89.192,70.155.152.125,Voyatouch
17,3/11/2018,16:08,698bbfed-41f6-4178-98c9-5403e06af82f,53.254.34.46,157.43.114.253,Job
18,7/16/2018,12:00,59563839-8977-4ea8-917f-b9008f10c6bd,6.101.75.60,200.83.216.127,Bitchip
19,8/4/2018,23:44,e5b3e8cd-12da-43c4-a801-37037910cefb,200.147.8.76,122.43.227.199,Job
20,2/20/2018,22:38,20ab3f63-c00b-48e8-bfd1-42f98b74ab77,131.225.165.78,144.52.107.218,Vagram
21,10/20/2017,21:05,a40968f2-5a1b-4c87-9962-a9013d34721a,235.255.53.103,52.242.161.168,Quo Lux
22,9/16/2018,18:03,82aa66ca-5bf8-403f-97a3-34864ea35fbd,199.35.155.18,53.57.85.184,Keylex
23,12/15/2017,20:26,b8159590-3d7b-4e75-999c-cbb61518ecc2,126.189.94.192,51.209.208.126,Duobam
24,10/27/2017,6:55,3a705722-5653-441d-bef1-c1fede58045f,62.165.88.255,28.113.252.223,Cookley
25,7/7/2018,5:46,1c99d367-4dde-4d87-a261-a2c7e0ec4eac,136.147.109.245,45.193.221.38,Y-Solowarm
26,4/1/2018,23:30,3ede054f-5b71-4101-a9be-04d51e738aba,205.18.199.36,116.119.74.249,Latlux
27,3/23/2018,21:21,51cf9ade-ab90-4dd8-933a-e6f4169de967,30.163.60.77,165.32.24.80,Temp
28,10/26/2018,2:40,c6d99778-642f-413a-aef1-fc63b1d929af,236.160.170.235,213.73.64.209,Sonair
29,9/18/2018,20:57,53773fb1-571c-4b50-95ee-39295dbcfdf1,177.84.62.83,14.85.89.13,Zoolab
30,2/10/2018,2:21,d8326f16-a860-444c-b633-3e9b75ca0ddf,137.203.189.130,163.114.158.192,Bitwolf
31,12/20/2017,20:50,d61f79ab-ea3e-4815-a249-61bc428807ed,206.171.65.154,216.98.28.193,Duobam
32,12/18/2017,4:18,75350b8a-3529-4257-9211-51df1f59f6c9,189.12.247.79,234.80.59.181,Flexidy
33,10/3/2017,13:01,df62554c-0248-47e6-8e73-cd1b56d7be95,97.239.229.212,177.214.109.180,Tempsoft
34,10/18/2017,13:35,a6fd4ad4-176d-45ce-b49f-e4c322f8f52c,213.180.91.255,159.20.49.127,Asoka
35,8/15/2018,14:55,289d1679-6687-4c8c-b318-4f66611883e9,114.33.242.165,189.180.226.8,Y-Solowarm
36,3/11/2018,22:40,b8cb0e71-b3df-4c8e-932c-9e0a926a094f,245.17.18.231,229.73.185.108,Zamit
37,1/8/2018,9:33,c370b442-52fd-4f3d-aee4-9f5d1b305ff7,156.211.247.140,255.171.175.210,Sonsing
38,10/25/2018,14:07,c2c0ca35-152c-4cb0-bcf7-57ab82e57d26,201.206.67.186,55.125.76.39,Stringtough
39,5/3/2018,10:29,613a7045-c6dc-49c8-8aca-a01ccd4af35b,65.43.101.124,17.182.39.155,Greenlam
40,9/1/2018,18:15,7d1eb5e7-3a23-4e0e-b4dd-87a4fa6cdcd8,75.219.87.231,180.156.7.91,Biodex
41,12/11/2017,15:22,42f88f60-17da-4409-815c-3136155a637a,36.160.167.129,48.131.168.129,Matsoft
42,4/23/2018,21:25,b1ab48d6-51b7-4d7d-a968-80a1ace81cae,206.190.34.75,154.220.84.187,Voyatouch
43,11/12/2017,9:06,8915b3ac-4141-42ff-ac2a-3c7cabcee170,54.177.149.27,136.233.232.122,Opela
44,3/6/2018,14:21,23c94a5c-bff7-4543-8166-c811954cf236,174.100.4.56,3.234.160.203,Fintone
45,12/5/2017,16:27,e6354921-91e4-44e2-87af-66739950f8d0,144.67.28.226,84.95.111.111,Regrant
46,2/14/2018,23:02,00a32abf-0b67-4a92-a02c-434d8cad8d3d,171.78.15.119,201.168.188.57,Bamity
47,9/19/2018,18:06,9b527d8b-4291-4291-814c-57fbec1e5f5f,127.251.95.162,118.55.82.104,Wrapsafe
48,10/20/2018,0:12,3d27d528-77d5-4347-923b-697a4d8bf9f3,172.74.161.158,54.141.105.84,Cardguard
49,3/19/2018,2:02,cca0fbe9-e0ba-47d7-93a7-22922b2dcad6,241.164.121.244,151.66.231.145,Namfix
50,7/15/2018,6:15,79842aee-e3ce-4c62-800f-f4436710aca2,44.175.255.207,234.102.26.160,Matsoft
51,11/11/2017,20:30,c04b1f0f-6dcb-46f6-9f65-6d92d2bf9124,152.194.102.68,113.248.107.213,Latlux
52,3/31/2018,13:48,60419803-4d8f-42c9-ab5e-05ae02e2f8e5,74.137.6.254,187.68.23.231,Sonair
53,7/16/2018,14:04,b3ffb2d9-f7bd-4e16-988e-2f7ed03cb9cf,31.89.53.141,179.195.239.183,Pannier
54,3/3/2018,22:43,efad60dd-b21f-4342-b1f0-311dfc5ad9c7,182.57.116.226,79.18.230.79,Domainer
55,1/22/2018,7:05,e301907d-9be9-400e-a54d-2aa3e233c08d,64.139.232.75,137.96.88.195,Stringtough
56,11/2/2017,4:02,432753a7-aef9-45fb-99fe-467233d8d53f,89.174.79.105,179.174.113.155,Bigtax
57,1/5/2018,12:18,42b83191-f79b-44b7-956e-302b3e031c8a,135.243.1.221,115.123.148.62,Trippledex
58,10/25/2018,21:40,6f3f12b9-02bf-4644-a503-6386c3fad2ee,20.145.150.146,166.184.44.174,Daltfresh
59,10/21/2018,3:50,7b115059-d277-4e88-90b5-1da629edc8f9,98.101.51.118,131.150.28.252,Flowdesk
60,12/25/2017,20:36,66e04f16-f2ce-4a5b-95ae-0084282131e4,183.133.149.44,151.126.233.66,Bytecard
61,9/19/2018,16:50,657ac4c5-1915-4aa8-ac1a-430357760298,162.142.55.250,244.49.68.172,Stronghold
62,3/5/2018,14:40,ec67f8df-6947-4377-adae-1cc0e2f29f68,105.118.192.84,125.235.241.154,Flexidy
63,1/12/2018,18:54,a10ee8c2-5478-4ef3-ad19-42dc2127e9eb,250.100.129.118,62.119.245.212,Sub-Ex
64,10/23/2017,2:01,7249adcb-0599-4ce0-9ac8-6c83e71d567c,10.73.76.78,125.247.53.249,Daltfresh
65,4/29/2018,18:06,22d811cf-c06e-4297-b7e0-66bf02c1125a,182.113.159.74,155.234.226.152,Flexidy
66,10/1/2017,3:35,935b7051-a091-45dd-b4fc-fd100e96c42a,128.205.77.173,203.238.61.20,Domainer
67,3/12/2018,8:19,17a87d67-bdd3-499a-841d-5472bdd431b8,12.114.155.244,146.60.232.161,Stim
68,4/12/2018,10:32,e0d102b5-fc55-4ee5-b291-dbe31e7f8585,219.251.250.210,105.134.125.15,Alphazap
69,7/31/2018,23:02,6a7e0097-21ef-4bae-918d-47cf2b9a353e,33.120.130.120,53.120.200.31,Pannier
70,11/6/2017,21:26,c5500f30-5492-4107-bce7-6e1a3aaa8779,123.236.25.64,100.239.133.129,Keylex
71,11/30/2017,0:24,d3aa1a8e-73f6-412d-89bb-bcd897644c26,220.187.58.56,233.142.100.25,Bamity
72,4/17/2018,4:43,b4d10e08-a28d-410f-9dfa-868add640aeb,65.210.189.86,44.92.210.252,Tres-Zap
73,11/1/2017,0:52,aab7a55b-9eae-430d-b654-7311a14481ac,154.9.4.230,138.131.76.163,Biodex
74,12/18/2017,20:00,defda87c-e6e7-4528-bb95-248822fce636,240.157.197.164,253.88.194.111,Fixflex
75,10/25/2017,8:48,614393b1-972c-40f9-9236-cff1c1fac90d,224.102.121.254,41.85.107.114,Y-find
76,4/15/2018,5:38,80479f13-cbf7-4cce-b7e8-aac23eb05335,84.149.71.3,39.42.169.181,Transcof
77,9/11/2018,4:06,17187449-a773-4aad-90e5-8e1acc96e0c8,168.235.141.216,246.14.167.140,Cardify
78,4/12/2018,22:13,6420c60a-fd16-49d8-bf54-155b95ac1c50,247.120.255.226,13.249.186.234,Sub-Ex
79,3/11/2018,19:57,c03b067a-232b-4dfb-a229-f6933872a2c8,124.242.248.181,9.219.89.227,Flowdesk
80,5/6/2018,5:14,0121b989-c181-41a3-8904-df10ca83b570,119.91.199.97,126.135.236.83,Tres-Zap
81,12/4/2017,11:29,ea188ecd-f895-425f-8f48-52a777373123,207.47.107.93,131.87.29.203,Greenlam
82,8/3/2018,19:48,a8dc0e09-ec5d-4571-832d-f7fbce90c353,172.209.238.226,250.248.162.88,Cookley
83,9/6/2018,2:59,ce7a61f2-5de4-456d-96c2-e1b138ea2db0,68.156.166.93,46.243.28.213,It
84,10/19/2017,2:46,e3c8935a-3e1d-4623-bbbc-ca5e028eec4b,91.39.60.175,11.124.180.192,Subin
85,3/20/2018,7:41,7c0297f8-d9e2-4bf5-a25b-c6c46a7eecc5,83.206.70.129,80.154.191.125,Wrapsafe
86,5/15/2018,21:23,0f9bdd5f-d2ec-4d0f-8042-ac6307f72895,90.199.52.27,118.135.212.40,Viva
87,7/19/2018,13:36,3ed264b7-4a35-4b61-8950-ff049f8f7460,6.227.228.93,90.62.121.249,Toughjoyfax
88,1/24/2018,7:13,c6f24a0d-7aef-49c2-9597-6ca0a7f79b9c,33.57.187.98,146.209.64.103,Tempsoft
89,1/10/2018,16:57,c6c55796-7fb7-44be-a57e-211374a476b8,65.116.240.157,213.224.129.36,Flexidy
90,1/15/2018,10:11,12a7c0dc-d4e4-40fe-be30-e6af1b727de0,76.216.224.59,150.187.91.215,Bytecard
91,10/6/2018,13:50,6da004f9-0bb4-446c-a766-7482d837ca5f,90.40.194.237,77.179.189.244,Latlux
92,10/4/2017,10:32,188960fa-8b18-4a3f-8d2a-ca9d1f438281,5.54.155.55,125.59.68.234,Ventosanzap
93,2/4/2018,23:12,5e8a9950-28ce-40f5-b39e-9d2e216fec0d,116.37.250.53,217.214.62.58,Home Ing
94,4/8/2018,9:30,fcc5a696-9b7b-44e8-bb50-07f46b3fa9ce,190.200.168.169,29.101.104.82,Stim
95,7/4/2018,20:44,9b19c788-f930-47b6-8f24-1eef09272aea,174.218.152.243,47.53.161.37,Bamity
96,7/27/2018,6:15,cd03cb93-57f5-4826-91e8-427fcfe7e43a,179.179.18.109,224.130.74.135,Alphazap
97,12/5/2017,9:57,cf67f4f4-c966-4100-bd7c-d537a9ad4172,80.1.41.232,201.186.229.232,Pannier
98,12/4/2017,11:29,3fdf4a10-b9c6-4a83-aec7-d39b497b2dfc,4.196.154.187,228.13.202.196,Domainer
99,5/5/2018,1:05,29b9e740-d278-4b19-aeca-1f878409fadc,179.233.180.223,193.151.83.87,Rank
100,10/1/2018,23:16,0fae0e7d-6452-403e-83c6-08da56423cd2,212.119.54.196,240.116.130.127,Zoolab
101,11/9/2017,8:12,7c272758-c6ef-4221-89ac-207f568aa060,181.66.98.50,51.21.163.213,Bitwolf
102,1/16/2018,10:40,c3cc54fc-fde5-44eb-87f1-ff00b2e0698a,159.149.157.249,77.239.133.112,Viva
103,12/28/2017,12:57,e37762ef-d656-44cf-ad2b-65e78c739b76,30.243.146.223,203.10.206.215,Cardify
104,7/13/2018,14:02,1be688c1-bc72-4cbd-9ad0-d13b5bde032b,37.2.238.232,240.219.201.189,Trippledex
105,10/17/2018,7:30,72aed7eb-aedb-4750-95ec-98e48011a92a,200.221.2.66,92.171.164.131,Redhold
106,1/21/2018,12:03,c5b7fa15-9424-4295-959d-82d4b20136e8,188.254.74.49,121.16.97.13,Ventosanzap
107,2/4/2018,15:32,d9dbaaa5-2ea8-491c-b05b-a5d71256c068,10.41.222.149,253.141.190.182,Trippledex
108,1/12/2018,11:38,281bfeff-c725-418c-be93-9f3dde9a003b,39.169.142.248,224.192.17.135,Lotlux
109,6/1/2018,21:53,3aeef06c-02ff-4194-a281-f83e8904ce72,240.92.20.87,85.127.5.238,Ronstring
110,10/14/2018,8:15,33c66778-a088-4e59-bc04-f879659b88f0,65.254.120.244,11.62.215.187,Stim
111,12/23/2017,9:02,3a3a7457-8dc7-4792-9f88-601e61156ac6,51.176.19.61,167.88.183.132,Span
112,9/8/2018,22:01,d2d4f7a2-fab1-4604-a774-85a47257d949,10.22.7.239,170.23.132.13,Transcof
113,1/8/2018,19:34,236b25e5-5c03-4ed2-8118-edb48a003393,34.91.181.33,22.205.74.34,Gembucket
114,3/29/2018,17:06,cf1b9685-a0b4-411c-9c53-50e5a6cc5a4c,41.249.58.132,10.45.170.100,Fintone
115,5/9/2018,12:30,4d79aa1f-041a-4dc5-b9ff-bb4d032c0b18,39.132.174.74,100.236.215.88,Bamity
116,6/20/2018,4:43,0e217b4b-bb2e-4056-890e-9f9f6c58c9d4,199.1.224.2,239.76.67.180,Veribet
117,5/12/2018,17:34,9517bf57-ab7c-4410-af5f-847fa6a7c1df,120.249.62.62,94.88.110.209,Y-Solowarm
118,4/18/2018,2:40,d38b5a7d-3d92-4c41-a756-2a04ae46564d,235.57.161.234,154.251.141.207,Toughjoyfax
119,7/15/2018,10:11,1ae27bc3-824d-4f9e-b1b5-7d94ce55713d,22.17.104.145,70.54.224.223,Home Ing
120,4/14/2018,15:40,d2a7bde0-68ed-4f73-83a4-7ddcbe9a73b7,3.182.172.222,210.201.95.78,Temp
121,12/27/2017,18:12,c7780987-a3c2-4da8-ba65-a32b9703d8a1,188.134.45.195,57.15.198.126,Sonsing
122,10/26/2017,7:03,10b9186f-b477-4b09-b1d2-669aa149e7ac,158.215.50.70,135.176.147.74,Biodex
123,10/17/2018,14:58,036b129b-a3f0-4b94-b0aa-df7b757d062f,99.237.183.129,124.253.59.194,Trippledex
124,10/19/2018,1:33,90085aa6-616e-4451-a6a2-60dd9c4072e1,114.164.210.41,150.32.98.186,Cookley
125,12/31/2017,13:45,e73fa06c-f3a6-44c2-88ca-3d286325278f,130.8.215.183,216.215.209.253,Span
126,10/21/2017,5:14,6608e60d-36c8-4ddc-88be-75737f9b0384,215.243.36.217,235.39.125.69,Tin
127,11/22/2017,5:04,fa24a4ff-1da5-4e1a-b016-1e6a8d6d1d5b,135.152.152.6,48.225.118.112,Zaam-Dox
128,10/20/2018,20:01,2b4fe7bc-ee07-4877-bd6e-434a74b2f020,158.238.78.117,109.97.159.225,Prodder
129,6/17/2018,20:41,8b9cea95-29ed-4145-8793-70b2f68c4847,8.219.118.74,232.191.95.192,Tampflex
130,12/5/2017,2:50,649443dc-7901-4b44-8479-5cbe50bf7f7c,95.239.63.122,239.177.208.71,Zontrax
131,2/6/2018,18:08,08839032-c2d5-4347-a9de-e9fd2cb49553,207.76.208.40,132.216.85.77,Cookley
132,9/10/2018,2:41,0de1cf16-5a8a-4aa9-9a69-780b2a13574f,250.141.36.144,240.136.205.243,Fix San
133,9/11/2018,13:24,a3ce6aa6-688e-4485-a6b2-bbdc777bf560,242.89.65.187,225.39.33.178,Bamity
134,2/2/2018,4:02,b9436742-aa9f-4a04-90ce-c778f0ea03c9,64.74.70.46,212.203.102.209,Stim
135,1/1/2018,19:02,a414ece2-1aa1-4b10-8be5-0952b9760e8a,151.15.166.55,179.239.87.58,Zaam-Dox
136,11/23/2017,23:17,469bdbc0-86fd-4e59-961d-f8f797914be9,96.24.225.108,6.214.19.180,Andalax
137,12/23/2017,13:10,a8c99216-4a70-4ae4-bfad-3b15a7b0b1b4,189.29.225.29,59.10.67.239,Konklux
138,4/6/2018,12:16,2b9063fe-f8c6-4291-8042-d765ed5f92c0,128.64.108.223,169.109.211.128,Bytecard
139,10/20/2018,5:07,ca0e6f36-3115-40f8-93e4-7fb516779dd1,172.59.151.203,72.202.34.68,Konklux
140,4/14/2018,16:57,57a60a36-db01-4af9-914f-58f75bb99601,208.199.232.133,13.86.63.7,Tampflex
141,10/30/2017,10:07,45a98f19-edd5-4e72-b22c-9ee0068f2397,51.183.171.222,30.5.40.147,Voyatouch
142,6/17/2018,16:50,8b8640ec-1a9e-48b4-8fde-3dc060075188,129.95.208.40,160.217.217.97,Rank
143,9/16/2018,9:13,63497909-9689-4f0f-8d3e-9390599cdc42,143.243.165.58,98.141.139.211,Bamity
144,3/6/2018,17:00,cb494cfb-d400-4405-a614-ad1bbe0dbde7,170.127.149.117,212.224.22.246,Konklab
145,7/29/2018,4:25,953f651c-6056-4b99-9088-82822a365702,229.140.97.240,241.213.70.71,Sonair
146,12/11/2017,8:08,2c2231c1-879e-4b9d-afbc-6ca664b4aad3,129.152.220.37,91.11.2.229,Lotlux
147,7/19/2018,18:20,15a23d68-ae6a-44ba-8168-97dd92835ee7,186.38.90.47,73.167.109.120,Zontrax
148,2/12/2018,17:02,3813d3c7-1a67-4c23-bb72-3b1edf3617f6,70.29.242.26,100.220.139.112,Regrant
149,8/15/2018,0:22,84a4b9a5-21cd-4bfb-98dd-4ccce0d66bbd,254.44.131.17,224.249.29.229,Fix San
150,12/28/2017,15:28,65d02622-1056-4aee-ac56-7e7ead67ee57,103.203.90.206,54.175.246.158,Trippledex
151,1/3/2018,10:14,4f96baed-df87-4e5f-90b8-3a92dae65fb8,150.43.20.173,196.81.34.239,Solarbreeze
152,7/14/2018,19:47,9dc81d5f-7cc2-4c0d-8c29-8b6e8fd847aa,228.254.36.174,247.100.227.74,Sub-Ex
153,6/17/2018,5:46,05adc930-63da-47af-9fe8-7b1a3c45cab3,98.133.176.191,172.97.69.146,Ventosanzap
154,4/23/2018,4:07,15fe49d1-5d03-4936-9069-1b8b671aa2a6,38.20.240.211,65.57.217.115,Voltsillam
155,5/18/2018,14:27,58e6a0b6-39da-4538-ac99-bc3f3bd9b84a,225.171.165.66,236.0.108.84,Hatity
156,7/5/2018,17:40,0ace540e-88c4-4b1a-8a66-c36bf32528c2,221.201.148.34,135.60.213.115,Tres-Zap
157,7/30/2018,22:23,906cf263-fa58-450c-9ed8-acba7ba0fa2b,204.225.59.11,141.64.147.89,Asoka
158,7/26/2018,2:49,0fa0c11b-dd91-47e0-96d3-41c0181efdd4,130.211.108.146,167.44.28.194,Trippledex
159,5/7/2018,15:11,624da71c-c006-4e26-b72c-b0ff7c381efa,248.44.220.117,93.253.64.84,Opela
160,7/23/2018,18:47,fd3a79aa-978f-4217-8e76-0e431715b7ae,208.78.209.161,251.161.57.6,Tampflex
161,11/30/2017,8:07,ad70ed97-3884-4851-ade8-1043f8e5c5b3,130.227.123.178,96.150.47.236,Regrant
162,12/20/2017,5:05,53a880fb-885c-4df8-a6b8-d3d6fe141558,40.180.241.129,138.251.212.31,Holdlamis
163,11/7/2017,23:53,336c54cd-91ab-4cb7-b350-4cccf6fadca2,201.198.191.215,218.155.7.141,Tin
164,2/28/2018,8:11,3beb0d89-1e96-4743-8257-0c2a8cbf4407,6.75.242.28,70.222.227.243,Quo Lux
165,10/27/2017,7:59,b6db1949-4267-4fbe-8694-f402744f7a20,191.230.255.155,253.95.138.139,Domainer
166,6/14/2018,6:59,d63ecc75-ec51-4263-9e7c-229f7cccaeb9,149.11.202.204,150.255.212.131,Hatity
167,10/18/2017,9:58,37c4cc44-5ab8-47cd-9278-82513d0b9aaa,210.225.83.252,212.50.154.228,Greenlam
168,10/17/2018,6:34,3b33d5dc-1d35-41cf-abc3-07c43d6acce4,56.162.127.63,155.89.222.0,Quo Lux
169,4/5/2018,13:48,75ea3fc9-92e4-4ed9-85f4-90caa4847597,97.87.243.37,131.27.103.119,Zathin
170,11/25/2017,19:32,409d30c7-45a8-4770-97fc-1500573755f1,131.235.248.69,113.144.145.212,Zathin
171,6/24/2018,8:11,949edafa-6159-4064-af1d-ce206e6e0d69,20.235.253.87,47.208.19.253,Y-Solowarm
172,6/26/2018,9:48,9752edc9-183a-4b82-ab20-06a92eebba27,122.193.189.73,226.232.5.60,Cardify
173,12/13/2017,12:07,f49c3688-d9a1-40f2-8411-5f5cdcd51d56,25.157.230.236,147.62.8.11,Prodder
174,7/16/2018,15:58,892c798d-1b44-4ff7-b1fe-a0afbc9c8bde,31.142.87.99,107.159.110.167,Latlux
175,1/7/2018,5:30,55764760-3304-45fa-9cb6-c63380979193,28.241.8.208,78.165.67.96,Matsoft
176,12/3/2017,7:52,e5a39664-5b13-4849-bb3e-1bc0bea4e561,232.212.144.106,224.187.251.192,Lotlux
177,6/29/2018,18:03,37f51457-4178-49e4-9afd-bd1c28b75e5a,53.147.165.134,55.0.26.205,Biodex
178,3/30/2018,17:18,387c20ac-43c4-4d9e-bffe-ab1c3f33bb17,191.177.233.198,96.70.226.126,Bitwolf
179,1/22/2018,5:25,7d0aa6d8-d963-4b4c-99bf-9f196c225f95,135.91.32.212,172.99.249.90,Andalax
180,6/8/2018,18:22,68ebaeb6-14bc-4949-98b0-55ae8a4569d4,101.17.27.251,82.100.5.142,Home Ing
181,11/5/2017,5:48,07ac9459-cc11-4c95-95dc-7adb399706a9,95.45.151.84,162.148.174.140,Temp
182,4/4/2018,11:18,d6e5e2e2-0807-4a29-b133-65d52d01d493,122.22.43.144,183.28.146.185,Greenlam
183,12/10/2017,1:05,0d8abcbb-eb47-43ab-a11b-de28a830b095,202.107.220.76,165.129.76.216,Biodex
184,2/21/2018,1:09,e08a9a8a-3aca-4adb-84b5-9f37cf242051,154.85.207.133,251.18.166.111,Hatity
185,2/2/2018,19:39,22ba1082-8dd2-4d72-abf6-ed62c5b788ce,131.5.216.73,202.124.217.42,Veribet
186,3/31/2018,10:56,25271911-ff54-4019-9be2-751be4f110c3,156.4.139.253,219.105.131.224,Stim
187,10/8/2018,16:38,e911cb8c-2b61-4b88-a0bd-cca9412cdaa0,74.41.179.153,100.170.38.209,Lotstring
188,5/14/2018,16:38,5fcc307f-20dc-43b6-9e78-10a5eec22d21,182.163.109.84,44.33.143.149,Sub-Ex
189,7/14/2018,15:31,eb844e2e-674b-42dd-9159-7903794fbc74,149.188.164.38,179.13.168.114,Latlux
190,6/20/2018,15:34,e16570cc-a007-49ff-ac44-741d5929bfe3,78.16.204.235,199.1.82.98,Job
191,10/23/2018,0:24,37afc37d-1d70-4d5c-ae82-24a3318f8436,80.135.120.225,66.138.33.62,Asoka
192,12/1/2017,1:33,13a6ebfd-1155-4752-aca9-6f8c54d9013a,22.89.162.241,114.187.13.203,Zamit
193,10/14/2018,8:01,e607c52d-e85c-4dcc-bff0-3a0df0da4df0,92.42.196.19,48.16.113.144,Alphazap
194,10/20/2018,9:14,cc6b1675-aebb-48f4-a3a0-2a782fa18136,219.241.97.46,73.217.245.40,Mat Lam Tam
195,10/5/2018,21:54,1dc68880-ea3b-486f-986f-240cf1421b6a,118.220.149.183,199.102.163.101,Cardguard
196,11/17/2017,21:13,7ef08235-d530-4324-96fb-61688b5ad789,45.75.84.143,128.160.144.162,Bytecard
197,5/21/2018,19:04,2f5a9f0d-7cad-492e-8886-4a98b9c54f52,63.11.38.247,81.224.145.146,Home Ing
198,7/9/2018,20:22,f3afda71-f7a2-4ac1-aee8-618f73cf83ba,243.29.116.76,24.206.183.92,Flowdesk
199,10/31/2017,12:41,d917b433-d38d-40f6-98b0-57e65a505d71,81.65.78.207,169.77.43.157,Zamit
200,2/25/2018,14:20,3062f8d7-be17-4dfd-bb1a-d9b35bee5297,159.84.188.62,157.134.37.94,Voltsillam
201,4/17/2018,6:23,84190e00-2a82-4e96-a9d9-267342c84dcd,161.78.130.63,48.172.19.204,Bitwolf
202,9/20/2018,21:08,6f0b2d32-7650-431e-8666-0bad47331241,166.26.204.76,246.118.15.116,Ventosanzap
203,10/3/2017,9:08,f82ff69b-cab9-467b-88f5-94a6b9f22f76,47.113.249.4,255.159.150.116,Konklab
204,7/9/2018,6:56,379634a7-0a1c-486e-b29f-b1fb7742a275,4.184.43.85,55.220.118.207,Voyatouch
205,7/7/2018,18:51,109201c8-e129-44d8-8fa9-c86ac17b08a3,66.60.235.247,146.142.168.124,Fix San
206,5/24/2018,6:57,b003110f-5d13-4628-a9b0-8efe8219c255,136.52.154.139,113.121.204.34,Hatity
207,5/24/2018,11:01,fd066fa5-bd2b-430e-bf77-0f7a51af4ffa,42.160.229.44,170.17.245.95,Pannier
208,12/12/2017,11:19,160bfcc5-42f2-4557-8d48-d42701625c4c,252.98.217.171,42.57.77.74,Ventosanzap
209,6/6/2018,6:26,784ee9c9-1e20-49e1-80f8-312472832db2,18.194.255.156,197.91.79.168,Namfix
210,3/15/2018,1:30,6dce3cc8-7345-44c7-aac0-3949d5af1dc6,31.103.71.10,120.100.57.152,Quo Lux
211,12/10/2017,18:01,2a851c2d-8bbd-4b09-8092-2a9824a26394,63.77.15.40,247.150.249.221,Overhold
212,3/7/2018,17:38,c92fdf8c-8610-4624-8c49-9ca50259ddc4,120.185.204.238,192.110.178.165,Holdlamis
213,7/2/2018,20:10,3728b08d-24d5-44e9-ac48-3e07966afaf7,8.199.246.221,49.2.21.252,Konklab
214,5/30/2018,7:36,cf3baa9d-d962-40e1-bc24-d369a8136058,113.102.5.11,104.45.249.114,Treeflex
215,10/18/2018,12:10,27e8ffd5-0d41-4777-9073-839b499582af,217.195.228.84,21.45.117.14,Zathin
216,8/5/2018,7:32,18e186fb-3704-4a8f-aafd-f0ce3f524ae7,205.207.137.16,170.111.149.108,Toughjoyfax
217,4/9/2018,19:31,24388171-380e-4422-875a-f9446751b6b1,217.101.115.8,134.195.134.237,Alphazap
218,10/4/2017,16:04,1c8c00bd-bf2f-49cf-911c-bb8b2a67a9ac,250.175.30.115,64.131.122.167,Y-Solowarm
219,6/4/2018,20:22,e3693a8d-07dd-4493-832a-f452275ab6fb,189.43.88.238,78.26.47.146,Bamity
220,2/20/2018,23:56,232d45af-c8de-4371-940d-75af0c0d332c,75.210.241.219,229.215.225.247,Biodex
221,3/9/2018,13:54,cd2a3d44-7924-4b4d-ba1c-b047dd701b58,196.30.89.83,38.127.146.109,Sub-Ex
222,2/27/2018,19:40,13fae06c-0aef-4c21-8b7e-d3b1c7392e73,116.247.97.67,44.250.246.23,Mat Lam Tam
223,1/3/2018,2:29,62771784-3491-4f22-8495-8e23f6a1631e,162.203.173.66,26.244.0.246,Bytecard
224,5/28/2018,1:46,e06d9ba6-5ac0-4b41-bb27-4cb3cfe3bdb6,150.6.30.51,145.7.62.182,Redhold
225,7/15/2018,21:43,71d0318f-e760-4df3-b715-ada14f4db7de,180.40.3.141,120.136.173.91,Solarbreeze
226,9/25/2018,7:57,287d77fa-547f-48d9-b397-a152e3378b52,173.30.140.253,66.135.63.41,Lotlux
227,9/12/2018,10:09,30ce562d-48fe-4cc4-987b-0baa8be3dfd6,246.239.208.173,153.219.245.7,Otcom
228,12/29/2017,12:20,ba82e8fa-01e0-40b7-8615-a654be90045d,11.176.115.68,7.200.25.90,Holdlamis
229,11/30/2017,4:43,d059c95b-fa3a-4e64-807b-53c1e3549351,0.240.85.33,202.213.122.202,Flowdesk
230,8/12/2018,2:01,e3b38763-d5a5-4348-97f5-d2569b7c8ef5,123.98.102.61,81.3.168.7,Greenlam
231,7/5/2018,5:27,516b62bb-e79e-45b6-8601-2a671ebe7a5a,124.18.239.35,106.243.167.156,Bitwolf
232,12/9/2017,22:20,f6c48fc1-4689-4e21-b920-35e51285b163,252.240.1.163,85.180.44.118,Domainer
233,12/11/2017,0:58,622ac720-1877-41aa-b988-47a3ddc5c687,100.180.50.66,3.102.69.226,Viva
234,10/29/2017,18:10,f6ae3b02-741f-4f69-a5cc-0c9e051cf972,130.9.144.122,66.157.0.227,Holdlamis
235,9/6/2018,7:18,0e373d74-d271-4988-b2ac-e6dd6998e7e0,152.199.157.229,188.188.25.113,Greenlam
236,2/8/2018,8:53,d41aeb7a-0e9f-4dc5-a76d-f8312f6f72fb,209.74.181.210,26.173.223.20,Asoka
237,1/3/2018,12:08,92085f5b-5dd8-41b1-9d34-0cf24ed4f45d,96.199.195.196,112.252.37.255,Konklux
238,8/21/2018,6:34,b92c0b43-6a0d-42cb-90bc-5c9197777108,161.79.232.116,220.232.60.88,Zaam-Dox
239,5/5/2018,5:52,b1c7af81-762a-4b2c-85c1-bcb6bdba9814,109.179.210.250,220.94.99.113,Y-Solowarm
240,10/19/2018,15:44,8d9e3f2e-13c2-4756-987f-bd1dd12ee957,219.236.239.190,47.42.215.254,Mat Lam Tam
241,10/29/2018,20:35,93828dda-1a87-407f-8ab6-b2602e29f757,241.26.200.169,119.199.14.19,Fix San
242,12/5/2017,18:16,f044074e-6bcc-491d-8c06-0158e4deb6e5,227.131.163.255,230.30.86.231,Biodex
243,11/5/2017,9:35,400191ad-8f06-4dee-8f48-ed250a1dd982,59.27.96.140,26.197.47.116,Fix San
244,3/31/2018,8:38,dd6f7ea7-e6dd-4804-a9f0-b480ba4e8f35,36.63.160.0,51.27.177.225,Zathin
245,8/8/2018,9:09,98a5119d-78bd-47e6-8b39-bb44ed2bda8b,105.51.125.227,1.240.26.169,Job
246,10/13/2017,21:04,d8e46bf2-1f75-46e3-b287-3ab7d43a26cd,153.124.55.12,231.79.187.63,Treeflex
247,6/29/2018,23:01,8270eb3f-ad29-4d94-b6ca-cea00bd9d0ea,145.5.65.139,35.31.4.168,Greenlam
248,2/19/2018,15:39,4729dc0f-dac3-440a-b8b4-bd4ae02dfddc,202.109.52.104,240.221.241.227,Fixflex
249,1/5/2018,16:59,89683b60-4ada-4607-b4c6-9f97f74d0167,41.90.115.245,161.223.4.8,Wrapsafe
250,10/27/2017,11:34,ee544416-0cd1-4b93-9c1e-7b2c8f20e24b,99.226.226.253,32.66.94.54,Veribet
251,6/29/2018,16:32,94367ee5-9528-470f-a1bf-327a065cc6ff,166.99.105.247,224.106.7.238,Tempsoft
252,8/20/2018,23:37,e53fb31f-3a4b-44ff-b596-2d244a95162b,153.130.39.130,104.227.173.247,Quo Lux
253,5/8/2018,4:59,c6b40acf-2ba1-4046-8453-93c850fc58b8,30.233.2.103,180.221.169.98,Stringtough
254,8/8/2018,23:00,f277ae81-618f-436a-bbec-b1b2d8c7f2aa,236.203.112.175,246.195.29.93,Trippledex
255,6/23/2018,17:53,af936274-cd21-4fd1-828b-df40aa9d829c,129.148.85.41,4.50.40.17,Zontrax
256,6/3/2018,21:41,733ae814-5693-4ebd-b4cc-0d2188761b36,180.149.197.176,154.158.201.94,Solarbreeze
257,10/11/2017,4:13,b5f2fb05-6caf-405f-9638-a84635662c40,97.140.100.251,223.69.111.41,Stronghold
258,4/9/2018,21:06,a7518013-5d47-451c-978a-cdbd2bdf6b02,189.77.237.220,92.119.101.168,Quo Lux
259,2/2/2018,18:12,699a8015-82ac-4b62-8944-e1986383c0b9,156.247.102.147,51.49.57.47,Zoolab
260,11/17/2017,20:41,becbf8f4-c276-4032-bf15-256649eb5c62,86.203.15.75,118.177.94.4,Hatity
261,10/17/2018,0:41,4e8a78dd-8633-43f2-84e0-7186a69a0b6e,230.185.63.44,137.35.238.146,Zontrax
262,2/4/2018,6:41,e10d35e2-17fc-4835-8e64-ed3fda099384,3.59.192.246,157.163.117.173,Y-Solowarm
263,8/30/2018,7:21,4d724e97-7996-47d1-9de4-f42676e85f8e,230.161.84.233,125.86.39.222,Cookley
264,5/28/2018,18:17,39ef1d71-cc74-497a-8ca1-3e9941ebf08b,184.123.181.136,144.36.100.173,Tres-Zap
265,10/20/2017,16:41,3c75cecb-2fb8-4c92-9f20-0d7b10fb2ce5,188.158.132.181,56.3.139.230,Solarbreeze
266,3/17/2018,21:02,08251fd4-5f7c-465b-bb2e-2f659136da8e,161.96.54.109,86.68.176.92,Ventosanzap
267,8/16/2018,7:12,2181126f-db96-440d-a243-5cccada8ff70,253.22.54.59,198.233.8.3,Home Ing
268,11/14/2017,2:01,e2c4a4a7-e3ba-4666-9102-005792bbfc14,54.154.178.208,176.68.220.71,Lotstring
269,9/13/2018,19:55,be589f15-6fca-46ee-9df6-09345761a7bd,139.238.184.37,231.191.132.46,Keylex
270,10/8/2018,5:45,1de834c5-5f6a-4666-ab3a-bf4f663586f5,167.216.21.17,94.132.131.249,Namfix
271,10/11/2017,2:31,aa10df30-d88d-48f3-bc73-f1f15d557144,129.17.33.37,40.27.193.165,Bitwolf
272,10/25/2017,13:41,8516a643-7d2d-4b8d-8a6c-cceb1217c818,170.216.218.81,153.162.0.79,Latlux
273,8/11/2018,21:23,14c01344-32a5-4aa4-82a4-72edc92493f5,207.95.159.147,182.240.250.115,Lotstring
274,12/1/2017,19:29,1d6cd651-684c-45ca-8abf-a3a830f384a8,72.30.81.183,230.91.3.162,Lotstring
275,9/7/2018,15:56,1188baa9-9379-46e0-9b8b-a07af51d028e,199.254.45.210,96.229.232.42,Voltsillam
276,1/27/2018,17:43,a7747028-1988-421a-ac48-f5b0880a60b2,74.30.156.25,65.0.34.183,Cardify
277,11/28/2017,22:28,90d7f2c1-a12e-49da-b3d4-07cc8120f841,26.226.141.199,35.168.113.41,Hatity
278,1/29/2018,11:08,4aeabedf-88ae-4323-901c-ced86d71ade6,111.91.128.209,70.77.196.56,Tres-Zap
279,8/13/2018,15:20,4215b915-8a67-4212-b0bb-543f42aa04f0,195.22.70.89,154.214.7.62,Tin
280,4/2/2018,7:17,b5e01573-6591-4e75-95e5-5bd13e029791,58.133.218.31,211.136.153.62,Tresom
281,6/22/2018,17:34,18591ce4-7aa1-4c6d-9c50-f46ba35fe4e8,219.231.34.148,64.90.199.252,Hatity
282,11/2/2017,20:52,2b33ba4c-11b2-4d51-9d57-245c99e1ac97,22.119.201.65,255.201.108.20,Sonair
283,2/14/2018,14:00,185d336d-2210-4057-9d2f-0bc08e2ef1c8,68.79.104.41,203.60.220.53,Ronstring
284,7/27/2018,10:02,9aaff192-9450-4a12-947e-9d0106144b51,196.125.188.14,227.225.116.135,Matsoft
285,10/24/2018,19:13,bf52337c-c2ba-455c-96f5-8827b3a75129,209.122.234.218,139.194.251.235,Bitchip
286,4/2/2018,23:43,9f0acf41-d4da-45f9-a2d1-79fbb93bc568,97.38.235.42,42.218.214.11,Transcof
287,10/7/2018,17:44,44ca34f3-2779-4d0e-9855-c5a68f5d6eb8,66.193.186.82,49.245.238.142,Solarbreeze
288,11/15/2017,22:28,23196e31-4fa0-401b-8570-ebe5948d1062,61.100.92.153,212.238.121.37,Voyatouch
289,8/22/2018,19:56,5cebfd61-8b9f-4d6f-9b9e-98c7adf681f1,200.116.140.194,105.220.26.204,Zamit
290,4/22/2018,16:50,c63cc0be-2f0d-4afa-bbb5-30cc5d6af99f,170.108.70.132,59.101.127.120,Stronghold
291,1/4/2018,8:50,691e6825-efdd-4e80-ba68-53808df9df26,56.14.176.137,7.8.181.74,Bitchip
292,2/10/2018,2:20,7c623f52-0ff3-4233-9f09-c2ac53790503,244.29.36.218,119.48.65.176,Job
293,2/19/2018,10:56,5fb5e5e1-fe05-4533-b566-b8a4f1c8049e,190.222.133.231,27.134.109.44,Domainer
294,8/17/2018,10:58,ed2da45c-0ac5-4e1a-b650-80ce46b2e774,134.105.153.7,176.219.188.147,Otcom
295,8/8/2018,11:53,08e803c3-b819-49e2-af46-fa0b081f114a,182.13.191.169,148.13.22.60,Fixflex
296,4/19/2018,11:08,e17e444b-c816-4efd-a941-654dba366141,148.148.187.167,222.155.164.249,Ronstring
297,6/10/2018,11:36,68f41225-da75-47dc-b000-fb8a4b67b42a,246.75.9.38,91.169.176.70,Bitwolf
298,9/17/2018,12:44,74dcd27d-2087-4712-900d-c6e36c81a639,244.237.65.21,190.183.137.221,Temp
299,12/28/2017,6:03,a7bc5244-3e5e-4010-af7f-2dbe4466c872,136.219.98.218,19.136.99.128,Ronstring
300,9/3/2018,10:36,0a908151-f9fb-41f0-b42d-78da5dc24416,1.146.79.145,19.225.85.100,Treeflex
301,4/6/2018,3:34,9cdf98df-a386-4117-8723-81dc98427684,102.111.223.65,41.114.54.103,Solarbreeze
302,1/2/2018,19:45,e21c98b8-6007-4deb-bb56-ddf20ff71412,55.235.232.196,106.99.190.181,Namfix
303,8/13/2018,7:09,bf8716ab-af29-49f0-870c-c11c53acc264,40.205.128.168,208.36.167.25,Sub-Ex
304,11/8/2017,0:19,2dc9015f-55f2-47d2-978a-6ada0f9ed812,233.6.200.237,139.91.160.22,Bitchip
305,4/19/2018,20:03,02490d6a-ddfa-4287-8486-1f63b0da8fc7,43.224.77.242,108.165.157.89,Redhold
306,8/15/2018,19:15,f026022b-6254-4555-8c28-1315ecab1345,226.153.121.14,9.49.228.149,Otcom
307,3/23/2018,10:43,7dcfefc3-439c-4ae6-91ac-4e5a93d42cbe,115.196.3.233,192.99.147.110,Kanlam
308,12/29/2017,14:47,5a401cf0-494d-42d9-bf78-38e55911cb07,124.249.31.128,79.249.58.154,Redhold
309,7/2/2018,13:35,d26574e6-385f-4c2d-90b6-816e1abc5a77,221.7.48.1,241.42.180.15,Veribet
310,7/16/2018,7:22,eb0c02b3-5866-4120-acaa-d2a2cce81654,244.52.28.50,155.181.41.55,Latlux
311,4/6/2018,5:29,7ec267aa-c39e-4d26-b545-8edd26d3033f,137.198.229.255,82.54.204.233,Flexidy
312,10/21/2018,7:23,1849da19-6e28-4416-8aec-db5a30eb9fae,176.151.36.14,54.193.45.64,Ronstring
313,6/6/2018,17:37,107ee684-d266-4ac5-b061-32cc9a8b5058,153.164.251.198,90.126.185.230,Namfix
314,9/16/2018,6:40,22e48fc1-2126-4d78-995b-4033e292ab14,44.48.47.22,246.119.194.237,Bamity
315,5/18/2018,18:57,177eb38a-dad9-4a28-9ec9-c617b8442def,87.173.151.224,39.53.235.30,Otcom
316,2/11/2018,15:18,23e8fdce-5984-4320-a270-71f95fbd0787,253.32.254.29,245.163.190.253,Y-find
317,1/17/2018,14:44,b8c9e4ec-5d13-4027-970d-754539d94bdc,82.143.201.164,176.55.27.228,Tin
318,3/7/2018,7:33,369301dd-a56b-4a44-8aa1-ee91ad7f2093,244.158.173.114,214.119.26.23,Ventosanzap
319,12/22/2017,2:28,1d92c2ad-a719-4d06-ac4f-17f80e815bf4,138.135.227.99,235.37.107.55,Stringtough
320,4/4/2018,15:17,c8c740c8-6259-485f-95dd-ff80ee430171,40.131.75.114,222.47.228.43,Overhold
321,4/10/2018,11:11,9b9f5538-1f5f-4e9c-b122-a04423ae8d14,166.94.232.141,25.141.18.214,Alphazap
322,4/19/2018,21:25,ad08afda-ead5-4613-ab86-66b91d4b93ed,113.106.202.108,87.1.134.159,Zamit
323,6/8/2018,2:25,bf38cab0-4275-418c-81c8-281b9be48c67,154.226.33.85,83.251.232.249,Alpha
324,8/12/2018,5:09,eea85aa7-16c3-40e2-a945-2be0f6c5a397,103.224.102.147,155.129.110.224,Alpha
325,8/13/2018,9:18,4b9686a4-a062-4405-b079-d2211a945d8c,242.11.123.236,42.114.232.111,Quo Lux
326,10/29/2017,20:38,a7b845c9-65e3-443a-8e9d-6c2fdd95b8b7,63.83.245.52,31.152.66.226,Voltsillam
327,3/15/2018,17:17,dea8aa31-70ff-4477-8cf0-c69729b6e94f,64.82.9.26,149.129.189.127,Pannier
328,9/18/2018,20:14,42ec5d6d-8aa4-4024-a99b-14303ef08320,10.73.60.14,119.75.91.243,It
329,9/8/2018,12:32,d0759ec6-0dde-49f1-9a1c-5dd0dd1ba4ff,48.123.28.91,113.15.164.221,Kanlam
330,3/29/2018,11:23,f3eaced0-63ee-49bf-8230-eccaef83260f,241.186.196.24,105.79.171.79,Toughjoyfax
331,10/21/2017,5:13,8adb35cf-52b1-404a-9ff4-c1321e3eda01,184.136.56.216,232.114.165.2,Ventosanzap
332,3/28/2018,9:31,b5ee4b31-da3a-4e1b-8efd-810b61e815c9,122.72.208.135,124.194.156.199,Namfix
333,1/9/2018,7:34,667c2776-b5cd-42f9-8cd9-cda6c1c3583e,153.147.25.66,29.83.38.168,Ronstring
334,7/19/2018,16:05,05ad32ab-381a-4b83-8cd9-5f6c4a0266c6,150.86.22.182,172.69.92.202,Stim
335,5/15/2018,18:49,1c62250e-fd1b-4e65-80fb-ce4f39b071c3,27.11.53.175,109.101.111.191,Rank
336,11/9/2017,16:06,0d15e9cf-45de-473f-a292-788e2b4a7b93,251.181.205.104,79.114.208.212,Rank
337,2/27/2018,9:44,7b34d273-1a06-4143-a1b9-71a346665308,144.17.202.187,57.154.234.39,Home Ing
338,5/15/2018,3:16,1e3ccbcc-deaa-421d-b05c-a34c73e19d73,154.96.248.52,204.148.139.173,Matsoft
339,9/28/2018,12:13,8a2c3d26-9d9c-42ed-9755-e89805091aef,4.178.112.124,211.214.52.42,Viva
340,12/9/2017,17:25,143f46e0-ff5c-449e-9feb-4b656fc17e7b,94.186.75.165,192.119.31.112,Voyatouch
341,12/1/2017,10:13,371ebe79-9554-43bf-bef9-c28461a26eba,17.138.122.51,223.117.4.4,Sonsing
342,5/5/2018,13:23,c015fb14-e367-4d2d-b8b5-1bdfa1f3af52,225.116.22.8,47.148.213.59,Subin
343,2/27/2018,0:35,dd110ac3-c75f-4073-b6f3-4cc481cbb96f,89.78.220.12,187.78.28.108,Zaam-Dox
344,9/12/2018,21:35,5c043d76-d078-468b-85ce-c9b08fc66705,18.60.147.140,87.8.30.145,Y-find
345,9/25/2018,20:13,3e42f92f-8ba4-4ba3-bccf-66b35703b057,212.115.36.130,33.193.181.147,Wrapsafe
346,10/17/2017,23:48,9bdd7280-74ac-4524-95e7-5c170458a7d1,102.161.150.183,239.36.80.4,Sonair
347,8/21/2018,1:48,402c9f49-f69e-4fd1-8222-b9d61eeb8687,11.60.75.159,48.112.186.64,Redhold
348,6/4/2018,15:35,e1a2a2b4-b6e5-4433-843f-a006d0222d32,19.20.143.232,229.172.124.83,Subin
349,5/8/2018,9:42,7bcf5f50-ac59-48d9-9ae0-25b814c7c115,61.61.104.143,86.238.212.174,Latlux
350,11/23/2017,12:42,42857d81-992a-4e3c-a14e-783d6f0f216a,104.201.142.23,79.119.110.14,Alpha
351,2/14/2018,9:31,b1b28aee-7a3f-4d13-8ed1-0ef9d1340068,44.220.104.5,190.100.119.32,Flowdesk
352,2/3/2018,12:11,c8d2765e-44e2-4755-a670-3266005e0dfe,178.158.106.47,246.184.93.88,Stringtough
353,4/14/2018,7:37,259d5b68-9465-4e32-9551-4330a9d905a4,142.49.175.168,132.7.168.34,Sonair
354,10/28/2018,21:14,9e7a28cf-a30a-49cb-b485-0a819bbf77c3,120.120.119.226,112.45.119.126,Cardify
355,11/17/2017,12:55,216e85c1-918b-4fec-9866-e2d4ec71ec5f,32.9.120.2,203.238.214.201,Duobam
356,8/6/2018,12:01,929234ca-4ccf-4502-bc51-1218bd3b4e98,75.237.219.164,213.6.130.200,Alpha
357,8/21/2018,3:18,bb53f0af-1749-4742-8868-6d4923944598,118.177.175.117,239.206.192.40,Bitwolf
358,3/25/2018,23:12,088ccda4-06b3-4bef-9bd2-c03be0150486,81.234.208.146,90.168.198.157,Latlux
359,12/4/2017,22:05,3aadc2fc-d372-4941-8bb8-9a2a59da35fb,187.128.136.214,152.63.229.247,Tampflex
360,2/5/2018,1:58,e6c37072-ba9e-4bf4-bb12-0ccff25f144f,26.90.106.127,41.122.54.109,Gembucket
361,10/11/2017,10:36,28f354d5-c238-4a6c-af71-d54a5a120f39,97.220.198.8,4.194.229.129,Y-find
362,7/1/2018,8:06,cfa587cb-8bc1-467e-8f57-69475f4b107f,122.186.107.137,17.48.13.81,Hatity
363,6/10/2018,14:32,773d2fb6-c44e-4fda-b350-05813cffa63a,65.65.14.15,28.93.96.230,Veribet
364,12/30/2017,18:00,aae0aab2-877d-43c8-a989-7281c854ee23,209.101.227.18,232.235.190.222,Keylex
365,3/29/2018,19:55,8d1e1dfb-63be-4d14-80df-fa66fe13800f,166.35.228.17,119.10.55.251,Andalax
366,4/27/2018,15:03,e997ff35-208e-43d8-b769-385008cb3fa0,117.211.83.195,93.20.28.51,Tres-Zap
367,8/8/2018,0:46,d69523e3-020b-482c-afc5-6f5da3284f70,96.230.94.12,218.185.240.214,Treeflex
368,12/14/2017,19:51,31599eb7-1c30-475e-8e73-b7bc4089c68b,108.198.236.141,90.108.227.210,Mat Lam Tam
369,10/17/2017,3:49,215cbe5b-237d-4c55-a577-634fe8c978f6,181.238.99.45,223.4.223.90,Stronghold
370,1/30/2018,21:23,33e62de6-07bf-42f6-b612-fe44d2249d3e,54.197.88.101,78.253.118.237,Flowdesk
371,3/27/2018,22:00,55ab8483-9947-4214-b914-462af3960ce9,65.153.14.115,61.116.40.26,Voltsillam
372,12/16/2017,6:03,bb91be94-1db6-4d1f-ae10-51c69a0d4ace,95.218.30.213,122.120.217.221,Rank
373,9/29/2018,8:47,f7f1602a-7026-4c45-92a5-b3d0e49df446,38.56.229.44,66.111.105.44,Greenlam
374,12/5/2017,20:31,36ab873e-1152-4c7e-bf67-47a1b6262aa5,251.207.150.166,125.140.120.217,Tres-Zap
375,2/15/2018,18:52,fa7250b1-260f-4bd8-9c99-3d8aca7dcf75,196.63.227.181,125.128.136.130,Konklab
376,4/16/2018,0:34,275e8756-cc49-4eb6-a953-c030ffe59fc0,36.93.244.165,214.30.225.113,Vagram
377,9/23/2018,12:32,9744b817-2332-492d-a301-1e192cad6b47,179.252.116.185,37.82.98.209,Duobam
378,1/18/2018,16:02,506d95fa-6bb5-4d18-8cb8-8100654ca078,125.244.179.249,61.116.44.176,Bigtax
379,10/25/2018,2:01,6065629c-0449-4c47-b319-85b97ea73bc1,184.85.183.150,215.0.146.255,Home Ing
380,6/26/2018,23:32,8741db41-4810-47a5-b904-edefb1c8af89,200.155.194.242,161.10.111.73,Zathin
381,10/14/2018,6:12,65e085bd-17d3-4318-9872-91cfbc36c250,121.127.30.183,131.244.15.179,Opela
382,12/24/2017,22:24,56b03813-dd4e-4a92-99a3-adb6f2f178de,250.44.44.49,128.188.141.234,Asoka
383,4/27/2018,1:15,b00dec01-beb2-4811-8c82-871989ed0345,9.204.66.47,202.115.83.243,Ronstring
384,12/20/2017,0:57,257e72aa-c9a4-4dba-9466-2c3008b54103,196.86.72.249,42.109.173.169,Konklux
385,10/27/2017,20:03,7fe8144c-e1f8-4b35-9301-40049ee6dc8b,38.79.86.203,31.0.72.58,Bytecard
386,12/16/2017,9:28,f46a9d0e-bef4-44e7-97c4-837a7e62a9c1,216.41.173.183,8.69.106.140,Tresom
387,5/21/2018,22:32,caec932b-c41a-4a44-96aa-60facdbb134c,170.121.224.165,240.36.45.36,Fintone
388,2/4/2018,11:33,434cb057-df8e-47cc-a473-87e2c116d7e0,105.206.97.98,214.57.212.213,It
389,12/19/2017,6:24,909d6cc2-2f61-4418-a506-2e441c37707d,244.121.41.15,78.129.121.180,Zontrax
390,3/7/2018,6:15,d2444d43-fbb8-465d-8bbc-b035218ae7eb,156.27.7.242,216.92.198.200,Andalax
391,7/25/2018,1:55,f18ad2b0-1e5a-4bb8-98a2-293db37647b4,52.242.36.207,46.197.2.124,Biodex
392,2/22/2018,8:17,ab282a8e-c4b9-45e9-ba97-31e68426f82d,125.189.19.122,168.49.255.32,Rank
393,6/24/2018,3:15,e29e9d5c-1e46-42bf-86ae-f78729ac1a39,5.44.180.14,110.50.71.15,Overhold
394,7/9/2018,21:28,e76a63b9-9b9f-4809-a142-c9837c9e34f9,162.67.87.215,195.51.13.195,Sonair
395,3/24/2018,5:29,f0b53cc1-87de-46c7-a7df-224a85f6525d,79.124.116.210,232.128.188.130,Greenlam
396,8/20/2018,17:54,feb3f722-7502-45fa-94c7-60c2b423f8bf,52.236.144.36,159.70.74.115,Toughjoyfax
397,10/7/2018,23:52,6e0506de-4cd9-4771-a37f-bb07b220fe1d,11.170.133.132,120.159.101.200,Sonair
398,5/13/2018,8:32,82a54722-4ea6-4457-8fae-bceaf0fdc477,83.127.242.248,84.110.229.177,Matsoft
399,2/25/2018,14:57,099e3d2e-ca98-42e3-aec1-7690f6f6129a,142.154.151.25,107.114.190.5,Stronghold
400,7/27/2018,7:07,2b49251a-fac0-4fc7-bb37-3522a7dd291d,46.26.92.204,103.61.49.241,Konklux
401,5/7/2018,1:09,208b2b95-72bc-4acf-86c3-cdff1fb696d9,179.130.203.0,192.139.214.177,Regrant
402,7/23/2018,11:29,dea01578-b5e9-456a-89ed-963d724a59b7,252.84.245.151,135.69.72.133,Zontrax
403,10/21/2018,22:00,8871ffb5-a2f4-4abe-b784-42895ef6574d,190.248.190.12,216.111.86.63,Tresom
404,6/2/2018,19:08,64ffe3d3-7a64-4888-a376-f0772e5c5b82,146.180.130.88,28.206.151.63,Solarbreeze
405,10/8/2018,14:41,64507a81-7f46-4e87-a1ec-d6c473eb5867,164.204.154.11,188.131.165.152,Bitwolf
406,9/19/2018,15:10,10bdfc6c-c54f-4f06-a2a1-8f13cfc049e5,135.61.218.187,242.127.121.145,Voltsillam
407,1/23/2018,11:43,2d51724a-4ae3-4683-9a8e-913533db59d1,186.244.14.22,73.142.54.162,Voltsillam
408,10/1/2017,5:17,fd72ca90-0cd5-4be1-a096-a064516acdf9,179.55.73.175,14.111.80.93,Lotstring
409,12/31/2017,4:51,0df0cee4-1829-4abe-8e18-215f6d309991,68.103.212.31,35.245.107.228,Greenlam
410,8/20/2018,12:01,bc60c5e4-d816-45dc-ab7b-2eda37d8fd6d,149.164.107.205,166.6.164.210,Treeflex
411,11/16/2017,23:45,ab6f1e00-bbb3-4032-abaf-db4bb4d866f3,26.105.250.2,243.92.197.191,Tin
412,2/1/2018,2:29,a5396b22-a2df-4525-b5a4-cf8dc4af735b,5.38.145.91,242.212.203.145,Opela
413,10/25/2017,20:25,bbfb3e02-4d8b-4ed7-8bb8-8525cc8b399a,128.110.53.48,228.141.142.218,Namfix
414,6/2/2018,10:14,ec9da9fd-ecbb-4fdf-a1cc-86f08e038321,121.167.42.240,203.197.39.173,Home Ing
415,1/27/2018,23:06,27773ce1-93e0-4ff5-befb-41ff6620ed30,109.162.100.161,230.149.235.126,Temp
416,6/6/2018,4:51,89c7d6a7-e2b2-4ee9-8545-abf88865f52a,32.115.207.75,50.198.74.74,It
417,9/8/2018,4:43,16106db1-26cd-4946-a647-b1184718b079,15.50.153.212,40.239.237.129,Zontrax
418,7/4/2018,11:29,b53d9e15-1797-40a5-b603-24e93f05c0d1,180.219.28.31,242.78.157.227,Bitwolf
419,2/2/2018,12:22,dd0ae243-faad-4a95-a2cc-28fd43736f1a,32.204.173.198,247.154.121.202,Stim
420,2/8/2018,23:06,30b16bd3-689b-458f-93e0-64793d3ad4cd,202.101.168.94,130.72.117.130,Flowdesk
421,3/23/2018,19:16,403444ee-e8dd-4c09-b68e-ceeb85f41751,119.96.170.49,143.95.134.9,Sonair
422,8/25/2018,1:31,e201ae54-ade5-4d5d-895a-4de2cf65b3de,79.198.72.65,189.157.115.19,Toughjoyfax
423,1/8/2018,10:44,7377b6e1-814b-420a-a2c4-1e4a44564ff1,51.234.159.77,255.38.123.255,Sonsing
424,1/4/2018,11:24,51fb17c8-5073-4eb7-9b67-4a59c393c8fa,105.229.161.166,156.165.143.247,Ronstring
425,1/30/2018,16:56,a2bba67b-bb7b-40ac-8dd9-b28458220ecc,226.9.223.227,61.233.141.55,Cookley
426,2/2/2018,8:17,41663548-59e2-4383-b269-5ab1a5ba3681,25.248.159.144,7.22.67.229,Duobam
427,8/10/2018,15:40,73da0545-0f09-45a5-80a2-3f2507720cf8,82.199.201.108,14.249.72.39,Zontrax
428,11/23/2017,12:24,fc81ca2d-4261-450e-af08-2151114f5d56,97.51.123.249,87.93.245.89,Stim
429,6/27/2018,2:34,792d09d9-eda9-49ea-93b9-dc8750edbdf4,140.233.202.224,99.76.204.31,Quo Lux
430,10/4/2018,0:24,260653b3-be1d-42ae-a029-340271451360,202.51.102.119,19.7.74.130,Job
431,12/27/2017,8:27,b4e1c548-ff2c-4a97-ae4e-595a073d0c42,152.177.152.222,40.12.202.132,Zoolab
432,6/5/2018,14:26,1b30fc56-2818-4531-a389-c04324381e33,157.127.26.92,227.150.25.41,Holdlamis
433,2/14/2018,12:11,3f32c58c-4503-4d1a-8d6e-3b9c698901d2,168.10.152.140,191.106.89.249,Vagram
434,12/30/2017,21:46,6d15f019-d442-4c44-bf99-eaa6f887410f,127.196.66.21,195.44.14.107,Tin
435,11/28/2017,1:24,bc964c32-2931-4437-bf7d-acdcee79f2f4,55.43.248.96,136.29.169.9,It
436,4/18/2018,12:37,91949c0b-ac6a-4d3b-815a-8c0dad0abb39,95.178.166.237,171.172.95.190,Tampflex
437,4/17/2018,7:55,27c1a9d4-6acd-4eb8-aae7-b78fe8528835,57.25.110.193,126.250.32.46,Sonair
438,9/29/2018,8:50,1c9acf6b-44db-403a-94e9-c0dfb1428733,61.9.135.162,81.234.118.108,Rank
439,1/2/2018,20:02,f3fd571e-5b21-4b0b-a9c2-84cb8685833f,3.63.221.109,29.155.6.229,Fix San
440,3/5/2018,6:49,5ef031c3-558d-4917-97d5-ef052f403195,26.47.210.187,234.8.129.155,Prodder
441,3/3/2018,13:16,157b093b-8b52-4e8b-bf43-0c25dc780a58,189.65.219.207,118.45.166.22,Mat Lam Tam
442,10/3/2017,9:24,3183dd92-b0f4-4247-8a9e-2269cfbe9f23,231.183.51.116,17.183.248.130,Zoolab
443,8/18/2018,13:59,b153817c-216b-4457-aa49-32dd38fcd581,16.171.130.169,26.17.88.64,Tresom
444,10/5/2017,14:47,03b822c4-0185-45cc-b5ac-4fa91069c750,148.10.69.130,181.100.71.187,Daltfresh
445,8/16/2018,20:51,1c1e22a7-139a-4f40-a5bb-5b3c7ea6f74b,142.81.24.167,31.105.103.202,Duobam
446,2/16/2018,8:51,fb4fc4a0-18c4-482b-9f58-39eff2e4fd9e,204.125.32.85,167.153.148.42,Tempsoft
447,6/29/2018,22:30,f3e785ed-1ad4-4339-be78-483716ae185c,145.152.35.221,69.109.226.18,Fintone
448,10/7/2018,6:51,e7e5c344-5ae7-49c8-bc16-98269d71d477,209.142.224.40,217.40.58.39,Voltsillam
449,3/23/2018,20:33,0e95223a-942b-4455-b4a5-a099beb8bbbf,124.220.14.137,212.60.70.78,Sub-Ex
450,11/25/2017,20:36,aa5de659-32a8-405f-9893-f0047903f9fa,245.232.224.89,232.79.181.34,Keylex
451,3/20/2018,5:01,3347eb01-b8fa-478d-9745-cac29400025a,179.22.6.230,83.57.115.96,Holdlamis
452,10/19/2018,4:39,c1dc98cd-9d1b-4c32-a1e8-67db295235fd,38.88.22.246,3.182.228.226,Lotlux
453,5/16/2018,9:18,00afee1a-7998-41c3-8ba7-a5e2e130f270,4.169.100.28,71.247.163.174,Gembucket
454,1/21/2018,22:40,78a42414-c410-4106-852b-878935dd71eb,132.155.21.156,65.15.220.138,Tempsoft
455,10/7/2017,6:18,d31d4f00-c252-4ca5-a0e1-c3ead5ce1d65,21.209.229.146,76.92.58.172,Hatity
456,6/23/2018,8:30,62f3703d-0c6b-439a-a6eb-5e0043ec243c,28.125.192.80,119.77.27.199,Subin
457,3/6/2018,6:06,8e454d14-a77f-41ad-9655-a74ed62c4317,56.52.96.57,48.70.95.71,Overhold
458,3/27/2018,21:50,b7d52cf7-b348-4ee0-8482-26e8ea90ee5d,73.114.101.236,75.210.204.107,Viva
459,4/9/2018,4:34,9c39678c-a5b1-4565-8563-30ddb36b7a76,183.175.154.251,171.8.199.157,Lotstring
460,1/13/2018,16:54,48a20989-3331-40e7-8378-2964afa50bb1,15.103.30.60,235.32.203.34,Y-find
461,3/17/2018,16:31,18fc0d90-b195-43c7-8fe8-787c9ac9b5e0,143.25.77.155,232.1.197.186,Prodder
462,11/5/2017,20:18,481f9c0b-093a-4ed1-83e7-ba9df5f34332,246.138.233.185,205.151.40.22,Lotstring
463,7/10/2018,1:30,18ce5191-745a-49fc-9e9a-81a7d784545f,103.70.223.136,129.57.90.88,Toughjoyfax
464,4/10/2018,3:47,094bd2fd-cac1-4ef4-b7bd-fe4132300e88,199.127.183.140,184.92.226.236,Trippledex
465,9/4/2018,5:24,841f66ac-d888-469e-8cdc-bdf643f4afb9,10.41.35.105,171.95.162.107,Transcof
466,8/24/2018,18:11,4cba8df1-db8f-4a4a-a410-38f6ce3ef129,160.246.87.167,82.102.64.25,Regrant
467,8/15/2018,12:54,3454f03f-deef-43f5-b35f-493c38d0d733,224.71.147.191,26.132.56.251,Veribet
468,7/2/2018,3:01,204afdca-3d52-4bb5-93ba-a2402b8ce50c,91.45.130.126,204.88.31.62,Konklab
469,5/14/2018,5:06,30feccf9-b0e5-47e6-ae5e-1cae5abf164f,219.12.217.232,145.167.3.10,Hatity
470,8/10/2018,1:52,114afcf7-d8c7-4449-a8a6-89e0d5d54bcd,87.76.129.75,42.166.16.124,Opela
471,1/25/2018,3:14,7680148c-a109-45cd-a48b-cc135556f9ca,204.6.1.166,75.124.57.119,Sonsing
472,8/8/2018,0:26,7a1f0d95-5b1e-4830-b66f-d8ace25043a7,33.107.40.117,62.114.200.108,Veribet
473,2/1/2018,16:29,64b513ee-29fe-4732-8f67-3595d571d9bd,71.77.129.90,144.246.178.243,Bitchip
474,10/17/2018,4:07,7b40b3f2-39f2-4bd3-9272-db2ebcdbc6d6,175.109.76.102,132.131.243.106,Cardify
475,5/12/2018,5:27,965ace7e-2a72-453f-b4fc-21e6785ca9e5,204.87.5.184,46.240.71.2,Veribet
476,1/20/2018,3:29,b80520a3-72d7-44b5-9bf6-cfb3d221eb68,196.248.213.2,3.47.246.16,Holdlamis
477,7/23/2018,5:31,95f5c277-2fe4-4a72-b3a0-20df62743a66,104.170.126.189,4.131.38.116,Overhold
478,3/20/2018,8:37,4a7d96c1-3ee4-4f2f-b17c-2ab9de0e2223,87.110.176.255,102.47.119.45,Fintone
479,10/28/2017,21:48,a0dc9e53-336f-4671-b144-db68a37225a0,16.78.57.228,84.215.208.192,Sub-Ex
480,7/2/2018,6:52,2b91c652-3918-4515-966f-82fc673a11d8,58.35.227.205,195.245.116.182,Redhold
481,12/3/2017,16:20,b235f8a6-276a-4430-a982-842f8e945bee,134.52.156.63,197.31.237.26,Bigtax
482,11/21/2017,17:55,58789b40-6918-4f22-8835-e06b410d58d5,60.10.87.227,89.217.239.179,Lotlux
483,9/7/2018,4:36,c593d44a-ec82-458b-a966-7e7c5859eae8,66.92.133.237,19.255.78.202,It
484,10/6/2017,18:56,2ea4e8f6-2ae8-4d0e-bfb8-0122f22d9255,140.71.118.211,196.73.15.245,Biodex
485,11/17/2017,12:39,2d30558c-61a4-460e-9580-9c85c1e01317,111.224.186.103,253.38.11.79,Biodex
486,9/30/2018,17:26,32db6179-5d64-4104-9313-c1a97d3c5ed9,144.249.8.106,58.189.40.123,Gembucket
487,6/22/2018,14:15,ced6b4a5-272e-434c-a463-5b077c40871a,21.82.68.173,22.66.203.64,Hatity
488,1/17/2018,11:59,9c7a4768-9120-48c0-a240-9b1ef0c8fe2f,128.211.184.193,239.145.112.75,Span
489,4/6/2018,13:55,0abaf501-9bd0-4e29-a717-cd224a0bdfac,143.166.180.117,225.93.140.64,Konklab
490,9/16/2018,8:58,ec75964d-3a16-4417-87be-38a2f34b1658,5.173.25.245,62.167.92.127,Span
491,6/21/2018,7:57,e7add403-833f-4490-a886-4ba9e08c2515,99.162.21.66,81.208.233.229,Asoka
492,9/18/2018,13:20,0ab2578b-b5d1-406a-90a3-a3277b23862f,188.66.21.200,63.56.13.15,Cardguard
493,6/3/2018,5:49,e551ccb5-9120-4e6f-957f-e2b6d2d106d2,84.246.166.67,196.190.212.59,Kanlam
494,4/10/2018,21:37,e8ea5883-373b-4ec2-969b-015e215f9557,138.246.180.149,83.80.36.190,Lotstring
495,10/29/2018,16:11,16612ab7-546c-42bb-9f1a-6ed32243558b,149.5.125.143,255.50.245.167,Veribet
496,7/29/2018,15:01,0d32c834-6c92-487d-a749-d1ef86370f20,130.52.203.90,143.115.227.158,Y-find
497,6/1/2018,22:34,af468a7e-9d17-4d36-91fc-3bf0ae1846c8,254.171.38.125,77.28.255.221,Solarbreeze
498,11/25/2017,2:22,c4f927c7-2a3e-411e-9b3b-bb8e2dc372fd,225.119.18.140,71.183.235.97,Namfix
499,2/23/2018,13:38,ee54f86f-25ec-4289-900b-4d4df62eb477,153.69.45.221,134.69.159.236,Zamit
500,5/25/2018,9:13,5f0e4551-0cd7-4360-8c8d-1e18bacffb63,93.83.196.57,183.211.9.73,Cardguard
501,7/8/2018,12:19,56fee193-59a8-45fb-938d-82ac50d9053e,187.249.196.229,52.187.46.252,Mat Lam Tam
502,10/19/2018,0:49,3d2903c4-2deb-4edc-8e76-6e14662ce1a8,195.15.179.106,191.126.31.34,Subin
503,10/30/2018,0:11,caa4a420-9ff2-479e-ae14-79a097ab2bc2,113.237.161.194,177.223.212.151,Konklab
504,8/22/2018,21:36,df226381-8298-4a26-b90e-ef929ee80866,72.218.244.112,27.189.181.225,Transcof
505,11/3/2017,22:49,8308e802-525e-4685-b570-3aff3089eaf3,15.164.70.221,77.213.231.108,Tres-Zap
506,8/25/2018,19:38,c5eb7f87-1830-4ff3-acfb-8a58bad244b6,41.13.57.35,74.129.187.113,Andalax
507,10/29/2017,21:33,942dcbd2-6bc3-4c53-9b07-7a8805811190,56.156.89.188,6.248.161.72,Daltfresh
508,12/13/2017,7:04,4bfd27a4-950b-4860-8520-155c41730b81,13.162.106.168,242.222.9.174,Sonsing
509,4/2/2018,16:47,681aa3cd-cd45-4998-91cf-9afbf401f84e,12.31.233.164,151.54.61.239,Biodex
510,1/10/2018,17:48,2033deef-c749-4862-8ac9-54b1051363d0,252.202.39.219,37.40.166.6,Andalax
511,5/22/2018,13:29,76013e80-0985-4a9c-a33e-373dbb3914a6,48.113.187.153,75.11.156.102,Ventosanzap
512,4/20/2018,21:42,7923bf01-f7ed-4feb-8284-5d5421ace12b,200.78.146.151,44.135.212.190,Span
513,5/12/2018,12:05,272d46ff-351f-4d29-b484-282c81aa30da,204.171.198.4,234.50.143.88,Job
514,8/14/2018,16:55,c2397c30-4be4-4604-86ab-0ccf5376826d,51.50.160.134,106.131.154.79,Treeflex
515,5/31/2018,11:52,7243fe3d-c8be-4697-acf5-8e426082ee30,70.188.189.189,125.100.12.235,Flexidy
516,11/25/2017,12:12,12becd1b-0335-40f4-8ae7-fa210fb08ce2,243.119.129.242,175.128.126.0,Duobam
517,4/25/2018,3:34,9d182db7-fcd0-4c09-9dcb-633eab12fad1,173.254.231.56,68.232.6.136,Cardify
518,2/24/2018,16:36,32ce5a67-d7ff-4aa9-98cf-922000b3aeb8,194.134.148.107,107.190.250.240,Mat Lam Tam
519,12/26/2017,16:34,9cb760b8-41a9-4543-92dc-e9b578f1ea82,193.66.50.34,15.125.60.205,Stim
520,1/15/2018,18:37,090b519e-74b3-4486-9d58-539d8d3cf0d6,94.111.108.158,102.131.74.84,Pannier
521,9/10/2018,7:33,a3168854-d3bc-46ce-a5c0-29f51c36e14b,150.46.157.148,186.200.158.19,Domainer
522,3/1/2018,0:19,2b44d3ba-2888-4118-afe1-486b1121f8d4,145.24.113.179,125.12.99.84,Cardguard
523,10/24/2018,7:46,c85162d6-3a82-462c-ba80-bc4e00ecad5a,67.116.79.57,5.18.38.8,Tempsoft
524,6/14/2018,16:20,53078bb6-bbef-4493-8a21-be1ff6ee0808,255.168.86.123,45.208.72.104,Lotlux
525,10/28/2018,0:58,7c80b31b-b928-4a68-9a6e-2af053240414,205.13.26.179,233.95.52.244,Zathin
526,3/5/2018,9:09,7c54250f-76f8-4259-be70-9d04347d8c5c,72.15.144.97,145.210.18.241,It
527,9/9/2018,19:51,aa9b0a79-2029-48e5-8add-eadf833693e2,107.123.185.37,94.42.45.237,Otcom
528,7/24/2018,9:16,7d7fd1aa-1867-478a-a08b-d5a85ca11485,164.207.127.132,85.196.61.86,Wrapsafe
529,2/1/2018,8:40,5ec82fdc-6c01-4e36-971b-15bbb3433da1,215.51.78.143,136.124.73.186,Bytecard
530,12/17/2017,23:22,ec6727c7-9eba-4996-b467-a244c14a89b1,121.18.7.216,228.54.5.183,Tampflex
531,5/21/2018,4:01,b0987a7a-c613-47c9-9973-96c5b14eaf02,201.226.70.115,253.236.145.144,Bytecard
532,2/27/2018,3:42,e30d6d98-5fe6-4bfd-8c58-990a98f733a7,188.150.29.70,134.91.242.15,Bitchip
533,3/16/2018,18:49,de0e5c7f-d2cb-4225-8c43-56aba0a0c2c4,108.108.130.237,56.147.30.161,Zamit
534,1/28/2018,0:36,8daaaddf-4110-42c6-bfee-f607866ee23c,158.27.238.180,37.173.205.45,Fixflex
535,9/12/2018,22:33,ca9864a2-be69-49e3-b484-27c23284e294,184.18.134.82,108.179.240.90,Viva
536,10/18/2017,20:41,a47f5194-c0a4-4f3f-9d31-4600233a5e6b,95.14.142.152,87.137.137.45,Konklux
537,9/25/2018,21:45,4abca766-4c2d-4a29-8c3d-df7703a48211,183.83.112.126,254.160.126.84,Gembucket
538,2/16/2018,22:20,8fe0f72b-fd7c-48ed-ad64-308d02db640e,197.230.215.92,135.104.29.46,Y-find
539,2/28/2018,2:50,e22f3102-e861-4130-a4d1-1182f3f120bb,151.189.35.7,149.211.54.109,Temp
540,7/1/2018,16:21,6e81c88e-9847-41cf-9633-0a79b74dcc48,0.122.127.123,5.90.25.34,Tresom
541,10/27/2017,2:01,2daf72d8-c588-4d76-81a1-d5b4ee968143,73.45.18.171,132.167.245.6,Tresom
542,10/1/2018,9:07,04d5b765-db2d-459c-8517-1b399b27df6a,182.144.55.187,163.31.254.37,Tampflex
543,1/22/2018,23:32,18838cfc-52d4-4cc4-840a-8b79d5c5719c,89.248.81.113,232.30.28.47,Solarbreeze
544,10/16/2018,12:44,ca03f246-f558-49a7-82cb-aa9a916b58da,32.232.66.247,246.192.210.48,Tresom
545,9/8/2018,19:39,06d1730b-f54e-4d77-bfbe-3023adbd02dc,48.106.160.160,152.47.189.90,Bamity
546,2/8/2018,0:04,5d3fda9a-9ecd-4d93-be6e-3a4776acce36,128.25.40.216,205.116.146.190,Ronstring
547,3/24/2018,20:49,d12861d4-c9a1-43dc-a73a-8599f23a5f37,121.18.148.32,102.63.203.24,Domainer
548,7/11/2018,23:46,a27c4f63-747f-4d79-a77f-ac149331666d,21.126.72.213,227.81.117.108,Opela
549,9/8/2018,10:12,2a3ae4cd-dd43-45bb-83cc-3606da5935fb,152.184.52.252,92.20.171.80,Pannier
550,1/25/2018,12:41,5a997e51-2a08-4307-a316-5b15f078bb3f,6.153.77.151,232.131.51.133,Bitchip
551,4/22/2018,10:08,e60c1cb9-7eb9-4b50-a2dc-3c7914266ce5,201.144.209.175,182.195.169.111,Y-find
552,1/17/2018,11:54,ca86191d-7fa3-4d53-8bac-c215c0cabce5,133.249.156.248,104.42.88.219,Wrapsafe
553,9/14/2018,4:42,ef6529c4-c7db-471b-a0f6-fc301925f9fa,105.53.5.156,93.1.25.185,Alpha
554,1/27/2018,21:09,8789452a-3db7-43ba-8133-eca78bd16ef3,142.62.174.88,123.31.207.124,Tampflex
555,10/26/2017,5:08,f31c8255-aac1-44df-9ba7-166fbf2d5acf,131.111.29.98,80.144.154.209,Tres-Zap
556,1/1/2018,4:34,e45b0369-83bd-4229-b1ab-1dcc065d4c02,41.175.99.61,80.116.245.60,Tempsoft
557,11/14/2017,21:19,0aefc43b-5103-4893-aecf-7e2cb6abc5a0,36.102.45.20,171.153.139.249,Zoolab
558,8/8/2018,14:20,8e7df585-e158-40af-8343-7e5c3ee56be4,89.189.45.185,73.73.146.76,Tampflex
559,3/8/2018,10:25,14c77807-f84d-4410-9c60-6c4a4bb8c511,227.138.231.177,7.161.115.116,Biodex
560,4/26/2018,18:41,1afe52db-877e-44b9-b789-3ff6ab922ecb,99.243.47.239,11.161.224.214,Konklab
561,2/26/2018,5:45,0a2f44ea-6151-4914-9fbe-346488c6bbfe,53.148.169.29,255.112.161.254,Zontrax
562,6/1/2018,19:28,0da2dd54-3c64-4355-91e7-1831fbe9d0fe,89.21.164.29,7.106.146.21,Bitwolf
563,5/28/2018,21:12,85963043-57a7-4126-85b1-a1f1034bcaa4,155.149.114.161,203.77.15.141,Kanlam
564,9/13/2018,4:22,467eccc8-70b6-4924-9784-c0d6d8cff307,186.4.162.193,108.26.75.77,Prodder
565,9/23/2018,12:12,63bd41e1-9c79-4c4b-87f5-2c4f34abe409,192.94.185.80,78.118.37.255,Otcom
566,9/6/2018,19:42,145f7277-c5d6-4603-b46b-0af3a30ed82a,130.68.91.213,109.75.149.98,Biodex
567,8/31/2018,17:56,c5b58222-ef25-4d08-a71d-7018f316b639,32.4.184.142,80.141.2.237,Tin
568,12/9/2017,20:32,f56d7b0f-c447-4e2b-8711-f5e1c96d207c,241.208.22.146,197.131.66.104,Bitwolf
569,3/28/2018,0:35,77a8db74-d858-40ce-85ca-593617e627ca,151.74.15.24,197.27.190.165,Flexidy
570,11/22/2017,9:32,8725ddba-d41f-44ee-a3ed-f50ccea00df9,53.254.251.246,2.104.212.188,Cardguard
571,10/5/2018,23:17,eb818643-c6ec-43a0-9b05-b487c955fd53,179.254.171.249,79.87.100.189,Temp
572,12/7/2017,4:04,7d8a0094-d7bd-4ed8-8ca4-4e3ff5048929,61.124.102.171,43.228.247.39,Solarbreeze
573,6/27/2018,19:50,3154e01a-0d32-4d1a-8e26-b06d372c5171,218.61.129.163,34.33.173.25,Keylex
574,2/4/2018,5:47,7d9d1b6c-8a05-4a9d-986c-7c220b589f42,116.246.4.98,156.42.129.148,Zamit
575,10/23/2018,23:14,0087c6c2-c87c-49aa-b168-0f1fd06171cf,159.159.179.103,249.127.223.41,Overhold
576,1/7/2018,10:09,312165fd-d066-4d4a-846d-f519a30c7b42,184.82.49.94,151.74.30.70,Prodder
577,7/30/2018,5:03,a420032c-f787-4af0-9947-dcb35e653df5,16.34.180.43,210.67.174.148,Bytecard
578,12/24/2017,16:12,2aca1a8c-e95d-4281-aee0-d62bf6ee4c26,51.35.23.62,53.219.163.68,Domainer
579,7/8/2018,1:09,3b826ba4-b8d2-46a7-b161-dee5192a8274,144.147.205.85,65.195.175.161,Zamit
580,9/24/2018,0:34,26590774-5e1c-43fe-8999-40b3d79fe75a,121.109.131.163,15.199.178.237,Vagram
581,10/11/2017,4:31,0282fad8-aa15-4a6c-8569-842cef81a4d1,129.217.166.60,78.58.103.252,Sub-Ex
582,12/29/2017,10:09,e7850335-7b6a-4b15-b1b5-9256b0f6eab3,30.103.230.64,140.12.212.101,Tin
583,9/17/2018,2:40,30ba1539-0816-491b-8c3b-dbf953fbcd20,70.220.154.175,76.178.143.135,Fixflex
584,9/22/2018,1:11,da9db3ab-1a23-4024-bb8a-accbca917d9d,2.1.27.165,42.99.238.167,Home Ing
585,5/12/2018,17:44,0b5bdb81-6f0a-4100-a77d-ffb3034938e3,15.227.29.186,8.58.190.224,Sonsing
586,2/1/2018,12:49,f5810623-88ec-4fcb-997b-912e57b0e27e,95.243.158.108,25.53.210.97,Y-Solowarm
587,1/15/2018,8:46,36e45db7-3083-478a-a759-b07b68cc3ebd,6.216.111.157,110.237.110.80,Domainer
588,8/26/2018,18:22,8588c5e5-fa77-488c-9b32-5b078d610d0b,166.20.25.149,16.181.213.52,Bytecard
589,12/12/2017,8:02,ff4d7c65-39f7-40af-b34a-104e7d8f5435,179.62.146.56,175.122.133.67,Overhold
590,10/8/2018,18:35,b73fed5a-ecbe-4cc1-9da5-3ee40510ec3a,206.142.96.140,234.62.217.25,Fintone
591,7/14/2018,18:51,2812c00e-1a7d-41f3-97ed-4f9ea8dd052c,166.3.102.4,206.155.78.7,Domainer
592,2/8/2018,19:08,04383a14-10c8-4f2c-be8a-fdc13dbfbff3,154.155.145.35,8.144.229.187,Bamity
593,4/27/2018,13:19,b2dad016-4d63-4fc4-b410-8e0cf408eb12,151.200.237.195,167.14.35.62,Wrapsafe
594,7/3/2018,19:29,89624735-92f7-4766-9fe4-6aaf9c4889b3,116.223.100.150,149.157.199.240,Span
595,8/7/2018,1:23,b59d164b-73bc-449c-b76f-db6bb80767e1,68.208.69.36,97.2.37.3,Fintone
596,2/5/2018,12:28,cc6cb355-8fd1-419d-af45-d9aa9e97e797,185.209.63.173,225.150.201.15,Opela
597,12/31/2017,22:47,f4cc16fd-eef6-4255-83c9-78eec78f1454,156.19.229.110,155.207.87.27,Wrapsafe
598,4/15/2018,23:19,89a21b4f-4160-423e-abea-6717719d7790,92.137.63.132,59.80.151.71,Toughjoyfax
599,2/21/2018,4:41,f2e125e5-75fb-49dd-92e6-bb8521d5ffc3,15.165.99.188,125.228.169.229,Voltsillam
600,7/24/2018,17:41,f3ee6f0b-1364-4f10-9ef9-d1be8ca35cae,63.254.7.113,87.7.15.91,Bamity
601,1/7/2018,18:13,780f1061-804c-42f7-9c9e-f025ebe5ea88,111.11.75.90,18.33.175.157,Job
602,8/10/2018,18:40,4b8f4f78-897b-44f0-a5b8-923b832e5461,141.200.2.68,57.220.35.94,Tempsoft
603,7/8/2018,17:20,1fc4a32e-22aa-4b93-abc9-eb05b9e38dcf,215.45.43.45,115.106.86.156,Keylex
604,8/13/2018,4:51,b9e68ca6-8c30-4b22-b4e0-6cacc83d0e10,54.200.185.253,84.243.54.194,Y-Solowarm
605,7/27/2018,4:23,6943b81e-35f8-47e8-9118-447c23657ad5,78.149.126.133,34.11.70.121,Bitchip
606,5/17/2018,15:14,9dee1c6d-cb6f-4e93-acac-b5738a0d6180,252.50.239.151,66.197.179.249,Treeflex
607,9/3/2018,8:04,36c634ba-d851-4346-b767-f05939edbdeb,19.179.3.13,129.188.102.196,Wrapsafe
608,6/23/2018,15:46,1ce5c582-358e-4be9-a69b-0d309c73c9ce,201.36.6.57,120.178.153.1,Fix San
609,6/14/2018,7:36,e394c258-109e-41d4-a9c5-4e7fa373a7a3,149.53.34.137,5.66.83.222,Otcom
610,4/2/2018,13:35,3dbcc703-5a50-4868-947e-a9dd7bf4ab2a,57.232.51.167,37.169.39.141,Zaam-Dox
611,3/7/2018,18:30,3160f7e8-751e-4f75-9596-652013079a8f,73.152.226.21,0.4.203.232,Stim
612,9/22/2018,23:35,a08a02c9-cb26-4533-a6ff-135a80d4e435,182.36.178.75,176.194.96.96,Ventosanzap
613,2/8/2018,1:05,f6102014-894b-469b-a424-291cf40b56b9,59.63.194.233,116.40.242.183,Gembucket
614,6/16/2018,11:17,cc574075-cc8b-493b-93c8-3325b670cfef,3.19.50.166,114.48.163.12,Tempsoft
615,8/21/2018,9:12,969d0689-6aff-4801-8090-ae98edcc6e82,63.127.255.158,38.216.14.27,Sonsing
616,6/23/2018,1:15,10518daa-3e78-499b-a733-7469f7184235,189.31.58.223,79.105.73.136,Holdlamis
617,5/20/2018,16:13,4b9a4cdb-5ce2-4b59-86ab-c5de8fb4380e,176.54.168.187,8.21.17.176,Daltfresh
618,10/20/2017,21:52,0ab46b01-0cdc-4f77-b023-4ee8b5aa13b3,8.99.185.218,178.23.58.222,Bytecard
619,4/2/2018,22:58,85094576-ed50-4033-a83a-53fd3c495d7f,176.48.146.18,70.85.127.73,Rank
620,10/22/2017,12:42,d640f86e-8700-4991-b723-a257a6ad4412,17.176.21.165,255.3.198.127,Treeflex
621,8/19/2018,16:05,9c6c5cc3-fbcd-4ec8-956e-08f0d3c113c5,26.234.251.83,252.160.193.136,Ventosanzap
622,11/7/2017,0:22,179a6d91-4ee8-4973-99ca-220ce9cbadfd,244.25.251.83,237.168.183.24,Solarbreeze
623,6/7/2018,15:41,e79f2609-69e0-4d9a-8dda-2b0b41afdea6,1.193.104.218,248.9.3.131,Cardify
624,9/18/2018,14:34,e958ad2f-c250-427e-86bd-da9dd79505b7,71.59.175.14,193.25.93.212,Gembucket
625,10/16/2017,8:35,232eddfa-7033-477a-8e87-3d3cf3838579,213.87.242.128,152.69.108.38,Zontrax
626,8/7/2018,1:35,8bd92de3-138a-4df2-87db-23cab70c100d,255.127.92.246,248.156.16.214,Bamity
627,7/8/2018,0:02,74c78ad8-81ce-4061-916b-816cf04d3b64,103.155.225.151,39.147.35.49,Toughjoyfax
628,10/15/2017,5:49,68aef16f-b080-4656-a01d-02f8307535eb,128.102.163.71,249.219.3.158,Y-find
629,11/1/2017,13:40,3c462bfa-db58-47bb-859b-c2f214e2cf6c,206.236.182.173,153.161.24.206,Job
630,3/13/2018,6:38,6f762c08-c7af-4d2a-813a-859f93910a89,140.109.206.191,1.106.139.128,Pannier
631,12/15/2017,12:14,71b07257-f3cc-4dc8-913a-9cbbaf10a17c,136.36.253.52,55.103.53.170,Ronstring
632,8/20/2018,13:40,c428b538-bc48-47f6-9412-6344e1c7eef3,92.35.148.160,211.131.43.59,Ventosanzap
633,5/5/2018,16:28,2dd8f5af-6639-4801-b475-19873de1f57b,228.191.113.147,79.163.21.204,Hatity
634,4/14/2018,11:31,ca8408ae-91d1-499a-b566-cf37ae6ada7e,164.214.206.203,85.142.36.153,Otcom
635,12/11/2017,7:49,4571c053-aadc-4d90-ba9a-1a2239c4d937,235.245.60.99,22.127.148.1,Transcof
636,11/18/2017,3:24,b3eef7e7-b8cc-4a1a-ba93-5685dea0278e,160.140.190.223,90.42.3.210,Konklux
637,3/19/2018,6:02,6c963487-8525-4b5a-b0e2-d7e2b8b28254,94.108.254.195,1.184.212.122,Ronstring
638,11/2/2017,8:42,2f893327-47e1-4489-bece-df5c5524405f,254.121.30.18,17.162.112.245,Lotlux
639,10/20/2017,12:39,87b0c464-2c40-4c5f-b597-b614a63c32ef,110.145.201.124,247.226.3.99,Bigtax
640,10/28/2017,13:03,049e88c5-df5f-4c7f-8611-360627a677d9,59.75.156.67,212.228.225.9,Tin
641,8/19/2018,11:19,ce9656c7-a1e1-4f7e-8c17-f8aad3c14b70,88.85.205.178,10.135.136.206,Matsoft
642,8/13/2018,6:14,1efd2197-3db0-4da2-9b12-74d5e8a831c0,50.45.94.1,79.164.98.175,Job
643,8/18/2018,11:10,a52892fb-ba12-471b-8be5-c240a32635ab,40.101.142.9,157.238.190.12,Zathin
644,6/13/2018,18:54,014ab1e8-971f-4e2a-a5ba-284ee048f885,184.9.154.182,21.102.205.16,Greenlam
645,11/1/2017,4:34,84e2bfca-4579-4476-8bad-63c542e2d8ea,71.73.239.174,108.216.145.72,Holdlamis
646,8/16/2018,1:25,92a1afab-bd33-4c01-833e-b008d6b4afa4,100.40.87.96,52.45.172.132,Zoolab
647,7/15/2018,17:42,62710d61-834f-42b8-a5e3-2944c6fffb51,62.240.79.224,173.212.13.104,Cardify
648,10/23/2018,18:27,80ac7f2b-4c60-49a1-b017-72f1ee23e7c8,47.177.227.114,122.22.115.74,Rank
649,1/15/2018,4:15,3c578365-7a25-45d3-ab6e-5459c1285ebb,196.118.192.226,42.142.79.222,Lotlux
650,11/2/2017,13:15,34f1a0ae-229d-40ce-9b51-d608d91df778,159.184.197.110,207.46.17.169,Keylex
651,10/18/2018,10:00,1b480e1b-f9d9-49aa-88cf-69b373940658,1.156.138.117,24.39.253.184,Voltsillam
652,8/28/2018,16:20,27aa0e03-32d5-4590-91cd-28edae2b47b7,60.178.90.102,140.37.0.206,Latlux
653,10/17/2018,21:47,ddce6b84-b5ea-4e32-85fb-10eba347e35d,228.109.198.181,186.112.119.60,Bitchip
654,10/8/2018,14:54,6691ac96-4a01-4bca-aa57-694405e46a1c,126.66.253.248,200.114.144.3,Kanlam
655,12/17/2017,17:52,cdcfe997-0917-434f-b132-6acf5807820c,252.52.32.207,194.195.136.207,Vagram
656,5/11/2018,16:26,8ecc4588-2de2-4561-b4b5-ecbb79c6aa85,158.95.243.147,178.252.69.42,Mat Lam Tam
657,7/19/2018,12:55,02932bb9-ec99-4481-aa7b-8b4d9e0afe76,169.107.247.115,140.204.116.164,Domainer
658,10/23/2018,7:34,9392eaac-b090-4f2b-a9dc-cda8ce793653,179.223.99.15,221.155.250.235,Quo Lux
659,12/18/2017,18:38,8b97dd1b-8751-43c2-901c-095bb6cb1392,99.184.30.8,147.107.73.250,Ventosanzap
660,8/31/2018,16:10,4240d5ba-1024-4ca2-9cd1-f2b71c8dcef3,206.26.183.3,62.127.45.84,Prodder
661,5/18/2018,8:45,ca9fef0f-4288-4349-96d3-7b736e0f2735,65.56.52.252,112.232.146.189,Domainer
662,1/21/2018,6:10,e5165ff2-fa26-4554-b698-b491432b9006,121.19.144.53,64.69.171.225,Sub-Ex
663,6/13/2018,5:19,ea65d6f2-6077-4135-83fc-ed47462e9cac,228.10.187.99,115.165.237.142,Zontrax
664,4/14/2018,3:05,57f85e17-44c7-4d10-8ad1-7f5e2f7a7483,242.35.120.195,230.164.129.231,Temp
665,5/6/2018,7:00,c5100f68-47a3-45b9-9abd-f9264fc031c6,104.200.77.237,116.190.85.134,Asoka
666,1/19/2018,11:33,f2c697e1-9eda-4217-a705-ae1c33e284f2,126.205.77.75,134.116.186.79,Job
667,2/22/2018,19:54,9279393f-b0aa-4549-bc63-9b2adaae0063,234.87.155.212,27.46.21.115,Prodder
668,6/14/2018,10:51,3677ea9e-58ad-406f-80e9-fe56a0f2b5e2,172.32.21.197,135.223.176.106,Voltsillam
669,10/24/2018,11:15,604353a3-7bee-4f55-94ab-bf3a515b83d3,173.192.246.99,248.104.2.19,Fixflex
670,4/17/2018,8:57,563f9633-f3a8-4733-9e5a-7804af2ac108,83.95.128.152,211.151.109.87,Redhold
671,5/27/2018,8:41,490ef058-552a-4edc-8b25-1b57659bcf2a,145.79.239.224,80.24.4.55,Viva
672,11/21/2017,7:08,52419e1b-d3e0-4828-8993-7aad52250d26,65.163.115.187,214.102.95.157,Flowdesk
673,6/22/2018,6:30,6ee27101-fee5-45a8-a209-5fafde2cb028,201.144.197.13,17.196.214.108,Zoolab
674,3/20/2018,1:43,90992f56-92a8-4d71-ac01-98592d46e718,114.231.230.64,215.0.234.112,Tampflex
675,6/21/2018,0:10,1bfdc600-97ce-43f8-a04b-8394441b7da6,9.149.70.210,21.223.117.236,It
676,2/27/2018,16:43,31f29657-3275-40e0-b0f1-d6ef2f4919ed,134.42.192.173,35.17.50.143,Prodder
677,7/13/2018,14:39,bb5361ab-205f-4d51-a375-336960ca1219,175.152.111.77,197.92.122.126,Domainer
678,12/1/2017,3:33,f1764949-ab61-4411-96e8-495e2065cec3,108.30.45.225,98.14.151.35,Flowdesk
679,5/23/2018,2:58,f6270ea5-995d-45ae-9485-0ed9908f1fa7,119.215.147.204,17.152.90.143,Lotlux
680,4/9/2018,5:34,9c00f87f-85af-485f-9d44-f82c612f2c98,154.145.238.106,152.183.96.164,Zontrax
681,9/5/2018,18:33,69ea94cc-9004-4ee9-ac52-66114935c507,0.208.121.245,132.166.200.136,Ventosanzap
682,6/6/2018,18:02,6a0fc6ab-7b32-4655-baf1-ab7ce37fd385,221.160.64.155,216.233.221.197,Rank
683,4/22/2018,22:08,e693f3b5-b085-4e1d-90ad-6bb18bd47298,232.175.144.23,84.145.105.22,Transcof
684,1/25/2018,10:32,ff0f49f7-7b39-42b4-8edb-64a27a8b1dc1,126.34.245.191,153.25.165.99,Andalax
685,1/8/2018,17:28,57db9ed4-eab3-451c-b193-5117dc5b1680,196.83.223.153,92.102.74.179,Sonsing
686,4/18/2018,11:23,c5922a9e-9a3b-45d7-9ab6-b4ac0ab8e364,245.14.65.221,50.41.226.228,Kanlam
687,7/16/2018,8:52,3d68482c-aba2-438d-a7d5-1092528ba272,4.118.117.206,186.233.152.45,Zaam-Dox
688,3/14/2018,6:17,e3161477-2600-4b28-b970-f609bbc4dc1a,189.148.139.20,98.219.200.136,Fix San
689,10/31/2017,21:20,c4b767b0-b8a7-45f3-8529-2d540be6b350,4.44.109.192,0.127.107.130,Quo Lux
690,1/26/2018,13:18,aa1ff84c-4985-4315-b38b-72ce8129e070,247.95.210.167,20.130.220.47,Flexidy
691,4/12/2018,9:07,bdea8a51-d8af-474a-8a0c-bf56b8be2c85,209.40.155.52,251.42.130.198,Zathin
692,3/23/2018,0:34,7bbd7aeb-25a0-42db-8f35-dc71db363eb7,116.114.82.43,195.97.106.208,Latlux
693,8/24/2018,20:56,a76bba45-000d-40e6-9a11-fbcb810dfd25,202.214.37.120,78.159.240.221,Latlux
694,11/30/2017,17:34,b44abab0-cd02-4f92-9f35-54cf733166db,185.136.84.124,152.199.86.31,Opela
695,1/30/2018,2:00,bd4923d9-4999-4623-98e4-3460fc94dfc8,15.91.232.86,216.195.204.87,Konklab
696,11/30/2017,7:40,4f717dd5-3ad1-402c-94af-0bac800f6b25,245.8.52.118,1.198.101.118,Tin
697,6/12/2018,20:44,1bef1069-8300-450a-93d6-47b5fff379c7,4.63.48.179,53.178.231.35,Tampflex
698,1/6/2018,23:22,abe22afb-eea5-4f45-b635-5cb069633897,165.230.244.60,80.155.223.244,Fintone
699,10/22/2018,4:19,20dff81f-6059-489f-b901-a13ddabfc970,21.175.198.240,17.14.92.220,Kanlam
700,9/2/2018,12:38,5a9f00e4-4fb2-45d6-b466-242bafda63bb,244.191.14.108,206.52.157.144,Asoka
701,10/18/2018,10:43,1bfe9879-fcf4-4636-a93f-da299ec1abd0,42.145.37.115,82.70.9.2,Voltsillam
702,4/23/2018,2:00,3586ad06-a2d9-4f88-8536-f3d63ca7d6a6,120.34.238.203,35.170.206.94,Sub-Ex
703,6/27/2018,12:38,ccd2f7f8-556f-4394-872a-7c7620f3558a,4.161.99.221,8.243.173.76,Cardify
704,11/8/2017,8:10,659fc500-79d2-4478-a763-a237ee294b42,98.140.84.211,32.83.229.202,Overhold
705,7/19/2018,19:44,c5160a71-0e6c-4693-b980-e5d55c4c6f27,13.244.87.216,17.33.189.178,Domainer
706,2/9/2018,6:12,cf5dc8fa-84c9-4c7a-80f1-2a1f1f28d142,211.164.227.117,141.111.165.226,Sub-Ex
707,2/5/2018,21:55,0b3f029b-06ca-4624-a93e-7f2cf57f4a89,181.168.75.128,16.219.65.139,Overhold
708,1/25/2018,22:26,2c509105-c150-4484-aa10-7384fe5b673e,78.189.54.193,157.45.194.46,Cardguard
709,9/13/2018,16:22,560680a1-837f-4bbf-a92d-93975aae1237,131.47.48.118,108.185.214.215,Mat Lam Tam
710,11/25/2017,18:23,dcfd47b1-7d40-4b09-8caa-98996717a2b2,106.247.103.173,183.72.230.145,Konklab
711,10/27/2018,8:01,39d2a1c9-2171-418e-a7dd-a99862f517fb,182.177.103.75,241.229.28.84,Y-Solowarm
712,2/13/2018,4:06,450ddff0-f38d-4bde-8cf8-45411110cecb,173.196.122.136,4.174.162.82,Cardguard
713,12/12/2017,5:11,50f6362d-10e6-4583-b7fb-ece85a33908a,56.8.201.131,77.20.130.214,Zontrax
714,9/4/2018,11:48,bde3dbbe-1ece-4ff6-aba3-8ea68ee9e2a7,132.103.106.29,35.107.121.9,Voyatouch
715,10/24/2018,9:15,952acf56-6e9f-40bd-840e-4ef28c270838,123.5.108.58,234.230.148.88,Asoka
716,6/5/2018,11:33,1868a483-0aa4-4bde-a44e-7f6a9405cc8c,173.115.188.203,197.64.205.155,Quo Lux
717,4/12/2018,16:37,b16c717d-99e8-41e4-ad50-4923f5548638,123.233.128.16,220.191.237.76,Stim
718,2/5/2018,22:48,18704985-7cc6-42b2-a9a1-d28d1456aadd,229.173.147.156,66.131.115.17,Tresom
719,8/18/2018,8:03,0fbd94c5-39fb-49d0-bd9e-bde7e18420cc,43.145.246.5,117.61.165.99,Cookley
720,10/1/2017,3:29,424cfda9-5436-4acb-9141-90d658ce7d6e,139.130.158.126,223.192.99.27,Pannier
721,3/31/2018,22:43,f53a1c87-3d87-47ae-83ab-e2ca75af2ec8,144.229.74.8,219.91.134.35,Ronstring
722,2/14/2018,3:34,2941f3a2-fcc6-4ddb-9c1d-7a6622384213,106.120.202.4,246.80.136.154,Opela
723,2/1/2018,19:30,a2d1ecdf-ff4f-4c64-8f5f-188ef00a20bc,6.125.71.31,71.118.64.32,Pannier
724,7/2/2018,15:56,37d20a67-c365-45cf-8efd-5ca57660d88b,138.13.99.96,167.34.14.226,Toughjoyfax
725,7/21/2018,13:50,7570a7aa-5f01-4fc5-ab52-bbb73990cc69,56.143.8.255,44.236.35.151,Bigtax
726,7/11/2018,19:24,3a01699b-9537-4904-9568-92d2aedba88b,93.101.241.171,60.63.240.248,Asoka
727,8/5/2018,20:37,6b18ee7f-2825-4beb-9897-697c3e67b22b,247.55.252.233,250.52.133.66,Bytecard
728,8/17/2018,0:44,899dae10-c2bb-4821-9f7a-8a335cae1ba4,29.64.162.175,185.246.126.152,Quo Lux
729,7/21/2018,18:10,dd3dadaa-eb8d-41dc-b112-790016100024,55.140.90.39,203.253.14.23,Ronstring
730,6/3/2018,4:05,c5395559-4842-4d76-94db-9348a5ea9067,155.69.175.65,158.17.252.241,Voyatouch
731,2/18/2018,6:55,2eca8410-65a0-4cbd-a4c8-4d2c21cdcf02,247.86.19.154,135.150.19.74,Quo Lux
732,1/12/2018,0:30,232c8987-1c79-4904-8194-33baf7144a9e,136.134.190.187,142.203.181.41,Otcom
733,8/3/2018,14:44,ccf6f9ab-d386-4d87-ae7a-63c169ba7036,123.30.139.75,166.156.45.109,Tin
734,8/29/2018,5:59,8f76204f-1039-4af3-8d96-314e85af70d7,98.12.47.20,81.211.166.48,Ronstring
735,4/28/2018,4:41,fc8f3d08-0ac2-47cf-8033-61af7c6330df,223.124.184.71,238.39.234.84,Prodder
736,4/28/2018,9:51,346616fc-32cb-4906-9514-d9ea7c82d15a,135.90.251.183,233.164.192.164,Holdlamis
737,9/4/2018,12:10,a240bbc6-6c18-4891-ad3e-67242569f262,248.245.156.54,255.151.251.178,Overhold
738,10/16/2017,14:57,7e957e91-6205-4bf0-81f1-0234432cd40d,35.94.1.185,242.124.57.200,Tresom
739,8/15/2018,16:18,7cb5037b-ea0e-48ab-b43c-ddefc33080d7,80.194.221.30,234.144.4.100,Tres-Zap
740,11/29/2017,19:07,0761723c-53c9-46a3-a4f8-74e0cb2be5d9,73.54.227.128,120.253.113.193,Stronghold
741,1/8/2018,15:55,29c87ae1-f33c-4702-b5ec-6945ff23a082,238.71.164.139,102.176.55.181,Viva
742,8/8/2018,9:11,651157a9-aa4f-4aa7-bbae-dd30c1432ac0,41.196.24.244,78.75.95.7,Zoolab
743,4/14/2018,22:03,6ab606b5-49a7-4733-9569-2ba96821bc7d,186.162.178.156,13.33.163.241,Zamit
744,9/30/2018,7:58,a8628fe4-c68d-4ab3-b37f-32b7c16aeb55,250.161.8.39,14.187.161.186,Toughjoyfax
745,7/27/2018,0:56,c36ed9eb-7c58-4238-8899-c489c8699d10,189.21.87.228,246.13.40.46,Stringtough
746,12/29/2017,20:33,6dde4973-3364-4d89-9509-f331749fe5a6,136.250.144.84,173.12.102.72,Opela
747,9/15/2018,11:26,ac822cba-1ba7-4c1e-91e2-cf4deb28e2c5,236.102.73.165,213.198.118.230,Flowdesk
748,8/28/2018,9:08,39641b1e-fa4a-4c00-be3f-e85aeddcc865,210.105.61.42,107.37.218.131,Quo Lux
749,6/26/2018,22:23,e49f289d-8842-44a4-bc0a-254721b071a4,250.5.52.136,247.173.87.191,Sonair
750,12/11/2017,1:38,0557840c-e039-4a40-ba84-236288ebcaab,96.158.119.72,193.193.199.143,Prodder
751,6/26/2018,22:13,1d7521b8-8038-4a4c-a77b-de6336e77824,186.253.137.32,224.75.35.1,Regrant
752,12/6/2017,0:19,5341faff-f551-4a19-bf2b-734dea670210,21.137.7.244,239.212.80.66,Konklux
753,2/10/2018,2:53,dcc43cd7-2e29-4ed5-9ff5-c360c4199c6f,191.99.13.214,227.227.59.32,Namfix
754,10/15/2018,6:05,9c70120a-a0d0-466d-a0b4-5415e19aebd8,76.1.14.65,117.171.26.154,Bitchip
755,12/16/2017,23:31,91d52246-36e9-4cb3-b0dd-2ed1e2fc6b9f,98.24.136.186,7.74.112.182,Fix San
756,3/19/2018,6:37,bd639dfc-6fd8-4c35-b62d-2445ca49c8c6,174.81.128.78,172.211.124.55,Zoolab
757,4/21/2018,15:19,f350a61c-03b1-4afc-aad4-8a2821ce0337,240.196.95.121,107.72.77.171,Bytecard
758,10/10/2017,21:56,aeac3c54-c4fc-487e-84bf-b63f9b8bd5a5,84.207.124.136,173.164.216.86,Alphazap
759,12/20/2017,23:19,f65d2f24-7b5c-45c2-83a0-d27f152c2d83,25.26.188.158,145.69.113.72,Opela
760,9/30/2018,12:53,40516ccf-6d77-45a1-9100-29d877c5254b,64.57.112.216,178.92.63.146,Greenlam
761,4/9/2018,0:06,1f43ea60-e849-4c11-a252-97a8f91be416,45.25.2.31,32.6.221.169,Cardguard
762,1/19/2018,13:28,9b0e5828-ac9e-4568-bc26-e362f2ac975c,175.2.215.110,121.52.120.224,Duobam
763,12/15/2017,19:51,fe68165c-b39f-4083-aa87-23ad852affcb,172.2.119.92,139.154.124.8,Cookley
764,5/21/2018,16:11,313ba918-b6f7-489b-b0af-aaf983ab6df1,44.205.156.92,160.142.6.42,Zontrax
765,5/16/2018,19:29,9fa8ed97-42b5-4c2e-a612-770573cd984b,185.94.169.4,19.56.143.98,Aerified
766,7/7/2018,16:20,faa5e9cb-dd18-46da-9365-d8f2e8046275,61.55.58.191,52.203.185.41,Veribet
767,10/18/2018,1:25,2d0bfa26-3f21-4bfb-a353-c38d40c437a4,20.51.132.11,104.41.180.109,Tresom
768,3/10/2018,17:45,c6e3a114-ecdc-40a5-9a67-2efd9074e463,88.144.69.44,203.71.30.12,Alpha
769,9/4/2018,5:12,9c0fea8e-285c-412f-8440-4df792da52e1,14.197.132.99,219.128.122.184,Sonsing
770,12/3/2017,16:29,664beb45-5d45-4bce-aad4-022d1b53323f,197.127.80.56,67.240.100.90,Otcom
771,6/16/2018,11:19,689248ed-c894-423b-925d-0a6235b1f509,230.98.28.9,118.169.240.245,Tampflex
772,5/22/2018,1:41,dc3912db-4e20-43a3-a869-ffddbdeaa9e9,92.33.178.44,25.8.157.34,Hatity
773,12/11/2017,19:39,fe8f520b-1917-4315-a385-456d67ebc562,89.131.97.89,103.114.17.32,Subin
774,10/26/2017,11:53,534d9d48-7954-449a-8238-2bc5b5f19146,165.209.79.157,122.62.81.92,Subin
775,7/3/2018,15:41,6283e544-a73b-4e03-b58b-0405d6454d95,107.86.56.139,227.54.166.48,Treeflex
776,10/24/2018,8:43,e138eee7-1969-4d3a-9e9b-a71a79bb2065,97.54.159.203,40.208.38.58,Asoka
777,6/5/2018,12:37,79c3ae40-ac8d-48f0-ba2d-9f6dac569f05,28.69.155.133,14.188.191.225,Fintone
778,3/30/2018,0:28,6c79eb1a-ad53-44a4-8047-4ca9940b8b16,210.8.197.195,196.36.195.110,Zontrax
779,3/6/2018,18:28,7948ec1f-8f6c-44aa-8b1e-617bf1835a0e,124.122.105.82,217.191.60.6,Zaam-Dox
780,12/13/2017,1:00,d631950c-6f99-4e78-96f5-339e4ebfa1d5,139.134.126.196,122.148.79.67,Matsoft
781,6/11/2018,17:18,b38d9506-f517-4fcb-9a34-64f70bf5a807,86.100.240.254,137.17.194.90,Cardify
782,11/1/2017,16:13,0dc9c0fb-77af-4ee7-b593-8f988e6f54a3,247.48.76.86,57.21.130.126,Rank
783,8/30/2018,15:37,d51f649d-844c-48f9-a4bc-dd3a0f4f6a7b,213.6.68.46,176.236.117.139,Flexidy
784,2/18/2018,11:51,e9c94a14-bee0-45f6-9c57-11561c13a58b,49.36.65.101,239.11.135.79,Tin
785,10/22/2018,2:45,bf6e5e71-213d-4740-be76-b11e35529421,204.131.175.161,188.60.253.219,Holdlamis
786,6/21/2018,5:19,97b96a86-6eb3-4dc1-89da-68a6633de2b3,34.197.55.14,66.80.254.40,Cardify
787,7/10/2018,19:20,d82f6abf-002c-467b-b791-102ee1cf6885,242.9.220.21,155.137.231.230,Fixflex
788,10/1/2017,9:08,2aa84dd4-118f-475b-bc1b-c294504a322d,246.236.55.185,4.25.159.220,Voltsillam
789,7/20/2018,15:14,d975c8ef-8083-4c58-9f9d-b4bf2d985b9d,84.86.46.152,118.57.129.40,Fintone
790,6/27/2018,7:28,a8d2e8fd-4767-4935-85ea-69580b9061b7,83.210.230.44,121.15.21.55,Fixflex
791,10/24/2017,4:37,47b34af8-8a82-4b6e-99b8-fcbb6880ca4e,29.11.108.91,185.242.5.247,Subin
792,4/16/2018,10:33,c61a8a62-5d36-4f54-bc11-821527d191b8,136.151.74.199,67.243.154.79,Bytecard
793,4/12/2018,6:20,1455e065-dcd4-4a09-9bfd-a81cdbca3f36,157.179.76.103,87.75.114.1,Y-Solowarm
794,7/30/2018,19:00,a36138d0-9682-4d6b-b43b-d63f7f2e10ce,122.129.109.90,67.33.84.26,Ventosanzap
795,4/9/2018,14:10,e7aaf9a7-ba6b-46cd-bdcc-7726dc206128,124.215.197.131,77.236.219.101,Stim
796,5/21/2018,0:57,85af9dba-c16b-4670-b47a-2389d1b0436c,10.140.143.107,212.6.79.217,Stim
797,9/19/2018,8:11,3d915073-435c-4a36-9b62-928c2c8793d6,119.176.111.208,21.244.102.101,Fixflex
798,2/14/2018,0:56,a588dce1-5e4a-485a-b0cd-581c47087402,59.81.180.231,111.171.36.17,Wrapsafe
799,6/24/2018,4:04,090c885c-89f7-465d-985c-b2bb19bbc76e,129.32.8.199,107.242.197.26,Redhold
800,10/15/2017,18:42,a706eab3-fdd5-4651-9381-4062339c1acc,184.0.98.71,33.28.203.153,Alphazap
801,10/31/2017,17:37,e5a9c981-646b-443e-8095-2fa7ce6edc50,252.218.135.135,101.102.209.195,Regrant
802,7/23/2018,6:20,22a9715e-6c79-4f4f-95d0-997ac9593841,142.40.249.22,75.220.109.164,Hatity
803,4/6/2018,23:44,c38ccd08-de24-47f1-91bc-59f900d90f5d,247.74.89.178,255.120.178.142,Tres-Zap
804,2/4/2018,0:12,dc8934a9-236f-461d-ae72-b2843a7ba820,163.251.246.61,1.44.194.32,Tin
805,7/1/2018,1:41,44a9bd3a-328e-4957-8ba6-ff812d56faeb,74.51.116.75,182.42.243.88,Solarbreeze
806,4/8/2018,6:39,81f892f6-c102-495b-b283-2ecd5df5ab52,45.245.48.204,73.37.40.178,Asoka
807,10/18/2018,8:23,b7409823-f326-419f-8a24-32085293ce12,60.205.60.123,41.197.124.30,Span
808,8/16/2018,12:52,9f35e5a4-91be-427b-95f5-98dfd8fa58a0,173.29.123.183,212.116.203.42,Overhold
809,4/29/2018,17:03,f72179d6-efc1-45b5-b6ac-a664c6fe66be,74.164.80.211,73.150.159.1,Toughjoyfax
810,10/20/2018,15:50,b996efbf-c4c1-4a4b-ad28-a6955c2da20e,47.108.124.169,95.121.126.239,Sub-Ex
811,10/24/2017,21:35,27e264e2-321c-473a-9589-2a65a1b328f8,50.66.130.205,128.97.255.119,Daltfresh
812,10/28/2017,18:19,2c602fbf-86c2-4be2-a8af-dca7062f8f9f,11.30.129.120,212.207.210.171,Flexidy
813,9/22/2018,14:00,87a82eac-5b16-48d2-9adf-5d8d197531fc,8.36.255.186,192.240.101.66,Bitchip
814,10/15/2017,4:24,1d6a24fe-6222-4014-8ca2-2bcd23615895,107.219.218.15,47.153.192.32,Treeflex
815,10/1/2018,10:37,22851a15-f18f-41cb-9044-01491ff6e165,104.212.229.20,110.252.82.55,Temp
816,10/15/2017,18:48,b46fb454-6f49-4299-898b-beb589272791,64.112.241.250,171.249.118.239,Bitwolf
817,1/3/2018,15:22,9eb93089-dde3-4a05-b411-95a5b8db8529,24.216.241.139,209.252.162.136,Flexidy
818,7/28/2018,1:09,49638980-007a-4a30-bd1e-6f2d871309b4,0.133.28.161,164.199.159.76,Solarbreeze
819,8/21/2018,2:47,0468dd05-8d16-4f4d-bfef-4c3a507b016e,139.22.13.8,213.96.188.186,Voltsillam
820,1/19/2018,21:06,626350f9-1270-438c-aa97-4a76763b4634,169.197.214.255,51.106.22.160,Zaam-Dox
821,9/20/2018,22:08,b5f1b889-e510-483b-b6ab-52e48ba467ee,174.80.66.123,127.77.172.186,Fix San
822,5/1/2018,17:02,18faaa18-b808-44d3-b4d6-a5679721ece0,184.112.131.237,111.11.227.72,Domainer
823,5/31/2018,16:23,b84c308c-1191-42b9-9d84-79c7748d9cfe,70.210.151.244,244.189.189.40,Konklab
824,2/26/2018,6:51,1aa2ddcd-ebb6-43de-ba99-3764c762c8a0,58.153.84.73,30.249.159.108,Regrant
825,3/30/2018,1:09,a60e9d8c-59c3-44ea-9b22-93df091860e5,165.11.65.168,13.12.6.96,Zathin
826,12/8/2017,8:29,b708c0cd-2bf0-4520-ac05-10bb921f50c5,44.53.53.26,148.119.189.85,Tempsoft
827,12/24/2017,16:26,309d7318-b4cf-426b-9b28-11f24d08cb00,150.231.71.229,173.159.174.12,Lotstring
828,3/27/2018,17:45,e598b2d8-69ef-40b5-918d-401776a8b7e7,75.230.151.224,88.209.149.191,Bamity
829,10/18/2017,17:24,f6dcb01f-053c-4978-b1ff-a28f1b5cedc7,39.241.82.93,201.65.229.111,Duobam
830,2/18/2018,18:16,fab8ec64-0c40-4949-bab3-753fa4fba11b,97.191.218.106,139.105.216.81,Bitchip
831,10/30/2017,20:55,2049d74b-cebf-47ca-9721-a72e9d835ce4,201.86.121.240,169.133.33.147,Solarbreeze
832,8/11/2018,11:19,901878ce-ed3a-434b-8be7-0b6ce05c607f,254.112.232.57,38.159.149.206,Bigtax
833,4/28/2018,20:34,8e48d139-d03e-4303-8aae-b06ec26e36e9,67.48.185.122,74.239.57.80,Tres-Zap
834,12/12/2017,17:03,6e5ac416-fd5b-4a81-9c87-a561c77b9e26,134.238.142.248,233.254.161.184,Keylex
835,6/26/2018,21:39,f41a78f1-3135-419b-a693-c6eba7bef377,186.142.65.175,193.2.171.55,Cardify
836,7/10/2018,1:41,a8f10491-888c-4c0f-9d96-ada6b73fdcee,28.54.56.158,197.158.55.111,Redhold
837,7/22/2018,14:52,a5646455-6c1f-4cd6-858f-66d9ba32aafd,76.243.100.124,215.221.106.118,Opela
838,3/19/2018,8:33,c2820b7d-aecd-4fd3-bcae-f2cf0cc4dd6c,84.183.14.208,9.64.66.55,Fixflex
839,2/18/2018,2:18,2566d986-5462-4142-af64-c546de8930b6,4.59.187.244,51.47.156.24,Stim
840,5/8/2018,17:04,9e23bfb0-b356-4577-94b2-5062099601bf,56.57.116.10,214.96.80.130,Subin
841,3/5/2018,22:38,d0685d5c-bb7f-48a0-bd9d-2dbfabebbdb5,163.142.19.177,160.205.189.73,Bigtax
842,3/3/2018,13:02,a86ff167-e703-414d-9592-2d3436c6dc04,18.247.56.110,234.53.115.125,Toughjoyfax
843,6/24/2018,5:34,f1ec79e1-bf6e-49ab-a3f8-9c80db3d4067,167.154.120.229,54.44.169.59,Biodex
844,5/15/2018,22:36,9cb772a8-0b64-4618-80f7-0f9525bae0ac,80.20.161.130,9.85.23.39,Sub-Ex
845,3/13/2018,11:24,d8a24368-2d58-4839-a9ad-dabffa77819b,126.117.99.39,199.0.110.61,Job
846,2/10/2018,12:50,36ff1737-8168-4eb5-8ec7-fc96df5fa2cb,131.155.116.25,16.93.153.245,Keylex
847,5/31/2018,2:42,4dc192b7-5d97-44f1-981e-954002312c71,119.201.54.140,100.226.197.71,Fintone
848,8/7/2018,8:28,d8aa393a-85a2-4416-bf61-22fd8637c339,87.214.185.172,40.53.227.255,Wrapsafe
849,6/10/2018,22:38,e6416ed7-1e65-4e0c-bd75-eae164754695,151.188.8.176,223.186.17.11,Tres-Zap
850,10/22/2017,2:27,34bdf32b-17e7-440e-b1d5-ff81c4ae9e05,255.189.54.240,231.85.28.187,Fixflex
851,5/3/2018,13:19,a24b6871-fbd0-4f84-8437-5adae38c5736,79.243.77.110,22.146.213.13,Alpha
852,4/21/2018,22:19,25d115ae-c10d-497d-9814-9f26b19e170e,229.19.40.13,247.2.8.176,Tin
853,10/1/2018,19:11,5f349174-099a-4db5-b9a5-76f7cd0dc02e,139.11.240.206,92.184.234.131,Treeflex
854,12/8/2017,5:21,a48df52d-c473-46fc-aa5d-148afcd442ab,12.75.84.202,248.104.56.57,Sonsing
855,11/13/2017,15:19,17be05ea-4224-41e4-95ef-9f06fb82da93,210.168.61.187,31.4.116.145,Hatity
856,3/21/2018,0:04,2e01ef71-e18a-4031-a019-998e38f64b8c,140.120.213.218,189.73.83.231,Daltfresh
857,4/30/2018,11:33,bec1b991-10df-4aba-b671-ed4a63cd21ed,93.56.87.234,162.43.84.150,Sonsing
858,11/24/2017,19:16,e59f91d4-a4fd-4f1e-9ca8-c70e8ec83423,62.161.47.211,126.106.69.18,Hatity
859,3/24/2018,15:23,71ef5d51-4fbb-49ea-8363-58a7d5451918,86.223.187.81,64.48.110.217,Duobam
860,2/12/2018,7:21,af35876c-937d-416a-ba04-a35c0bef0c0a,78.49.151.253,90.148.136.162,Andalax
861,1/19/2018,23:35,350fbf7e-d944-48be-a8a3-49d0fadde015,195.137.242.203,9.22.121.87,Y-Solowarm
862,9/24/2018,20:25,e423926c-628d-46e3-8054-d5775737498f,133.133.153.16,194.5.39.222,Gembucket
863,11/29/2017,16:00,a0098b36-77d7-4e99-869c-0e7170289c72,95.246.151.73,53.68.250.168,Solarbreeze
864,5/22/2018,4:52,3e4a2c9d-f68a-49d7-a3d7-0c772fe5510d,114.98.44.54,221.97.228.13,Y-find
865,5/29/2018,4:35,08fc346d-dba3-47b9-bf84-c9b8219ab0ee,182.222.78.194,148.59.98.123,Stringtough
866,4/5/2018,0:12,fa739be2-a992-45ca-8db7-4750aef7033d,189.32.95.39,119.216.143.99,Zaam-Dox
867,1/31/2018,5:35,2004702a-0fd2-4d97-88b3-f854f9c55655,125.200.210.171,18.83.199.246,Tres-Zap
868,3/2/2018,1:00,065a9b87-e5fd-4a76-825a-f60fe38402cd,102.48.71.52,190.106.219.158,Flexidy
869,8/5/2018,4:01,441167b5-f1e3-4958-a34c-08c7e7b9c13b,157.103.242.81,217.87.101.49,Sonair
870,1/24/2018,3:43,51893473-7128-45f8-9c43-d60cf52dd0fe,237.192.32.86,7.31.127.219,Treeflex
871,9/27/2018,4:07,8ab71f1d-27b7-4f76-b9e9-c3f739a581f8,122.10.231.97,236.70.220.23,Opela
872,2/23/2018,10:15,500c2e71-32a4-41d4-b1d1-f2339f6a7e30,37.155.11.151,124.195.37.156,Wrapsafe
873,1/10/2018,3:51,ef666777-612b-4531-a9a9-dc80ed4c9a40,226.137.8.150,22.207.249.130,Bytecard
874,5/3/2018,5:33,3f159d82-bb0c-493f-a565-e4fd20a50b8c,230.169.4.209,116.39.146.114,Prodder
875,7/7/2018,15:50,88a06ef1-7704-4319-9588-490651aa8a4b,235.20.157.227,126.168.168.100,Span
876,1/25/2018,18:52,7a5b4673-0485-43ca-8649-adfbdca9e746,143.203.120.89,182.216.119.114,Stronghold
877,10/15/2018,19:47,582a7e89-04a3-4f78-bfb7-151fe420ee87,221.134.19.183,53.173.96.93,Alphazap
878,10/9/2018,7:11,af8c68dc-3bae-4b48-9799-9e968526e078,219.5.212.57,232.7.120.117,Zathin
879,3/21/2018,9:08,4a2d90cf-892c-4535-a3cd-1a41538b86b4,165.165.98.148,138.170.246.206,Ventosanzap
880,12/22/2017,5:20,246d43da-2826-4990-a07d-cb4594d53d14,249.118.159.70,250.220.197.4,Lotlux
881,10/25/2017,14:19,adaff8a0-25ae-4471-8509-2bc997b5422b,125.251.54.127,144.179.136.12,Domainer
882,10/19/2018,7:28,2d63da99-89ef-4620-8a6c-0dddad1b6ffd,84.191.156.45,2.106.27.86,Domainer
883,4/9/2018,10:41,01c9a2e6-15af-4ffc-b157-6e7a001a2ebe,14.62.114.249,84.31.191.219,Keylex
884,6/10/2018,21:55,b2452868-c9ae-435e-a8d6-d031c068c706,30.217.140.133,24.119.31.153,Konklab
885,5/30/2018,16:30,031e7f5d-7564-4cbd-8454-4f9315a2ee13,204.160.11.149,213.241.239.239,Subin
886,3/13/2018,8:22,a03c1afb-fa0c-4176-bbfa-b621a2c228fd,57.95.136.8,67.104.143.156,Span
887,10/31/2017,19:40,e6319fd5-8533-4055-a124-c85b1e44600d,201.161.163.253,113.32.21.60,Stronghold
888,1/9/2018,11:33,fac9d27b-710c-491b-816e-b5d9e905fd1b,96.121.93.104,214.29.81.2,Tresom
889,9/20/2018,15:03,4ec549fb-96f2-4bd9-a946-2f10ddb6b87e,75.4.120.252,215.123.41.199,Mat Lam Tam
890,11/27/2017,7:41,6d497cc9-4f7e-453c-a138-ef10fcde943c,86.242.50.102,251.180.5.151,Fixflex
891,8/23/2018,7:46,a580398a-1615-49d5-bd0a-e3d3b82d77c5,221.173.223.160,190.36.79.72,Bamity
892,6/24/2018,2:07,18192975-70fa-41e1-a936-b60df7eb98f2,2.130.107.3,30.231.69.129,Stringtough
893,12/16/2017,23:03,015de28d-c710-40a9-a6fa-63b5579e8fa5,160.98.80.235,47.175.184.245,Y-Solowarm
894,5/25/2018,15:56,a90b73a3-b69c-424c-b27b-cd123824d25d,236.166.45.238,158.113.182.154,Konklab
895,1/22/2018,8:03,30b5e2f1-29d9-49c6-8607-c25c2ddd45ac,184.13.83.210,27.154.57.84,Vagram
896,9/6/2018,17:36,b8754d2c-fada-429f-bb8b-6ed45b4857e7,5.81.173.13,250.105.174.36,Wrapsafe
897,2/22/2018,1:25,5e92b256-ce79-4629-94fe-1959d86d7844,111.165.243.33,55.154.253.107,Voyatouch
898,6/22/2018,21:06,393f1886-9c18-4b7e-a4d7-819d460e93c5,77.18.229.255,117.61.194.18,Ronstring
899,3/14/2018,10:43,b9f7d467-f578-45da-af34-67de83d0b55e,76.27.208.12,113.93.99.230,Tampflex
900,11/30/2017,18:05,c43ee6a2-6d52-4129-a75b-2df2b76f2383,171.173.190.129,108.28.21.72,Alpha
901,2/10/2018,13:04,f48543bf-5bf2-45f2-9e4e-570c17105cd5,42.48.237.155,239.64.100.90,Zamit
902,2/8/2018,23:13,59105e53-8d26-4e6d-8a4e-575ca6fbe22b,175.225.160.36,136.16.78.42,Transcof
903,6/20/2018,1:58,3d3cd490-c051-4100-9187-9ced5098cd46,221.239.13.129,156.149.149.74,Sonair
904,7/26/2018,10:39,79a28486-6a97-45e6-afbc-2550988ad350,172.6.186.3,251.230.96.120,Opela
905,7/30/2018,17:11,3a8dcdce-74b8-4aba-94bd-f2754f0f5738,158.24.205.55,65.248.100.58,Trippledex
906,4/14/2018,22:02,6dedd43a-758d-4675-b07c-6f50bacd8889,59.78.46.44,56.104.25.73,Temp
907,2/2/2018,9:04,ba089d76-27ac-4d8a-8d78-f5a4db370ab7,205.213.31.49,158.231.81.18,Bitchip
908,4/16/2018,2:20,8192cc28-e7e6-4d8d-a922-80188a10f163,93.186.203.207,135.12.127.201,Asoka
909,3/15/2018,4:47,6a17e55c-6806-4d13-9f7e-173ebd4b2335,146.21.158.249,194.192.192.6,Fintone
910,2/5/2018,15:38,704085a4-f22d-46c6-b87e-8a598213ff2f,71.223.83.97,46.19.207.115,Subin
911,9/26/2018,15:27,e308dca6-8d34-4048-9768-ea59f5ce08b3,139.211.2.184,147.152.173.60,Keylex
912,4/16/2018,6:54,d2c15b61-3ecf-4bee-8a45-576a02cd523b,210.114.104.218,225.39.227.14,Subin
913,8/5/2018,3:28,556b1561-a9a2-4e81-89c6-ce36a612c384,72.63.10.56,236.30.252.102,Keylex
914,9/30/2018,19:58,cd3131c7-a002-42ee-bcdb-a3361cbcfa30,63.216.127.158,27.217.87.120,Voltsillam
915,4/25/2018,13:36,65cc780e-f107-41b1-b0f3-57e8fdaaafc5,178.163.169.50,233.199.50.8,Stringtough
916,4/22/2018,18:01,b0e2ffc4-d2a6-4d92-8bc3-5f2889c00328,176.162.51.140,77.249.100.74,Stringtough
917,11/23/2017,17:07,64b4f023-10cc-433b-b3bd-93622238dc15,47.120.46.77,49.199.178.12,Regrant
918,7/18/2018,12:54,087a6251-9ba6-46ab-9aea-e762fbcc36c8,143.101.2.200,17.152.59.139,Solarbreeze
919,10/4/2017,11:22,937f36d7-9388-48e4-a0bc-e8fdfaddecb8,64.39.103.104,246.12.233.108,It
920,3/13/2018,16:37,9cff1952-e95b-4a49-b50d-728d2aaa253a,37.116.183.31,31.144.18.182,Veribet
921,12/26/2017,21:02,d5516c30-8173-498a-8ed6-ab2d31100187,90.89.138.50,88.53.109.109,Span
922,7/1/2018,22:08,1d7a6517-d19a-4ea0-a908-45b384b28127,243.35.46.193,23.110.202.166,Otcom
923,11/26/2017,15:37,b31220c7-80dc-487f-924a-a58eb06b3df6,161.122.74.102,92.133.45.209,Hatity
924,8/9/2018,11:06,116f079c-e050-4824-9ae3-8a1053a9751b,49.174.88.145,65.162.221.54,Zontrax
925,2/17/2018,6:32,b5667945-34dc-414c-b661-d1dd4c2de7b5,211.67.228.14,216.197.13.188,Latlux
926,12/2/2017,2:49,d747385d-cfc9-47d0-bb6b-99ce0189e0e5,193.15.195.42,167.27.222.193,Rank
927,1/28/2018,11:29,d273a561-ed99-4496-be5c-602a0ead3e5b,65.156.209.147,254.237.193.146,Sub-Ex
928,3/25/2018,6:23,515af3a6-3bc4-4e57-ad2f-e400bc2f793f,39.213.207.3,142.16.227.238,Alphazap
929,1/14/2018,2:17,e1874103-8700-4089-8477-93f9d926919a,2.244.94.62,1.187.117.54,Voyatouch
930,12/1/2017,8:18,91c35b6a-22c7-4379-b138-5913d2f8aad9,255.112.241.146,35.159.241.3,Sonsing
931,8/26/2018,10:19,87e09c9b-eca0-44e0-acdf-d053cf02b1cf,213.111.77.161,173.117.252.211,Kanlam
932,5/21/2018,9:06,dfa0d3dc-da26-4710-ad9b-b9276263f2c9,185.230.249.72,141.129.152.78,Ventosanzap
933,10/8/2018,9:56,9bc99cb5-8bbe-4142-a09d-c9799d9de211,125.109.206.43,154.92.153.246,Bitwolf
934,3/2/2018,20:21,897993b4-5702-4691-9df5-e6a2b425cd68,199.202.10.141,241.34.155.21,Rank
935,3/20/2018,15:25,27caa82e-a090-46f1-bf9b-44e4ed4fe2fe,96.121.133.118,194.102.16.148,Aerified
936,10/17/2017,23:05,e80a89d9-1f1c-40a0-a096-a782991f4184,110.236.226.35,199.177.50.42,Temp
937,8/13/2018,3:19,b9b15ae0-f001-4933-9951-ac31fe0b9bb0,253.170.193.155,166.18.218.130,Matsoft
938,10/8/2018,19:11,e163e09d-f451-4a95-84b1-cc9b5c68ca8d,172.59.144.101,157.178.77.129,Regrant
939,1/2/2018,0:01,10bf961a-039d-4dec-8241-96e77393eb69,200.94.129.161,169.167.12.170,Toughjoyfax
940,7/4/2018,18:19,7b5568fb-23fe-44e5-9390-d5f0a97f4564,229.230.116.241,215.44.106.62,Redhold
941,6/7/2018,22:40,04501ee8-72b1-4d73-b1a4-5d781a8a89dc,60.22.196.116,224.167.57.123,Greenlam
942,3/29/2018,15:07,c6b642ca-9fe7-4b95-abb0-fe42f5bf573a,99.65.126.87,0.20.5.18,Alpha
943,7/18/2018,5:10,51210ee0-faa5-4497-9094-97f8c1cc3b31,238.3.126.187,195.176.10.28,Stronghold
944,10/11/2017,9:57,9a8cb694-dbcf-4fdc-bc15-9dfa430917c5,234.106.54.145,242.131.168.212,Bamity
945,8/21/2018,13:57,5a09153e-21a5-43e4-98ff-ab0e367e5bed,49.126.29.90,67.191.14.247,Tin
946,5/5/2018,10:07,73b219fb-9ddc-40a1-a328-0ac07bfc0a4a,32.85.24.90,17.205.154.27,Lotlux
947,3/18/2018,13:11,bc4da4ae-30a1-4bdb-a08d-374c2bbd6a0e,12.99.53.68,224.232.179.175,Konklab
948,10/8/2017,17:18,ffa8ca65-0b65-42d4-84a8-5154ee055c2a,218.179.59.47,226.90.239.249,Mat Lam Tam
949,10/5/2018,4:18,5a350bec-fbfb-41b1-8067-028a9f28e68b,236.98.52.41,144.244.227.117,Konklab
950,5/1/2018,8:10,8aab3603-6af6-4365-82af-00dcc9606204,81.201.109.116,200.227.236.154,Span
951,6/29/2018,8:27,485fc684-0d91-4883-b0f1-db81dde3d7af,74.103.101.144,253.230.238.64,Greenlam
952,7/2/2018,22:15,52f1259c-baab-4f59-bbf4-b1f4cf5b524d,57.136.154.242,2.158.227.85,Lotstring
953,4/5/2018,3:10,286b7248-a7f7-4408-8b7f-d3763534cc14,112.209.129.3,223.80.60.74,Prodder
954,5/7/2018,10:08,f8217da6-a417-461e-9a22-be560b4072f2,55.162.46.253,15.30.6.190,Y-Solowarm
955,10/1/2018,20:04,cab87a8e-0a06-423a-9b00-5df836454709,153.159.155.15,80.170.59.100,Viva
956,4/10/2018,3:35,5d050ec5-a49f-4618-abbf-7c2db2789a28,226.194.14.125,105.244.26.213,Zontrax
957,10/25/2018,17:32,059228aa-61d6-4d47-b3b5-f88048f1996b,149.189.28.235,203.57.164.154,Tresom
958,4/25/2018,14:07,7906762a-ee14-4d15-a084-46e89580b405,51.179.128.198,80.16.13.108,It
959,11/14/2017,1:36,37249e2e-e9c6-40c7-98b8-ba8e78466410,190.116.204.8,68.185.130.10,Subin
960,10/4/2018,8:12,ca34ec77-1162-4aed-b7ce-8678cc6edf2f,35.149.114.134,202.152.208.232,Hatity
961,2/19/2018,15:28,55666d3e-c678-4632-9b33-d8426931a0cc,225.85.93.73,141.123.251.106,Lotlux
962,7/22/2018,8:54,d8216da6-2368-47b7-a9b8-03ba46fc53b8,97.105.196.211,135.79.249.144,Ventosanzap
963,10/23/2018,15:23,d3a63cbf-6d22-4b60-9610-1d7ec62c68da,91.65.226.247,156.72.118.215,Voyatouch
964,6/18/2018,7:43,eefaa451-70e0-41c4-aead-194bd9cb06e7,107.164.155.177,161.168.160.251,Konklux
965,11/7/2017,4:42,74000962-c18d-4522-9906-42daedc97c15,27.105.20.70,212.189.203.39,Tres-Zap
966,9/30/2018,10:42,d79beb7a-f143-4d32-9e98-d84d2803f9bd,194.37.126.200,156.111.65.103,Otcom
967,6/30/2018,4:51,606cabf5-975c-4010-a676-40d2686d8049,29.245.229.7,153.98.22.225,Tampflex
968,8/5/2018,7:18,1a6ea576-b8ca-4fa4-ba41-a003a2e410a2,167.111.105.19,1.224.163.153,Lotlux
969,9/22/2018,17:08,10adaf71-1de4-41a0-89d1-7e5ede9ff54a,164.42.242.74,240.1.145.152,Transcof
970,4/3/2018,21:54,d33e0725-155e-49f5-8716-8b6480f18598,149.209.12.22,16.237.15.198,Otcom
971,8/7/2018,4:12,6b1b6b2c-9bd1-4fff-ac07-bb3814b05452,20.0.94.0,75.158.46.217,Y-find
972,5/29/2018,9:34,f62b81f3-5036-4be2-866f-ad22ef3585bb,143.49.117.114,225.140.117.226,Viva
973,3/21/2018,3:55,2135d668-48c7-47f0-988a-77e9fff614eb,175.24.226.31,232.73.182.138,Kanlam
974,1/20/2018,9:35,ddb2b913-bf87-4251-90b3-73be4339ec83,243.87.240.81,35.26.126.78,Hatity
975,5/4/2018,5:24,0ecb3010-be29-4817-bdb8-63552f9b410d,7.248.182.24,247.146.57.56,Holdlamis
976,11/17/2017,2:14,66e1129e-8ae2-4b10-bbb4-3c2c12f9e322,70.82.214.156,158.196.101.17,Redhold
977,12/10/2017,0:02,bc1636b3-85e0-4f75-8a39-407454e3af67,122.43.43.215,233.93.234.213,Greenlam
978,1/24/2018,16:39,e261a6aa-3e78-4ccb-a934-604539e34d41,173.104.168.94,168.58.43.152,Trippledex
979,4/3/2018,10:03,671e7d16-4a34-4cc0-9fc3-8bef38a59532,90.167.241.121,55.179.55.96,Overhold
980,10/22/2018,8:29,afa1d375-299c-43d1-bc52-02a4a3e0f952,49.245.127.82,174.141.168.17,Temp
981,11/26/2017,17:16,28c52289-111a-4dfa-ab17-1bfdd85f4c0f,197.203.217.69,223.14.182.253,Pannier
982,6/22/2018,13:41,b40926b3-6f6b-4041-9a77-f333c019b0ee,69.163.183.54,98.121.136.238,Tin
983,10/10/2018,17:50,2323d6dd-6c0b-49e7-9033-04ff54062176,91.11.150.183,249.0.4.17,Biodex
984,6/2/2018,16:48,1c3987d4-1633-48be-b1c9-2020e6801bca,124.42.155.95,117.234.235.242,Zaam-Dox
985,2/17/2018,19:58,544e8fcf-a39c-4a2e-8ab3-a97d2860a9f4,211.117.239.21,183.31.146.69,Tres-Zap
986,1/17/2018,15:32,583a60c9-5929-4075-ae95-6daedb01c6bc,167.198.98.239,81.150.42.157,Bamity
987,3/31/2018,14:06,75f923b7-a176-4fda-abec-4bdc4ab051af,36.1.213.193,138.46.142.202,Treeflex
988,6/6/2018,14:45,ce80b7c2-090e-4a07-9728-936c6c797ca4,31.112.35.6,183.12.76.140,Viva
989,12/14/2017,0:45,9e96738f-4174-4aaf-9b0c-0517aa6bd8f3,232.75.245.86,230.119.151.134,Andalax
990,2/27/2018,0:12,b6ab67df-c747-4cab-9fe2-7f55ed392482,251.19.59.30,139.117.164.162,Zoolab
991,5/4/2018,1:39,675e4b13-1243-44d6-9b0e-fc9d798d46ae,68.228.250.249,200.72.116.223,Andalax
992,6/14/2018,11:00,98b3dd7b-53af-49c8-a751-a61128920937,248.179.68.58,231.116.133.13,Zamit
993,2/27/2018,23:36,b2285b83-3692-40e2-b367-586af3be6b2f,33.163.6.238,248.38.194.242,Voltsillam
994,9/5/2018,5:27,4dac5aef-6d00-4979-a125-ee81e9b815d0,119.206.54.65,164.193.89.83,Stronghold
995,10/27/2017,18:16,f0444d58-1213-4bc4-bb5e-9824f4cf843b,244.22.192.46,156.186.44.215,Kanlam
996,6/5/2018,3:10,0d4a1408-1f1b-4a80-9f1c-0dafc79fa9f9,11.218.226.127,211.210.199.212,Duobam
997,1/11/2018,5:38,e26f2a76-a7df-4167-ac88-3a4c54954c97,35.234.206.22,178.153.255.81,Alphazap
998,9/17/2018,0:02,88fdf8de-ff7c-40e3-9bce-45182438156a,81.13.140.105,227.76.77.188,Otcom
999,1/21/2018,17:46,fe401545-b3e8-44d1-9a37-ae9724dc0188,52.18.6.23,186.215.38.111,Cardify
1000,4/19/2018,21:54,53474fc4-bad9-40a8-93f5-52e5dd83529e,90.57.41.205,240.238.165.224,Domainer
Quick start test data
(
Download mock_stroom_data.csv
)
To this XML:
<?xml version="1.1" encoding="UTF-8"?>
<Events xmlns:stroom="stroom" xmlns:xsi="http://www.w3.org/2001/XMLSchema-instance">
   <Event>
      <Id>1</Id>
      <Guid>10990cde-1084-4006-aaf3-7fe52b62ce06</Guid>
      <FromIp>159.161.108.105</FromIp>
      <ToIp>217.151.32.69</ToIp>
      <Application>Tres-Zap</Application>
   </Event>
   <Event>
      <Id>2</Id>
      <Guid>633aa1a8-04ff-442d-ad9a-03ce9166a63a</Guid>
      <FromIp>210.14.34.58</FromIp>
      <ToIp>133.136.48.23</ToIp>
      <Application>Sub-Ex</Application>
   </Event>
  ...
You will go from a clean vanilla Stroom to having a simple pipeline that takes in CSV data and outputs that data transformed into XML. Stroom is a generic and powerful tool for ingesting and processing data: it’s flexible because it’s generic so if you do want to start processing data we would recommend you follow this tutorial otherwise you’ll find yourself struggling.
We’re going to do the following:
All the things we create here are available as a content pack , so if you just wanted to see it running you could get there quite easily.
Note: The CSV data used in mock_stroom_data.csv (linked to above) is randomly generated and any association with any real world IP address or name is entirely coincidental.
We’re going to follow the links below in this order.
If you don’t want to follow all the steps to create the example content then the stroom_core_test stack includes it in the folder Stroom 101.
1.1 - Running Stroom
How to install and run Stroom locally.
Getting and Running Stroom
For this quick start you want a simple single-node Stroom. You will want to follow these instructions for setting up a single node stroom_core_test stack installation in the simplest way.
First look
Once you log into Stroom you will see that it comes pre-loaded with some content as can be seen in the left hand explorer pane. The stroom_core_test stack includes stroom-log-sender to forward the application, user and request logs generated by Stroom, Stroom Proxy and Nginx to Stroom. This stack is pre-configured to have processing enabled on boot so Stroom will start receiving logs and processing them.
Double click on the System entry in the explorer tree to see all raw and processed streams.
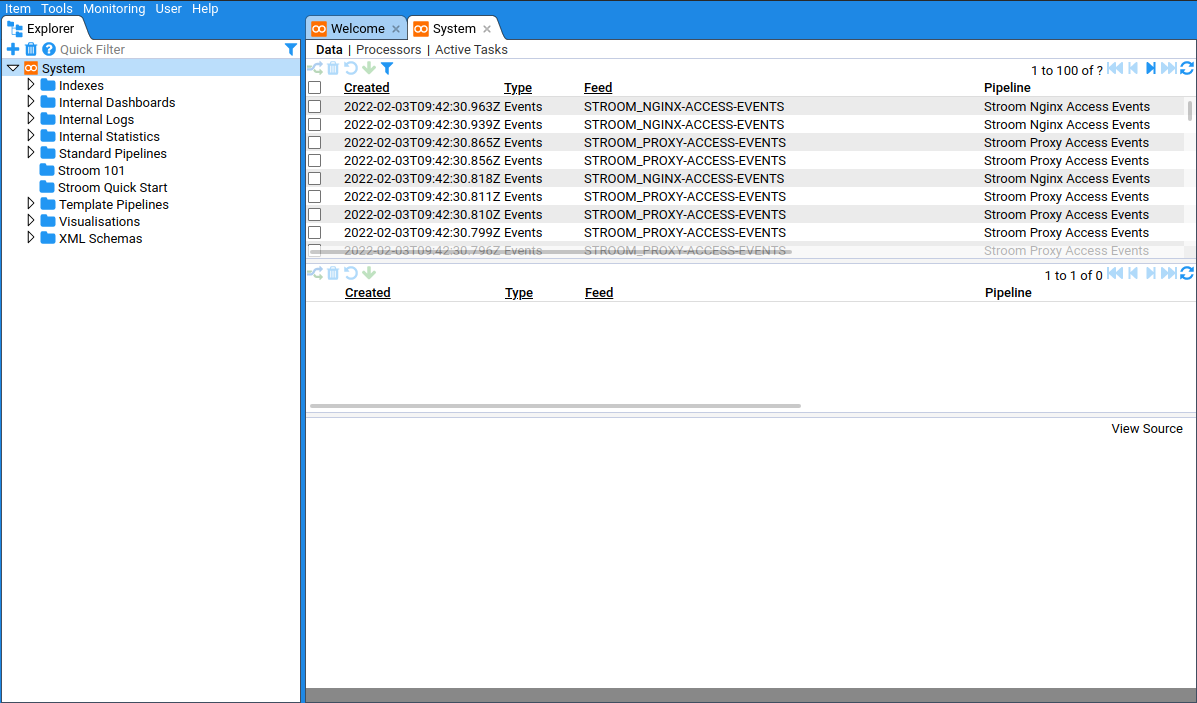
So now we’ve got Stroom up and running let’s get data into Stroom
1.2 - Feeds
How to get data into Stroom.
Getting data into Stroom
Create the feed
Stroom organises the data it ingests and stores by Feed Feed A Feed is a means of organising and categorising data in Stroom. A Feed contains multiple Streams of data that have been ingested into Stroom or output by a Pipeline. Typically a Feed will contain Streams of data that are all from one system and have a common data format.Click to see more details.... A feed will typically be created for each client system and data format.
Data is sent to a Stroom feed using a POST to the /datafeed
API
API
Application Programming Interface. An interface that one system can present so other systems can use it to communicate. Stroom has a number of APIs, e.g. its many REST APIs and its /datafeed interface for data receipt.Click to see more details....
We will use curl to represent a client system sending data into Stroom.
Warning
The stroom_core_test stack that you are running includes a copy of the content created by this quick start guide in the folder Stroom 101. If you want to skip the steps involving creating content then you can just use the pre-loaded Stroom 101 content. To delete the folder and all its content, right-click on it and then click delete.
We think you will learn more by deleting this pre-loaded content and following all the steps.
-
A lot of Stroom’s functionality is available through right-click context menus. If you right-click System in the tree you can create new child items.
Create a new folder by selecting:
Call it something like
Stroom 101: -
Right-click on the new Stroom Quick Start folder then select this to create a feed:
The name needs to be capitalised and unique across all feeds. Name it
CSV_FEED.This will open a new tab for the feed.
-
We want to emulate a client system sending some data to the feed, so from the command line do
Download mock_stroom_data.csv to your computer. Then open a terminal session and change directory to the location of the downloaded file.
The -H arguments add HTTP headers to the HTTP POST request.
Stroom uses these headers to determine how to process the data, see Header Arguments for more details.
Note
In this example we used/datafeeddirect rather than /datafeed.
The former goes directly into Stroom, the latter goes via Stroom Proxy where it is aggregated before being picked up by Stroom.
That’s it, there’s now data in Stroom. In the CSV_FEED tab, ensure the Data sub-tab is selected then click the new entry in the top pane and finally click the button: You should be able to see it in the data table in the bottom pane.
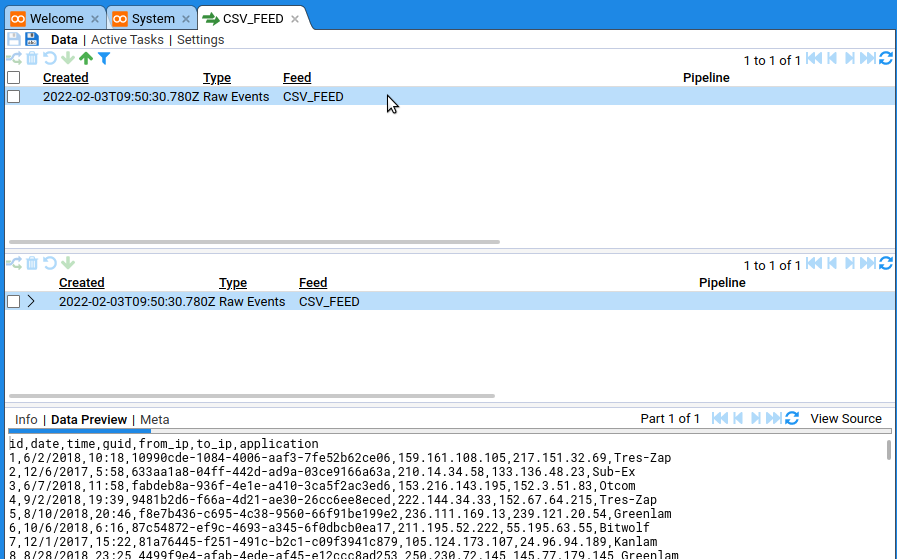
Now you can do all sorts of things with the data: transform it, visualise it, index it. It’s Pipelines that allow all these things to happen.
1.3 - Pipeline Processing
Creating pipelines to process and transform data.
Pipelines control how data is processed in Stroom. Typically you’re going to want to do a lot of the same stuff for every pipeline, i.e. similar transformations, indexing, writing out data. You can actually create a template pipeline and inherit from it, tweaking what you need to for this or that feed. We’re not doing that now because we want to show how to create one from scratch.
Create a pipeline
-
Create a pipeline by right-clicking our
Stroom 101folder and selecting: -
Call it something like
CSV to XML pipeline. -
Select Structure from the top of the new tab. This is the most important view for the pipeline because it shows what will actually happen on the pipeline.
We already have a Source element.
Unlike most other pipeline elements this isn’t something we need to configure.
It’s just there to show the starting point.
Data gets into the pipeline via other means - we’ll describe this in detail later.
Add a data splitter
Data splitters are powerful, and there is a lot we can say about them. Here we’re just going to make a basic one.
Create a CSV splitter
We have CSV data in the following form:
id,guid,from_ip,to_ip,application
1,10990cde-1084-4006-aaf3-7fe52b62ce06,159.161.108.105,217.151.32.69,Tres-Zap
2,633aa1a8-04ff-442d-ad9a-03ce9166a63a,210.14.34.58,133.136.48.23,Sub-Ex
To process this we need to know if there’s a header row, and what the delimiters are. This is a job for a Data Splitter.
The splitter is actually a type of Text Converter , so lets create one of those:
-
Right click on our
Stroom 101folder and selecting: -
Call it something like
CSV splitter.
In the new tab you need to tell the Text Converter that it’ll be a Data Splitter:
Click the Settings sub-tab then select Data Splitter in the Converter Type drop-down.
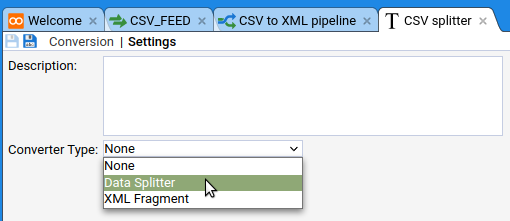
Now go to the Conversion tab. What you need to put in here is specific to the built-in Data Splitter functionality, so I’m just going to tell you what you’re going to need:
<?xml version="1.1" encoding="UTF-8"?>
<dataSplitter
xmlns="data-splitter:3"
xmlns:xsi="http://www.w3.org/2001/XMLSchema-instance"
xsi:schemaLocation="data-splitter:3 file://data-splitter-v3.0.xsd"
version="3.0">
<!-- The first line contains the field names -->
<split delimiter="\n" maxMatch="1">
<group>
<split delimiter="," containerStart=""" containerEnd=""">
<var id="heading" />
</split>
</group>
</split>
<!-- All subsequent lines are records -->
<split delimiter="\n">
<group>
<split delimiter="," containerStart=""" containerEnd=""">
<data name="$heading$1" value="$1" />
</split>
</group>
</split>
</dataSplitter>
This guide assumes you are running the stroom_core_test stack which has the data_splitter-v3.0.xsd schema pre-loaded.
Save it by clicking the save button .
So we now have a configured, re-usable data splitter for CSV files that have headers. We need to add this to our pipeline as a filter, so head back to the pipeline’s Structure section and add a DSParser.
-
Right-click the Source element and select:
-
Call it CSV Parser and click OK.
We need to tell the new CSV parser to use the TextConverter (CSV splitter) we created earlier.
- Click on the CSV Parser element and the pane below will show its properties.
- Double click the
textConverterproperty and changeValueto our CSV splitter entity.
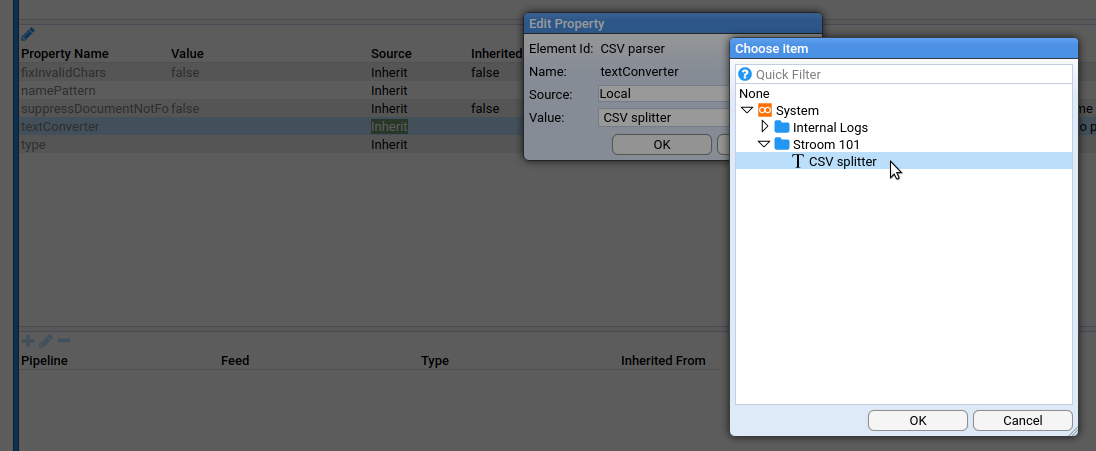
Now save the pipeline by clicking the add button .
Test the CSV splitter
So now we have CSV data in Stroom and a pipeline that is configured to process CSV data. We’ve done a fair few things so far and are we sure the pipeline is correctly configured? We can do some debugging and find out.
In Stroom you can step through you records and see what the output is at each stage.
It’s easy to start doing this.
The first thing to do is to open your CSV_FEED feed, click on the
Stream
Stream
A Stream is the unit of data that Stroom works with and will typically contain many Events.Click to see more details... in the top pane then click the big blue stepping button at the bottom right of the bottom data pane.
You’ll be asked to select a pipeline:
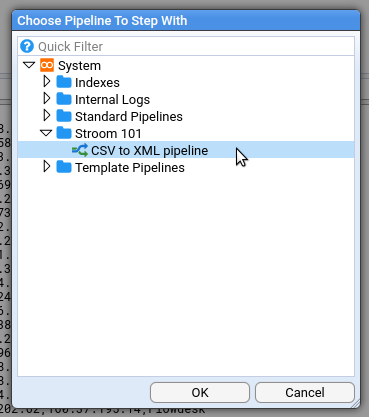
Now you get a view that’s similar to your feed view, except it also shows the pipeline. The Stepper allows you to step through each record in the source data, where a record is defined by your Data Splitter parser. The Stepper will highlight the currently selected record/event.
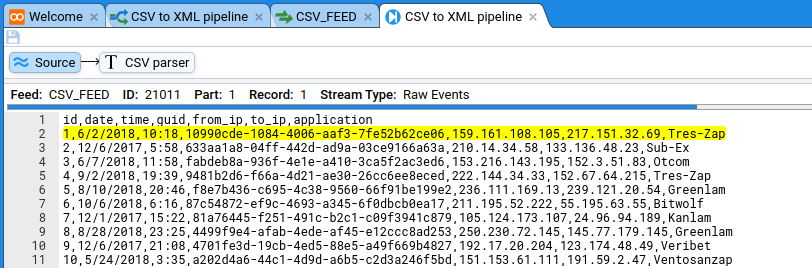
The Stepper also has stepping controls to allow you to move forward/backward through the source data. Click the green step forward button .
You should see the highlighted section advance to the next record/event.
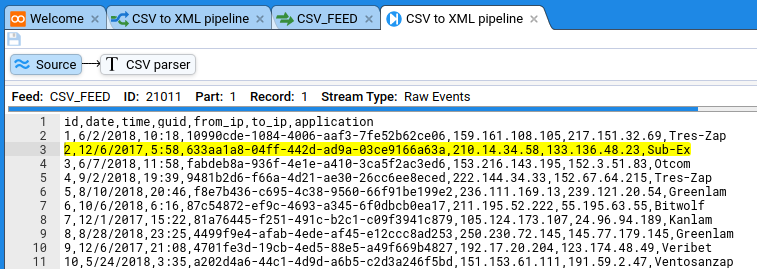
Click on the CSV parser element. You will now see the stepping view for this element that is split into three panes:
- Top pane - this shows the content of your CSV parser element, i.e. the TextConverter (CSV splitter) XML. This can be used to modify your TextConverter.
- Bottom left pane - this shows the input to the pipeline element.
- Bottom right pane - this shows the output from the pipeline element.
The output from the Data Splitter is XML in records format.
You can see the schema for records in the
XML schemasfolder.
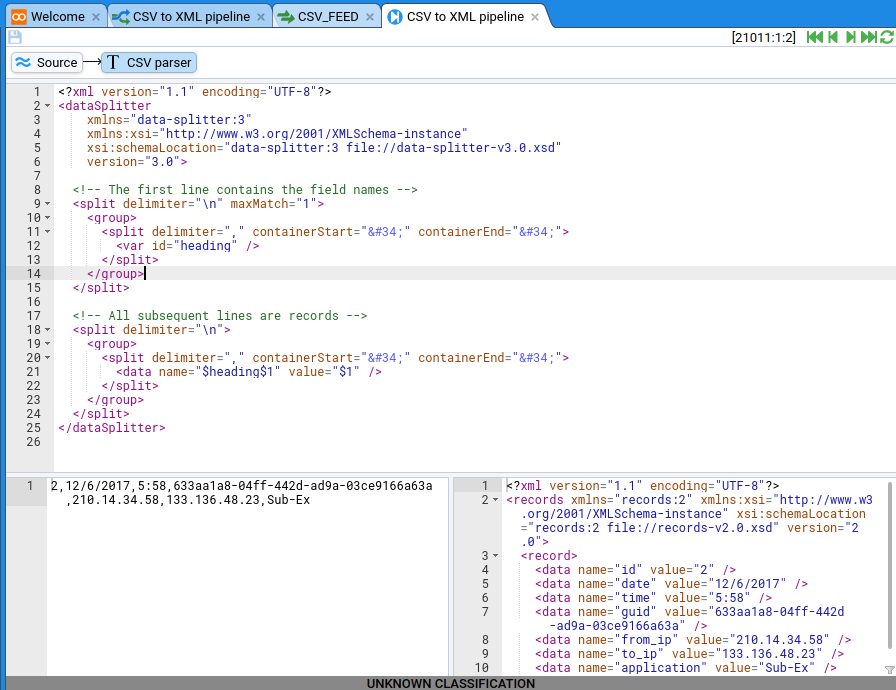
If there are any errors then you will see an error icon in the gutter of the top pane. In the example below, an invalid XML element has been added to the Data Splitter content to demonstrate an error occurring.
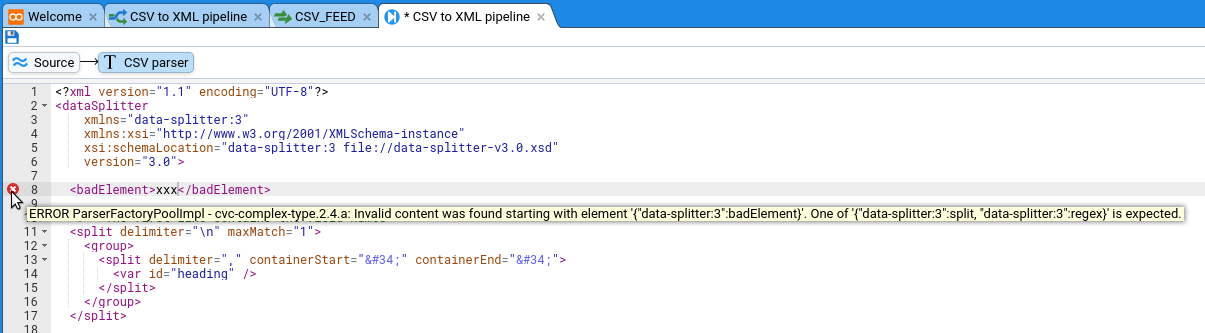
Add XSLT to transform records format XML into something else
XSLT XSLT Extensible Stylesheet Language Transformations is a language for transforming XML documents into other XML documents. XSLTs are the primary means of transforming data in Stroom.Click to see more details... is the language used to transform record/event data from one form into another in Stroom pipelines. An XSLTFilter pipeline element takes XML input and uses an XSLT to transform it into different XML or some other text format.
Create the XSLT filter
This process is very similar to creating the CSV splitter:
- Create the XSLT filter
- Add it to the pipeline
- Step through to make sure it’s doing what we expect
To create the new XSLT entity do the following:
-
Right click the Stroom 101 folder in the Explorer tree Explorer tree The left hand navigation tree. The Explorer Tree is used for finding, opening, creating, renaming, copying, moving and deleting Documents.Click to see more details... and select:
-
Name it XSLT.
-
Click OK.
This will open a new tab for the XSLT entity.
On the new tab ensure the XSLT sub-tab is selected.
This is another text editor pane but this one accepts XSLT.
This XSLT will be very basic and just takes the record data from the split filter and puts it into fields.
The XSLT for this is below but if you’d like to tinker then go ahead.
<?xml version="1.1" encoding="UTF-8" ?>
<xsl:stylesheet
    xpath-default-namespace="records:2"
    xmlns:stroom="stroom"
    xmlns:xsl="http://www.w3.org/1999/XSL/Transform"
    xmlns:xsi="http://www.w3.org/2001/XMLSchema-instance"
    version="2.0">

  <xsl:template match="records">
    <Events>
      <xsl:apply-templates />
    </Events>
  </xsl:template>
  <xsl:template match="record">
    <xsl:variable name="id" select="data[@name='id']/@value" />
    <xsl:variable name="guid" select="data[@name='guid']/@value" />
    <xsl:variable name="from_ip" select="data[@name='from_ip']/@value" />
    <xsl:variable name="to_ip" select="data[@name='to_ip']/@value" />
    <xsl:variable name="application" select="data[@name='application']/@value" />

    <Event>
      <Id><xsl:value-of select="$id" /></Id>
      <Guid><xsl:value-of select="$guid" /></Guid>
      <FromIp><xsl:value-of select="$from_ip" /></FromIp>
      <ToIp><xsl:value-of select="$to_ip" /></ToIp>
      <Application><xsl:value-of select="$application" /></Application>
    </Event>
  </xsl:template>
</xsl:stylesheet>
Make sure you save it by clicking the save button .
Go back to the Structure sub-tab of the pipeline and add an XSLTFilter element downstream of the CSV parser element. Call it something like XSLT filter.
Select the XSLT filter element and configure it to use the actual XSLT you just created by double-clicking xslt in the properties pane at the bottom:
In the dialog make sure you select the XSLT filter in the Stroom 101 folder.
Save the pipeline.
Test the XSLT filter
We’re going to test this in the same way we tested the CSV splitter, by clicking the large stepping button on the feed data pane. Click the step forward button a few times to make sure it’s working then click on the XSLT element. This time you should see the XSLT filter there too, as well as the basic XML being transformed into more useful XML:
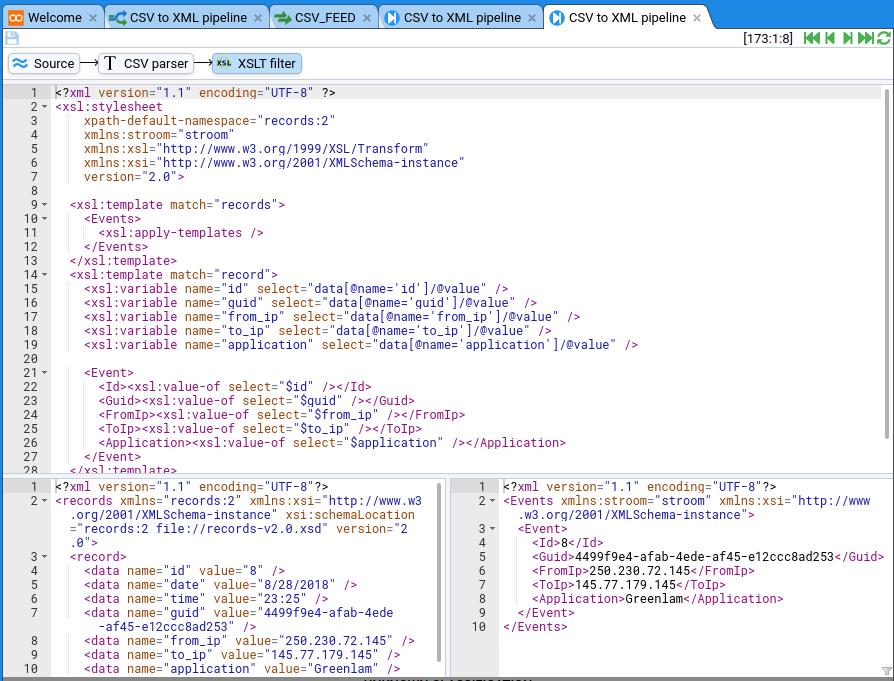
There’s a few more things to get this pipeline ready for doing this task for real. We need to get this data to a destination.
Outputting the transformed data
The XSLT filter doesn’t actually write XML but instead it just outputs XML events to the next element in the pipeline. In order to write these XML events out to a destination you need a writer. If your transformation is producing XML then you need an XMLWriter , if it is producing JSON then you need a JSONWriter and for plain text you need a TextWriter .
Our XSLT filter element is outputting XML so we will create an XMLWriter.
Create the XML writer
You don’t need to create one outside the pipeline (in the way you did with the CSV splitter and the XSLT filter).
Just do the following:
-
Right click on the XSLT filter element and select:
-
Name it XML writer.
-
Click OK.
That’s it, no other configuration necessary.
Create the destination
We need to do something with the serialised XML. We’ll write it to a Stream Stream A Stream is the unit of data that Stroom works with and will typically contain many Events.Click to see more details.... To do this we create a StreamAppender :
-
Right click on the XML Writer element and select:
-
Name it Stream appender.
-
Click OK.
Streams only exist within feeds and have a type. We could set the feed that the stream will be written into but by default the StreamAppender will write to the same Feed as the input stream. We must however set the type of the Stream to distinguish it from the Raw Events Stream that we POSTed to Stroom.
To set the
Stream Type
Stream Type
All Streams must have a Stream Type. The list of Stream Types is configured using the Property stroom.data.meta.metaTypes.Click to see more details... do the following:
- Click on the Stream appender pipeline element and the pane below will show its properties.
- Double click the
streamTypeproperty and changeValueto the Events stream type.
Test the destination
We can test the XML writer and the streamAppender using the same stepping feature.
Make sure you’ve saved the pipeline and set a new stepping session running.
If you click on the stream appender you’ll see something like this:

Set the pipeline running
Obviously you don’t want to step through your data one by one. This all needs automation, and this is what Processors Processor A Processor belongs to a Pipeline. It controls the processing of data through its parent Pipeline using one or more Processor Filters.Click to see more details... and Processor Filters Processor filter A Processor Filter is used to used to find Streams to process through the Pipeline associated with the Processor Filter. A Processor Filter consists of an expression tree to select which Streams to process and a tracker to track the what Streams have been processed.Click to see more details... are for. The processor works in the background to take any unprocessed streams (as determined by the Processor Filter and its Tracker Tracker A Tracker is associated with a Processor Filter and keeps track of the Stream that the Processor Filter has already processed.Click to see more details...) and process them through the pipeline. So far everything on our EXAMPLE_IN feed is unprocessed.
Create a processor and filter
Processors are created from the Processors sub-tab of the pipeline.
Click the add button and you will be presented with a Filter Expression tree Expression tree A tree of expression terms that each evaluate to a boolean (True/False) value. Terms can be grouped together within an expression operator (AND, OR, NOT).Click to see more details.... To configure the filter do the following:
- Right click on the root AND operator and click Add Term.
A new expression is added to the tree as a child of the operator and it has three dropdowns in it (
Field
Field
A named data Field within some form of record or entity, and where each Field can have an associated value. In Stroom, Fields can be the Fields in an Index (or other queryable Data Source or the fields of Metadata associated with a Stream, e.g. Stream ID, Feed, creation time, etc.Click to see more details...,
Condition
Condition
A Condition in an query expression term, e.g.
=,>,in, etc.Click to see more details... and value). - Create an expression term for the Feed:
- Field:
Feed - Condition:
is - Value:
CSV_FEED
- Field:
- Create an expression term for the Stream Type:
- Field:
Type - Condition:
= - Value:
Raw Events
- Field:
You only need to set the incoming feed and the stream types:
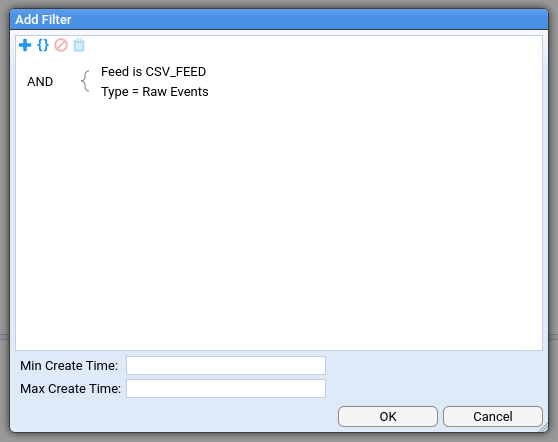
You will now see the newly created processor and its filter.

Ensure that both the processor and its filter are enabled by clicking the checkbox at the left of the row. This is it, everything we’ve done is about to start working on its own, just like it would in a real configuration.
If you keep refreshing this table it will show you the processing status which should change after a few seconds to show that the data you have uploaded is being or has been processed.
The fields in the filter row will have been updated to reflect the new position of the Filter Tracker.
Once this has happened you should be able to open the destination feed CSV_FEED and see the output data (or errors if there were any).
If the CSV_FEED tab was already open then you will likely need to click refresh on the top pane.
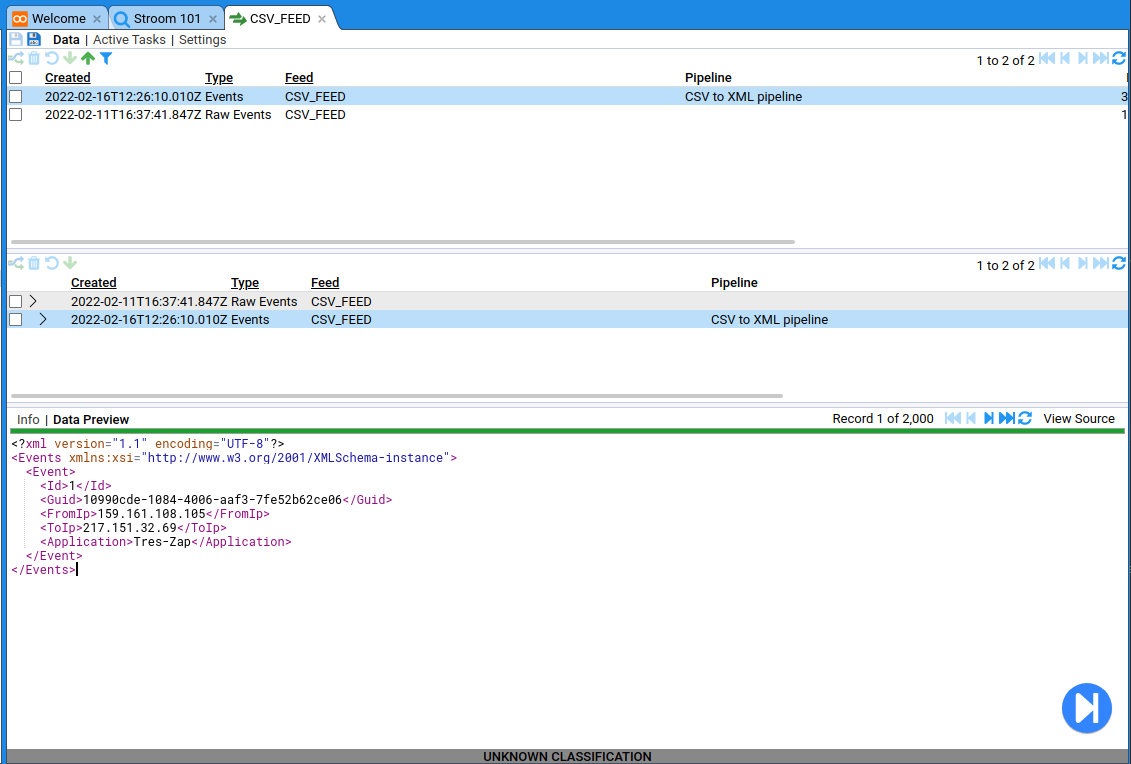
You can see that there are the Raw Events and the processed Events.
If you click on the Events then you can see all the XML that we’ve produced.
Now you’ve processed your data you can go ahead and index it.
1.4 - Indexing
Indexing the ingested data so we can search it.
Before you can visualise your data with dashboards you have to Index Index A Data Source that is backed by a Lucene based search index.Click to see more details... the data.
Note
Stroom uses Apache Lucene for indexing its data but can also integrate with Solr and Elasticsearch Elasticsearch Elasticsearch is an Open Source and commercial search index product. Stroom can be connected to one or more Elasticsearch clusters so that event indexing and search is handled by Elasticsearch rather than internally.Click to see more details…. For this Quick Start Guide we are going to use Stroom’s internal Lucene indexing.
Create the index
We can create an index by adding an index entity to the explorer tree. You do this in the same way you create any of the items.
-
Right click on the Stroom 101 folder and select:
-
Call the index Stroom 101. Click OK.
This will open the new Stroom 101 index as a new tab, Stroom 101 .
Assign a volume group
In the settings tab we need to specify the Volume Volume In Stroom a Volume is a logical storage area that Stroom can write data to. Volumes are associated with a path on a file system that can either be local to the Stroom node or on a shared file system.Click to see more details... where we will store our index shards.
- Click the Settings sub-tab.
- In the Volume Group dropdown select Default Volume Group.
- Click the button.
Adding fields
Now you need to add fields to this index.
The fields in the index may map 1:1 with the fields in the source data but you may want to index only a sub-set of the fields, e.g. if you would only ever want to filter the data on certain fields. Fields can also be created that are an abstraction of multiple fields in the data, e.g. adding all text in the record into one field to allow filtering on some text appearing anywhere in the record/event.
Click the Fields sub-tab.
We need to create fields in our index to match the fields in our source data so that we can query against them.
Click on the button to add a new index field.
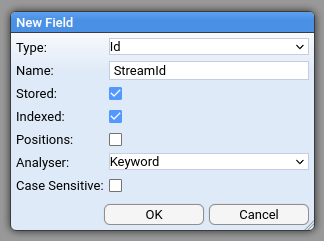
Now create the fields using these values.
| Name | Type | Store | Index | Positions | Analyser | Case Sensitive |
|---|---|---|---|---|---|---|
| StreamId | Id | Yes | Yes | No | Keyword | false |
| EventId | Id | Yes | Yes | No | Keyword | false |
| Id | Id | Yes | Yes | No | Keyword | false |
| Guid | Text | Yes | Yes | No | Keyword | false |
| FromIp | Text | Yes | Yes | No | Keyword | false |
| ToIp | Text | Yes | Yes | No | Keyword | false |
| Application | Text | Yes | Yes | Yes | Alpha numeric | false |
Note
There are two mandatory fields that need to be added:StreamId and EventId.
These are not in the source records but are assigned to cooked events/records by Stroom.
You will see later how these fields get populated.
You should now have:
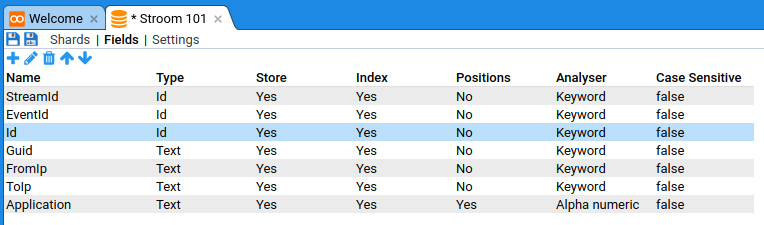
When you’ve done that, save the new index by clicking the button.
Create empty index XSLT
In order for Stroom to index the data, an XSLT XSLT Extensible Stylesheet Language Transformations is a language for transforming XML documents into other XML documents. XSLTs are the primary means of transforming data in Stroom.Click to see more details... is required to convert the event XML into an Index record. This can be a simple 1:1 mapping from event field to index field or something more complex, e.g. combining multiple event fields into one index field.
To create the XSLT for the Index:
-
Right click on the Stroom 101 folder in the explorer tree, then select:
-
Name it
Stroom 101. -
Click OK.
We will add the XSLT content later on.
Index pipeline
Now we are going to create a pipeline to send the processed data (Events) to the index we just created. Typically in Stroom all Raw Events Raw Events This is a Stream Type used for Streams received by Stroom. Streams received by Stroom will be in a variety of text formats (CSV, delimited, fixed width, XML, JSON, etc.). Until they have been processed by a pipeline they are essentially just unstructured character data with no concept of what is a record/event. A Parser in a pipeline is required to provide the demarcation between records/events.Click to see more details... are first processed into normalised Events Events This is a Stream Type in Stroom. An Events stream consists of processed/cooked data that has been demarcated into individual Events.Click to see more details... conforming to the same XML schema to allow common onward processing of events from all sources.
We will create a pipeline to index the processed Event streams containing XML data.
-
Right click on the Stroom 101 folder in the explorer tree, then select:
-
Name it
Stroom 101. -
Click OK.
Select the Structure sub-tab to edit the structure of the pipeline.
Pipelines can inherit from other pipelines in Stroom so that you can benefit from re-use. We will inherit from an existing indexing template pipeline and then modify it for our needs.
- On the Structure sub tab, click the in the Inherit From entity picker.
- Select Template Pipelines / Indexing
You should now see the following structure:

Inheriting from another pipeline often means the structure is there but some properties may not have been set, e.g. xslt in the xsltFilter.
If a property has been set in the parent pipeline then you can either use the inherited value or override it.
See the Pipeline Element Reference for details of what each element does.
Now we need to set the xslt property on the xsltFilter to point at the XSLT document we created earlier and set the index property on the indexFilter to point to the index we created.
- Assign the XSLT document
- Click on the XSLTFilter element.
- In the middle Properties pane double-click on the
xsltrow. - Click the in the Value document picker
- Select:
Stroom 101 / Stroom 101. - Click .
- Assign the Index document
- Click on the IndexingFilter element.
- In the middle Properties pane double-click on the
indexrow. - Click the
...in the Value document picker - Select:
Stroom 101 / Stroom 101. - Click .
Once that’s done you can save your new pipeline by clicking the button.
Develop index translation
Next we need to create an XSLT that the indexingFilter understands.
The best place to develop a translation is in the
Stepper
Stepper
The Stepper is a tool in Stroom for developing and debugging a Pipeline. It allows the user to simulate passing a Stream through a pipeline with the ability to step from one record/event to the next or to jump to records/events based on filter criteria.Click to see more details... as it allows you to simulate running the data through the pipeline without producing any persistent output.
Open the CSV_FEED Feed Feed A Feed is a means of organising and categorising data in Stroom. A Feed contains multiple Streams of data that have been ingested into Stroom or output by a Pipeline. Typically a Feed will contain Streams of data that are all from one system and have a common data format.Click to see more details... we created earlier in the quick-start guide.
- In the top pane of the Data Browser select the Events Events Events This is a Stream Type in Stroom. An Events stream consists of processed/cooked data that has been demarcated into individual Events.Click to see more details... stream.
- In the bottom pane you will see the XML data that you processed earlier.
- Click the button to open the Stepper.
- In the Choose Pipeline To Step With dialog select our index pipeline:
Stroom 101 / Stroom 101.
This will open a Stepper tab showing only the elements of the selected pipeline that can be stepped. The data pane of the Source element will show the first event in the stream.
To add XSLT content click the xsltFilter element. This will show the three pane view with editable content (empty) in the top pane and input and output in the bottom two panes.
The input and output panes will be identical as there is no XSLT content to transform the input.
Input
<?xml version="1.1" encoding="UTF-8"?>
<Events xmlns:xsi="http://www.w3.org/2001/XMLSchema-instance">
  <Event StreamId="25884" EventId="1">
    <Id>1</Id>
    <Guid>10990cde-1084-4006-aaf3-7fe52b62ce06</Guid>
    <FromIp>159.161.108.105</FromIp>
    <ToIp>217.151.32.69</ToIp>
    <Application>Tres-Zap</Application>
  </Event>
</Events>
Output
<?xml version="1.1" encoding="UTF-8"?>
<Events xmlns:xsi="http://www.w3.org/2001/XMLSchema-instance">
  <Event StreamId="25884" EventId="1">
    <Id>1</Id>
    <Guid>10990cde-1084-4006-aaf3-7fe52b62ce06</Guid>
    <FromIp>159.161.108.105</FromIp>
    <ToIp>217.151.32.69</ToIp>
    <Application>Tres-Zap</Application>
  </Event>
</Events>
Paste the following content into the top pane.
<?xml version="1.0" encoding="UTF-8" ?>
<xsl:stylesheet
    xmlns="records:2"
    xmlns:xsl="http://www.w3.org/1999/XSL/Transform"
    xmlns:xsi="http://www.w3.org/2001/XMLSchema-instance"
    version="2.0">

  <!-- Match on the top level Events element -->
  <xsl:template match="/Events">
    <!-- Create the wrapper element for all the events/records -->
    <records
        xsi:schemaLocation="records:2 file://records-v2.0.xsd"
        version="2.0">
      <!-- Apply any templates to this element or its children -->
      <xsl:apply-templates />
    </records>
  </xsl:template>

  <!-- Match on any Event element at this level -->
  <xsl:template match="Event">
    <!-- Create a record element and populate its data items -->
    <record>
      <data name="StreamId">
        <!-- Added to the event by the IdEnrichmentFiler -->
        <xsl:attribute name="value" select="@StreamId" />
      </data>
      <data name="EventId">
        <!-- Added to the event by the IdEnrichmentFiler -->
        <xsl:attribute name="value" select="@EventId" />
      </data>
      <data name="Id">
        <xsl:attribute name="value" select="./Id" />
      </data>
      <data name="Guid">
        <xsl:attribute name="value" select="./Guid" />
      </data>
      <data name="FromIp">
        <xsl:attribute name="value" select="./FromIp" />
      </data>
      <data name="ToIp">
        <xsl:attribute name="value" select="./ToIp" />
      </data>
      <data name="Application">
        <xsl:attribute name="value" select="./Application" />
      </data>
    </record>
  </xsl:template>
</xsl:stylesheet>
The XSLT is converting Events/Event elements into Records/Record elements conforming to the records:2 XML Schema, which is the expected input format for the
IndexingFilter
.
The IndexingFilter expects a set of Record elements wrapped in a Records element.
Each Record element needs to contain one Data element for each Field in the Index.
Each Data element needs a Name attribute (the Index Field name) and a Value attribute (the value from the event to index).
Now click the refresh button to refresh the step with the new XSLT content.
The Output should have changed so that the Input and Output now look like this:
Input
<?xml version="1.1" encoding="UTF-8"?>
<Events xmlns:xsi="http://www.w3.org/2001/XMLSchema-instance">
  <Event StreamId="25884" EventId="1">
    <Id>1</Id>
    <Guid>10990cde-1084-4006-aaf3-7fe52b62ce06</Guid>
    <FromIp>159.161.108.105</FromIp>
    <ToIp>217.151.32.69</ToIp>
    <Application>Tres-Zap</Application>
  </Event>
</Events>
Output
<?xml version="1.1" encoding="UTF-8"?>
<records
    xmlns="records:2"
    xmlns:stroom="stroom"
    xmlns:xsi="http://www.w3.org/2001/XMLSchema-instance"
    xsi:schemaLocation="records:2 file://records-v2.0.xsd"
    version="2.0">
  <record>
    <data name="StreamId" value="25884" />
    <data name="EventId" value="1" />
    <data name="Id" value="1" />
    <data name="Guid" value="10990cde-1084-4006-aaf3-7fe52b62ce06" />
    <data name="FromIp" value="159.161.108.105" />
    <data name="ToIp" value="217.151.32.69" />
    <data name="Application" value="Tres-Zap" />
  </record>
</records>
You can use the stepping controls () to check that the output is correct for other input events.
Once you are happy with your translation click the button to save the XSLT content to the Stroom 101 XSLT document.
Processing the indexing pipeline
To get our indexing pipeline processing data we need to create a Processor filter Processor filter A Processor Filter is used to used to find Streams to process through the Pipeline associated with the Processor Filter. A Processor Filter consists of an expression tree to select which Streams to process and a tracker to track the what Streams have been processed.Click to see more details... to select the data to process through the pipeline.
Go back to your Stroom 101 pipeline and go to the Processors sub-tab.
Click the add button and you will be presented with a Filter Expression tree Expression tree A tree of expression terms that each evaluate to a boolean (True/False) value. Terms can be grouped together within an expression operator (AND, OR, NOT).Click to see more details... in the Add Filter dialog. To configure the filter do the following:
- Right click on the root AND operator and click Add Term.
A new expression is added to the tree as a child of the operator and it has three dropdowns in it (
Field
Field
A named data Field within some form of record or entity, and where each Field can have an associated value. In Stroom, Fields can be the Fields in an Index (or other queryable Data Source or the fields of Metadata associated with a Stream, e.g. Stream ID, Feed, creation time, etc.Click to see more details...,
Condition
Condition
A Condition in an query expression term, e.g.
=,>,in, etc.Click to see more details... and value). - To create an expression term for the Feed:
- Field:
Feed - Condition:
is - Value:
CSV_FEED
- Field:
- To create an expression term for the Stream Type:
- Field:
Type - Condition:
= - Value:
Events
- Field:
This filter will process all Streams of type Events in the Feed CSV_FEED.
Enable processing for the Pipeline and the Processor Filter by clicking the checkboxes in the Enabled column.
Stroom should then index the data, assuming everything is correct.
If there are errors you’ll see error streams produced in the data browsing page of the CSV_FEED Feed or the Stroom 101 Pipeline. If no errors have occurred, there will be no rows in the data browser page as the IndexFilter does not output any Streams.
To verify the data has been written to the Index:
- Open the Stroom 101 Index.
- Select the Shards sub-tab.
- Click refresh. You many need to wait a bit for the data to be flushed to the index shards.
You should eventually see a Doc Count of 2,000 to match the number of events processed in the source Stream.
Now that we have finished indexing we can display data on a dashboard.
1.5 - Dashboards
Querying and visualising the indexed data.
Create a new Dashboard Dashboard A Dashboard is a configurable entity for querying one or more Data Sources and displaying the results as a table, a visualisation or some other form.Click to see more details... in the Stroom 101 folder and call it Stroom 101.
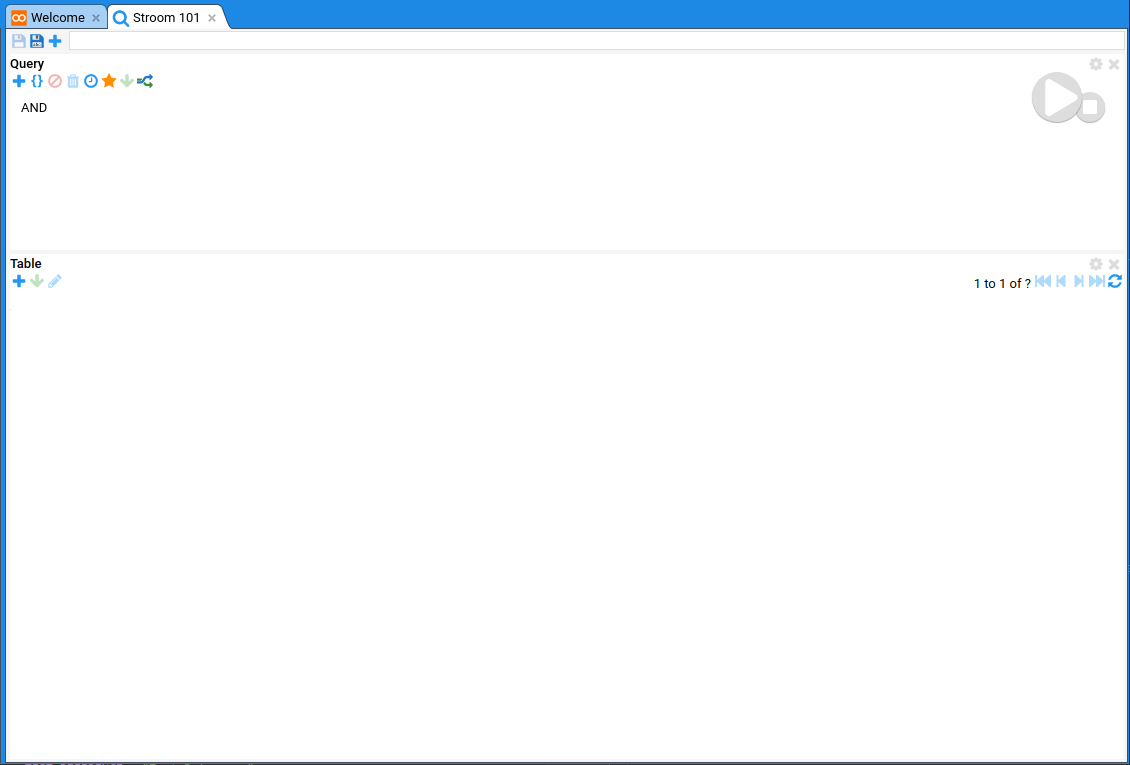
By default a new Dashboard opens with two panes; a Query Query The search Query in a Dashboard that selects the data to display. The Query is constructed using an Expression Tree of terms.Click to see more details... pane at the top to build the query; and a Table Table A Table is the tabular part of a Dashboard or Query that contains the data.Click to see more details... pane at the bottom to display the results. Dashboards are highly configurable; panes can be added and resized; they can contain multiple queries; and a query pane can provide data for multiple output panes (such as Visualisations Visualisation A document comprising some Javascript code for visualising data, e.g. pie charts, heat maps, line graphs etc. Visualisations are not baked into Stroom, they are content, so can be created/modified/shared by Stroom users.Click to see more details...).
Configuring the query data source
On the query pane click the settings button on the top right of the panel.
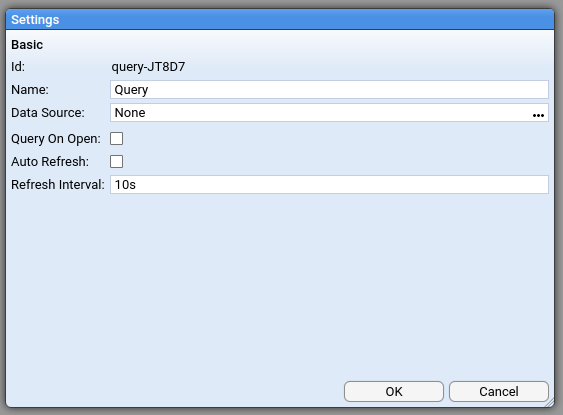
- Click on the Data Source document picker.
- Select the index you created earlier:
Stroom 101 / Stroom 101
Note
Dashboards can be made to automatically run all queries when they are opened and/or to keep refreshing the query every N seconds. This can be done in the Query settings dialog you used above.Configuring the query expression
Now add a term to the query to filter the data.
- Right click on the root AND operator and click Add Term.
A new expression is added to the tree as a child of the operator and it has three dropdowns in it (
Field
Field
A named data Field within some form of record or entity, and where each Field can have an associated value. In Stroom, Fields can be the Fields in an Index (or other queryable Data Source or the fields of Metadata associated with a Stream, e.g. Stream ID, Feed, creation time, etc.Click to see more details...,
Condition
Condition
A Condition in an query expression term, e.g.
=,>,in, etc.Click to see more details... and value). - Create an expression term for the Application field:
- Field:
Application - Condition:
= - Value:
*b*
- Field:
This will find any records with b in the Application field value.
Configuring the table
All fields are stored in our index so we do not need to worry about configuring Search extraction Search extraction The process of extracting un-indexed Field values from the source Event to be used in search results.Click to see more details....
We first need to add some columns to our table. Using the button on the Table pane, add the following columns to the table. We want a count of records grouped by Application.
- Application
- Count
Note
Count is a special column (not in the index) that applies the aggregate function count().
All columns are actually just an expression which may be a simple field like ${Application} or a function.
Stroom has a rich library of functions for aggregating and mutating query results.
See Expressions.
To group our data by Application we need to apply a group level to the Application column.
- Click on the Application column
- Click
Group => Level 1
Now we can reverse sort the data in the table by the count.
- Click on the Count column.
- Click
Sort => Sort Z to A
Now click the large green and white play button to run the query. You should see 15 Applications and their counts returned in the table.
Now we are going to add a custom column to show the lowest EventId for each Application group.
- Click on the button on the Table pane.
- Select Custom (at the bottom of the list).
- Click on the new Custom column.
- Click
Expression - In the Set Expression For ‘Custom’ dialog enter the following:
first(${EventId}) - Click OK.
Instead of typing out the expression you can use the and buttons to pick from a list to add expressions and fields respectively. You can also use Ctrl ^ + Space ␣ to auto-complete your expressions.
To rename the Custom column:
- Click on the Custom column.
- Click
Rename - Enter the text
First Event ID. - Click OK.
Now run the query again to see the results with the added column.
Add a visualisation
We will add a new pane to the dashboard to display a Visualisation Visualisation A document comprising some Javascript code for visualising data, e.g. pie charts, heat maps, line graphs etc. Visualisations are not baked into Stroom, they are content, so can be created/modified/shared by Stroom users.Click to see more details....
- Click on the button at the top left of the Dashboard.
- Select Visualisation.
A new empty Visualisation pane will be added at the bottom of the Dashboard.
To configure the visualisation:
- Click on the button at the top right of the Visualisation pane.
- In the Visualisation document picker select
Visualisations / Version3 / Bubble - Click OK.
- On the Data tab that has now appeared in the dialog, assign the following table fields to the visualisation:
- Name:
Application - Value:
Count - Series:
Application
- Name:
- On the Bubble tab on the dialog, set the following:
- Show Labels:
True
- Show Labels:
- Click OK.
To change the look of your Dashboard you can drag the different panes around into different positions.
- Click and hold on the
Visualisationtext in the top left of the Visualisation pane. - Drag the cursor to the right hand side of the Table pane. You will see a purple rectangle showing where the pane will be moved to.
- Once you are happy with the position release the mouse button.
- Click and hold the mouse button on the borders between the panes to resize the panes to suit.
- Click to save the Dashboard.
You should now see something like this:
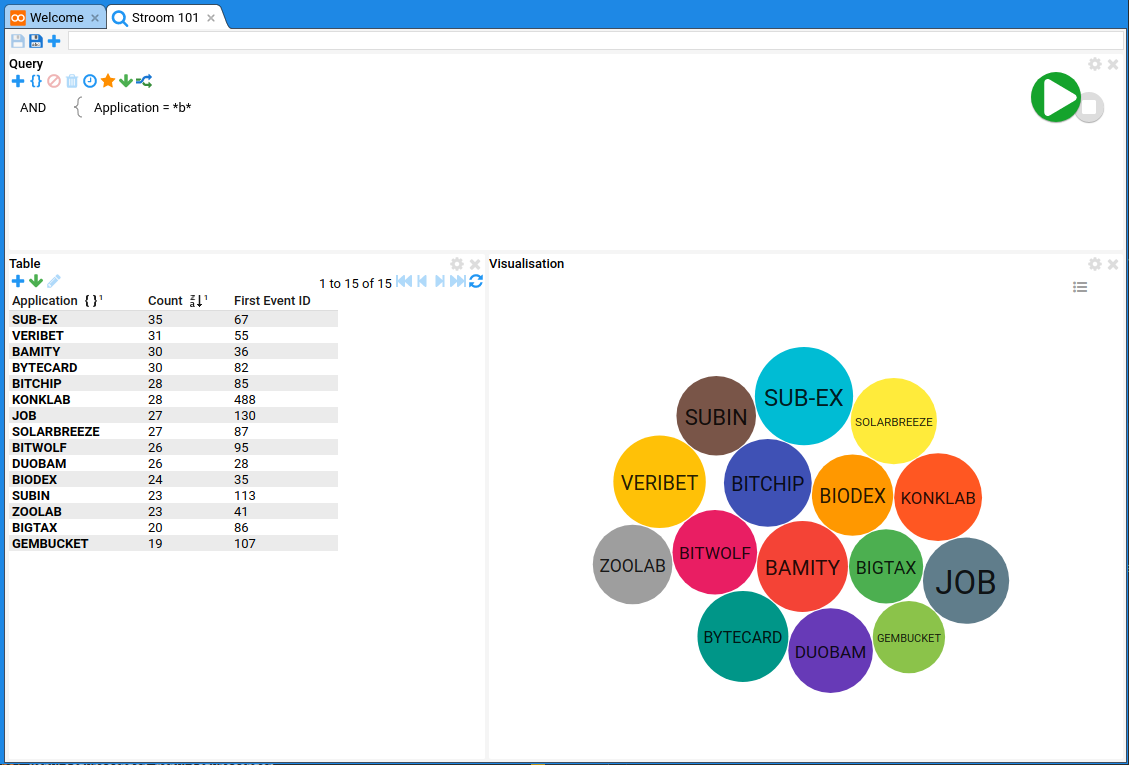
2 - Stroom Architecture
Overview
Stroom’s architecture varies, depending on largely the choice of deployment method. The types of deployment currently supported are:
- Traditional, bare-metal install without the use of containers
- Docker deployment
- Using Docker Compose with a Stroom stack and the stroom docker images.
- Using Kubernetes with the stroom docker images.
- A mixed deployment with some containers and some bare metal installations.
An architecture diagram is included below, depicting a notional Stroom cluster consisting of two Stroom nodes and two Stroom-Proxy nodes. This represents a reference architecture and deployment for stroom but it is possible to deploy the various services in many different ways, e.g. using a different web server to Nginx or introducing hardware load balancers.

Changes from previous versions
Stroom v7 features a number of key changes to architecture compared to v5 and v6. They are:
- The authentication service is now integrated with the Stroom app as it was with v5, instead of in v6 where it existed as a separate microservice. There is now an option for Stroom to authenticate via an external identity provider, using the Open ID Connect (OIDC) Protocol.
- Stroom-Proxy no longer has any connection to the MySQL database. It does all feed status and policy checking via the APIs on Stroom.
- Stroom-Proxy no longer has to be co-located with Stroom as the proxy aggregation function has been removed.
Stroom-Proxy now forwards its data to Stroom via HTTP on the
/datafeedendpoint.
Nginx
In a reference deployment Nginx is key to the whole architecture. It acts in the following capacities:
- A reverse proxy to abstract clients from the multiple service instances.
- An API gateway to route all service traffic.
- The termination point for client SSL traffic.
- A load balancer to balance the load across all the nodes.
Reverse Proxy
Nginx is used to reverse proxy all client connections (even those from within the estate) to the various services that sit behind it.
For example, a client request to https://nginx-host/stroom will be reverse proxied to http://a-stroom-host:8080/stroom.
Nginx is responsible for selecting the upstream server to reverse proxy to.
It is possible to use multiple instances of Nginx for redundancy or improved performance, however care needs to be taken to ensure all requests for a session go to the same Nginx instance, i.e. sticky sessions.
Some requests are stateful and some are stateless but the Nginx configuration will reverse proxy them accordingly.
API Gateway
Nginx is also used as an API gateway. This means all inter-service calls go via the Nginx gateway so each service only needs to know the location of the Nginx gateway. Nginx will then reverse proxy all requests to the appropriate instance of an upstream service.
The purple dashed lines on the diagram attempt to show the effective inter-service connections that are being made if you ignore the Nginx reverse proxying.
Both Stroom and Stroom-Proxy share similar paths, i.e:
/datafeed
/api
/ui
So Nginx has to be configured to map alternative public paths to the appropriate service, e.g.:
/datafeeddirect => /datafeed (stroom)
/datafeed => /datafeed (proxy)
/proxy/* => /* (proxy)
/* => /* (stroom)
SSL Termination
All SSL termination is handled by Nginx. Nginx holds the server and certificate authority certificate and will authenticate the client requests if the client has a certificate. Any client certificate details will be passed on to the service that is being reverse proxied.
Physical Deployment
Single Node Docker Deployment
The simplest deployment of stroom is where all services are on a single host and each service runs in its own docker container. Such a deployment can be achieved by following these instructions.
The following diagram shows how a single node deployment would look.

Multi Node Mixed Deployment
The typical deployment for a large scale stroom is where stroom is run on multiple hosts to scale out the processing. In this deployment stroom and MySQL are run directly on the host OS, i.e. without docker. This approach was taken to gradually introduce docker into the stroom deployment strategies.
The following diagram shows how a multi node deployment would look.

Multi Node Docker Deployment
For details of a multi-node deployment using Docker containers, see Kubernetes.
3 - Installation Guide
This section describes how to install Stroom, its dependencies and related applications.
3.1 - Single Node Docker Installation
How to install a Single node instance of Stroom using Docker containers.
Running Stroom in Docker is the quickest and easiest way to get Stroom up and running. Using Docker means you don’t need to install the right versions of dependencies like Java or MySQL or get them configured correctly for Stroom.
This section details how to install single instances of of Stroom and Stroom-Proxy using Docker.
Note
If you want to deploy a Stroom cluster using containers then you should use Kubernetes, see Kubernetes Cluster.
Stroom Docker stacks
Stroom has a number of predefined stacks that combine multiple docker containers into a fully functioning Stroom environment. The Docker stacks are aimed primarily at single node instances or for evaluation/test. The stack makes use of various shell scripts combined with Docker Compose to integrate the various Docker containers and make them easy to run.
At the moment the usable stacks are:
-
stroom_core- A single node stroom stack geared towards production use. -
stroom_core_test- A single node stroom for test/evaluation, pre-loaded with content. Also includes a remote proxy for demonstration purposes. If you just want to try out Stroom, this is the one to use. -
stroom_proxy- A remote proxy stack for aggregating and forwarding logs to stroom(-proxy). Intended for use as a remote proxy that will forward received/aggregated data into a downstream stroom/stroom-proxy. -
stroom_services- An Nginx instance for running stroom without Docker.
Each stack contains the following docker compose services.
stroom_core
stroom
stroom-proxy-local
stroom-log-sender
nginx
mysql
stroom_core_test
stroom
stroom-proxy-local
stroom-proxy-remote
stroom-log-sender
nginx
mysql
stroom_proxy
stroom-proxy-remote
stroom-log-sender
nginx
stroom_services
stroom-log-sender
nginx
The services are as follows:
stroom- A Stroom instance.stroom-proxy-local- A Stroom-Proxy instance that is typically local to Stroom and acts as its front door for data reception.stroom-proxy-remote- A Stroom-Proxy instance that is remote from Stroom (e.g. owned by another team) and is intended to pass data to a downstream Stroom-Proxy.nginx- An instance of nginx that is configured to reverse proxy to Stroom and Stroom-Proxy as appropriate. It can also be configured to act as a load balancer to multiple Stroom instances if Stroom is being installed without using Docker.mysql- An instance of MySQL that is configured to create the database and users required by Stroom.stroom-log-sender- A simple container that is configured to gather all the log files produced by Stroom, Stroom-Proxy and nginx, to then forward them to Stroom so Stroom can process its own logs.
Prerequisites
In order to run Stroom using Docker you will need the following installed on the machine you intend to run Stroom on:
- An internet connection. If you don’t have one see Air Gapped Environments.
- A Linux-like shell environment.
- Docker CE (v17.12.0+) - e.g. docs.docker.com/install/linux/docker-ce/centos/ for Centos
- docker-compose (v1.21.0+) - docs.docker.com/compose/install/
- bash (v4+)
- jq -
stedolan.github.io/jq/
e.g.
sudo yum install jq - curl
- A non-root user to perform the install as, e.g.
stroomuser
Note
jq is not a hard requirement but improves the functionality of the health checks and is a useful thing to have, e.g. for using Stroom’s REST API.
Install steps
This will install the core stack (Stroom and the peripheral services required to run Stroom).
Visit stroom-resources/releases to find the latest stack release. The Stroom stack comes in a number of different variants:
- stroom_core_test - If you are just evaluating Stroom or just want to see it running then download the
stroom_core_test*.tar.gzstack which includes some pre-loaded content. - stroom_core - If it is for an actual deployment of Stroom then download
stroom_core*.tar.gz, which has no content and requires some configuration.
Using stroom_core_test-v7.10.11.tar.gz as an example:
# Define the version to download
VERSION="v7.10.11"; STACK="stroom_core_test"

# Download and extract the Stroom stack
curl -sL "https://github.com/gchq/stroom-resources/releases/download/stroom-stacks-${VERSION}/${STACK}-${VERSION}.tar.gz" | tar xz

# Navigate into the new stack directory, where xxxx is the directory that has just been created
cd "${STACK}-${VERSION}"

# Start the stack
./start.sh
Alternatively if you understand the risks of redirecting web sourced content direct to bash, you can get the latest stroom_core_test release using:
On first run stroom will build the database schemas so this can take a minute or two.
The start.sh script will provide details of the various URLs that are available.
Open a browser (preferably Chrome) at https://localhost and login with:
- username: admin
- password: admin
Note
If you have installed thestroom_core stack no user accounts are created by default.
You will need to manually create an administrator account.
The stroom stack comes supplied with self-signed certificates so you may need to accept a prompt warning you about visiting an untrusted site.
Configuration
To configure your new instance see Configuration.
Docker Hub links
3.2 - Configuration
Stroom and its associated services can be deployed in may ways (single node docker stack, non-docker cluster, kubernetes, etc.). This document will cover two types of deployment:
- Single node stroom_core docker stack.
- A mixed deployment with nginx in docker and stroom, stroom-proxy and the database not in docker.
This document will explain how each application/service is configured and where its configuration files live.
Application Configuration
The following sections provide links to how to configure each application.
General configuration of docker stacks
Environment variables
The stroom docker stacks have a single env file <stack name>.env that acts as a single point to configure some aspects of the stack.
Setting values in the env file can be useful when the value is shared between multiple containers.
This env file sets environment variables that are then used for variable substitution in the docker compose YAML files, e.g.
    environment:
      - MYSQL_ROOT_PASSWORD=${STROOM_DB_ROOT_PASSWORD:-my-secret-pw}
In this example the environment variable STROOM_DB_ROOT_PASSWORD is read and used to set the environment variable MYSQL_ROOT_PASSWORD in the docker container.
If STROOM_DB_ROOT_PASSWORD is not set then the value my-secret-pw is used instead.
The environment variables set in the env file are NOT automatically visible inside the containers.
Only those environment variables defined in the environment section of the docker-compose YAML files are visible.
These environment entries can either be hard coded values or use environment variables from outside the container.
In some case the names in the env file and the names of the environment variables set in the containers are the same, in some they are different.
The environment variables set in the containers can then be used by the application running in each container to set its configuration.
For example, stroom’s config.yml file also uses variable substitution, e.g.
appConfig:
  commonDbDetails:
    connection:
    jdbcDriverClassName: "${STROOM_JDBC_DRIVER_CLASS_NAME:-com.mysql.cj.jdbc.Driver}"
In this example jdbcDriverUrl will be set to the value of environment variable STROOM_JDBC_DRIVER_CLASS_NAME or com.mysql.cj.jdbc.Driver if that is not set.
The following example shows how setting MY_ENV_VAR=123 means myProperty will ultimately get a value of 123 and not its default of 789.
env file (stroom<stack name>.env) - MY_ENV_VAR=123
                |
                |
                | environment variable substitution
                |
                v
docker compose YAML (01_stroom.yml) - STROOM_ENV_VAR=${MY_ENV_VAR:-456}
                |
                |
                | environment variable substitution
                |
                v
Stroom configuration file (config.yml) - myProperty: "${STROOM_ENV_VAR:-789}"
Note that environment variables are only set into the container on start. Any changes to the env file will not take effect until the container is (re)started.
Configuration files
The following shows the basic structure of a stack with respect to the location of the configuration files:
── stroom_core_test-vX.Y.Z
   ├── config                [stack env file and docker compose YAML files]
   └── volumes
       └── <service>
           └── conf/config   [service specifc configuration files]
Some aspects of configuration do not lend themselves to environment variable substitution, e.g. deeply nested parts of stroom’s config.yml.
In these instances it may be necessary to have static configuration files that have no connection to the env file or only use environment variables for some values.
Bind mounts
Everything in the stack volumes directory is bind-mounted into the named docker container but is mounted read-only to the container.
This allows configuration files to be read by the container but not modified.
Typically the bind mounts mount a directory into the container, though in the case of the stroom-all-dbs.cnf file, the file is mounted.
The mounts are done using the inode of the file/directory rather than the name, so docker will mount whatever the inode points to even if the name changes.
If for instance the stroom-all-dbs.cnf file is renamed to stroom-all-dbs.cnf.old then copied to stroom-all-dbs.cnf and then the new version modified, the container would still see the old file.
Docker managed volumes
When stroom is running various forms of data are persisted, e.g. stroom’s stream store, stroom-all-dbs database files, etc.
All this data is stored in docker managed volumes.
By default these will be located in /var/lib/docker/volumes/<volume name>/_data and root/sudo access will be needed to access these directories.
Docker data root
IMPORTANT
By default Docker stores all its images, container layers and managed volumes in its default data root directory which defaults to /var/lib/docker.
It is typical in server deployments for the root file system to be kept fairly small and this is likely to result in the root file system running out of space due to the growth in docker images/layers/volumes in /var/lib/docker.
It is therefore strongly recommended to move the docker data root to another location with more space.
There are various options for achieving this.
In all cases the docker daemon should be stopped prior to making the changes, e.g. service docker stop, then started afterwards.
-
Symlink - One option is to move the
var/lib/dockerdirectory to a new location then create a symlink to it. For example:This has the advantage that anyone unaware that the data root has moved will be able to easily find it if they look in the default location.
-
Configuration - The location can be changed by adding this key to the file
/etc/docker/daemon.json(or creating this file if it doesn’t exist.{ "data-root": "/mnt/docker" } -
Mount - If your intention is to use a whole storage device for the docker data root then you can mount that device to
/var/lib/docker. You will need to make a copy of the/var/lib/dockerdirectory prior to doing this then copy it mount once created. The process for setting up this mount will be OS dependent and is outside the scope of this document.
Active services
Each stroom docker stack comes pre-built with a number of different services, e.g. the stroom_core stack contains the following:
- stroom
- stroom-proxy-local
- stroom-all-dbs
- nginx
- stroom-log-sender
While you can pass a set of service names to the commands like start.sh and stop.sh, it may sometimes be required to configure the stack instance to only have a set of services active.
You can set the active services like so:
In the above example and subsequent use of commands like start.sh and stop.sh with no named services would only act upon the active services set by set_services.sh.
This list of active services is held in ACTIVE_SERVICES.txt and the full list of available services is held in ALL_SERVICES.txt.
Certificates
A number of the services in the docker stacks will make use of SSL certificates/keys in various forms.
The certificate/key files are typically found in the directories volumes/<service>/certs/.
The stacks come with a set of client/server certificates that can be used for demo/test purposes. For production deployments these should be replaced with the actual certificates/keys for your environment.
In general the best approach to configuring the certificates/keys is to replace the existing files with symlinks to the actual files.
For example in the case of the server certificates for nginx (found in volumes/nginx/certs/) the directory would look like:
ca.pem.crt -> /some/path/to/certificate_authority.pem.crt
server.pem.crt -> /some/path/to/host123.pem.crt
server.unencrypted.key -> /some/path/to/host123.key
This approach avoids the need to change any configuration files to reference differently named certificate/key files and avoids having to copy your real certificates/keys into multiple places.
For examples of how to create certificates, keys and keystores see creatCerts.sh
3.2.1 - Stroom and Stroom-Proxy Configuration
How to configure Stroom and Stroom-Proxy.
The Stroom and Stroom-Proxy applications are built on the same Dropwizard framework so have a lot of similarities when it comes to configuration.
The Stroom/Stroom-Proxy applications are essentially just an executable
JAR
file that can be run when provided with a configuration file, config.yml.
This config file is common to all forms of deployment.
3.2.1.1 - Common Configuration
Configuration common to Stroom and Stroom-Proxy.
This YAML file, sometimes known as the Dropwizard configuration file (as it conforms to a structure defined by Dropwizard) is the primary means of configuring Stroom/Stroom-Proxy. As a minimum this file should be used to configure anything that needs to be set before stroom can start up, e.g. web server, logging, database connection details, etc. It is also used to configure anything that is specific to a node in a stroom cluster.
If you are using some form of scripted deployment, e.g. ansible then it can be used to set all stroom properties for the environment that stroom runs in. If you are not using scripted deployments then you can maintain stroom’s node agnostic configuration properties via the user interface.
Config File Structure
This file contains both the Dropwizard configuration settings (settings for ports, paths and application logging) and the Stroom/Stroom-Proxy application specific properties configuration.
The file is in YAML format and the application properties are located under the appConfig key.
For details of the Dropwizard configuration structure, see
here
.
The file is split into sections using these keys:
server- Configuration of the web server, e.g. ports, paths, request logging.logging- Configuration of application loggingjerseyClients- Configuration of the various Jersey HTTP clients in use. See Jersey HTTP Client Configuration.- Application specific configuration:
appConfig- The Stroom configuration properties. These properties can be viewed/modified in the user interface.proxyConfig- The Stroom-Proxy configuration properties. These properties can be viewed/modified in the user interface.
The following is an example of the YAML configuration file for Stroom:
# Dropwizard configuration section
server:
  # e.g. ports and paths
logging:
  # e.g. logging levels/appenders

jerseyClients:
  DEFAULT:
    # Configuration of the named client

# Stroom properties configuration section
appConfig:
  commonDbDetails:
    connection:
      jdbcDriverClassName: ${STROOM_JDBC_DRIVER_CLASS_NAME:-com.mysql.cj.jdbc.Driver}
      jdbcDriverUrl: ${STROOM_JDBC_DRIVER_URL:-jdbc:mysql://localhost:3307/stroom?useUnicode=yes&characterEncoding=UTF-8}
      jdbcDriverUsername: ${STROOM_JDBC_DRIVER_USERNAME:-stroomuser}
      jdbcDriverPassword: ${STROOM_JDBC_DRIVER_PASSWORD:-stroompassword1}
  contentPackImport:
    enabled: true
  ...
The following is an example of the YAML configuration file for Stroom-Proxy:
# Dropwizard configuration section
server:
  # e.g. ports and paths
logging:
  # e.g. logging levels/appenders

jerseyClients:
  DEFAULT:
    # Configuration of the named client

# Stroom properties configuration section
proxyConfig:
  path:
    home: /some/path
  ...
appConfig Section
The appConfig section is special as it maps to the Properties seen in the Stroom user interface so values can be managed in the file or via the Properties screen in the Stroom UI.
The other sections of the file can only be managed via the YAML file.
In the Stroom user interface, properties are named with a dot notation key, e.g. stroom.contentPackImport.enabled.
Each part of the dot notation property name represents a key in the YAML file, e.g. for this example, the location in the YAML would be:
appConfig:
  contentPackImport:
    enabled: true   # stroom.contentPackImport.enabled
The stroom part of the dot notation name is replaced with appConfig.
For more details on the link between this YAML file and Stroom Properties, see Properties
Variable Substitution
The YAML configuration file supports Bash style variable substitution in the form of:
This allows values to be set either directly in the file or via an environment variable, e.g.
jdbcDriverClassName: ${STROOM_JDBC_DRIVER_CLASS_NAME:-com.mysql.cj.jdbc.Driver}
In the above example, if the STROOM_JDBC_DRIVER_CLASS_NAME environment variable is not set then the value com.mysql.cj.jdbc.Driver will be used instead.
Typed Values
YAML supports typed values rather than just strings, see https://yaml.org/refcard.html. YAML understands booleans, strings, integers, floating point numbers, as well as sequences/lists and maps. Some properties will be represented differently in the user interface to the YAML file. This is due to how values are stored in the database and how the current user interface works. This will likely be improved in future versions. For details of how different types are represented in the YAML and the UI, see Data Types.
Server configuration
The server section controls the configuration of the Jetty web server.
For full details of how to configure the server section see:
The following is an example of the configuration for an application listening on HTTP.
server:
  # The base path for the main application and its API
  applicationContextPath: "/"
  # The base path for the admininstration pages/API
  # For Stroom-Proxy the default is /proxyAdmin
  adminContextPath: "/stroomAdmin"

  # The scheme/port for the main application and its API
  applicationConnectors:
    - type: http
      # For Stroom-Proxy the default is 8090
      port: 8080
      # Uses X-Forwarded-*** headers in request log instead of proxy server details.
      useForwardedHeaders: true

  # The scheme/port for the admininstration pages/API
  adminConnectors:
    - type: http
      # For Stroom-Proxy the default is 8091
      port: 8081
      useForwardedHeaders: true
Common Application Configuration
This section details configuration that is common in both the Stroom appConfig and Stroom-Proxy proxyConfig sections.
Receive Configuration
Configuration for controlling the receipt of data into Stroom and Stroom-Proxy through the /datafeed API.
appConfig / proxyConfig:
  receive:
    # An allow-list containing IP addresses or fully qualified host names to verify that the direct sender
    # of a request (e.g. a load balancer or reverse proxy) is trusted to supply certificate/DN headers
    # as configured with 'x509CertificateHeader' and 'x509CertificateDnHeader'.
    # If this list is null/empty then no check will be made on the client's address.
    allowedCertificateProviders: []
    # Standard cache configuration block for the cache of authenticated Datafeed Keys.
    # This cache is used to avoid having to re-verify every data feed key.
    authenticatedDataFeedKeyCache:
    # If true, the sender will be authenticated using a certificate or token depending on the
    # state of tokenAuthenticationEnabled and certificateAuthenticationEnabled. If the sender
    # can't be authenticated an error will be returned to the client
    # If false, then authentication will be performed if a token/key/certificate
    # is present, otherwise data will be accepted without a sender identity
    authenticationRequired: true
    # The meta key that is used to identify the owner of a Data Feed Key. This
    # may be an AccountId or similar. It must be provided as a header when sending data
    # using the associated Data Feed Key, and its value will be checked against the value
    # held with the hashed Data Feed Key by Stroom. Default value is 'AccountId'.
    # Case does not matter
    dataFeedKeyOwnerMetaKey: "AccountId"
    # The directory where Stroom will look for datafeed key files.
    # Only used if datafeedKeyAuthenticationEnabled is true
    # If the value is a relative path then it will be treated as being
    # relative to stroom.path.home. Data feed key files must have the extension .json.
    # Files in sub-directory will be ignored.
    dataFeedKeysDir: "data_feed_keys"
    # The types of authentication that are enabled for data receipt.
    # One or more of
    # TOKEN - A Stroom API Key or an OAuth token in the 'Authorization' header
    # CERTIFICATE - An X509 certificate on the request or a DN in the header configured
    #               by .receive.x509CertificateDnHeader
    # DATA_FEED_KEY - A Stroom Data Feed Key in the 'Authorization' header
    enabledAuthenticationTypes:
    - "TOKEN"
    - "CERTIFICATE"
    # If receiptCheckMode is RECEIPT_POLICY or FEED_STATUS and stroom/proxy is
    # unable to perform the receipt check, then this action will be used as a fallback
    # until the receipt check can be successfully performed
    fallbackReceiveAction: "RECEIVE"
    # If true the client is not required to set the 'Feed' header. If Feed is not present
    # a feed name will be generated based on the template specified by the
    # 'feedNameTemplate' property. If false (the default), a populated 'Feed'
    # header will be required
    feedNameGenerationEnabled: false
    # The set of header keys are mandatory if feedNameGenerationEnabled is set to true.
    # Should be set to complement the header keys used in 'feedNameTemplate', but may be a
    # sub-set of those in the template to allow for optional headers
    feedNameGenerationMandatoryHeaders:
    - "AccountId"
    - "Component"
    - "Format"
    - "Schema"
    # A template for generating a feed name from a set of headers. The value of
    # each header referenced in the template will have any unsuitable characters
    # replaced with '_'.
    # If this property is set in the YAML file, use single quotes to prevent the
    # variables being expanded when the config file is loaded
    feedNameTemplate: "${accountid}-${component}-${format}-${schema}"
    # If defined then states the maximum size of a request (uncompressed for gzip requests).
    # Will return a 413 Content Too Long response code for any requests exceeding this
    # value. If undefined then there is no limit to the size of the request.
    maxRequestSize: null
    # Set of supported meta type names. This set must contain all of the names
    # in the default value for this property but can contain additional names.
    metaTypes:
    - "Context"
    - "Detections"
    - "Error"
    - "Events"
    - "Meta Data"
    - "Raw Events"
    - "Raw Reference"
    - "Records"
    - "Reference"
    - "Test Events"
    - "Test Reference"
    # Controls how or whether data is checked on receipt. Valid values
    # (FEED_STATUS|RECEIPT_POLICY|RECEIVE_ALL|REJECT_ALL|DROP_ALL)
    receiptCheckMode: "FEED_STATUS"
    # The format of the Distinguished Name used in the certificate. Valid values are
    # LDAP and OPEN_SSL, where LDAP is the default
    x509CertificateDnFormat: "LDAP"
    # The HTTP header key used to extract the distinguished name (DN) as obtained from an X509 certificate.
    # This is used when a load balancer does the SSL/mTLS termination and passes the client DN though
    # in a header. Only used for
    # authentication if a value is set and 'enabledAuthenticationTypes' includes CERTIFICATE
    x509CertificateDnHeader: "X-SSL-CLIENT-S-DN"
    # The HTTP header key used to extract an X509 certificate. This is used when a load balancer does the
    # SSL/mTLS termination and passes the client certificate though in a header. Only used for
    # authentication if a value is set and 'enabledAuthenticationTypes' includes CERTIFICATE
    x509CertificateHeader: "X-SSL-CERT"
Cache Configuration
Multiple configuration branches in both Stroom and Stroom-Proxy have one or more properties for configuring a cache.
Each of these share the same structure and will typically be named xxxCache, e.g. feedStatusCache or metaTypeCache.
Warning
The default values for each property within the cache config will be specific to the cache. Care needs to be taken when changing the cache properties to avoid changing the behaviour of the cache, e.g. changing from having aexpireAfterWrite value to having a expireAfterAccess value may prevent items from aging off as expected.
      xxxCache:
        # Specifies that each entry should be automatically removed from the cache once
        # this duration has elapsed after the entry's creation, the most recent replacement of
        # its value, or its last read. In ISO-8601 duration format, e.g. 'PT10M'. If no value is set then
        #  entries will not be aged out based these criteria
        expireAfterAccess:
        # Specifies that each entry should be automatically removed from the cache once
        # a fixed duration has elapsed after the entry's creation, or the most recent replacement of its value.
        # In ISO-8601 duration format, e.g. 'PT5M'. If no value is set then entries will not be aged out based on
        # these criteria.
        expireAfterWrite:
        # Specifies the maximum number of entries the cache may contain. Note that the cache
        # may evict an entry before this limit is exceeded or temporarily exceed the threshold while evicting.
        # As the cache size grows close to the maximum, the cache evicts entries that are less likely to be used
        # again. For example, the cache may evict an entry because it hasn't been used recently or very often.
        # When size is zero, elements will be evicted immediately after being loaded into the cache. This can
        # be useful in testing, or to disable caching temporarily without a code change. If no value is set then
        # no size limit will be applied
        maximumSize:
        # Specifies that each entry should be automatically refreshed in the cache after
        # a fixed duration has elapsed after the entry's creation, or the most recent replacement of its value.
        # In ISO-8601 duration format, e.g. 'PT5M'. Refreshing is performed asynchronously and the current value
        # provided until the refresh has occurred. This mechanism allows the cache to update values without any
        # impact on performance
        refreshAfterWrite:
        # Determines whether/how statistics are captured on cache usage
        # (e.g. hits, misses, entries, etc.). Values are (NONE, INTERNAL, DROPWIZARD_METRICS).
        # NONE means capture no stats, offering a very slight performance gain, but the Caches screen in Stroom
        # won't be able to show any stats for this cache.
        # INTERNAL means the stats are captured but are only accessible via the Stroom Caches screen, thus not
        # suitable for Stroom-Proxy.
        # DROPWIZARD_METRICS means the stats are captured and are accessible via the Stroom Caches screen AND via
        # the metrics servlet on the admin port for integration with tools like Graphite/Collectd
        # The default for Stroom is INTERNAL, the default for Stroom-Proxy is DROPWIZARD_METRICS
        statisticsMode:
Open ID Configuration
Both Stroom and Stroom-Proxy share the same configuration structure for configuring Open ID Connect authentication.
This section of config is only applicable if appConfig/proxyConfig.security.authentication.identityProviderType is set to EXTERNAL_IDP.
appConfig / proxyConfig:
  security:
    authentication:
      openId:
        # A set of audience claim values, one of which must appear in the audience
        # claim in the token.
        # If empty, no validation will be performed on the audience claim
        # If audienceClaimRequired is false and there is no audience claim in the token,
        # then allowedAudiences will be ignored
        allowedAudiences: []
        # If true the token will fail validation if the audience claim is not present
        # and allowedAudiences is not empty
        audienceClaimRequired: false
        # The authentication endpoint used in OpenId authentication
        # Should only be set if not using a configuration endpoint
        authEndpoint: null
        # If custom scopes are required for client_credentials requests then this should be
        # set to replace the default of 'openid'. E.g. for Azure AD you will likely need to set
        # this to 'openid' and '<your-app-id-uri>/.default>'
        clientCredentialsScopes:
        - "openid"
        # The client ID used in OpenId authentication.
        clientId: null
        # The client secret used in OpenId authentication.
        clientSecret: null
        # If using an AWS load balancer to handle the authentication, set this to the Amazon
        # Resource Names (ARN) of the load balancer(s) fronting stroom, which will be something
        # like 'arn:aws:elasticloadbalancing:region-code:account-id:loadbalance
        # /app/load-balancer-name/load-balancer-id'.
        # This config value will be used to verify the 'signer' in the JWT header.
        # Each value is the first N characters of the ARN and as a minimum must include up to
        # the colon after the account-id, i.e.
        # 'arn:aws:elasticloadbalancing:region-code:account-id:'
        # See https://docs.aws.amazon.com/elasticloadbalancing/latest/application/listener-authenticate-users.html#user-claims-encodin
        expectedSignerPrefixes: []
        # Some OpenId providers, e.g. AWS Cognito, require a form to be used for token requests.
        formTokenRequest: true
        # A template to build the user's full name using claim values as variables in the
        # template. E.g '${firstName} ${lastName}' or '${name}'.
        # If this property is set in the YAML file, use single quotes to prevent the
        # variables being expanded when the config file is loaded. Note: claim names are
        # case sensitive
        fullNameClaimTemplate: "${name}"
        # The type of Open ID Connect identity provider that stroom/prox
        # will use for authentication. Valid values are:
        # INTERNAL_IDP - Stroom's internal IDP. Not valid for Stroom-Proxy.
        # EXTERNAL_IDP - An external IDP such as KeyCloak/Cognito,
        # TEST_CREDENTIALS - Use hard-coded authentication credentials for test/demo only and
        # NO_IDP - No IDP is used. API keys are set in config for feed status checks. Only for use by Stroom-Proxy
        # Changing this property will require a restart of the application
        identityProviderType: "NO_IDP"
        # The issuer used in OpenId authentication.
        # Should only be set if not using a configuration endpoint
        issuer: null
        # The URI to obtain the JSON Web Key Set from in OpenId authentication
        # Should only be set if not using a configuration endpoint
        jwksUri: null
        # The logout endpoint for the identity provider
        # This is not typically provided by the configuration endpoint
        logoutEndpoint: null
        # The name of the URI parameter to use when passing the logout redirect URI to the IDP.
        # This is here as the spec seems to have changed from 'redirect_uri' to
        # 'post_logout_redirect_uri'
        logoutRedirectParamName: "post_logout_redirect_uri"
        # You can set an openid-configuration URL to automatically configure much of the openid
        # settings. Without this the other endpoints etc must be set manually
        openIdConfigurationEndpoint: null
        # If the token is signed by AWS then use this pattern to form the URI to obtain the
        # public key from. The pattern supports the variables '${awsRegion}' and '${keyId}'.
        # Multiple instances of a variable are also supported.
        # If this property is set in the YAML file, use single quotes to prevent the
        # variables being expanded when the config file is loaded.
        publicKeyUriPattern: "https://public-keys.auth.elb.${awsRegion}.amazonaws.com/${keyId}"
        # If custom auth flow request scopes are required then this should be set to replace
        # the defaults of 'openid' and 'email'.
        requestScopes:
        - "openid"
        - "email"
        # The token endpoint used in OpenId authentication
        # Should only be set if not using a configuration endpoint
        tokenEndpoint: null
        # The Open ID Connect claim used to link an identity on the IDP to a stroom user.
        # Must uniquely identify the user on the IDP and not be subject to change. Uses 'sub' by
        # default
        uniqueIdentityClaim: "sub"
        # The Open ID Connect claim used to provide a more human friendly username for a user
        # than that provided by uniqueIdentityClaim. It is not guaranteed to be unique and may
        # change
        userDisplayNameClaim: "preferred_username"
        # A set of issuers (in addition to the 'issuer' property that is provided by the IDP
        # that are deemed valid when seen in a token. If no additional valid issuers are
        # required then set this to an empty set. Also this is used to validate the 'issuer'
        # returned by the IDP when it is not a sub path of 'openIdConfigurationEndpoint'. If
        # this set is empty then Stroom will verify that the
        validIssuers: []
Jersey HTTP Client Configuration
Stroom and Stroom Proxy use the
Jersey
client for making HTTP connections with other nodes or other systems (e.g. Open ID Connect identity providers).
In the YAML file, the jerseyClients key controls the configuration of the various clients in use.
To allow complete control of the client configuration, Stroom uses the concept of named client configurations. Each named client will be unique to a destination (where a destination is typically a server or a cluster of functionally identical servers). Thus the configuration of the connections to each of those destinations can be configured independently.
The client names are as follows:
DEFAULT- The default client configuration used if a named configuration is not present.AWS_PUBLIC_KEYS- Connections to fetch AWS public keys used in Open ID Connect authentication.DOWNSTREAM- Connections to downstream proxy/stroom instances to check feed status. (Stroom Proxy only).OPEN_ID- Connections to an Open ID Connect identity provider, e.g. Cognito, Azure AD, KeyCloak, etc.STROOM- Inter-node communications within the Stroom cluster (Stroom only).
Note
If a named configuration does not exist then the configuration forDEFAULT will be used.
If DEFAULT is not defined in the configuration then the Dropwizard defaults will be used.
The following is an example of how the clients are configured in the YAML file:
jerseyClients:
  DEFAULT:
    # Default client configuration, e.g.
    timeout: 500ms
  STROOM:
    # Configuration items for stroom inter-node communications
    timeout: 30s
  # etc.
The configuration keys (along with their default values and descriptions) for each client can be found here:
The following is another example including most keys:
jerseyClients:
  DEFAULT:
    minThreads: 1
    maxThreads: 128
    workQueueSize: 8
    gzipEnabled: true
    gzipEnabledForRequests: true
    chunkedEncodingEnabled: true
    timeout: 500ms
    connectionTimeout: 500ms
    timeToLive: 1h
    cookiesEnabled: false
    maxConnections: 1024
    maxConnectionsPerRoute: 1024
    keepAlive: 0ms
    retries: 0
    userAgent: <application name> (<client name>)
    proxy:
      host: 192.168.52.11
      port: 8080
      scheme : http
      auth:
        username: secret
        password: stuff
        authScheme: NTLM
        realm: realm
        hostname: host
        domain: WINDOWSDOMAIN
        credentialType: NT
      nonProxyHosts:
        - localhost
        - '192.168.52.*'
        - '*.example.com'
    tls:
      protocol: TLSv1.2
      provider: SunJSSE
      verifyHostname: true
      keyStorePath: /path/to/file
      keyStorePassword: changeit
      keyStoreType: JKS
      trustStorePath: /path/to/file
      trustStorePassword: changeit
      trustStoreType: JKS
      trustSelfSignedCertificates: false
      supportedProtocols: TLSv1.1,TLSv1.2
      supportedCipherSuites: TLS_ECDHE_ECDSA_WITH_AES_128_CBC_SHA256
      certAlias: alias-of-specific-cert
Note
Duration values in the Jersey client configuration blocks are different to Stroom Durations defined in Stroom properties.
They are defined as a numeric value and a unit suffix.
Typical suffixes are (in ascending order): ns, us, ms, s, m, h, d.
ISO 8601 duration strings are NOT supported, nor are values without a suffix.
Full list of duration suffixes and their aliases
Note
The paths used for the key and trust stores will be treated in the same way as Stroom property paths, i.e. relative tostroom.home if relative and supporting variable substitution.
Logging Configuration
The Dropwizard configuration file controls all the logging by the application. In addition to the main application log, there are additional logs such as stroom user events (for audit), Stroom-Proxy send and receive logs and database migration logs.
For full details of the logging configuration, see Dropwizard Logging Configuration
Request Log
The request log is slightly different to the other logs.
It logs all requests to the web server.
It is configured in the server section.
The property archivedLogFilenamePattern controls rolling of the active log file.
The date pattern in the filename controls the frequency that the log files are rolled.
In this example, files will be rolled every 1 minute.
server:
  requestLog:
    appenders:
    - type: file
      currentLogFilename: logs/access/access.log
      discardingThreshold: 0
      # Rolled and gzipped every minute
      archivedLogFilenamePattern: logs/access/access-%d{yyyy-MM-dd'T'HH:mm}.log.gz
      archivedFileCount: 10080
      logFormat: '%h %l "%u" [%t] "%r" %s %b "%i{Referer}" "%i{User-Agent}" %D'
Logback Logs
Dropwizard uses Logback for application level logging. All logs in Stroom and Stroom-Proxy apart from the request log are Logback based logs.
Logback uses the concept of Loggers and Appenders. A Logger is a named thing that produces log messages. An Appender is an output that a Logger can append its log messages to. Typical Appenders are:
- File - appends messages to a file that may or may not be rolled.
- Console - appends messages to
stdout. - Syslog - appends messages to
syslog.
Loggers
A Logger can append to more than one Appender if required. For example, the default configuration file for Stroom has two appenders for the application logs. The rolled files from one appender are POSTed to Stroom to index its own logs, then deleted and the other is intended to remain on the server until archived off to allow viewing by an administrator.
A Logger can be configured with a severity, valid severities are (TRACE, DEBUG, WARN, ERROR).
The severity set on a logger means that only messages with that severity or higher will be logged, with the rest not logged.
Logger names are typically the name of the Java class that is producing the log message.
You don’t need to understand too much about Java classes as you are only likely to change logger severities when requested by one of the developers.
Some loggers, such as event-logger do not have a Java class name.
As an example this is a portion of a Stroom config.yml file to illustrate the different loggers/appenders:
logging:
  # This is root logging severity level for all loggers. Only messages >= to WARN will be logged unless overridden
  # for a specific logger
  level: WARN

  # All the named loggers
  loggers:
    # Logs useful information about stroom. Only set DEBUG on specific 'stroom' classes or packages
    # due to the large volume of logs that would be produced for all of 'stroom' in DEBUG.
    stroom: INFO
    # Logs useful information about dropwizard when booting stroom
    io.dropwizard: INFO
    # Logs useful information about the jetty server when booting stroom
    org.eclipse.jetty: INFO
    # Logs REST request/responses with headers/payloads. Set this to OFF to turn disable that logging.
    org.glassfish.jersey.logging.LoggingFeature: INFO
    # Logs summary information about FlyWay database migrations
    org.flywaydb: INFO
    # Logger and custom appender for audit logs
    event-logger:
      level: INFO
      # Prevents messages from this logger from being sent to other appenders
      additive: false
      appenders:
        - type: file
          currentLogFilename: logs/user/user.log
          discardingThreshold: 0
          # Rolled every minute
          archivedLogFilenamePattern: logs/user/user-%d{yyyy-MM-dd'T'HH:mm}.log
          # Minute rolled logs older than a week will be deleted. Note rolled logs are deleted
          # based on the age of the window they contain, not the number of them. This value should be greater
          # than the maximum time stroom is not producing events for.
          archivedFileCount: 10080
          logFormat: "%msg%n"
    # Logger and custom appender for the flyway DB migration SQL output
    org.flywaydb.core.internal.sqlscript:
      level: DEBUG
      additive: false
      appenders:
        - type: file
          currentLogFilename: logs/migration/migration.log
          discardingThreshold: 0
          # Rolled every day
          archivedLogFilenamePattern: logs/migration/migration-%d{yyyy-MM-dd}.log
          archivedFileCount: 10
          logFormat: "%-6level [%d{\"yyyy-MM-dd'T'HH:mm:ss.SSS'Z'\",UTC}] [%t] %logger - %X{code} %msg %n"
Appenders
The following is an example of the default appenders that will be used for all loggers unless they have their own custom appender configured.
logging:
  # Appenders for all loggers except for where a logger has a custom appender configured
  appenders:

    # stdout
  - type: console
    # Multi-coloured log format for console output
    logFormat: "%highlight(%-6level) [%d{\"yyyy-MM-dd'T'HH:mm:ss.SSS'Z'\",UTC}] [%green(%t)] %cyan(%logger) - %X{code} %msg %n"
    timeZone: UTC
#
    # Minute rolled files for stroom/datafeed, will be curl'd/deleted by stroom-log-sender
  - type: file
    currentLogFilename: logs/app/app.log
    discardingThreshold: 0
    # Rolled and gzipped every minute
    archivedLogFilenamePattern: logs/app/app-%d{yyyy-MM-dd'T'HH:mm}.log.gz
    # One week using minute files
    archivedFileCount: 10080
    logFormat: "%-6level [%d{\"yyyy-MM-dd'T'HH:mm:ss.SSS'Z'\",UTC}] [%t] %logger - %X{code} %msg %n"
Log Rolling
Rolling of log files can be done based on size of file or time.
The archivedLogFilenamePattern property controls the rolling behaviour.
The rolling policy is determined from the filename pattern, e.g. a pattern with a minute precision date format will be rolled every minute.
The following is an example of an appender that rolls based on the size of the log file:
  - type: file
    currentLogFilename: logs/app.log
    # The name pattern, where i a sequential number indicating age, where 1 is the most recent
    archivedLogFilenamePattern: logs/app-%i.log
    # The maximum number of rolled files to keep
    archivedFileCount: 10
    # The maximum size of a log file
    maxFileSize: "100MB"
    logFormat: "%-6level [%d{\"yyyy-MM-dd'T'HH:mm:ss.SSS'Z'\",UTC}] [%t] %logger - %X{code} %msg %n"
The following is an example of an appender that rolls every minute to gzipped files:
  - type: file
    currentLogFilename: logs/app/app.log
    # Rolled and gzipped every minute
    archivedLogFilenamePattern: logs/app/app-%d{yyyy-MM-dd'T'HH:mm}.log.gz
    # One week using minute files
    archivedFileCount: 10080
    logFormat: "%-6level [%d{\"yyyy-MM-dd'T'HH:mm:ss.SSS'Z'\",UTC}] [%t] %logger - %X{code} %msg %n"
Warning
Log file rolling is event based, so a file will only roll when a new message arrives that would require a roll to happen. This means that if the application is idle for a long period with no log output then the un-rolled file will remain active until a new message arrives to trigger it to roll. For example, if Stroom is unused overnight, then the last log message from the night before will not be rolled until a new messages arrive in the morning.
For this reason, archivedFileCount should be set to a value that is greater than the maximum time the application may be idle, else rolled log files may be deleted as soon as they are rolled.
3.2.1.2 - Stroom Configuration
Describes how the Stroom application is configured.
General configuration
The Stroom application is essentially just an executable
JAR
file that can be run when provided with a configuration file, config.yml.
This config file is common to all forms of deployment.
config.yml
Stroom operates on a configuration by exception basis so all configuration properties will have a sensible default value and a property only needs to be explicitly configured if the default value is not appropriate, e.g. for tuning a large scale production deployment or where values are environment specific.
As a result config.yml only contains a minimal set of properties.
The full tree of properties can be seen in ./config/config-defaults.yml and a schema for the configuration tree (along with descriptions for each property) can be found in ./config/config-schema.yml.
These two files can be used as a reference when configuring stroom.
Key Configuration Properties
The following are key properties that would typically be changed for a production deployment.
All configuration branches are relative to the appConfig root.
The database name(s), hostname(s), port(s), usernames(s) and password(s) should be configured using these properties. Typically stroom is configured to keep it statistics data in a separate database to the main stroom database, as is configured below.
  commonDbDetails:
    connection:
      jdbcDriverUrl: "jdbc:mysql://localhost:3307/stroom?useUnicode=yes&characterEncoding=UTF-8"
      jdbcDriverUsername: "stroomuser"
      jdbcDriverPassword: "stroompassword1"
  statistics:
    sql:
      db:
        connection:
          jdbcDriverUrl: "jdbc:mysql://localhost:3307/stats?useUnicode=yes&characterEncoding=UTF-8"
          jdbcDriverUsername: "statsuser"
          jdbcDriverPassword: "stroompassword1"
In a clustered deployment each node must be given a node name that is unique within the cluster. This is used to identify nodes in the Nodes screen. It could be the hostname of the node or follow some other naming convention.
  node:
    name: "node1a"
Each node should have its identity on the network configured so that it uses the appropriate FQDNs.
The nodeUri hostname is the FQDN of each node and used by nodes to communicate with each other, therefore it can be private to the cluster of nodes.
The publicUri hostname is the public facing FQDN for stroom, i.e. the address of a load balancer or Nginx.
This is the address that users will use in their browser.
  nodeUri:
    hostname: "localhost" # e.g. node5.stroomnodes.somedomain
  publicUri:
    hostname: "localhost" # e.g. stroom.somedomain
Deploying without Docker
Stroom running without docker has two files to configure it. The following locations are relative to the stroom home directory, i.e. the root of the distribution zip.
./config/config.yml- Stroom configuration YAML file./config/scripts.env- Stroom scripts configuration env file
The distribution also includes these files which are helpful when it comes to configuring stroom.
./config/config-defaults.yml- Full version of the config.yml file containing all branches/leaves with default values set. Useful as a reference for the structure and the default values../config/config-schema.yml- The schema defining the structure of theconfig.ymlfile.
scripts.env
This file is used by the various shell scripts like start.sh, stop.sh, etc.
This file should not need to be changed unless you want to change the locations where certain log files are written to or need to change the java memory settings.
In a production system it is highly likely that you will need to increase the java heap size as the default is only 2G. The heap size settings and any other java command line options can be set by changing:
JAVA_OPTS="-Xms512m -Xmx2048m"
As part of a docker stack
When stroom is run as part of one of our docker stacks, e.g. stroom_core there are some additional layers of configuration to take into account, but the configuration is still primarily done using the config.yml file.
Stroom’s config.yml file is found in the stack in ./volumes/stroom/config/ and this is the primary means of configuring Stroom.
The stack also ships with a default config.yml file baked into the docker image.
This minimal fallback file (located in /stroom/config-fallback/ inside the container) will be used in the absence of one provided in the docker stack configuration (./volumes/stroom/config/).
The default config.yml file uses environment variable substitution so some configuration items will be set by environment variables set into the container by the stack env file and the docker-compose YAML.
This approach is useful for configuration values that need to be used by multiple containers, e.g. the public FQDN of Nginx, so it can be configured in one place.
If you need to further customise the stroom configuration then it is recommended to edit the ./volumes/stroom/config/config.yml file.
This can either be a simple file with hard coded values or one that uses environment variables for some of its
configuration items.
The configuration works as follows:
env file (stroom<stack name>.env)
                |
                |
                | environment variable substitution
                |
                v
docker compose YAML (01_stroom.yml)
                |
                |
                | environment variable substitution
                |
                v
Stroom configuration file (config.yml)
Ansible
If you are using Ansible to deploy a stack then it is recommended that all of stroom’s configuration properties are set directly in the config.yml file using a templated version of the file and to NOT use any environment variable substitution.
When using Ansible, the Ansible inventory is the single source of truth for your configuration so not using environment variable substitution for stroom simplifies the configuration and makes it clearer when looking at deployed configuration files.
Stroom-ansible has an example inventory for a single node stroom stack deployment. The group_vars/all file shows how values can be set into the env file.
Configuration Reference
appConfig:
  haltBootOnConfigValidationFailure: true
  ...
The following sections document each level one branch of appConfig, e.g. appConfig.receive.
A common structure within the configuration is the Cache Configuration.
Typically any property name that ends ....Cache has this structure.
Each functional area/module in Stroom has its own logical database connection.
Any property with the name db is a standard structure for configuring a database connection.
See Common Database Configuration.
This allows each module to, in theory, connect to a separate database, be they on one host or multiple.
In practice most Stroom deployments will use one database connection for all modules.
See commonDbDetails for details on how to use one shared database configuration.
activity
appConfig:
  activity:
    db: # Common database configuration branch
analytics
appConfig:
  analytics:
    db: # Common database configuration branch
    duplicateCheckStore:
      lmdb: # Common LMDB structure
        localDir: "lmdb/duplicate_check"
    emailConfig:
      fromAddress: "noreply@stroom"
      fromName: "Stroom Analytics"
      smtp:
        host: "localhost"
        password: null
        port: 2525
        transport: "plain"
        username: null
    executionHistoryRetention: "P10D"
    resultStore:
      lmdb: # Common LMDB structure
        localDir: "lmdb/analytic_store"
      maxPayloadSize: "1G"
      maxPutsBeforeCommit: 10000
      maxSortedItems: 500000
      maxStringFieldLength: 1000
      minPayloadSize: "1M"
      offHeapResults: true
      valueQueueSize: 10000
    streamingAnalyticCache: # Common cache structure
    timezone: "UTC"
annotation
appConfig:
  annotation:
    annotationFeedCache:
    annotationTagCache:
    createText: "Create Annotation"
    db:
    defaultRetentionPeriod: "5y"
    physicalDeleteAge: "P7D"
    standardComments: []
askStroomAi
appConfig:
  askStroomAi:
    chatMemory:
      timeToLive:
        time: 1
        timeUnit: "HOURS"
      tokenLimit: 30000
    tableSummary:
      maximumBatchSize: 16384
      maximumTableInputRows: 100
autoContentCreation
appConfig:
  autoContentCreation:

    #An optional group to add the group defined by groupTemplate to.
    #The value of this property is the name of a group. It can be the same
    #as groupParentGroupName if required.
    #It allows all the templated groups to belong to a common group for easier
    #permission management.
    additionalGroupParentGroupName: "Data Feed Developer"

    #If set, when Stroom auto-creates a feed, it will create an additional user group with a
    #name derived from this template. This is in addition to the user group defined by 'groupTemplate'.
    #If not set, only the latter user group will be created. Default value is 'grp-${accountid}-sandbox'.
    #If this property is set in the YAML file, use single quotes to prevent the
    #variables being expanded when the config file is loaded.
    additionalGroupTemplate: "grp-${accountid}-sandbox"

    #The subjectId of the user/group who the auto-created content will be created by,
    #typically a group with administrator privileges.
    #This user/group must have the permission to create all content required. It will also be the
    #'run as' user for created pipeline processor filters.
    createAsSubjectId: "Administrators"

    #The type of the entity represented by createAsSubjectId, i.g. 'USER' or 'GROUP'.
    #It is possible for content to be owned by a group rather than individual users.
    createAsType: "GROUP"

    #The templated path to a folder in the Stroom explorer tree where Stroom will auto-create
    #content. If it doesn't exist it will be created. Content will be created in a sub-folder of this
    #folder with a name derived from the system name of the received data. By default this is
    #'Feeds/${accountid}'.
    #If this property is set in the YAML file, use single quotes to prevent the
    #variables being expanded when the config file is loaded.
    destinationExplorerPathTemplate: "/Feeds/${accountid}"

    #An optional templated sub-path of 'destinationExplorerPathTemplate'. If set, copied dependencies (e.g.
    #XSLT filters, Test Converters, etc.) will be created in the sub-directory defined by this template.
    #If not set, that content will be created in the directory
    destinationExplorerSubPathTemplate: "sandbox"

    #Whether the auto-creation of content on data receipt is enabled or not.
    #If enabled, Stroom will automatically create content such as Feeds/XSLTs/Pipelines on receipt of
    #a data stream. The property 'templatesPath' will contain content to be used as templates for
    #auto-creation. Content will only be created if a Content Template rule matches the attributes
    #on the incoming data.
    enabled: false

    #An optional group to add the group defined by groupTemplate to.
    #The value of this property is the name of a group.
    #It allows all the templated groups to belong to a common group for easier
    #permission management.
    groupParentGroupName: "Data Feed Reader"

    #When Stroom auto-creates a feed, it will create a user group with a
    #name derived from this template. Default value is 'grp-${accountid}'.
    #If this property is set in the YAML file, use single quotes to prevent the
    #variables being expanded when the config file is loaded.
    groupTemplate: "grp-${accountid}"

    #The header keys available for use when matching a request to a content template.
    #Must be in lower case.
    templateMatchFields:
    - "accountid"
    - "accountname"
    - "component"
    - "feed"
    - "format"
    - "schema"
    - "schemaversion"
byteBufferPool
appConfig:
  byteBufferPool:
    blockOnExhaustedPool: false
    pooledByteBufferCounts:
      1: 50
      10: 50
      100: 50
      1000: 50
      10000: 50
      100000: 10
      1000000: 3
    warningThresholdPercentage: 90
cluster
appConfig:
  cluster:
    clusterCallIgnoreSSLHostnameVerifier: true
    clusterCallReadTimeout: "PT30S"
    clusterCallUseLocal: true
    clusterResponseTimeout: "PT30S"
clusterLock
appConfig:
  clusterLock:
    db:
    lockTimeout: "PT10M"
commonDbDetails
appConfig:
  commonDbDetails:
commonDbDetails has the same structure as all the db branches.
It is used for defining a database connection configuration that will be used for all stroom functional areas/modules unless the module has explicitly configured its db configuration branch.
contentPackImport
appConfig:
  contentPackImport:
    enabled: false
    importAsSubjectId: "Administrators"
    importAsType: "GROUP"
    importDirectory: "content_pack_import"
contentStore
appConfig:
  contentStore:
    urls:
    - "https://raw.githubusercontent.com/gchq/stroom-content/refs/heads/master/source/content-store.yml"
credentials
appConfig:
  credentials:
    db:
    keyStoreCachePath: "${stroom.home}/keystores"
crossModule
appConfig:
  crossModule:
    db:
dashboard
appConfig:
  dashboard:
    visualisationDocCache:
      expireAfterAccess: null
      expireAfterWrite: "PT10M"
      maximumSize: 100
      refreshAfterWrite: null
      statisticsMode: "INTERNAL"
data
appConfig:
  data:
    filesystemVolume:
      createDefaultStreamVolumesOnStart: true
      defaultStreamVolumeFilesystemUtilisation: 0.9
      defaultStreamVolumeGroupName: "Default Volume Group"
      defaultStreamVolumePaths:
      - "volumes/default_stream_volume"
      feedPathCache:
      findOrphanedMetaBatchSize: 7000
      maxVolumeStateAge: "PT30S"
      metaTypeExtensions:
        Detections: "dtxn"
        Error: "err"
        Events: "evt"
        Raw Events: "revt"
        Raw Reference: "rref"
        Records: "rec"
        Reference: "ref"
        Test Events: "tevt"
        Test Reference: "tref"
      typePathCache:
      volumeCache:
      volumeSelector: "RoundRobin"
    meta:
      dataFormats:
      - "FIXED_WIDTH_NO_HEADER"
      - "INI"
      - "CSV"
      - "JSON"
      - "TEXT"
      - "XML_FRAGMENT"
      - "YAML"
      - "PSV_NO_HEADER"
      - "PSV"
      - "CSV_NO_HEADER"
      - "XML"
      - "TSV"
      - "SYSLOG"
      - "TSV_NO_HEADER"
      - "FIXED_WIDTH"
      - "TOML"
      db:
      metaFeedCache:
      metaProcessorCache:
      metaStatusUpdateBatchSize: 0
      metaTypeCache:
      metaTypes:
      - "Context"
      - "Raw Reference"
      - "Events"
      - "Raw Events"
      - "Reference"
      - "Error"
      - "Test Events"
      - "Test Reference"
      - "Detections"
      - "Meta Data"
      - "Records"
      metaValue:
        addAsync: true
        deleteAge: "P30D"
        deleteBatchSize: 500
        flushBatchSize: 500
      rawMetaTypes:
      - "Raw Reference"
      - "Raw Events"
    retention:
      deleteBatchSize: 1000
      useQueryOptimisation: true
    store:
      db:
      deleteBatchSize: 1000
      deleteFailureThreshold: 100
      deletePurgeAge: "P7D"
      fileSystemCleanBatchSize: 20
      fileSystemCleanDeleteOut: false
      fileSystemCleanOldAge: "P1D"
docstore
appConfig:
  docstore:
    db:
elastic
appConfig:
  elastic:
    client:
      maxConnections: 30
      maxConnectionsPerRoute: 10
    indexCache:
    indexClientCache:
    indexing:
      initialRetryBackoffPeriodMs: 1000
      maxNestedElementDepth: 10
      retryCount: 5
    search:
      highlight: true
      scrollDuration: "PT1M"
      storeSize: "1000000,100,10,1"
      suggestions:
        enabled: true
explorer
appConfig:
  explorer:
    db:
    dependencyWarningsEnabled: false
    docRefInfoCache:
    suggestedTags:
    - "reference-loader"
    - "dynamic"
    - "extraction"
export
appConfig:
  export:
    enabled: false
feed
appConfig:
  feed:
    feedDocCache:
    feedNamePattern: "^[A-Z0-9_-]{3,}$"
    unknownClassification: "UNKNOWN CLASSIFICATION"
gitRepo
appConfig:
  gitRepo:
    db:
    localDir: "git_repo"
index
appConfig:
  index:
    db:
    indexCache:
    indexFieldCache:
    ramBufferSizeMB: 1024
    writer:
      activeShardCache:
      cache:
        coreItems: 50
        maxItems: 100
        minItems: 0
        timeToIdle: "PT0S"
        timeToLive: "PT0S"
      indexShardWriterCache:
      slowIndexWriteWarningThreshold: "PT1S"
job
appConfig:
  job:
    db:
    enableJobsOnBootstrap: false
    enabled: true
    executionInterval: "10s"
kafka
appConfig:
  kafka:
    kafkaConfigDocCache:
      expireAfterAccess: "PT10S"
      expireAfterWrite: null
      maximumSize: 1000
      refreshAfterWrite: null
      statisticsMode: "INTERNAL"
    skeletonConfigContent: ".........TRUNCATED..........."
lifecycle
appConfig:
  lifecycle:
    enabled: true
lmdbLibrary
appConfig:
  lmdbLibrary:
    providedSystemLibraryPath: null
    systemLibraryExtractDir: "lmdb_library"
logging
appConfig:
  logging:
    deviceCache:
    logEveryRestCallEnabled: false
    maxDataElementStringLength: 500
    maxListElements: 5
    omitRecordDetailsLoggingEnabled: true
node
appConfig:
  node:
    db:
    name: "tba"
    status:
      heapHistogram:
        classNameMatchRegex: "^stroom\\..*$"
        classNameReplacementRegex: "((?<=\\$Proxy)[0-9]+|(?<=\\$\\$)[0-9a-f]+|(?<=\\\
          $\\$Lambda\\$)[0-9]+\\/[0-9]+)"
nodeUri
appConfig:
  nodeUri:
    hostname: null
    pathPrefix: null
    port: null
    scheme: null
path
appConfig:
  path:
    home: null
    temp: null
pipeline
appConfig:
  pipeline:
    appender:
      maxActiveDestinations: 100
    documentPermissionCache:
    httpClientCache:
    parser:
      cache:
      secureProcessing: true
    pipelineDataCache:
    referenceData:
      effectiveStreamCache:
      lmdb:
        localDir: "reference_data"
        readerBlockedByWriter: true
      loadingLockStripes: 2048
      maxPurgeDeletesBeforeCommit: 200000
      maxPutsBeforeCommit: 200000
      metaIdToRefStoreCache:
        expireAfterAccess: "PT1H"
        expireAfterWrite: null
        maximumSize: 1000
        refreshAfterWrite: null
        statisticsMode: "INTERNAL"
      purgeAge: "P30D"
      stagingLmdb:
        localDir: "reference_staging_data"
        maxReaders: 5
        maxStoreSize: "10G"
        readAheadEnabled: true
        readerBlockedByWriter: false
    xmlSchema:
      cache:
        expireAfterAccess: "PT10M"
        expireAfterWrite: null
        maximumSize: 1000
        refreshAfterWrite: null
        statisticsMode: "INTERNAL"
    xslt:
      cache:
        expireAfterAccess: "PT10M"
        expireAfterWrite: null
        maximumSize: 1000
        refreshAfterWrite: null
        statisticsMode: "INTERNAL"
      maxElements: 1000000
planb
appConfig:
  planb:
    minTimeToKeepEnvOpen: "PT1M"
    minTimeToKeepSnapshots: "PT10M"
    nodeList: []
    path: "${stroom.home}/planb"
    snapshotRetryFetchInterval: "PT1M"
    stateDocCache:
processor
appConfig:
  processor:
    assignTasks: true
    createTasksBeyondProcessLimit: true
    databaseMultiInsertMaxBatchSize: 500
    db:
    deleteAge: "P1D"
    disownDeadTasksAfter: "PT10M"
    fillTaskQueue: true
    processorCache:
    processorFeedCache:
    processorFilterCache:
    processorNodeCache:
    queueSize: 1000
    skipNonProducingFiltersDuration: "PT10S"
    taskCreationThreadCount: 5
    tasksToCreate: 1000
    waitToQueueTasksDuration: "PT10S"
properties
appConfig:
  properties:
    db:
publicUri
appConfig:
  publicUri:
    hostname: null
    pathPrefix: null
    port: null
    scheme: "https"
queryDataSource
appConfig:
  queryDataSource:
    db:
queryHistory
appConfig:
  queryHistory:
    daysRetention: 365
    db:
    itemsRetention: 100
receiptPolicy
appConfig:
  receiptPolicy:
    obfuscatedFields:
    - "AccountId"
    - "AccountName"
    - "Component"
    - "Feed"
    - "ReceivedPath"
    - "RemoteDN"
    - "RemoteHost"
    - "System"
    - "UploadUserId"
    - "UploadUsername"
    - "X-Forwarded-For"
    obfuscationHashAlgorithm: "SHA2_512"
    receiptRulesInitialFields:
      AccountId: "Text"
      Component: "Text"
      Compression: "Text"
      content-length: "Text"
      ContextEncoding: "Text"
      ContextFormat: "Text"
      EffectiveTime: "Date"
      Encoding: "Text"
      Environment: "Text"
      Feed: "Text"
      Format: "Text"
      ReceiptId: "Text"
      ReceiptIdPath: "Text"
      ReceivedPath: "Text"
      ReceivedTime: "Date"
      ReceivedTimeHistory: "Text"
      RemoteCertExpiry: "Date"
      RemoteDN: "Text"
      RemoteHost: "Text"
      RemoteAddress: "Text"
      Schema: "Text"
      SchemaVersion: "Text"
      System: "Text"
      Type: "Text"
      UploadUsername: "Text"
      UploadUserId: "Text"
      user-agent: "Text"
      X-Forwarded-For: "Text"
receive
appConfig:
  receive:
The receive configuration branch is common to both Stroom and Stroom Proxy.
See Receive Configuration for more details.
s3
appConfig:
  s3:
    s3ConfigDocCache:
    skeletonConfigContent: "{\n  \"credentialsProviderType\" : \"DEFAULT\",\n  \"\
      region\" : \"eu-west-2\",\n  \"bucketName\" : \"XXXX-eu-west-2\",\n  \"keyPattern\"\
      \ : \"${type}/${year}/${month}/${day}/${idPath}/${feed}/${idPadded}.zip\"\n\
      }\n"
search
appConfig:
  search:
    extraction:
      extractionDelayMs: 100
      maxStoredDataQueueSize: 1000
      maxStreamEventMapSize: 1000000
      maxThreadsPerTask: 5
    maxBooleanClauseCount: 1024
    maxStoredDataQueueSize: 1000
    resultStore:
      lmdb:
        localDir: "search_results"
        maxReaders: 10
        maxStoreSize: "10G"
        readAheadEnabled: true
      map:
        minUntrimmedSize: 100000
        trimmedSizeLimit: 500000
      maxPayloadSize: "1G"
      maxPutsBeforeCommit: 10000
      maxSortedItems: 500000
      maxStringFieldLength: 1000
      minPayloadSize: "1M"
      offHeapResults: true
      valueQueueSize: 10000
    shard:
      indexShardSearcherCache:
      maxDocIdQueueSize: 1000000
      maxThreadsPerTask: 5
      remoteSearchResultCache:
security
appConfig:
  security:
    authentication:
      apiKeyCache:
      authenticationStateCache:
      maxApiKeyExpiryAge: "P365D"
      openId:
        allowedAudiences: []
        audienceClaimRequired: false
        authEndpoint: null
        clientCredentialsScopes:
        - "openid"
        clientId: null
        clientSecret: null
        expectedSignerPrefixes: []
        formTokenRequest: true
        fullNameClaimTemplate: "${name}"
        identityProviderType: "INTERNAL_IDP"
        issuer: null
        jwksUri: null
        logoutEndpoint: null
        logoutRedirectParamName: "post_logout_redirect_uri"
        openIdConfigurationEndpoint: null
        publicKeyUriPattern: "https://public-keys.auth.elb.${awsRegion}.amazonaws.com/${keyId}"
        requestScopes:
        - "openid"
        - "email"
        tokenEndpoint: null
        uniqueIdentityClaim: "sub"
        userDisplayNameClaim: "preferred_username"
        validIssuers: []
      preventLogin: false
    authorisation:
      appPermissionIdCache:
      db:
      docTypeIdCache:
      userAppPermissionsCache:
      userByUuidCache:
      userCache:
      userDocumentPermissionsCache:
      userGroupsCache:
      userInfoByUuidCache:
    crypto:
      secretEncryptionKey: ""
    identity:
      allowCertificateAuthentication: false
      autoCreateAdminAccountOnBoot: false
      certificateCnCaptureGroupIndex: 1
      certificateCnPattern: ".*\\((.*)\\)"
      db:
      email:
        allowPasswordResets: false
        fromAddress: "noreply@stroom"
        fromName: "Stroom User Accounts"
        passwordResetSubject: "Password reset for Stroom"
        passwordResetText: "A password reset has been requested for this email address.\
          \ Please visit the following URL to reset your password: %s."
        passwordResetUrl: "/s/resetPassword/?user=%s&token=%s"
        smtp:
          host: "localhost"
          password: null
          port: 2525
          transport: "plain"
          username: null
      failedLoginLockThreshold: 3
      openid:
        accessCodeCache:
        refreshTokenCache:
      passwordPolicy:
        allowPasswordResets: true
        forcePasswordChangeOnFirstLogin: true
        mandatoryPasswordChangeDuration: "P90D"
        minimumPasswordLength: 8
        minimumPasswordStrength: 3
        neverUsedAccountDeactivationThreshold: "P30D"
        passwordComplexityRegex: ".*"
        passwordPolicyMessage: "To conform with our Strong Password policy, you are\
          \ required to use a sufficiently strong password. Password must be more\
          \ than 8 characters."
        unusedAccountDeactivationThreshold: "P90D"
      token:
        accessTokenExpiration: "PT1H"
        algorithm: "RS256"
        defaultApiKeyExpiration: "P365D"
        emailResetTokenExpiration: "PT10M"
        idTokenExpiration: "PT1H"
        jwsIssuer: "stroom"
        refreshTokenExpiration: "P30D"
    webContent:
      contentSecurityPolicy: "default-src 'self'; script-src 'self' 'unsafe-eval'\
        \ 'unsafe-inline'; img-src 'self' data:; style-src 'self' 'unsafe-inline';\
        \ frame-ancestors 'self';"
      contentTypeOptions: "nosniff"
      frameOptions: "sameorigin"
      strictTransportSecurity: "max-age=31536000; includeSubDomains; preload"
      xssProtection: "1; mode=block"
session
appConfig:
  session:
    maxInactiveInterval: "P7D"
sessionCookie
appConfig:
  sessionCookie:
    httpOnly: true
    sameSite: "STRICT"
    secure: true
solr
appConfig:
  solr:
    indexCache:
    indexClientCache:
    search:
      maxBooleanClauseCount: 1024
      maxStoredDataQueueSize: 1000
state
appConfig:
  state:
    scyllaDbDocCache:
    sessionCache:
    stateDocCache:
statistics
appConfig:
  statistics:
    hbase:
      docRefType: "StroomStatsStore"
      eventsPerMessage: 100
      kafkaConfigUuid: null
      kafkaTopics:
        count: "statisticEvents-Count"
        value: "statisticEvents-Value"
    internal:
      benchmarkCluster:
      - type: "StatisticStore"
        uuid: "946a88c6-a59a-11e6-bdc4-0242ac110002"
        name: "Benchmark-Cluster Test"
      - type: "StroomStatsStore"
        uuid: "2503f703-5ce0-4432-b9d4-e3272178f47e"
        name: "Benchmark-Cluster Test"
      cpu:
      - type: "StatisticStore"
        uuid: "af08c4a7-ee7c-44e4-8f5e-e9c6be280434"
        name: "CPU"
      - type: "StroomStatsStore"
        uuid: "1edfd582-5e60-413a-b91c-151bd544da47"
        name: "CPU"
      enabledStoreTypes:
      - "StatisticStore"
      eventsPerSecond:
      - type: "StatisticStore"
        uuid: "a9936548-2572-448b-9d5b-8543052c4d92"
        name: "EPS"
      - type: "StroomStatsStore"
        uuid: "cde67df0-0f77-45d3-b2c0-ee8bb7b3c9c6"
        name: "EPS"
      heapHistogramBytes:
      - type: "StatisticStore"
        uuid: "934a1600-b456-49bf-9aea-f1e84025febd"
        name: "Heap Histogram Bytes"
      - type: "StroomStatsStore"
        uuid: "b0110ab4-ac25-4b73-b4f6-96f2b50b456a"
        name: "Heap Histogram Bytes"
      heapHistogramInstances:
      - type: "StatisticStore"
        uuid: "e4f243b8-2c70-4d6e-9d5a-16466bf8764f"
        name: "Heap Histogram Instances"
      - type: "StroomStatsStore"
        uuid: "bdd933a4-4309-47fd-98f6-1bc2eb555f20"
        name: "Heap Histogram Instances"
      memory:
      - type: "StatisticStore"
        uuid: "77c09ccb-e251-4ca5-bca0-56a842654397"
        name: "Memory"
      - type: "StroomStatsStore"
        uuid: "d8a7da4f-ef6d-47e0-b16a-af26367a2798"
        name: "Memory"
      metaDataStreamSize:
      - type: "StatisticStore"
        uuid: "946a8814-a59a-11e6-bdc4-0242ac110002"
        name: "Meta Data-Stream Size"
      - type: "StroomStatsStore"
        uuid: "3b25d63b-5472-44d0-80e8-8eea94f40f14"
        name: "Meta Data-Stream Size"
      metaDataStreamsReceived:
      - type: "StatisticStore"
        uuid: "946a87bc-a59a-11e6-bdc4-0242ac110002"
        name: "Meta Data-Streams Received"
      - type: "StroomStatsStore"
        uuid: "5535f493-29ae-4ee6-bba6-735aa3104136"
        name: "Meta Data-Streams Received"
      pipelineStreamProcessor:
      - type: "StatisticStore"
        uuid: "946a80fc-a59a-11e6-bdc4-0242ac110002"
        name: "PipelineStreamProcessor"
      - type: "StroomStatsStore"
        uuid: "efd9bad4-0bab-460f-ae98-79e9717deeaf"
        name: "PipelineStreamProcessor"
      refDataStoreEntryCount:
      - type: "StatisticStore"
        uuid: "f1587262-9cbc-46b4-80eb-51deb011b2c1"
        name: "Reference Data Store Entry Count"
      - type: "StroomStatsStore"
        uuid: "TODO"
        name: "Reference Data Store Entry Count"
      refDataStoreSize:
      - type: "StatisticStore"
        uuid: "e57959bf-0b2d-4008-98a7-ffcae4bbc4bb"
        name: "Reference Data Store Size"
      - type: "StroomStatsStore"
        uuid: "TODO"
        name: "Reference Data Store Size"
      refDataStoreStreamCount:
      - type: "StatisticStore"
        uuid: "0dfd4e00-e068-4667-9c60-d3f6163a6c04"
        name: "Reference Data Store Stream Count"
      - type: "StroomStatsStore"
        uuid: "TODO"
        name: "Reference Data Store Stream Count"
      searchResultsStoreCount:
      - type: "StatisticStore"
        uuid: "35d60e7d-f11a-45c9-981d-16d8ddda081e"
        name: "Search Results Store Count"
      - type: "StroomStatsStore"
        uuid: "TODO"
        name: "Search Results Store Count"
      searchResultsStoreSize:
      - type: "StatisticStore"
        uuid: "de5b831d-3b7e-4bb5-836f-2f438ec30568"
        name: "Search Results Store Size"
      - type: "StroomStatsStore"
        uuid: "TODO"
        name: "Search Results Store Size"
      streamTaskQueueSize:
      - type: "StatisticStore"
        uuid: "946a7f0f-a59a-11e6-bdc4-0242ac110002"
        name: "Stream Task Queue Size"
      - type: "StroomStatsStore"
        uuid: "4ce8d6e7-94be-40e1-8294-bf29dd089962"
        name: "Stream Task Queue Size"
      volumes:
      - type: "StatisticStore"
        uuid: "ac4d8d10-6f75-4946-9708-18b8cb42a5a3"
        name: "Volumes"
      - type: "StroomStatsStore"
        uuid: "60f4f5f0-4cc3-42d6-8fe7-21a7cec30f8e"
        name: "Volumes"
    sql:
      dataSourceCache:
      db:
      docRefType: "StatisticStore"
      inMemAggregatorPoolSize: 10
      inMemFinalAggregatorSizeThreshold: 1000000
      inMemPooledAggregatorAgeThreshold: "PT5M"
      inMemPooledAggregatorSizeThreshold: 1000000
      maxProcessingAge: null
      search:
        fetchSize: 5000
        maxResults: 100000
      slowQueryWarningThreshold: "PT1S"
      statisticAggregationBatchSize: 1000000
      statisticAggregationStageTwoBatchSize: 200000
      statisticFlushBatchSize: 8000
ui
appConfig:
  ui:
    aboutHtml: "<h1>About Stroom</h1><p>Stroom is designed to receive data from multiple\
      \ systems.</p>"
    activity:
      chooseOnStartup: false
      editorBody: "Activity Code:</br><input type=\"text\" name=\"code\"></input></br></br>Activity\
        \ Description:</br><textarea rows=\"4\" style=\"width:100%;height:80px\" name=\"\
        description\" validation=\".{80,}\" validationMessage=\"The activity description\
        \ must be at least 80 characters long.\" ></textarea>Explain what the activity\
        \ is"
      editorTitle: "Edit Activity"
      enabled: false
      managerTitle: "Choose Activity"
    analyticUiDefaultConfig:
      defaultBodyTemplate: "<!DOCTYPE html>\n<html lang=\"en\">\n<meta charset=\"\
        UTF-8\" />\n<title>Detector '{{ detectorName | escape }}' Alert</title>\n\
        <body>\n  <p>Detector <em>{{ detectorName | escape }}</em> {{ detectorVersion\
        \ | escape }} fired at {{ detectTime | escape }}</p>\n\n  {%- if (values |\
        \ length) > 0 -%}\n  <p>Detail: {{ headline | escape }}</p>\n  <ul>\n    {%\
        \ for key, val in values | dictsort -%}\n      <li><strong>{{ key | escape\
        \ }}</strong>: {{ val | escape }}</li>\n    {% endfor %}\n  </ul>\n  {% endif\
        \ -%}\n\n  {%- if (linkedEvents | length) > 0 -%}\n  <p>Linked Events:</p>\n\
        \  <ul>\n    {% for linkedEvent in linkedEvents -%}\n      <li>Environment:\
        \ {{ linkedEvent.stroom | escape }}, Stream ID: {{ linkedEvent.streamId |\
        \ escape }}, Event ID: {{ linkedEvent.eventId | escape }}</li>\n    {% endfor\
        \ %}\n  </ul>\n  {% endif %}\n</body>\n"
      defaultSubjectTemplate: "Detector '{{ detectorName | escape }}' Alert"
    defaultApiKeyHashAlgorithm: "SHA3_256"
    defaultMaxResults: "1000000,100,10,1"
    helpSubPathDocumentation: "/user-guide/content/documentation/"
    helpSubPathExpressions: "/user-guide/dashboards/expressions/"
    helpSubPathJobs: "/reference-section/jobs/"
    helpSubPathProperties: "/user-guide/properties/"
    helpSubPathQuickFilter: "/user-guide/finding-things/"
    helpSubPathStroomQueryLanguage: "/user-guide/dashboards/stroom-query-language/"
    helpUrl: "https://gchq.github.io/stroom-docs/7.5/docs"
    htmlTitle: "Stroom"
    maxEditorCompletionEntries: 1000
    namePattern: "^[a-zA-Z0-9_\\- \\.\\(\\)]{1,}$"
    nestedIndexFieldsDelimiterPattern: "[.:]"
    nodeMonitoring:
      pingMaxThreshold: 500
      pingWarnThreshold: 100
    oncontextmenu: "return false;"
    process:
      defaultRecordLimit: 1000000
      defaultTimeLimit: 30
    query:
      dashboardPipelineSelectorIncludedTags:
      - "extraction"
      indexPipelineSelectorIncludedTags:
      - "extraction"
      infoPopup:
        enabled: false
        title: "Please Provide Query Info"
        validationRegex: "^[\\s\\S]{3,}$"
      viewPipelineSelectorIncludedTags:
      - "extraction"
    referencePipelineSelectorIncludedTags:
    - "reference-loader"
    reportUiDefaultConfig:
      defaultBodyTemplate: "<!DOCTYPE html>\n<html lang=\"en\">\n<meta charset=\"\
        UTF-8\" />\n<title>Report '{{ reportName | escape }}'</title>\n<body>\n <p><em>Report:\
        \ {{ reportName | escape }}</em>  executed for {{ effectiveExecutionTime |\
        \ escape }} on {{ executionTime | escape }}</p>\n <p><em>Description:</em>\
        \  {{ description | escape }}</p>\n</body>\n"
      defaultSubjectTemplate: "Report '{{ reportName | escape }}'"
    source:
      maxCharactersInPreviewFetch: 30000
      maxCharactersPerFetch: 80000
      maxCharactersToCompleteLine: 10000
      maxHexDumpLines: 1000
    splash:
      body: "<h1>About Stroom</h1><p>Stroom is designed to receive data from multiple\
        \ systems.</p>"
      enabled: false
      title: "Splash Screen"
      version: "v0.1"
    theme:
      labelColours: "TEST1=#FF0000,TEST2=#FF9900"
    welcomeHtml: "<h1>About Stroom</h1><p>Stroom is designed to receive data from\
      \ multiple systems.</p>"
uiUri
appConfig:
  uiUri:
    hostname: null
    pathPrefix: null
    port: null
    scheme: "https"
volumes
appConfig:
  volumes:
    createDefaultIndexVolumesOnStart: true
    defaultIndexVolumeFilesystemUtilisation: 0.9
    defaultIndexVolumeGroupName: "Default Volume Group"
    defaultIndexVolumeGroupPaths:
    - "volumes/default_index_volume"
    volumeSelector: "RoundRobin"
    volumeSelectorCache:
Common Configuration Structures
The following are configuration branch structures that are used in multiple places in Stroom’s configuration.
Common Database Configuration
The following shows the structure of the common database configuration that features in many of the above configuration branches.
Any property with the name db will follow this structure.
    db:
      connection:
        jdbcDriverClassName: null
        jdbcDriverPassword: null
        jdbcDriverUrl: null
        jdbcDriverUsername: null
      connectionPool:
        cachePrepStmts: false
        connectionTimeout: "PT30S"
        idleTimeout: "PT10M"
        leakDetectionThreshold: "PT0S"
        maxLifetime: "PT30M"
        maxPoolSize: 30
        minimumIdle: 10
        prepStmtCacheSize: 25
        prepStmtCacheSqlLimit: 256
Common LMDB Configuration
lmdb:
  # The directory where the LMDB files will be persisted
  localDir: "lmdb/xxxxxx"
  # The maximum number of concurrent readers
  maxReaders: 10
  # The maximum size the store can grow to
  maxStoreSize: "10G"
  # If true LMDB with read additional pages of data to optimistically hold
  # in the page cache.
  readAheadEnabled: true
  # If true readers will be blocked when other threads are writing.
  # This can prevent excessive store size growth if reading and writing happens concurrently.
  readerBlockedByWriter: true
3.2.1.3 - Stroom Proxy Configuration
Describes how the Stroom-Proxy application is configured.
The configuration of Stroom-proxy is very much the same as for Stroom with the only difference being the structure of the application specific part of the config.yml file.
Stroom-proxy has a proxyConfig key in the YAML while Stroom has appConfig.
YAML Configuration File
The Stroom-proxy application is essentially just an executable
JAR
file that can be run when provided with a configuration file, config.yml.
This configuration file is common to all forms of deployment.
As Stroom-proxy does not have a user interface, the config.yml file is the only way of configuring Stroom-Proxy.
As with stroom, the config.yml file is split into three sections using these keys:
-
server- Configuration of the web server, e.g. ports, paths, request logging. See Server Configuration -
logging- Configuration of application logging. See Logging Configuration -
proxyConfig- Stroom-Proxy specific configuration
See also Properties for more details on structure of the config.yml file and supported data types.
Stroom-Proxy operates on a configuration by exception basis so as far as is possible, all configuration properties will have a sensible default value and a property only needs to be explicitly configured if the default value is not appropriate (e.g. for tuning a large scale production deployment) or where values are environment specific (e.g. the hostname of a forward destination).
As a result the config.yml shipped with Stroom Proxy only contains a minimal set of properties.
The full tree of properties can be seen in ./config/config-defaults.yml and a schema for the configuration tree (along with descriptions for each property) can be found in ./config/config-schema.yml.
These two files can be used as a reference when configuring stroom.
In the snippets of YAML configuration below, the default sections
Basic Structure
Stroom-Proxy has a number of key functions which are all configured via its YAML configuration file.
The following YAML shows the high level structure of the Stroom-Proxy configuration file. Each branch of the this YAML is explained in more detail below.
proxyConfig:

  # This should be set to a value that is unique within your Stroom/Stroom-Proxy estate.
  # It is used in the unique ReceiptId that is set in the meta of received data so
  # provides provenence of where data was received at each stage.
  proxyId: null

  # If true, Stroom-Proxy will halt on start up if any errors are found in the YAML
  # configuration file. If false, the errors will simply be logged. Setting this to
  # false is not advised
  haltBootOnConfigValidationFailure: true

  # Configuration of the base and temp paths used by Stroom-Proxy.
  # See Path Configuration below
  path:

  # This is the downstream (in flow of stream data terms) Stroom/Stroom-Proxy instance/cluster
  # used for feed status checks, supplying data receipt rules and verifying API keys.
  downstreamHost:

  # This controls the aggregation of received data into larger chunks prior to forwarding.
  # This is typically required to prevent Stroom receiving lots of small streams.
  aggregator:

  # If receive.receiptCheckMode is FEED_STATUS, this controls the feed status
  # checking. See Feed Status Configuration below.
  feedStatus:

  # Zero to many HTTP POST based destinations.
  # E.g. for forwarding to Stroom or another Stroom-Proxy
  forwardHttpDestinations:

  # Zero to many file system based destinations. See Forward Configuration below.
  forwardFileDestinations:

  # This controls the meta entries that will be included in the send and receive logs.
  logStream:

  # If receive.receiptCheckMode is RECEIPT_POLICY, this controls the fetching
  # of the policy rules.
  receiptPolicy:

  # This section is common to both Stroom and Stroom-Proxy
  # See Receive Configuration below.
  receive:

  # Configuration for authentication. See Security Configuration below.
  security:
Stroom-proxy should be configured to check the receipt status of feeds on receipt of data. This is done by configuring the end point of a downstream stroom-proxy or stroom.
  feedStatus:
    url: "http://stroom:8080/api/feedStatus/v1"
    apiKey: ""
The url should be the url for the feed status API on the downstream stroom(-proxy).
If this is on the same host then you can use the http endpoint, however if it is on a remote host then you should use https and the host of its nginx, e.g. https://downstream-instance/api/feedStatus/v1.
In order to use the API, the proxy must have a configured apiKey.
The API key must be created in the downstream stroom instance and then copied into this configuration.
If the proxy is configured to forward data then the forward destination(s) should be set.
This is the datafeed endpoint of the downstream stroom-proxy or stroom instance that data will be forwarded to.
This may also be the address of a load balancer or similar that is fronting a cluster of stroom-proxy or stroom instances.
See also Feed status certificate configuration.
  forwardHttpDestinations:
    - enabled: true
      name: "downstream"
      forwardUrl: "https://some-host/stroom/datafeed"
forwardUrl specifies the URL of the datafeed endpoint on the destination host.
Each forward location can use a different key/trust store pair.
See also Forwarding certificate configuration.
If the proxy is configured to store then the location of the proxy repository may need to be configured if it needs to be in a different location to the proxy home directory, e.g. on another mount point.
Aggregator Configuration
proxyConfig:
  aggregator:
    enabled: true
    # Whether to split received ZIPs if they are too large.
    splitSources: true
    # Maximum number of items to include in an aggregate
    maxItemsPerAggregate: 1000
    # Maximum size of the aggregate in uncompressed bytes.
    # Aggregates may be larger than this is splitSources is false or single very
    # large streams are received.
    maxUncompressedByteSize: "1G"
    #The the length of time that data is added to an aggregate for before the aggregate is closed.
    aggregationFrequency: "PT10M"
Note
The aggregator settings apply to all forwarders.
It is not possible for forwarders to to use different aggregation settings.
If you need to forward to a HTTP destination but also want to forward to a file destination using different aggregator settings, e.g. to keep a local archive of the data, you would need to employ a second Stroom-Proxy. Stroom-Proxy A would forward to the HTTP downstream and forward to Stroom-Proxy B over HTTP. Stroom-Proxy B would forward to a file destination, using much larger aggregator thresholds.
Directory Scanner Configuration
This configuration controls the directories that Stroom-Proxy scans to look for ZIP files to ingest. It is primarily used as a means of manually re-processing files that have failed to forward, either as a result of too many retries or due to an unrecoverable error.
proxyConfig:
  dirScanner:
    # One or more directories to scan.
    # If the path is relative it is treated as relative to the proxyConfig.path.home property.
    dirs:
    - "zip_file_ingest"
    # Whether directory scanning is enabled or not
    enabled: true
    # The directory to move any failed files to.
    # If the path is relative it is treated as relative to the proxyConfig.path.home property.
    failureDir: "zip_file_ingest_failed"
    # How frequently each directory is scanned for files.
    scanFrequency: "PT1M"
Downstream Host Configuration
This is the default downstream (in flow of stream data terms) Stroom/Stroom-Proxy instance/cluster used for feed status checks, supplying data receipt rules and verifying API keys.
By default it will be used as the default
proxyConfig:
  downstreamHost:
    # http or https
    scheme: "https"
    # If not set, will default to 80/443 depending on scheme
    port: 443
    hostname: "...STROOM-PROXY OR STROOM FQDN..."
    # If not using OpenID authentication you will need to provide an API key.
    apiKey: "sak_6a011e3e5d_oKimmDxfNwj......<truncated>.....HYQxHaR2"
Event Store Configuration
The Event Store is used to store and aggregate individual events received via the /api/event
API
API
Application Programming Interface. An interface that one system can present so other systems can use it to communicate. Stroom has a number of APIs, e.g. its many REST APIs and its /datafeed interface for data receipt.Click to see more details... or the SQS Connectors.
Events are appended to files specific to the Feed and Stream Type of the event.
Once a threshold is reached, the file will be rolled and processed by Stroom-Proxy.
Each event is stored as a JSON line in the file.
proxyConfig:
  eventStore:
    # The size of an internal queue used to buffer aggregates that are ready to process.
    forwardQueueSize: 1000
    # The maximum age of the file before it is rolled.
    maxAge: "PT1M"
    # The maximum size of the file before it is rolled.
    maxByteCount: 9223372036854775807
    # The maximum number of events in the file before it is rolled.
    maxEventCount: 9223372036854775807
    # Configuration of the cache used for the event store.
    openFilesCache:
    # The frequency at which files are checked to see if they need to be rolled or not.
    rollFrequency: "PT10S"
Feed Status Configuration
The configuration for performing feed status checks.
This section is only relevant if proxyConfig.receive.receiptCheckMode is set to FEED_STATUS.
proxyConfig:
  feedStatus:
    # Standard cache configuration block for configuring the cache of feed status check outcomes
    feedStatusCache:
    # The full URL to use for feed status checking.
    # ONLY set this if using a non-standard URL, otherwise
    # it will be derived from the downstreamHost.
    url: null
The configuration of the client certificates for feed status checks is done using the DOWNSTREAM jersey client configuration.
See Stroom and Stroom-Proxy Common Configuration.
Forward Configuration
Stroom-Proxy has two configuration branches for controlling forwarding as each has a different structure.
proxyConfig:
  # Zero to many HTTP POST based destinations.
  forwardHttpDestinations:
  # Zero to many file system based destinations.
  forwardFileDestinations:
Both types of forwarder have an enabled property.
If a forwarder’s enabled state is set to false it is as if the forwarder configuration does not exist, i.e no data will be queued for that forwarder until its state is changed to true.
File Forward Destinations Configuration
proxyConfig:
  # Zero to many file system based destinations.
  forwardFileDestinations:
    # Stroom-Proxy will attempt to move files onto the forward destination using an atomic move.
    # This ensures that the move does not happen more than once. If an atomic move is not possible,
    # e.g. the destination is a remote file system that does not support an atomic move, then it will
    # fall back to a non-atomic move with the risk of it happening more than once. If you see warnings
    # in the logs or know the file system will not support atomic moves then set this to false
  - atomicMoveEnabled: true
    # Whether this destination is enabled or not.
    enabled: true
    # If Instant Forwarding is to be used.
    instant: false
    # The type of liveness check to perform:
    # READ - will attempt to read the file/dir specified in livenessCheckPath.
    # WRITE - will attempt to touch the file specified in livenessCheckPath.
    livenessCheckMode: "READ"
    # The path to use for regular liveness checking of this forward destination.
    # If null, empty or if the 'queue' property is not configured, then no liveness check
    # will be performed and the destination will be
    # assumed to be healthy. If livenessCheckMode is READ, livenessCheckPath can be a
    # directory or a file and stroom-proxy will attempt to check it can read the
    # file/directory. If livenessCheckMode is WRITE, then livenessCheckPath must be a
    # file and stroom-proxy will attempt to touch that file. It is
    # only recommended to set this property for a remote file system where
    # connection issues may be likely. If it is a relative path, it will be assumed
    # to be relative to 'path'
    livenessCheckPath: null
    # The unique name of the destination (across all file/http forward destinations.
    # The name is used in the directories on the file system, so do not change the name
    # once proxy has processed data. Must be provided.
    name: "...PROVIDE FORWARDER NAME..."
    # The base path of a directory to forward to.
    path: "...PROVIDE PATH..."
    # See Queue Configuration section below
    queue:
    # The templated relative sub-path of path.
    # The default path template is '${year}${month}${day}/${feed}'
    # Cannot be an absolute path and must resolve to a descendant of path.
    # Fore details of this configuration branch, see Path Templating Configuration below.
    subPathTemplate: null
HTTP Forward Destinations Configuration
proxyConfig:
  # Zero to many HTTP POST based destinations.
  forwardHttpDestinations:
    # If true, add Open ID authentication headers to the request. Only works if the identityProviderType
    # is EXTERNAL_IDP and the destination is in the same Open ID Connect realm as the OIDC client that this
    # proxy instance is using.
  - addOpenIdAccessToken: false
    # The API key to use when forwarding data if Stroom is configured to require an API key.
    # Does NOT use the API Key from downstreamHost config.
    apiKey: null
    # Whether this destination is enabled or not.
    enabled: true
    forwardHeadersAdditionalAllowSet: []
    # The full URL to forward to if different from <downstreamHost>/datafeed
    forwardUrl: null
    # Configuration of the HTTP client, see below.
    httpClient:
    # If Instant Forwarding is to be used.
    instant: false
    # Whether liveness checking of the HTTP destination will take place. The queue property
    # must also be configured for liveness checking to happen
    livenessCheckEnabled: true
    # The URL/path to check for liveness of the forward destination. The URL should return a 200 response
    # to a GET request for the destination to be considered live.
    # If the response from the liveness check is not a 200, forwarding
    # will be paused at least until the next liveness check is performed.
    # If this property is not set, the downstreamHost configuration will be combined with the default API
    # path (/status).
    # If this property is just a path, it will be combined with the downstreamHost configuration.
    # Only set this property if you wish to use a non-default path.
    # or you want to use a different host/port/scheme to that defined in downstreamHost
    livenessCheckUrl: null
    # The unique name of the destination (across all file/http forward destinations.
    # The name is used in the directories on the file system, so do not change the name
    # once proxy has processed data. Must be provided.
    name: "...PROVIDE FORWARDER NAME..."
    # See Queue Configuration section below
    queue:
Queue Configuration
Each forward destination (whether file or HTTP) has a queue configuration property that controls various aspects of forwarding, e.g. failure handling, delays, concurrency, etc.
  forwardHttpDestinations / forwardFileDestinations:
    queue:
      # The sub-path template to use for data that could not be retried
      # or has reached a retry limit.
      errorSubPathTemplate:
        enabled: true
        pathTemplate: "${year}${month}${day}/${feed}"
        templatingMode: "REPLACE_UNKNOWN_PARAMS"
      # A delay to add before forwarding. Primarily for testing.
      forwardDelay: "PT0S"
      # Number of threads to process retries
      forwardRetryThreadCount: 1
      # Number of threads to handle forwarding
      forwardThreadCount: 5
      # Duration between liveness checks
      livenessCheckInterval: "PT1M"
      # The maximum time from the first failed forward attempt to continue retrying.
      # After this the data will be move to the failure directory permenantly.
      maxRetryAge: "P7D"
      # The maximum time between retries. Must be greater than or equal to retryDelay.
      maxRetryDelay: "P1D"
      # If false forwards will be attempted imediately and any failure will restult in the
      # data being moved to the failure directory.
      queueAndRetryEnabled: false
      # The time between retries. If retryDelayGrowthFactor is >1, this value will grow
      # after each retry.
      retryDelay: "PT10M"
      # The factor to apply to retryDelay after each failed retry.
      retryDelayGrowthFactor: 1.0
Path Templating Configuration
The following properties all share the same structure:
proxyConfig.forwardFileDestinations.[n].subPathTemplateproxyConfig.forwardFileDestinations.[n].queue.errorSubPathTemplateproxyConfig.forwardHttpDestinations.[n].queue.errorSubPathTemplate
  xxxxxxTemplate:
    # Whether templating is enabled or not. If not enabled
    # no sub-path will be used.
    enabled: true
    # The template to use for the sub-path
    pathTemplate: "${year}${month}${day}/${feed}"
    # Controls how unknown parameters are dealt with. One of:
    # IGNORE_UNKNOWN_PARAMS - e.g. 'cat/${unknownparam}/dog' => 'cat/${unknownparam}/dog'
    # REMOVE_UNKNOWN_PARAMS - e.g. 'cat/${unknownparam}/dog' => 'cat/dog'
    # REPLACE_UNKNOWN_PARAMS - Replace unknown with 'XXX', e.g. 'cat/${unknownparam}/dog' => 'cat/XXX/dog'
    templatingMode: "REPLACE_UNKNOWN_PARAMS"
The following template parameters are supported:
${feed}- The Feed name.${type}- The Stream Type.${year}- The 4 digit year of the current date/time.${month}- The 2 digit month of the current date/time.${day}- The 2 digit day of the current date/time.${hour}- The 2 digit hour of the current date/time.${minute}- The 2 digit minute of the current date/time.${second}- The 2 digit second of the current date/time.${millis}- The 3 digit milliseconds of the current date/time.${ms}- The current date/time as milliseconds since the Unix Epoch.
Liveness Checking
Each of the configured forward destinations has a liveness check that can be configured. This allows Stroom Proxy to periodically check that the destination is live. If the liveness check fails for a destination, all forwarding for that destination will be paused until a subsequent liveness check reports it as live again.
The liveness checks take the following forms:
- HTTP Destination
- Performs a
GETrequest to the URL configured usingforwardHttpDestinations.[n].livenessCheckUrl. If not configured it will use/statuson the downstream host. The destination is considered live if it gets a200response. You can use a URL that allows the destination to control its liveness, i.e. to take itself off line during an upgrade. - File Destination
- Reads or writes (
touch) to a file defined byforwardFileDestinations.[n].livenessCheckPath. Liveness checking for a file destination may be useful if the destination is on a network file share.livenessCheckModecontrols whether a read or write to the file is performed.
HTTP Client Configuration
proxyConfig:
  forwardHttpDestinations:
    httpClient:
      connectionRequestTimeout: "PT3M"
      connectionTimeout: "PT3M"
      cookiesEnabled: false
      keepAlive: "PT0S"
      maxConnections: 1024
      maxConnectionsPerRoute: 1024
      proxy: null
      retries: 0
      timeToLive: "PT1H"
      timeout: "PT3M"
      # Transport Layer Security, see below.
      tls: null
      userAgent: null
      validateAfterInactivityPeriod: "PT0S"
The tls branch of the configuration is for configuring Transport Layer Security (the successor to Secure Sockets Layer (SSL)).
It is null by default, i.e. no additional TLS configuration is used.
Its structure is:
proxyConfig:
  forwardHttpDestinations:
    httpClient:
      tls:
        protocol: "TLSv1.2"
        # The name of the JCE provider to use on client side for cryptographic support
        # (for example, SunJCE, Conscrypt, BC, etc). See Oracle documentation for more information.
        provider:
        # The path of the key store file
        keyStorePath: null
        # The password of the key store file
        keyStorePassword: null
        # The type of key store (usually JKS, PKCS12, JCEKS, Windows-MY, or Windows-ROOT).
        keyStoreType: "JKS"
        keyStoreProvider: null
        # The path of the trust store file
        trustStorePath: null
        # The password of the trust store file
        trustStorePassword: null
        # The type of trust store (usually JKS, PKCS12, JCEKS, Windows-MY, or Windows-ROOT).
        trustStoreType: "JKS"
        trustStoreProvider: null
        trustSelfSignedCertificates: false
        verifyHostname: false
        # Zero to protocols (e.g., SSLv3, TLSv1) which are supported.
        # All other protocols will be refused.
        supportedProtocols: null
        # A list of cipher suites (e.g., TLS_ECDHE_ECDSA_WITH_AES_128_CBC_SHA256) which are supported.
        # All other cipher suites will be refused.
        supportedCiphers: null
        certAlias: null
Log Stream Configuration
This controls the meta entries that will be included in the send and receive logs.
proxyConfig:
  logStream:
    # The headers attributes that will be output in the send/receive log lines.
    # They will be output in the order that they appear in this list.
    # Duplicates will be ignored, case does not matter.
    metaKeys:
      - "guid"
      - "receiptid"
      - "feed"
      - "system"
      - "environment"
      - "remotehost"
      - "remoteaddress"
      - "remotedn"
      - "remotecertexpiry"
Path Configuration
proxyConfig:
  path:
    # By default all files read or written to by stroom-proxy will be in directories relative to
    # the home location. Ideally this should differ from the location of the Stroom Proxy
    # installed software as it has a different lifecycle.
    # If not set the location of the Stroom-Proxy application JAR file will be used and if that
    # can't be determined, <user's home>/.stroom will be used.
    home: "...SET TO AN ABSOLUTE PATH..."
    # The location for Stroom-Proxy's persisted data
    data: "data"
    # The location for any temporary files/directories.
    # If not set, will use a sub-directory called 'stroom-proxy' in the system temp dir,
    # i.e. as defined by 'java.io.tmpdir'.
    temp: null
All paths in the configuration file can be either relative or absolute.
If relative then they will be treated as being relative to the home path.
Receipt Policy Configuration
This section of configuration is only applicable if proxyConfig.receive.receiptCheckMode is RECEIPT_POLICY.
It controls the fetching of the receipt policy rules from a downstream Stroom or Stroom-Proxy.
proxyConfig:
  receiptPolicy:
    # Only set if using a non-standard URL, else this is derived based on downstreamHost
    # config.
    receiveDataRulesUrl: null
    # The duration between calls to fetch the latest policy rules.
    syncFrequency: "PT1M"
The configuration of the client certificates for receipt policy checks is done using the DOWNSTREAM jersey client configuration.
See Stroom and Stroom-Proxy Common Configuration.
Receive Configuration
The receive configuration is common to both Stroom and Stroom-Proxy, see Receive Configuration
Security Configuration
proxyConfig:
  security:
    authentication:
      # This property is currently not used
      authenticationRequired: true
      # Open ID Connect configuration
      openId:
The openId branch of the config is common to both Stroom and Stroom-Proxy, see Open ID Configuration for details.
Amazon Simple Queue Service Configuration
Stroom-Proxy is able to consume messages from multiple AWS SQS queues. Each message received from a queue will be added to the Event Store for aggregation by Feed and Stream Type.
proxyConfig:
  # Zero to many connectors
  sqsConnectors:
    # This property is not currently used
  - awsProfileName: null
    # The name of the AWS region the SQS queue exists in.
    awsRegionName: "...AWS REGION..."
    # The maximum time to wait when polling the queue for messages
    pollFrequency: "PT10S"
    # This property is not currently used
    queueName: null
    # The URL of the Amazon SQS queue from which messages are received.
    queueUrl: "...SQS QUEUE URL..."
Thread Configuration
Stroom-Proxy is able to run certain operations in parallel. This configuration allows you to increase the number of threads used for each operation.
proxyConfig:
  threads:
    # Number of threads to consume from the aggregate input queue.
    aggregateInputQueueThreadCount: 1
    # Number of threads to consume from the forwarding input queue.
    forwardingInputQueueThreadCount: 1
    # Number of threads to consume from the pre-aggregate input queue.
    preAggregateInputQueueThreadCount: 1
    # Number of threads to consume from the zip splitting input queue.
    zipSplittingInputQueueThreadCount: 1
Deploying without Docker
Apart from the structure of the config.yml file, the configuration in a non-docker environment is the same as for stroom.
As part of a docker stack
The way Stroom-Proxy is configured is essentially the same as for stroom with the only real difference being the structure of the config.yml file as note above .
As with stroom the docker stack comes with a ./volumes/stroom-proxy-*/config/config.yml file that will be used in the absence of a provided one.
Also as with stroom, the config.yml file supports environment variable substitution so can make use of environment variables set in the stack .env file and passed down via the docker-compose YAML files.
Certificates
Stroom-proxy makes use of client certificates for two purposes:
- Communicating with a downstream stroom/stroom-proxy in order to establish the receipt status for the feeds it has received data for.
- When forwarding data to a downstream stroom/stroom-proxy
The stack comes with the following files that can be used for demo/test purposes.
volumes/stroom-proxy-*/certs/ca.jks
volumes/stroom-proxy-*/certs/client.jks
For a production deployment these will need to be replaced with the certificates that are appropriate for your environment.
Typical Configuration
The following are a guide to typical configurations for operating a Stroom-Proxy with different use cases.
Store and Forward
This is a typical case where you want to aggregate received data then forward it to a downstream Stroom or Stroom-Proxy, but also retain a store of the aggregates.
server:
  applicationContextPath: /
  adminContextPath: /proxyAdmin
  applicationConnectors:
    - type: http
      port: "8090"
      useForwardedHeaders: true
  adminConnectors:
    - type: http
      port: "8091"
      useForwardedHeaders: true
  detailedJsonProcessingExceptionMapper: true
  requestLog:
    appenders:
      # Log appender for the web server request logging
    - type: file
      currentLogFilename: logs/access/access.log
      discardingThreshold: 0
      # Rolled and gzipped every minute
      archivedLogFilenamePattern: logs/access/access-%d{yyyy-MM-dd'T'HH:mm}.log.gz
      # One week using minute files
      archivedFileCount: 10080
      logFormat: '%h %l "%u" [%t] "%r" %s %b "%i{Referer}" "%i{User-Agent}" %D'

logging:
  level: WARN
  loggers:
    # Logs useful information about stroom proxy. Only set DEBUG on specific 'stroom' classes or packages
    # due to the large volume of logs that would be produced for all of 'stroom' in DEBUG.
    stroom: INFO
    # Logs useful information about dropwizard when booting stroom
    io.dropwizard: INFO
    # Logs useful information about the jetty server when booting stroom
    # Set this to INFO if you want to log all REST request/responses with headers/payloads.
    org.glassfish.jersey.logging.LoggingFeature: OFF

    # Logger and appender for proxy receipt audit logs
    "receive":
      level: INFO
      additive: false
      appenders:
      - type: file
        currentLogFilename: logs/receive/receive.log
        discardingThreshold: 0
        # Rolled and gzipped every minute
        archivedLogFilenamePattern: logs/receive/receive-%d{yyyy-MM-dd'T'HH:mm}.log.gz
        # One week using minute files
        archivedFileCount: 10080
        logFormat: "%-6level [%d{yyyy-MM-dd'T'HH:mm:ss.SSS'Z'}] [%t] %logger - %X{code} %msg %n"

    # Logger and appender for proxy send audit logs
    "send":
      level: INFO
      additive: false
      appenders:
      - type: file
        currentLogFilename: logs/send/send.log
        discardingThreshold: 0
        # Rolled and gzipped every minute
        archivedLogFilenamePattern: logs/send/send-%d{yyyy-MM-dd'T'HH:mm}.log.gz
        # One week using minute files
        archivedFileCount: 10080
        logFormat: "%-6level [%d{yyyy-MM-dd'T'HH:mm:ss.SSS'Z'}] [%t] %logger - %X{code} %msg %n"

  appenders:

    # Log to stdout, use this if running in Docker
  - type: console
    # Multi-coloured log format for console output
    logFormat: "%highlight(%-6level) [%d{\"yyyy-MM-dd'T'HH:mm:ss.SSS'Z'\",UTC}] [%green(%t)] %cyan(%logger) - %X{code} %msg %n"
    timeZone: UTC

    # Minute rolled files for stroom/datafeed, will be curl'd/deleted by stroom-log-sender
  - type: file
    currentLogFilename: logs/app/app.log
    discardingThreshold: 0
    archivedLogFilenamePattern: logs/app/app-%d{yyyy-MM-dd'T'HH:mm}.log.gz
    # One week using minute files
    archivedFileCount: 10080
    logFormat: "%-6level [%d{\"yyyy-MM-dd'T'HH:mm:ss.SSS'Z'\",UTC}] [%t] %logger - %X{code} %msg %n"

# This section contains the Stroom Proxy configuration properties
# For more information see:
# https://gchq.github.io/stroom-docs/user-guide/properties.html
# jerseyClients are used for making feed status and content sync REST calls
jerseyClients:
  default:
    tls:
      keyStorePath: "certs/client.jks"
      keyStorePassword: "password"
      trustStorePath: "certs/ca.jks"
      trustStorePassword: "password"

proxyConfig:
  path:
    # By default all files read or written to by stroom-proxy will be in directories relative to
    # the home location. This must be set to an absolute path and also to one that differs
    # the installed software as it has a different lifecycle.
    home: "/stroomdata/stroom-proxy/home"
  # This is the downstream (in datafeed flow terms) stroom/stroom-proxy used for
  # feed status checks, supplying data receipt rules and verifying API keys.
  downstreamHost:
    scheme: "https"
    port: "443"
    hostname: "stroom.some.domain"
    apiKey: "...API KEY..."

  aggregator:
    maxItemsPerAggregate: 1000
    maxUncompressedByteSize: "1G"
    aggregationFrequency: 10m

  forwardFileDestinations:
  - name: "archive-repo"
    path: "/stroomdata/stroom-proxy/archive-repo"
    subPathTemplate:
      pathTemplate: "${year}/${year}-${month}/${year}-${month}-${day}/${year}-${month}-${day}-${feed}/"

  forwardHttpDestinations:
  - name: "downstream-stroom"
    httpClient:
      tls:
        keyStorePath: "certs/client.jks"
        keyStorePassword: "password"
        trustStorePath: "certs/ca.jks"
        trustStorePassword: "password"

  receive:
    receiptCheckMode: "RECEIPT_POLICY"
Air-Gapped Store Only
This is an example of a Stroom-Proxy instance that is hosted in an environment where is has no direct link to a downstream Stroom/Stroom-Proxy. All data is aggregated and forwarded to the local file system for transport downstream using other means outside of the scope of this documentation.
server:
  # ... Same as configuration above

logging:
  # ... Same as configuration above

jerseyClients:
  # ... Same as configuration above

proxyConfig:
  path:
    # By default all files read or written to by stroom-proxy will be in directories relative to
    # the home location. This must be set to an absolute path and also to one that differs
    # the installed software as it has a different lifecycle.
    home: "/stroomdata/stroom-proxy/home"

  # No downstreamHost due to air-gap
  downstreamHost:
    enabled: false

  aggregator:
    maxItemsPerAggregate: 1000
    maxUncompressedByteSize: "1G"
    aggregationFrequency: 10m

  forwardFileDestinations:

  # Repo for a local archive
  - name: "archive-repo"
    path: "/stroomdata/stroom-proxy/archive-repo"
    subPathTemplate:
      pathTemplate: "${year}/${year}-${month}/${year}-${month}-${day}/${year}-${month}-${day}-${feed}/"

  # Repo to be transported downstream around air-gap
  - name: "downstream-repo"
    path: "/stroomdata/stroom-proxy/downstream-repo"
    subPathTemplate:
      pathTemplate: "${year}/${year}-${month}/${year}-${month}-${day}/${year}-${month}-${day}-${feed}/"

  forwardHttpDestinations: []

  receive:
    # No receipt checking due to air-gap. All data accepted.
    receiptCheckMode: "RECEIVE_ALL"
3.2.2 - Nginx Configuration
Configuring Nginx for use with Stroom and Stroom Proxy.
See Also
Nginx is the standard web server used by stroom. Its primary role is SSL termination and reverse proxying for stroom and stroom-proxy that sit behind it. It can also load balance incoming requests and ensure traffic from the same source is always routed to the same upstream instance. Other web servers can be used if required but their installation/configuration is out of the scope of this documentation.
Without Docker
The standard way of deploying Nginx with stroom running without docker involves running Nginx as part of the services stack. See below for details of how to configure it. If you want to deploy Nginx without docker then you can but that is outside the scope of this documentation.
As part of a docker stack
Nginx is included in all the stroom docker stacks.
Nginx is configured using multiple configuration files to aid clarity and allow reuse of sections of configuration.
The main file for configuring Nginx is nginx.conf.template and this makes use of other files via include statements.
The purpose of the various files is as follows:
nginx.conf.template- Top level configuration file that orchestrates the other files.logging.conf.template- Configures the logging output, its content and format.server.conf.template- Configures things like SSL settings, timeouts, ports, buffering, etc.- Upstream configuration
upstreams.stroom.ui.conf.template- Defines the upstream host(s) for stroom node(s) that are dedicated to serving the user interface.upstreams.stroom.processing.conf.template- Defines the upstream host(s) for stroom node(s) that are dedicated to stream processing and direct data receipt.upstreams.proxy.conf.template- Defines the upstream host(s) for local stroom-proxy node(s).
- Location configuration
locations_defaults.conf.template- Defines some default directives (e.g. headers) for configuring stroom paths.proxy_location_defaults.conf.template- Defines some default directives (e.g. headers) for configuring stroom-proxy paths.locations.proxy.conf.template- Defines the various paths (e.g.//datafeed) that will be reverse proxied to stroom-proxy hosts.locations.stroom.conf.template- Defines the various paths (e.g.//datafeeddirect) that will be reverse proxied to stroom hosts.
Templating
The nginx container has been configured to support using environment variables passed into it to set values in the Nginx configuration files. It should be noted that recent versions of Nginx have templating support built in. The templating mechanism used in stroom’s Nginx container was set up before this existed but achieves the same result.
All non-default configuration files for Nginx should be placed in volumes/nginx/conf/ and named with the suffix .template (even if no templating is needed).
When the container starts any variables in these templates will be substituted and the resulting files will be copied into /etc/nginx.
The result of the template substitution is logged to help with debugging.
The files can contain templating of the form:
ssl_certificate /stroom-nginx/certs/<<<NGINX_SSL_CERTIFICATE>>>;
In this example <<<NGINX_SSL_CERTIFICATE>>> will be replaced with the value of environment variable NGINX_SSL_CERTIFICATE when the container starts.
Upstreams
When configuring a multi node cluster you will need to configure the upstream hosts. Nginx acts as a reverse proxy for the applications behind it so the lists of hosts for each application need to be configured.
For example if you have a 10 node cluster and 2 of those nodes are dedicated for user interface use then the configuration would look like:
upstreams.stroom.ui.conf.template
server node1.stroomhosts:<<<STROOM_PORT>>>
server node2.stroomhosts:<<<STROOM_PORT>>>
upstreams.stroom.processing.conf.template
server node3.stroomhosts:<<<STROOM_PORT>>>
server node4.stroomhosts:<<<STROOM_PORT>>>
server node5.stroomhosts:<<<STROOM_PORT>>>
server node6.stroomhosts:<<<STROOM_PORT>>>
server node7.stroomhosts:<<<STROOM_PORT>>>
server node8.stroomhosts:<<<STROOM_PORT>>>
server node9.stroomhosts:<<<STROOM_PORT>>>
server node10.stroomhosts:<<<STROOM_PORT>>>
upstreams.proxy.conf.template
server node3.stroomhosts:<<<STROOM_PORT>>>
server node4.stroomhosts:<<<STROOM_PORT>>>
server node5.stroomhosts:<<<STROOM_PORT>>>
server node6.stroomhosts:<<<STROOM_PORT>>>
server node7.stroomhosts:<<<STROOM_PORT>>>
server node8.stroomhosts:<<<STROOM_PORT>>>
server node9.stroomhosts:<<<STROOM_PORT>>>
server node10.stroomhosts:<<<STROOM_PORT>>>
In the above example the port is set using templating as it is the same for all nodes. Nodes 1 and 2 will receive all UI and REST API traffic. Nodes 8-10 will serve all datafeed(direct) requests.
Certificates
The stack comes with a default server certificate/key and CA certificate for demo/test purposes.
The files are located in volumes/nginx/certs/.
For a production deployment these will need to be changed, see Certificates
Log rotation
The Nginx container makes use of logrotate to rotate Nginx’s log files after a period of time so that rotated logs can be sent to stroom.
Logrotate is configured using the file volumes/stroom-log-sender/logrotate.conf.template.
This file is templated in the same way as the Nginx configuration files, see above.
The number of rotated files that should be kept before deleting them can be controlled using the line.
rotate 100
This should be set in conjunction with the frequency that logrotate is called, which is controlled by volumes/stroom-log-sender/crontab.txt.
This crontab file drives the logrotate process and by default is set to run every minute.
3.2.3 - Stroom Log Sender Configuration
Stroom log sender is a docker image used for sending application logs to stroom. It is essentially just a combination of the send_to_stroom.sh script and a set of crontab entries to call the script at intervals.
Deploying without Docker
When deploying without docker stroom and stroom-proxy nodes will need to be configured to send their logs to stroom.
This can be done using the ./bin/send_to_stroom.sh script in the stroom and stroom-proxy zip distributions and some crontab configuration.
The crontab file for the user account running stroom should be edited (crontab -e) and set to something like:
# stroom logs
* * * * * STROOM_HOME=<path to stroom home> ${STROOM_HOME}/bin/send_to_stroom.sh ${STROOM_HOME}/logs/access STROOM-ACCESS-EVENTS <datafeed URL> --system STROOM --environment <environment> --file-regex '.*/[a-z]+-[0-9]{4}-[0-9]{2}-[0-9]{2}T.*\\.log' --max-sleep 10 --key <key file> --cert <cert file> --cacert <CA cert file> --delete-after-sending --compress >> <path to log> 2>&1
* * * * * STROOM_HOME=<path to stroom home> ${STROOM_HOME}/bin/send_to_stroom.sh ${STROOM_HOME}/logs/app    STROOM-APP-EVENTS    <datafeed URL> --system STROOM --environment <environment> --file-regex '.*/[a-z]+-[0-9]{4}-[0-9]{2}-[0-9]{2}T.*\\.log' --max-sleep 10 --key <key file> --cert <cert file> --cacert <CA cert file> --delete-after-sending --compress >> <path to log> 2>&1
* * * * * STROOM_HOME=<path to stroom home> ${STROOM_HOME}/bin/send_to_stroom.sh ${STROOM_HOME}/logs/user   STROOM-USER-EVENTS   <datafeed URL> --system STROOM --environment <environment> --file-regex '.*/[a-z]+-[0-9]{4}-[0-9]{2}-[0-9]{2}T.*\\.log' --max-sleep 10 --key <key file> --cert <cert file> --cacert <CA cert file> --delete-after-sending --compress >> <path to log> 2>&1

# stroom-proxy logs
* * * * * PROXY_HOME=<path to proxy home> ${PROXY_HOME}/bin/send_to_stroom.sh ${PROXY_HOME}/logs/access  STROOM_PROXY-ACCESS-EVENTS  <datafeed URL> --system STROOM-PROXY --environment <environment> --file-regex '.*/[a-z]+-[0-9]{4}-[0-9]{2}-[0-9]{2}T.*\\.log' --max-sleep 10 --key <key file> --cert <cert file> --cacert <CA cert file> --delete-after-sending --compress >> <path to log> 2>&1
* * * * * PROXY_HOME=<path to proxy home> ${PROXY_HOME}/bin/send_to_stroom.sh ${PROXY_HOME}/logs/app     STROOM_PROXY-APP-EVENTS     <datafeed URL> --system STROOM-PROXY --environment <environment> --file-regex '.*/[a-z]+-[0-9]{4}-[0-9]{2}-[0-9]{2}T.*\\.log' --max-sleep 10 --key <key file> --cert <cert file> --cacert <CA cert file> --delete-after-sending --compress >> <path to log> 2>&1
* * * * * PROXY_HOME=<path to proxy home> ${PROXY_HOME}/bin/send_to_stroom.sh ${PROXY_HOME}/logs/send    STROOM_PROXY-SEND-EVENTS    <datafeed URL> --system STROOM-PROXY --environment <environment> --file-regex '.*/[a-z]+-[0-9]{4}-[0-9]{2}-[0-9]{2}T.*\\.log' --max-sleep 10 --key <key file> --cert <cert file> --cacert <CA cert file> --delete-after-sending --compress >> <path to log> 2>&1
* * * * * PROXY_HOME=<path to proxy home> ${PROXY_HOME}/bin/send_to_stroom.sh ${PROXY_HOME}/logs/receive STROOM_PROXY-RECEIVE-EVENTS <datafeed URL> --system STROOM-PROXY --environment <environment> --file-regex '.*/[a-z]+-[0-9]{4}-[0-9]{2}-[0-9]{2}T.*\\.log' --max-sleep 10 --key <key file> --cert <cert file> --cacert <CA cert file> --delete-after-sending --compress >> <path to log> 2>&1
where the environment specific values are:
<path to stroom home>- The absolute path to the stroom home, i.e. the location of thestart.shscript.<path to proxy home>- The absolute path to the stroom-proxy home, i.e. the location of thestart.shscript.<datafeed URL>- The URL that the logs will be sent to. This will typically be the nginx host or load balancer and the path will typically behttps://host/datafeeddirectto bypass the proxy for faster access to the logs.<environment>- The environment name that the stroom/proxy is deployed in, e.g. OPS, REF, DEV, etc.<key file>- The absolute path to the SSL key file used by curl.<cert file>- The absolute path to the SSL certificate file used by curl.<CA cert file>- The absolute path to the SSL certificate authority file used by curl.<path to log>- The absolute path to a log file to log all the send_to_stroom.sh output to.
If your implementation of cron supports environment variables then you can define some of the common values at the top of the crontab file and use them in the entries.
cronie as used by Centos does not support environment variables in the crontab file but variables can be defined at the line level as has been shown with STROOM_HOME and PROXY_HOME.
The above crontab entries assume that stroom and stroom-proxy are running on the same host. If they are not then the entries can be split across the hosts accordingly.
Service host(s)
When deploying stroom/stroom-proxy without stroom you may still be deploying the service stack (nginx and stroom-log-sender) to a host. In this case see As part of a docker stack below for details of how to configure stroom-log-sender to send the nginx logs.
As part of a docker stack
Crontab
The docker stacks include the stroom-log-sender docker image for sending the logs of all the other containers to stroom.
Stroom-log-sender is configured using the crontab file volumes/stroom-log-sender/conf/crontab.txt.
When the container starts this file will be read.
Any variables in it will be substituted with the values from the corresponding environment variables that are present in the container.
These common values can be set in the config/<stack name>.env file.
As the variables are substituted on container start you will need to restart the container following any configuration change.
Certificates
The directory volumes/stroom-log-sender/certs contains the default client certificates used for the stack.
These allow stroom-log-sender to send the log files over SSL which also provides stroom with details of the sender.
These will need to be replaced in a production environment.
volumes/stroom-log-sender/certs/ca.pem.crt
volumes/stroom-log-sender/certs/client.pem.crt
volumes/stroom-log-sender/certs/client.unencrypted.key
For a production deployment these will need to be changed, see Certificates
3.2.4 - MySQL Configuration
Configuring MySQL for use with Stroom.
General configuration
MySQL is configured via the .cnf file which is typically located in one of these locations:
/etc/my.cnf/etc/mysql/my.cnf$MYSQL_HOME/my.cnf<data dir>/my.cnf~/.my.cnf
Key configuration properties
-
lower_case_table_names- This property controls how the tables are stored on the filesystem and the case-sensitivity of table names in SQL. A value of0means tables are stored on the filesystem in the case used in CREATE TABLE and sql is case sensitive. This is the default in linux and is the preferred value for deployments of stroom of v7+. A value of1means tables are stored on the filesystem in lowercase but sql is case insensitive. See also Identifier Case Sensitivity -
max_connections- The maximum permitted number of simultaneous client connections. For a clustered deployment of stroom, the default value of 151 will typically be too low. Each stroom node will hold a pool of open database connections for its use, therefore with a large number of stroom nodes and a big connection pool the total number of connections can be very large. This property should be set taking into account the values of the stroom properties of the form*.db.connectionPool.maxPoolSize. See also Connection Interfaces -
innodb_buffer_pool_size/innodb_buffer_pool_instances- Controls the amount of memory available to MySQL for caching table/index data. Typically this will be set to 80% of available RAM, assuming MySQL is running on a dedicated host and the total amount of table/index data is greater than 80% of available RAM. Note:innodb_buffer_pool_sizemust be set to a value that is equal to or a multiple ofinnodb_buffer_pool_chunk_size * innodb_buffer_pool_instances. See also Configuring InnoDB Buffer Pool Size
TODO
Add additional key configuration itemsDeploying without Docker
When MySQL is deployed without a docker stack then MySQL should be installed and configured according to the MySQL documentation. How MySQL is deployed and configured will depend on the requirements of the environment, e.g. clustered, primary/standby, etc.
As part of a docker stack
Where a stroom docker stack includes stroom-all-dbs (MySQL) the MySQL instance is configured via the .cnf file.
The .cnf file is located in volumes/stroom-all-dbs/conf/stroom-all-dbs.cnf.
This file is read-only to the container and will be read on container start.
Database initialisation
When the container is started for the first time the database will be initialised with the root user account.
It will also then run any scripts found in volumes/stroom-all-dbs/init/stroom.
The scripts in here will be run in alphabetical order.
Scripts of the form .sh, .sql, .sql.gz and .sql.template are supported.
.sql.template files are proprietary to stroom stacks and are just templated .sql files.
They can contain tags of the form <<<ENV_VAR_NAME>>> which will be replaced with the value of the named environment variable that has been set in the container.
If you need to add additional database users then either add them to volumes/stroom-all-dbs/init/stroom/001_create_databases.sql.template or create additional scripts/templates in that directory.
The script that controls this templating is volumes/stroom-all-dbs/init/000_stroom_init.sh.
This script MUST not have its executable bit set else it will be executed rather than being sourced by the MySQL entry point scripts and will then not work.
3.3 - Installing in an Air Gapped Environment
How to install Stroom when there is no internet connection.
Docker images
For those deployments of Stroom that use docker containers, by default docker will try to pull the docker images from DockerHub on the internet. If you do not have an internet connection then you will need to make these images available to the local docker binary in another way.
Downloading the images
Firstly you need to determine which images and which tags you need.
Look at
stroom-resources/releases
and for each release and variant of the Stroom stacks you will see a manifest of the docker images/tags in that release/variant.
For example, for stroom-stacks-v7.0-beta.175 and stack variant stroom_core the list of images is:
nginx gchq/stroom-nginx:v7.0-beta.2
stroom gchq/stroom:v7.0-beta.175
stroom-all-dbs mysql:8.0.23
stroom-log-sender gchq/stroom-log-sender:v2.2.0
stroom-proxy-local gchq/stroom-proxy:v7.0-beta.175
With the docker binary
If you have access to an internet connected computer that has Docker installed on it then you can use Docker to pull the images. For each of the required images run a command like this:
Without the docker binary
If you can’t install Docker on the internet connected machine then this shell script may help you to download and assemble the various layers of an image from DockerHub using only bash, curl and jq. This is a third party script so we cannot vouch for it in any way. As with all scripts you run that you find on the internet, look at and understand what they do before running them.
Loading the images
Once you have downloaded the image tar files and transferred them over the air gap you will need to load them into your local docker repo. Either this will be the local repo on the machine where you will deploy Stroom (or one of its component containers) or you will have a central docker repository that many machines can access. Managing a central air-gapped repository is beyond the scope of this documentation.
To load the images into your local repository use a command similar to this for each of the .tar files that you created using docker save above:
You can check the images are available using:
3.4 - Upgrades
3.4.1 - Minor Upgrades and Patches
How to upgrade to a new minor or patch release.
Stroom versioning follows Semantic Versioning .
Given a version number MAJOR.MINOR.PATCH:
- MAJOR is incremented when there are major or breaking changes.
- MINOR is incremented when functionality is added in a backwards compatible manner.
- PATCH is incremented when bugs are fixed.
Stroom is designed to detect the version of the existing database schema and to run any migrations necessary to bring it up to the version begin deployed. This means you can jump from say 7.0.0 => 7.2.0 or from 7.0.0 to 7.0.5.
This document covers minor and patch upgrades only.
Docker stack deployments
TODO
Complete thisNon-docker deployments
TODO
Complete thisMajor version upgrades
The following notes are specific for these major version upgrades
3.4.2 - Upgrade from v5 to v7
This document describes the process for upgrading Stroom from v5.x to v7.x.
Note
This page is currently work in progress and will evolve with further testing of v5 => v7 migrations.Warning
Before commencing an upgrade to v7 you must upgrade Stroom to the latest minor and patch version of v5.
At the time of writing the latest version of v5 is v5.5.16.
Differences between v5 and v7
Stroom v7 has significant differences to v6 which make the upgrade process a little more complicated.
- v5 handled authentication within the application. In v7 authentication is handled either internally in stroom (the default) or by an external identity provider such as google or AWS Cognito.
- v5 used the
~setup.xml,~env.shandstroom.propertiesfiles for configuration. In v7 stroom uses a config.yml file for its configuration (see Properties) - v5 used upper case and heavily abbreviated names for its tables.
In v7 clearer and lower case table names are used.
As a result ALL v5 tables get renamed with the prefix
OLD_, the new tables created and any content copied over. As the database will be holding two copies of most data you need to ensure you have space to accommodate it.
Pre-Upgrade tasks
Stroom can be upgraded straight from v5 to v7 without going via v6. There are however a few pre-migration steps that need to be followed.
Upgrade Stroom to the latest v5 version
Follow your standard process for performing a minor upgrade to bring your v5 Stroom instance up to the latest v5 version. This ensures all v5 migrations are applying all the v6 and v7 migrations.
Download migration scripts
Download the migration SQL scripts from https://github.com/gchq/stroom/blob/STROOM_VERSION/scripts e.g. https://github.com/gchq/stroom/blob/v7.0-beta.198/scripts
Some of these scripts will be used in the steps below. The unused scripts are not applicable to a v5=>v7 upgrade.
Pre-migration database checks
Run the pre-migration checks script on the running database.
This will produce a report of items that will not be migrated or need attention before migration.
Capture non-default Stroom properties
Run the following script to capture the non-default system properties that are held in the database. This is a precaution in case they are needed following migration.
Stop processing
Before shutting stroom down it is wise to turn off stream processing and let all outstanding server tasks complete.
TODO clarify steps for this.
Stop Stroom
Stop the stack (stroom and the database) then start up the database. Do this using the v6 stack. This ensures that stroom is not trying to access the database.
Backup the databases
Backup all the databases for the different components.
Typically these will be stroom and stats (or statistics).
Stop the database
Stop the database using the v6 stack.
Deploy v7
Deploy the latest version of Stroom but don’t start it.
TODO - more detail
Migrate the v5 configuration into v7
The configuration properties held in the database and accessed for the Properties UI screen will be migrated automatically by Stroom where possible.
Stroom v5 and v7 however are configured differently when it comes to the configuration files used to bootstrap the application, such as the database connection details.
These properties will need to be manually migrated from the v5 instance to the v7 instance.
The configuration to bootstrap Stroom v5 can be found in instance/lib/stroom.properties.
The configuration for v7 can be found in the following places:
- Zip distribution -
config/config.yml. - Docker stack -
volumes/stroom/config/config.yml. Note that this file uses variable substitution so values can be set inconfig/<stack_name>.envif suitably substituted.
The following table shows the key configuration properties that need to be set to start the application and how they map between v5 and v7.
| V5 property | V7 property | Notes |
|---|---|---|
| stroom.temp | appConfig.path.temp | Set this if different from $TEMP env var. |
| - | appConfig.path.home | By default all local state (e.g. reference data stores, search results) will live under this directory. Typically it should be in a different location to the stroom instance as it has a different lifecycle. |
| stroom.node | appConfig.node.name | |
| - | appConfig.nodeUrl.hostname | Set this to the FQDN of the node so other nodes can communicate with it. |
| - | appConfig.publicUrl.hostname | Set this to the public FQDN of Stroom, typically a load balancer or Nginx instance. |
| stroom.jdbcDriverClassName | appConfig.commonDbDetails.connection.jdbcDriverClassName | Do not set this. Will get defaulted to com.mysql.cj.jdbc.Driver |
| stroom.jdbcDriverUrl | appConfig.commonDbDetails.connection.jdbcDriverUrl | |
| stroom.jdbcDriverUsername | appConfig.commonDbDetails.connection.jdbcDriverUsername | |
| stroom.jdbcDriverPassword | appConfig.commonDbDetails.connection.jdbcDriverPassword | |
| stroom.jpaDialect | - | |
| stroom.statistics.sql.jdbcDriverClassName | appConfig.commonDbDetails.connection.jdbcDriverClassName | Do not set this. Will get defaulted to com.mysql.cj.jdbc.Driver |
| stroom.statistics.sql.jdbcDriverUrl | appConfig.statistics.sql.db.connection.jdbcDriverUrl | |
| stroom.statistics.sql.jdbcDriverUsername | appConfig.statistics.sql.db.connection.jdbcDriverUsername | |
| stroom.statistics.sql.jdbcDriverPassword | appConfig.statistics.sql.db.connection.jdbcDriverPassword | |
| stroom.statistics.common.statisticEngines | appConfig.statistics.internal.enabledStoreTypes | Do not set this. Will get defaulted to StatisticStore |
| - | appConfig.ui.helpUrl | Set this to the URL of your locally published stroom-docs site. |
| stroom.contentPackImportEnabled | appConfig.contentPackImport.enabled |
Note
In theconfig.yml file, properties have a root of appConfig. which corresponds to a root of stroom. in the UI Properties screen.
Some v5 properties, such as connection pool settings cannot be migrated to v7 equivalents.
It is recommended to review the default values for v7 appConfig.commonDbDetails.connectionPool.* and appConfig.statistics.sql.db.connectionPool.* properties to ensure they are suitable for your environment.
If they are not then set them in the config.yml file.
The defaults can be found in config-defaults.yml.
Upgrading the MySQL instance and database
Stroom v5 ran on MySQL v5.6. Stroom v7 runs on MySQL v8. The upgrade path for MySQL is 5.6 => 5.7.33 => 8.x (see Upgrade Paths ).
To ensure the database is up to date mysql_upgrade needs to be run using the 5.7.33 binaries, see the
MySQL documentation
.
This is the process for upgrading the database. The exact steps will depend on how you have installed MySQL.
- Shutdown the database instance.
- Remove the MySQL 5.6 binaries, e.g. using your package manager.
- Install the MySQL 5.7.33 binaries.
- Start the database instance using the 5.7.33 binaries.
- Run
mysql_upgradeto upgrade the database to 5.7 specification. - Shutdown the database instance.
- Remove the MySQL 5.7.33 binaries.
- Install the latest MySQL 8.0 binaries.
- Start the database instance.
On start up MySQL 8 will detect a v5.7 instance and upgrade it to 8.0 spec automatically without the need to run
mysql_upgrade.
Performing the Stroom upgrade
To perform the stroom schema upgrade to v7 run the migrate command (on a single node) which will migrate the database then exit. For a large upgrade like this is it is preferable to run the migrate command rather than just starting Stroom as Stroom will only migrate the parts of the schema as it needs to use them so some parts of the database may not be migrated initially. Running the migrate command ensures all parts of the migration are completed when the command is run and no other parts of stroom will be started.
Post-Upgrade tasks
TODO
3.4.3 - Upgrade from v6 to v7
This document describes the process for upgrading a Stroom single node docker stack from v6.x to v7.x.
Warning
Before commencing an upgrade to v7 you should upgrade Stroom to the latest minor and patch version of v6.
Differences between v6 and v7
Stroom v7 has significant differences to v6 which make the upgrade process a little more complicated.
- v6 handled authentication using a separate application, stroom-auth-service, with its own database. In v7 authentication is handled either internally in stroom (the default) or by an external identity provider such as google or AWS Cognito.
- v6 used a stroom.conf file or environment variables for configuration. In v7 stroom uses a config.yml file for its configuration (see Properties)
- v6 used upper case and heavily abbreviated names for its tables.
In v7 clearer and lower case table names are used.
As a result ALL v6 tables get renamed with the prefix
OLD_, the new tables created and any content copied over. As the database will be holding two copies of most data you need to ensure you have space to accommodate it.
Pre-Upgrade tasks
The following steps are required to be performed before migrating from v6 to v7.
Download migration scripts
Download the migration SQL scripts from https://github.com/gchq/stroom/blob/STROOM_VERSION/scripts e.g. https://github.com/gchq/stroom/blob/v7.0-beta.133/scripts
These scripts will be used in the steps below.
Pre-migration database checks
Run the pre-migration checks script on the running database.
This will produce a report of items that will not be migrated or need attention before migration.
Stop processing
Before shutting stroom down it is wise to turn off stream processing and let all outstanding server tasks complete.
TODO clarify steps for this.
Stop the stack
Stop the stack (stroom and the database) then start up the database. Do this using the v6 stack. This ensures that stroom is not trying to access the database.
Backup the databases
Backup all the databases for the different components.
Typically these will be stroom, stats and auth.
If you are running in a docker stack then you can run the ./backup_databases.sh script.
Stop the database
Stop the database using the v6 stack.
Deploy and configure v7
Deploy the v7 stack. TODO - more detail
Verify the database connection configuration for the stroom and stats databases. Ensure that there is NOT any configuration for a separate auth database as this will now be in stroom.
Running mysql_upgrade
Stroom v6 ran on mysql v5.6. Stroom v7 runs on mysql v8. The upgrade path for MySQL is 5.6 => 5.7.33 => 8.x
To ensure the database is up to date mysql_upgrade needs to be run using the 5.7.33 binaries, see the
MySQL documentation
.
This is the process for upgrading the database. All of these commands are using the v7 stack.
Rename legacy stroom-auth tables
Run this command to connect to the auth database and run the pre-migration SQL script.
This will rename all but one of the tables in the auth database.
Copy the auth database content to stroom
Having run the table rename perform another backup of just the auth database.
Now restore this backup into the
stroom database.
You can use the v7 stack scripts to do this.
You should now see the following tables in the stroom database:
OLD_AUTH_json_web_key
OLD_AUTH_schema_version
OLD_AUTH_token_types
OLD_AUTH_tokens
OLD_AUTH_users
This can be checked by running the following in the v7 stack.
Drop unused databases
There may be a number of databases that are no longer used that can be dropped prior to the upgrade.
Note the use of the --force argument so it copes with users that are not there.
Verify it worked with:
Performing the upgrade
To perform the stroom schema upgrade to v7 run the migrate command which will migrate the database then exit. For a large upgrade like this it is preferable to run the migrate command rather than just starting stroom as stroom will only migrate the parts of the schema as it needs to use them. Running migrate ensures all parts of the migration are completed when the command is run and no other parts of stroom will be started.
Post-Upgrade tasks
TODO remove auth* containers,images,volumes
3.5 - Setup
3.5.1 - MySQL Setup
TODO
This needs updating to MySQL 8. Stroom v7 requires MySQL 8.Prerequisites
- MySQL 8.0.x server installed (e.g. yum install mysql-server)
- Processing User Setup
A single MySQL database is required for each Stroom instance. You do not need to setup a MySQL instance per node in your cluster.
Check Database installed and running
The following commands can be used to auto start mysql if required:
Overview
MySQL configuration can be simple to complex depending on your requirements.
For a very simple configuration you simply need an out-of-the-box mysql install and create a database user account.
Things get more complicated when considering:
- Security
- Replication
- Tuning memory usage
- Running Stroom Stats in a different database to Stroom
- Performance Monitoring
Simple Install
Ensure the database is running, then create the database and grant access to it:
Advanced Security
It is recommended to run /usr/bin/mysql_secure_installation to remove test database and accounts.
./stroom-setup/mysql_grant.sh is a utility script that creates accounts for you to use within a cluster (or single node setup). Run to see the options:
N.B. name is used when multiple mysql instances are setup (see below).
You need to create a file cluster.txt with a line for each member of your cluster (or single line in the case of a one node Stroom install). Then run the utility script to lock down the server access.
Advanced Install
The below example uses the utility scripts to create 3 custom mysql server instances on 2 servers:
- server1 - stroom (source),
- server2 - stroom (replica), stroom_stats
As root on server1:
Create the master database:
Check Start up Settings Correct
Create a text file with all members of the cluster:
Create the grants:
As root on server2:
Check Start up Settings Correct
Create the grants:
Make the slave database start to follow:
As processing user on server1:
As processing user on server2 check server replicating OK:
As root on server2:
Create the grants:
As processing user create the database:
3.5.2 - Securing Stroom
How to secure Stroom and the cluster
NOTE This document was written for stroom v4/5. Some parts may not be applicable for v6+.
Firewall
The following firewall configuration is recommended:
- Outside cluster drop all access except ports HTTP 80, HTTPS 443, and any other system ports your require SSH, etc.
- Within cluster allow all access
This will enable nodes within the cluster to communicate on:
- 8080 - Stroom HTTP.
- 8081 - Stroom HTTP (admin).
- 8090 - Stroom Proxy HTTP.
- 8091 - Stroom Proxy HTTP (admin).
- 3306 - MySQL
MySQL
TODO
Update this for MySQL 8It is recommended that you run mysql_secure_installation to set a root password and remove the test database:
When prompted, answer as follows (providing a root password when asked):
- Set root password? → Y
- Remove anonymous users? → Y
- Disallow root login remotely? → Y
- Remove test database and access to it? → Y
- Reload privilege tables now? → Y
3.5.3 - Java Key Store Setup
TODO
This is out of date for stroom 7.In order that the java process communicates over https (for example Stroom Proxy forwarding onto Stroom) the JVM requires relevant keystore’s setting up.
As the processing user copy the following files to a directory stroom-jks in the processing user home directory :
- CA.crt - Certificate Authority
- SERVER.crt - Server certificate with client authentication attributes
- SERVER.key - Server private key
As the processing user perform the following:
- First turn your keys into der format:
- Import Keys into the Key Stores:
- Update Processing User Global Java Settings:
Any Stroom or Stroom Proxy instance will now additionally pickup the above JAVA_OPTS settings.
3.5.4 - Processing Users
Processing User Setup
Stroom and Stroom Proxy should be run under a processing user (we assume stroomuser below).
Create user
You may want to allow normal accounts to sudo to this account for maintenance (visudo).
Create service script
Create a service script to start/stop on server startup (as root).
Paste/type the following content into vi.
#!/bin/bash
#
# stroomuser       This shell script takes care of starting and stopping
#               the stroomuser subsystem (tomcat6, etc)
#
# chkconfig: - 86 14
# description: stroomuser is the stroomuser sub system

STROOM_USER=stroomuser
DEPLOY_DIR=/home/${STROOM_USER}/stroom-deploy

case $1 in
start)
/bin/su ${STROOM_USER} ${DEPLOY_DIR}/stroom-deploy/start.sh
;;
stop)
/bin/su ${STROOM_USER} ${DEPLOY_DIR}/stroom-deploy/stop.sh
;;
restart)
/bin/su ${STROOM_USER} ${DEPLOY_DIR}/stroom-deploy/stop.sh
/bin/su ${STROOM_USER} ${DEPLOY_DIR}/stroom-deploy/start.sh
;;
esac
exit 0
Now initialise the script.
Setup user’s environment
Setup env.sh to include JAVA_HOME to point to the installed directory of the JDK (this will be platform specific).
In vi add the following lines.
# User specific aliases and functions
export JAVA_HOME=/usr/lib/jvm/java-1.8.0
export PATH=${JAVA_HOME}/bin:${PATH}
Setup the user’s profile to source the env script.
In vi add the following lines.
# User specific aliases and functions
. ~/env.sh
Verify Java installation
Assuming you are using Stroom without using docker and have installed Java, verify that the processing user can use the Java installation.
The shell output below may show a different version of Java to the one you are using.
3.5.5 - Setting up Stroom with an Open ID Connect IDP
How to set up Stroom to use a 3rd party Identity Provider (e.g. KeyCloak, Cognito, etc.) for authentication.
Warning
This section is currently work in progress so may contain incorrect information.3.5.5.1 - Accounts vs Users
The distinction between Accounts and Users in Stroom.
In Stroom we have the concept of Users and Accounts, and it is important to understand the distinction.
Accounts
Accounts Account Refers to a user account in Stroom’s internal Identity Provider.Click to see more details... are user identities in the internal Identity Provider (IDP) Identity Provider (IDP) An Identity Provider is a system or service that can authenticate a user and assert their identity. Identity providers can support single sign on (SSO), which allows the user to sign in once to the Identity Provider so they are then authenticated to all systems using that IDP.Click to see more details.... The internal IDP is used when you want Stroom to manage all the authentication. The internal IDP is the default option and the simplest for test environments. Accounts are not applicable when using an external 3rd party IDP.
Accounts are managed in Stroom using the Manage Accounts screen available from the _Tools => Users menu item. An administrator can create and manage user accounts allowing users to log in to Stroom.
Accounts are for authentication only, and play no part in authorisation (permissions). A Stroom user account has a unique identity that will be associated with a Stroom User to link the two together.
When using a 3rd party IDP this screen is not available as all management of users with respect to authentication is done in the 3rd party IDP.
Accounts are stored in the account database table.
Stroom Users
A User User Refers to a Stroom User that is linked to either an Account in Stroom’s internal Identity Provider or a user account in an external Identity Provider. A Stroom User is only concerned with authorisation (i.e. application/document permissions and group memberships), and not authentication.Click to see more details... in Stroom is used for managing authorisation, i.e. permissions and group memberships. It plays no part in authentication. A user has a unique identifier that is provided by the IDP (internal or 3rd party) to identify it. This ID is also the link it to the Stroom Account in the case of the internal IDP or the identity on a 3rd party IDP.
Stroom users and groups are managed in the stroom_user and stroom_user_group database tables respectively.
3.5.5.2 - Stroom's Internal IDP
Details about Stroom’s own internal identity provider and authentication mechanisms.
By default a new Stroom instance/cluster will use its own internal Identity Provider (IDP) Identity Provider (IDP) An Identity Provider is a system or service that can authenticate a user and assert their identity. Identity providers can support single sign on (SSO), which allows the user to sign in once to the Identity Provider so they are then authenticated to all systems using that IDP.Click to see more details... for authentication.
Note
An exception to this is the _test variant of the Stroom Docker stack which will default to using Test Credentials
In this configuration, Stroom acts as its own Open ID Connect Identity Provider and manages both the user accounts for authentication and the user/group permissions, (see Accounts and Users).
A fresh install will come pre-loaded with a user account called admin with the password admin.
This user is a member of a
group
Group (users)
A named group of users to which application and document permissions can be assigned. Users can belong to multiple groups. A Group can belong to multiple groups. Groups allow permissions to be assigned to the group such that members of that group inherit those permissions.Click to see more details... called Administrators which has the Administrator application permission.
This admin user can be used to set up the other users on the system.
Additional user accounts are created and maintained using the Tools => Users menu item.
Configuration for the internal IDP
While Stroom is pre-configured to use its internal IDP, this section describes the configuration required.
In Stroom:
  security:
    authentication:
      authenticationRequired: true
      openId:
        identityProviderType: INTERNAL_IDP
In Stroom-Proxy:
  feedStatus:
    apiKey: "AN_API_KEY_CREATED_IN_STROOM"
  security:
    authentication:
      openId:
        identityProviderType: NO_IDP
3.5.5.3 - External IDP
How to setup KeyCloak as an external identity provider for Stroom.
You may be running Stroom in an environment with an existing Identity Provider (IDP) Identity Provider (IDP) An Identity Provider is a system or service that can authenticate a user and assert their identity. Identity providers can support single sign on (SSO), which allows the user to sign in once to the Identity Provider so they are then authenticated to all systems using that IDP.Click to see more details... (KeyCloak, Cognito, Google, Active Directory, etc.) and want to use that for authenticating users. Stroom supports 3rd party IDPs that conform to the Open ID Connect specification.
The following is a guide to setting up a new stroom instance/cluster with KeyCloak as the 3rd party IDP. KeyCloak is an Open ID Connect IDP. Configuration for other IDPs will be very similar so these instructions will have to be adapted accordingly. It is assumed that you have deployed a new instance/cluster of stroom AND have not yet started it.
Running KeyCloak
If you already have a KeyCloak instance running then move on to the next section.
This section is not a definitive guide to running/administering KeyCloak. It describes how to run KeyCloak using non-production settings for simplicity and to demonstrate using a 3rd party IDP. You should consult the KeyCloak documentation on how to set up a production ready instance of KeyCloak.
The easiest way to run KeyCloak is using Docker. To create a KeyCloak container do the following:
This example maps KeyCloak’s port to port 9999 to avoid any clash with Stroom that also runs on 8080.
This will create a docker container called keycloak that uses an embedded H2 database to hold its state.
To start the container in the foreground, do:
KeyCloak should now be running on
http://localhost:9999/admin
.
If you want to run KeyCloak on a different port then delete the container and create it with a different port for the -p argument.
Log into KeyCloak using the username admin and password admin as specified in the environment variables set in the container creation command above.
You should see the admin console.
Creating a realm
First you need to create a Realm.
- Click on the drop-down in the left pane that contains the word
master. - Click Create Realm.
- Set the Realm name to
StroomRealm. - Click Create.
Creating a client
In the new realm click on Clients in the left pane, then Create client.
- Set the Client ID to
StroomClient. - Click Next.
- Set Client authentication to on.
- Ensure the following are ticked:
- Standard flow
- Direct access grants
- Click Save.
Open the new Client and on the Settings tab set:
- Valid redirect URIs to
https://localhost/* - Valid post logout redirect URIs to
https://localhost/*
On the Credentials tab copy the Client secret for use later in Stroom config.
Creating users
Click on Users in the left pane then Add user. Set the following:
- Username -
admin - First name -
Administrator - Last name -
Administrator
Click Create.
Select the Credentials tab and click Set password.
Set the password to admin and set Temporary to off.
Note
Standard practice would be for there to be a number of administrators where each has their own identity (in their own name) on the IDP. Each would be granted theAdministrator application permission (directly or via a group).
For this example we are calling our administrator admin.
Repeat this process for the following user:
- Username -
jbloggs - First name -
Joe - Last name -
Bloggs - Password -
password
Configure Stroom for KeyCloak
Edit the config.yml file and set the following values
  receive:
    # Set to true to require authentication for /datafeed requests
    authenticationRequired: true
    # Set to true to allow authentication using an Open ID token
    tokenAuthenticationEnabled: true
  security:
    authentication:
      authenticationRequired: true
      openId:
        # The client ID created in KeyCloak
        clientId: "StroomClient"
        # The client secret copied from KeyCloak above
        clientSecret: "XwTPPudGZkDK2hu31MZkotzRUdBWfHO6"
        # Tells Stroom to use an external IDP for authentication
        identityProviderType: EXTERNAL_IDP
        # The URL on the IDP to redirect users to when logging out in Stroom
        logoutEndpoint: "http://localhost:9999/realms/StroomRealm/protocol/openid-connect/logout"
        # The endpoint to obtain the rest of the IDPs configuration. Specific to the realm/issuer.
        openIdConfigurationEndpoint: "http://localhost:9999/realms/StroomRealm/.well-known/openid-configuration"
These values are obtained from the IDP. In the case of KeyCloak they can be found by clicking on Realm settings => Endpoints => OpenID Endpoint Configuration and extracting the various values from the JSON response. Alternatively they can typically be found at this address on any Open ID Connect IDP, https://host/.well-known/openid-configuration. The values will reflect the host/port that the IDP is running on along with the name of the realm.
Setting the above values assumes KeyCloak is running on localhost:9999 and the Realm name is StroomRealm.
Setting up the admin user in Stroom
Now that the admin user exists in the IDP we need to grant it Administrator rights in Stroom.
In the Users section of KeyCloak click on user admin.
On the Details tab copy the value of the ID field.
The ID is in the form of a
UUID
UUID
A Universally Unique Identifier for uniquely identifying something. UUIDs are used as the identifier in Doc Refs. An example of a UUID is 4ffeb895-53c9-40d6-bf33-3ef025401ad3.Click to see more details...
This ID will be used in Stroom to uniquely identify the user and associate it with the identity in KeyCloak.
To set up Stroom with this admin user run the following (before Stroom has been started for the first time):
Where XXX is the user ID copied from the IDP as described above.
This command is repeatable as it will skip any users/groups/memberships that already exist.
See Also
See Command Line Tools for more details on using the manage_users command.
This command will do the following:
- Create the Stroom User by creating an entry in the
stroom_userdatabase table for the IDP’sadminuser. - Ensure that an
Administratorsgroup exists (i.e. an entry in thestroom_userdatabase table for theAdministratorsgroup). - Add the
adminuser to the groupAdministrators. - Grant the application permission
Administratorto the groupAdministrators.
Note
This process is only required to bootstrap the admin user to allow them to log in with administrator rights to be able to manage the permissions and group memberships of other users. It does not need to be done for every user. Whenever a user successfully logs in via the IDP, Stroom will automatically create an entry in thestroom_user table for that user.
The user will have no permissions or group memberships so this will need to be applied by the administrator.
This does mean that new users will need to login before the administrator can manage their permissions/memberships.
Logging into Stroom
As the administrator
Now that the user and permissions have been set up in Stroom, the administrator can log in.
First start the Stroom instance/cluster.
Warning
If themanage_users command is run while Stroom is running you will likely not see the effect when logging in as the user permissions are cached.
Without Administrator rights you will not be able to clear the caches so you will need to wait for the cache entries to expire or restart Stroom.
Navigate to http://STROOM_FQDN and Stroom should re-direct you to the IDP (KeyCloak) to authenticate.
Enter the username of admin and password admin.
You should be authenticated by KeyCloak and re-directed back to stroom.
Your user ID is shown in the bottom right corner of the Welcome tab.
As an administrator, the Tools => User Permissions menu item will be available to manage the permissions of any users that have logged on at least once.
Now select User => Logout to be re-directed to the IDP to logout. Once you logout of the IDP it should re-direct you back to the IDP login screen for Stroom to log back in again.
As an ordinary user
On the IDP login screen, login as user jbloggs with the password password.
You will be re-directed to Stroom however the explorer tree will be empty and most of the menu items will be disabled.
In order to gain permissions to do anything in Stroom a Stroom administrator will need to grant application/document permissions and/or group memberships to the user via the Tools => User Permissions menu item.
Configure Stroom-Proxy for KeyCloak
In order to use Stroom-Proxy with OIDC
Edit the config.yml file and set the following values
  receive:
    # Set to true to require authentication for /datafeed requests
    authenticationRequired: true
    # Set to true to allow authentication using an Open ID token
    tokenAuthenticationEnabled: true
  security:
    authentication:
      openId:
        # The client ID created in KeyCloak
        clientId: "StroomClient"
        # The client secret copied from KeyCloak above
        clientSecret: "XwTPPudGZkDK2hu31MZkotzRUdBWfHO6"
        # Tells Stroom to use an external IDP for authentication
        identityProviderType: EXTERNAL_IDP
        # The URL on the IDP to redirect users to when logging out in Stroom
        logoutEndpoint: "http://localhost:9999/realms/StroomRealm/protocol/openid-connect/logout"
        # The endpoint to obtain the rest of the IDPs configuration. Specific to the realm/issuer.
        openIdConfigurationEndpoint: "http://localhost:9999/realms/StroomRealm/.well-known/openid-configuration"
If Stroom-Proxy is configured to forward data onto another Stroom-Proxy or Stroom instance then it can use tokens when forwarding the data. This assumes the downstream Stroom or Stroom-Proxy is also configured to use the same external IDP.
  forwardHttpDestinations:

      # If true, adds a token for the service user to the request
    - addOpenIdAccessToken: true
      enabled: true
      name: "downstream"
      forwardUrl: "http://somehost/stroom/datafeed"
The token used will be for the service user account of the identity provider client used by Stroom-Proxy.
3.5.5.4 - Tokens for API use
How to create and use tokens for making API calls.
Note
We strongly recommend you install jq if you are working with JSON responses from the IDP. It allows you to parse and extract parts of the JSON response. https://stedolan.github.io/jq/
Creating a user access token
If a user wants to use the REST API they will need to create a token for authentication/authorisation in API calls. Any calls to the REST API will have the same permissions that the user has within Stroom.
The following excerpt of shell commands shows how you can get an access/refresh token pair for a user and then later use the refresh token to obtain a new access token. It also shows how you can extract the expiry date/time from a token using jq.
get_jwt_expiry() {
  jq \
    --raw-input \
    --raw-output \
    'split(".") | .[1] | @base64d | fromjson | .exp | todateiso8601' \
    <<< "${1}"
}

# Fetch a new set of tokens (id, access and refresh) for the user
response="$( \
  curl \
    --silent \
    --request POST \
    --header 'Content-Type: application/x-www-form-urlencoded' \
    --data-urlencode 'client_id=admin-cli' \
    --data-urlencode 'grant_type=password' \
    --data-urlencode 'scope=openid' \
    --data-urlencode 'username=jbloggs' \
    --data-urlencode 'password=password' \
    'http://localhost:9999/realms/StroomRealm/protocol/openid-connect/token' )"

# Extract the individual tokens from the response
access_token="$( jq -r '.access_token' <<< "${response}" )"
refresh_token="$( jq -r '.refresh_token' <<< "${response}" )"

# Output the tokens
echo -e "\nAccess token (expiry $( get_jwt_expiry "${access_token}")):\n${access_token}"
echo -e "\nRefresh token (expiry $( get_jwt_expiry "${refresh_token}")):\n${refresh_token}"

# Fetch a new access token using the stored refresh token
response="$( \
  curl \
    --silent \
    --request POST \
    --header 'Content-Type: application/x-www-form-urlencoded' \
    --data-urlencode 'client_id=admin-cli' \
    --data-urlencode 'grant_type=refresh_token' \
    --data-urlencode "refresh_token=${refresh_token}" \
    'http://localhost:9999/realms/StroomRealm/protocol/openid-connect/token' )"

access_token="$( jq -r '.access_token' <<< "${response}" )"
refresh_token="$( jq -r '.refresh_token' <<< "${response}" )"

echo -e "\nNew access token (expiry $( get_jwt_expiry "${access_token}")):\n${access_token}"
echo -e "\nNew refresh token (expiry $( get_jwt_expiry "${refresh_token}")):\n${refresh_token}"
The above example assumes that you have created a user called jbloggs and a client ID admin-cli.
Access tokens typically have a short life (of the order of minutes) while a refresh token will have a much longer life (maybe up to a year). Refreshing the token does not require re-authentication.
Creating a service account token
If you want another system to call one of Stroom’s APIs then it is likely that you will do that using a non-human service account (or processing user account).
Creating a new Client ID
The client system needs to be represented by a Client ID in KeyCloak. To create a new Client ID, assuming the client system is called System X, do the following in the KeyCloak admin UI.
- Click Clients in the left pane.
- Click Create client.
- Set the Client ID to be
system-x. - Set the Name to be
System X. - Click Next.
- Enable Client Authentication.
- Enable Service accounts roles.
- Click Save.
Note
By enabling Service accounts role, KeyCloak will create a service account user calledservice-account-system-x.
Tokens will be created under this non-human user identity.
Open the Credentials tab and copy the Client secret for use later.
To create an access token run the following shell commands:
response="$( \
  curl \
    --silent \
    --request POST \
    --header 'Content-Type: application/x-www-form-urlencoded' \
    --data-urlencode 'client_secret=k0BhYyvt6PHQqwKnnQpbL3KXVFHG0Wa1' \
    --data-urlencode 'client_id=system-x' \
    --data-urlencode 'grant_type=client_credentials' \
    --data-urlencode 'scope=openid' \
    'http://localhost:9999/realms/StroomRealm/protocol/openid-connect/token' )"

access_token="$( jq -r '.access_token' <<< "${response}" )"
refresh_token="$( jq -r '.refresh_token' <<< "${response}" )"

echo -e "\nAccess token:\n${access_token}"
Where client_secret is the Client secret that you copied from KeyCloak earlier.
This access token can be refreshed in the same way as for a user access token, as described above.
Using access tokens
Access tokens can be used in calls to Stroom’s REST API or its datafeed API. The process of including the token in a HTTP request is described in API Authentication
3.5.5.5 - Test Credentials
Hard coded Open ID credentials for test or demonstration purposes.
Stroom and Stroom-Proxy come with a set of hard coded Open ID credentials that are intended for use in test/demo environments.
These credentials mean that the _test stroom docker stack can function out of the box with Stroom-Proxy able to authenticate with Stroom.
Warning
These credentials are publicly available and therefore totally insecure. If you are configuring a production instance of Stroom or Stroom-Proxy you must not use these credentials.
To correctly configure secure authentication in Stroom and Stroom-Proxy see Internal IDP or External IDP.
Configuring the test credentials
To configure Stroom to use these hard-coded credentials you need to set the following property:
  security:
    authentication:
      openId:
        identityProviderType: TEST_CREDENTIALS
When you start the Stroom instance you will see a large banner message in the logs that will include the Token Token Typically refers to an authentication token that may be used for user authentication. A Stroom API Key is a form of authentication token.Click to see more details... that can be used in API calls or by Stroom-proxy for its feed status checks.
To configure Stroom-Proxy to use these credentials set the following:
  feedStatus:
    apiKey: "THE_TOKEN_OBTAINED_FROM_STROOM'S_LOGS"
  security:
    authentication:
      openId:
        identityProviderType: NO_IDP
3.6 - Stroom 6 Installation
TODO
Update this for Stroom 7.Running on a single box
Running a release
Download a
release
, for example
Stroom Core v6.0 Beta 3
, unpack it, and run the start.sh script. When you’ve given it some time to start up go to http://localhost/stroom. There’s a README.md file inside the tar.gz with more information.
Admin Account creation
By default, Stroom does not come with an administrator account/user so one or more administrators will need to be setup in order to login and continue provisioning Stroom via the UI.
See Creating an Internal IDP Administrator or Creating an External IDP Administrator depending on the type of Identity Provider (IDP) Identity Provider (IDP) An Identity Provider is a system or service that can authenticate a user and assert their identity. Identity providers can support single sign on (SSO), which allows the user to sign in once to the Identity Provider so they are then authenticated to all systems using that IDP.Click to see more details... that is configured.
Post-install hardening
Before first run
Change database passwords
If you don’t do this before the first run of Stroom then the passwords will already be set and you’ll have to change them on the database manually, and then change the .env.
This change should be made in the .env configuration file. If the values are not there then this service is not included in your Stroom stack and there is nothing to change.
-
STROOM_DB_PASSWORD -
STROOM_DB_ROOT_PASSWORD -
STROOM_STATS_DB_ROOT_PASSWORD -
STROOM_STATS_DB_PASSWORD -
STROOM_AUTH_DB_PASSWORD -
STROOM_AUTH_DB_ROOT_PASSWORD -
STROOM_ANNOTATIONS_DB_PASSWORD -
STROOM_ANNOTATIONS_DB_ROOT_PASSWORD
On first run
Create yourself an account
After first logging in as admin you should create yourself a normal account (using your email address) and add yourself to the Administrators group. You should then log out of admin, log in with your new administrator account and then disable the admin account.
If you decide to use the admin account as your normal account you might find yourself locked out. The admin account has no associated email address, so the Reset Password feature will not work if your account is locked. It might become locked if you enter your password incorrectly too many times.
Delete un-used users and API keys
- If you’re not using stats you can delete or disable the following:
- the user
statsServiceUser - the API key for
statsServiceUser
- the user
Change the API keys
First generate new API keys. You can generate a new API key using Stroom. From the top menu, select:
The following need to be changed:
-
STROOM_SECURITY_API_TOKEN- This is the API token for user
stroomServiceUser.
- This is the API token for user
Then stop Stroom and update the API key in the .env configuration file with the new value.
Troubleshooting
I’m trying to use certificate logins (PKI) but I keep being prompted for the username and password!
You need to be sure of several things:
- When a user arrives at Stroom the first thing Stroom does is redirect the user to the authentication service. This is when the certificate is checked. If this redirect doesn’t use HTTPS then nginx will not get the cert and will not send it onwards to the authentication service. Remember that all of this stuff, apart from back-channel/service-to-service chatter, goes through nginx. The env var that needs to use HTTPS is STROOM_AUTHENTICATION_SERVICE_URL. Note that this is the var Stroom looks for, not the var as set in the stack, so you’ll find it in the stack YAML.
- Are your certs configured properly? If nginx isn’t able to decode the incoming cert for some reason then it won’t pass anything on to the service.
- Is your browser sending certificates?
3.7 - Stroom Installation
Details how to install Stroom and its assocatied services.
TODO
This section is not yet complete.Typical Deployments
Stroom can be deployed in a number of ways:
-
Single node - For environments with low data volumes, test environments or where resilience is not critical. For a single node deployment, the simplest way to deploy is with a Single Node Docker Stack as this includes everything needed for Stroom to run.
-
Non-Docker Cluster - A Stroom cluster where the Stroom Java application is running direction on the physical/virtual host and Stroom’s peripheral services (e.g. Nginx, MySQL, Stroom-Proxy) have been installed adjacent to the Stroom Cluster.
-
Kubernetes - For deploying a containerised Stroom cluster, Kubernetes (k8s) is the recommended approach. See Kubernetes Cluster.
This document will only be concerned with the installation of a non-Docker Stroom cluster.
For a more detailed description of the deployment architecture, see Architecture.
For details of how to install Stroom-Proxy see Stroom-Proxy Installation.
Assumptions
The following assumptions are used in this document.
- The user has reasonable RHEL/CentOS/Rocky System administration skills.
- Installation is on a fully patched minimal RHEL/CentOS/Rocky instance.
- The application user
stroomuserhas been created in the OS. - The user has set up the Stroom processing user as described here.
- The prerequisite software has been installed.
Firewall Configuration
The following are the ports used in a typical Stroom deployment. Some may need to be opened to allow access to the ports from outside the host.
80- Nginx listens on port80but redirects onto443.443- Nginx listens on port443.3306- MySQL listens on port3306by default.8080- Stroom listens on port8080for its main public APIs (/datafeed, REST endpoints, etc).8081- Stroom listens on port8081for its administration APIs. Access to this port should probably be carefully controlled.8090- Stroom-Proxy listens on port8090for its main public APIs (/datafeed, REST endpoints, etc).8091- Stroom-Proxy listens on port8091for its administration APIs. Access to this port should probably be carefully controlled.
Note
A lot of the default Stroom configuration assumes MySQL is listening on3307.
This is for historic reasons.
You can either change the Stroom configuration to use 3306 or change MySQL to listen on 3307.
Which ports you open on a host will depend on what service is running on that host.
Typically Stroom will be running on different hosts to Nginx, MySQL and Stroom-Proxy, so Stroom’s 8080 port will need to be opened for traffic from Stroom-Proxy and Nginx.
For example on a RHEL/CentOS server using firewalld the commands would be as root user:
Prerequisites
- RHEL/CentOS/Rocky
- Java JDK (JDK is preferred over JRE as it provides additional tools (e.g.
jmap) for capturing heap histogram statistics). For details about which Java distribution and version to use, and how to install it, see Java. bashv4 or greater - Used by the helper scripts.- GNU
coreutils- Used by the helper scripts. jq- Used by the stack scripts.
Create a shell script that will define the Java variable OR add the statements to .bash_profile.
Install Components
Install Nginx
To deploy Nginx, it can either be installed manually (see
Installing Nginx
) or using the stroom_services Docker Stack.
Install Stroom-Proxy
For details of how to install Stroom-Proxy see Stroom-Proxy Installation.
Install MySQL
For details of how to install MySQL see MySQL Setup.
Install Stroom
Stroom releases are available from
github.com/gchq/stroom/releases
.
Each release has a number of artefacts, the Stroom application is stroom-app-v*.zip.
The installation example below is for stroom version 7.10.20, but is applicable to other stroom v7 versions. As a suitable stroom user e.g. stroomuser - download and unpack the stroom software.
The configuration file – stroom/config/config.yml – is the principal file that controls the configuration of Stroom, although once Stroom is running, the configuration can be managed via System Properties.
See Stroom Configuration.
3.8 - Java
Stroom and Stroom-Proxy both run on Java. This section details the requirements they have in terms of Java.
Recommended Java Distribution
There are multiple distributions of Java available (Oracle, OpenJDK, Adoptium, Azul, etc). Our recommendation is to use Adoptium Eclipse Temurin as this is free and Open Source and has 4 year support periods for Long Term Support (LTS) releases of Java.
JDK or JRE
Java distributions are available as a Java Development Kit or a Java Runtime Environment. The JDK is primarily intended for development of Java applications (i.e. compiling code) while the JRE is simply for running a compiled application.
However, we recommend installing the JDK as this can run an application in the same way as the JRE, but also provides additional tools to aid in debugging the application if required.
For example the JDK includes the jmap binary that can be used by Stroom to capture statistics on object use within the Java Heap.
Java Releases
Java now has a regular release cycle of new major versions. Periodically a Java release will be deemed a Long Term Support (LTS) releases, e.g. Java v11, v17 & v25. Intermediate version have a short support lifecycle.
Stroom and Stroom-Proxy versions will now typically require an LTS releases of Java as a minimum. While you can run a later release of Java than that required by the Stroom/Stroom-Proxy release, it is generally simpler to run the minimum required version. Using the same LTS release means you will get security/bug updates for 4 or so years and you don’t need to worry about any breaking changes that a later version of Java may have introduced.
The following lists the minimum required Java version required by each Stroom release.
| Stroom/Stroom-Proxy Version | Minimum Java Version |
|---|---|
| v7.11 | v25 |
| v7.10 | v21 |
| v7.9 | v21 |
| v7.8 | v21 |
| v7.7 | v21 |
| v7.6 | v21 |
| v7.5 | v21 |
| v7.4 | v21 |
| v7.3 | v21 |
| v7.2 | v17 |
| v7.1 | v17 |
| v7.0 | v15 |
Installing Java
See Linux Installation Instructions for details of how to install the JDK using your package manager.
Alternatively, see Adoptium Eclipse Temurin for links to download the Java binaries for manual installation.
Setting Java Home
Create a shell script that will define the Java variable OR add the statements to .bash_profile.
e.g. vi /etc/profile.d/jdk.sh
export JAVA_HOME=/path/to/java/home
export PATH=$PATH:$JAVA_HOME/bin
3.9 - Kubernetes Cluster
How to deploy and administer a container based Stroom cluster using Kubernetes.
3.9.1 - Introduction
Introduction to using Stroom on Kubernetes.
Kubernetes is an open-source system for automating deployment scaling and management of containerised applications.
Stroom is a distributed application designed to handle large-scale dataflows. As such, it is ideally suited to a Kubernetes deployment, especially when operated at scale. Features standard to Kubernetes, like Ingress and Cluster Networking , simplify the installation and ongoing operation of Stroom.
Running applications in K8s can be challenging for applications not designed to operate in a K8s cluster natively. A purpose-built Kubernetes Operator ( stroom-k8s-operator ) has been developed to make deployment easier, while taking advantage of several key Kubernetes features to further automate Stroom cluster management.
The concept of Kubernetes operators is discussed here .
Key features
The Stroom K8s Operator provides the following key features:
Deployment
- Simplified configuration, enabling administrators to define the entire state of a Stroom cluster in one file
- Designate separate processing and UI nodes, to ensure the Stroom user interface remains responsive, regardless of processing load
- Automatic secrets management
Operations
- Scheduled database backups
- Stroom node audit log shipping
- Automatically drain Stroom tasks before node shutdown
- Automatic Stroom task limit tuning, to attempt to keep CPU usage within configured parameters
- Rolling Stroom version upgrades
Next steps
Install the Stroom K8s Operator
3.9.2 - Install Operator
How to install the Stroom Kubernetes operator.
Prerequisites
- Kubernetes cluster, version >= 1.20.2
- metrics-server (pre-installed with some K8s distributions)
kubectland cluster-wide admin access
Preparation
Stage the following images in a locally-accessible container registry:
- All images listed in: https://github.com/p-kimberley/stroom-k8s-operator/blob/master/deploy/images.txt
- MySQL (e.g.
mysql/mysql-server:8.0.25) - Stroom (e.g.
gchq/stroom:v7-LATEST) gchq/stroom-log-sender:v2.2.0(only required if log forwarding is enabled)
Install the Stroom K8s Operator
-
Clone the repository
-
Edit
./deploy/all-in-one.yaml, prefixing any referenced images with your private registry URL. For example, if your private registry ismy-registry.example.com, the imagegcr.io/kubebuilder/kube-rbac-proxy:v0.8.0will become:my-registry.example.com:5000/gcr.io/kubebuilder/kube-rbac-proxy:v0.8.0. -
Deploy the Operator
The Stroom K8s Operator is now deployed to namespace stroom-operator-system.
You can monitor its progress by watching the Pod named stroom-operator-controller-manager.
Once it reaches Ready state, you can deploy a Stroom cluster.
Allocating more resources
If the Operator Pod is killed due to running out of memory, you may want to increase the amount allocated to it.
This can be done by:
- Editing the
resources.limitssettings of the controller Pod inall-in-one.yaml kubectl apply -f all-in-one.yaml
Note
The Operator retains CPU and memory metrics for allStroomCluster Pods for a 60-minute window.
In very large deployments, this may cause it to run out of memory.
Next steps
3.9.3 - Upgrade Operator
How to upgrade the Stroom Kubernetes Operator.
Upgrading the Operator can be performed without disrupting any resources it controls, including Stroom clusters.
To perform the upgrade, follow the same steps in Installing the Stroom K8s Operator.
Warning
Ensure you do NOT delete the operator first (i.e.kubectl delete ...)
Once you have initiated the update (by executing kubectl apply -f all-in-one.yaml), an instance of the new Operator version will be created.
Once it starts up successfully, the old instance will be removed.
You can check whether the update succeeded by inspecting the image tag of the Operator Pod: stroom-operator-system/stroom-operator-controller-manager.
The tag should correspond to the release number that was downloaded (e.g. 1.0.0)
If the upgrade failed, the existing Operator should still be running.
3.9.4 - Remove Operator
How to remove the Stroom Kubernetes operator.
Removing the Stroom K8s Operator must be done with caution, as it causes all resources it manages, including StroomCluster, DatabaseServer and StroomTaskAutoscaler to be deleted.
While the Stroom clusters under its control will be gracefully terminated, they will become inaccessible until re-deployed.
It is good practice to first delete any dependent resources before deleting the Operator.
Deleting the Operator
Execute this command against the same version of manifest that was used to deploy the Operator currently running.
3.9.5 - Configure Database
How to configure the database server for a Stroom cluster.
Before creating a Stroom cluster, a database server must first be configured.
There are two options for deploying a MySQL database for Stroom:
Managed by Stroom K8s Operator
A Database server can be created and managed by the Operator.
This is the recommended option, as the Operator will take care of the creation and storage of database credentials, which are shared securely with the Pod via the use of a Secret cluster resource.
Create a DatabaseServer resource manifest
Use the example at database-server.yaml .
See the DatabaseServer Custom Resource Definition (CRD)
API documentation
for an explanation of the various CRD fields.
By default, MySQL imposes a limit of 151 concurrent connections.
If your Stroom cluster is larger than a few nodes, it is likely you will exceed this limit.
Therefore, it is recommended to set the MySQL property max_connections to a suitable value.
Bear in mind the Operator generally consumes one connection per StroomCluster it manages, so be sure to include some headroom in your allocation.
You can specify this value via the spec.additionalConfig property as in the example below:
apiVersion: stroom.gchq.github.io/v1
kind: DatabaseServer
...
spec:
  additionalConfig:
    - max_connections=1000
...
Provision a PersistentVolume for the DatabaseServer
General instructions on creating a Kubernetes Persistent Volume (PV) are explained here .
The Operator will create StatefulSet when the DatabaseServer is deployed, which will attempt to claim a PersistentVolume matching the specification provided in DatabaseServer.spec.volumeClaim.
Fast, low-latency storage should be used for the Stroom database
Deploy the DatabaseServer to the cluster
Observe the Pod stroom-<database server name>-db start up.
Once it’s reached Ready state, the server has started, and the databases you specified have been created.
Backup the created credentials
The Operator generates a Secret containing the passwords of the users root and stroomuser when it initially creates the DatabaseServer resource.
These credentials should be backed up to a secure location, in the event the Secret is inadvertently deleted.
The Secret is named using the format: stroom-<db server name>-db (e.g. stroom-dev-db).
External
You may alternatively provide the connection details of an existing MySQL (or compatible) database server. This may be desirable if you have for instance, a replication-enabled MySQL InnoDB cluster.
Provision the server and Stroom databases
TODO
Complete this section.Store credentials in a Secret
Create a Secret in the same namespace as the StroomCluster, containing the key stroomuser, with the value set to the password of that user.
Warning
If at any time the MySQL password is updated, the value of theSecret must also be changed.
Otherwise, Stroom will stop functioning.
Upgrading or removing a DatabaseServer
A DatabaseServer cannot shut down while its dependent StroomCluster is running.
This is a necessary safeguard to prevent database connectivity from being lost.
Upgrading or removing a DatabaseServer requires the StroomCluster be removed first.
Next steps
Configure a Stroom cluster
3.9.6 - Configure a cluster
How to configure a Stroom cluster.
A StroomCluster resource defines the topology and behaviour of a collection of Stroom nodes.
The following key concepts should be understood in order to optimally configure a cluster.
Concepts
NodeSet
A logical grouping of nodes intended to together, fulfil a common role.
There are three possible roles, as defined by ProcessingNodeRole:
- Undefined (default).
Each node in the
NodeSetcan receive and process data, as well as service web frontend requests. ProcessingNode can receive and process data, but not service web frontend requests.FrontendNode services web frontend requests only.
There is no imposed limit to the number of NodeSets, however it generally doesn’t make sense to have more than one assigned to either Processing or Frontend roles.
In clusters where nodes are not very busy, it should not be necessary to have dedicated Frontend nodes.
In cases where load is prone to spikes, such nodes can greatly help improve the responsiveness of the Stroom user interface.
It is important to ensure there is at least one
NodeSetfor each role in theStroomClusterThe Operator automatically wires up traffic routing to ensure that only non-Frontendnodes receive event data. Additionally,Frontend-only nodes have server tasks disabled automatically on startup, effectively preventing them from participating in stream processing.
Ingress
Kubernetes Ingress resources determine how requests are routed to an application.
Ingress resources are configured by the Operator based on the NodeSet roles and the provided StroomCluster.spec.ingress parameters.
It is possible to disable Ingress for a given NodeSet, which excludes nodes within that group from receiving any traffic via the public endpoint.
This can be useful when creating nodes dedicated to data processing, which do not receive data.
StroomTaskAutoscaler
StroomTaskAutoscaler is an optional resource that if defined, activates “auto-pilot” features for an associated StroomCluster.
See this guide on how to configure.
Creating a Stroom cluster
Create a StroomCluster resource manifest
Use the example stroom-cluster.yaml .
If you chose to create an Operator-managed DatabaseServer, the StroomCluster.spec.databaseServerRef should point to the name of the DatabaseServer.
See Also
See the StroomCluster Custom Resource Definition (CRD)
API documentation
for an explanation of the various CRD fields
Provision a PersistentVolume for each Stroom node
Each PersistentVolume provides persistent local storage for a Stroom node.
The amount of storage doesn’t generally need to be large, as stream data is stored on another volume.
When deciding on a storage quota, be sure to consider the needs of log and reference data, in particular.
This volume should ideally be backed by fast, low-latency storage in order to maximise the performance of LMDB.
Deploy the StroomCluster resource
If the StroomCluster configuration is valid, the Operator will deploy a StatefulSet for each NodeSet defined in StroomCluster.spec.nodeSets.
Once these StatefulSets reach Ready state, you are ready to access the Stroom UI.
Note
If theStatefulSets don’t deploy, there is probably something wrong with your configuration. Check the logs of the pod stroom-operator-system/stroom-operator-controller-manager for any errors.
Log into Stroom
Access the Stroom UI at: https://<ingress hostname>.
The initial credentials are:
- Username:
admin - Password:
admin
Further customisation (optional)
The configuration bundled with the Operator provides enough customisation for most use cases, via explicit properties and environment variables.
If you need to further customise Stroom, you have the following methods available:
Override the Stroom configuration file
Deploy a ConfigMap separately.
You can then specify the ConfigMap name and key (itemName) containing the configuration file to be mounted into each Stroom node container.
Provide additional environment variables
Specify custom environment variables in StroomCluster.spec.extraEnv.
You can reference these in the Stroom configuration file.
Mount additional files
You can also define additional Volumes and VolumeMounts to be injected into each Stroom node.
This can be useful when providing files like certificates for Kafka integration.
Reconfiguring the cluster
Some StroomCluster configuration properties can be reconfigured while the cluster is still running:
spec.imageChange this to deploy a newer (or different) Stroom versionspec.terminationGracePeriodSecsApplies the next time a node or cluster is deletedspec.nodeSets.countIf changed, theNodeSet’sStatefulSetwill be scaled (up or down) to match the corresponding number of replicas
After changing any of the above properties, re-apply the manifest:
If any other changes need to be made, delete then re-create the StroomCluster.
Next steps
Configure Stroom task autoscaling
Stop a Stroom cluster
3.9.7 - Auto Scaler
How to configure Stroom task auto scaling.
Motivation
Setting optimal Stroom stream processor task limits is a crucial factor in running a healthy, performant cluster. If a node is allocated too many tasks, it may become unresponsive or crash. Conversely, if allocated too few tasks, it may have CPU cycles to spare.
The optimal number of tasks is often time-dependent, as load will usually fluctuate during the day and night. In large deployments, it’s not ideal to set static limits, as doing so risks over-committing nodes during intense spikes in activity (such as backlog processing or multiple concurrent searches). Therefore an automated solution, factoring in system load, is called for.
Stroom task autoscaling
When a StroomTaskAutoscaler resource is deployed to a linked StroomCluster, the Operator will periodically compare each Stroom node’s average Pod CPU usage against user-defined thresholds.
Enabling autoscaling
Create an StroomTaskAutoscaler resource manifest
Use the example autoscaler.yaml .
Below is an explanation of some of the main parameters. The rest are documented here .
adjustmentIntervalMinsDetermines how often the Operator will check whether a node has exceeded its CPU parameters. It should be often enough to catch brief load spikes, but not too often as to overload the Operator and Kubernetes cluster through excessive API calls and other overhead.metricsSlidingWindowMinis the window of time over which CPU usage is averaged. Should not be too small, otherwise momentary load spikes could cause task limits to be reduced unnecessarily. Too large and spikes may not cause throttling to occur.minCpuPercentandmaxCpuPercentshould be set to a reasonably tight range, in order to keep the task limit as close to optimal as possible.minTaskLimitandmaxTaskLimitare considered safeguards to avoid nodes ever being allocated an unreasonable number of task. SettingmaxTaskLimitto be equal to the number of assigned CPUs would be a reasonable starting point.
Note
A node’s task limits will only be adjusted while its task queue is full. That is, unless a node is fully-committed, it will not be scaled. This is to avoid continually downscaling each node to the minimum during periods of inactivity. Because of this, be realistic with settingmaxTaskLimit to ensure the node is actually capable of hitting that maximum.
If it can’t, the autoscaler will continue adjusting upwards, potentially causing the node to become unresponsive.
Deploy the resource manifest
Disable autoscaling
Delete the StroomTaskAutoscaler resource
3.9.8 - Stop Stroom Cluster
How to stop the whole Stroom cluster.
A Stroom cluster can be stopped by deleting the StroomCluster resource that was deployed.
When this occurs, the Operator will perform the following actions for each node, in sequence:
- Disable processing of all tasks.
- Wait for all processing tasks to be completed. This check is performed once every minute, so there may be a brief delay between a node completed its tasks before being shut down.
- Terminate the container.
The StroomCluster resource will be removed from the Kubernetes cluster once all nodes have finished processing tasks.
Note
TheStroomCluster.spec.nodeTerminationGracePeriodSecs is an important setting that determines how long the Operator will wait for each node’s tasks to complete before terminating it.
Ensure this is set to a reasonable value, otherwise long-running tasks may not have enough time to finish if the StroomCluster is taken down (e.g. for maintenance).
Stopping the cluster
If a StroomTaskAutoscaler was created, remove that as well.
If any of these commands appear to hang with no response, that’s normal; the Operator is likely waiting for tasks to drain.
You may press Ctrl+C to return to the shell and task termination will continue in the background.
Note
If theStroomCluster deletion appears to be hung, you can inspect the Operator logs to see which nodes are holding up deletion due to outstanding tasks.
You will see a list of one or more node names, with the number of tasks outstanding in brackets (e.g. StroomCluster deletion waiting on task completing for 1 nodes: stroom-dev-node-data-0 (5)).
Once the StroomCluster is removed, it can be reconfigured (if required) and redeployed, using the same process as in Configure a Stroom cluster.
PersistentVolumeClaim deletion
When a Stroom node is shut down, by default its PersistentVolumeClaim will remain.
This ensures it gets re-assigned the same PersistentVolume when it starts up again.
This behaviour should satisfy most use cases.
However the operator may be configured to delete the PVC in certain situations, by specifying the StroomCluster.spec.volumeClaimDeletePolicy:
DeleteOnScaledownOnlydeletes a node’s PVC where the number of nodes in theNodeSetis reduced and as a result, the node Pod is no longer part of theNodeSetDeleteOnScaledownAndClusterDeletiondeletes the PVC if the node Pod is removed.
Next steps
Removing the Stroom K8s Operator
3.9.9 - Restart Node
How to restart a Stroom node.
Stroom nodes may occasionally hang or become unresponsive. In these situations, it may be necessary to terminate the Pod.
After you identify the unresponsive Pod (e.g. by finding a node not responding to cluster ping):
This will attempt to drain tasks for the node. After the termination grace period has elapsed, the Pod will be killed and a new one will automatically re-spawn to take its place. Once the new Pod finishes starting up, if functioning correct it should begin responding to cluster ping.
Note
Prior to a Stroom node being stopped (for whatever reason), task processing for that node is disabled and it is drained of all active tasks. Task processing is resumed once the node starts up again.Force deletion
If waiting for the grace period to elapse is unacceptable and you are willing to risk shutting down the node without draining it first (or you are sure it has no active tasks), you can force delete the Pod using the procedure outline in the Kubernetes documentation :
4 - How Tos
This is a series of HOWTOs that are designed to get one started with Stroom. The HOWTOs are broken down into different functional concepts or areas of Stroom.
Note
These HOWTOs will match the development of Stroom and as a result, various elements will be updated over time, including screen captures. In some instances, screen captures will contain timestamps and so you may note inconsistent date or time movements within a complete HOWTO, although if a sequence of captures is contained within a section of a document, they all will be replaced.General
Raw Source Tracking shows how to associate a processed Event with the source line that generated it.
Other topics in this section are
Administration
HOWTO documents that illustrate how to perform certain system administration tasks within Stroom: Manage System Properties
Authentication
Contains User Login, User Logout, Create User HOWTO documents.
Installation
The Installation Scenarios HOWTO is provided to assist users in setting up a number of different Stroom deployments.
Event Feed Processing
The Event Feed Processing HOWTO is provided to assist users in setting up Stroom to process inbound event logs and transform them into the Stroom Event Logging XML Schema.
The Apache HTTPD Event Feed is interwoven into other HOWTOs that utilise this feed as a datasource.
Reference Feeds
Reference Feeds are used to provide look up data for a translation. The reference feed HOWTOs illustrate how to create reference feeds Create Reference Feed and how to use look up reference data maps to enrich the data you are processing Use Reference Feed.
Searches and Indexing
This section covers using Stroom to index and search data.
Event Post Processing
The Event Forwarding HOWTO demonstrates how to extract certain events from the Stroom event store and export the events in XML to a file system.
4.1 - General
General How Tos for using Stroom.
4.1.1 - Enabling Processors
How to enable processing for a Pipeline.
Introduction
A pipeline is a structure that allows for the processing of streams of data.
Once you have defined a pipeline, built its structure, and tested it via ‘Stepping’ the pipeline, you will want to enable the automatic processing of raw event data streams.
In this example we will build on our Apache-SSLBlackBox-V2.0-EVENTS event feed and enable automatic processing of raw event data streams.
If this is the first time you have set up pipeline processing on your Stroom instance you may need to check that the Stream Processor job is enabled on your Stroom instance.
Refer to the Stream Processor Tasks section of the Stroom HOWTO - Task Maintenance
documentation for detailed instruction on this.
Pipeline
Initially we need to open the Apache-SSLBlackBox-V2.0-EVENTS pipeline.
Within the Explorer pane, navigate to the Apache HTTPD folder, then double click on the
Apache-SSLBlackBox-V2.0-EVENTS Pipeline
to bring up the Apache-SSLBlackBox-V2.0-EVENTS pipeline configuration tab
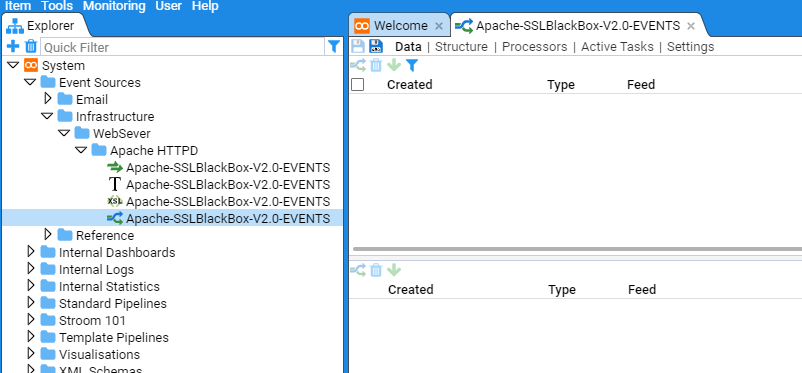
Next, select the Processors sub-item to show

This configuration tab is divided into two panes. The top pane shows the current enabled Processors and any recently processed streams and the bottom pane provides meta-data about each Processor or recently processed streams.
Add a Processor
We now want to add a Processor for the Apache-SSLBlackBox-V2.0-EVENTS pipeline.
First, move the mouse to the Add Processor icon at the top left of the top pane. Select by left clicking this icon to display the Add Filter selection window
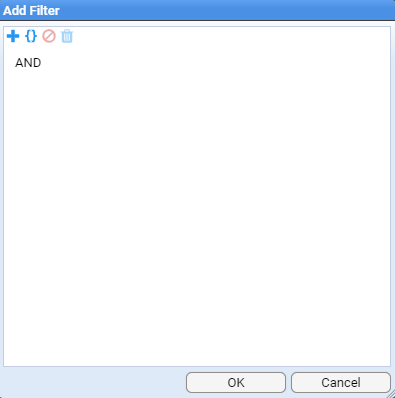
This selection window allows us to filter what set of data streams we want our Processor to process. As our intent is to enable processing for all Apache-SSLBlackBox-V2.0-EVENT streams, both already received and yet to be received, then our filtering criteria is just to process all Raw Events streams for this feed, ignoring all other conditions.
To do this, first click on the Add Term icon. Keep the term and operator at the default settings, and select the Choose item icon to navigate to the desired feed name (Apache-SSLBlackBox-V2.0-EVENT) object
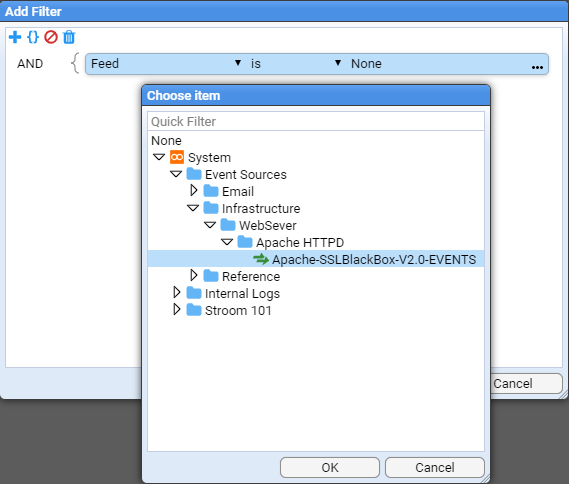
and press OK to make the selection.
Next, we select the required stream type. To do this click on the Add Term icon again. Click on the down arrow to change the Term selection from Feed to Type. Click in the Value position on the highlighted line (it will be currently empty). Once you have clicked here a drop-down box will appear as per

at which point, select the Stream Type of Raw Events and then press OK. At this point, we return to the Add Processor selection window to see that the Raw Events stream type has been added.

If the expected feed rate is small, for example, NOT operating system or database access feeds, then you would leave the Processor Priority at the default of 10. Typically, Apache HTTPD access events are not considered to have an excessive feed rate (by comparison to operating system or database access feeds), so we leave the Priority at 10.
Note the Processor has been added but it is in a disabled state. We enable both the pipeline processor and the processor filter by checking both Enabled check boxes

Once the processor has been enabled, at first you will see nothing. But if you press the button at the top right of the top pane, you will see that the Child processor has processed a stream, listing the time it did it and also listing the last time the processor looked for more streams to process and how many it found. If your event feed contained multiple streams you would see the streams count incrementing and the Tracker% incrementing (when the Tracker% reaches 100% then all current streams you filtered for have been processed). You may need to click on the refresh icon to see the stream count and Tracker% changes.

When in the Processors sub-item, if we select the Parent Processor, then no meta-data is displayed
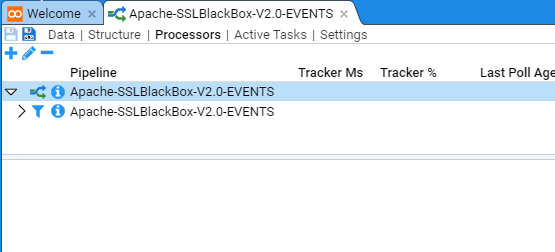
If we select the Parent’s child, then we see the meta-data for this, the actual actionable Processor

If you select the Active Tasks sub-item, you will see a summary of the recently processed streams
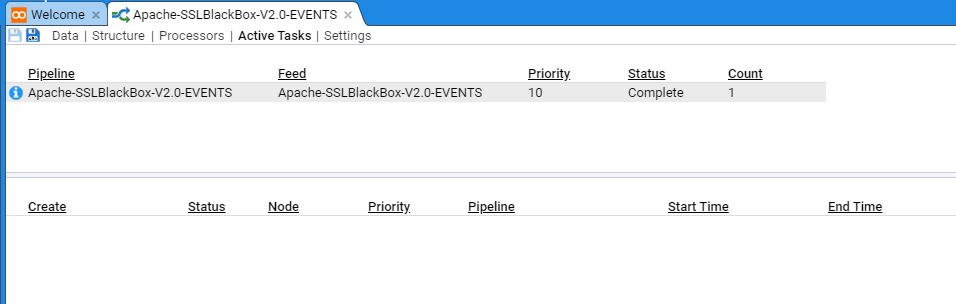
The top pane provides a summary table of recent stream batches processed, based on Pipeline and Feed, and if selected, the individual streams will be displayed in the bottom pane
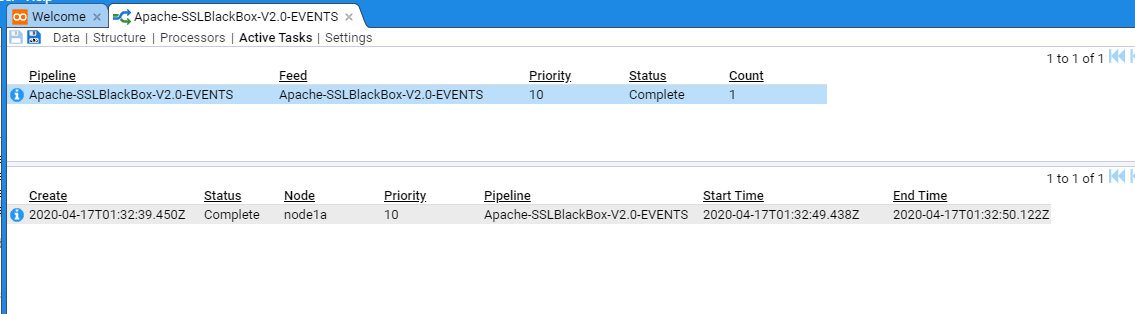
If further detail is required, then left click on the icon at the top left of a pane. This will reveal additional information such as
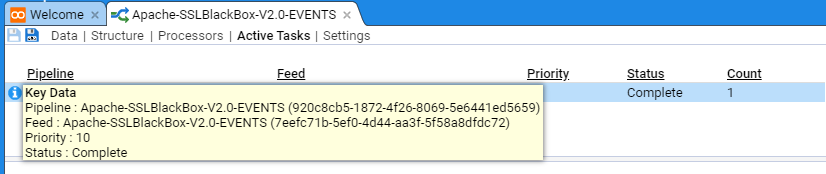
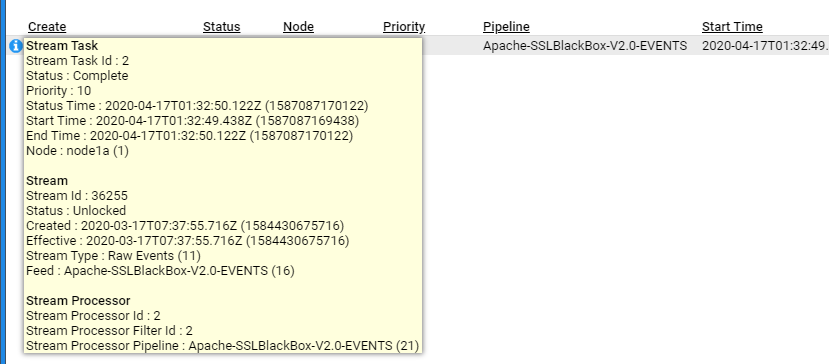
At this point, if you click on the Data sub-item you will see
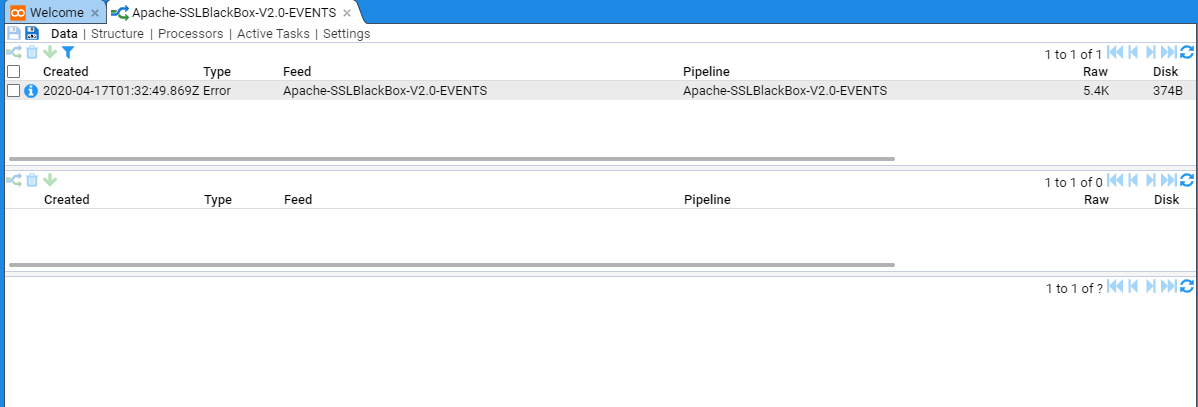
This view displays the recently processed streams in the top pane. If a stream is selected, then the Specific stream and any related streams are displayed in the middle pane and the bottom pane displays the data itself
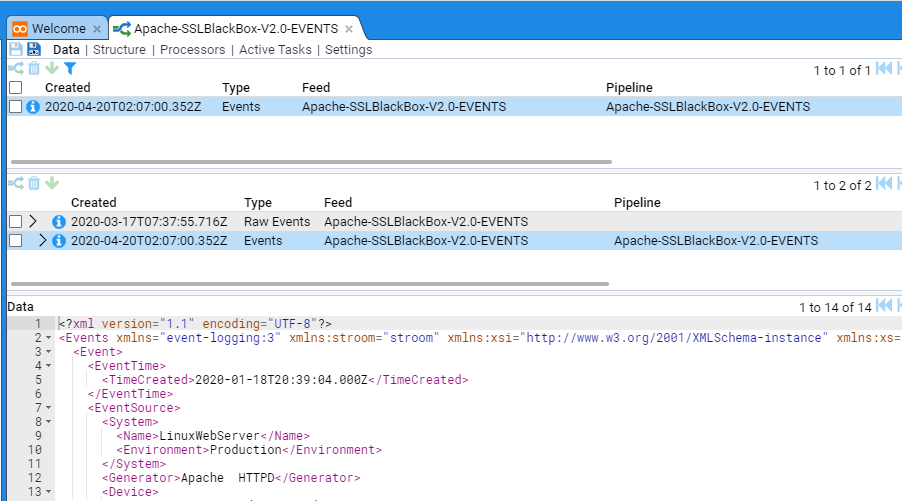
As you can see, the processed stream has an associated Raw Events stream. If we click on that stream we will see the raw data
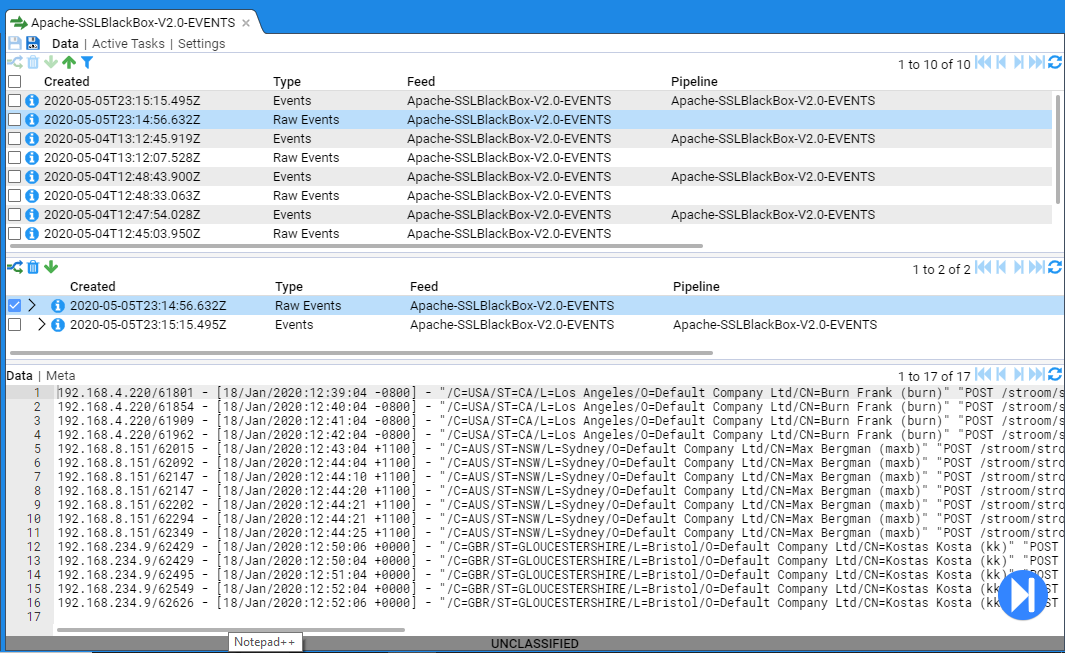
Processor Errors
Occasionally you may need to reprocess a stream. This is most likely required as a result of correcting translation issues during the development phase, or it can occur from the data source having an unexpected change (un-notified application upgrade for example). You can reprocess a stream by selecting its check box and then pressing the icon in the top left of the same pane. This will cause the pipeline to reprocess the selected stream. One can only reprocess Event or Error streams.
In the below example we have a stream that is displaying errors (this was due to a translation that did not conform to the schema version).
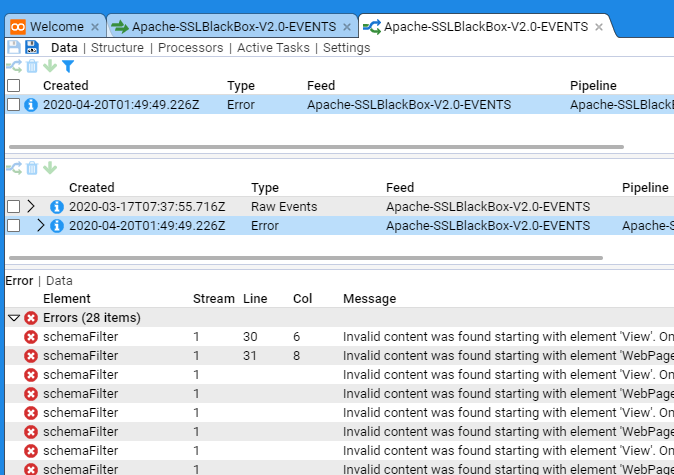
Once the translation was remediated to remove schema issues the pipeline could successfully process the stream and the errors disappeared.
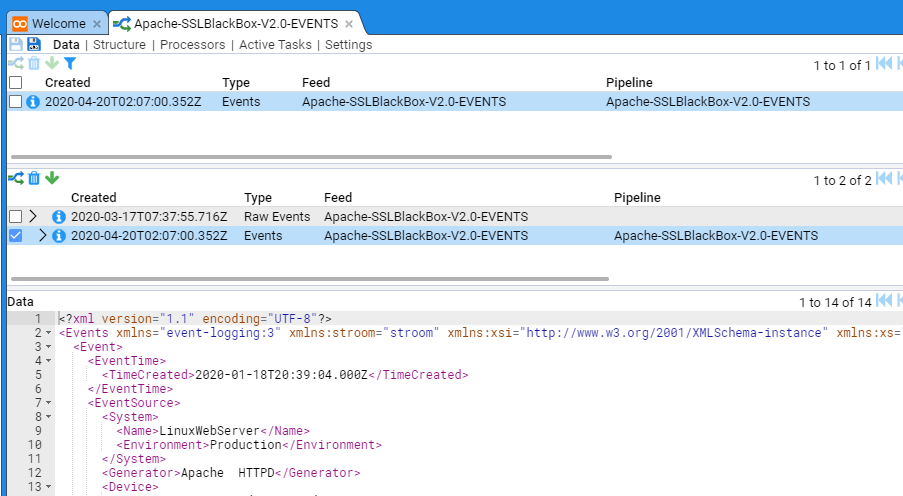
You should be aware that if you need to reprocess bulk streams that there is an upper limit of 1000 streams that can be reprocessed in a single batch. As of Stroom v6, if you exceed this number then you receive no error notification but the task never completes. The reason for this behaviour is to do with database performance and complexity. When you reprocess the current selection of filtered data, it can contain data that has resulted from many pipelines and this requires creation of new processor filters for each of these pipelines. Due to this complexity there exists an arbitrary limit of 1000 streams.
A workaround for this limitation is to create batches of ‘Events’ by filtering the event streams based on Type and Create Time.
For example in our Apache-SSLBlackBox-V2.0-EVENTS event feed select the icon.
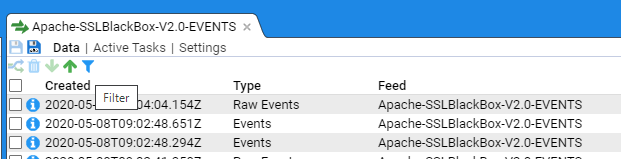
Filter the feed by errors and creation time. Then click OK.
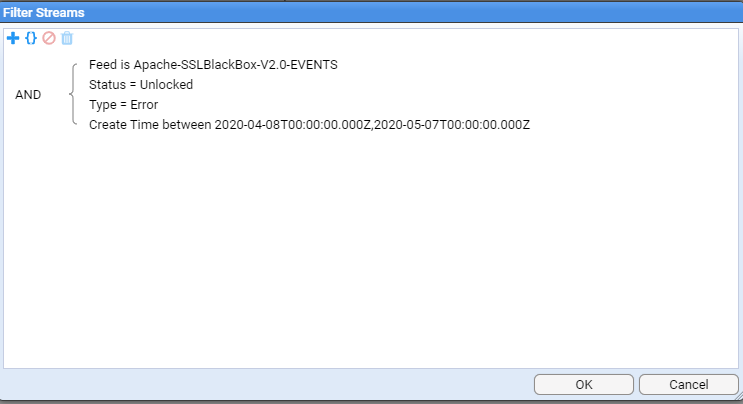
You will need to adjust the create time range until you get the number of event streams displayed in the feed window below 1000.
Once you are displaying fewer than 1000 streams you can select all the streams in your filtered selection by clicking in the topmost check box. Then click on the icon to reprocess these streams.

Repeat the process in batches of fewer than 1000 until your entire error stream backlog has been reprocessed.
In a worst-case scenario, one can also delete a set of streams for a given time period and then reprocess them all. The only risk here is that if there are other pipelines that trigger on Event creation, you will activate them.
The reprocessing may result in having two index entries in an index. Stroom dashboards can silently cater for this, or you may choose to re-flatten data to some external downstream capability.
When considering reprocessing streams there are some other ‘downstream effects’ to be mindful of.
If you have indexing in place, then additional index documents will be added to the index as the indexing capability does not replace documents, but adds them. If there are only a small number of streams reprocessed then there should not be too big an index storage impost, but should a large number of streams be reprocessed, then rebuilding the affected indices should be considered.
If the pipeline exports data for consumption by another capability, then you will have exported a portion of the data twice. Depending on the risk of downstream data duplication, you may need to prevent the export or the consumption of the export. Some ways to address this can vary from creating a new pipeline to reprocess the errant streams which does not export data, to temporarily redirecting the export destination whilst reprocessing and preventing ingest of new source data to the pipeline at the same time.
4.1.2 - Explorer Management
How to manage Documents and Entities in the Explorer Tree.
Moving a set of Objects
The following shows how to create a System Folder(s) within the Explorer tree and move a set of objects into the new structure. We will create the system group GeoHost Reference and move all the GeoHost reference feed objects into this system group. Because Stroom Explorer is a flat structure you can move resources around to reorganise the content without any impact on directory paths, configurations etc.
Create a System Group
First, move your mouse over the Event Sources object in the explorer, single click to highlight this object, and you will see
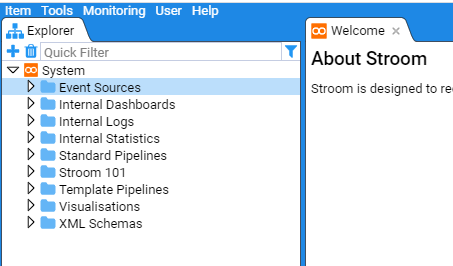
Now right click to bring up the object context menu
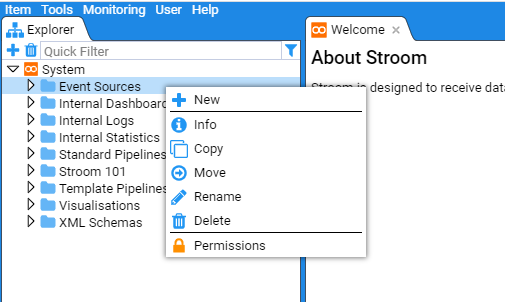
Next move the mouse over the New icon to reveal the New sub-context menu.
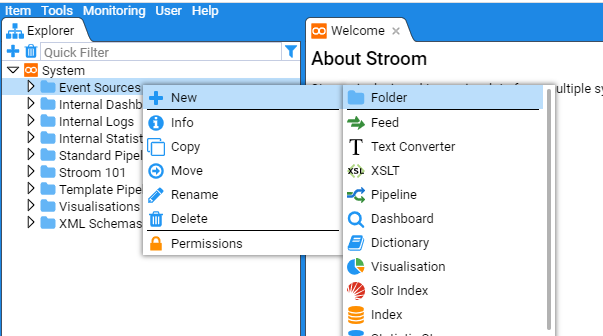
Click on the folder icon, at which point the New Folder selection window will be presented
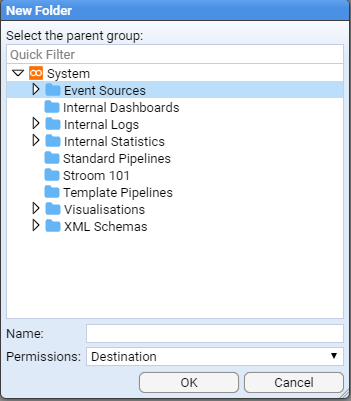
We will enter the name Reference into the Name: entry box
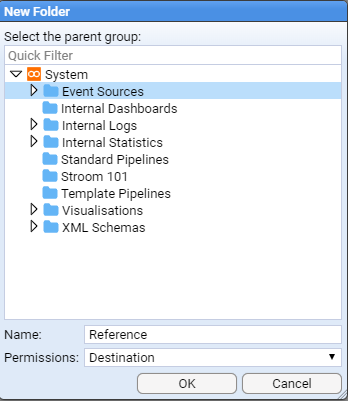
With the newly created Reference folder highlighted, repeat the above process but use the folder Name: of GeoHost

then click to save.
Note that we could have navigated within the explorer tree but as we want the Reference/GeoHost system group at the top level of the Event Sources group, there is no need to perform any navigation.
Had we needed to, double click any system group that contains objects; to select the system group you want to store your new group in, just left or right click the mouse once over the group to select it.
You will note that the Event Sources system group was selected above.
At this point, our new folders will display in the main pane.
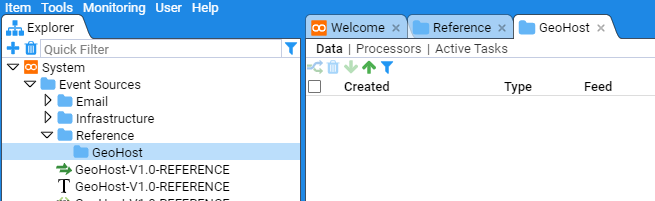
You can look at the folder properties by selecting the desired folder, right clicking and choosing Info option
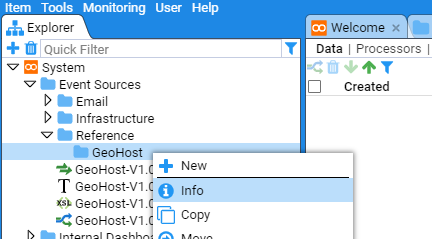
This will return a window with folder specific information
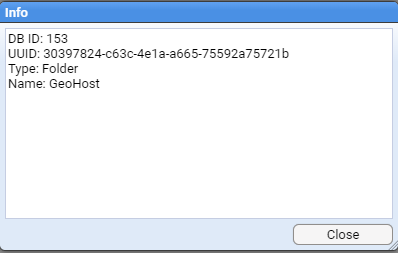
Should you wish to limit the users who can access this folder, you similarly select the desired folder, right click and choose Permissions
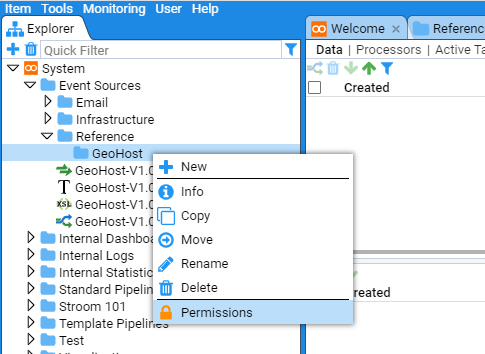
You can limit folder access as required in the resultant window.
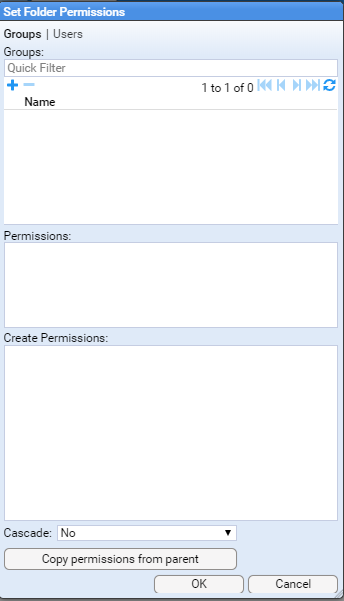
Make any required changes and click on to save the changes.
Moving Objects into a System Group
Now you have created the new folder structure you can move the various GeoHost resources to this location.
Select all four resources by using the mouse right-click button while holding down the Shift key. Then right click on the highlighted group to display the action menu
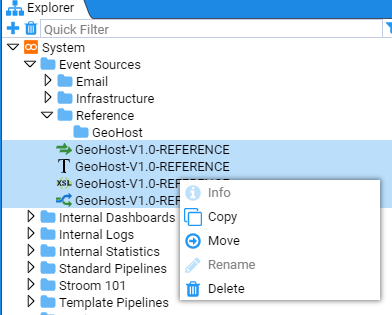
Select move and the Move Multiple Items window will display.
Navigate to the Reference/GeoHost folder to move the items to this destination.

The final structure is seen below
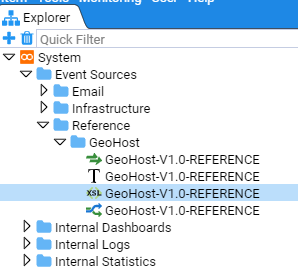
Note that when a folder contains child objects this is indicated by a folder icon with an arrow to the left of the folder. Whether the arrow is pointing right or down indicates whether or not the folder is expanded.

The GeoHost resources move has now been completed.
4.1.3 - Feed Management
This HOWTO demonstrates how to manage feeds.
This HOWTO demonstrates how to manage Feeds
Assumptions
- All Sections
- an account with the
AdministratorApplication Permission is currently logged in.
- an account with the
Creation of an Event Feed
We will be creating an Event Feed with the name TEST-FEED-V1_0.
Once you have logged in, move the cursor to the System folder within the Explorer tab and select it.

Once selected, right click to bring up the New Item selection sub-menu. By selecting the System folder we are
requesting any new item created to be placed within it.
Select
You will be presented with a New Feed configuration window.
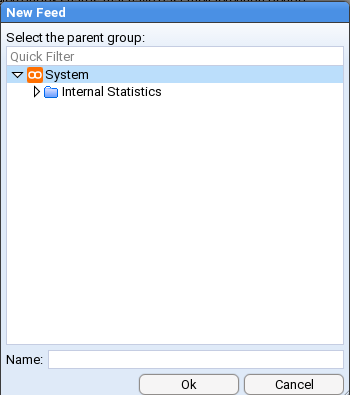
You will note that the System folder has already been selected as the parent group and all we need to do is enter our feed’s name in the Name: entry box
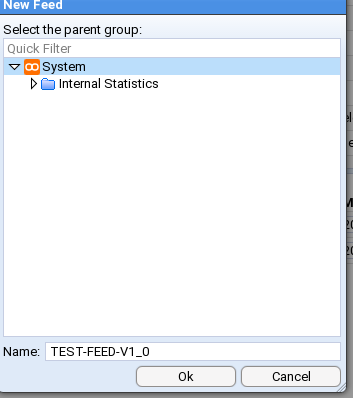
On pressing
we are presented with the Feed tab for our new feed. The tab is labelled with the feed name TEST-FEED-V1_0.
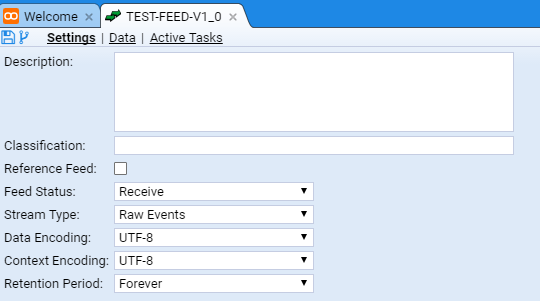
We will leave the definitions of the Feed attributes for the present, but we will enter a Description: for our feed as we should ALWAYS do this fundamental tenet of data management - document the data. We will use the description of ‘Feed for installation validation only. No data value’.
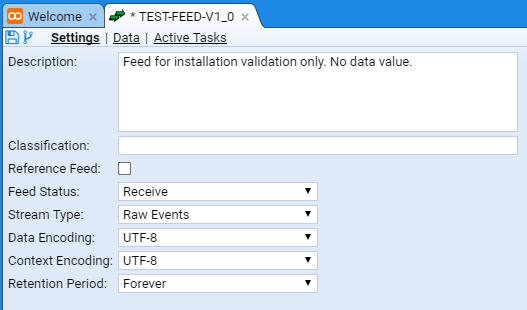
One should note that the
* TEST-FEED-V1_0
tab has been marked as having unsaved changes.
This is indicated by the asterisk character * between the Feed icon and the name of the feed TEST-FEED-V1_0.
We can save the changes to our feed by pressing the Save icon in the top left of the TEST-FEED-V1_0 tab. At this point one should notice two things, the first is that the asterisk
has disappeared from the Feed tab and the Save icon is ghosted.
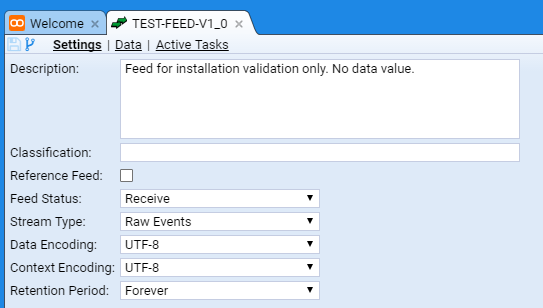
Folder Structure for Event Sources
In order to simplify the management of multiple event sources being processed by Stroom, it is suggested that an Event Source folder is created at the root of the System folder in the Explorer tab.
This can be achieved by right clicking on the System root folder and selecting:
You will be presented with a New Folder configuration window.
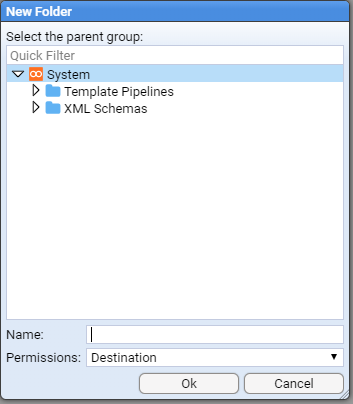
You will note that the System folder has already been selected as the parent group and all we need to do is enter our folder’s name in the Name: entry box
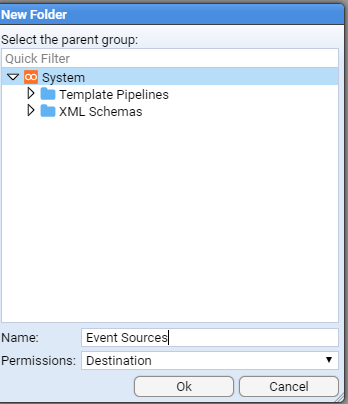
On pressing we are presented with the Event Sources tab for our new folder.

You will also note that the Explorer tab has displayed the Event Sources folder in its display.
Create Folder for specific Event Source
In order to manage all artefacts of a given Event Source (aka Feed), one would create an appropriately named sub-folder within the Event Sources folder structure.
In this example, we will create one for a BlueCoat Proxy Feed.
As we may eventually have multiple proxy event sources, we will first create a Proxy folder in the Event Sources before creating the desired BlueCoat folder that will hold the processing components.
So, right-click on the Event Sources folder in the Explorer tree and select:
You will be presented with a New Folder configuration window.
Enter Proxy as the folder Name:
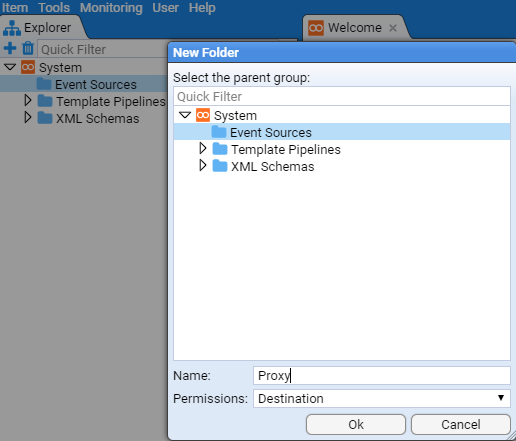
and press .
At this point, you will be presented with a new Proxy tab for the new sub-folder and we note that it has been added below the Event Sources folder in the Explorer tree.
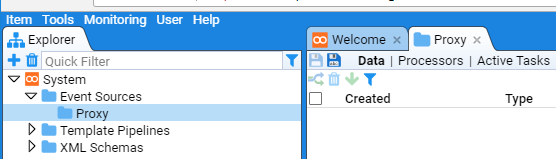
Repeat this process to create the desired BlueCoat sub-folder with the result
.
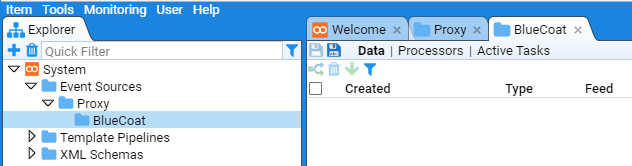
4.1.4 - Raw Source Tracking
How to link every Event back to the Raw log
Stroom v6.1 introduced a new feature (stroom:source()) to allow a translation developer to obtain positional details of the source file that is currently being processed. Using the positional information it is possible to tag Events with sufficient details to link back to the Raw source.
Assumptions
- You have a working pipeline that processes logs into Events.
- Events are indexed
- You have a Dashboard that uses a Search Extraction pipeline.
Steps
-
Create a new XSLT called Source Decoration containing the following:
<xsl:stylesheet
    xpath-default-namespace="event-logging:3"
    xmlns:sm="stroom-meta" xmlns="event-logging:3"
    xmlns:rec="records:2"
    xmlns:stroom="stroom"
    version="3.0"
    xmlns:xsl="http://www.w3.org/1999/XSL/Transform">
  <xsl:template match="@*|node()">
    <xsl:copy>
      <xsl:apply-templates select="@*|node()" />
    </xsl:copy>
  </xsl:template>
  <xsl:template match="Event/Meta[not(sm:source)]">
    <xsl:copy>
      <xsl:apply-templates />
      <xsl:copy-of select="stroom:source()" />
    </xsl:copy>
  </xsl:template>
  <xsl:template match="Event[not(Meta)]">
    <xsl:copy>
      <xsl:element name="Meta">
        <xsl:copy-of select="stroom:source()" />
      </xsl:element>
      <xsl:apply-templates />
    </xsl:copy>
  </xsl:template>
</xsl:stylesheet>
This XSLT will add or augment the Meta section of the Event with the source details.
-
Insert a new XSLT filter into your translation pipeline after your translation filter and set it to the XSLT created above.
-
Reprocess the Events through the modified pipeline, also ensure your Events are indexed.
-
Amend the translation performed by the Extraction pipeline to include the new data items that represent the source position data. Add the following to the XSLT:
<xsl:element name="data"> <xsl:attribute name="name"> <xsl:text>src-id</xsl:text> </xsl:attribute> <xsl:attribute name="value" select="Meta/sm:source/sm:id" /> </xsl:element> <xsl:element name="data"> <xsl:attribute name="name"> <xsl:text>src-partNo</xsl:text> </xsl:attribute> <xsl:attribute name="value" select="Meta/sm:source/sm:partNo" /> </xsl:element> <xsl:element name="data"> <xsl:attribute name="name"> <xsl:text>src-recordNo</xsl:text> </xsl:attribute> <xsl:attribute name="value" select="Meta/sm:source/sm:recordNo" /> </xsl:element> <xsl:element name="data"> <xsl:attribute name="name"> <xsl:text>src-lineFrom</xsl:text> </xsl:attribute> <xsl:attribute name="value" select="Meta/sm:source/sm:lineFrom" /> </xsl:element> <xsl:element name="data"> <xsl:attribute name="name"> <xsl:text>src-colFrom</xsl:text> </xsl:attribute> <xsl:attribute name="value" select="Meta/sm:source/sm:colFrom" /> </xsl:element> <xsl:element name="data"> <xsl:attribute name="name"> <xsl:text>src-lineTo</xsl:text> </xsl:attribute> <xsl:attribute name="value" select="Meta/sm:source/sm:lineTo" /> </xsl:element> <xsl:element name="data"> <xsl:attribute name="name"> <xsl:text>src-colTo</xsl:text> </xsl:attribute> <xsl:attribute name="value" select="Meta/sm:source/sm:colTo" /> </xsl:element> -
Open your dashboard, now add the following custom fields to your table:
${src-id}, ${src-partNo}, ${src-recordNo}, ${src-lineFrom}, ${src-lineTo}, ${src-colFrom}, ${src-colTo} -
Now add a New Text Window to your Dashboard, and configure it as below:
-
You can also add a column to the table that will open a data window showing the source. Add a custom column with the following expression:
data('Raw Log',${src-id},${src-partNo},'',${src-lineFrom},${src-colFrom},${src-lineTo},${src-colTo})
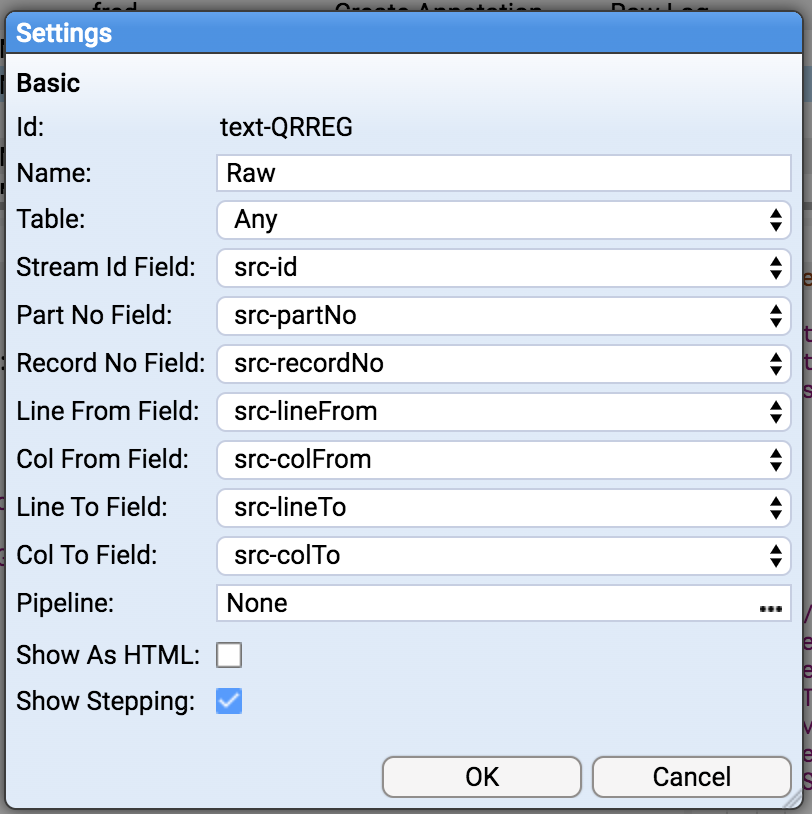
4.1.5 - Task Management
This HOWTO demonstrates how to manage background tasks.
Various Tasks run in the background within Stroom. This HOWTO demonstrates how to manage these tasks
Assumptions
- All Sections
- an account with the
AdministratorApplication Permission is currently logged in.
- an account with the
- Proxy Aggregation Tasks
- we have a multi node Stroom cluster with two nodes,
stroomp00andstroomp01.
- we have a multi node Stroom cluster with two nodes,
- Stream Processor Tasks
- we have a multi node Stroom cluster with two nodes,
stroomp00andstroomp01. - when demonstrating adding a new node to an existing cluster, the new node is
stroomp02.
- we have a multi node Stroom cluster with two nodes,
Proxy Aggregation
Turn Off Proxy Aggregation
We first select the Monitoring item of the Main Menu to bring up the Monitoring sub-menu.
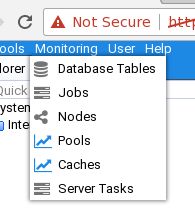
Then move down and select the Jobs sub-item to be presented with the Jobs configuration tab as seen below.
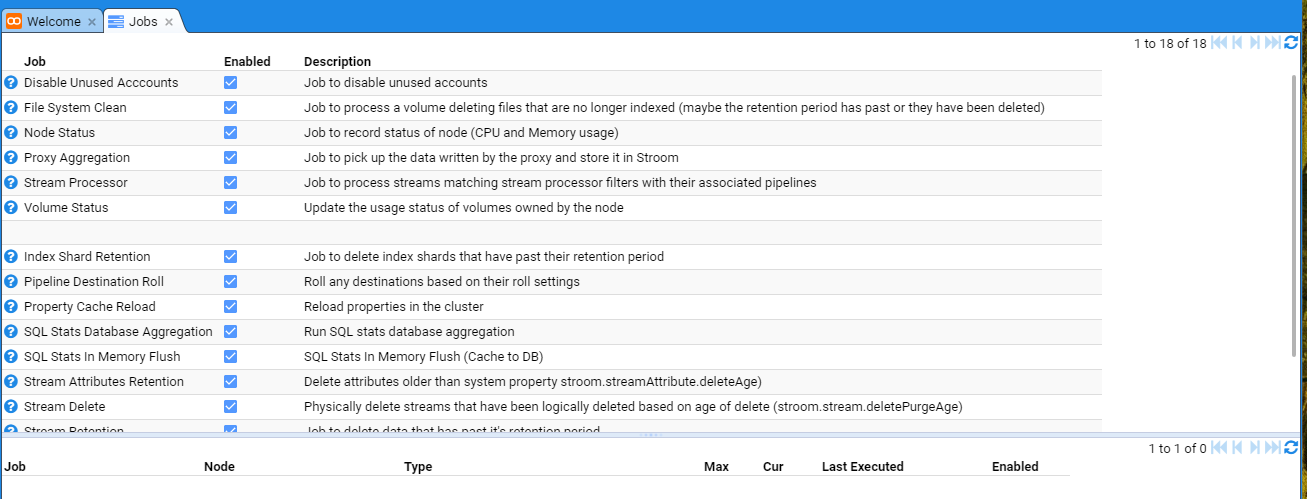
At this point, we can select the Proxy Aggregation Job whose check-box is selected and the tab will show the individual Stroom Processor nodes
in the deployment.

At this point, uncheck the Enabled check-boxes for both nodes and also the main Proxy Aggregation check-box to see.
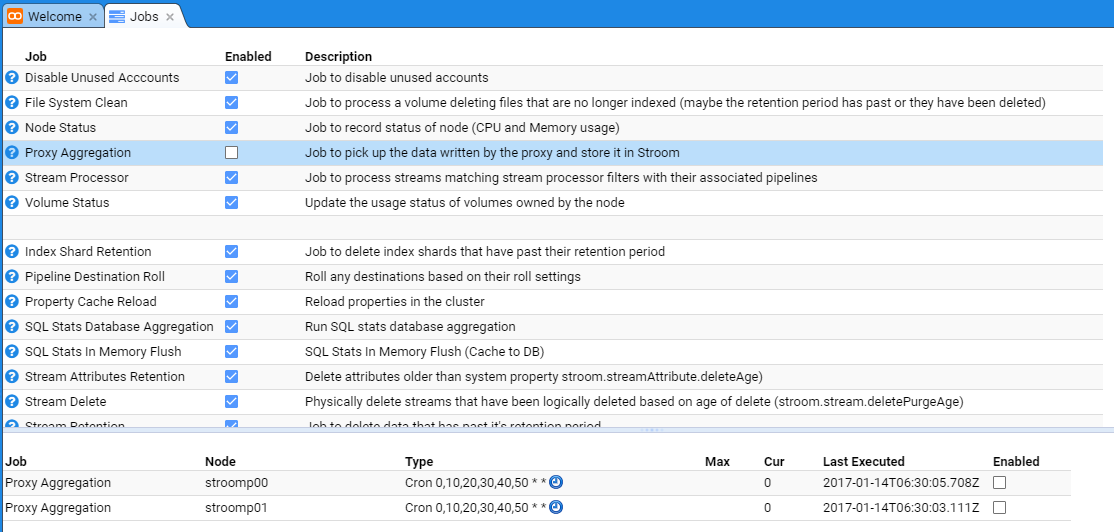
At this point, no new proxy aggregation will occur and any inbound files received by the Store Proxies will accumulate in the proxy storage area.
Turn On Proxy Aggregation
We first select the Monitoring item of the Main Menu to bring up the Monitoring sub-menu.
Then move down and select the Jobs sub-item then select the Proxy Aggregation Job to be presented with the Jobs configuration tab as seen below.
Now, re-enable each node’s Proxy Aggregation check-box and the main Proxy Aggregation check-box.
After checking the check-boxes, perform a refresh of the display by pressing the Refresh icon .
on the top right of the lower (node display) pane. You should note the Last Executed date/time change to see
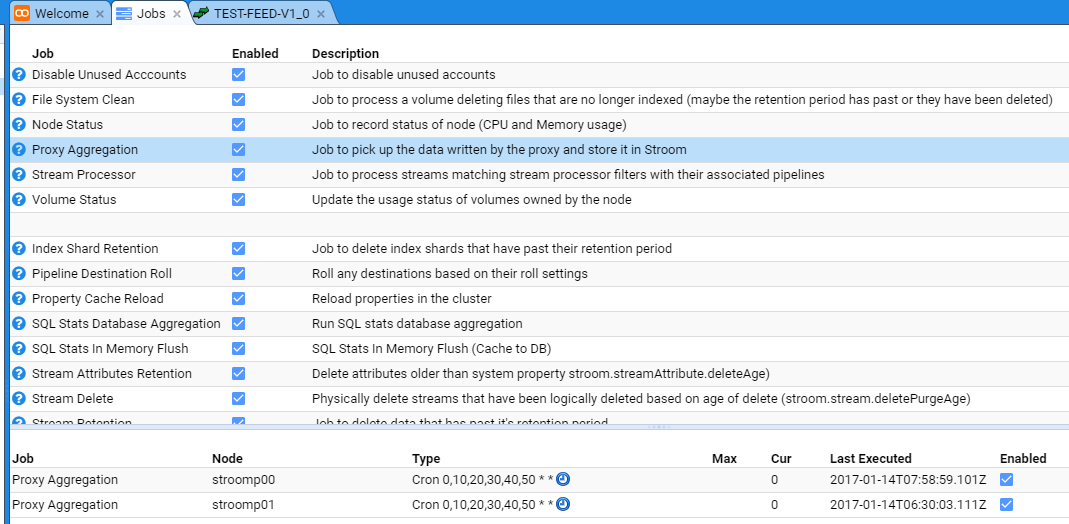
Stream Processors
Enable Stream Processors
To enable the Stream Processors task, move to the Monitoring item of the Main Menu and select it to bring up the Monitoring sub-menu.
Then move down and select the Jobs sub-item to be presented with the Jobs configuration tab as seen below.
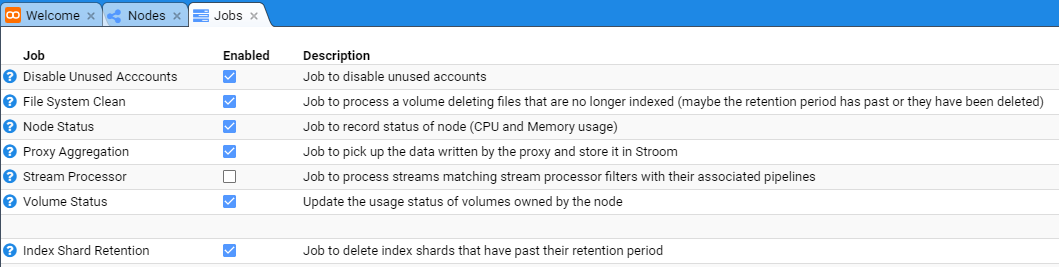
At this point, we select the Stream Processor Job whose check-box is not selected and the tab will show the individual Stroom Processor
nodes in the Stroom deployment.
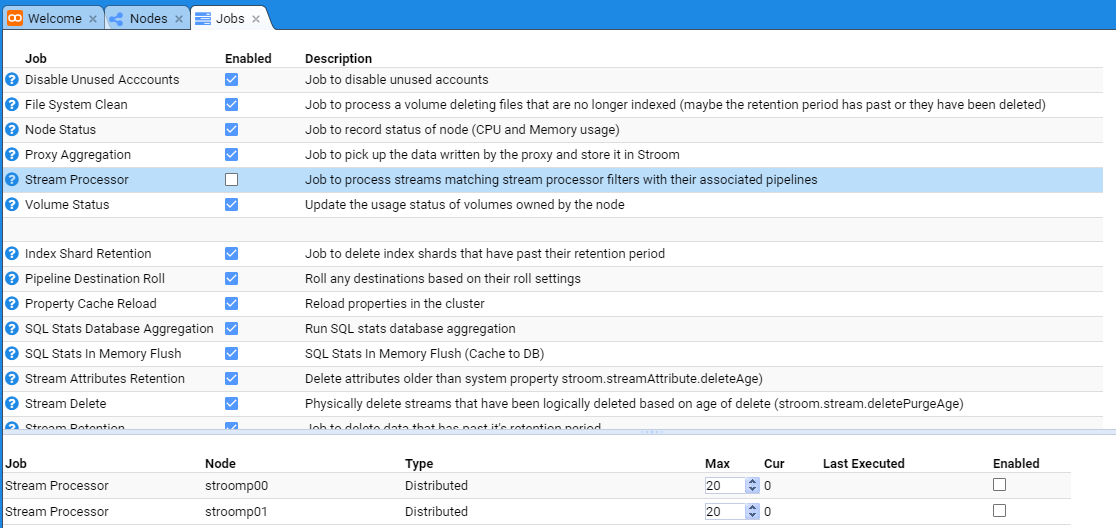
Clearly, if it was a single node Stroom deployment, you would only see the one node at the bottom of the Jobs configuration tab.
We enable nodes by selecting their check-boxes as well as the main Stream Processors check-box. Do so.
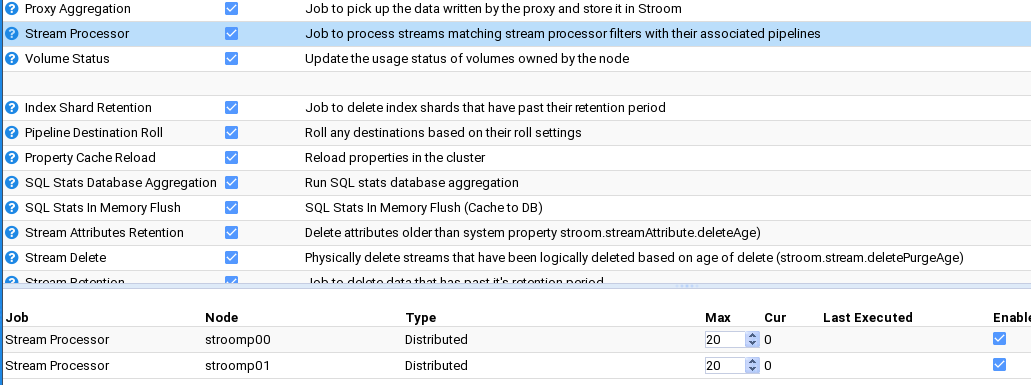
That is it. Stroom will automatically take note of these changes and internally start each node’s Stroom Processor task.
Enable Stream Processors On New Node
When one expands a Multi Node Stroom cluster deployment, after the installation of the Stroom Proxy and Application software and
services on the new node, we need to enable its Stream Processors task.
To enable the Stream Processors for this new node, move to the Monitoring item of the Main Menu and select it to bring up the Monitoring sub-menu.
Then move down and select the Jobs sub-item to be presented with the Jobs configuration tab as seen below.
At this point, we select the Stream Processor Job whose check-box is selected
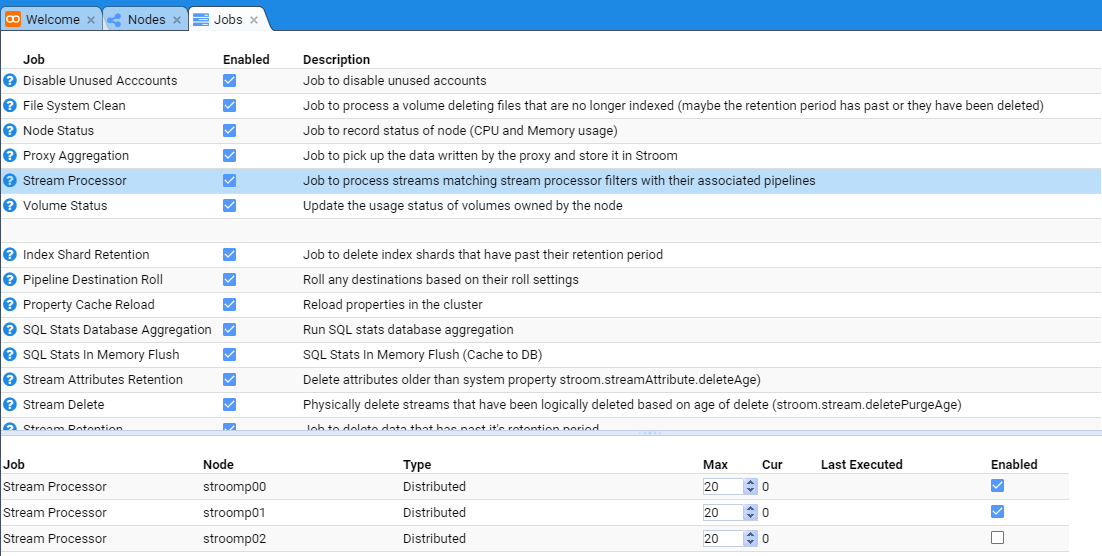
We enable the new node by selecting its check-box.
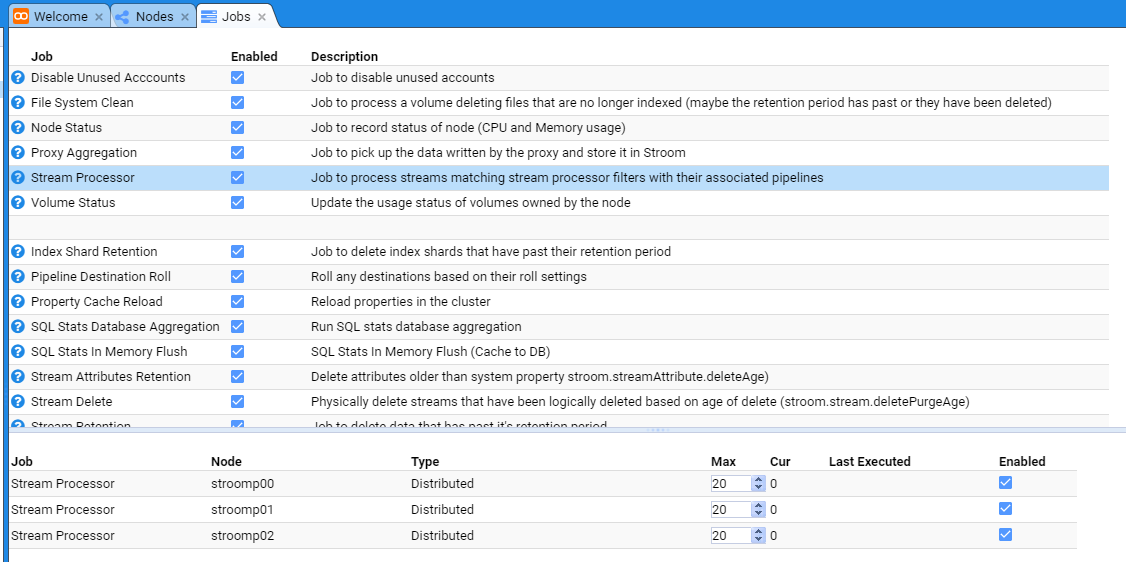
4.2 - Administration
4.2.1 - System Properties
This HOWTO is provided to assist users in managing Stroom System Properties via the User Interface.
Assumptions
The following assumptions are used in this document.
- the user successfully logged into Stroom with the appropriate administrative privilege (Manage Properties).
Introduction
Certain Stroom System Properties can be edited via the Stroom User Interface.
Editing a System Property
To edit a System Property select the Tools item of the Main Menu and select to bring up the Tools sub-menu.
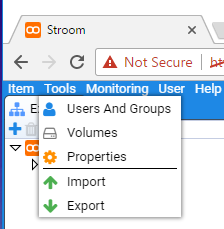
Then move down and select the Properties sub-item to be presented with System Properties configuration window as seen below.

Use the scrollbar to the right of the System Properties configuration window to scroll down to the line where the property one wants to modify is displayed, then select (left click) the line.
In the example below we have selected the stroom.maxStreamSize property.

Now bring up the editing window by double clicking on the selected line.
At this point we will be presented with the
Application Property - stroom.maxStreamSize editing window.
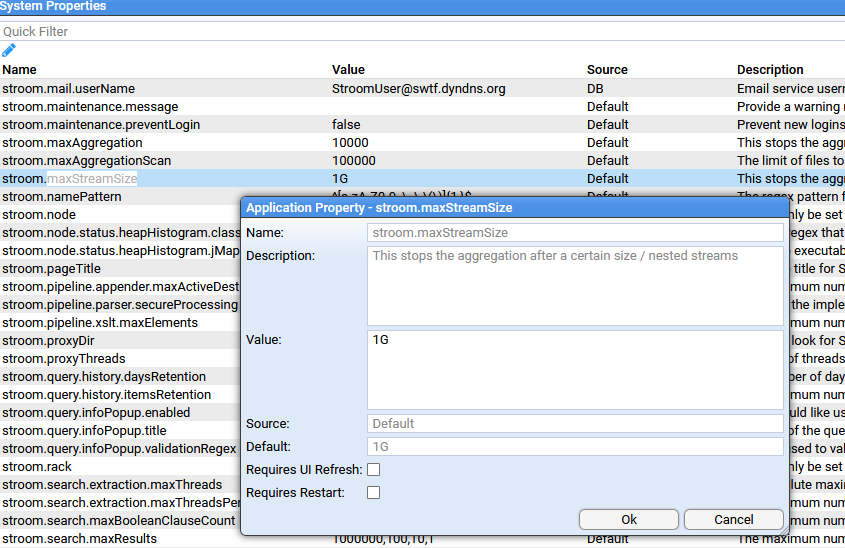
Now edit the property, by double clicking the string in the Value entry box.
In this case we select the 1G value to see
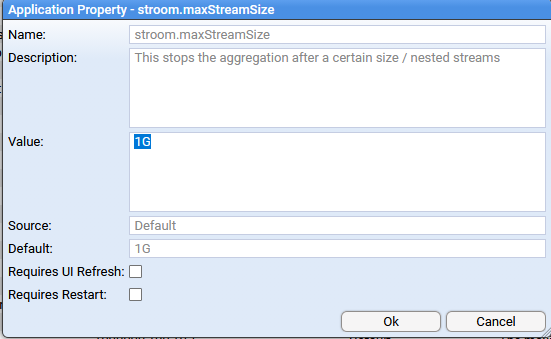
Now change the selected 1G value to the value we want.
In this example, we are changing the value to 512M.

At this point, press the to see the new value updated in the System Properties configuration window.

4.3 - Authentication
4.3.1 - Create a user
This HOWTO provides the steps to create a user via the Stroom User Interface.
Assumptions
The following assumptions are used in this document.
- An account with the
AdministratorApplication Permission is currently logged in. - We will be adding the user
burn - We will make this user an
Administrator
Add a new user
To add a new user, move your cursor to the Tools item of the Main Menu and select to bring up the Tools sub-menu.
Then move down and select the Users and Groups sub-item to be presented with the Users and Groups configuration window as seen below.

To add the user, move the cursor to the New icon in the top left and
select it. On selection you will be prompted for a user name. In our case we will enter the user burn.
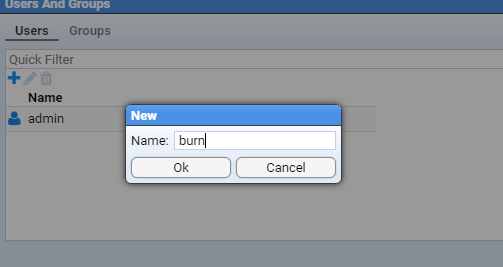
and on pressing will be presented with the User configuration window.
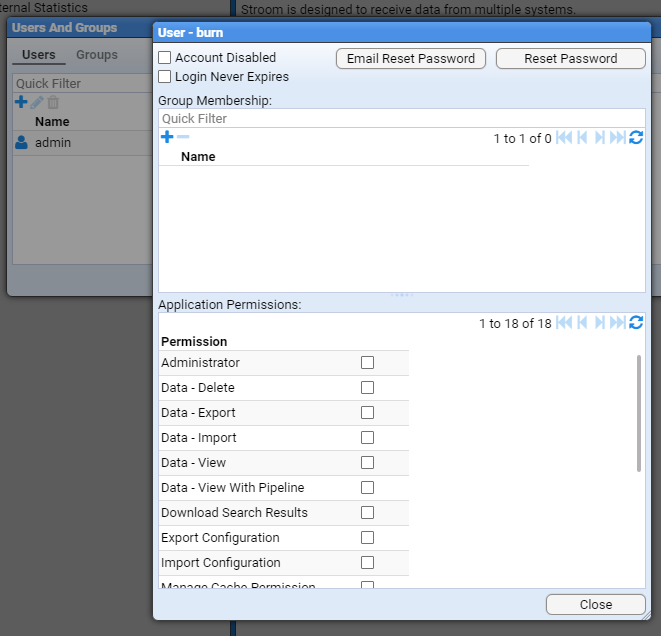
Set the User Application Permissions
See Permissions for an explanation of the various Application Permissions a user can have.
Assign an Administrator Permission
As we want the user to be an administrator, select the Administrator Permission check-box
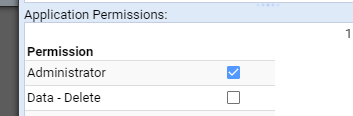
Set User’s Password
We need to set burn's password (which he will need to reset on first login). So, select the
button to gain the Reset Password window
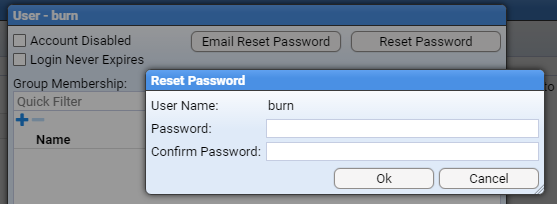
After setting a password and pressing the button we get the informational Alert window as per

and on close of the Alert we are presented again with the User configuration window.

We should close this window by pressing the
button to be presented with the Users and Groups window with the new user burn added.

At this point, one can close the Users and Groups configuration window by pressing the
button at the bottom right of the window.
4.3.2 - Login
This HOWTO shows how to log into the Stroom User Interface.
Assumptions
The following assumptions are used in this document.
- for manual login, we will log in as the user
adminwhose password is set toadminand the password is pre-expired - for PKI Certificate login, the Stroom deployment would have been configured to accept PKI Logins
Manual Login
Within the Login panel, enter admin into the User Name: entry box and admin into the Password: entry box as per

When you press the button, you are advised that your user’s password has expired and you need to change it.
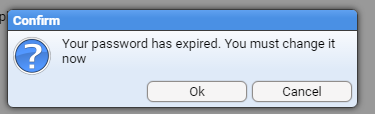
Press the
button and enter the old password admin and a new password with confirmation in the appropriate entry boxes.
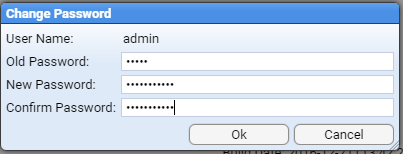
Again press the button to see the confirmation that the password has changed.
.

On pressing
you will be logged in as the admin user and you will be presented with the Main Menu (Item Tools Monitoring User Help), and the Explorer and Welcome panels (or tabs).
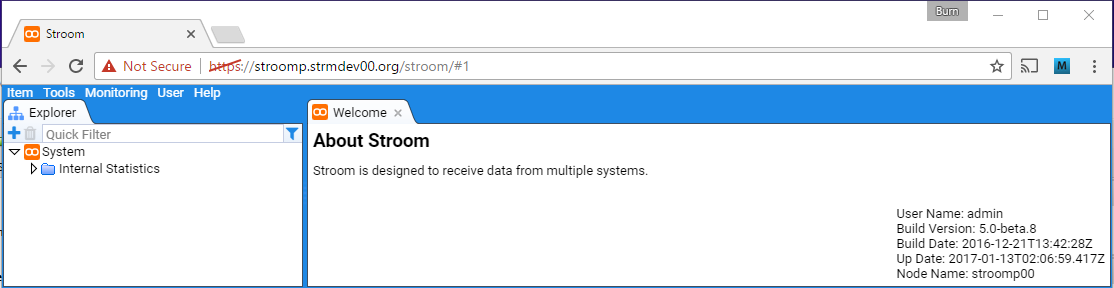
We have now successfully logged on as the admin user.
The next time you login with this account, you will not be prompted to change the password until the password expiry period has been met.
PKI Certificate Login
To login using a PKI Certificate, a user should have their Personal PKI certificate loaded in the browser (and selected if you have multiple certificates) and the user just needs to go to the Stroom UI URL, and providing you have an account, you will be automatically logged in.
4.3.3 - Logout
This HOWTO shows how to log out of the Stroom User Interface.
Assumptions
The following assumptions are used in this document.
- the user
adminis currently logged in
Log out of UI
To log out of the UI, select the User item of the Main Menu and to bring up the User sub-menu.
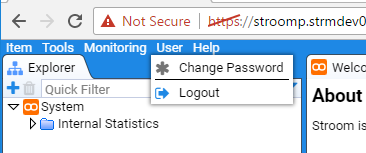
and select the Logout sub-item and confirm you wish to log out by selecting the
button.

This will return you to the Login page.
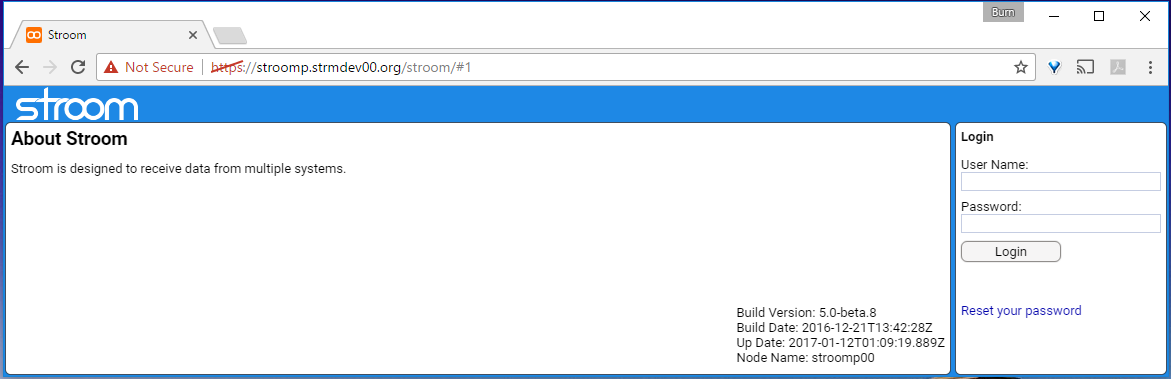
4.4 - Installation
Various How Tos covering installation of Stroom and its dependencies
4.4.1 - Apache Httpd/Mod_JK configuration for Stroom
The following is a HOWTO to assist users in configuring Apache’s HTTPD with Mod_JK for Stroom.
Assumptions
The following assumptions are used in this document.
- The user has reasonable RHEL/Centos System administration skills
- Installations are on Centos 7.3 minimal systems (fully patched)
- The security of the HTTPD deployment should be reviewed for a production environment.
Installation of Apache httpd and Mod_JK Software
To deploy Stroom using Apache’s httpd web service as a front end (https) and Apache’s mod_jk as the interface between Apache and the Stroom tomcat applications, we also need
aprapr-utilapr-develgcchttpdhttpd-develmod_sslepel-releasetomcat-native- Apache’s
mod_jkTomcat connector plugin
Most of the required software are packages available via standard repositories and hence we can simply execute
The reason for the distinct tomcat-native installation is that this package is from the
EPEL
repository so it must be installed first.
For the Apache mod_jk Tomcat connector we need to acquire a recent release and install it. The following commands achieve this for the 1.2.42 release.
Although you could remove the gcc compiler at this point, we leave it installed as one should continue to upgrade the Tomcat Connectors to later releases.
Configure Apache httpd
We need to configure Apache as the root user.
If the Apache httpd service is ‘fronting’ a Stroom user interface, we should create an index file (/var/www/html/index.html) on all nodes so browsing to the root of the node will present the Stroom UI. This is not needed if you are deploying a Forwarding or Standalone Stroom proxy.
Forwarding file for Stroom User Interface deployments
Remember, deploy this file on all nodes running the Stroom Application.
Httpd.conf Configuration
We modify /etc/httpd/conf/httpd.conf on all nodes, but backup the file first with
Irrespective of the Stroom scenario being deployed - Multi Node Stroom (Application and Proxy), single Standalone Stroom Proxy or single Forwarding
Stroom Proxy, the configuration of the /etc/httpd/conf/httpd.conf file is the same.
We start by modifying the configuration file by adding just before the ServerRoot directive the following directives which are designed to make the httpd service more secure.
# Stroom Change: Start - Apply generic security directives
ServerTokens Prod
ServerSignature Off
FileETag None
RewriteEngine On
RewriteCond %{THE_REQUEST} !HTTP/1.1$
RewriteRule .* - [F]
Header set X-XSS-Protection "1; mode=block"
# Stroom Change: End
That is,
...
# Do not add a slash at the end of the directory path.  If you point
# ServerRoot at a non-local disk, be sure to specify a local disk on the
# Mutex directive, if file-based mutexes are used.  If you wish to share the
# same ServerRoot for multiple httpd daemons, you will need to change at
# least PidFile.
#
ServerRoot "/etc/httpd"

#
# Listen: Allows you to bind Apache to specific IP addresses and/or
...
Becomes
...
# Do not add a slash at the end of the directory path.  If you point
# ServerRoot at a non-local disk, be sure to specify a local disk on the
# Mutex directive, if file-based mutexes are used.  If you wish to share the
# same ServerRoot for multiple httpd daemons, you will need to change at
# least PidFile.
#
# Stroom Change: Start - Apply generic security directives
ServerTokens Prod
ServerSignature Off
FileETag None
RewriteEngine On
RewriteCond %{THE_REQUEST} !HTTP/1.1$
RewriteRule .* - [F]
Header set X-XSS-Protection "1; mode=block"
# Stroom Change: End
ServerRoot "/etc/httpd"

#
# Listen: Allows you to bind Apache to specific IP addresses and/or
...
We now block access to the /var/www directory by commenting out
<Directory "/var/www">
  AllowOverride None
  # Allow open access:
  Require all granted
</Directory>
that is
...
#
# Relax access to content within /var/www.
#
<Directory "/var/www">
    AllowOverride None
    # Allow open access:
    Require all granted
</Directory>

# Further relax access to the default document root:
...
Becomes
...
#
# Relax access to content within /var/www.
#
# Stroom Change: Start - Block access to /var/www
# <Directory "/var/www">
#     AllowOverride None
#     # Allow open access:
#     Require all granted
# </Directory>
# Stroom Change: End

# Further relax access to the default document root:
...
Then within the /var/www/html directory turn off Indexes FollowSymLinks by commenting out the line:
Options Indexes FollowSymLinks
That is
...
    # The Options directive is both complicated and important.  Please see
    # http://httpd.apache.org/docs/2.4/mod/core.html#options
    # for more information.
    #
    Options Indexes FollowSymLinks

    #
    # AllowOverride controls what directives may be placed in .htaccess files.
    # It can be "All", "None", or any combination of the keywords:
...
Becomes
...
    # The Options directive is both complicated and important.  Please see
    # http://httpd.apache.org/docs/2.4/mod/core.html#options
    # for more information.
    #
    # Stroom Change: Start - turn off indexes and FollowSymLinks
    # Options Indexes FollowSymLinks
    # Stroom Change: End

    #
    # AllowOverride controls what directives may be placed in .htaccess files.
    # It can be "All", "None", or any combination of the keywords:
...
Then finally we add two new log formats and configure the access log to use the new format. This is done within the <IfModule logio_module> by adding the two new LogFormat directives
LogFormat "%a/%{REMOTE_PORT}e %X %t %l \"%u\" \"%r\" %s/%>s %D %I/%O/%B \"%{Referer}i\" \"%{User-Agent}i\" %V/%p" blackboxUser
LogFormat "%a/%{REMOTE_PORT}e %X %t %l \"%{SSL_CLIENT_S_DN}x\" \"%r\" %s/%>s %D %I/%O/%B \"%{Referer}i\" \"%{User-Agent}i\" %V/%p" blackboxSSLUser
And replacing the CustomLog directive
CustomLog "logs/access_log" combined
With
CustomLog logs/access_log blackboxSSLUser
That is
...
    LogFormat "%h %l %u %t \"%r\" %>s %b" common

    <IfModule logio_module>
      # You need to enable mod_logio.c to use %I and %O
      LogFormat "%h %l %u %t \"%r\" %>s %b \"%{Referer}i\" \"%{User-Agent}i\" %I %O" combinedio
    </IfModule>

    #
    # The location and format of the access logfile (Common Logfile Format).
    # If you do not define any access logfiles within a <VirtualHost>
    # container, they will be logged here.  Contrariwise, if you *do*
    # define per-<VirtualHost> access logfiles, transactions will be
    # logged therein and *not* in this file.
    #
    #CustomLog "logs/access_log" common

    #
    # If you prefer a logfile with access, agent, and referer information
    # (Combined Logfile Format) you can use the following directive.
    #
    CustomLog "logs/access_log" combined
</IfModule>
...
Becomes
...
    LogFormat "%h %l %u %t \"%r\" %>s %b" common

    <IfModule logio_module>
      # You need to enable mod_logio.c to use %I and %O
      LogFormat "%h %l %u %t \"%r\" %>s %b \"%{Referer}i\" \"%{User-Agent}i\" %I %O" combinedio
      # Stroom Change: Start - Add new logformats
      LogFormat "%a/%{REMOTE_PORT}e %X %t %l \"%u\" \"%r\" %s/%>s %D %I/%O/%B \"%{Referer}i\" \"%{User-Agent}i\" %V/%p" blackboxUser
      LogFormat "%a/%{REMOTE_PORT}e %X %t %l \"%{SSL_CLIENT_S_DN}x\" \"%r\" %s/%>s %D %I/%O/%B \"%{Referer}i\" \"%{User-Agent}i\" %V/%p" blackboxSSLUser
      # Stroom Change: End
    </IfModule>
    # Stroom Change: Start - Add new logformats without the additional byte values
    <IfModule !logio_module>
      LogFormat "%a/%{REMOTE_PORT}e %X %t %l \"%u\" \"%r\" %s/%>s %D 0/0/%B \"%{Referer}i\" \"%{User-Agent}i\" %V/%p" blackboxUser
      LogFormat "%a/%{REMOTE_PORT}e %X %t %l \"%{SSL_CLIENT_S_DN}x\" \"%r\" %s/%>s %D 0/0/%B \"%{Referer}i\" \"%{User-Agent}i\" %V/%p" blackboxSSLUser
    </IfModule>
    # Stroom Change: End

    #
    # The location and format of the access logfile (Common Logfile Format).
    # If you do not define any access logfiles within a <VirtualHost>
    # container, they will be logged here.  Contrariwise, if you *do*
    # define per-<VirtualHost> access logfiles, transactions will be
    # logged therein and *not* in this file.
    #
    #CustomLog "logs/access_log" common

    #
    # If you prefer a logfile with access, agent, and referer information
    # (Combined Logfile Format) you can use the following directive.
    #
    # Stroom Change: Start - Make the access log use a new format
    # CustomLog "logs/access_log" combined
    CustomLog logs/access_log blackboxSSLUser
    # Stroom Change: End
</IfModule>
...
Remember, deploy this file on all nodes.
Configuration of ssl.conf
We modify /etc/httpd/conf.d/ssl.conf on all nodes, backing up first,
The configuration of the /etc/httpd/conf.d/ssl.conf does change depending on the Stroom scenario deployed. In the following we will indicate
differences by tagged sub-headings. If the configuration applies irrespective of scenario, then All scenarios is the tag, else the tag indicated the
type of Stroom deployment.
ssl.conf: HTTP to HTTPS Redirection - All scenarios
Before the
<VirtualHost *:80>
  ServerName stroomp00.strmdev00.org
  Redirect permanent "/" "https://stroomp00.strmdev00.org/"
</VirtualHost>
That is, we change
...
## SSL Virtual Host Context
##

<VirtualHost _default_:443>
...
To
...
## SSL Virtual Host Context
##

# Stroom Change: Start - Add http redirection to https
<VirtualHost *:80>
  ServerName stroomp00.strmdev00.org
  Redirect permanent "/" "https://stroomp00.strmdev00.org/"
</VirtualHost>
# Stroom Change: End

<VirtualHost _default_:443>
ssl.conf: VirtualHost directives - Multi Node ‘Application and Proxy’ deployment
Within the stroomp.strmdev00.org
ServerName stroomp.strmdev00.org
JkMount /stroom* loadbalancer
JkMount /stroom/remoting/cluster* local
JkMount /stroom/datafeed* loadbalancer_proxy
JkMount /stroom/remoting* loadbalancer_proxy
JkMount /stroom/datafeeddirect* loadbalancer
JkOptions +ForwardKeySize +ForwardURICompat +ForwardSSLCertChain -ForwardDirectories
That is, we change
...
<VirtualHost _default_:443>

# General setup for the virtual host, inherited from global configuration
#DocumentRoot "/var/www/html"
#ServerName www.example.com:443

# Use separate log files for the SSL virtual host; note that LogLevel
# is not inherited from httpd.conf.
...
To
...
<VirtualHost _default_:443>

# General setup for the virtual host, inherited from global configuration
#DocumentRoot "/var/www/html"
#ServerName www.example.com:443
# Stroom Change: Start - Set servername and mod_jk connectivity
ServerName stroomp.strmdev00.org
JkMount /stroom* loadbalancer
JkMount /stroom/remoting/cluster* local
JkMount /stroom/datafeed* loadbalancer_proxy
JkMount /stroom/remoting* loadbalancer_proxy
JkMount /stroom/datafeeddirect* loadbalancer
JkOptions +ForwardKeySize +ForwardURICompat +ForwardSSLCertChain -ForwardDirectories
# Stroom Change: End

# Use separate log files for the SSL virtual host; note that LogLevel
# is not inherited from httpd.conf.
...
ssl.conf: VirtualHost directives - Standalone or Forwarding Proxy deployment
Within the stroomfp0.strmdev00.org
ServerName stroomfp0.strmdev00.org
JkMount /stroom/datafeed* local_proxy
JkOptions +ForwardKeySize +ForwardURICompat +ForwardSSLCertChain -ForwardDirectories
That is, we change
...
<VirtualHost _default_:443>

# General setup for the virtual host, inherited from global configuration
#DocumentRoot "/var/www/html"
#ServerName www.example.com:443

# Use separate log files for the SSL virtual host; note that LogLevel
# is not inherited from httpd.conf.
...
To
...
<VirtualHost _default_:443>

# General setup for the virtual host, inherited from global configuration
#DocumentRoot "/var/www/html"
#ServerName www.example.com:443
# Stroom Change: Start - Set servername and mod_jk connectivity
ServerName stroomfp0.strmdev00.org
JkMount /stroom/datafeed* local_proxy
JkOptions +ForwardKeySize +ForwardURICompat +ForwardSSLCertChain -ForwardDirectories
# Stroom Change: End

# Use separate log files for the SSL virtual host; note that LogLevel
# is not inherited from httpd.conf.
...
ssl.conf: VirtualHost directives - Single Node ‘Application and Proxy’ deployment
Within the stroomp00.strmdev00.org
ServerName stroomp00.strmdev00.org
JkMount /stroom* local
JkMount /stroom/remoting/cluster* local
JkMount /stroom/datafeed* local_proxy
JkMount /stroom/remoting* local_proxy
JkMount /stroom/datafeeddirect* local
JkOptions +ForwardKeySize +ForwardURICompat +ForwardSSLCertChain -ForwardDirectories
That is, we change
...
<VirtualHost _default_:443>

# General setup for the virtual host, inherited from global configuration
#DocumentRoot "/var/www/html"
#ServerName www.example.com:443

# Use separate log files for the SSL virtual host; note that LogLevel
# is not inherited from httpd.conf.
...
To
...
<VirtualHost _default_:443>

# General setup for the virtual host, inherited from global configuration
#DocumentRoot "/var/www/html"
#ServerName www.example.com:443
# Stroom Change: Start - Set servername and mod_jk connectivity
ServerName stroomp00.strmdev00.org
JkMount /stroom* local
JkMount /stroom/remoting/cluster* local
JkMount /stroom/datafeed* local_proxy
JkMount /stroom/remoting* local_proxy
JkMount /stroom/datafeeddirect* local
JkOptions +ForwardKeySize +ForwardURICompat +ForwardSSLCertChain -ForwardDirectories
# Stroom Change: End

# Use separate log files for the SSL virtual host; note that LogLevel
# is not inherited from httpd.conf.
...
ssl.conf: Certificate file changes - All scenarios
We replace the standard certificate files with the generated certificates. In the example below, we are using the multi node scenario, in
that the key file names are stroomp.crt and stroomp.key. For other scenarios, use the appropriate file names generated. We replace
SSLCertificateFile /etc/pki/tls/certs/localhost.crt
with
SSLCertificateFile /home/stroomuser/stroom-jks/public/stroomp.crt
and
SSLCertificateKeyFile /etc/pki/tls/private/localhost.key
with
SSLCertificateKeyFile /home/stroomuser/stroom-jks/private/stroomp.key
That is, change
...
# pass phrase. Note that a kill -HUP will prompt again. A new
# certificate can be generated using the genkey(1) command.
SSLCertificateFile /etc/pki/tls/certs/localhost.crt
# Server Private Key:
# If the key is not combined with the certificate, use this
# directive to point at the key file. Keep in mind that if
# you've both a RSA and a DSA private key you can configure
# both in parallel (to also allow the use of DSA ciphers, etc.)
SSLCertificateKeyFile /etc/pki/tls/private/localhost.key
# Server Certificate Chain:
# Point SSLCertificateChainFile at a file containing the
...
to
...
# pass phrase. Note that a kill -HUP will prompt again. A new
# certificate can be generated using the genkey(1) command.
# Stroom Change: Start - Replace with Stroom server certificate
# SSLCertificateFile /etc/pki/tls/certs/localhost.crt
SSLCertificateFile /home/stroomuser/stroom-jks/public/stroomp.crt
# Stroom Change: End
# Server Private Key:
# If the key is not combined with the certificate, use this
# directive to point at the key file. Keep in mind that if
# you've both a RSA and a DSA private key you can configure
# both in parallel (to also allow the use of DSA ciphers, etc.)
# Stroom Change: Start - Replace with Stroom server private key file
# SSLCertificateKeyFile /etc/pki/tls/private/localhost.key
SSLCertificateKeyFile /home/stroomuser/stroom-jks/private/stroomp.key
# Stroom Change: End
# Server Certificate Chain:
# Point SSLCertificateChainFile at a file containing the
...
ssl.conf: Certificate Bundle/NO-CA Verification - All scenarios
If you have signed your Stroom server certificate with a Certificate Authority, then change
SSLCACertificateFile /etc/pki/tls/certs/ca-bundle.crt
to be your own certificate bundle which you should probably store as ~stroomuser/stroom-jks/public/stroomp-ca-bundle.crt.
Now if you are using a self signed certificate, you will need to set the Client Authentication to have a value of
SSLVerifyClient optional_no_ca
noting that this may change if you actually use a CA. That is, changing
...
# Client Authentication (Type):
# Client certificate verification type and depth. Types are
# none, optional, require and optional_no_ca. Depth is a
# number which specifies how deeply to verify the certificate
# issuer chain before deciding the certificate is not valid.
#SSLVerifyClient require
#SSLVerifyDepth 10
# Access Control:
# With SSLRequire you can do per-directory access control based
...
to
...
# Client Authentication (Type):
# Client certificate verification type and depth. Types are
# none, optional, require and optional_no_ca. Depth is a
# number which specifies how deeply to verify the certificate
# issuer chain before deciding the certificate is not valid.
#SSLVerifyClient require
#SSLVerifyDepth 10
# Stroom Change: Start - Set optional_no_ca (given we have a self signed certificate)
SSLVerifyClient optional_no_ca
# Stroom Change: End
# Access Control:
# With SSLRequire you can do per-directory access control based
...
ssl.conf: Servlet Protection - Single or Multi Node scenarios (not for Standalone/Forwarding Proxy)
We now need to secure certain Stroom Application servlets, to ensure they are only accessed under appropriate control.
This set of servlets will be accessible by all nodes in the subnet 192.168.2 (as well as localhost). We achieve this by adding after the example Location directives
<Location ~ "stroom/(status|echo|sessionList|debug)" >
Require all denied
Require ip 127.0.0.1 192.168.2
</Location>
We further restrict the clustercall and export servlets to just the localhost. If we had multiple Stroom processing nodes, you would specify each node, or preferably, the subnet they are on. In our multi node case this is 192.168.2.
<Location ~ "stroom/export/|stroom/remoting/clustercall.rpc" >
Require all denied
Require ip 127.0.0.1 192.168.2
</Location>
That is, the following
...
# and %{TIME_WDAY} >= 1 and %{TIME_WDAY} <= 5 \
# and %{TIME_HOUR} >= 8 and %{TIME_HOUR} <= 20 ) \
# or %{REMOTE_ADDR} =~ m/^192\.76\.162\.[0-9]+$/
#</Location>
# SSL Engine Options:
# Set various options for the SSL engine.
# o FakeBasicAuth:
...
changes to
...
# and %{TIME_WDAY} >= 1 and %{TIME_WDAY} <= 5 \
# and %{TIME_HOUR} >= 8 and %{TIME_HOUR} <= 20 ) \
# or %{REMOTE_ADDR} =~ m/^192\.76\.162\.[0-9]+$/
#</Location>
# Stroom Change: Start - Lock access to certain servlets
<Location ~ "stroom/(status|echo|sessionList|debug)" >
Require all denied
Require ip 127.0.0.1 192.168.2
</Location>
# Lock these Servlets more securely - to just localhost and processing node(s)
<Location ~ "stroom/export/|stroom/remoting/clustercall.rpc" >
Require all denied
Require ip 127.0.0.1 192.168.2
</Location>
# Stroom Change: End
# SSL Engine Options:
# Set various options for the SSL engine.
# o FakeBasicAuth:
...
ssl.conf: Log formats - All scenarios
Finally, as we make use of the Black Box Apache log format, we replace the standard format
CustomLog logs/ssl_request_log \
"%t %h %{SSL_PROTOCOL}x %{SSL_CIPHER}x \"%r\" %b"
with
CustomLog logs/ssl_request_log blackboxSSLUser
That is, change
...
# Per-Server Logging:
# The home of a custom SSL log file. Use this when you want a
# compact non-error SSL logfile on a virtual host basis.
CustomLog logs/ssl_request_log \
"%t %h %{SSL_PROTOCOL}x %{SSL_CIPHER}x \"%r\" %b"
</VirtualHost>
to
...
# Per-Server Logging:
# The home of a custom SSL log file. Use this when you want a
# compact non-error SSL logfile on a virtual host basis.
# Stroom Change: Start - Change ssl_request log to use our BlackBox format
# CustomLog logs/ssl_request_log \
# "%t %h %{SSL_PROTOCOL}x %{SSL_CIPHER}x \"%r\" %b"
CustomLog logs/ssl_request_log blackboxSSLUser
# Stroom Change: End
</VirtualHost>
Remember, in the case of Multi node stroom Application servers, deploy this file on all servers.
Apache Mod_JK configuration
Apache Mod_JK has two configuration files
- /etc/httpd/conf.d/mod_jk.conf - for the http server configuration
- /etc/httpd/conf/workers.properties - to configure the Tomcat workers
In multi node scenarios, /etc/httpd/conf.d/mod_jk.conf is the same on all servers, but the /etc/httpd/conf/workers.properties file is different.
The contents of these two configuration files differ depending on the Stroom deployment. The following provide the various deployment scenarios.
Mod_JK Multi Node Application and Proxy Deployment
For a Stroom Multi node Application and Proxy server,
We configure /etc/httpd/conf.d/mod_jk.conf as per
F=/etc/httpd/conf.d/mod_jk.conf
printf 'LoadModule jk_module modules/mod_jk.so\n' > ${F}
printf 'JkWorkersFile conf/workers.properties\n' >> ${F}
printf 'JkLogFile logs/mod_jk.log\n' >> ${F}
printf 'JkLogLevel info\n' >> ${F}
printf 'JkLogStampFormat "[%%a %%b %%d %%H:%%M:%%S %%Y]"\n' >> ${F}
printf 'JkOptions +ForwardKeySize +ForwardURICompat +ForwardSSLCertChain -ForwardDirectories\n' >> ${F}
printf 'JkRequestLogFormat "%%w %%V %%T"\n' >> ${F}
printf 'JkMount /stroom* loadbalancer\n' >> ${F}
printf 'JkMount /stroom/remoting/cluster* local\n' >> ${F}
printf 'JkMount /stroom/datafeed* loadbalancer_proxy\n' >> ${F}
printf 'JkMount /stroom/remoting* loadbalancer_proxy\n' >> ${F}
printf 'JkMount /stroom/datafeeddirect* loadbalancer\n' >> ${F}
printf '# Note: Replaced JkShmFile logs/jk.shm due to SELinux issues. Refer to\n' >> ${F}
printf '# https://bugzilla.redhat.com/bugzilla/show_bug.cgi?id=225452\n' >> ${F}
printf '# The following makes use of the existing /run/httpd directory\n' >> ${F}
printf 'JkShmFile run/jk.shm\n' >> ${F}
printf '<Location /jkstatus/>\n' >> ${F}
printf ' JkMount status\n' >> ${F}
printf ' Order deny,allow\n' >> ${F}
printf ' Deny from all\n' >> ${F}
printf ' Allow from 127.0.0.1\n' >> ${F}
printf '</Location>\n' >> ${F}
chmod 640 ${F}
We configure /etc/httpd/conf/workers.properties as per
Since we are deploying for a cluster with load balancing, we need a workers.properties file per node. Executing the following will result in two files (workers.properties.stroomp00 and workers.properties.stroomp01) which should be deployed to their respective servers.
cd /tmp
# Set the list of nodes
Nodes="stroomp00.strmdev00.org stroomp01.strmdev00.org"
for oN in ${Nodes}; do
_n=`echo ${oN} | cut -f1 -d\.`
(
printf '# Workers.properties for Stroom Cluster member: %s %s\n' ${oN}
printf 'worker.list=loadbalancer,loadbalancer_proxy,local,local_proxy,status\n'
L_t=""
Lp_t=""
for FQDN in ${Nodes}; do
N=`echo ${FQDN} | cut -f1 -d\.`
printf 'worker.%s.port=8009\n' ${N}
printf 'worker.%s.host=%s\n' ${N} ${FQDN}
printf 'worker.%s.type=ajp13\n' ${N}
printf 'worker.%s.lbfactor=1\n' ${N}
printf 'worker.%s.max_packet_size=65536\n' ${N}
printf 'worker.%s_proxy.port=9009\n' ${N}
printf 'worker.%s_proxy.host=%s\n' ${N} ${FQDN}
printf 'worker.%s_proxy.type=ajp13\n' ${N}
printf 'worker.%s_proxy.lbfactor=1\n' ${N}
printf 'worker.%s_proxy.max_packet_size=65536\n' ${N}
L_t="${L_t}${N},"
Lp_t="${Lp_t}${N}_proxy,"
done
L=`echo $L_t | sed -e 's/.$//'`
Lp=`echo $Lp_t | sed -e 's/.$//'`
printf 'worker.loadbalancer.type=lb\n'
printf 'worker.loadbalancer.balance_workers=%s\n' $L
printf 'worker.loadbalancer.sticky_session=1\n'
printf 'worker.loadbalancer_proxy.type=lb\n'
printf 'worker.loadbalancer_proxy.balance_workers=%s\n' $Lp
printf 'worker.loadbalancer_proxy.sticky_session=1\n'
printf 'worker.local.type=lb\n'
printf 'worker.local.balance_workers=%s\n' ${_n}
printf 'worker.local.sticky_session=1\n'
printf 'worker.local_proxy.type=lb\n'
printf 'worker.local_proxy.balance_workers=%s_proxy\n' ${_n}
printf 'worker.local_proxy.sticky_session=1\n'
printf 'worker.status.type=status\n'
) > workers.properties.${_n}
chmod 640 workers.properties.${_n}
done
Now depending in the node you are on, copy the relevant workers.properties.nodename file to /etc/httpd/conf/workers.properties.
The following command makes this simple.
If you were to add an additional node to a multi node cluster, say the node stroomp02.strmdev00.org, then you would re-run the above script with
Nodes="stroomp00.strmdev00.org stroomp01.strmdev00.org stroomp02.strmdev00.org"
then redeploy all three files to the respective servers. Also note, that for the newly created workers.properties files for the existing nodes to take effect you will need to restart the Apache Httpd service on both nodes.
Remember, in multi node cluster deployments, the following files are the same and hence can be created on one node, but copied to the others not forgetting to backup the other node’s original files. That is, the files
/var/www/html/index.html/etc/httpd/conf.d/mod_jk.conf/etc/httpd/conf/httpd.conf
Are to be the same on all nodes.
Only the /etc/httpd/conf.d/ssl.conf and /etc/httpd/conf/workers.properties files change.
Mod_JK Standalone or Forwarding Stroom Proxy Deployment
For a Stroom Standalone or Forwarding proxy,
We configure /etc/httpd/conf.d/mod_jk.conf as per
F=/etc/httpd/conf.d/mod_jk.conf
printf 'LoadModule jk_module modules/mod_jk.so\n' > ${F}
printf 'JkWorkersFile conf/workers.properties\n' >> ${F}
printf 'JkLogFile logs/mod_jk.log\n' >> ${F}
printf 'JkLogLevel info\n' >> ${F}
printf 'JkLogStampFormat "[%%a %%b %%d %%H:%%M:%%S %%Y]"\n' >> ${F}
printf 'JkOptions +ForwardKeySize +ForwardURICompat +ForwardSSLCertChain -ForwardDirectories\n' >> ${F}
printf 'JkRequestLogFormat "%%w %%V %%T"\n' >> ${F}
printf 'JkMount /stroom/datafeed* local_proxy\n' >> ${F}
printf '# Note: Replaced JkShmFile logs/jk.shm due to SELinux issues. Refer to\n' >> ${F}
printf '# https://bugzilla.redhat.com/bugzilla/show_bug.cgi?id=225452\n' >> ${F}
printf '# The following makes use of the existing /run/httpd directory\n' >> ${F}
printf 'JkShmFile run/jk.shm\n' >> ${F}
printf '<Location /jkstatus/>\n' >> ${F}
printf ' JkMount status\n' >> ${F}
printf ' Order deny,allow\n' >> ${F}
printf ' Deny from all\n' >> ${F}
printf ' Allow from 127.0.0.1\n' >> ${F}
printf '</Location>\n' >> ${F}
chmod 640 ${F}
We configure /etc/httpd/conf/workers.properties as per
The variable N in the script below is to be the node name (not FQDN) of your sever (i.e. stroomfp0).
N=stroomfp0
FQDN=`hostname -f`
F=/etc/httpd/conf/workers.properties
printf 'worker.list=local_proxy,status\n' > ${F}
printf 'worker.%s_proxy.port=9009\n' ${N} >> ${F}
printf 'worker.%s_proxy.host=%s\n' ${N} ${FQDN} >> ${F}
printf 'worker.%s_proxy.type=ajp13\n' ${N} >> ${F}
printf 'worker.%s_proxy.lbfactor=1\n' ${N} >> ${F}
printf 'worker.local_proxy.type=lb\n' >> ${F}
printf 'worker.local_proxy.balance_workers=%s_proxy\n' ${N} >> ${F}
printf 'worker.local_proxy.sticky_session=1\n' >> ${F}
printf 'worker.status.type=status\n' >> ${F}
chmod 640 ${F}
Mod_JK Single Node Application and Proxy Deployment
For a Stroom Single node Application and Proxy server,
We configure /etc/httpd/conf.d/mod_jk.conf as per
F=/etc/httpd/conf.d/mod_jk.conf
printf 'LoadModule jk_module modules/mod_jk.so\n' > ${F}
printf 'JkWorkersFile conf/workers.properties\n' >> ${F}
printf 'JkLogFile logs/mod_jk.log\n' >> ${F}
printf 'JkLogLevel info\n' >> ${F}
printf 'JkLogStampFormat "[%%a %%b %%d %%H:%%M:%%S %%Y]"\n' >> ${F}
printf 'JkOptions +ForwardKeySize +ForwardURICompat +ForwardSSLCertChain -ForwardDirectories\n' >> ${F}
printf 'JkRequestLogFormat "%%w %%V %%T"\n' >> ${F}
printf 'JkMount /stroom* local\n' >> ${F}
printf 'JkMount /stroom/remoting/cluster* local\n' >> ${F}
printf 'JkMount /stroom/datafeed* local_proxy\n' >> ${F}
printf 'JkMount /stroom/remoting* local_proxy\n' >> ${F}
printf 'JkMount /stroom/datafeeddirect* local\n' >> ${F}
printf '# Note: Replaced JkShmFile logs/jk.shm due to SELinux issues. Refer to\n' >> ${F}
printf '# https://bugzilla.redhat.com/bugzilla/show_bug.cgi?id=225452\n' >> ${F}
printf '# The following makes use of the existing /run/httpd directory\n' >> ${F}
printf 'JkShmFile run/jk.shm\n' >> ${F}
printf '<Location /jkstatus/>\n' >> ${F}
printf ' JkMount status\n' >> ${F}
printf ' Order deny,allow\n' >> ${F}
printf ' Deny from all\n' >> ${F}
printf ' Allow from 127.0.0.1\n' >> ${F}
printf '</Location>\n' >> ${F}
chmod 640 ${F}
We configure /etc/httpd/conf/workers.properties as per
The variable N in the script below is to be the node name (not FQDN) of your sever (i.e. stroomp00).
N=stroomp00
FQDN=`hostname -f`
F=/etc/httpd/conf/workers.properties
printf 'worker.list=local,local_proxy,status\n' > ${F}
printf 'worker.%s.port=8009\n' ${N} >> ${F}
printf 'worker.%s.host=%s\n' ${N} ${FQDN} >> ${F}
printf 'worker.%s.type=ajp13\n' ${N} >> ${F}
printf 'worker.%s.lbfactor=1\n' ${N} >> ${F}
printf 'worker.%s.max_packet_size=65536\n' ${N} >> ${F}
printf 'worker.%s_proxy.port=9009\n' ${N} >> ${F}
printf 'worker.%s_proxy.host=%s\n' ${N} ${FQDN} >> ${F}
printf 'worker.%s_proxy.type=ajp13\n' ${N} >> ${F}
printf 'worker.%s_proxy.lbfactor=1\n' ${N} >> ${F}
printf 'worker.%s_proxy.max_packet_size=65536\n' ${N} >> ${F}
printf 'worker.local.type=lb\n' >> ${F}
printf 'worker.local.balance_workers=%s\n' ${N} >> ${F}
printf 'worker.local.sticky_session=1\n' >> ${F}
printf 'worker.local_proxy.type=lb\n' >> ${F}
printf 'worker.local_proxy.balance_workers=%s_proxy\n' ${N} >> ${F}
printf 'worker.local_proxy.sticky_session=1\n' >> ${F}
printf 'worker.status.type=status\n' >> ${F}
chmod 640 ${F}
Final host configuration and web service enablement
Now tidy up the SELinux context for access on all nodes and files via the commands
We also enable both http and https services via the firewall on all nodes. If you don’t want to present a http access point, then don’t enable it in the firewall setting. This is done with
Finally enable then start the httpd service, correcting any errors. It should be noted that on any errors,
the suggestion of a systemctl status or viewing the journal are good, but also review information in the httpd error logs found in /var/log/httpd/.
4.4.2 - Database Installation
This HOWTO describes the installation of the Stroom databases.
Following this HOWTO will produce a simple, minimally secured database deployment. In a production environment consideration needs to be made for redundancy, better security, data-store location, increased memory usage, and the like.
Stroom has two databases. The first, stroom, is used for management of Stroom itself and the second, statistics is used for the Stroom Statistics capability. There are many ways to deploy these two databases. One could
- have a single database instance and serve both databases from it
- have two database instances on the same server and serve one database per instance
- have two separate nodes, each with its own database instance
- the list goes on.
In this HOWTO, we describe the deployment of two database instances on the one node, each serving a single database. We provide example deployments using either the MariaDB or MySQL Community versions of MySQL.
Assumptions
- we are installing the MariaDB or MySQL Community RDBMS software.
- the primary database node is
stroomdb0.strmdev00.org. - installation is on a fully patched minimal Centos 7.3 instance.
- we are installing BOTH databases (
stroomandstatistics) on the same node -stroomdb0.stroomdev00.orgbut with two distinct database engines. The first database will communicate on port3307and the second on3308. - we are deploying with SELinux in enforcing mode.
- any scripts or commands that should run are in code blocks and are designed to allow the user to cut then paste the commands onto their systems.
- in this document, when a textual screen capture is documented, data entry is identified by the data surrounded by ‘<’ ‘>’ . This excludes enter/return presses.
Installation of Software
MariaDB Server Installation
As MariaDB is directly supported by Centos 7, we simply install the database server software and SELinux policy files, as per
MySQL Community Server Installation
As MySQL is not directly supported by Centos 7, we need to install its repository files prior to installation. We get the current MySQL Community release repository rpm and validate its MD5 checksum against the published value found on the MySQL Yum Repository site.
On correct validation of the MD5 checksum, we install the repository files via
NOTE: Stroom currently does not support the latest production MySQL version - 5.7. You will need to install MySQL Version 5.6.
Now since we must use MySQL Version 5.6 you will need to edit the MySQL repo file /etc/yum.repos.d/mysql-community.repo to
disable the mysql57-community channel and enable the mysql56-community channel. We start by, backing up the repo file with
Then edit the file to change
...
# Enable to use MySQL 5.6
[mysql56-community]
name=MySQL 5.6 Community Server
baseurl=http://repo.mysql.com/yum/mysql-5.6-community/el/7/$basearch/
enabled=0
gpgcheck=1
gpgkey=file:///etc/pki/rpm-gpg/RPM-GPG-KEY-mysql
[mysql57-community]
name=MySQL 5.7 Community Server
baseurl=http://repo.mysql.com/yum/mysql-5.7-community/el/7/$basearch/
enabled=1
gpgcheck=1
gpgkey=file:///etc/pki/rpm-gpg/RPM-GPG-KEY-mysql
...
To become
...
# Enable to use MySQL 5.6
[mysql56-community]
name=MySQL 5.6 Community Server
baseurl=http://repo.mysql.com/yum/mysql-5.6-community/el/7/$basearch/
enabled=1
gpgcheck=1
gpgkey=file:///etc/pki/rpm-gpg/RPM-GPG-KEY-mysql
[mysql57-community]
name=MySQL 5.7 Community Server
baseurl=http://repo.mysql.com/yum/mysql-5.7-community/el/7/$basearch/
enabled=0
gpgcheck=1
gpgkey=file:///etc/pki/rpm-gpg/RPM-GPG-KEY-mysql
...
Next we install server software and SELinux policy files, as per
Preparing the Database Deployment
MariaDB Variant
Create and instantiate both database instances
To set up two MariaDB database instances on the one node, we will use mysql_multi and systemd service templates. The mysql_multi utility is a capability that manages multiple MariaDB databases on the same node and systemd service templates manage multiple services from one configuration file. A systemd service template is unique in that it has an @ character before the .service suffix.
To use this multiple-instance capability, we need to create two data directories for each database instance and also replace the main MariaDB configuration file, /etc/my.cnf, with one that includes configuration of key options for each instance. We will name our instances, mysqld0 and mysqld1. We will also create specific log files for each instance.
We will use the directories, /var/lib/mysql-mysqld0 and /var/lib/mysql-mysqld1 for the data directories and /var/log/mariadb/mysql-mysqld0.log and /var/log/mariadb/mysql-mysqld1.log for the log files. Note you should modify /etc/logrotate.d/mariadb to manage these log files. Note also, we need to set the appropriate SELinux file contexts on the created directories and any files.
We create the data directories and log files and set their respective SELinux contexts via
We now initialise our two database data directories via
We now replace the MySQL configuration file to set the options for each instance. Note that we will serve mysqld0 and mysqld1 via TCP ports 3307 and 3308 respectively. First backup the existing configuration file with
then setup
/etc/my.cnf as per
sudo bash
F=/etc/my.cnf
printf '[mysqld_multi]\n' > ${F}
printf 'mysqld = /usr/bin/mysqld_safe --basedir=/usr\n' >> ${F}
printf '\n' >> ${F}
printf '[mysqld0]\n' >> ${F}
printf 'port=3307\n' >> ${F}
printf 'mysqld = /usr/bin/mysqld_safe --basedir=/usr\n' >> ${F}
printf 'datadir=/var/lib/mysql-mysqld0/\n' >> ${F}
printf 'socket=/var/lib/mysql-mysqld0/mysql.sock\n' >> ${F}
printf 'pid-file=/var/run/mariadb/mysql-mysqld0.pid\n' >> ${F}
printf '\n' >> ${F}
printf 'log-error=/var/log/mariadb/mysql-mysqld0.log\n' >> ${F}
printf '\n' >> ${F}
printf '# Disabling symbolic-links is recommended to prevent assorted security\n' >> ${F}
printf '# risks\n' >> ${F}
printf 'symbolic-links=0\n' >> ${F}
printf '\n' >> ${F}
printf '[mysqld1]\n' >> ${F}
printf 'mysqld = /usr/bin/mysqld_safe --basedir=/usr\n' >> ${F}
printf 'port=3308\n' >> ${F}
printf 'datadir=/var/lib/mysql-mysqld1/\n' >> ${F}
printf 'socket=/var/lib/mysql-mysqld1/mysql.sock\n' >> ${F}
printf 'pid-file=/var/run/mariadb/mysql-mysqld1.pid\n' >> ${F}
printf '\n' >> ${F}
printf 'log-error=/var/log/mariadb/mysql-mysqld1.log\n' >> ${F}
printf '\n' >> ${F}
printf '# Disabling symbolic-links is recommended to prevent assorted security risks\n' >> ${F}
printf 'symbolic-links=0\n' >> ${F}
exit # To exit the root shell
We also need to associate the ports with the mysqld_port_t SELinux context as per
sudo bash
F=/etc/systemd/system/mysqld@.service
printf '# Install in /etc/systemd/system\n' > ${F}
printf '# Enable via systemctl enable mysqld@0 or systemctl enable mysqld@1\n' >> ${F}
printf '[Unit]\n' >> ${F}
printf 'Description=MySQL Multi Server for instance %%i\n' >> ${F}
printf 'After=syslog.target\n' >> ${F}
printf 'After=network.target\n' >> ${F}
printf '\n' >> ${F}
printf '[Service]\n' >> ${F}
printf 'User=mysql\n' >> ${F}
printf 'Group=mysql\n' >> ${F}
printf 'Type=forking\n' >> ${F}
printf 'ExecStart=/usr/bin/mysqld_multi start %%i\n' >> ${F}
printf 'ExecStop=/usr/bin/mysqld_multi stop %%i\n' >> ${F}
printf 'Restart=always\n' >> ${F}
printf 'PrivateTmp=true\n' >> ${F}
printf '\n' >> ${F}
printf '[Install]\n' >> ${F}
printf 'WantedBy=multi-user.target\n' >> ${F}
chmod 644 ${F}
exit; # to exit the root shell
We next enable and start both instances via
At this point, we should have both instances running. One should check each instance’s log file for any errors.Secure each database instance
We secure each database engine by running the mysql_secure_installation script. One should accept all defaults, which means the
only entry (aside from pressing returns) is the administrator (root) database password. Make a note of the password you use. In this case
we will use Stroom5User@.
The utility mysql_secure_installation expects to find the Linux socket file to access the database it’s securing at /var/lib/mysql/mysql.sock.
Since we have used other locations, we temporarily link the real socket file to /var/lib/mysql/mysql.sock for each invocation of the
utility. Thus we execute
to see
NOTE: RUNNING ALL PARTS OF THIS SCRIPT IS RECOMMENDED FOR ALL MariaDB
SERVERS IN PRODUCTION USE! PLEASE READ EACH STEP CAREFULLY!
In order to log into MariaDB to secure it, we'll need the current
password for the root user. If you've just installed MariaDB, and
you haven't set the root password yet, the password will be blank,
so you should just press enter here.
Enter current password for root (enter for none):
OK, successfully used password, moving on...
Setting the root password ensures that nobody can log into the MariaDB
root user without the proper authorisation.
Set root password? [Y/n]
New password: <__ Stroom5User@ __>
Re-enter new password: <__ Stroom5User@ __>
Password updated successfully!
Reloading privilege tables..
... Success!
By default, a MariaDB installation has an anonymous user, allowing anyone
to log into MariaDB without having to have a user account created for
them. This is intended only for testing, and to make the installation
go a bit smoother. You should remove them before moving into a
production environment.
Remove anonymous users? [Y/n]
... Success!
Normally, root should only be allowed to connect from 'localhost'. This
ensures that someone cannot guess at the root password from the network.
Disallow root login remotely? [Y/n]
... Success!
By default, MariaDB comes with a database named 'test' that anyone can
access. This is also intended only for testing, and should be removed
before moving into a production environment.
Remove test database and access to it? [Y/n]
- Dropping test database...
... Success!
- Removing privileges on test database...
... Success!
Reloading the privilege tables will ensure that all changes made so far
will take effect immediately.
Reload privilege tables now? [Y/n]
... Success!
Cleaning up...
All done! If you've completed all of the above steps, your MariaDB
installation should now be secure.
Thanks for using MariaDB!
then we execute
and process as before (for when running mysql_secure_installation). At this both database instances should be secure.
MySQL Community Variant
Create and instantiate both database instances
To set up two MySQL database instances on the one node, we will use mysql_multi and systemd service templates. The mysql_multi utility is a capability that manages multiple MySQL databases on the same node and systemd service templates manage multiple services from one configuration file. A systemd service template is unique in that it has an @ character before the .service suffix.
To use this multiple-instance capability, we need to create two data directories for each database instance and also replace the main MySQL configuration file, /etc/my.cnf, with one that includes configuration of key options for each instance. We will name our instances, mysqld0 and mysqld1. We will also create specific log files for each instance.
We will use the directories, /var/lib/mysql-mysqld0 and /var/lib/mysql-mysqld1 for the data directories and /var/log/mysql-mysqld0.log and /var/log/mysql-mysqld1.log for the log directories. Note you should modify /etc/logrotate.d/mysql to manage these log files. Note also, we need to set the appropriate SELinux file context on the created directories and files.
We now initialise our two database data directories via
Disable the default database via
We now modify the MySQL configuration file to set the options for each instance. Note that we will serve mysqld0 and mysqld1 via TCP ports 3307 and 3308 respectively. First backup the existing configuration file with
then setup
/etc/my.cnf as per
sudo bash
F=/etc/my.cnf
printf '[mysqld_multi]\n' > ${F}
printf 'mysqld = /usr/bin/mysqld_safe --basedir=/usr\n' >> ${F}
printf '\n' >> ${F}
printf '[mysqld0]\n' >> ${F}
printf 'port=3307\n' >> ${F}
printf 'mysqld = /usr/bin/mysqld_safe --basedir=/usr\n' >> ${F}
printf 'datadir=/var/lib/mysql-mysqld0/\n' >> ${F}
printf 'socket=/var/lib/mysql-mysqld0/mysql.sock\n' >> ${F}
printf 'pid-file=/var/run/mysqld/mysql-mysqld0.pid\n' >> ${F}
printf '\n' >> ${F}
printf 'log-error=/var/log/mysql-mysqld0.log\n' >> ${F}
printf '\n' >> ${F}
printf '# Disabling symbolic-links is recommended to prevent assorted security\n' >> ${F}
printf '# risks\n' >> ${F}
printf 'symbolic-links=0\n' >> ${F}
printf '\n' >> ${F}
printf '[mysqld1]\n' >> ${F}
printf 'mysqld = /usr/bin/mysqld_safe --basedir=/usr\n' >> ${F}
printf 'port=3308\n' >> ${F}
printf 'datadir=/var/lib/mysql-mysqld1/\n' >> ${F}
printf 'socket=/var/lib/mysql-mysqld1/mysql.sock\n' >> ${F}
printf 'pid-file=/var/run/mysqld/mysql-mysqld1.pid\n' >> ${F}
printf '\n' >> ${F}
printf 'log-error=/var/log/mysql-mysqld1.log\n' >> ${F}
printf '\n' >> ${F}
printf '# Disabling symbolic-links is recommended to prevent assorted security risks\n' >> ${F}
printf 'symbolic-links=0\n' >> ${F}
exit # To exit the root shell
We also need to associate the ports with the mysqld_port_t SELinux context as per
We next create the systemd service template as per
sudo bash
F=/etc/systemd/system/mysqld@.service
printf '# Install in /etc/systemd/system\n' > ${F}
printf '# Enable via systemctl enable mysqld@0 or systemctl enable mysqld@1\n' >> ${F}
printf '[Unit]\n' >> ${F}
printf 'Description=MySQL Multi Server for instance %%i\n' >> ${F}
printf 'After=syslog.target\n' >> ${F}
printf 'After=network.target\n' >> ${F}
printf '\n' >> ${F}
printf '[Service]\n' >> ${F}
printf 'User=mysql\n' >> ${F}
printf 'Group=mysql\n' >> ${F}
printf 'Type=forking\n' >> ${F}
printf 'ExecStart=/usr/bin/mysqld_multi start %%i\n' >> ${F}
printf 'ExecStop=/usr/bin/mysqld_multi stop %%i\n' >> ${F}
printf 'Restart=always\n' >> ${F}
printf 'PrivateTmp=true\n' >> ${F}
printf '\n' >> ${F}
printf '[Install]\n' >> ${F}
printf 'WantedBy=multi-user.target\n' >> ${F}
chmod 644 ${F}
exit; # to exit the root shell
We next enable and start both instances via
At this point, we should have both instances running. One should check each instance’s log file for any errors.
Secure each database instance
We secure each database engine by running the mysql_secure_installation script. One should accept all defaults, which means the
only entry (aside from pressing returns) is the administrator (root) database password. Make a note of the password you use. In this case
we will use Stroom5User@.
The utility mysql_secure_installation expects to find the Linux socket file to access the database it’s securing at /var/lib/mysql/mysql.sock.
Since we have used other locations, we temporarily link the real socket file to /var/lib/mysql/mysql.sock for each invocation of the
utility. Thus we execute
to see
NOTE: RUNNING ALL PARTS OF THIS SCRIPT IS RECOMMENDED FOR ALL MySQL
SERVERS IN PRODUCTION USE! PLEASE READ EACH STEP CAREFULLY!
In order to log into MySQL to secure it, we'll need the current
password for the root user. If you've just installed MySQL, and
you haven't set the root password yet, the password will be blank,
so you should just press enter here.
Enter current password for root (enter for none):
OK, successfully used password, moving on...
Setting the root password ensures that nobody can log into the MySQL
root user without the proper authorisation.
Set root password? [Y/n] y
New password: <__ Stroom5User@ __>
Re-enter new password: <__ Stroom5User@ __>
Password updated successfully!
Reloading privilege tables..
... Success!
By default, a MySQL installation has an anonymous user, allowing anyone
to log into MySQL without having to have a user account created for
them. This is intended only for testing, and to make the installation
go a bit smoother. You should remove them before moving into a
production environment.
Remove anonymous users? [Y/n]
... Success!
Normally, root should only be allowed to connect from 'localhost'. This
ensures that someone cannot guess at the root password from the network.
Disallow root login remotely? [Y/n]
... Success!
By default, MySQL comes with a database named 'test' that anyone can
access. This is also intended only for testing, and should be removed
before moving into a production environment.
Remove test database and access to it? [Y/n]
- Dropping test database...
ERROR 1008 (HY000) at line 1: Can't drop database 'test'; database doesn't exist
... Failed! Not critical, keep moving...
- Removing privileges on test database...
... Success!
Reloading the privilege tables will ensure that all changes made so far
will take effect immediately.
Reload privilege tables now? [Y/n]
... Success!
All done! If you've completed all of the above steps, your MySQL
installation should now be secure.
Thanks for using MySQL!
Cleaning up...
then we execute
and process as before (for when running mysql_secure_installation). At this point, both database instances should be secure.
Create the Databases and Enable access by the Stroom processing users
We now create the stroom database within the first instance, mysqld0 and the statistics database within the second
instance mysqld1. It does not matter which database variant used as all commands are the same for both.
As well as creating the databases, we also need to establish the Stroom processing users
that the Stroom processing nodes will use to access each database.
For the stroom database, we will use the database user stroomuser with a password of Stroompassword1@ and for the statistics database, we will use the database user stroomstats with a password of Stroompassword2@. One identifies a processing user as <user>@<host> on a grant SQL command.
In the stroom database instance, we will grant access for
stroomuser@localhostfor local access for maintenance etc.stroomuser@stroomp00.strmdev00.orgfor access by processing nodestroomp00.strmdev00.orgstroomuser@stroomp01.strmdev00.orgfor access by processing nodestroomp01.strmdev00.org
and in the statistics database instance, we will grant access for
stroomstats@localhostfor local access for maintenance etc.stroomstats@stroomp00.strmdev00.orgfor access by processing nodestroomp00.strmdev00.orgstroomstats@stroomp01.strmdev00.orgfor access by processing nodestroomp01.strmdev00.org
Thus for the stroom database we execute
and on entering the administrator’s password, we arrive at the
MariaDB [(none)]> or mysql> prompt. At this point we create the database with
and then to establish the users, we execute
then
to exit.
And for the statistics database
with
and then to establish the users, we execute
then
to exit.
Clearly if we need to add more processing nodes, additional grant commands would be used. Further, if we were installing the databases in a single node Stroom environment, we would just have the first two pairs of grants.
Configure Firewall
Next we need to modify our firewall to allow remote access to our databases which listens on ports 3307 and 3308. The simplest way to achieve this is with the commands
Note
That this allows ANY node to connect to your databases. You should give consideration to restricting this to only allowing processing node access.Debugging of Mariadb for Stroom
If there is a need to debug the Mariadb database and Stroom interaction, one can turn on auditing for the Mariadb service. To do so, log onto the relevant database as the administrative user as per
or
And at the MariaDB [(none)]> prompt enter
or
The above will generate two log files,
/var/log/mariadb/mysqld-mysqld0_server_audit.logor/var/log/mariadb/mysqld-mysqld1_server_audit.logwhich records all commands the respective databases run. We have configured the log file will rotate at 10MB in size./var/lib/mysql-mysqld0/sql_errors.logor/var/lib/mysql-mysqld1/sql_errors.logwhich records all erroneous SQL commands. This log file will rotate at 10MB in size. Note we cannot set this filename via the UI, but it will be appear in the data directory.
All files will, by default, generate up to 9 rotated files.
If you wish to rotate a log file manually, log into the database as the administrative user and execute either
set global server_audit_file_rotate_now=1;to rotate the audit log fileset global sql_error_log_rotate=1;to rotate thesql_errloglog file
Initial Database Access
It should be noted that if you monitor the sql_errors.log log file on a new Stroom deployment, when the Stroom Application first starts, its initial access to the stroom database will result in the following attempted SQL statements.
After this access the application will realise the database does not exist and it will initialise the database.
In the case of the statistics database you may note the following attempted access
Again, at this point the application will initialise this database.
4.4.3 - Installation
This HOWTO is provided to assist users in setting up a number of different Stroom environments based on Centos 7.3 infrastructure.
Assumptions
The following assumptions are used in this document.
- The user has reasonable RHEL/Centos System administration skills.
- Installations are on Centos 7.3 minimal systems (fully patched).
- The term ’node’ is used to reference the ‘host’ a service is running on.
- The Stroom Proxy and Application software runs as user
stroomuserand will be deployed in this user’s home directory - Data will reside in a directory tree referenced via
/stroomdata. It is up to the user to provision a file system here, noting sub-directories of it will be NFS shared in Multi Node Stroom Deployments - Any scripts or commands that should run are in code blocks and are designed to allow the user to cut then paste the commands onto their systems
- In this document, when a textual screen capture is documented, data entry is identified by the data surrounded by
<____>. This excludes enter/return presses. - Better security of password choices, networking, firewalls, data stores, etc. can and should be achieved in various ways, but these HOWTOs are just a quick means of getting a working system, so only limited security is applied
- Better configuration of the database (e.g. more memory, redundancy, etc.) should be considered in production environments
- The use of self signed certificates is appropriate for test systems, but users should consider appropriate CA infrastructure in production environments
- The user has access to a Chrome web browser as Stroom is optimised for this browser.
Introduction
This HOWTO provides guidance on a variety of simple Stroom deployments.
for an environment where multiple nodes are required to handle the processing load.
for extensive networks where one wants to aggregate data through a proxy before sending data to the central Stroom processing systems.
for disconnected networks where collected data can be manually transferred to a Stroom processing service.
for when one needs to add an additional node to an existing cluster.
Node Name Nomenclature
For simplicity sake, the node names used in this HOWTO are geared towards the Multi Node Stroom Cluster deployment. That is:
- the database node name is
stroomdb0.strmdev00.org - the processing node names are
stroomp00.strmdev00.org,stroomp01.strmdev00.org, andstroomp02.strmdev00.org - the first node in our cluster,
stroomp00.strmdev00.org, also has theCNAMEstroomp.strmdev00.org
In the case of the Proxy only deployments,
- the forwarding Stroom proxy node name is
stoomfp0.strmdev00.org - the standalone node name will be
stroomp00.strmdev00.org
Storage
Both the Stroom Proxy and Application store data. The typical requirement is
- directory for Stroom proxy to store inbound data files
- directory for Stroom application permanent data files (events, etc.)
- directory for Stroom application index data files
- directory for Stroom application working files (temporary files, output, etc.)
Where multiple processing nodes are involved, the application’s permanent data directories need to be accessible by all participating nodes.
Thus a hierarchy for a Stroom Proxy might be
/stroomdata/stroom-proxy
And for an Application node
/stroomdata/stroom-data/stroomdata/stroom-index/stroomdata/stroom-working
In the following examples, the storage hierarchy proposed will more suited for a multi node Stroom cluster, including the Forwarding or Standalone proxy deployments. This is to simplify the documentation. Thus, the above structure is generalised into
/stroomdata/stroom-working-p_nn_/proxy
And
/stroomdata/stroom-data-p_nn_/stroomdata/stroom-index-p_nn_/stroomdata/stroom-working-p_nn_
Where nn is a two digit node number. The reason for placing the proxy directory within the Application working area will be explained later.
All data should be owned by the Stroom processing user. In this HOWTO, we will use stroomuser
Multi Node Stroom Cluster (Proxy and Application) Deployment
In this deployment we will install the database on a given node then deploy both the Stroom Proxy and Stroom Application software to both our processing nodes. At this point we will then integrate a web service to run ‘in-front’ of our Stroom software and then perform the initial configuration of Stroom via the user interface.
Database Installation
The Stroom capability requires access to two MySQL/MariaDB databases. The first is for persisting application configuration and metadata information, and the second is for the Stroom Statistics capability. Instructions for installation of the Stroom databases can be found here. Although these instructions describe the deployment of the databases to their own node, there is no reason why one can’t just install them both on the first (or only) Stroom node.
Prerequisite Software Installation
Certain software packages are required for either the Stroom Proxy or Stroom Application to run.
The core software list is
java-1.8.0-openjdkjava-1.8.0-openjdk-develpolicycoreutils-pythonunzipzip- MariaDB or MySQL client
Most of the required software are packages available via standard repositories and hence we can simply execute
One has a choice of database clients. MariaDB is directly supported by Centos 7 and is simplest to install. This is done via
One could deploy the MySQL database software as the alternative.
To do this you need to install the MySQL Community repository files then install the client. Instructions for installation of the MySQL Community repository files can be found here or on the MySQL Site . Once you have installed the MySQL repository files, install the client via
Note that additional software will be required for other integration components (e.g. Apache httpd/mod_jk). This is described in the Web Service Integration section of this document.
Note also, that Standalone or Forwarding Stroom Proxy deployments do NOT need a database client deployed.
Entropy Issues in Virtual environments
TODO
This section is likely out of date due to changes in the Linux kernel and how SecureRandom is implemented. Unless you are experiencing delays, there is no need to installhaveged.
Both the Stroom Application and Stroom Proxy currently run on Tomcat (Version 7) which relies on the Java SecureRandom class to provide random values for any generated session identifiers as well as other components. In some circumstances the Java runtime can be delayed if the entropy source that is used to initialise SecureRandom is short of entropy. The delay is caused by the Java runtime waiting on the blocking entropy source /dev/random to have sufficient entropy. This quite often occurs in virtual environments were there are few sources that can contribute to a system’s entropy.
To view the current available entropy on a Linux system, run the command
A reasonable value would be over 2000 and a poor value would be below a few hundred.If you are deploying Stroom onto systems with low available entropy, the start time for the Stroom Proxy can be as high as 5 minutes and for the Application as high as 15 minutes.
One software based solution would be to install the haveged service that attempts to provide an easy-to-use, unpredictable random number generator based upon an adaptation of the HAVEGE algorithm.
To install execute
For background reading in this matter, see this reference or this reference .
Storage Scenario
For the purpose of this Installation HOWTO, the following sets up the storage hierarchy for a two node processing cluster. To share our permanent data we will use NFS. Accept that the NFS deployment described here is very simple, and in a production deployment, a lot more security controls should be used. Further,
Our hierarchy is
- Node:
stroomp00.strmdev00.org /stroomdata/stroom-data-p00- location to store Stroom application data files (events, etc.) for this node/stroomdata/stroom-index-p00- location to store Stroom application index files/stroomdata/stroom-working-p00- location to store Stroom application working files (e.g. temporary files, output, etc.) for this node/stroomdata/stroom-working-p00/proxy- location for Stroom proxy to store inbound data files- Node:
stroomp01.strmdev00.org /stroomdata/stroom-data-p01- location to store Stroom application data files (events, etc.) for this node/stroomdata/stroom-index-p01- location to store Stroom application index files/stroomdata/stroom-working-p01- location to store Stroom application working files (e.g. temporary files, output, etc.) for this node/stroomdata/stroom-working-p01/proxy- location for Stroom proxy to store inbound data files
Creation of Storage Hierarchy
So, we first create processing user on all nodes as per
And the relevant commands to create the above hierarchy would be
- Node:
stroomp00.strmdev00.org
- Node:
stroomp01.strmdev00.org
Deployment of NFS to share Stroom Storage
We will use NFS to cross mount the permanent data directories. That is
- node
stroomp00.strmdev00.orgwill mountstroomp01.strmdev00.org:/stroomdata/stroom-data-p01and, - node
stroomp01.strmdev00.orgwill mountstroomp00.strmdev00.org:/stroomdata/stroom-data-p00.
The HOWTO guide to deploy and configure NFS for our Scenario is here
Stroom Installation
Pre-installation setup
Before installing either the Stroom Proxy or Stroom Application, we need establish various files and scripts within the Stroom Processing user’s home directory to support the Stroom services and their persistence. This is setup is described here.
Stroom Proxy Installation
Instructions for installation of the Stroom Proxy can be found here.
Stroom Application Installation
Instructions for installation of the Stroom application can be found here.
Web Service Integration
One typically ‘fronts’ either a Stroom Proxy or Stroom Application with a secure web service such as Apache’s Httpd or NGINX. In our scenario, we will use SSL to secure the web service and further, we will use Apache’s Httpd.
We first need to create certificates for use by the web service. The following provides instructions for this. The created certificates can then be used when configuring the web service.
This HOWTO is designed to deploy Apache’s httpd web service as a front end (https) (to the user) and Apache’s mod_jk as the interface between Apache and the Stroom tomcat applications. The instructions to configure this can be found here.
Other Web service capability can be used, for example, NGINX .
Installation Validation
We will now check that the installation and web services integration has worked.
Sanity firewall check
To ensure you have the firewall correctly set up, the following command
should result in
public (active)
target: default
icmp-block-inversion: no
interfaces: enp0s3
sources:
services: dhcpv6-client http https nfs ssh
ports: 8009/tcp 9080/tcp 8080/tcp 9009/tcp
protocols:
masquerade: no
forward-ports:
sourceports:
icmp-blocks:
rich rules:
Test Posting of data to the Stroom service
You can test the data posting service with the command
which WILL result in an error as we have not configured the Stroom Application as yet. The error should look like
<html><head><title>Apache Tomcat/7.0.53 - Error report</title><style><!--H1 {font-family:Tahoma,Arial,sans-serif;color:white;background-color:#525D76;font-size:22px;} H2 {font-family:Tahoma,Arial,sans-serif;color:white;background-color:#525D76;font-size:16px;} H3 {font-family:Tahoma,Arial,sans-serif;color:white;background-color:#525D76;font-size:14px;} BODY {font-family:Tahoma,Arial,sans-serif;color:black;background-color:white;} B {font-family:Tahoma,Arial,sans-serif;color:white;background-color:#525D76;} P {font-family:Tahoma,Arial,sans-serif;background:white;color:black;font-size:12px;}A {color : black;}A.name {color : black;}HR {color : #525D76;}--></style> </head><body><h1>HTTP Status 406 - Stroom Status 110 - Feed is not set to receive data - </h1><HR size="1" noshade="noshade"><p><b>type</b> Status report</p><p><b>message</b> <u>Stroom Status 110 - Feed is not set to receive data - </u></p><p><b>description</b> <u>The resource identified by this request is only capable of generating responses with characteristics not acceptable according to the request "accept" headers.</u></p><HR size="1" noshade="noshade"><h3>Apache Tomcat/7.0.53</h3></body></html>
If you view the Stroom proxy log, ~/stroom-proxy/instance/logs/stroom.log, on both processing nodes, you will see on one node,
the datafeed.DataFeedRequestHandler events running under, in this case, the ajp-apr-9009-exec-1 thread indicating the failure
...
2017-01-03T03:35:47.366Z WARN [ajp-apr-9009-exec-1] datafeed.DataFeedRequestHandler (DataFeedRequestHandler.java:131) - "handleException()","Environment=EXAMPLE_ENVIRONMENT","Expect=100-continue","Feed=TEST-FEED-V1_0","GUID=39960cf9-e50b-4ae8-a5f2-449ee670d2eb","ReceivedTime=2017-01-03T03:35:46.915Z","RemoteAddress=192.168.2.220","RemoteHost=192.168.2.220","System=EXAMPLE_SYSTEM","accept=*/*","content-length=1051","content-type=application/x-www-form-urlencoded","host=stroomp.strmdev00.org","user-agent=curl/7.19.7 (x86_64-redhat-linux-gnu) libcurl/7.19.7 NSS/3.21 Basic ECC zlib/1.2.3 libidn/1.18 libssh2/1.4.2","Stroom Status 110 - Feed is not set to receive data"
2017-01-03T03:35:47.367Z ERROR [ajp-apr-9009-exec-1] zip.StroomStreamException (StroomStreamException.java:131) - sendErrorResponse() - 406 Stroom Status 110 - Feed is not set to receive data -
2017-01-03T03:35:47.368Z INFO [ajp-apr-9009-exec-1] datafeed.DataFeedRequestHandler$1 (DataFeedRequestHandler.java:104) - "doPost() - Took 478 ms to process (concurrentRequestCount=1) 406","Environment=EXAMPLE_ENVIRONMENT","Expect=100-continue","Feed=TEST-FEED-V1_0","GUID=39960cf9-e50b-4ae8-a5f2-449ee670d2eb","ReceivedTime=2017-01-03T03:35:46.915Z","RemoteAddress=192.168.2.220","RemoteHost=192.168.2.220","System=EXAMPLE_SYSTEM","accept=*/*","content-length=1051","content-type=application/x-www-form-urlencoded","host=stroomp.strmdev00.org","user-agent=curl/7.19.7 (x86_64-redhat-linux-gnu) libcurl/7.19.7 NSS/3.21 Basic ECC zlib/1.2.3 libidn/1.18 libssh2/1.4.2"
...
Further, if you execute the data posting command (curl) multiple times, you will see the load balancer working in that,
the above WARN/ERROR/INFO logs will swap between the proxy services (i.e. first error will be in stroomp00.strmdev00.org’s
proxy log file, then second on stroomp01.strmdev00.org’s proxy log file, then back to stroomp00.strmdev00.org and so on).
Stroom Application Configuration
Although we have installed our multi node Stroom cluster, we now need to configure it. We do this via the user interface (UI).
Logging into the Stroom UI for the first time
To log into the UI of your newly installed Stroom instance, present the base URL to your
Chrome
browser. In this deployment, you should enter the URLS
http://stroomp.strmdev00.org, or https://stroomp.strmdev00.org or https://stroomp.strmdev00.org/stroom, noting the first URLs
should automatically direct you to the last URL.
If you have personal certificates loaded in your Chrome browser, you may be asked which certificate to use to authenticate yourself
to stroomp.strmdev00.org:443. As Stroom has not been configured to use user certificates, the choice is not relevant, just choose one
and continue.
Additionally, if you are using self-signed certificates, your browser will generate an alert as per
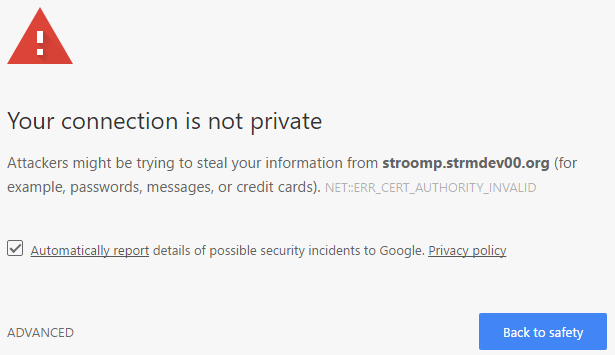
To proceed you need to select the ADVANCED hyperlink to see
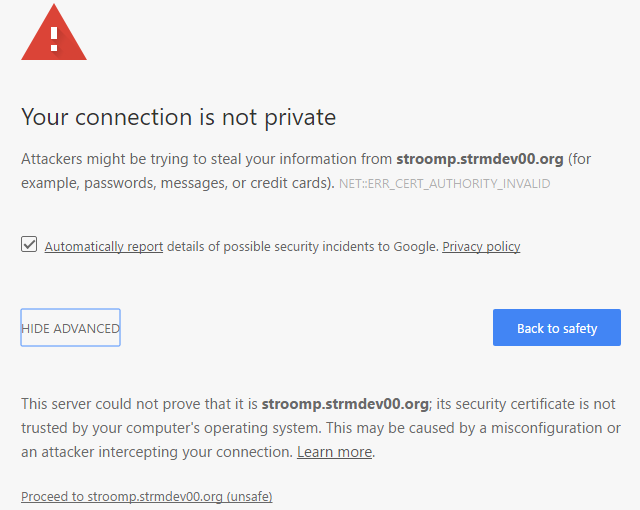
If you select the Proceed to stroomp.strmdev00.org (unsafe) hyper-link you will be presented with the standard Stroom UI login page.
This page has two panels - About Stroom and Login.
In the About Stroom panel we see an introductory description of Stroom in the top left and deployment details in the bottom left of the panel. The deployment details provide
Build Version:- the build version of the Stroom application deployedBuild Date:- the date the version was builtUp Date:- the install dateNode Name:- the node within the Stroom cluster you have connected to
Login with Stroom default Administrative User
Each new Stroom deployment automatically creates the administrative user admin and this user’s password is initially set to admin.
We will login as this user which also validates that the database and UI is working correctly in that you can login and the password is admin.
Create an Attributed User to perform configuration
We should configure Stroom using an attributed user account.
That is, we should create a user, in our case it will be burn (the author) and once created, we login with that account then perform the initial configuration activities.
You don’t have to do this, but it is sound security practice.
Once you have created the user you should log out of the admin account and log back in as our user burn.
Configure the Volumes for our Stroom deployment
Before we can store data within Stroom we need to configure the volumes we have allocated in our Storage hierarchy. The Volume Maintenance HOWTO shows how to do this.
Configure the Nodes for our Stroom deployment
In a Stroom cluster, nodes are expected to communicate with each other on port 8080 over http. Our installation in a multi node environment ensures the firewall will allow this but we also need to configure the nodes. This is achieved via the Stroom UI where we set a Cluster URL for each node. The following Node Configuration HOWTO demonstrates how do set the Cluster URL.
Data Stream Processing
To enable Stroom to process data, it’s Data Processors need to be enabled. There are NOT enabled by default on installation. The following section in our Stroom Tasks HowTo shows how to do this.
Testing our Stroom Application and Proxy Installation
To complete the installation process we will test that we can send and ingest data.
Add a Test Feed
In order for Stroom to be able to handle various data sources, be they Apache HTTPD web access logs, Microsoft Windows Event logs or Squid Proxy logs, Stroom must be told what the data is when it is received. This is achieved using Event Feeds. Each feed has a unique name within the system.
To test our installation can accept and ingest data, we will create a test Event feed.
The ’name’ of the feed will be TEST-FEED-V1_0.
Note that in a production environment is is best that a well defined nomenclature is used for feed ’names’.
For our testing purposes TEST-FEED-V1_0 is sufficient.
Sending Test Data
Before testing our new feed, we should restart both our Stroom application services so that any volume changes are propagated. This can be achieved by simply running the following on both nodes.
It is suggested you first log out of Stroom, if you are currently logged in and you should monitor the Stroom
application logs to ensure it has successfully restarted. Remember to use the T and Tp bash aliases we set up.
For this test, we will send the contents of /etc/group to our test feed. We will also send the file from the cluster’s database machine. The command to send this file is
We will test a number of features as part of our installation test. These are
- simple post of data
- simple post of data to validate load balancing is working
- simple post to direct feed interface
- simple post to direct feed interface to validate load balancing is working
- identify that the Stroom Proxy Aggregation is working correctly
As part of our testing will check the presence of the inbound data, as files, within the proxy storage area.
Now as the proxy storage area is also the location from which the Stroom application
automatically aggregates then ingests the data stored by the proxy, we can either turn off the
Proxy Aggregation task,
or attempt to
perform our tests noting that proxy aggregation occurs every 10 minutes by default. For simplicity, we will
turn off the Proxy Aggregation task.
We can now perform our tests. Follow the steps in the Data Posting Tests section of the Testing Stroom Installation HOWTO
Forwarding Stroom Proxy Deployment
In this deployment we will install a Stroom Forwarding Proxy which is designed to aggregate data posted to it for managed forwarding to
a central Stroom processing system. This scenario is assuming we are installing on the fully patch Centos 7.3 host, stroomfp0.strmdev00.org.
Further it assumes we have installed, configured and tested the destination Stroom system we will be forwarding to.
We will first deploy the Stroom Proxy then configure it as a Forwarding Proxy then integrate a web service to run ‘in-front’ of Proxy.
Prerequisite Software Installation for Forwarding Proxy
Certain software packages are required for the Stroom Proxy to run.
The core software list is
java-1.8.0-openjdkjava-1.8.0-openjdk-develpolicycoreutils-pythonunzipzip
Most of the required software are packages available via standard repositories and hence we can simply execute
Note that additional software will be required for other integration components (e.g. Apache httpd/mod_jk). This is described in the Web Service Integration for Forwarding Proxy section of this document.
Forwarding Proxy Storage
Since we are a proxy that stores data sent to it and forwards it each minute we have only one directory.
/stroomdata/stroom-working-fp0/proxy- location for Stroom proxy to store inbound data files prior to forwarding
You will note that these HOWTOs use a consistent storage nomenclature for simplicity of documentations.
Creation of Storage for Forwarding Proxy
We create the processing user, as per
Then create the storage hierarchy with the commands
Stroom Forwarding Proxy Installation
Pre-installation setup
Before installing the Stroom Forwarding Proxy, we need establish various files and scripts within the Stroom Processing user’s home directory to support the Stroom services and their persistence. This is setup is described here. Although this setup HOWTO is orientated towards a complete Stroom Proxy and Application installation, it does provide all the processing user setup requirements for a Stroom Proxy as well.
Stroom Forwarding Proxy Installation
Instructions for installation of the Stroom Proxy can be found here, noting you should follow the steps for configuring the proxy as a Forwarding proxy.
Web Service Integration for Forwarding Proxy
One typically ‘fronts’ a Stroom Proxy with a secure web service such as Apache’s Httpd or NGINX. In our scenario, we will use SSL to secure the web service and further, we will use Apache’s Httpd.
We first need to create certificates for use by the web service. The SSL Certificate Generation HOWTO provides instructions for this. The created certificates can then be used when configuring the web service. NOTE also, that for a forwarding proxy we will need to establish Key and Trust stores as well. This is also documented in the SSL Certificate Generation HOWTO here
This HOWTO is designed to deploy Apache’s httpd web service as a front end (https) (to the user) and Apache’s mod_jk as the interface between Apache and the Stroom tomcat applications. The instructions to configure this can be found here. Please take note of where a Stroom Proxy configuration item is different to that of a Stroom Application processing node.
Other Web service capability can be used, for example, NGINX .
Testing our Forwarding Proxy Installation
To complete the installation process we will test that we can send data to the forwarding proxy and that it forwards the files
it receives to the central Stroom processing system.
As stated earlier, it is assumed we have installed, configured and tested the destination central Stroom processing system and thus we will have a test Feed already established - TEST-FEED-V1_0.
Sending Test Data
For this test, we will send the contents of /etc/group to our test feed - TEST-FEED-V1_0.
It doesn’t matter from which host we send the file from.
The command to send file is
Before testing, it is recommended you set up to monitor the Stroom proxy logs on the central server as well as on the Forwarding Proxy server.
Follow the steps in the Forwarding Proxy Data Posting Tests section of the Testing Stroom Installation HOWTO
Standalone Stroom Proxy Deployment
In this deployment will install a Stroom Standalone Proxy which is designed to accept and store data posted to it for manual forwarding to
a central Stroom processing system. This scenario is assuming we are installing on the fully patch Centos 7.3 host, stroomsap0.strmdev00.org.
We will first deploy the Stroom Proxy then configure it as a Standalone Proxy then integrate a web service to run ‘in-front’ of Proxy.
Prerequisite Software Installation for Forwarding Proxy
Certain software packages are required for the Stroom Proxy to run.
The core software list is
java-1.8.0-openjdkjava-1.8.0-openjdk-develpolicycoreutils-pythonunzipzip
Most of the required software are packages available via standard repositories and hence we can simply execute
Note that additional software will be required for other integration components (e.g. Apache httpd/mod_jk). This is described in the Web Service Integration for Standalone Proxy section of this document.
Standalone Proxy Storage
Since we are a proxy that stores data sent to it we have only one directory.
/stroomdata/stroom-working-sap0/proxy- location for Stroom proxy to store inbound data files
You will note that these HOWTOs use a consistent storage nomenclature for simplicity of documentations.
Creation of Storage for Standalone Proxy
We create the processing user, as per
then create the storage hierarchy with the commands
Stroom Standalone Proxy Installation
Pre-installation setup
Before installing the Stroom Standalone Proxy, we need establish various files and scripts within the Stroom Processing user’s home directory to support the Stroom services and their persistence. This is setup is described here. Although this setup HOWTO is orientated towards a complete Stroom Proxy and Application installation, it does provide all the processing user setup requirements for a Stroom Proxy as well.
Stroom Standalone Proxy Installation
Instructions for installation of the Stroom Proxy can be found here, noting you should follow the steps for configuring the proxy as a Store_NoDB proxy.
Web Service Integration for Standalone Proxy
One typically ‘fronts’ a Stroom Proxy with a secure web service such as Apache’s Httpd or NGINX. In our scenario, we will use SSL to secure the web service and further, we will use Apache’s Httpd.
We first need to create certificates for use by the web service. The SSL Certificate Generation HOWTO provides instructions for this. The created certificates can then be used when configuring the web service. There is no need for Trust or Key stores.
This HOWTO is designed to deploy Apache’s httpd web service as a front end (https) (to the user) and Apache’s mod_jk as the interface between Apache and the Stroom tomcat applications. The instructions to configure this can be found here. Please take note of where a Stroom Proxy configuration item is different to that of a Stroom Application processing node.
Other Web service capability can be used, for example, NGINX .
Testing our Standalone Proxy Installation
To complete the installation process we will test that we can send data to the standalone proxy and it stores it.
Sending Test Data
For this test, we will send the contents of /etc/group to our test feed - TEST-FEED-V1_0. It doesn’t matter from which host we send the file from.
The command to send file is
Before testing, it is recommended you set up to monitor the Standalone Proxy logs.
Follow the steps in the Standalone Proxy Data Posting Tests section of the Testing Stroom Installation HOWTO
Addition of a Node to a Stroom Cluster Deployment
In this deployment we will deploy both the Stroom Proxy and Stroom Application software
to a new processing node we wish to add to our cluster. Once we have deploy and configured the Stroom software, we will then integrate a web
service to run ‘in-front’ of our Stroom software, and then perform the initial configuration of to add this node via the user interface. The
node we will add is stroomp02.strmdev00.org.
Grant access to the database for this node
Connect to the Stroom database as the administrative (root) user, via the command
and at the MariaDB [(none)]> or mysql> prompt enter
Prerequisite Software Installation
Certain software packages are required for either the Stroom Proxy or Stroom Application to run.
The core software list is
java-1.8.0-openjdkjava-1.8.0-openjdk-develpolicycoreutils-pythonunzipzip- MariaDB or MySQL client
Most of the required software are packages available via standard repositories and hence we can simply execute
In the above instance, the database client choice is MariaDB as it is directly supported by Centos 7. One could deploy the MySQL database software as the alternative. If you have chosen a different database for the already deployed Stroom Cluster then you should use that one. See earlier in this document on how to install the MySQL Community client.
Note that additional software will be required for other integration components (e.g. Apache httpd/mod_jk). This is described in the Web Service Integration section of this document.
Storage Scenario
To maintain our Storage Scenario them, the scenario for this node is
- Node:
stroomp02.strmdev00.org/stroomdata/stroom-data-p02- location to store Stroom application data files (events, etc.) for this node/stroomdata/stroom-index-p02- location to store Stroom application index files/stroomdata/stroom-working-p02- location to store Stroom application working files (e.g. tmp, output, etc.) for this node/stroomdata/stroom-working-p02/proxy- location for Stroom proxy to store inbound data files
Creation of Storage Hierarchy
So, we first create processing user on our new node as per
Then create the storage via
As we need to share this new nodes permanent data directories to the existing nodes in the Cluster, we need to create mount point directories on our existing nodes in addition to deploying NFS.
So we execute on
- Node:
stroomp00.strmdev00.org
And on
- Node:
stroomp01.strmdev00.org
Deployment of NFS to share Stroom Storage
We will use NFS to cross mount the permanent data directories. That is
- node
stroomp00.strmdev00.orgwill mountstroomp01.strmdev00.org:/stroomdata/stroom-data-p01and,stroomp02.strmdev00.org:/stroomdata/stroom-data-p02and,
- node
stroomp01.strmdev00.orgwill mountstroomp00.strmdev00.org:/stroomdata/stroom-data-p00andstroomp02.strmdev00.org:/stroomdata/stroom-data-p02
- node
stroomp02.strmdev00.orgwill mountstroomp00.strmdev00.org:/stroomdata/stroom-data-p00andstroomp01.strmdev00.org:/stroomdata/stroom-data-p01
The HOWTO guide to deploy and configure NFS for our Scenario is here.
Stroom Installation
Pre-installation setup
Before installing either the Stroom Proxy or Stroom Application, we need establish various files and scripts within the Stroom Processing user’s home directory to support the Stroom services and their persistence. This is setup is described here. Note you should remember to set the N bash variable when generating the Environment Variable files to 02.
Stroom Proxy Installation
Instructions for installation of the Stroom Proxy can be found here. Note you
will be deploying a Store proxy and during the setup execution ensure you enter the appropriate values for NODE stroomp02
and REPO_DIR /stroomdata/stroom-working-p02/proxy. All other values will be the same.
Stroom Application Installation
Instructions for installation of the Stroom application can be found here.
When executing the setup script ensure you enter the appropriate values for TEMP_DIR /stroomdata/stroom-working-p02 and NODE stroomp02.
All other values will be the same. Note also that you will not have to wait for the ‘first’ node to initialise the Stroom database as this would have already been done when you first deployed your Stroom Cluster.
Web Service Integration
One typically ‘fronts’ either a Stroom Proxy or Stroom Application with a secure web service such as Apache’s Httpd or NGINX. In our scenario, we will use SSL to secure the web service and further, we will use Apache’s Httpd.
As we are a cluster, we use the same certificate as the other nodes. Thus we need to gain the certificate package from an existing node.
So, on stroomp00.strmdev00.org, we replicate the directory ~/stroomuser/stroom-jks to our new node.
That is, tar it up, copy the tar file to stroomp02 and untar it.
We can make use of the other node’s mounted file system.
Then on our new node (stroomp02.strmdev00.org) we extract the data.
Now ensure protection, ownership and SELinux context for these files by running
This HOWTO is designed to deploy Apache’s httpd web service as a front end (https) (to the user) and Apache’s mod_jk as the interface between Apache and the Stroom tomcat applications. The instructions to configure this can be found here. You should pay particular attention to the section on the Apache Mod_JK configuration as you MUST regenerate the Mod_JK workers.properties file on the existing cluster nodes as well as generating it on our new node.
Other Web service capability can be used, for example, NGINX .
Note that once you have integrated the web services for our new node, you will need to restart the Apache systemd process on the existing two nodes so that the new Mod_JK configuration has taken place.
Installation Validation
We will now check that the installation and web services integration has worked. We do this with a simple firewall check and later perform complete integration tests.
Sanity firewall check
To ensure you have the firewall correctly set up, the following command
Should result in
public (active)
target: default
icmp-block-inversion: no
interfaces: enp0s3
sources:
services: dhcpv6-client http https nfs ssh
ports: 8009/tcp 9080/tcp 8080/tcp 9009/tcp
protocols:
masquerade: no
forward-ports:
sourceports:
icmp-blocks:
rich rules:
Stroom Application Configuration - New Node
We will need to configure this new node’s volumes, set its Cluster URL and enable its Stream Processors. We do this by logging into the Stroom User Interface (UI) with an account with Administrator privileges. It is recommended you use a attributed user for this activity. Once you have logged in you can configure this new node.
Configure the Volumes for our Stroom deployment
Before we can store data on this new Stroom node we need to configure its volumes we have allocated in our Storage hierarchy. The section on adding new volumes in the Volume Maintenance HOWTO shows how to do this.
Configure the Nodes for our Stroom deployment
In a Stroom cluster, nodes are expected to communicate with each other on port 8080 over http. Our installation in a multi node environment ensures the firewall will allow this but we also need to configure the new node. This is achieved via the Stroom UI where we set a Cluster URL for our node. The section on Configuring a new node in the Node Configuration HOWTO demonstrates how do set the Cluster URL.
Data Stream Processing
To enable Stroom to process data, it’s Data Processors need to be enabled. They are NOT enabled by default on installation. The following section in our Stroom Tasks HowTo shows how to do this.
Testing our New Node Installation
To complete the installation process we will test that our new node has successfully integrated into our cluster.
First we need to ensure we have restarted the Apache Httpd service (httpd.service) on the original nodes so that the new workers.properties configuration files take effect.
We now test the node integration by running the tests we use to validate a Multi Node Stroom Cluster Deployment found
here noting we should
monitor all three nodes proxy and application log files. Basically we are looking to see that this new node participates in the
load balancing for the stroomp.strmdev00.org cluster.
4.4.4 - Installation of Stroom Application
This HOWTO describes the installation and initial configuration of the Stroom Application.
TODO
This section was written for Stroom v5, so some parts are out of date.Assumptions
- the user has reasonable RHEL/Centos System administration skills
- installation is on a fully patched minimal Centos 7.3 instance.
- the Stroom
stroomdatabase has been created and resides on the hoststroomdb0.strmdev00.orglistening on port 3307. - the Stroom
stroomdatabase user isstroomuserwith a password ofStroompassword1@. - the Stroom
statisticsdatabase has been created and resides on the hoststroomdb0.strmdev00.orglistening on port 3308. - the Stroom
statisticsdatabase user isstroomuserwith a password ofStroompassword2@. - the application user
stroomuserhas been created - the user is or has deployed the two node Stroom cluster described here
- the user has set up the Stroom processing user as described here
- the prerequisite software has been installed
- when a screen capture is documented, data entry is identified by the data surrounded by ‘<’ ‘>’ . This excludes enter/return presses.
Confirm Prerequisite Software Installation
The following command will ensure the prerequisite software has been deployed
or
Test Database connectivity
We need to test access to the Stroom databases on stroomdb0.strmdev00.org. We do this using the client mysql utility. We note that we
must enter the stroomuser user’s password set up in the creation of the database earlier (Stroompassword1@) when connecting to
the stroom database and we must enter the stroomstats user’s password (Stroompassword2@) when connecting to the statistics database.
We first test we can connect to the stroom database and then set the default database to be stroom.
Enter password: <__ Stroompassword1@ __>
In the case of a MySQL Community deployment you will see
Enter password: <__ Stroompassword1@ __>
We next test connecting to the statistics database and verify we can set the default database to be statistics.
Enter password: <__ Stroompassword2@ __>
In the case of a MySQL Community deployment you will see
Enter password: <__ Stroompassword2@ __>
If there are any errors, correct them.
Get the Software
The following will gain the identified, in this case release 5.0-beta.18, Stroom Application software release from github, then deploy it. You should regularly monitor the site for newer releases.
Configure the Software
We install the application via
During which one is prompted for a number of configuration settings. Use the following
TEMP_DIR should be set to '/stroomdata/stroom-working-p00' or '/stroomdata/stroom-working-p01' etc depending on the node we are installing on
NODE to be the hostname (not FQDN) of your host (i.e. 'stroomp00' or 'stroomp01' in our multi node scenario)
RACK can be ignored, just press return
PORT_PREFIX should use the default, just press return
JDBC_CLASSNAME should use the default, just press return
JDBC_URL to 'jdbc:mysql://stroomdb0.strmdev00.org:3307/stroom?useUnicode=yes&characterEncoding=UTF-8'
DB_USERNAME should be our processing user, 'stroomuser'
DB_PASSWORD should be the one we set when creating the stroom database, that is 'Stroompassword1@'
JPA_DIALECT should use the default, just press return
JAVA_OPTS can use the defaults, but ensure you have sufficient memory, either change or accept the default
STROOM_STATISTICS_SQL_JDBC_CLASSNAME should use the default, just press return
STROOM_STATISTICS_SQL_JDBC_URL to 'jdbc:mysql://stroomdb0.strmdev00.org:3308/statistics?useUnicode=yes&characterEncoding=UTF-8'
STROOM_STATISTICS_SQL_DB_USERNAME should be our processing user, 'stroomstats'
STROOM_STATISTICS_SQL_DB_PASSWORD should be the one we set when creating the stroom database, that is 'Stroompassword2@'
STATS_ENGINES should use the default, just press return
CONTENT_PACK_IMPORT_ENABLED should use the default, just press return
CREATE_DEFAULT_VOLUME_ON_START should use the default, just press return
At this point, the script will configure the application. There should be no errors, but review the output. If you made an error then just re-run the script.
You will note that TEMP_DIR is the same directory we used for our STROOM_TMP environment variable when we set up the processing user scripts.
Note that if you are deploying a single node environment, where the database is also running on your Stroom node, then the JDBC_URL setting can be the default.
Start the Application service
Now we start the application. In the case of multi node Stroom deployment, we start the Stroom application on the first node in the cluster, then wait until it has initialised the database commenced its Lifecycle task. You will need to monitor the log file to see its completed initialisation.
So as the stroomuser start the application with the command
stroom-app/instance/logs for any errors. Initially you will see the log files localhost_access_log.YYYY-MM-DD.txt
and catalina.out. Check them for errors and correct (or post a question). The log4j warnings in catalina.out can be ignored.
Eventually the log file stroom-app/instance/logs/stroom.log will appear. Again check it for errors and then wait for the application to
be initialised. That is, wait for the Lifecycle service thread to start. This is indicated by the message
INFO [Thread-11] lifecycle.LifecycleServiceImpl (LifecycleServiceImpl.java:166) - Started Stroom Lifecycle service
The directory stroom-app/instance/logs/events will also appear with an empty file with
the nomenclature events_YYYY-MM-DDThh:mm:ss.msecZ. This is the directory for storing Stroom’s application event logs. We will return to this
directory and its content in a later HOWTO.
If you have a multi node configuration, then once the database has initialised, start the application service on all other nodes. Again with
and then monitor the files in itsstroom-app/instance/logs for any errors. Note that in multi node configurations,
you will see server.UpdateClusterStateTaskHandler messages in the log file of the form
WARN [Stroom P2 #9 - GenericServerTask] server.UpdateClusterStateTaskHandler (UpdateClusterStateTaskHandler.java:150) - discover() - unable to contact stroomp00 - No cluster call URL has been set for node: stroomp00
This is ok as we will establish the cluster URL’s later.
Multi Node Firewall Provision
In the case of a multi node Stroom deployment, you will need to open certain ports to allow Tomcat to communicate to all nodes participating
in the cluster. Execute the following on all nodes. Note you will need to drop out of the stroomuser shell prior to execution.
In a production environment you would improve the above firewall settings - to perhaps limit the communication to just the Stroom processing nodes.
4.4.5 - Installation of Stroom Proxy
This HOWTO describes the installation and configuration of the Stroom Proxy software.
TODO
This section was written for Stroom-Proxy v5, so is out of date.Assumptions
The following assumptions are used in this document.
- The user has reasonable RHEL/Centos System administration skills.
- Installation is on a fully patched minimal Centos 7.3 instance.
- The Stroom database has been created and resides on the host
stroomdb0.strmdev00.orglistening on port 3307. - The Stroom database user is
stroomuserwith a password ofStroompassword1@. - The application user
stroomuserhas been created. - The user is or has deployed the two node Stroom cluster described here.
- The user has set up the Stroom processing user as described here.
- The prerequisite software has been installed.
- When a screen capture is documented, data entry is identified by the data surrounded by ‘<’ ‘>’ . This excludes enter/return presses.
Confirm Prerequisite Software Installation
The following command will ensure the prerequisite software has been deployed
or
Note that we do NOT need the database client software for a Forwarding or Standalone proxy.
Get the Software
The following will gain the identified, in this case release 5.1-beta.10, Stroom Application software release from github, then deploy it. You should regularly monitor the site for newer releases.
Configure the Software
There are three different types of Stroom Proxy
-
Store - A store proxy accepts batches of events, as files. It will validate the batch with the database then store the batches as files in a configured directory.
-
Store_No_DB - A store_no_DB proxy accepts batches of events, as files. It has no connectivity to the database, so it assumes all batches are valid, so it stores the batches as files in a configured directory.
-
Forwarding - A forwarding proxy accepts batches of events, as files. It has indirect connectivity to the database via the destination proxy, so it validates the batches then stores the batches as files in a configured directory until they are periodically forwarded to the configured destination Stroom proxy.
We will demonstrate the installation of each.
Store Proxy Configuration
In our Store Proxy description below, we will use the multi node deployment scenario. That is we are deploying the Store proxy on multiple Stroom nodes (stroomp00, stroomp01) and we have configured our storage as per the Storage Scenario which means the directories to install the inbound batches of data are /stroomdata/stroom-working-p00/proxy and /stroomdata/stroom-working-p01/proxy depending on the node.
To install a Store proxy, we run
during which one is prompted for a number of configuration settings. Use the following
NODE to be the hostname (not FQDN) of your host (i.e. 'stroomp00' or 'stroomp01' depending on the node we are installing on)
PORT_PREFIX should use the default, just press return
REPO_DIR should be set to '/stroomdata/stroom-working-p00/proxy' or '/stroomdata/stroom-working-p01/proxy' depending on the node we are installing on
REPO_FORMAT can be left as the default, just press return
JDBC_CLASSNAME should use the default, just press return
JDBC_URL should be set to 'jdbc:mysql://stroomdb0.strmdev00.org:3307/stroom'
DB_USERNAME should be our processing user, 'stroomuser'
DB_PASSWORD should be the one we set when creating the stroom database, that is 'Stroompassword1@'
JAVA_OPTS can use the defaults, but ensure you have sufficient memory, either change or accept the default
At this point, the script will configure the proxy. There should be no errors, but review the output. If you make a mistake in the above, just re-run the script.
NOTE: The selection of the REPO_DIR above and the setting of the STROOM_TMP environment variable earlier ensure that not only inbound files are placed in the REPO_DIR location but the Stroom Application itself will access the same directory when it aggregates inbound data for ingest in its proxy aggregation threads.
Forwarding Proxy Configuration
In our Forwarding Proxy description below, we will deploy on a host named stroomfp0 and it will store the files in /stroomdata/stroom-working-fp0/proxy. Remember, we are being consistent with our Storage hierarchy to make documentation and scripting simpler. Our destination host to periodically forward the files to will be stroomp.strmdev00.org (the CNAME for stroomp00.strmdev00.org).
To install a Forwarding proxy, we run
during which one is prompted for a number of configuration settings. Use the following
NODE to be the hostname (not FQDN) of your host (i.e. 'stroomfp0' in our example)
PORT_PREFIX should use the default, just press return
REPO_DIR should be set to '/stroomdata/stroom-working-fp0/proxy' which we created earlier.
REPO_FORMAT can be left as the default, just press return
FORWARD_SERVER should be set to our stroom server. (i.e. 'stroomp.strmdev00.org' in our example)
JAVA_OPTS can use the defaults, but ensure you have sufficient memory, either change or accept the default
At this point, the script will configure the proxy. There should be no errors, but review the output.
Store No Database Proxy Configuration
In our Store_No_DB Proxy description below, we will deploy on a host named stroomsap0 and it will store the files in /stroomdata/stroom-working-sap0/proxy. Remember, we are being consistent with our Storage hierarchy to make documentation and scripting simpler.
To install a Store_No_DB proxy, we run
During which one is prompted for a number of configuration settings. Use the following
NODE to be the hostname (not FQDN) of your host (i.e. 'stroomsap0' in our example)
PORT_PREFIX should use the default, just press return
REPO_DIR should be set to '/stroomdata/stroom-working-sap0/proxy' which we created earlier.
REPO_FORMAT can be left as the default, just press return
JAVA_OPTS can use the defaults, but ensure you have sufficient memory, either change or accept the default
At this point, the script will configure the proxy. There should be no errors, but review the output.
Apache/Mod_JK change
For all proxy deployments, if we are using Apache’s mod_jk then we need to ensure the proxy’s AJP connector specifies a 64K packetSize. View the file stroom-proxy/instance/conf/server.xml to ensure the Connector element for the AJP protocol has a packetSize attribute of 65536. For example,
shows
<Connector port="9009" protocol="AJP/1.3" connectionTimeout="20000" redirectPort="8443" maxThreads="200" packetSize="65536" />
This check is required for earlier releases of the Stroom Proxy. Releases since v5.1-beta.4 have set the AJP packetSize.
Start the Proxy Service
We can now manually start our proxy service. Do so as the stroomuser with the command
stroom-proxy/instance/logs for any errors. Initially you will see the log files localhost_access_log.YYYY-MM-DD.txt and catalina.out. Check them for errors and correct (or pose a question to this arena).
The context path and unknown version warnings in catalina.out can be ignored.
Eventually (about 60 seconds) the log file stroom-proxy/instance/logs/stroom.log will appear. Again check it for errors.
The proxy will have completely started when you see the messages
INFO [localhost-startStop-1] spring.StroomBeanLifeCycleReloadableContextBeanProcessor (StroomBeanLifeCycleReloadableContextBeanProcessor.java:109) - ** proxyContext 0 START COMPLETE **
and
INFO [localhost-startStop-1] spring.StroomBeanLifeCycleReloadableContextBeanProcessor (StroomBeanLifeCycleReloadableContextBeanProcessor.java:109) - ** webContext 0 START COMPLETE **
If you leave it for a while you will eventually see cyclic (10 minute cycle) messages of the form
INFO [Repository Reader Thread 1] repo.ProxyRepositoryReader (ProxyRepositoryReader.java:170) - run() - Cron Match at YYYY-MM-DD ...
If a proxy takes too long to start, you should read the section on Entropy Issues.
Proxy Repository Format
A Stroom Proxy stores inbound files in a hierarchical file system whose root is supplied during the proxy setup (REPO_DIR) and as files arrive they are given a repository id that is a one-up number starting at one (1). The files are stored in a specific repository format.
The default template is ${pathId}/${id} and this pattern will produce the following output files under REPO_DIR for the given repository id
| Repository Id | FilePath |
|---|---|
| 1 | 000.zip |
| 100 | 100.zip |
| 1000 | 001/001000.zip |
| 10000 | 010/010000.zip |
| 100000 | 100/100000.zip |
Since version v5.1-beta.4, this template can be specified during proxy setup via the entry to the Stroom Proxy Repository Format prompt
...
@@REPO_FORMAT@@ : Stroom Proxy Repository Format [${pathId}/${id}] >
...
The template uses replacement variables to form the file path. As indicated above, the default template is ${pathId}/${id} where ${pathId} is the automatically generated directory for a given repository id and ${id} is the repository id.
Other replacement variables can be used to in the template including http header meta data parameters (e.g. ‘${feed}’) and time based parameters (e.g. ‘${year}’). Replacement variables that cannot be resolved will be output as ‘_’. You must ensure that all templates include the ‘${id}’ replacement variable at the start of the file name, failure to do this will result in an invalid repository.
Available time based parameters are based on the file’s time of processing and are zero filled (excluding ms).
| Parameter | Description |
|---|---|
year |
four digit year |
month |
two digit month |
day |
two digit day |
hour |
two digit hour |
minute |
two digit minute |
second |
two digit second |
millis |
three digit milliseconds value |
ms |
milliseconds since Epoch value |
Proxy Repository Template Examples
For each of the following templates applied to a Store NoDB Proxy, the resultant proxy directory tree is shown after three posts were sent to the test feed TEST-FEED-V1_0 and two posts to the test feed FEED-NOVALUE-V9_0
Example A - The default - ${pathId}/${id}
Example B - A feed orientated structure - ${feed}/${year}/${month}/${day}/${pathId}/${id}
Example C - A date orientated structure - ${year}/${month}/${day}/${pathId}/${id}
Example D - A feed orientated structure, but with a bad parameter - ${feed}/${badparam}/${day}/${pathId}/${id}
and one would also see a warning for each post in the proxy’s log file of the form
WARN [ajp-apr-9009-exec-4] repo.StroomFileNameUtil (StroomFileNameUtil.java:133) - Unused variables found: [badparam]
4.4.6 - NFS Installation and Configuration
The following is a HOWTO to assist users in the installation and set up of NFS to support the sharing of directories in a two node Stroom cluster or add a new node to an existing cluster.
Assumptions
The following assumptions are used in this document.
- the user has reasonable RHEL/Centos System administration skills
- installations are on Centos 7.3 minimal systems (fully patched)
- the user is or has deployed the example two node Stroom cluster storage hierarchy described here
- the configuration of this NFS is NOT secure. It is highly recommended to improve its security in a production environment. This could include improved firewall configuration to limit NFS access, NFS4 with Kerberos etc.
Installation of NFS software
We install NFS on each node, via
and enable the relevant services, viasudo systemctl enable rpcbind
sudo systemctl enable nfs-server
sudo systemctl enable nfs-lock
sudo systemctl enable nfs-idmap
sudo systemctl start rpcbind
sudo systemctl start nfs-server
sudo systemctl start nfs-lock
sudo systemctl start nfs-idmap
Configuration of NFS exports
We now export the node’s /stroomdata directory (in case you want to share the working directories) by configuring /etc/exports. For simplicity sake, we will allow all nodes with the hostname nomenclature of stroomp*.strmdev00.org to mount the /stroomdata directory.
This means the same configuration applies to all nodes.
# Share Stroom data directory
/stroomdata stroomp*.strmdev00.org(rw,sync,no_root_squash)
This can be achieved with the following on both nodes
On both nodes restart the NFS service to ensure the above export takes effect via
So that our nodes can offer their filesystems, we need to enable NFS access on the firewall. This is done via
Test Mounting
You should do test mounts on each node.
- Node:
stroomp00.strmdev00.org
- Node:
stroomp01.strmdev00.org
If you are concerned you can’t see the mount with a df try a df --type=nfs4 -a or a sudo df. Irrespective, once the mounting works, make the mounts permanent by adding the following to each node’s /etc/fstab file.
- Node:
stroomp00.strmdev00.org
stroomp01.strmdev00.org:/stroomdata/stroom-data-p01 /stroomdata/stroom-data-p01 nfs4 soft,bg
achieved with
- Node:
stroomp01.strmdev00.org
stroomp00.strmdev00.org:/stroomdata/stroom-data-p00 /stroomdata/stroom-data-p00 nfs4 soft,bg
achieved with
At this point reboot all processing nodes to ensure the directories mount automatically. You may need to give the nodes a minute to do this.
Addition of another Node
If one needs to add another node to the cluster, lets say, stroomp02.strmdev00.org, on which /stroomdata follows the same storage hierarchy
as the existing nodes and all nodes have added mount points (directories) for this new node, you would take the following steps in order.
-
Node:
stroomp02.strmdev00.org- Install NFS software as above
- Configure the exports file as per
- Restart the NFS service and make the firewall enable NFS access as per
- Test mount the existing node file systems
- Once the test mounts work, we make them permanent by adding the following to the /etc/fstab file.
stroomp00.strmdev00.org:/home/stroomdata/stroom-data-p00 /home/stroomdata/stroom-data-p00 nfs4 soft,bg
stroomp01.strmdev00.org:/home/stroomdata/stroom-data-p01 /home/stroomdata/stroom-data-p01 nfs4 soft,bg
achieved with
-
Node:
stroomp00.strmdev00.organdstroomp01.strmdev00.org- Test mount the new node’s filesystem as per
- Once the test mount works, make the mount permanent by adding the following to the /etc/fstab file
stroomp02.strmdev00.org:/stroomdata/stroom-data-p02 /stroomdata/stroom-data-p02 nfs4 soft,bg
achieved with
4.4.7 - Node Cluster URL Setup
Configuring Stroom cluster URLs
In a Stroom cluster, Nodes are expected to communicate with each other on port 8080 over http. To facilitate this, we need to set each node’s Cluster URL and the following demonstrates this process.
Assumptions
- an account with the
AdministratorApplication Permission is currently logged in. - we have a multi node Stroom cluster with two nodes,
stroomp00andstroomp01 - appropriate firewall configurations have been made
- in the scenario of adding a new node to our multi node deployment, the node added will be
stroomp02
Configure Two Nodes
To configure the nodes, move to the Monitoring item of the Main Menu and select it to bring up the Monitoring sub-menu.
then move down and select the Nodes sub-item to be presented with the Nodes configuration tab as seen below.

To set stroomp00’s Cluster URL, move to its line in the display and select it. It will be highlighted.

Then move the cursor to the Edit Node icon in the top left of
the Nodes tab and select it. On selection the Edit Node configuration window will be displayed and into
the Cluster URL: entry box, enter the first node’s URL of http://stroomp00.strmdev00.org:8080/stroom/clustercall.rpc
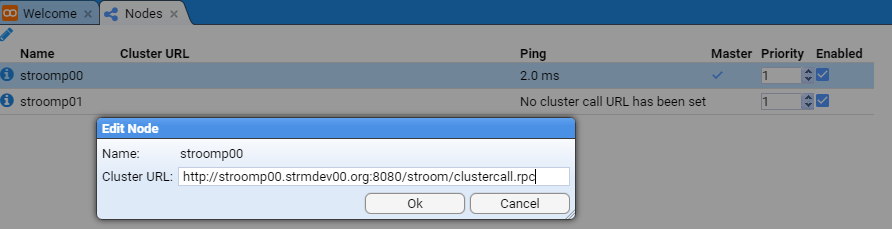
then press the at which we see the Cluster URL has been set for the first node as per

We next select the second node

then move the cursor to the Edit Node icon in the top left of
the Nodes tab and select it. On selection the Edit Node configuration window will be displayed and into
the Cluster URL: entry box, enter the second node’s URL of http://stroomp01.strmdev00.org:8080/stroom/clustercall.rpc

then press the button.
At this point we will see both nodes have the Cluster URLs set.
.

You may need to press the Refresh icon found at top left of Nodes configuration tab, until both nodes show healthy pings.
.

If you do not get ping results for each node, then they are not configured correctly. In that situation, review all log files and processes that you have performed.
Once you have set the Cluster URLs of each node you should also set the master assignment priority for each node to
be different to all of the others. In the image above both have been assigned equal priority - 1. We will
change stroomp00 to have a different priority - 3. You should note that the node with the highest
priority gains the Master node status.
.

Configure New Node
When one expands a Multi Node Stroom cluster deployment, after the installation of the Stroom Proxy and Application software and services on the new node, one has to configure the new node’s Cluster URL.
To configure the new node, move to the Monitoring item of the Main Menu and select it to bring up the Monitoring sub-menu.
then move down and select the Nodes sub-item to be presented with the Nodes configuration tab as seen below.

To set stroomp02’s Cluster URL, move to its line in the display and select it. It will be highlighted.

Then move the cursor to the Edit Node icon in the top left
of the Nodes tab and select it. On selection the Edit Node configuration window will be displayed
and into the Cluster URL: entry box, enter the first node’s URL of http://stroomp02.strmdev00.org:8080/stroom/clustercall.rpc
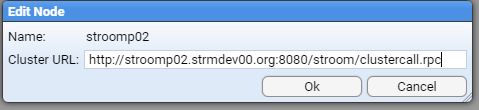
then press the button at which we see the Cluster URL has been set for the first node as per

You need to press the Refresh icon found at top left of Nodes configuration tab, until the new node shows a healthy ping.
.

If you do not get a ping results for the new node, then it is not configured correctly. In that situation, review all log files and processes that you have performed.
Once you have set the Cluster URL you should also set the master assignment priority for each node to
be different to all of the others. In the image above both stroomp01 and the new node, stroomp02, have been
assigned equal priority - 1. We will change stroomp01 to have a different priority - 2. You should note that the node
with the highest priority maintains the Master node status.
.

4.4.8 - Processing User setup
This HOWTO demonstrates how to set up various files and scripts that the Stroom processing user requires.
Assumptions
- the user has reasonable RHEL/Centos System administration skills
- installation is on a fully patched minimal Centos 7.3 instance.
- the application user
stroomuserhas been created - the user is deploying for either
- the example two node Stroom cluster whose storage is described here
- a simple Forwarding or Standalone Proxy
- adding a node to an existing Stroom cluster
Set up the Stroom processing user’s environment
To automate the running of a Stroom Proxy or Application service under our Stroom processing user, stroomuser, there are a number of configuration files and scripts we need to deploy.
We first become the stroomuser
Environment Variable files
When either a Stroom Proxy or Application starts, it needs predefined environment variables. We set these up in the stroomuser home directory.
We need two files for this. The first is for the Stroom processes themselves and the second is for the Stroom systemd service we deploy. The
difference is that for the Stroom processes, we need to export the environment variables where as the Stroom systemd service file just needs to read them.
The JAVA_HOME and PATH variables are to support Java running the Tomcat instances. The STROOM_TMP variable is set to a working area for the Stroom Application to use. The application accesses this environment variable internally via the ${stroom_tmp} context variable. Note that we only need the STROOM_TMP variable for Stroom Application deployments, so one could remove it from the files for a Forwarding or Standalone proxy deployment.
With respect to the working area, we will make use of the Storage Scenario we have defined and hence use the directory /stroomdata/stroom-working-p_nn_ where nn is the hostname node number (i.e. 00 for host stroomp00, 01 for host stroomp01, etc).
So, for the first node, 00, we run
N=00
F=~/env.sh
printf '# Environment variables for Stroom services\n' > ${F}
printf 'export JAVA_HOME=/usr/lib/jvm/java-1.8.0\n' >> ${F}
printf 'export PATH=${JAVA_HOME}/bin:${PATH}\n' >> ${F}
printf 'export STROOM_TMP=/stroomdata/stroom-working-p%s\n' ${N} >> ${F}
chmod 640 ${F}
F=~/env_service.sh
printf '# Environment variables for Stroom services, executed out of systemd service\n' > ${F}
printf 'JAVA_HOME=/usr/lib/jvm/java-1.8.0\n' >> ${F}
printf 'PATH=${JAVA_HOME}/bin:${PATH}\n' >> ${F}
printf 'STROOM_TMP=/stroomdata/stroom-working-p%s\n' ${N} >> ${F}
chmod 640 ${F}
Then we can change the N variable on each successive node and run the above.
Alternately, for a Stroom Forwarding or Standalone proxy, the following would be sufficient
F=~/env.sh
printf '# Environment variables for Stroom services\n' > ${F}
printf 'export JAVA_HOME=/usr/lib/jvm/java-1.8.0\n' >> ${F}
printf 'export PATH=${JAVA_HOME}/bin:${PATH}\n' >> ${F}
chmod 640 ${F}
F=~/env_service.sh
printf '# Environment variables for Stroom services, executed out of systemd service\n' > ${F}
printf 'JAVA_HOME=/usr/lib/jvm/java-1.8.0\n' >> ${F}
printf 'PATH=${JAVA_HOME}/bin:${PATH}\n' >> ${F}
chmod 640 ${F}
And we integrate the environment into our bash instantiation script as well as setting up useful bash functions. This is the same for all nodes.
Note that the T and Tp aliases are always installed whether they are of use of not. IE a Standalone or Forwarding Stroom Proxy could make
no use of the T shell alias.
F=~/.bashrc
printf '. ~/env.sh\n\n' >> ${F}
printf '# Simple functions to support Stroom\n' >> ${F}
printf '# T - continually monitor (tail) the Stroom application log\n' >> ${F}
printf '# Tp - continually monitor (tail) the Stroom proxy log\n' >> ${F}
printf 'function T {\n tail --follow=name ~/stroom-app/instance/logs/stroom.log\n}\n' >> ${F}
printf 'function Tp {\n tail --follow=name ~/stroom-proxy/instance/logs/stroom.log\n}\n' >> ${F}
And test it has set up correctly
which should return
/usr/lib/jvm/java-1.8.0/bin/java
Establish Simple Start/Stop Scripts
We create some simple start/stop scripts that start, or stop, all the available Stroom services. At this point, it’s just the Stroom application and proxy.
if [ ! -d ~/bin ]; then mkdir ~/bin; fi
F=~/bin/StartServices.sh
printf '#!/bin/bash\n' > ${F}
printf '# Start all Stroom services\n' >> ${F}
printf '# Set list of services\n' >> ${F}
printf 'Services="stroom-proxy stroom-app"\n' >> ${F}
printf 'for service in ${Services}; do\n' >> ${F}
printf ' if [ -f ${service}/bin/start.sh ]; then\n' >> ${F}
printf ' bash ${service}/bin/start.sh\n' >> ${F}
printf ' fi\n' >> ${F}
printf 'done\n' >> ${F}
chmod 750 ${F}
F=~/bin/StopServices.sh
printf '#!/bin/bash\n' > ${F}
printf '# Stop all Stroom services\n' >> ${F}
printf '# Set list of services\n' >> ${F}
printf 'Services="stroom-proxy stroom-app"\n' >> ${F}
printf 'for service in ${Services}; do\n' >> ${F}
printf ' if [ -f ${service}/bin/stop.sh ]; then\n' >> ${F}
printf ' bash ${service}/bin/stop.sh\n' >> ${F}
printf ' fi\n' >> ${F}
printf 'done\n' >> ${F}
chmod 750 ${F}
Although one can modify the above for Stroom Forwarding or Standalone Proxy deployments, there is no issue if you use the same scripts.
Establish and Deploy Systemd services
Processing or Proxy node
For a standard Stroom Processing or Proxy nodes, we can use the following service script. (Noting this is done as root)
sudo bash
F=/etc/systemd/system/stroom-services.service
printf '# Install in /etc/systemd/system\n' > ${F}
printf '# Enable via systemctl enable stroom-services.service\n\n' >> ${F}
printf '[Unit]\n' >> ${F}
printf '# Who we are\n' >> ${F}
printf 'Description=Stroom Service\n' >> ${F}
printf '# We want the network and httpd up before us\n' >> ${F}
printf 'Requires=network-online.target httpd.service\n' >> ${F}
printf 'After= httpd.service network-online.target\n\n' >> ${F}
printf '[Service]\n' >> ${F}
printf '# Source our environment file so the Stroom service start/stop scripts work\n' >> ${F}
printf 'EnvironmentFile=/home/stroomuser/env_service.sh\n' >> ${F}
printf 'Type=oneshot\n' >> ${F}
printf 'ExecStart=/bin/su --login stroomuser /home/stroomuser/bin/StartServices.sh\n' >> ${F}
printf 'ExecStop=/bin/su --login stroomuser /home/stroomuser/bin/StopServices.sh\n' >> ${F}
printf 'RemainAfterExit=yes\n\n' >> ${F}
printf '[Install]\n' >> ${F}
printf 'WantedBy=multi-user.target\n' >> ${F}
chmod 640 ${F}
Single Node Scenario with local database
Should you only have a deployment where the database is on a processing node, use the following service script. The only
difference is the Stroom dependency on the database. The database dependency below is for the MariaDB database. If you had
installed the MySQL Community database, then replace mariadb.service with mysqld.service.
(Noting this is done as root)
sudo bash
F=/etc/systemd/system/stroom-services.service
printf '# Install in /etc/systemd/system\n' > ${F}
printf '# Enable via systemctl enable stroom-services.service\n\n' >> ${F}
printf '[Unit]\n' >> ${F}
printf '# Who we are\n' >> ${F}
printf 'Description=Stroom Service\n' >> ${F}
printf '# We want the network, httpd and Database up before us\n' >> ${F}
printf 'Requires=network-online.target httpd.service mariadb.service\n' >> ${F}
printf 'After=mariadb.service httpd.service network-online.target\n\n' >> ${F}
printf '[Service]\n' >> ${F}
printf '# Source our environment file so the Stroom service start/stop scripts work\n' >> ${F}
printf 'EnvironmentFile=/home/stroomuser/env_service.sh\n' >> ${F}
printf 'Type=oneshot\n' >> ${F}
printf 'ExecStart=/bin/su --login stroomuser /home/stroomuser/bin/StartServices.sh\n' >> ${F}
printf 'ExecStop=/bin/su --login stroomuser /home/stroomuser/bin/StopServices.sh\n' >> ${F}
printf 'RemainAfterExit=yes\n\n' >> ${F}
printf '[Install]\n' >> ${F}
printf 'WantedBy=multi-user.target\n' >> ${F}
chmod 640 ${F}
Enable the service
Now we enable the Stroom service, but we DO NOT start it as we will manually start the Stroom services as part of the installation process.
4.4.9 - SSL Certificate Generation
A HOWTO to assist users in setting up various SSL Certificates to support a Web interface to Stroom.
Assumptions
The following assumptions are used in this document.
- the user has reasonable RHEL/Centos System administration skills
- installations are on Centos 7.3 minimal systems (fully patched)
- either a Stroom Proxy or Stroom Application has already been deployed
- processing node names are
stroomp00.strmdev00.organdstroomp01.strmdev00.org - the first node,
stroomp00.strmdev00.orgalso has a CNAMEstroomp.strmdev00.org - in the scenario of a Stroom Forwarding Proxy, the node name is
stroomfp0.strmdev00.org - in the scenario of a Stroom Standalone Proxy, the node name is
stroomsap0.strmdev00.org - stroom runs as user
stroomuser - the use of self signed certificates is appropriate for test systems, but users should consider appropriate CA infrastructure in production environments
- in this document, when a screen capture is documented, data entry is identified by the data surrounded by
<____>. This excludes enter/return presses.
Create certificates
The first step is to establish a self signed certificate for our Stroom service. If you have a certificate server, then certainly gain an
appropriately signed certificate. For this HOWTO, we will stay with a self signed solution and hence no certificate authorities are
involved. If you are deploying a cluster, then you will only have one certificate for all nodes. We achieve this by setting up an
alias for the first node in the cluster and then use that alias for addressing the cluster. That is, we have set up a
CNAME, stroomp.strmdev00.org for stroomp00.strmdev00.org. This means within the web service we deploy, the ServerName will be stroomp.strmdev00.org
on each node. Since it’s one certificate we only need to set it up on one node then deploy the certificate key files to other nodes.
As the certificates will be stored in the stroomuser's home directory, we become the stroom user
Use host variable
To make things simpler in the following bash extracts, we establish the bash variable H to be used in filename generation. The variable name
is set to the name of the host (or cluster alias) your are deploying the certificates on. In our multi node HOWTO example we are using, we
would use the host CNAME stroomp. Thus we execute
Note in our the Stroom Forwarding Proxy HOWTO we would use the name stroomfp0. In the case of our Standalone Proxy we would use stroomsap0.
We set up a directory to house our certificates via
Create a server key for Stroom service (enter a password when prompted for both initial and verification prompts)
as perGenerating RSA private key, 2048 bit long modulus
.................................................................+++
...............................................+++
e is 65537 (0x10001)
Enter pass phrase for private/stroomp.key: <__ENTER_SERVER_KEY_PASSWORD__>
Verifying - Enter pass phrase for private/stroomp.key: <__ENTER_SERVER_KEY_PASSWORD__>
Create a signing request. The two important prompts are the password and Common Name. All the rest can use the defaults offered.
The requested password is for the server key and you should use the host (or cluster alias) your are deploying the certificates on for
the Common Name. In the output below we will assume a multi node cluster certificate is being generated, so will use stroomp.strmdev00.org.
as per
Enter pass phrase for private/stroomp.key: <__ENTER_SERVER_KEY_PASSWORD__>
You are about to be asked to enter information that will be incorporated
into your certificate request.
What you are about to enter is what is called a Distinguished Name or a DN.
There are quite a few fields but you can leave some blank
For some fields there will be a default value,
If you enter '.', the field will be left blank.
-----
Country Name (2 letter code) [XX]:
State or Province Name (full name) []:
Locality Name (eg, city) [Default City]:
Organization Name (eg, company) [Default Company Ltd]:
Organizational Unit Name (eg, section) []:
Common Name (eg, your name or your server's hostname) []:<__ stroomp.strmdev00.org __>
Email Address []:
Please enter the following 'extra' attributes
to be sent with your certificate request
A challenge password []:
An optional company name []:
We now self sign the certificate (again enter the server key password)
as perSignature ok
subject=/C=XX/L=Default City/O=Default Company Ltd/CN=stroomp.strmdev00.org
Getting Private key
Enter pass phrase for private/stroomp.key: <__ENTER_SERVER_KEY_PASSWORD__>
and noting the subject will change depending on the host name used when generating the signing request.
Create insecure version of private key for Apache auto-boot (you will again need to enter the server key password)
as perEnter pass phrase for private/stroomp.key: <__ENTER_SERVER_KEY_PASSWORD__>
writing RSA key
and then move the insecure keys as appropriate
We have now completed the creation of our certificates and keys.
Replication of Keys Directory to other nodes
If you are deploying a multi node Stroom cluster, then you would replicate the directory ~/stroomuser/stroom-jks to each node in the cluster. That is,
tar it up, copy the tar file to the other node(s) then untar it. We can make use of the other node’s mounted file system for this process.
That is one could execute the commands on the first node, where we created the certificates
stroomp01.strmdev00.org, as the stroomuser we extract the data.
Protection, Ownership and SELinux Context
Now ensure protection, ownership and SELinux context for these key files on ALL nodes via
Stroom Proxy to Proxy Key and Trust Stores
In order for a Stroom Forwarding Proxy to communicate to a central Stroom proxy over https, the JVM running the forwarding proxy needs relevant keystores set up.
One would set up a Stroom’s forwarding proxy SSL certificate as per above, with the change that the
hostname would be different. That is, in the initial setup, we would set the hostname variable H to be the hostname of the forwarding
proxy. Lets say it is stroomfp0 thus we would set
and then proceed as above.
Note that you also need the public key of the central Stroom server you will be connecting to. For the following, we will assume
the central Stroom proxy is the stroomp.strmdev00.org server and its public key is stored in the file stroomp.crt. We will store
this file on the forwarding proxy in ~stroomuser/stroom-jks/public/stroomp.crt.
So once you have created the forwarding proxy server’s SSL keys and have deployed the central proxy’s public key, we next need to convert the proxy server’s SSL keys into DER format. This is done by executing the following.
When you convert the local server’s private key, you will be prompted for the server key password.
as per
Enter pass phrase for private/stroomfp0.key.secure: <__ENTER_SERVER_KEY_PASSWORD__>
We now import these keys into our Key Store. As part of the Stroom Proxy release, an Import Keystore application has been provisioned. We identify where it’s found with the command
which should return /home/stroomuser/stroom-proxy/lib/stroom-proxy-util-v5.1-beta.10.jar or similar depending on the release version. To make execution simpler, we set this as a shell variable as per
We now create the keystore and import the proxy’s server key
as per
One certificate, no chain
We now import the destination server’s public key
as per
Certificate was added to keystore
We now add the key and trust store location and password arguments to our Stroom proxy environment files.
At this point you should restart the proxy service. Using the commands
then check the logs to ensure it started correctly.
4.4.10 - Testing Stroom Installation
This HOWTO will demonstrate various ways to test that your Stroom installation has been successful.
Assumptions
- Stroom Single or Multi Node Cluster Testing
- the Multi Node Stroom Cluster (Proxy and Application) has been deployed
- a Test Feed,
TEST-FEED-V1_0has been added - Proxy aggregation has been turned off on all Stroom Store Proxies
- the Stroom Proxy Repository Format (
REPO_FORMAT) chosen was the default -${pathId}/${id - Stroom Forwarding Proxy Testing
- the Multi Node Stroom Cluster (Proxy and Application) has been deployed
- the Stroom Forwarding Proxy has been deployed
- a Test Feed,
TEST-FEED-V1_0has been added - the Stroom Proxy Repository Format (
REPO_FORMAT) chosen was the default -${pathId}/${id - Stroom Standalone Proxy Testing
- the Stroom Standalone Proxy has been deployed
- the Stroom Proxy Repository Format (
REPO_FORMAT) chosen was the default -${pathId}/${id
Stroom Single or Multi Node Cluster Testing
Data Post Tests
Simple Post tests
These tests are to ensure the Stroom Store proxy and its connection to the database is working along with the Apache mod_jk loadbalancer.
We will send a file to the load balanced stroomp.strmdev00.org node (really stroomp00.strmdev00.org) and each time we send the file,
its receipt should be managed by alternate proxy nodes. As a number of elements can effect load balancing, it is not always guaranteed
to alternate every time but for the most part it will.
Perform the following
- Log onto the Stroom database node (stroomdb0.strmdev00.org) as any user.
- Log onto both Stroom nodes and become the
stroomuserand monitor each node’s Stroom proxy service using theTpbash macro. That is, on each node, run
You will note events of the form from
stroomp00.strmdev00.org:
...
2017-01-14T06:22:26.672Z INFO [ProxyProperties refresh thread 0] datafeed.ProxyHandlerFactory$1 (ProxyHandlerFactory.java:96) - refreshThread() - Started
2017-01-14T06:30:00.993Z INFO [Repository Reader Thread 1] handler.ProxyRepositoryReader (ProxyRepositoryReader.java:143) - run() - Cron Match at 2017-01-14T06:30:00.993Z
2017-01-14T06:40:00.245Z INFO [Repository Reader Thread 1] handler.ProxyRepositoryReader (ProxyRepositoryReader.java:143) - run() - Cron Match at 2017-01-14T06:40:00.245Z
and from stroomp01.strmdev00.org:
...
2017-01-14T06:22:26.828Z INFO [ProxyProperties refresh thread 0] datafeed.ProxyHandlerFactory$1 (ProxyHandlerFactory.java:96) - refreshThread() - Started
2017-01-14T06:30:00.066Z INFO [Repository Reader Thread 1] handler.ProxyRepositoryReader (ProxyRepositoryReader.java:143) - run() - Cron Match at 2017-01-14T06:30:00.066Z
2017-01-14T06:40:00.318Z INFO [Repository Reader Thread 1] handler.ProxyRepositoryReader (ProxyRepositoryReader.java:143) - run() - Cron Match at 2017-01-14T06:40:00.318Z
- On the Stroom database node, execute the command
If you are monitoring the proxy log of stroomp00.strmdev00.org you would see two new logs indicating the successful arrival of the file
2017-01-14T06:46:06.411Z INFO [ajp-apr-9009-exec-1] handler.LogRequestHandler (LogRequestHandler.java:37) - log() - guid=54dc0da2-f35c-4dc2-8a98-448415ffc76b,feed=TEST-FEED-V1_0,system=EXAMPLE_SYSTEM,environment=EXAMPLE_ENVIRONMENT,remotehost=192.168.2.144,remoteaddress=192.168.2.144
2017-01-14T06:46:06.449Z INFO [ajp-apr-9009-exec-1] datafeed.DataFeedRequestHandler$1 (DataFeedRequestHandler.java:104) - "doPost() - Took 571 ms to process (concurrentRequestCount=1) 200","Environment=EXAMPLE_ENVIRONMENT","Feed=TEST-FEED-V1_0","GUID=54dc0da2-f35c-4dc2-8a98-448415ffc76b","ReceivedTime=2017-01-14T06:46:05.883Z","RemoteAddress=192.168.2.144","RemoteHost=192.168.2.144","System=EXAMPLE_SYSTEM","accept=*/*","content-length=527","content-type=application/x-www-form-urlencoded","host=stroomp.strmdev00.org","user-agent=curl/7.29.0"
- On the Stroom database node, again execute the command
If you are monitoring the proxy log of stroomp01.strmdev00.org you should see a new log. As foreshadowed, we didn’t as the time delay resulted
in the first node getting the file. That is stroomp00.strmdev00.org log file gained the two entries
2017-01-14T06:47:26.642Z INFO [ajp-apr-9009-exec-2] handler.LogRequestHandler (LogRequestHandler.java:37) - log() - guid=941d2904-734f-4764-9ccf-4124b94a56f6,feed=TEST-FEED-V1_0,system=EXAMPLE_SYSTEM,environment=EXAMPLE_ENVIRONMENT,remotehost=192.168.2.144,remoteaddress=192.168.2.144
2017-01-14T06:47:26.645Z INFO [ajp-apr-9009-exec-2] datafeed.DataFeedRequestHandler$1 (DataFeedRequestHandler.java:104) - "doPost() - Took 174 ms to process (concurrentRequestCount=1) 200","Environment=EXAMPLE_ENVIRONMENT","Feed=TEST-FEED-V1_0","GUID=941d2904-734f-4764-9ccf-4124b94a56f6","ReceivedTime=2017-01-14T06:47:26.470Z","RemoteAddress=192.168.2.144","RemoteHost=192.168.2.144","System=EXAMPLE_SYSTEM","accept=*/*","content-length=527","content-type=application/x-www-form-urlencoded","host=stroomp.strmdev00.org","user-agent=curl/7.29.0"
- Again on the database node, execute the command and this time we see that node
stroomp01.strmdev00.orgreceived the file as per
2017-01-14T06:47:30.782Z INFO [ajp-apr-9009-exec-1] handler.LogRequestHandler (LogRequestHandler.java:37) - log() - guid=2cef6e23-b0e6-4d75-8374-cca7caf66e15,feed=TEST-FEED-V1_0,system=EXAMPLE_SYSTEM,environment=EXAMPLE_ENVIRONMENT,remotehost=192.168.2.144,remoteaddress=192.168.2.144
2017-01-14T06:47:30.816Z INFO [ajp-apr-9009-exec-1] datafeed.DataFeedRequestHandler$1 (DataFeedRequestHandler.java:104) - "doPost() - Took 593 ms to process (concurrentRequestCount=1) 200","Environment=EXAMPLE_ENVIRONMENT","Feed=TEST-FEED-V1_0","GUID=2cef6e23-b0e6-4d75-8374-cca7caf66e15","ReceivedTime=2017-01-14T06:47:30.238Z","RemoteAddress=192.168.2.144","RemoteHost=192.168.2.144","System=EXAMPLE_SYSTEM","accept=*/*","content-length=527","content-type=application/x-www-form-urlencoded","host=stroomp.strmdev00.org","user-agent=curl/7.29.0"
- Running the curl post command in quick succession shows the loadbalancer working … four executions result in seeing our pair of logs appearing on alternate proxies.
stroomp00:
2017-01-14T06:52:09.815Z INFO [ajp-apr-9009-exec-3] handler.LogRequestHandler (LogRequestHandler.java:37) - log() - guid=bf0bc38c-3533-4d5c-9ddf-5d30c0302787,feed=TEST-FEED-V1_0,system=EXAMPLE_SYSTEM,environment=EXAMPLE_ENVIRONMENT,remotehost=192.168.2.144,remoteaddress=192.168.2.144
2017-01-14T06:52:09.817Z INFO [ajp-apr-9009-exec-3] datafeed.DataFeedRequestHandler$1 (DataFeedRequestHandler.java:104) - "doPost() - Took 262 ms to process (concurrentRequestCount=1) 200","Environment=EXAMPLE_ENVIRONMENT","Feed=TEST-FEED-V1_0","GUID=bf0bc38c-3533-4d5c-9ddf-5d30c0302787","ReceivedTime=2017-01-14T06:52:09.555Z","RemoteAddress=192.168.2.144","RemoteHost=192.168.2.144","System=EXAMPLE_SYSTEM","accept=*/*","content-length=527","content-type=application/x-www-form-urlencoded","host=stroomp.strmdev00.org","user-agent=curl/7.29.0"
stroomp01:
2017-01-14T06:52:11.139Z INFO [ajp-apr-9009-exec-2] handler.LogRequestHandler (LogRequestHandler.java:37) - log() - guid=1088fdd8-6869-489f-8baf-948891363734,feed=TEST-FEED-V1_0,system=EXAMPLE_SYSTEM,environment=EXAMPLE_ENVIRONMENT,remotehost=192.168.2.144,remoteaddress=192.168.2.144
2017-01-14T06:52:11.150Z INFO [ajp-apr-9009-exec-2] datafeed.DataFeedRequestHandler$1 (DataFeedRequestHandler.java:104) - "doPost() - Took 289 ms to process (concurrentRequestCount=1) 200","Environment=EXAMPLE_ENVIRONMENT","Feed=TEST-FEED-V1_0","GUID=1088fdd8-6869-489f-8baf-948891363734","ReceivedTime=2017-01-14T06:52:10.861Z","RemoteAddress=192.168.2.144","RemoteHost=192.168.2.144","System=EXAMPLE_SYSTEM","accept=*/*","content-length=527","content-type=application/x-www-form-urlencoded","host=stroomp.strmdev00.org","user-agent=curl/7.29.0"
stroomp00:
2017-01-14T06:52:12.284Z INFO [ajp-apr-9009-exec-4] handler.LogRequestHandler (LogRequestHandler.java:37) - log() - guid=def94a4a-cf78-4c4d-9261-343663f7f79a,feed=TEST-FEED-V1_0,system=EXAMPLE_SYSTEM,environment=EXAMPLE_ENVIRONMENT,remotehost=192.168.2.144,remoteaddress=192.168.2.144
2017-01-14T06:52:12.289Z INFO [ajp-apr-9009-exec-4] datafeed.DataFeedRequestHandler$1 (DataFeedRequestHandler.java:104) - "doPost() - Took 5.0 ms to process (concurrentRequestCount=1) 200","Environment=EXAMPLE_ENVIRONMENT","Feed=TEST-FEED-V1_0","GUID=def94a4a-cf78-4c4d-9261-343663f7f79a","ReceivedTime=2017-01-14T06:52:12.284Z","RemoteAddress=192.168.2.144","RemoteHost=192.168.2.144","System=EXAMPLE_SYSTEM","accept=*/*","content-length=527","content-type=application/x-www-form-urlencoded","host=stroomp.strmdev00.org","user-agent=curl/7.29.0"
stroomp01:
2017-01-14T06:52:13.374Z INFO [ajp-apr-9009-exec-3] handler.LogRequestHandler (LogRequestHandler.java:37) - log() - guid=55dda4c9-2c76-43c8-9b48-dcdb3a1f459b,feed=TEST-FEED-V1_0,system=EXAMPLE_SYSTEM,environment=EXAMPLE_ENVIRONMENT,remotehost=192.168.2.144,remoteaddress=192.168.2.144
2017-01-14T06:52:13.378Z INFO [ajp-apr-9009-exec-3] datafeed.DataFeedRequestHandler$1 (DataFeedRequestHandler.java:104) - "doPost() - Took 3.0 ms to process (concurrentRequestCount=1) 200","Environment=EXAMPLE_ENVIRONMENT","Feed=TEST-FEED-V1_0","GUID=55dda4c9-2c76-43c8-9b48-dcdb3a1f459b","ReceivedTime=2017-01-14T06:52:13.374Z","RemoteAddress=192.168.2.144","RemoteHost=192.168.2.144","System=EXAMPLE_SYSTEM","accept=*/*","content-length=527","content-type=application/x-www-form-urlencoded","host=stroomp.strmdev00.org","user-agent=curl/7.29.0"
At this point we will see what the proxies have received.
- On each node run the command
On
stroomp00 we see
[stroomuser@stroomp00 ~]$ ls -l /stroomdata/stroom-working*/proxy
total 16
-rw-rw-r--. 1 stroomuser stroomuser 785 Jan 14 17:46 001.zip
-rw-rw-r--. 1 stroomuser stroomuser 783 Jan 14 17:47 002.zip
-rw-rw-r--. 1 stroomuser stroomuser 784 Jan 14 17:52 003.zip
-rw-rw-r--. 1 stroomuser stroomuser 783 Jan 14 17:52 004.zip
[stroomuser@stroomp00 ~]$
and on stroomp01 we see
[stroomuser@stroomp01 ~]$ ls -l /stroomdata/stroom-working*/proxy
total 12
-rw-rw-r--. 1 stroomuser stroomuser 785 Jan 14 17:47 001.zip
-rw-rw-r--. 1 stroomuser stroomuser 783 Jan 14 17:52 002.zip
-rw-rw-r--. 1 stroomuser stroomuser 784 Jan 14 17:52 003.zip
[stroomuser@stroomp01 ~]$
which corresponds to the seven posts of data and the associated events in the proxy logs. To see the contents of one of these files we execute on either node, the command
to see
Archive: /stroomdata/stroom-working-p00/proxy/001.zip
inflating: 001.dat
root:x:0:
bin:x:1:
daemon:x:2:
sys:x:3:
adm:x:4:
tty:x:5:
disk:x:6:
lp:x:7:
mem:x:8:
kmem:x:9:
wheel:x:10:burn
cdrom:x:11:
mail:x:12:postfix
man:x:15:
dialout:x:18:
floppy:x:19:
games:x:20:
tape:x:30:
video:x:39:
ftp:x:50:
lock:x:54:
audio:x:63:
nobody:x:99:
users:x:100:
utmp:x:22:
utempter:x:35:
input:x:999:
systemd-journal:x:190:
systemd-bus-proxy:x:998:
systemd-network:x:192:
dbus:x:81:
polkitd:x:997:
ssh_keys:x:996:
dip:x:40:
tss:x:59:
sshd:x:74:
postdrop:x:90:
postfix:x:89:
chrony:x:995:
burn:x:1000:burn
mysql:x:27:
inflating: 001.meta
content-type:application/x-www-form-urlencoded
Environment:EXAMPLE_ENVIRONMENT
Feed:TEST-FEED-V1_0
GUID:54dc0da2-f35c-4dc2-8a98-448415ffc76b
host:stroomp.strmdev00.org
ReceivedTime:2017-01-14T06:46:05.883Z
RemoteAddress:192.168.2.144
RemoteHost:192.168.2.144
StreamSize:527
System:EXAMPLE_SYSTEM
user-agent:curl/7.29.0
[stroomuser@stroomp00 ~]$
Checking the /etc/group file on stroomdb0.strmdev00.org confirms the above contents. For the present, ignore
the metadata file present in the zip archive.
If you execute the same command on the other files, all that changes is the value of the ReceivedTime: attribute in the .meta file.
For those curious about the file size differences, this is a function of the compression process within the proxy.
Using stroomp01’s files and extracting them manually and renaming them results in the six files
[stroomuser@stroomp01 xx]$ ls -l
total 24
-rw-rw-r--. 1 stroomuser stroomuser 527 Jan 14 17:47 A_001.dat
-rw-rw-r--. 1 stroomuser stroomuser 321 Jan 14 17:47 A_001.meta
-rw-rw-r--. 1 stroomuser stroomuser 527 Jan 14 17:52 B_001.dat
-rw-rw-r--. 1 stroomuser stroomuser 321 Jan 14 17:52 B_001.meta
-rw-rw-r--. 1 stroomuser stroomuser 527 Jan 14 17:52 C_001.dat
-rw-rw-r--. 1 stroomuser stroomuser 321 Jan 14 17:52 C_001.meta
[stroomuser@stroomp01 xx]$ cmp A_001.dat B_001.dat
[stroomuser@stroomp01 xx]$ cmp B_001.dat C_001.dat
[stroomuser@stroomp01 xx]$
We have effectively tested the receipt of our data and the load balancing of the Apache mod_jk installation.
Simple Direct Post tests
In this test we will use the direct feed interface of the Stroom application, rather than sending data via the proxy. One would normally use this interface for time sensitive data which shouldn’t aggregate in a proxy waiting for the Stroom application to collect it. In this situation we use the command
To prepare for this test, we monitor the Stroom application log using the T bash alias on each node. So on each node run the command
On each node you should see LifecycleTask events, for example,
2017-01-14T07:42:08.281Z INFO [Stroom P2 #7 - LifecycleTask] spring.StroomBeanMethodExecutable (StroomBeanMethodExecutable.java:47) - Executing nodeStatusExecutor.exec
2017-01-14T07:42:18.284Z INFO [Stroom P2 #2 - LifecycleTask] spring.StroomBeanMethodExecutable (StroomBeanMethodExecutable.java:47) - Executing SQLStatisticEventStore.evict
2017-01-14T07:42:18.284Z INFO [Stroom P2 #10 - LifecycleTask] spring.StroomBeanMethodExecutable (StroomBeanMethodExecutable.java:47) - Executing activeQueriesManager.evictExpiredElements
2017-01-14T07:42:18.285Z INFO [Stroom P2 #7 - LifecycleTask] spring.StroomBeanMethodExecutable (StroomBeanMethodExecutable.java:47) - Executing distributedTaskFetcher.execute
To perform the test, on the database node, run the posting command a number of times in rapid succession. This will result in server.DataFeedServiceImpl events in both log files. The Stroom application log is quite busy, you may have to look for these logs.
In the following we needed to execute the posting command three times before seeing the data arrive on both nodes. Looking at the arrival
times, the file turned up on the second node twice before appearing on the first node.
stroomp00:
2017-01-14T07:43:09.394Z INFO [ajp-apr-8009-exec-6] server.DataFeedServiceImpl (DataFeedServiceImpl.java:133) - handleRequest response 200 - 0 - OK
and on stroomp01:
2017-01-14T07:43:05.614Z INFO [ajp-apr-8009-exec-1] server.DataFeedServiceImpl (DataFeedServiceImpl.java:133) - handleRequest response 200 - 0 - OK
2017-01-14T07:43:06.821Z INFO [ajp-apr-8009-exec-2] server.DataFeedServiceImpl (DataFeedServiceImpl.java:133) - handleRequest response 200 - 0 - OK
To confirm this data arrived, we need to view the Data pane of our TEST-FEED-V1_0 tab. To do this, log onto the Stroom UI then
move the cursor to the TEST-FEED-V1_0 entry in the Explorer tab and select the item with a left click

And double click on the entry to see our TEST-FEED-V1_0 tab.
and it is noted that we are viewing the Feed’s attributes as we can see the Setting hyper-link highlighted. As we want to see the Data we have received for this feed, move the cursor to the Data hyper-link and select it to see .


These three entries correspond to the three posts we performed.
We have successfully tested direct posting to a Stroom feed and that the Apache mod_jk loadbalancer also works for this posting method.
Test Proxy Aggregation is Working
To test that the Proxy Aggregation is working, we need to enable on each node.
By enabling the Proxy Aggregation process, both nodes immediately performed the task as indicated by each node’s Stroom application logs as per
stroomp00:
2017-01-14T07:58:58.752Z INFO [Stroom P2 #3 - LifecycleTask] server.ProxyAggregationExecutor (ProxyAggregationExecutor.java:138) - exec() - started
2017-01-14T07:58:58.937Z INFO [Stroom P2 #2 - GenericServerTask] server.ProxyAggregationExecutor$2 (ProxyAggregationExecutor.java:203) - processFeedFiles() - Started TEST-FEED-V1_0 (4 Files)
2017-01-14T07:58:59.045Z INFO [Stroom P2 #2 - GenericServerTask] server.ProxyAggregationExecutor$2 (ProxyAggregationExecutor.java:265) - processFeedFiles() - Completed TEST-FEED-V1_0 in 108 ms
2017-01-14T07:58:59.101Z INFO [Stroom P2 #3 - LifecycleTask] server.ProxyAggregationExecutor (ProxyAggregationExecutor.java:152) - exec() - completedin 349 ms
and stroomp01:
2017-01-14T07:59:16.687Z INFO [Stroom P2 #10 - LifecycleTask] server.ProxyAggregationExecutor (ProxyAggregationExecutor.java:138) - exec() - started
2017-01-14T07:59:16.799Z INFO [Stroom P2 #5 - GenericServerTask] server.ProxyAggregationExecutor$2 (ProxyAggregationExecutor.java:203) - processFeedFiles() - Started TEST-FEED-V1_0 (3 Files)
2017-01-14T07:59:16.909Z INFO [Stroom P2 #5 - GenericServerTask] server.ProxyAggregationExecutor$2 (ProxyAggregationExecutor.java:265) - processFeedFiles() - Completed TEST-FEED-V1_0 in 110 ms
2017-01-14T07:59:16.997Z INFO [Stroom P2 #10 - LifecycleTask] server.ProxyAggregationExecutor (ProxyAggregationExecutor.java:152) - exec() - completed in 310 ms
And on refreshing the top pane of the TEST-FEED-V1_0 tab we see that two more batches of data have arrived.
.

This demonstrates that Proxy Aggregation is working.
Stroom Forwarding Proxy Testing
Data Post Tests
Simple Post tests
This test is to ensure the Stroom Forwarding proxy and its connection to the central Stroom Processing system is working.
We will send a file to our Forwarding proxy (stroomfp0.strmdev00.org) and monitor this nodes’ proxy log files as well as all the
destination nodes proxy log files. The reason for monitoring all the destination system’s proxy log files is that the destination system is
probably load balancing and hence the forwarded file may turn up on any of the destination nodes.
Perform the following
- Log onto any host where you will perform the
curlpost - Monitor all proxy log files
- Log onto the Forwarding Proxy node and become the
stroomuserand monitor the Stroom proxy service using theTpbash macro. - Log onto the destination Stroom nodes and become the
stroomuserand monitor each node’s Stroom proxy service using theTpbash macro. That is, on each node, run
- On the ‘posting’ node, run the command
In the Stroom Forwarding proxy log, ~/stroom-proxy/instance/logs/stroom.log, you will see the arrival of the
file as per the datafeed.DataFeedRequestHandler$1 event running under, in this case, the ajp-apr-9009-exec-1 thread.
...
2017-01-01T23:17:00.240Z INFO [Repository Reader Thread 1] handler.ProxyRepositoryReader (ProxyRepositoryReader.java:143) - run() - Cron Match at 2017-01-01T23:17:00.240Z
2017-01-01T23:18:00.275Z INFO [Repository Reader Thread 1] handler.ProxyRepositoryReader (ProxyRepositoryReader.java:143) - run() - Cron Match at 2017-01-01T23:18:00.275Z
2017-01-01T23:18:12.367Z INFO [ajp-apr-9009-exec-1] datafeed.DataFeedRequestHandler$1 (DataFeedRequestHandler.java:104) - "doPost() - Took 782 ms to process (concurrentRequestCount=1) 200","Environment=EXAMPLE_ENVIRONMENT","Expect=100-continue","Feed=TEST-FEED-V1_0","GUID=9601198e-98db-4cae-8b71-9404722ef1f9","ReceivedTime=2017-01-01T23:18:11.588Z","RemoteAddress=192.168.2.220","RemoteHost=192.168.2.220","System=EXAMPLE_SYSTEM","accept=*/*","content-length=1051","content-type=application/x-www-form-urlencoded","host=stroomfp0.strmdev00.org","user-agent=curl/7.19.7 (x86_64-redhat-linux-gnu) libcurl/7.19.7 NSS/3.21 Basic ECC zlib/1.2.3 libidn/1.18 libssh2/1.4.2"
And then at the next
periodic interval (60 second intervals) this file will be forwarded to the main stroom proxy
server stroomp.strmdev00.org as shown by the handler.ForwardRequestHandler events running under the pool-10-thread-2 thread.
2017-01-01T23:19:00.304Z INFO [Repository Reader Thread 1] handler.ProxyRepositoryReader (ProxyRepositoryReader.java:143) - run() - Cron Match at 2017-01-01T23:19:00.304Z
2017-01-01T23:19:00.586Z INFO [pool-10-thread-2] handler.ForwardRequestHandler (ForwardRequestHandler.java:109) - handleHeader() - https://stroomp00.strmdev00.org/stroom/datafeed Sending request {ReceivedPath=stroomfp0.strmdev00.org, Feed=TEST-FEED-V1_0, Compression=ZIP}
2017-01-01T23:19:00.990Z INFO [pool-10-thread-2] handler.ForwardRequestHandler (ForwardRequestHandler.java:89) - handleFooter() - b5722ead-714b-411b-a09f-901fb8b20389 took 403 ms to forward 1.4 kB response 200 - {ReceivedPath=stroomfp0.strmdev00.org, Feed=TEST-FEED-V1_0, GUID=b5722ead-714b-411b-a09f-901fb8b20389, Compression=ZIP}
2017-01-01T23:20:00.064Z INFO [Repository Reader Thread 1] handler.ProxyRepositoryReader (ProxyRepositoryReader.java:143) - run() - Cron Match at 2017-01-01T23:20:00.064Z
...
On one of the central processing nodes, when the file is send by the Forwarding Proxy, you will see the file’s arrival as per the datafeed.DataFeedRequestHandler$1 event in the ajp-apr-9009-exec-3 thread.
...
2017-01-01T23:00:00.236Z INFO [Repository Reader Thread 1] handler.ProxyRepositoryReader (ProxyRepositoryReader.java:143) - run() - Cron Match at 2017-01-01T23:00:00.236Z
2017-01-01T23:10:00.473Z INFO [Repository Reader Thread 1] handler.ProxyRepositoryReader (ProxyRepositoryReader.java:143) - run() - Cron Match at 2017-01-01T23:10:00.473Z
2017-01-01T23:19:00.787Z INFO [ajp-apr-9009-exec-3] handler.LogRequestHandler (LogRequestHandler.java:37) - log() - guid=b5722ead-714b-411b-a09f-901fb8b20389,feed=TEST-FEED-V1_0,system=null,environment=null,remotehost=null,remoteaddress=null
2017-01-01T23:19:00.981Z INFO [ajp-apr-9009-exec-3] datafeed.DataFeedRequestHandler$1 (DataFeedRequestHandler.java:104) - "doPost() - Took 196 ms to process (concurrentRequestCount=1) 200","Cache-Control=no-cache","Compression=ZIP","Feed=TEST-FEED-V1_0","GUID=b5722ead-714b-411b-a09f-901fb8b20389","ReceivedPath=stroomfp0.strmdev00.org","Transfer-Encoding=chunked","accept=text/html, image/gif, image/jpeg, *; q=.2, */*; q=.2","connection=keep-alive","content-type=application/audit","host=stroomp00.strmdev00.org","pragma=no-cache","user-agent=Java/1.8.0_111"
2017-01-01T23:20:00.771Z INFO [Repository Reader Thread 1] handler.ProxyRepositoryReader (ProxyRepositoryReader.java:143) - run() - Cron Match at 2017-01-01T23:20:00.771Z
...
Stroom Standalone Proxy Testing
Data Post Tests
Simple Post tests
This test is to ensure the Stroom Store NO-DB or Standalone proxy is working.
We will send a file to our Standalone proxy (stroomsap0.strmdev00.org) and monitor this nodes’ proxy log files as well the directory the
received files are meant to be stored in.
Perform the following
- Log onto any host where you will perform the
curlpost - Log onto the Standalone Proxy node and become the
stroomuserand monitor the Stroom proxy service using theTpbash macro. That is run
- On the ‘posting’ node, run the command
In the stroom proxy log, ~/stroom-proxy/instance/logs/stroom.log, you will see the arrival of the file via both the handler.LogRequestHandler and datafeed.DataFeedRequestHandler$1 events running under, in this case, the ajp-apr-9009-exec-1 thread.
...
2017-01-02T02:10:00.325Z INFO [Repository Reader Thread 1] handler.ProxyRepositoryReader (ProxyRepositoryReader.java:143) - run() - Cron Match at 2017-01-02T02:10:00.325Z
2017-01-02T02:11:34.501Z INFO [ajp-apr-9009-exec-1] handler.LogRequestHandler (LogRequestHandler.java:37) - log() - guid=ebd11215-7d4c-4be6-a524-358015e2ac38,feed=TEST-FEED-V1_0,system=EXAMPLE_SYSTEM,environment=EXAMPLE_ENVIRONMENT,remotehost=192.168.2.220,remoteaddress=192.168.2.220
2017-01-02T02:11:34.528Z INFO [ajp-apr-9009-exec-1] datafeed.DataFeedRequestHandler$1 (DataFeedRequestHandler.java:104) - "doPost() - Took 33 ms to process (concurrentRequestCount=1) 200","Environment=EXAMPLE_ENVIRONMENT","Expect=100-continue","Feed=TEST-FEED-V1_0","GUID=ebd11215-7d4c-4be6-a524-358015e2ac38","ReceivedTime=2017-01-02T02:11:34.501Z","RemoteAddress=192.168.2.220","RemoteHost=192.168.2.220","System=EXAMPLE_SYSTEM","accept=*/*","content-length=1051","content-type=application/x-www-form-urlencoded","host=stroomsap0.strmdev00.org","user-agent=curl/7.19.7 (x86_64-redhat-linux-gnu) libcurl/7.19.7 NSS/3.21 Basic ECC zlib/1.2.3 libidn/1.18 libssh2/1.4.2"
...
Further, if you check the proxy’s storage directory, you will see the file 001.zip. The file names number upwards from 001.
[stroomuser@stroomsap0 ~]$ ls -l /stroomdata/stroom-working-sap0/proxy
total 4
-rw-rw-r--. 1 stroomuser stroomuser 1107 Jan 2 13:11 001.zip
[stroomuser@stroomsap0 ~]$
On viewing the contents of this file we see both a .dat and .meta file.
[stroomuser@stroomsap0 ~]$ (cd /stroomdata/stroom-working-sap0/proxy; unzip 001.zip)
Archive: 001.zip
inflating: 001.dat
inflating: 001.meta
[stroomuser@stroomsap0 ~]$
The .dat file holds the content of the file we posted - /etc/group.
[stroomuser@stroomsap0 ~]$ (cd /stroomdata/stroom-working-sap0/proxy; head -5 001.dat)
root:x:0:
bin:x:1:bin,daemon
daemon:x:2:bin,daemon
sys:x:3:bin,adm
adm:x:4:adm,daemon
[stroomuser@stroomsap0 ~]$
The .meta file is generated by the proxy and holds information about the posted file
[stroomuser@stroomsap0 ~]$ (cd /stroomdata/stroom-working-sap0/proxy; cat 001.meta)
content-type:application/x-www-form-urlencoded
Environment:EXAMPLE_ENVIRONMENT
Feed:TEST-FEED-V1_0
GUID:ebd11215-7d4c-4be6-a524-358015e2ac38
host:stroomsap0.strmdev00.org
ReceivedTime:2017-01-02T02:11:34.501Z
RemoteAddress:192.168.2.220
RemoteHost:192.168.2.220
StreamSize:1051
System:EXAMPLE_SYSTEM
user-agent:curl/7.19.7 (x86_64-redhat-linux-gnu) libcurl/7.19.7 NSS/3.21 Basic ECC zlib/1.2.3 libidn/1.18 libssh2/1.4.2
[stroomuser@stroomsap0 ~]$ (cd /stroomdata/stroom-working-sap0/proxy; rm 001.meta 001.dat)
[stroomuser@stroomsap0 ~]$
4.4.11 - Volume Maintenance
How to maintain Stroom’s data and index volumes.
Stroom stores data in volumes. These are the logical link to the Storage hierarchy we setup on the operating system. This HOWTO will demonstrate how one first sets up volumes and also how to add additional volumes if one expanded an existing Stroom cluster.
Assumptions
- an account with the
AdministratorApplication Permission is currently logged in. - we will add volumes as per the Multi Node Stroom deployment Storage hierarchy
Configure the Volumes
We need to configure the volumes for Stroom. The follow demonstrates adding the volumes for two nodes, but demonstrates the process for a single node deployment as well the volume maintenance needed when expanding a Multi Node Cluster when adding in a new node.
To configure the volumes, move to the Tools item of the Main Menu and select it to bring up the Tools sub-menu.
then move down and select the Volumes sub-item to be presented with the Volumes configuration window as seen below.

The attributes we see for each volume are
- Node - the processing node the volume resides on (this is just the node name entered when configuring the Stroom application)
- Path - the path to the volume
- Volume Type - The type of volume
- Public - to indicate that all nodes would access this volume
- Private - to indicate that only the local node will access this volume
- Stream Status
- Active - to store data within the volume
- Inactive - to NOT store data within the volume
- Closed - had stored data within the volume, but now no more data can be stored
- Index Status
- Active - to store index data within the volume
- Inactive - to NOT store index data within the volume
- Closed - had stored index data within the volume, but now no more index data can be stored
- Usage Date - the date and time the volume was last used
- Limit - the maximum amount of data the system will store on the volume
- Used - the amount of data in use on the volume
- Free - the amount of available storage on the volume
- Use% - the usage percentage
If you are setting up Stroom for the first time and you had accepted the default for the CREATE_DEFAULT_VOLUME_ON_START configuration option (true) when configuring the Stroom service application, you will see two default volumes have already been created. Had you set this option to false then the window would be empty.
Add Volumes
Now from our two node Stroom Cluster example, our storage hierarchy was
- Node:
stroomp00.strmdev00.org /stroomdata/stroom-data-p00- location to store Stroom application data files (events, etc.) for this node/stroomdata/stroom-index-p00- location to store Stroom application index files/stroomdata/stroom-working-p00- location to store Stroom application working files (e.g. temporary files, output, etc.) for this node/stroomdata/stroom-working-p00/proxy- location for Stroom proxy to store inbound data files- Node:
stroomp01.strmdev00.org /stroomdata/stroom-data-p01- location to store Stroom application data files (events, etc.) for this node/stroomdata/stroom-index-p01- location to store Stroom application index files/stroomdata/stroom-working-p01- location to store Stroom application working files (e.g. temporary files, output, etc.) for this node/stroomdata/stroom-working-p01/proxy- location for Stroom proxy to store inbound data files
From this we need to create four volumes. On stroomp00.strmdev00.org we create
/stroomdata/stroom-data-p00- location to store Stroom application data files (events, etc.) for this node/stroomdata/stroom-index-p00- location to store Stroom application index files
and on stroomp01.strmdev00.org we create
/stroomdata/stroom-data-p01- location to store Stroom application data files (events, etc.) for this node/stroomdata/stroom-index-p01- location to store Stroom application index files
So the first step to configure a volume is to move the cursor to the New icon in the top left of
the Volumes window and select it. This will bring up the Add Volume configuration window
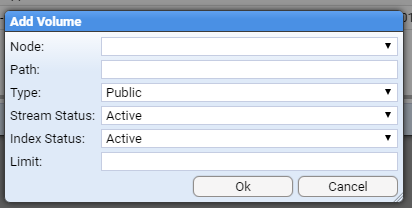
As you can see, the entry box titles reflect the attributes of a volume. So we will add the first nodes data volume
/stroomdata/stroom-data-p00- location to store Stroom application data files (events, etc.) for this node for nodestroomp00.
If you move the Node drop down entry box and select it you will be presented with a choice of available
nodes - in this case stroomp00 and stroomp01 as we have a two node cluster with these node names.
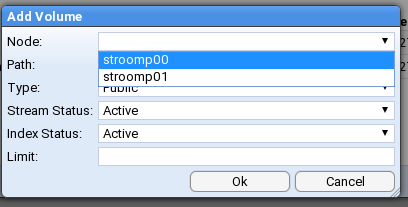
By selecting the node stroomp00 we see
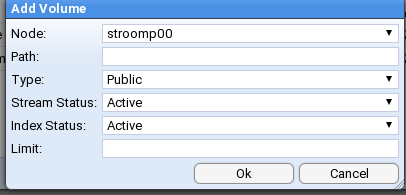
To configure the rest of the attributes for this volume, we:
- enter the Path to our first node’s data volume
- select a Volume Type of Public as this is a data volume we want all nodes to access
- select a Stream Status of Active to indicate we want to store data on it
- select an Index Status of Inactive as we do NOT want index data stored on it
- set a Limit of 12GB for allowed storage
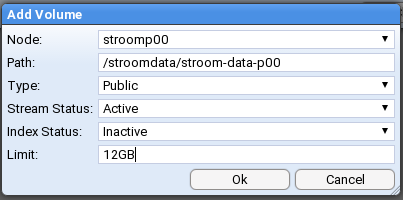
and on selection of the
we see the changes in the Volumes configuration window

We next add the first node’s index volume, as per
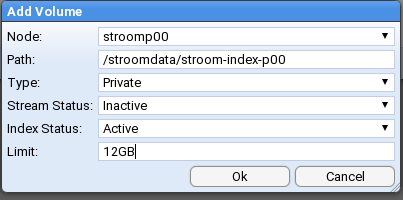
And after adding the second node’s volumes we are finally presented with our configured volumes

Delete Default Volumes
We now need to deal with our default volumes. We want to delete them.

So we move the cursor to the first volume’s line (stroomp00 /home/stroomuser/stroom-app/volumes/defaultindexVolume …) and select the line then move the cursor to the Delete icon in the top left of the Volumes window and select it. On selection you will be given a confirmation request
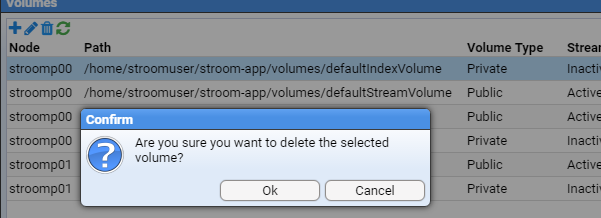
at which we press the button to see the first default volume has been deleted

and after we select then delete the second default volume(stroomp00 /home/stroomuser/stroom-app/volumes/defaultStreamVolume …), we are left with

At this point, one can close the Volumes configuration window by pressing the
button.
NOTE: At the time of writing there is an issue regarding volumes
Stroom Github Issue 84 -
Due to Issue 84 , if we delete volumes in a multi node environment, the deletion is not propagated to all other nodes in a cluster. Thus if we attempted to use the volumes we would get a database error. The current workaround is to restart all the Stroom applications which will cause a reload of all volume information. This MUST be done before sending any data to your multi-node Stroom cluster.
Adding new Volumes
When one expands a Multi Node Stroom cluster deployment, after the installation of the Stroom Proxy and Application software and services on the new node, one has to configure the new volumes that are on the new node. The following demonstrates this assuming we are adding
- the new node is
stroomp02 - the storage hierarchy for this node is
/stroomdata/stroom-data-p02- location to store Stroom application data files (events, etc.) for this node/stroomdata/stroom-index-p02- location to store Stroom application index files/stroomdata/stroom-working-p02- location to store Stroom application working files (e.g. tmp, output, etc.) for this node/stroomdata/stroom-working-p02/proxy- location for Stroom proxy to store inbound data files
From this we need to create two volumes on stroomp02
/stroomdata/stroom-data-p02- location to store Stroom application data files (events, etc.) for this node/stroomdata/stroom-index-p02- location to store Stroom application index files
To configure the volumes, move to the Tools item of the Main Menu and select it to bring up the Tools sub-menu.
then move down and select the Volumes sub-item to be presented with the Volumes configuration window as seen below.
We then move the cursor to the New icon
in the top left of the Volumes window and select it.
This will bring up the Add Volume configuration window where we select our volume’s node stroomp02.
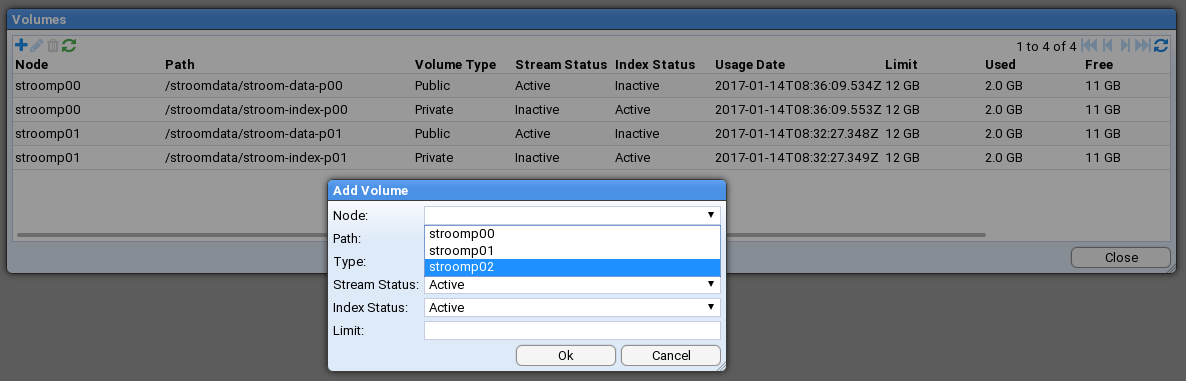
We select this node and then configure the rest of the attributes for this data volume
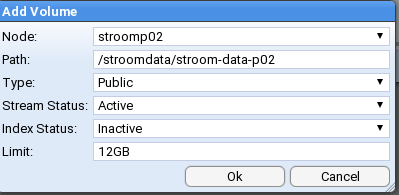
then press the button.
We then add another volume for the index volume for this node with attributes as per

And on pressing the button we see our two new volumes for this node have been added.

At this point, one can close the Volumes configuration window by pressing the
button.
4.5 - Event Feeds
4.5.1 - Writing an XSLT Translation
This HOWTO will take you through the production of an XSLT for a feed, including issues such as event filtering, common errors and testing.
See Also
Introduction
This document is intended to explain how and why to produce a translation within stroom and how the translation fits into the overall processing within stroom. It is intended for use by the developers/admins of client systems that want to send data to stroom and need to transform their events into event-logging XML format. It’s not intended as an XSLT tutorial so a basic XSLT knowledge must be assumed. The document will contain potentially useful XSLT fragments to show how certain processing activities can be carried out. As with most programming languages, there are likely to be multiple ways of producing the same end result with different degrees of complexity and efficiency. Examples here may not be the best for all situations but do reflect experience built up from many previous translation jobs.
The document should be read in conjunction with other online stroom documentation, in particular Event Processing.
Translation Overview
The translation process for raw logs is a multi-stage process defined by the processing pipeline:
Parser
The parser takes raw data and converts it into an intermediate XML document format. This is only required if source data is not already within an XML document. There are various standard parsers available (although not all may be available on a default stroom build) to cover the majority of standard source formats such as CSV, TSV, CSV with header row and XML fragments.
The language used within the parser is defined within an XML schema located at XML Schemas / data-splitter / data-splitter v3.0 within the tree browser.
The data splitter schema may have been provided as part of the core schemas content pack.
It is not present in a vanilla stroom.
The language can be quite complex so if non-standard format logs are being parsed, it may be worth speaking to your stroom sysadmin team to at least get an initial parser configured for your data.
Stroom also has a built-in parser for JSON fragments.
This can be set either by using the
CombinedParser
and setting the type property to JSON or preferably by just using the
JSONParser
.
The parser has several minor limitations. The most significant is that it’s unable to deal with records that are interleaved. This occasionally happens within multi-line syslog records where a syslog server receives the first x lines of record A followed by the first y lines of record B, then the rest of record A and finally the rest of record B (or the start of record C etc.). If data is likely to arrive like this then some sort of pre-processing within the source system would be necessary to ensure that each record is a contiguous block before being forwarded to stroom.
The other main limitation of the parser is actually its flexibility. If forwarding large streams to stroom and one or more regexes within the parser have been written inefficiently or incorrectly then it’s quite possible for the parser to try to read the entire stream in one go rather than a single record or part of a record. This will slow down the overall processing and may even cause memory issues in the worst cases. This is one of the reasons why the stroom team would prefer to be involved in the production of any non-standard parsers as mentioned above.
XSLT
The actual translation takes the XML document produced by the parser and converts it to a new XML document format in what’s known as “stroom schema format”.
The current latest schema is documented at XML Schemas / event-logging / event-logging v3.5.2 within the tree browser.
The version is likely to change over time so you should aim to use the latest non-beta version.
Other Pipeline Elements
The pipeline functionality is flexible in that multiple XSLTs may be used in sequence to add decoration (e.g. Job Title, Grade, Employee type etc. from an HR reference database), schema validation and other business-related tasks. However, this is outside the scope of this document and pipelines should not be altered unless agreed with the stroom sysadmins. As an example, we’ve seen instances of people removing schema validation tasks from a pipeline so that processing appears to occur without error. In practice, this just breaks things further down the processing chain.
Translation Basics
Assuming you have a simple pipeline containing a working parser and an empty XSLT, the output of the parser will look something like this:
<?xml version="1.1" encoding="UTF-8"?>
<records
xmlns="records:2"
xmlns:xsi="http://www.w3.org/2001/XMLSchema-instance"
xsi:schemaLocation="records:2 file://records-v2.0.xsd"
version="2.0">
<record>
<data value="2022-04-06 15:45:38.737" />
<data value="fakeuser2" />
<data value="192.168.0.1" />
<data value="1000011" />
<data value="200" />
<data value="Query success" />
<data value="1" />
</record>
</records>
The data nodes within the record node will differ as it’s possible to have nested data nodes as well as named data nodes, but for a non-JSON and non-XML fragment source data format, the top-level structure will be similar.
The XSLT needed to recognise and start processing the above example data needs to do several things. The following initial XSLT provides the minimum required function:
The following lists the necessary functions of the XSLT, along with the line numbers where they’re implemented in the above example:
- Match the source namespace -
line 3; - Specify the output namespace -
lines 4, 12; - Specify the namespace for any functions -
lines 5-8; - Match the top-level records node -
line 10; - Provide any output in stroom schema format -
lines 11, 14, 18-20; - Individually match subsequent record nodes -
line 17.
This XSLT will generate the following output data:
<?xml version="1.1" encoding="UTF-8"?>
<Events
xmlns="event-logging:3"
xmlns:stroom="stroom"
xmlns:xsi="http://www.w3.org/2001/XMLSchema-instance"
xsi:schemaLocation="event-logging:3 file://event-logging-v3.5.2.xsd"
Version="3.5.2">
<Event>
...
</Event>
...
<Events>
It’s normally best to get this part of the XSLT correctly stepping before getting any further into the code.
Similarly for JSON fragments, the output of the parser will look like:
<?xml version="1.1" encoding="UTF-8"?>
<map xmlns="http://www.w3.org/2013/XSL/json">
<map>
<string key="version">0</string>
<string key="id">2801bbff-fafa-4427-32b5-d38068d3de73</string>
<string key="detail-type">xyz_event</string>
<string key="source">my.host.here</string>
<string key="account">223592823261</string>
<string key="time">2022-02-15T11:01:36Z</string>
<array key="resources" />
<map key="detail">
<number key="id">1644922894335</number>
<string key="userId">testuser</string>
</map>
</map>
</map>
The following initial XSLT will carry out the same tasks as before:
The necessary functions of the XSLT, along with the line numbers where they’re implemented in the above example as before:
- Match the source namespace -
line 3; - Specify the output namespace -
lines 4, 12; - Specify the namespace for any functions -
lines 5-8; - Match the top-level /map node -
line 10; - Provide any output in stroom schema format -
lines 11, 14, 18-20; - Individually match subsequent /map/map nodes -
line 17.
This XSLT will generate the following output data which is identical to the previous output:
<?xml version="1.1" encoding="UTF-8"?>
<Events
xmlns="event-logging:3"
xmlns:stroom="stroom"
xmlns:xsi="http://www.w3.org/2001/XMLSchema-instance"
xsi:schemaLocation="event-logging:3 file://event-logging-v3.5.2.xsd"
Version="3.5.2">
<Event>
...
</Event>
...
<Events>
Once the initial XSLT is correct, it’s a fairly simple matter to populate the correct nodes using standard XSLT functions and a knowledge of XPaths.
Extending the Translation to Populate Specific Nodes
The above examples of <xsl:apply-templates match="..."/> for an Event all point to a specific path within the XML document - often at /records/record/ or at /map/map/.
XPath references to nodes further down inside the record should normally be made relative to this node.
Depending on the output format from the parser, there are two ways of referencing a field to populate an output node.
If the intermediate XML is of the following format:
<record>
<data value="2022-04-06 15:45:38.737" />
<data value="fakeuser2" />
<data value="192.168.0.1" />
...
</record>
Then the developer needs to understand which field contains what data and then to reference based upon the index, e.g.:
<IPAddress>
<xsl:value-of select="data[3]/@value"/>
</IPAddress>
However, if the intermediate XML is of this format:
<record>
<data name="time" value="2022-04-06 15:45:38.737" />
<data name="user" value="fakeuser2" />
<data name="ip" value="192.168.0.1" />
...
</record>
Then, although the first method is still acceptable, it’s easier and safer to reference by @name:
<IPAddress>
<xsl:value-of select="data[@name='ip']/@value"/>
</IPAddress>
This second method also has the advantage that if the field positions differ for different event types, the names will hopefully stay the same, saving the need to add if TypeA then do X, if TypeB then do Y, ... code into the XSLT.
More complex field references are likely to be required at times, particularly for data that’s been converted using the internal JSON parser. Assuming source data of:
<map>
<string key="version">0</string>
...
<array key="resources" />
<map key="detail">
<number key="id">1644922894335</number>
<string key="userId">testuser</string>
</map>
</map>
Then selecting the id field requires something like:
<xsl:value-of select="map[@key='detail']/number[@key='id']"/>
It’s important at this stage to have a reasonable understanding of which fields in the source data provide what detail in terms of stroom schema values, which fields can be ignored and which can be used but modified to control the flow of the translation. For example - there may be an IP address within the log, but is it of the device itself or of the client? It’s normally best to start with several examples of each event type requiring translation to ensure that fields are translated correctly.
Structuring the XSLT
There are many different ways of structuring the overall XSLT and it’s ultimately for the developer to decide the best way based upon the requirements of their own data. However, the following points should be noted:
- When working on e.g. a CreateDocument event, it’s far easier to edit a 10-line template named CreateDocument than lines 841-850 of a template named MainTemplate. Therefore, keep each template relatively small and helpfully named.
- Both the logic and XPaths required for EventTime and EventSource are normally common to all or most events for a given log. Therefore, it usually makes sense to have a common EventTime and EventSource template for all event types rather than a duplicate of this code for each event type.
- If code needs to be repeated in multiple templates, then it’s often simpler to move that code into a separate template and call it from multiple places. This is often used for e.g. adding an Outcome node for multiple failed event types.
- Use comments within the XSLT even when the code appears obvious.
If nothing else, a comment field will ensure a newline prior to the comment once auto-formatted.
This allows the end of one template and the start of the next template to be differentiated more easily if each template is prefixed by something like
<!-- Template for EventDetail -->. Comments are also useful for anybody who needs to fix your code several years later when you’ve moved on to far more interesting work. - For most feeds, the main development work is within the EventDetail node.
This will normally contain a lot of code effectively doing
if CreateDocument do X; if DeleteFile do Y; if SuccessfulLogin do Z; .... From experience, the following type of XSLT is normally the easiest to write and to follow:
<!-- Event Detail template -->
<xsl:template name="EventDetail">
<xsl:variable name="typeId" select="..."/>
<EventDetail>
<xsl:choose>
<xsl:when test="$typeId='A'">
<xsl:call-template name="Logon"/>
</xsl:when>
<xsl:when test="$typeId='B'">
<xsl:call-template name="CreateDoc"/>
</xsl:when>
...
</xsl:choose>
</EventDetail>
</xsl:template>
- If in the above example, the various values of
$typeIdare sufficiently descriptive to use as text values then the TypeId node can be implemented prior to the<xsl:choose>to avoid specifying it once in each child template. - It’s common for systems to generate
Create/Delete/View/Modify/...events against a range of differentDocument/File/Email/Object/...types. Rather than looking at events such asCreateDocument/DeleteFile/...and creating a template for each, it’s often simpler to work in two stages. Firstly create templates for theCreate/Delete/...types withinEventDetailand then from each of these templates, call another template which then checks and calls the relevant object template. - It’s also sometimes possible to take the above multi-step process further and use a common template for Create/Delete/View.
The following code assumes that the variable
${evttype}is a valid schema action such asCreate/Delete/View. Whilst it can be used to produce more compact XSLT code, it tends to lose readability and makes extending the code for additional types more difficult. The inner<xsl:choose>can even be simplified again by populating an<xsl:element>with{objType}to make the code even more compact and more difficult to follow. There may occasionally be times when this sort of thing is useful but care should be taken to use it sparingly and provide plenty of comments.
<xsl:variable name="evttype" select="..."/>
<xsl:element name="${evttype}">
<xsl:choose>
<xsl:when test="objType='Document'">
<xsl:call-template name="Document"/>
</xsl:when>
<xsl:when test="objType='File'">
<xsl:call-template name="File"/>
</xsl:when>
...
</xsl:choose>
</xsl:element>
There are always exceptions to the above advice. If a feed will only ever contain e.g. successful logins then it may be easier to create the entire event within a single template, for example. But if there’s ever a possibility of e.g. logon failures, logoffs or anything else in the future then it’s safer to structure the XSLT into separate templates.
Filtering Wanted/Unwanted Event Types
It’s common that not all received events are required to be translated. Depending upon the data being received and the auditing requirements that have been set against the source system, there are several ways to filter the events.
Remove Unwanted Events
The first method is best to use when the majority of event types are to be translated and only a few types, such as debug messages are to be dropped. Consider the code fragment from earlier:
<xsl:template match="record">
<Event>
...
</Event>
</xsl:template>
This will create an Event node for every source record. However, if we replace this with something like:
<xsl:template match="record[data[@name='logLevel' and @value='DEBUG']]"/>
<xsl:template match="record[data[@name='msgType'
and (@value='drop1' or @value='drop2')
]]"/>
<xsl:template match="record">
<Event>
...
</Event>
</xsl:template>
This will filter out all DEBUG messages and messages where the msgType is either “drop1" or “drop2". All other messages will result in an Event being generated.
This method is often not suited to systems where the full set of message types isn’t known prior to translation development, such as for closed source software where the full set of possible messages isn’t already known. If an unexpected message type appears in the logs then it’s likely that the translation won’t know how to deal with it and may either make incorrect assumptions about it or fail to produce a schema-compliant output.
Translate Wanted Events
This is the opposite of the previous method and the XSLT just ignores anything that it’s not expecting. This method is best used where only a few event types are of interest such as the scenario of translation logons/logoffs from a vast range of possible types.
For this, we’d use something like:
<xsl:template match="record[data[@name='msgType'
and (@value='logon' or @value='logoff')
]]">
<Event>
...
</Event>
</xsl:template>
<xsl:template match="text()"/>
The final line stops the XSLT outputting a sequence of unformatted text nodes for any unmatched event types when an <xsl:apply-templates/> is used elsewhere within the XSLT.
It isn’t always needed but does no harm if present.
This method starts to become messy and difficult to understand if a large number of wanted types are to be matched.
Advanced Removal Method (With Optional Warnings)
Where the full list of event types isn’t known or may expand over time, the best method may be to filter out the definite unwanted events and handle anything unexpected as well as the known and wanted events. This would use code similar to before to drop the specific unwanted types but handle everything else including unknown types:
<xsl:template match="record[data[@name='logLevel' and @value='DEBUG']]"/>
...
<xsl:template match="record[data[@name='msgType'
and (@value='drop1' or @value='drop2')
]]"/>
<xsl:template match="record">
<Event>
...
</Event>
</xsl:template>
However, the XSLT must then be able to handle unknown arbitrary event types. In practice, most systems provide a consistent format for logging the “who/where/when" and it’s only the “what" that differs between event types. Therefore, it’s usually possible to add something like this into the XSLT:
<EventDetail>
<xsl:choose>
<xsl:when test="$evtType='1'">
...
</xsl:when>
...
<xsl:when test="$evtType='n'">
...
</xsl:when>
<!-- Unknown event type -->
<xsl:otherwise>
<Unknown>
<xsl:value-of select="stroom:log(‘WARN',concat('Unexpected Event Type - ', $evtType))"/>
...
</Unknown>
</xsl:otherwise>
</EventDetail>
This will create an Event of type Unknown.
The Unknown node is only able to contain data name/value pairs and it should be simple to extract these directly from the intermediate XML using an <xsl:for-each>.
This will allow the attributes from the source event to populate the output event for later analysis but will also generate an error stream of level WARN which will record the event type.
Looking through these error streams will allow the developer to see which unexpected events have appeared then either filter them out within a top-level <xsl:template match="record[data[@name='...' and @value='...']]"/> statement or to produce an additional <xsl:when> within the EventDetail node to translate the type correctly.
Common Mistakes
Performance Issues
The way that the code is written can affect its overall performance. This may not matter for low-volume logs but can greatly affect processing time for higher volumes. Consider the following example:
<!-- Event Detail template -->
<xsl:template name="EventDetail">
<xsl:variable name="X" select="..."/>
<xsl:variable name="Y" select="..."/>
<xsl:variable name="Z" select="..."/>
<EventDetail>
<xsl:choose>
<xsl:when test="$X='A' and $Y='foo' and matches($Z,'blah.*blah')">
<xsl:call-template name="AAA"/>
</xsl:when>
<xsl:when test="$X='B' or $Z='ABC'">
<xsl:call-template name="BBB"/>
</xsl:when>
...
<xsl:otherwise>
<xsl:call-template name="ZZZ"/>
</xsl:otherwise>
</xsl:choose>
</EventDetail>
</xsl:template>
If none of the <xsl:when> choices match, particularly if there are many of them or their logic is complex then it’ll take a significant time to reach the <xsl:otherwise> element.
If this is by far the most common type of source data (i.e. none of the specific <xsl:when> elements is expected to match very often) then the XSLT will be slow and inefficient.
It’s therefore better to list the most common examples first, if known.
It’s also usually better to have a hierarchy of smaller numbers of options within an <xsl:choose>.
So rather than the above code, the following is likely to be more efficient:
<xsl:choose>
<xsl:when test="$X='A'">
<xsl:choose>
<xsl:when test="$Y='foo'">
<xsl:choose>
<xsl:when test="matches($Z,'blah.*blah')">
<xsl:call-template name="AAA"/>
</xsl:when>
<xsl:otherwise>
...
</xsl:otherwise>
</xsl:choose>
</xsl:when>
...
</xsl:choose>
...
</xsl:when>
...
</xsl:choose>
Whilst this code looks more complex, it’s far more efficient to carry out a shorter sequence of checks, each based upon the result of the previous check, rather than a single consecutive list of checks where the data may only match the final check.
Where possible, the most commonly appearing choices in the source data should be dealt with first to avoid running through multiple <xsl:when> statements.
Stepping Works Fine But Errors Whilst Processing
When data is being stepped, it’s only ever fed to the XSLT as a single event, whilst a pipeline is able to process multiple events within a single input stream. This apparently minor difference sometimes results in obscure errors if the translation has incorrect XPaths specified. Taking the following input data example:
<TopLevelNode>
<EventNode>
<Field1>1</Field1>
...
</EventNode>
<EventNode>
<Field1>2</Field1>
...
</EventNode>
...
<EventNode>
<Field1>n</Field1>
...
</EventNode>
</TopLevelNode>
If an XSLT is stepped, all XPaths will be relative to <EventNode>.
To extract the value of Field1, you’d use something similar to <xsl:value-of select="Field1"/>.
The following examples would also work in stepping mode or when there was only ever one Event per input stream:
<xsl:value-of select="//Field1"/>
<xsl:value-of select="../EventNode/Field1"/>
<xsl:value-of select="../*/Field1"/>
<xsl:value-of select="/TopLevelNode/EventNode/Field1"/>
However, if there’s ever a stream with multiple event nodes, the output from pipeline processing would be a sequence of the Field1 node values i.e. 12...n for each event.
Whilst it’s easy to spot the issues in these basic examples, it’s harder to see in more complex structures.
It’s also worth mentioning that just because your test data only ever has a single event per stream, there’s nothing to say it’ll stay this way when operational or when the next version of the software is installed on the source system, so you should always guard against using XPaths that go to the root of the tree.
Unexpected Data Values Causing Schema Validation Errors
A source system may provide a log containing an IP address. All works fine for a while with the following code fragment:
<Client>
<IPAddress>
<xsl:value-of select="$ipAddress"/>
</IPAddress>
</Client>
However, let’s assume that in certain circumstances (e.g. when accessed locally rather than over a network) the system provides a value of localhost or something else that’s not an IP address.
Whilst the majority of schema values are of type string, there are still many that are limited in character set in some way.
The most common is probably IPAddress and it must match a fairly complex regex to be valid.
In this instance, the translation will still succeed but any schema validation elements within the pipeline will throw an error and stop the invalid event (not just the invalid element) from being output within the Events stream.
Without the event in the stream, it’s not indexable or searchable so is effectively dropped by the system.
To resolve this issue, the XSLT should be aware of the possibility of invalid input using something like the following:
<Client>
<xsl:choose>
<xsl:when test="matches($ipAddress,'^[.0-9]+$')">
<IPAddress>
<xsl:value-of select="$ipAddress"/>
</IPAddress>
</xsl:when>
<xsl:otherwise>
<HostName>
<xsl:value-of select="$ipAddress"/>
</HostName>
</xsl:otherwise>
</xsl:choose>
</Client>
This would need to be modified slightly for IPv6 and also wouldn’t catch obvious errors such as 999.1..8888 but if we can assume that the source will generate either a valid IP address or a valid hostname then the events will at least be available within the output stream.
Testing the Translation
When stepping a stream with more than a few events in it, it’s possible to filter the stepping rather than just moving to first/previous/next/last. In the bottom right hand corner of the bottom right hand pane within the XSLT tab, there’s a small filter icon that’s often not spotted. The icon will be grey if no filter is set or green if set. Opening this filter gives choices such as:
- Jump to error
- Jump to empty/non-empty output
- Jump to specific XPath exists/contains/equals/unique
Each of these options can be used to move directly to the next/previous event that matches one of these attributes.
A filter on e.g. the XSLTFilter will still be active even if viewing the DSParser or any other pipeline entry, although the filter that’s present in the parser step will not show any values. This may cause confusion if you lose track of which filters have been set on which steps.
Filters can be entered for multiple pipeline elements, e.g. Empty output in translationFilter and Error in schemaFilter. In this example, all empty outputs AND schema errors will be seen, effectively providing an OR of the filters.
The XPath syntax is fairly flexible.
If looking for specific TypeId values, the shortcut of //TypeId will work just as well as /Events/Event/EventDetail/TypeId, for example.
Using filters will allow a developer to find a wide range of types of records far quicker than stepping through a large file of events.
4.5.2 - Apache HTTPD Event Feed
The following will take you through the process of creating an Event Feed in Stroom.
Introduction
The following will take you through the process of creating an Event Feed in Stroom.
In this example, the logs are in a well-defined, line based, text format so we will use a Data Splitter parser to transform the logs into simple record-based XML and then a XSLT translation to normalise them into the Event schema.
A separate document will describe the method of automating the storage of normalised events for this feed. Further, we will not Decorate these events. Again, Event Decoration is described in another document.
Event Log Source
For this example, we will use logs from an Apache HTTPD Web server. In fact, the web server in front of Stroom v5 and earlier.
To get the optimal information from the Apache HTTPD access logs, we define our log format based on an extension of the BlackBox format.
The format is described and defined below.
This is an extract from a HTTPD configuration file (/etc/httpd/conf/httpd.conf)
# Stroom - Black Box Auditing configuration
#
# %a - Client IP address (not hostname (%h) to ensure ip address only)
# When logging the remote host, it is important to log the client IP address, not the
# hostname. We do this with the '%a' directive. Even if HostnameLookups are turned on,
# using '%a' will only record the IP address. For the purposes of BlackBox formats,
# reversed DNS should not be trusted
# %{REMOTE_PORT}e - Client source port
# Logging the client source TCP port can provide some useful network data and can help
# one associate a single client with multiple requests.
# If two clients from the same IP address make simultaneous connections, the 'common log'
# file format cannot distinguish between those clients. Otherwise, if the client uses
# keep-alives, then every hit made from a single TCP session will be associated by the same
# client port number.
# The port information can indicate how many connections our server is handling at once,
# which may help in tuning server TCP/OP settings. It will also identify which client ports
# are legitimate requests if the administrator is examining a possible SYN-attack against a
# server.
# Note we are using the REMOTE_PORT environment variable. Environment variables only come
# into play when mod_cgi or mod_cgid is handling the request.
# %X - Connection status (use %c for Apache 1.3)
# The connection status directive tells us detailed information about the client connection.
# It returns one of three flags:
# x if the client aborted the connection before completion,
# + if the client has indicated that it will use keep-alives (and request additional URLS),
# - if the connection will be closed after the event
# Keep-Alive is a HTTP 1.1. directive that informs a web server that a client can request multiple
# files during the same connection. This way a client doesn't need to go through the overhead
# of re-establishing a TCP connection to retrieve a new file.
# %t - time - or [%{%d/%b/%Y:%T}t.%{msec_frac}t %{%z}t] for Apache 2.4
# The %t directive records the time that the request started.
# NOTE: When deployed on an Apache 2.4, or better, environment, you should use
# strftime format in order to get microsecond resolution.
# %l - remote logname
# %u - username [in quotes]
# The remote user (from auth; This may be bogus if the return status (%s) is 401
# for non-ssl services)
# For SSL services, user names need to be delivered as DNs to deliver PKI user details
# in full. To pass through PKI certificate properties in the correct form you need to
# add the following directives to your Apache configuration:
# SSLUserName SSL_CLIENT_S_DN
# SSLOptions +StdEnvVars
# If you cannot, then use %{SSL_CLIENT_S_DN}x in place of %u and use blackboxSSLUser
# LogFormat nickname
# %r - first line of text sent by web client [in quotes]
# This is the first line of text send by the web client, which includes the request
# method, the full URL, and the HTTP protocol.
# %s - status code before any redirection
# This is the status code of the original request.
# %>s - status code after any redirection has taken place
# This is the final status code of the request, after any internal redirections may
# have taken place.
# %D - time in microseconds to handle the request
# This is the number of microseconds the server took to handle the request in microseconds
# %I - incoming bytes
# This is the bytes received, include request and headers. It cannot, by definition be zero.
# %O - outgoing bytes
# This is the size in bytes of the outgoing data, including HTTP headers. It cannot, by
# definition be zero.
# %B - outgoing content bytes
# This is the size in bytes of the outgoing data, EXCLUDING HTTP headers. Unlike %b, which
# records '-' for zero bytes transferred, %B will record '0'.
# %{Referer}i - Referrer HTTP Request Header [in quotes]
# This is typically the URL of the page that made the request. If linked from
# e-mail or direct entry this value will be empty. Note, this can be spoofed
# or turned off
# %{User-Agent}i - User agent HTTP Request Header [in quotes]
# This is the identifying information the client (browser) reports about itself.
# It can be spoofed or turned off
# %V - the server name according to the UseCannonicalName setting
# This identifies the virtual host in a multi host webservice
# %p - the canonical port of the server servicing the request
# Define a variation of the Black Box logs
#
# Note, you only need to use the 'blackboxSSLUser' nickname if you cannot set the
# following directives for any SSL configurations
# SSLUserName SSL_CLIENT_S_DN
# SSLOptions +StdEnvVars
# You will also note the variation for no logio module. The logio module supports
# the %I and %O formatting directive
#
<IfModule mod_logio.c>
LogFormat "%a/%{REMOTE_PORT}e %X %t %l \"../../"%r\" %s/%>s %D %I/%O/%B \"%{Referer}i\" \"%{User-Agent}i\" %V/%p" blackboxUser
LogFormat "%a/%{REMOTE_PORT}e %X %t %l \"%{SSL_CLIENT_S_DN../../"%r\" %s/%>s %D %I/%O/%B \"%{Referer}i\" \"%{User-Agent}i\" %V/%p" blackboxSSLUser
</IfModule>
<IfModule !mod_logio.c>
LogFormat "%a/%{REMOTE_PORT}e %X %t %l \"../../"%r\" %s/%>s %D 0/0/%B \"%{Referer}i\" \"%{User-Agent}i\" %V/$p" blackboxUser
LogFormat "%a/%{REMOTE_PORT}e %X %t %l \"%{SSL_CLIENT_S_DN../../"%r\" %s/%>s %D 0/0/%B \"%{Referer}i\" \"%{User-Agent}i\" %V/$p" blackboxSSLUser
</IfModule>
_Apache BlackBox_ Auditing Configuration
(
Download ApacheHTTPDAuditConfig.txt
)
As Stroom can use PKI for login, you can configure Stroom’s Apache to make use of the blackboxSSLUser log format. A sample set of logs in this format appear below.
192.168.4.220/61801 - [18/Jan/2020:12:39:04 -0800] - "/C=USA/ST=CA/L=Los Angeles/O=Default Company Ltd/CN=Burn Frank (burn)" "POST /stroom/stroom/dispatch.rpc HTTP/1.1" 200/200 21221 2289/415/14 "https://stroomnode00.strmdev00.org/stroom/" "Mozilla/5.0 (Windows NT 10.0; Win64; x64) AppleWebKit/537.36 (KHTML, like Gecko) Chrome/81.0.4044.113 Safari/537.36" stroomnode00.strmdev00.org/443
192.168.4.220/61854 - [18/Jan/2020:12:40:04 -0800] - "/C=USA/ST=CA/L=Los Angeles/O=Default Company Ltd/CN=Burn Frank (burn)" "POST /stroom/stroom/dispatch.rpc HTTP/1.1" 200/200 7889 2289/415/14 "https://stroomnode00.strmdev00.org/stroom/" "Mozilla/5.0 (Windows NT 10.0; Win64; x64) AppleWebKit/537.36 (KHTML, like Gecko) Chrome/81.0.4044.113 Safari/537.36" stroomnode00.strmdev00.org/443
192.168.4.220/61909 - [18/Jan/2020:12:41:04 -0800] - "/C=USA/ST=CA/L=Los Angeles/O=Default Company Ltd/CN=Burn Frank (burn)" "POST /stroom/stroom/dispatch.rpc HTTP/1.1" 200/200 6901 2389/3796/14 "https://stroomnode00.strmdev00.org/stroom/" "Mozilla/5.0 (Windows NT 10.0; Win64; x64) AppleWebKit/537.36 (KHTML, like Gecko) Chrome/81.0.4044.113 Safari/537.36" stroomnode00.strmdev00.org/443
192.168.4.220/61962 - [18/Jan/2020:12:42:04 -0800] - "/C=USA/ST=CA/L=Los Angeles/O=Default Company Ltd/CN=Burn Frank (burn)" "POST /stroom/stroom/dispatch.rpc HTTP/1.1" 200/200 11219 2289/415/14 "https://stroomnode00.strmdev00.org/stroom/" "Mozilla/5.0 (Windows NT 10.0; Win64; x64) AppleWebKit/537.36 (KHTML, like Gecko) Chrome/81.0.4044.113 Safari/537.36" stroomnode00.strmdev00.org/443
192.168.8.151/62015 - [18/Jan/2020:12:43:04 +1100] - "/C=AUS/ST=NSW/L=Sydney/O=Default Company Ltd/CN=Max Bergman (maxb)" "POST /stroom/stroom/dispatch.rpc HTTP/1.1" 200/200 4265 2289/415/14 "https://stroomnode00.strmdev00.org/stroom/" "Mozilla/5.0 (Windows NT 10.0; Win64; x64) AppleWebKit/537.36 (KHTML, like Gecko) Chrome/81.0.4044.113 Safari/537.36" stroomnode00.strmdev00.org/443
192.168.8.151/62092 - [18/Jan/2020:12:44:04 +1100] - "/C=AUS/ST=NSW/L=Sydney/O=Default Company Ltd/CN=Max Bergman (maxb)" "POST /stroom/stroom/dispatch.rpc HTTP/1.1" 200/200 9791 2289/415/14 "https://stroomnode00.strmdev00.org/stroom/" "Mozilla/5.0 (Windows NT 10.0; Win64; x64) AppleWebKit/537.36 (KHTML, like Gecko) Chrome/81.0.4044.113 Safari/537.36" stroomnode00.strmdev00.org/443
192.168.8.151/62147 - [18/Jan/2020:12:44:10 +1100] - "/C=AUS/ST=NSW/L=Sydney/O=Default Company Ltd/CN=Max Bergman (maxb)" "POST /stroom/stroom/dispatch.rpc HTTP/1.1" 200/200 9791 2289/415/14 "https://stroomnode00.strmdev00.org/stroom/" "Mozilla/5.0 (Windows NT 10.0; Win64; x64) AppleWebKit/537.36 (KHTML, like Gecko) Chrome/81.0.4044.113 Safari/537.36" stroomnode00.strmdev00.org/443
192.168.8.151/62147 - [18/Jan/2020:12:44:20 +1100] - "/C=AUS/ST=NSW/L=Sydney/O=Default Company Ltd/CN=Max Bergman (maxb)" "POST /stroom/stroom/dispatch.rpc HTTP/1.1" 200/200 11509 2289/415/14 "https://stroomnode00.strmdev00.org/stroom/" "Mozilla/5.0 (Windows NT 10.0; Win64; x64) AppleWebKit/537.36 (KHTML, like Gecko) Chrome/81.0.4044.113 Safari/537.36" stroomnode00.strmdev00.org/443
192.168.8.151/62202 - [18/Jan/2020:12:44:21 +1100] - "/C=AUS/ST=NSW/L=Sydney/O=Default Company Ltd/CN=Max Bergman (maxb)" "POST /stroom/stroom/dispatch.rpc HTTP/1.1" 200/200 4627 2389/3796/14 "https://stroomnode00.strmdev00.org/stroom/" "Mozilla/5.0 (Windows NT 10.0; Win64; x64) AppleWebKit/537.36 (KHTML, like Gecko) Chrome/81.0.4044.113 Safari/537.36" stroomnode00.strmdev00.org/443
192.168.8.151/62294 - [18/Jan/2020:12:44:21 +1100] - "/C=AUS/ST=NSW/L=Sydney/O=Default Company Ltd/CN=Max Bergman (maxb)" "POST /stroom/stroom/dispatch.rpc HTTP/1.1" 200/200 12367 2289/415/14 "https://stroomnode00.strmdev00.org/stroom/" "Mozilla/5.0 (Windows NT 10.0; Win64; x64) AppleWebKit/537.36 (KHTML, like Gecko) Chrome/81.0.4044.113 Safari/537.36" stroomnode00.strmdev00.org/443
192.168.8.151/62349 - [18/Jan/2020:12:44:25 +1100] - "/C=AUS/ST=NSW/L=Sydney/O=Default Company Ltd/CN=Max Bergman (maxb)" "POST /stroom/stroom/dispatch.rpc HTTP/1.1" 200/200 12765 2289/415/14 "https://stroomnode00.strmdev00.org/stroom/" "Mozilla/5.0 (Windows NT 10.0; Win64; x64) AppleWebKit/537.36 (KHTML, like Gecko) Chrome/81.0.4044.113 Safari/537.36" stroomnode00.strmdev00.org/443
192.168.234.9/62429 - [18/Jan/2020:12:50:06 +0000] - "/C=GBR/ST=GLOUCESTERSHIRE/L=Bristol/O=Default Company Ltd/CN=Kostas Kosta (kk)" "POST /stroom/stroom/dispatch.rpc HTTP/1.1" 200/200 12245 2289/415/14 "https://stroomnode00.strmdev00.org/stroom/" "Mozilla/5.0 (Windows NT 10.0; Win64; x64) AppleWebKit/537.36 (KHTML, like Gecko) Chrome/81.0.4044.113 Safari/537.36" stroomnode00.strmdev00.org/443
192.168.234.9/62429 - [18/Jan/2020:12:50:04 +0000] - "/C=GBR/ST=GLOUCESTERSHIRE/L=Bristol/O=Default Company Ltd/CN=Kostas Kosta (kk)" "POST /stroom/stroom/dispatch.rpc HTTP/1.1" 200/200 12245 2289/415/14 "https://stroomnode00.strmdev00.org/stroom/" "Mozilla/5.0 (Windows NT 10.0; Win64; x64) AppleWebKit/537.36 (KHTML, like Gecko) Chrome/81.0.4044.113 Safari/537.36" stroomnode00.strmdev00.org/443
192.168.234.9/62495 - [18/Jan/2020:12:51:04 +0000] - "/C=GBR/ST=GLOUCESTERSHIRE/L=Bristol/O=Default Company Ltd/CN=Kostas Kosta (kk)" "POST /stroom/stroom/dispatch.rpc HTTP/1.1" 200/200 4327 2289/415/14 "https://stroomnode00.strmdev00.org/stroom/" "Mozilla/5.0 (Windows NT 10.0; Win64; x64) AppleWebKit/537.36 (KHTML, like Gecko) Chrome/81.0.4044.113 Safari/537.36" stroomnode00.strmdev00.org/443
192.168.234.9/62549 - [18/Jan/2020:12:52:04 +0000] - "/C=GBR/ST=GLOUCESTERSHIRE/L=Bristol/O=Default Company Ltd/CN=Kostas Kosta (kk)" "POST /stroom/stroom/dispatch.rpc HTTP/1.1" 200/200 7148 2289/415/14 "https://stroomnode00.strmdev00.org/stroom/" "Mozilla/5.0 (Windows NT 10.0; Win64; x64) AppleWebKit/537.36 (KHTML, like Gecko) Chrome/81.0.4044.113 Safari/537.36" stroomnode00.strmdev00.org/443
192.168.234.9/62626 - [18/Jan/2020:12:52:06 +0000] - "/C=GBR/ST=GLOUCESTERSHIRE/L=Bristol/O=Default Company Ltd/CN=Kostas Kosta (kk)" "POST /stroom/stroom/dispatch.rpc HTTP/1.1" 200/200 11386 2289/415/14 "https://stroomnode00.strmdev00.org/stroom/" "Mozilla/5.0 (Windows NT 10.0; Win64; x64) AppleWebKit/537.36 (KHTML, like Gecko) Chrome/81.0.4044.113 Safari/537.36" stroomnode00.strmdev00.org/443
_Apache BlackBox_ sample log
(
Download sampleApacheBlackBox.log
)
Save a copy of this data to your local environment for use later in this HOWTO. Save this file as a text document with ANSI encoding.
Create the Feed and its Pipeline
To reflect the source of these Accounting Logs, we will name our feed and its pipeline Apache-SSLBlackBox-V2.0-EVENTS and it will be stored in the system group Apache HTTPD under the main system group - Event Sources.
Create System Group
To create the system group Apache HTTPD, navigate to the Event Sources/Infrastructure/WebServer system group within the Explorer pane (if this system group structure does not already exist in your Stroom instance then refer to the HOWTO Stroom Explorer Management for guidance). Left click to highlight the WebServer system group then right click to bring up the object context menu. Navigate to the New icon, then the Folder icon to reveal the New Folder selection window.
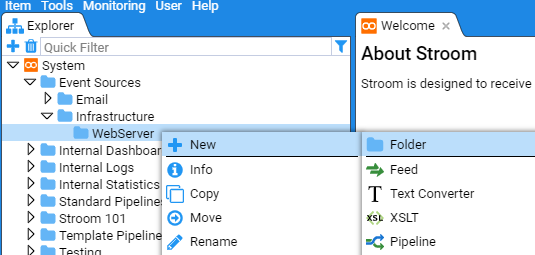
In the New Folder window enter Apache HTTPD into the Name: text entry box.
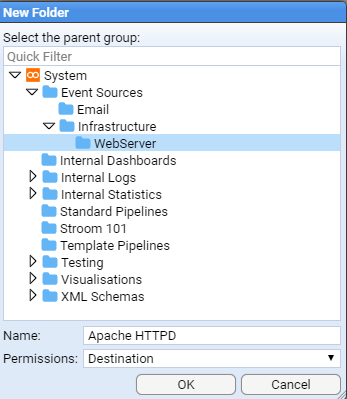
Then click on
at which point you will be presented with the Apache HTTPD system group configuration tab.
Also note, the WebServer system group within the Explorer pane has automatically expanded to display the Apache HTTPD system group.
Close the Apache HTTPD system group configuration tab by clicking on the close item icon on the right-hand side of the tab Apache HTTPD .
We now need to create, in order
- the Feed,
- the Text Parser,
- the Translation and finally,
- the Pipeline.
Create Feed
Within the Explorer pane, and having selected the Apache HTTPD group, right click to bring up object context menu. Navigate to New, Feed
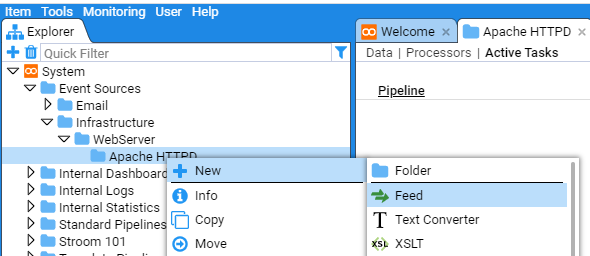
Select the Feed icon , when the New Feed selection window comes up, ensure the Apache HTTPD system group is selected or navigate to it.
Then enter the name of the feed, Apache-SSLBlackBox-V2.0-EVENTS, into the Name: text entry box then press
.
It should be noted that the default Stroom FeedName pattern will not accept this name.
One needs to modify the stroom.feedNamePattern stroom property to change the default pattern to ^[a-zA-Z0-9_-\.]{3,}$.
See the HOWTO on System Properties document to see how to make this change.
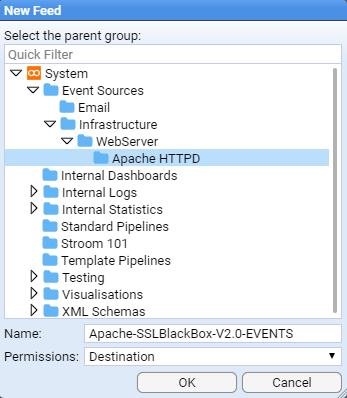
At this point you will be presented with the new feed’s configuration tab and the feed’s Explorer object will automatically appear in the Explorer pane within the Apache HTTPD system group.
Select the Settings tab on the feed’s configuration tab. Enter an appropriate description into the Description: text entry box, for instance:
“Apache HTTPD events for BlackBox Version 2.0. These events are from a Secure service (https).”
In the Classification: text entry box, enter a Classification of the data that the event feed will contain - that is the classification or sensitivity of the accounting log’s content itself.
As this is not a Reference Feed, leave the Reference Feed: check box unchecked.
We leave the Feed Status: at Receive.
We leave the Stream Type: as Raw Events as we will be sending batches (streams) of raw event logs.
We leave the Data Encoding: as UTF-8 as the raw logs are in this form.
We leave the Context Encoding: as UTF-8 as there are no context events for this feed.
We leave the Retention Period: at Forever as we do not want to delete the raw logs.
This results in
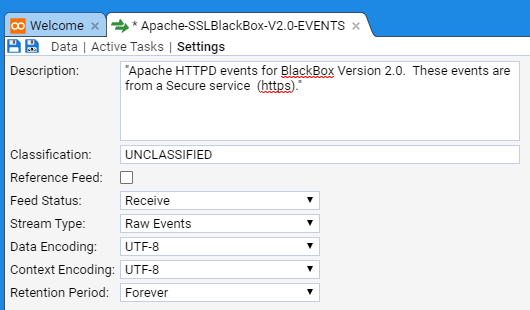
Save the feed by clicking on the save icon .
Create Text Converter
Within the Explorer pane, and having selected the Apache HTTPD system group, right click to bring up object context menu, then select:
When the New Text Converter

selection window comes up enter the name of the feed, Apache-SSLBlackBox-V2.0-EVENTS, into the Name: text entry box then press . At this point you will be presented with the new text converter’s configuration tab.

Enter an appropriate description into the Description: text entry box, for instance
“Apache HTTPD events for BlackBox Version 2.0 - text converter. See Conversion for complete documentation.”
Set the Converter Type: to be Data Splitter from drop down menu.
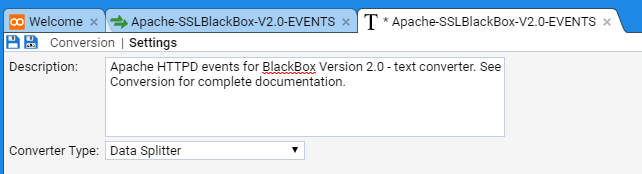
Save the text converter by clicking on the save icon .
Create XSLT Translation
Within the Explorer pane, and having selected the Apache HTTPD system group, right click to bring up object context menu, then select:
When the New XSLT selection window comes up,

enter the name of the feed, Apache-SSLBlackBox-V2.0-EVENTS, into the Name: text entry box then press . At this point you will be presented with the new XSLT’s configuration tab.
Enter an appropriate description into the Description: text entry box, for instance
“Apache HTTPD events for BlackBox Version 2.0 - translation. See Translation for complete documentation.”
Save the XSLT by clicking on the save icon.
Create Pipeline
In the process of creating this pipeline we have assumed that the Template Pipeline content pack has been loaded, so that we can Inherit a pipeline structure from this content pack and configure it to support this specific feed.
Within the Explorer pane, and having selected the Apache HTTPD system group, right click to bring up object context menu, then select:
When the New Pipeline selection window comes up, navigate to, then select the Apache HTTPD system group and then enter the name of the pipeline, Apache-SSLBlackBox-V2.0-EVENTS into the Name: text entry box then press . At this point you will be presented with the new pipeline’s configuration tab
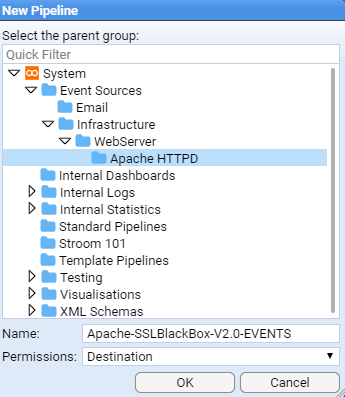
As usual, enter an appropriate Description:
“Apache HTTPD events for BlackBox Version 2.0 - pipeline. This pipeline uses the standard event pipeline to store the events in the Event Store.”
Save the pipeline by clicking on the save icon .
We now need to select the structure this pipeline will use. We need to move from the Settings sub-item on the pipeline configuration tab to the Structure sub-item. This is done by clicking on the Structure link, at which we see
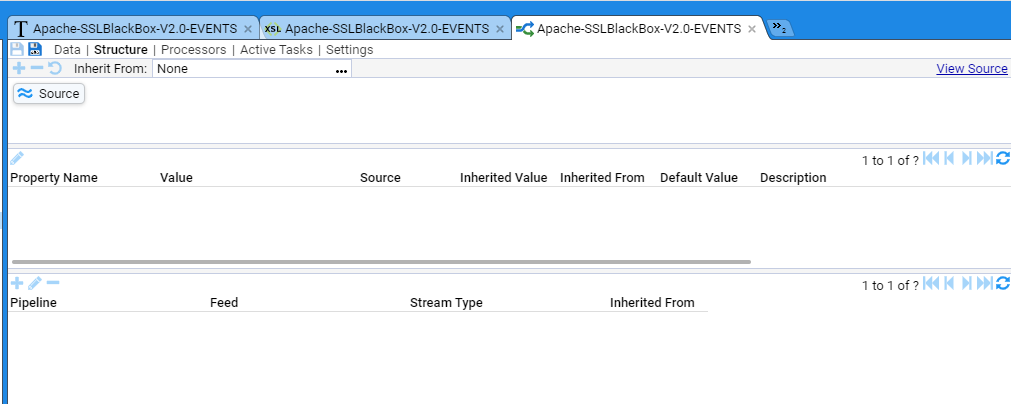
Next we will choose an Event Data pipeline. This is done by inheriting it from a defined set of Template Pipelines. To do this, click on the menu selection icon to the right of the Inherit From: text display box.
When the Choose item

selection window appears, select from the Template Pipelines system group.
In this instance, as our input data is text, we select (left click) the Event Data (Text) pipeline
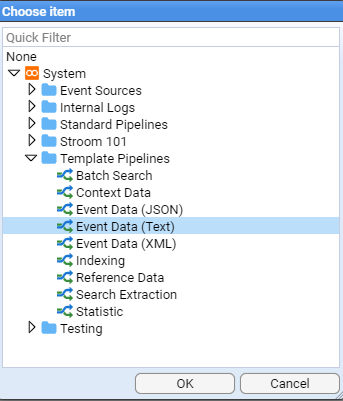
then press . At this point, we see the inherited pipeline structure of

For the purpose of this HOWTO, we are only interested in two of the eleven (11) elements in this pipeline
- the Text Converter labelled dsParser
- the XSLT Translation labelled translationFilter
We now need to associate our Text Converter and Translation with the pipeline so that we can pass raw events (logs) through our pipeline in order to save them in the Event Store.
To associate the Text Converter, select the Text Converter icon, to display.
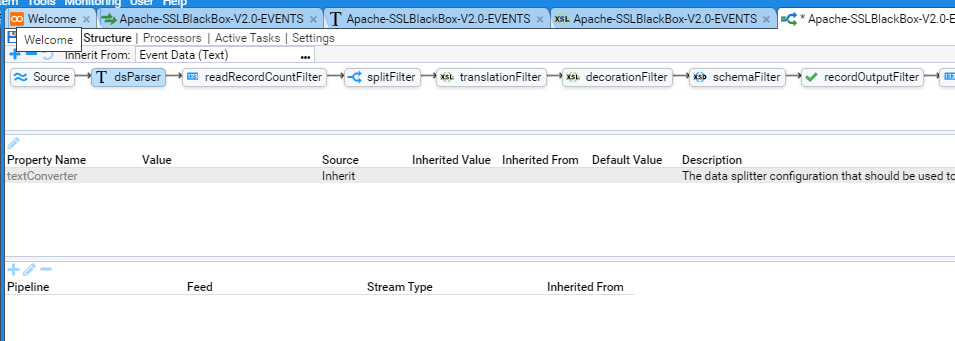
Now navigate to the Property pane (the middle pane of the pipeline configuration tab), then double click on the textConverter Property Name to display the Edit Property selection window that allows you to edit the given property
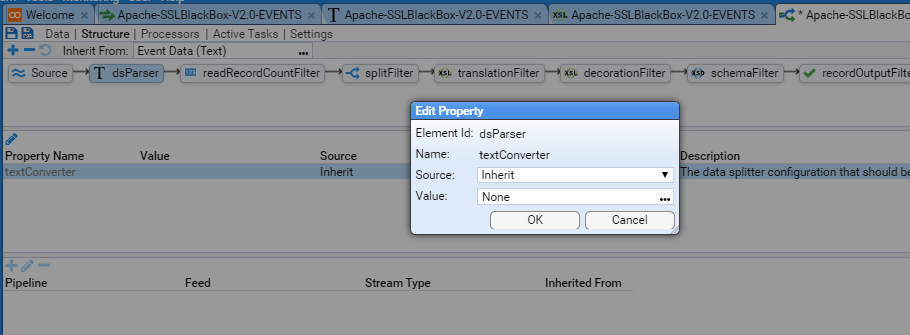
We leave the Property Source: as Inherit but we need to change the Property Value: from None to be our newly created Apache-SSLBlackBox-V2.0-EVENTS Text Converter.
To do this, position the cursor over the menu selection icon to the right of the Value: text display box and click to select.
Navigate to the Apache HTTPD system group then select the Apache-SSLBlackBox-V2.0-EVENTS text Converter
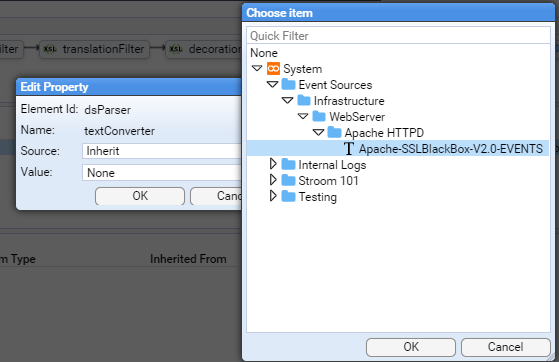
then press . At this point, we will see the Property Value set
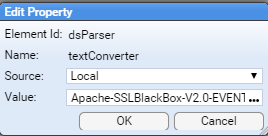
Again press to finish editing this property and we see that the textConverter Property has been set to Apache-SSLBlackBox-V2.0-EVENTS
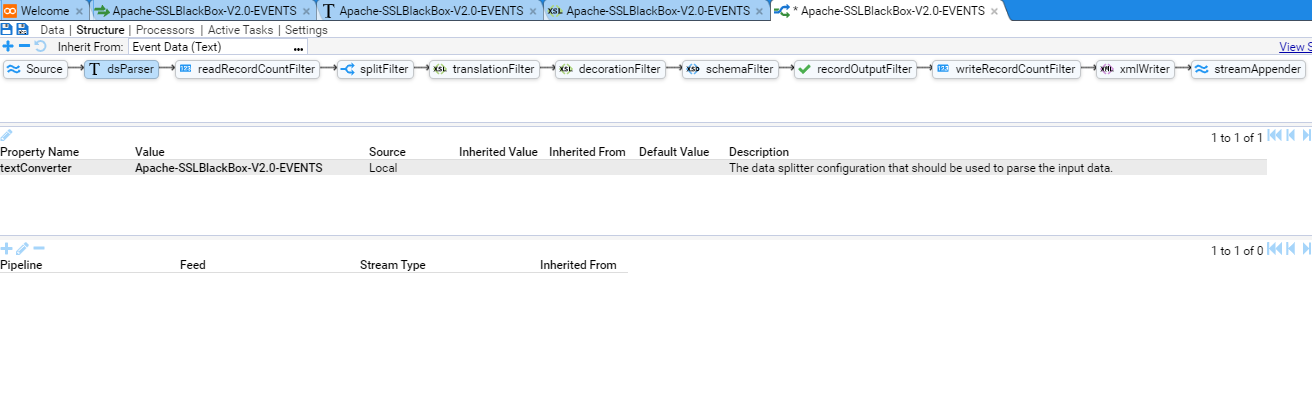
We perform the same actions to associate the translation.
First, we select the translation Filter’s
translationFilter
element and then within translation Filter’s Property pane we double click on the xslt Property Name to bring up the Property Editor.
As before, bring up the Choose item selection window, navigate to the Apache HTTPD system group and select the
Apache-SSLBlackBox-V2.0-EVENTS xslt Translation.
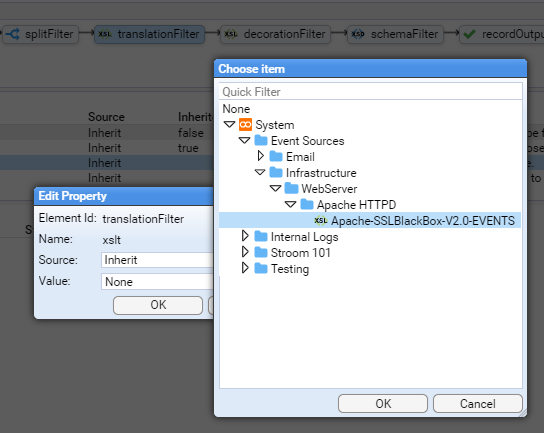
We leave the remaining properties in the translation Filter’s Property pane at their default values. The result is the assignment of our translation to the xslt Property.
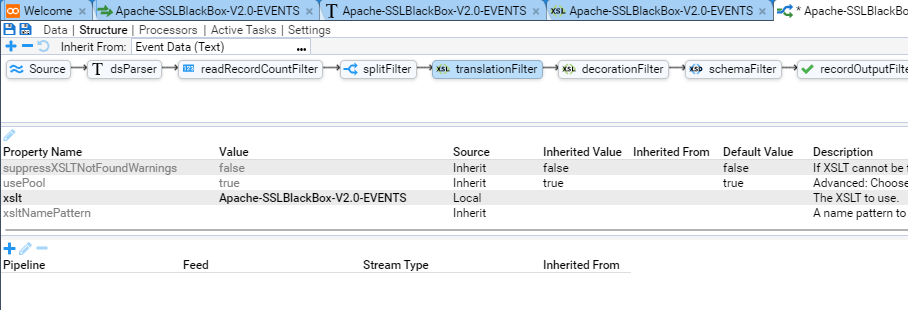
For the moment, we will not associate a decoration filter.
Save the pipeline by clicking on its icon.
Manually load Raw Event test data
Having established the pipeline, we can now start authoring our text converter and translation. The first step is to load some Raw Event test data. Previously in the Event Log Source of this HOWTO you saved a copy of the file sampleApacheBlackBox.log to your local environment. It contains only a few events as the content is consistently formatted. We could feed the test data by posting the file to Stroom’s accounting/datafeed url, but for this example we will manually load the file. Once developed, raw data is posted to the web service.
Select the ApacheHHTPDFeed tab and select the Data sub-tab to display
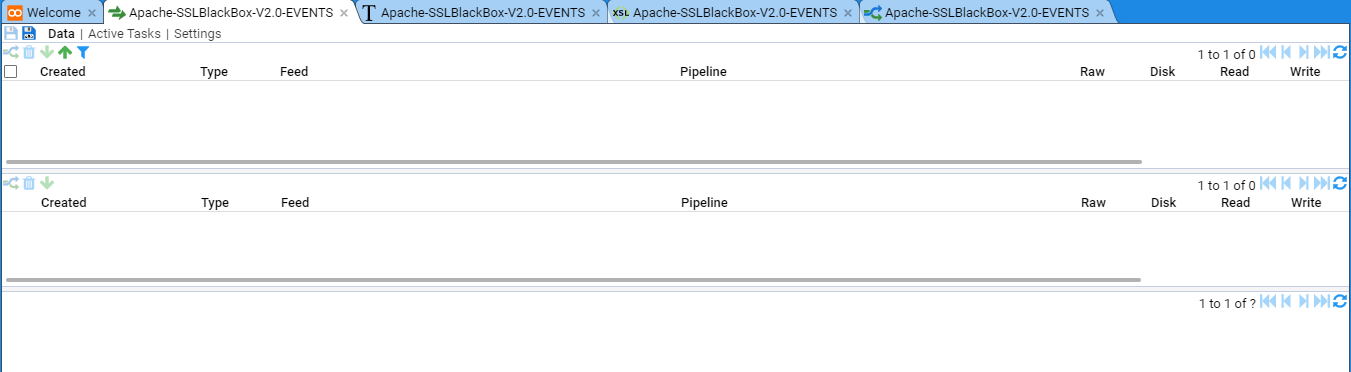
This window is divided into three panes.
The top pane displays the Stream Table, which is a table of the latest streams that belong to the feed (clearly it’s empty).

Note that a Raw Event stream is made up of data from a single file of data or aggregation of multiple data files and also meta-data associated with the data file(s). For example, file names, file size, etc.
The middle pane displays a Specific feed and any linked streams. To display a Specific feed, you select it from the Stream Table above.

The bottom pane displays the selected stream’s data or meta-data.
Note the Upload icon in the top left of the Stream table pane. On clicking the Upload icon, we are presented with the data Upload selection window.
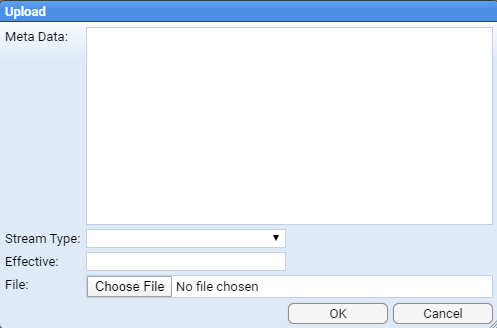
As stated earlier, raw event data is normally posted as a file to the Stroom web server. As part of this posting action, a set of well-defined HTTP extra headers are sent as part of the post. These headers, in the form of key value pairs, provide additional context associated with the system sending the logs. These standard headers become Stroom feed attributes available to the Stroom translation. Common attributes are
- System - the name of the System providing the logs
- Environment - the environment of the system (Production, Quality Assurance, Reference, Development)
- Feed - the feedname itself
- MyHost - the fully qualified domain name of the system sending the logs
- MyIPaddress - the IP address of the system sending the logs
- MyNameServer - the name server the system resolves names through
Since our translation will want these feed attributes, we will set them in the Meta Data text entry box of the Upload selection window.
Note we can skip Feed as this will automatically be assigned correctly as part of the upload action (setting it to Apache-SSLBlackBox-V2.0-EVENTS obviously).
Our Meta Data: will have
System:LinuxWebServer
Environment:Production
MyHost:stroomnode00.strmdev00.org
MyIPaddress:192.168.2.245
MyNameServer:192.168.2.254
We select a Stream Type: of Raw Events as this data is for an Event Feed. As this is not a Reference Feed we ignore the Effective: entry box (a date/time selector).
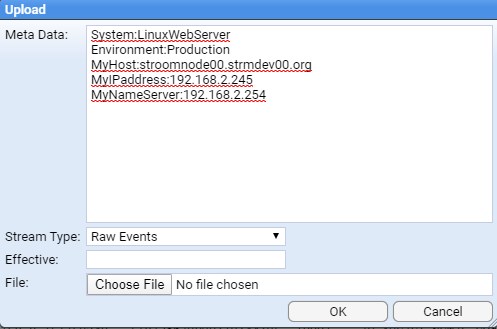
We now click the Choose File button, then navigate to the location of the raw log file you downloaded earlier, sampleApacheBlackBox.log
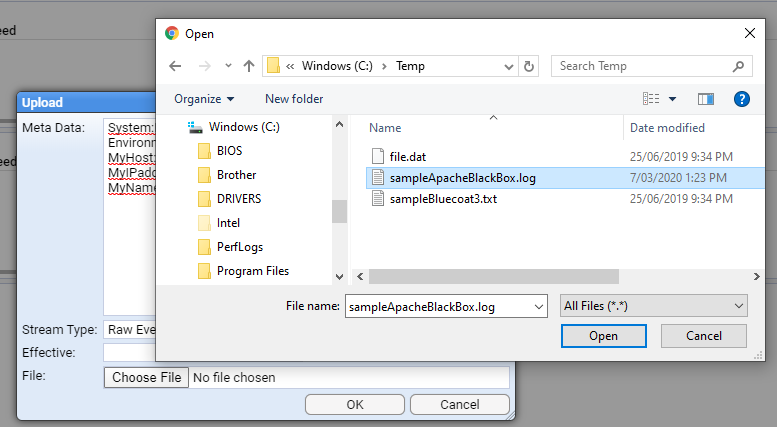
then click Open to return to the Upload selection window where we can then press to perform the upload.

An Alert dialog window is presented
which should be closed.
The stream we have just loaded will now be displayed in the Streams Table pane. Note that the Specific Stream and Data/Meta-data panes are still blank.
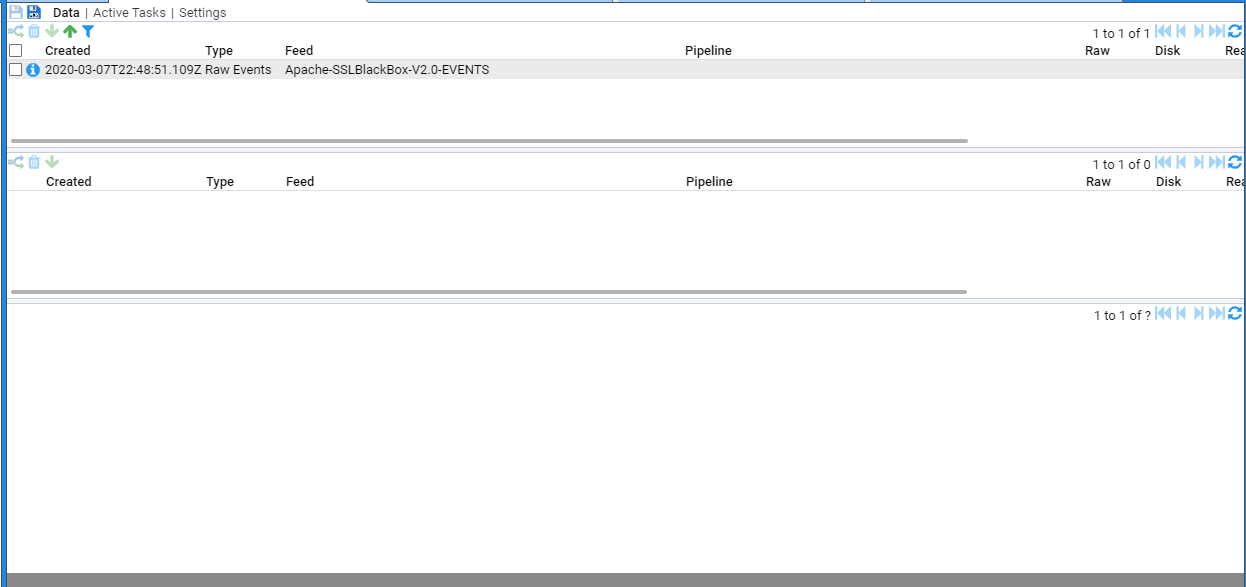
If we select the stream by clicking anywhere along its line, the stream is highlighted and the Specific Stream and Data/Meta-data_ panes now display data.
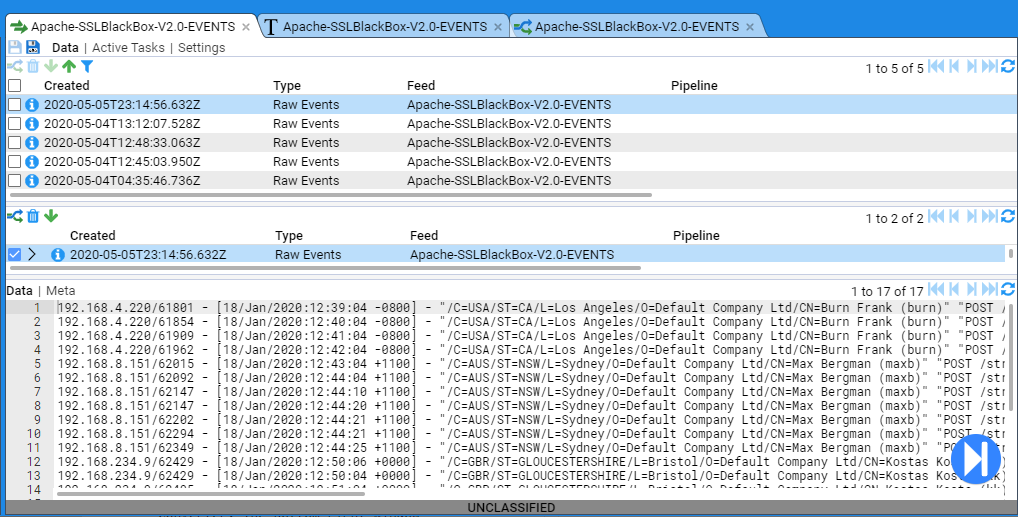
The Specific Stream pane only displays the Raw Event stream and the Data/Meta-data pane displays the content of the log file just uploaded (the Data link). If we were to click on the Meta link at the top of the Data/Meta-data pane, the log data is replaced by this stream’s meta-data.
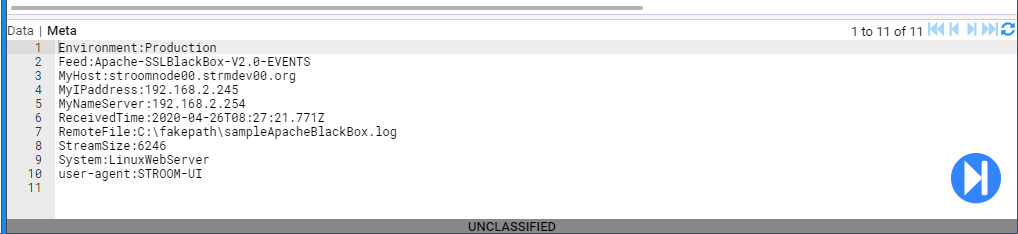
Note that, in addition to the feed attributes we set, the upload process added additional feed attributes of
- Feed - the feed name
- ReceivedTime - the time the feed was received by Stroom
- RemoteFile - the name of the file loaded
- StreamSize - the size, in bytes, of the loaded data within the stream
- user-agent - the user agent used to present the stream to Stroom - in this case, the Stroom user Interface
We now have data that will allow us to develop our text converter and translation.
Step data through Pipeline - Source
We now need to step our data through the pipeline.
To do this, set the check-box on the Specific Stream pane and we note that the previously greyed out action icons ( ) are now enabled.

We now want to step our data through the first element of the pipeline, the Text Converter. We enter Stepping Mode by pressing the stepping button found at the bottom right corner of the Data/Meta-data pane.
We will then be requested to choose a pipeline to step with, at which point you should navigate to the Apache-SSLBlackBox-V2.0-EVENTS pipeline as per

Then press .
At this point, we enter the pipeline Stepping tab
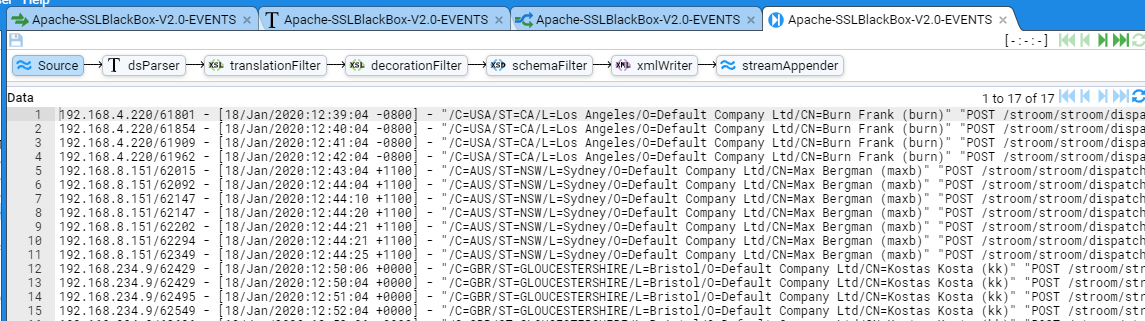
Which, initially displays the Raw Event data from our stream. This is the Source display for the Event Pipeline.
Step data through Pipeline - Text Converter
We click on the DSParser element to enter the Text Converter stepping window.
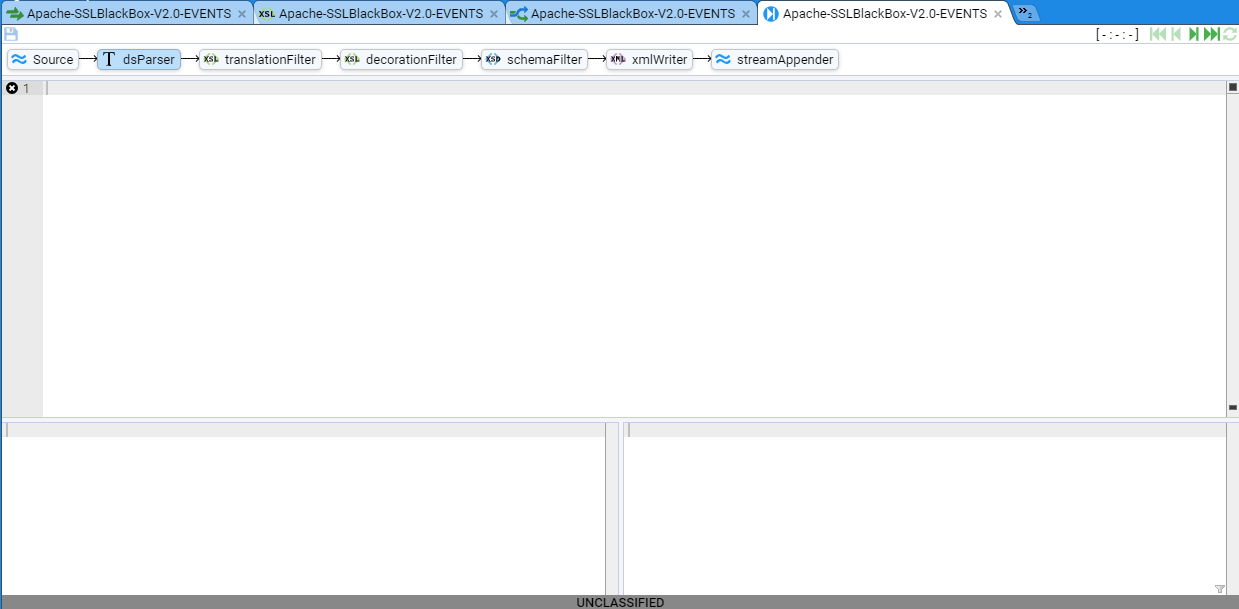
This stepping tab is divided into three sub-panes. The top one is the Text Converter editor and it will allow you to edit the text conversion. The bottom left window displays the input to the Text Converter. The bottom right window displays the output from the Text Converter for the given input.
We also note an error indicator - that of an error in the editor pane as indicated by the black back-grounded x and rectangular black boxes to the right of the editor’s scroll bar.
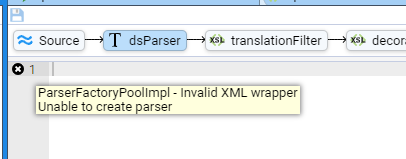
In essence, this means that we have no text converter to pass the Raw Event data through.
To correct this, we will author our text converter using the Data Splitter language. Normally this is done incrementally to more easily develop the parser. The minimum text converter contains
<?xml version="1.1" encoding="UTF-8"?>
<dataSplitter xmlns="data-splitter:3" xmlns:xsi="http://www.w3.org/2001/XMLSchema-instance" xsi:schemaLocation="data-splitter:3 file://data-splitter-v3.0.1.xsd" version="3.0">
<split delimiter="\n">
<group>
<regex pattern="^(.*)$">
<data name="rest" value="$1" />
</regex>
</group>
</split>
</dataSplitter>
If we now press the Step First icon the error will disappear and the stepping window will show.
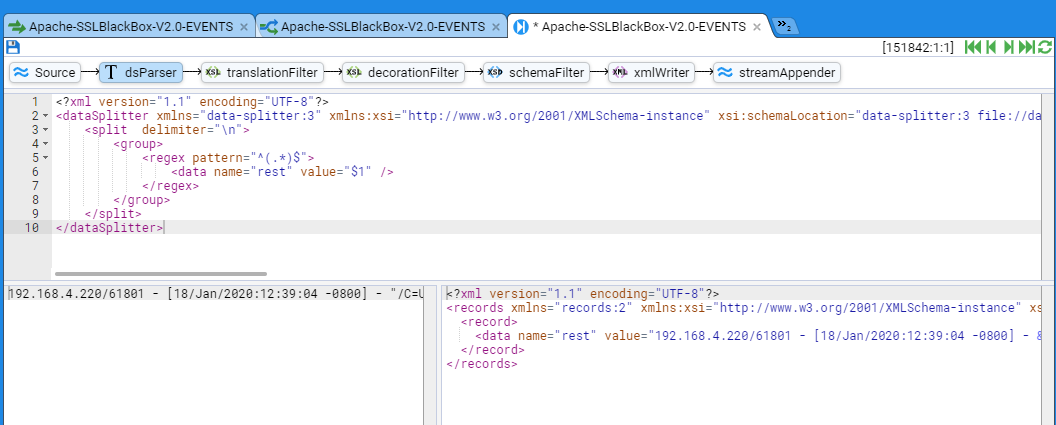
As we can see, the first line of our Raw Event is displayed in the input pane and the output window holds the converted XML output where we just have a single data element with a name attribute of rest and a value attribute of the complete raw event as our regular expression matched the entire line.
The next incremental step in the parser, would be to parse out additional data elements. For example, in this next iteration we extract the client ip address, the client port and hold the rest of the Event in the rest data element.
With the text converter containing
<?xml version="1.1" encoding="UTF-8"?>
<dataSplitter xmlns="data-splitter:3" xmlns:xsi="http://www.w3.org/2001/XMLSchema-instance" xsi:schemaLocation="data-splitter:3 file://data-splitter-v3.0.1.xsd" version="3.0">
<split delimiter="\n">
<group>
<regex pattern="^([^/]+)/([^ ]+) (.*)$">
<data name="clientip" value="$1" />
<data name="clientport" value="$2" />
<data name="rest" value="$3" />
</regex>
</group>
</split>
</dataSplitter>
and a click on the Refresh Current Step icon we will see the output pane contain
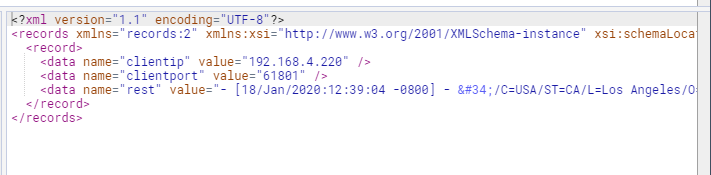
We continue this incremental parsing until we have our complete parser.
The following is our complete Text Converter which generates xml records as defined by the Stroom records v3.0 schema.
<?xml version="1.1" encoding="UTF-8"?>
<dataSplitter
xmlns="data-splitter:3"
xmlns:xsi="http://www.w3.org/2001/XMLSchema-instance"
xsi:schemaLocation="data-splitter:3 file://data-splitter-v3.0.1.xsd"
version="3.0">
<!-- CLASSIFICATION: UNCLASSIFIED -->
<!-- Release History:
Release 20131001, 1 Oct 2013 - Initial release
General Notes:
This data splitter takes audit events for the Stroom variant of the Black Box Apache Auditing.
Event Format: The following is extracted from the Configuration settings for the Stroom variant of the Black Box Apache Auditing format.
# Stroom - Black Box Auditing configuration
#
# %a - Client IP address (not hostname (%h) to ensure ip address only)
# When logging the remote host, it is important to log the client IP address, not the
# hostname. We do this with the '%a' directive. Even if HostnameLookups are turned on,
# using '%a' will only record the IP address. For the purposes of BlackBox formats,
# reversed DNS should not be trusted
# %{REMOTE_PORT}e - Client source port
# Logging the client source TCP port can provide some useful network data and can help
# one associate a single client with multiple requests.
# If two clients from the same IP address make simultaneous connections, the 'common log'
# file format cannot distinguish between those clients. Otherwise, if the client uses
# keep-alives, then every hit made from a single TCP session will be associated by the same
# client port number.
# The port information can indicate how many connections our server is handling at once,
# which may help in tuning server TCP/OP settings. It will also identify which client ports
# are legitimate requests if the administrator is examining a possible SYN-attack against a
# server.
# Note we are using the REMOTE_PORT environment variable. Environment variables only come
# into play when mod_cgi or mod_cgid is handling the request.
# %X - Connection status (use %c for Apache 1.3)
# The connection status directive tells us detailed information about the client connection.
# It returns one of three flags:
# x if the client aborted the connection before completion,
# + if the client has indicated that it will use keep-alives (and request additional URLS),
# - if the connection will be closed after the event
# Keep-Alive is a HTTP 1.1. directive that informs a web server that a client can request multiple
# files during the same connection. This way a client doesn't need to go through the overhead
# of re-establishing a TCP connection to retrieve a new file.
# %t - time - or [%{%d/%b/%Y:%T}t.%{msec_frac}t %{%z}t] for Apache 2.4
# The %t directive records the time that the request started.
# NOTE: When deployed on an Apache 2.4, or better, environment, you should use
# strftime format in order to get microsecond resolution.
# %l - remote logname
#
# %u - username [in quotes]
# The remote user (from auth; This may be bogus if the return status (%s) is 401
# for non-ssl services)
# For SSL services, user names need to be delivered as DNs to deliver PKI user details
# in full. To pass through PKI certificate properties in the correct form you need to
# add the following directives to your Apache configuration:
# SSLUserName SSL_CLIENT_S_DN
# SSLOptions +StdEnvVars
# If you cannot, then use %{SSL_CLIENT_S_DN}x in place of %u and use blackboxSSLUser
# LogFormat nickname
# %r - first line of text sent by web client [in quotes]
# This is the first line of text send by the web client, which includes the request
# method, the full URL, and the HTTP protocol.
# %s - status code before any redirection
# This is the status code of the original request.
# %>s - status code after any redirection has taken place
# This is the final status code of the request, after any internal redirections may
# have taken place.
# %D - time in microseconds to handle the request
# This is the number of microseconds the server took to handle the request in microseconds
# %I - incoming bytes
# This is the bytes received, include request and headers. It cannot, by definition be zero.
# %O - outgoing bytes
# This is the size in bytes of the outgoing data, including HTTP headers. It cannot, by
# definition be zero.
# %B - outgoing content bytes
# This is the size in bytes of the outgoing data, EXCLUDING HTTP headers. Unlike %b, which
# records '-' for zero bytes transferred, %B will record '0'.
# %{Referer}i - Referrer HTTP Request Header [in quotes]
# This is typically the URL of the page that made the request. If linked from
# e-mail or direct entry this value will be empty. Note, this can be spoofed
# or turned off
# %{User-Agent}i - User agent HTTP Request Header [in quotes]
# This is the identifying information the client (browser) reports about itself.
# It can be spoofed or turned off
# %V - the server name according to the UseCannonicalName setting
# This identifies the virtual host in a multi host webservice
# %p - the canonical port of the server servicing the request
# Define a variation of the Black Box logs
#
# Note, you only need to use the 'blackboxSSLUser' nickname if you cannot set the
# following directives for any SSL configurations
# SSLUserName SSL_CLIENT_S_DN
# SSLOptions +StdEnvVars
# You will also note the variation for no logio module. The logio module supports
# the %I and %O formatting directive
#
<IfModule mod_logio.c>
LogFormat "%a/%{REMOTE_PORT}e %X %t %l \"%u\" \"%r\" %s/%>s %D I/%O/%B \"%{Referer}i\" \"%{User-Agent}i\" %V/%p" blackboxUser
LogFormat "%a/%{REMOTE_PORT}e %X %t %l \"%{SSL_CLIENT_S_DN}x\" \"%r\" %s/%>s %D %I/%O/%B \"%{Referer}i\" \"%{User-Agent}i\" %V/%p" blackboxSSLUser
</IfModule>
<IfModule !mod_logio.c>
LogFormat "%a/%{REMOTE_PORT}e %X %t %l \"%u\" \"%r\" %s/%>s %D 0/0/%B \"%{Referer}i\" \"%{User-Agent}i\" %V/$p" blackboxUser
LogFormat "%a/%{REMOTE_PORT}e %X %t %l \"%{SSL_CLIENT_S_DN}x\" \"%r\" %s/%>s %D 0/0/%B \"%{Referer}i\" \"%{User-Agent}i\" %V/$p" blackboxSSLUser
</IfModule>
-->
<!-- Match line -->
<split delimiter="\n">
<group>
<regex pattern="^([^/]+)/([^ ]+) ([^ ]+) \[([^\]]+)] ([^ ]+) "([^"]+)" "([^"]+)" (\d+)/(\d+) (\d+) ([^/]+)/([^/]+)/(\d+) "([^"]+)" "([^"]+)" ([^/]+)/([^ ]+)">
<data name="clientip" value="$1" />
<data name="clientport" value="$2" />
<data name="constatus" value="$3" />
<data name="time" value="$4" />
<data name="remotelname" value="$5" />
<data name="user" value="$6" />
<data name="url" value="$7">
<group value="$7" ignoreErrors="true">
<!--
Special case the "GET /" url string as opposed to the more standard "method url protocol/protocol_version".
Also special case a url of "-" which occurs on some errors (eg 408)
-->
<regex pattern="^-$">
<data name="url" value="error" />
</regex>
<regex pattern="^([^ ]+) (/)$">
<data name="httpMethod" value="$1" />
<data name="url" value="$2" />
</regex>
<regex pattern="^([^ ]+) ([^ ]+) ([^ /]*)/([^ ]*)">
<data name="httpMethod" value="$1" />
<data name="url" value="$2" />
<data name="protocol" value="$3" />
<data name="version" value="$4" />
</regex>
</group>
</data>
<data name="responseB" value="$8" />
<data name="response" value="$9" />
<data name="timeM" value="$10" />
<data name="bytesIn" value="$11" />
<data name="bytesOut" value="$12" />
<data name="bytesOutContent" value="$13" />
<data name="referer" value="$14" />
<data name="userAgent" value="$15" />
<data name="vserver" value="$16" />
<data name="vserverport" value="$17" />
</regex>
</group>
</split>
</dataSplitter>
ApacheHTTPD BlackBox - Data Splitter
(
Download ApacheHTTPDBlackBox-DataSplitter.txt
)
If we now press the Step First icon we will see the complete parsed record
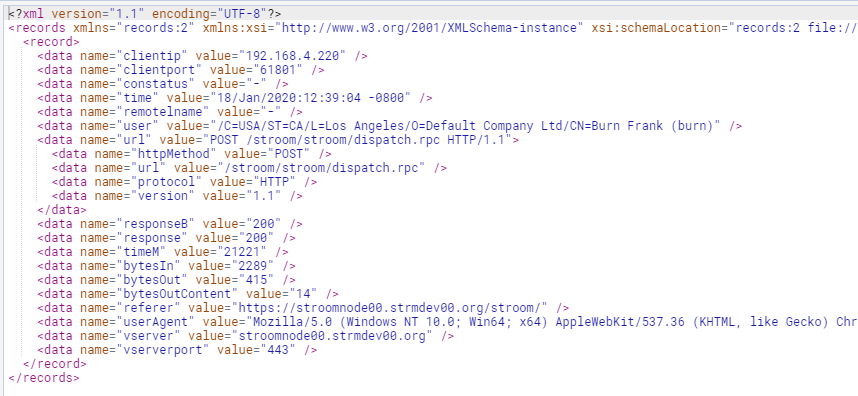
If we click on the Step Forward icon we will see the next event displayed in both the input and output panes.
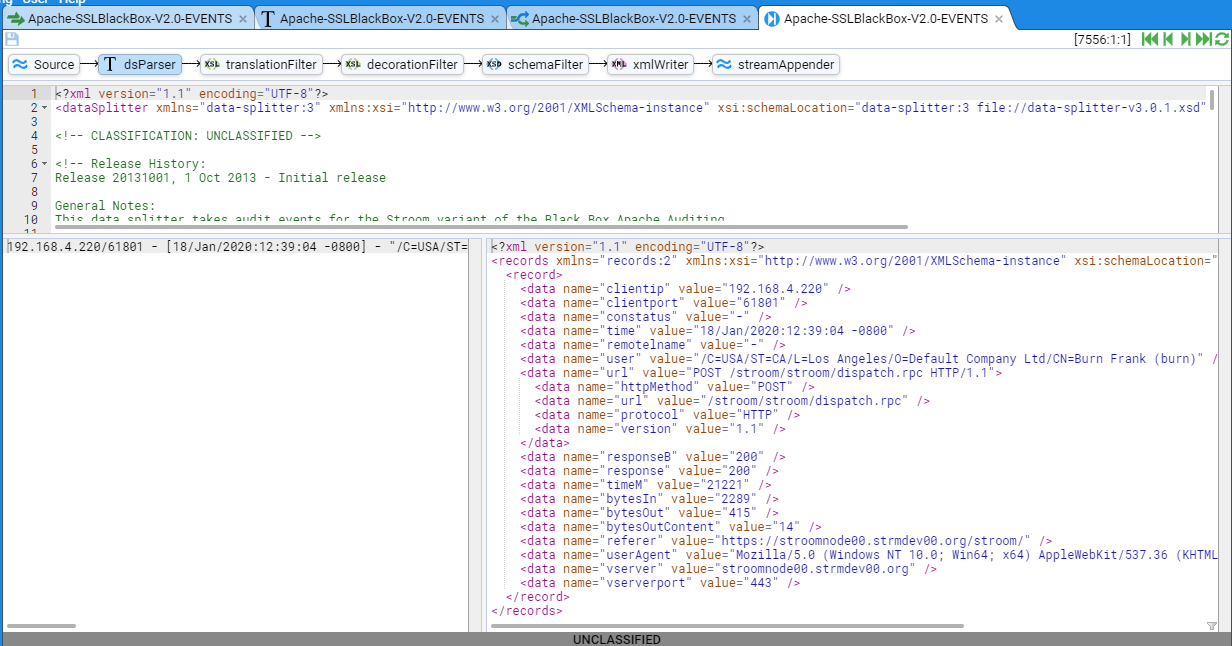
we click on the Step Last icon we will see the last event displayed in both the input and output panes.
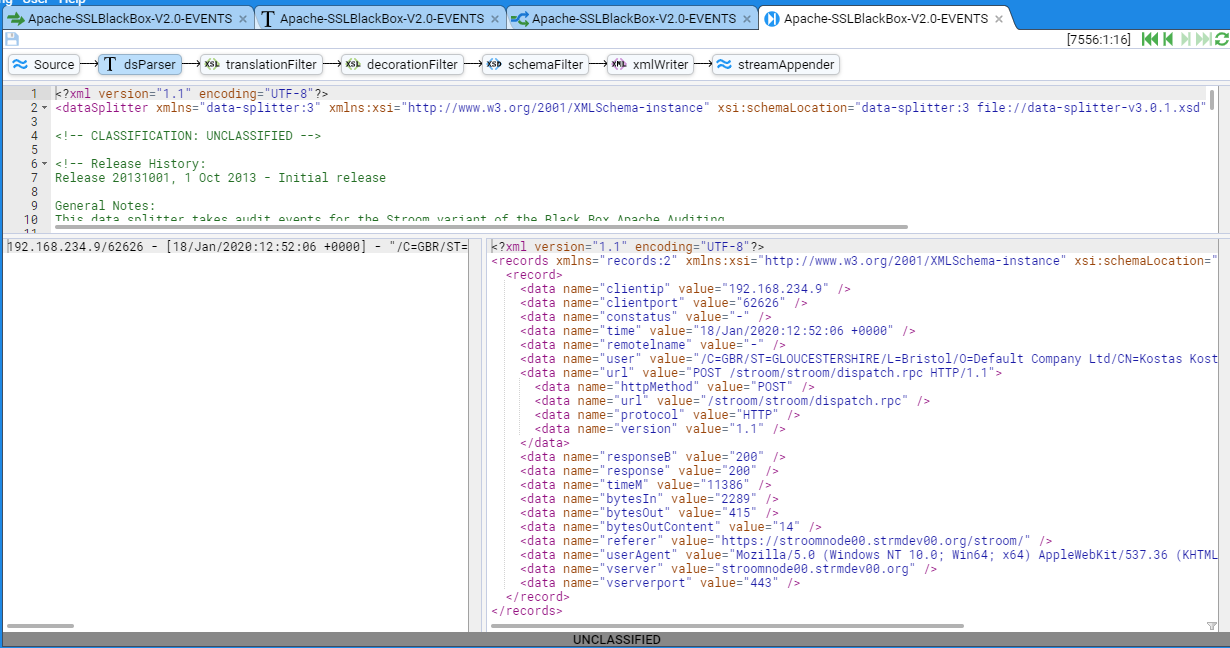
You should take note of the stepping location that has been displayed in each stepping window. The stepping location is the numbers enclosed in square brackets e.g. [7556:1:16] found in the top right-hand side of the stepping window next to the stepping icons
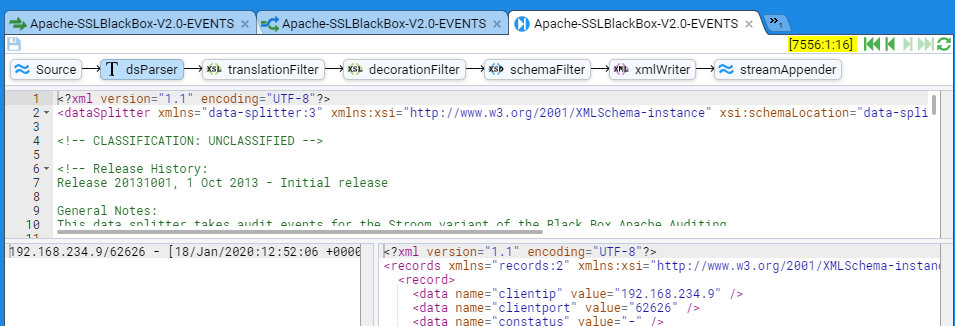
The form of these stepping locations is [ streamId ‘:’ subStreamId ‘:’ recordNo]
where
- streamId - is the stream ID and won’t change when stepping through the selected stream.
- subStreamId - is the sub stream ID. When Stroom processes event streams it aggregates multiple input files and this is the file number.
- recordNo - is the record number within the sub stream.
One can double click on either the subStreamId or recordNo numbers and enter a new number. This allows you to ‘step’ around a stream rather than just relying on first, previous, next and last movement.
Note, you should now Save your edited Text Converter.
Step data through Pipeline - Translation
To start authoring the xslt Translation Filter, press the translationFilter element which steps us to the xsl Translation Filter pane.
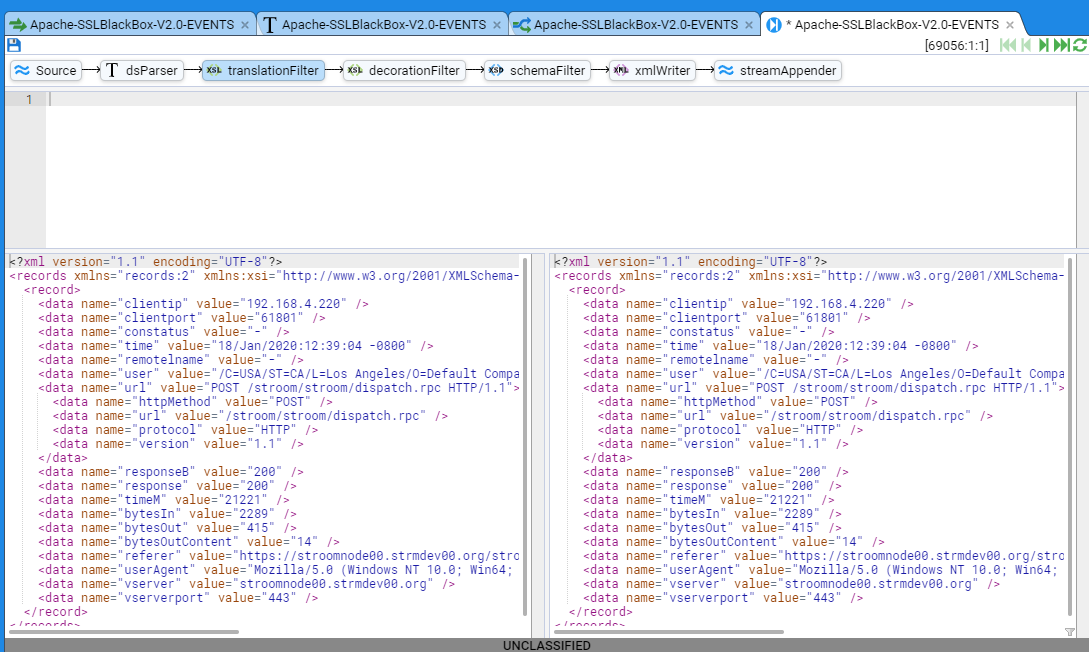
As for the Text Converter stepping tab, this tab is divided into three sub-panes. The top one is the xslt translation editor and it will allow you to edit the xslt translation. The bottom left window displays the input to the xslt translation (which is the output from the Text Converter). The bottom right window displays the output from the xslt Translation filter for the given input.
We now click on the pipeline Step Forward button to single step the Text Converter records element data through our xslt Translation. We see no change as an empty translation will just perform a copy of the input data.
To correct this, we will author our xslt translation. Like the Data Splitter this is also authored incrementally. A minimum xslt translation might contain
<?xml version="1.0" encoding="UTF-8" ?>
<xsl:stylesheet
xpath-default-namespace="records:2"
xmlns="event-logging:3"
xmlns:stroom="stroom"
xmlns:xsl="http://www.w3.org/1999/XSL/Transform"
xmlns:xsi="http://www.w3.org/2001/XMLSchema-instance"
xmlns:xs="http://www.w3.org/2001/XMLSchema"
version="3.0">
<!-- Ingest the records tree -->
<xsl:template match="records">
<Events xsi:schemaLocation="event-logging:3 file://event-logging-v3.2.3.xsd" Version="3.2.3">
<xsl:apply-templates />
</Events>
</xsl:template>
<!-- Only generate events if we have an url on input -->
<xsl:template match="record[data[@name = 'url']]">
<Event>
<xsl:apply-templates select="." mode="eventTime" />
<xsl:apply-templates select="." mode="eventSource" />
<xsl:apply-templates select="." mode="eventDetail" />
</Event>
</xsl:template>
<xsl:template match="node()" mode="eventTime">
<EventTime>
<TimeCreated/>
</EventTime>
</xsl:template>
<xsl:template match="node()" mode="eventSource">
<EventSource>
<System>
<Name />
<Environment />
</System>
<Generator />
<Device />
<Client />
<Server />
<User>
<Id />
</User>
</EventSource>
</xsl:template>
<xsl:template match="node()" mode="eventDetail">
<EventDetail>
<TypeId>SendToWebService</TypeId>
<Description />
<Classification />
<Send />
</EventDetail>
</xsl:template>
</xsl:stylesheet>
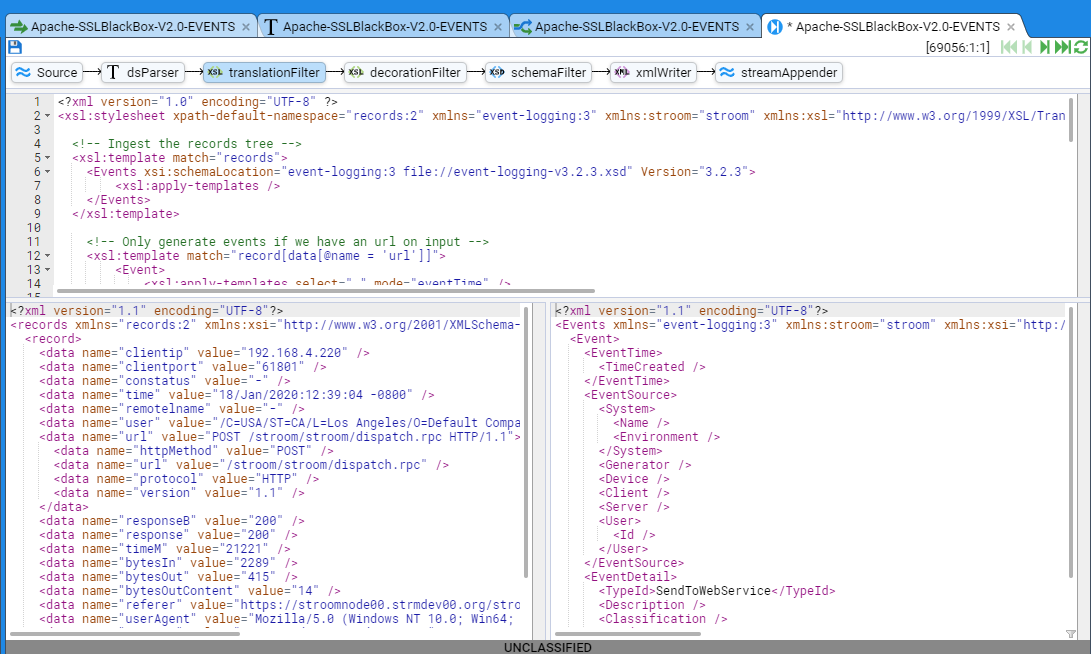
Clearly this doesn’t generate useful events. Our first iterative change might be to generate the TimeCreated element value. The change would be
<xsl:template match="node()" mode="eventTime">
<EventTime>
<TimeCreated>
<xsl:value-of select="stroom:format-date(data[@name = 'time']/@value, 'dd/MMM/yyyy:HH:mm:ss XX')" />
</TimeCreated>
</EventTime>
</xsl:template>

Adding in the EventSource elements (without ANY error checking!) as per
<xsl:template match="node()" mode="eventSource">
<EventSource>
<System>
<Name>
<xsl:value-of select="stroom:feed-attribute('System')" />
</Name>
<Environment>
<xsl:value-of select="stroom:feed-attribute('Environment')" />
</Environment>
</System>
<Generator>Apache HTTPD</Generator>
<Device>
<HostName>
<xsl:value-of select="stroom:feed-attribute('MyHost')" />
</HostName>
<IPAddress>
<xsl:value-of select="stroom:feed-attribute('MyIPAddress')" />
</IPAddress>
</Device>
<Client>
<IPAddress>
<xsl:value-of select="data[@name = 'clientip']/@value" />
</IPAddress>
<Port>
<xsl:value-of select="data[@name = 'clientport']/@value" />
</Port>
</Client>
<Server>
<HostName>
<xsl:value-of select="data[@name = 'vserver']/@value" />
</HostName>
<Port>
<xsl:value-of select="data[@name = 'vserverport']/@value" />
</Port>
</Server>
<User>
<Id>
<xsl:value-of select="data[@name='user']/@value" />
</Id>
</User>
</EventSource>
</xsl:template>
And after a Refresh Current Step we see our output event ‘grow’ to
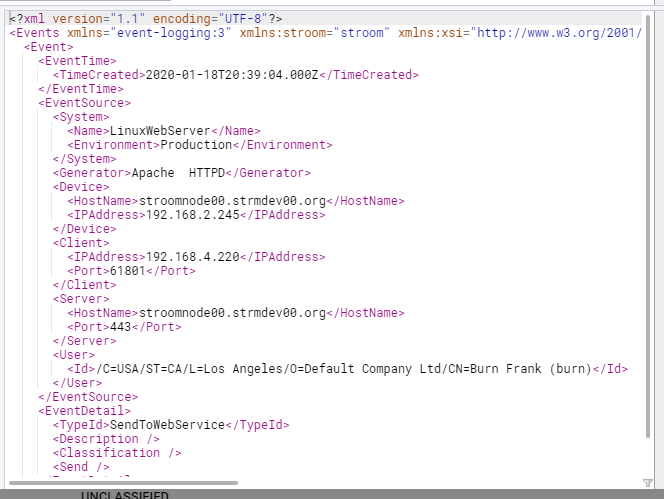
We now complete our translation by expanding the EventDetail elements to have the completed translation of (again with limited error checking and non-existent documentation!)
<?xml version="1.0" encoding="UTF-8" ?>
<xsl:stylesheet
xpath-default-namespace="records:2"
xmlns="event-logging:3"
xmlns:stroom="stroom"
xmlns:xsl="http://www.w3.org/1999/XSL/Transform"
xmlns:xsi="http://www.w3.org/2001/XMLSchema-instance"
xmlns:xs="http://www.w3.org/2001/XMLSchema"
version="3.0">
<!-- Ingest the records tree -->
<xsl:template match="records">
<Events xsi:schemaLocation="event-logging:3 file://event-logging-v3.2.3.xsd" Version="3.2.3">
<xsl:apply-templates />
</Events>
</xsl:template>
<!-- Only generate events if we have an url on input -->
<xsl:template match="record[data[@name = 'url']]">
<Event>
<xsl:apply-templates select="." mode="eventTime" />
<xsl:apply-templates select="." mode="eventSource" />
<xsl:apply-templates select="." mode="eventDetail" />
</Event>
</xsl:template>
<xsl:template match="node()" mode="eventTime">
<EventTime>
<TimeCreated>
<xsl:value-of select="stroom:format-date(data[@name = 'time']/@value, 'dd/MMM/yyyy:HH:mm:ss XX')" />
</TimeCreated>
</EventTime>
</xsl:template>
<xsl:template match="node()" mode="eventSource">
<EventSource>
<System>
<Name>
<xsl:value-of select="stroom:feed-attribute('System')" />
</Name>
<Environment>
<xsl:value-of select="stroom:feed-attribute('Environment')" />
</Environment>
</System>
<Generator>Apache HTTPD</Generator>
<Device>
<HostName>
<xsl:value-of select="stroom:feed-attribute('MyHost')" />
</HostName>
<IPAddress>
<xsl:value-of select="stroom:feed-attribute('MyIPAddress')" />
</IPAddress>
</Device>
<Client>
<IPAddress>
<xsl:value-of select="data[@name = 'clientip']/@value" />
</IPAddress>
<Port>
<xsl:value-of select="data[@name = 'clientport']/@value" />
</Port>
</Client>
<Server>
<HostName>
<xsl:value-of select="data[@name = 'vserver']/@value" />
</HostName>
<Port>
<xsl:value-of select="data[@name = 'vserverport']/@value" />
</Port>
</Server>
<User>
<Id>
<xsl:value-of select="data[@name='user']/@value" />
</Id>
</User>
</EventSource>
</xsl:template>
<!-- -->
<xsl:template match="node()" mode="eventDetail">
<EventDetail>
<TypeId>SendToWebService</TypeId>
<Description>Send/Access data to Web Service</Description>
<Classification>
<Text>UNCLASSIFIED</Text>
</Classification>
<Send>
<Source>
<Device>
<IPAddress>
<xsl:value-of select="data[@name = 'clientip']/@value"/>
</IPAddress>
<Port>
<xsl:value-of select="data[@name = 'vserverport']/@value"/>
</Port>
</Device>
</Source>
<Destination>
<Device>
<HostName>
<xsl:value-of select="data[@name = 'vserver']/@value"/>
</HostName>
<Port>
<xsl:value-of select="data[@name = 'vserverport']/@value"/>
</Port>
</Device>
</Destination>
<Payload>
<Resource>
<URL>
<xsl:value-of select="data[@name = 'url']/@value"/>
</URL>
<Referrer>
<xsl:value-of select="data[@name = 'referer']/@value"/>
</Referrer>
<HTTPMethod>
<xsl:value-of select="data[@name = 'url']/data[@name = 'httpMethod']/@value"/>
</HTTPMethod>
<HTTPVersion>
<xsl:value-of select="data[@name = 'url']/data[@name = 'version']/@value"/>
</HTTPVersion>
<UserAgent>
<xsl:value-of select="data[@name = 'userAgent']/@value"/>
</UserAgent>
<InboundSize>
<xsl:value-of select="data[@name = 'bytesIn']/@value"/>
</InboundSize>
<OutboundSize>
<xsl:value-of select="data[@name = 'bytesOut']/@value"/>
</OutboundSize>
<OutboundContentSize>
<xsl:value-of select="data[@name = 'bytesOutContent']/@value"/>
</OutboundContentSize>
<RequestTime>
<xsl:value-of select="data[@name = 'timeM']/@value"/>
</RequestTime>
<ConnectionStatus>
<xsl:value-of select="data[@name = 'constatus']/@value"/>
</ConnectionStatus>
<InitialResponseCode>
<xsl:value-of select="data[@name = 'responseB']/@value"/>
</InitialResponseCode>
<ResponseCode>
<xsl:value-of select="data[@name = 'response']/@value"/>
</ResponseCode>
<Data Name="Protocol">
<xsl:attribute select="data[@name = 'url']/data[@name = 'protocol']/@value" name="Value"/>
</Data>
</Resource>
</Payload>
<!-- Normally our translation at this point would contain an <Outcome> attribute.
Since all our sample data includes only successful outcomes we have ommitted the <Outcome> attribute
in the translation to minimise complexity-->
</Send>
</EventDetail>
</xsl:template>
</xsl:stylesheet>
Apache BlackBox Translation XSLT
(
Download ApacheHTTPDBlackBox-TranslationXSLT.txt
)
And after a Refresh Current Step we see the completed <EventDetail> section of our output event
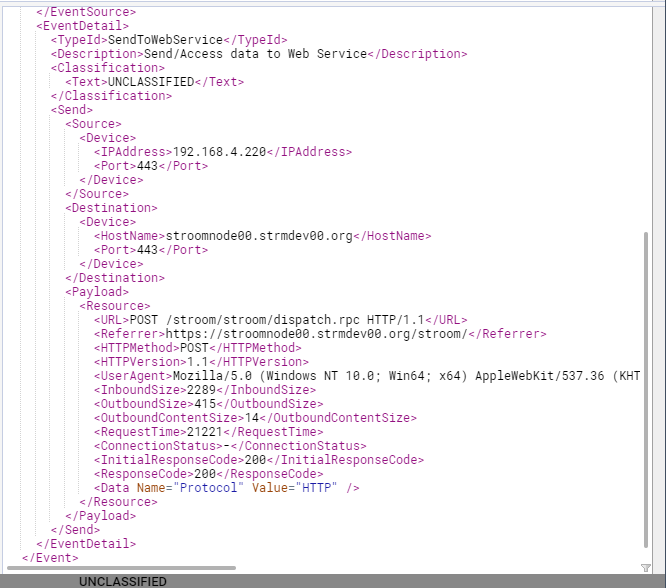
Note, you should now Save your edited xslt Translation.
We have completed the translation and have completed developing our Apache-SSLBlackBox-V2.0-EVENTS event feed.
At this point, this event feed is set up to accept Raw Event data, but it will not automatically process the raw data and hence it will not place events into the Event Store. To have Stroom automatically process Raw Event streams, you will need to enable Processors for this pipeline.
4.5.3 - Event Processing
This HOWTO is provided to assist users in setting up Stroom to process inbound raw event logs and transform them into the Stroom Event Logging XML Schema.
Introduction
This HOWTO is provided to assist users in setting up Stroom to process inbound raw event logs and transform them into the Stroom Event Logging XML Schema.
This HOWTO will demonstrate the process by which an Event Processing pipeline for a given Event Source is developed and deployed.
The sample event source used will be based on BlueCoat Proxy logs. An extract of BlueCoat logs were sourced from log-sharing.dreamhosters.com (a Public Security Log Sharing Site) but modified to add sample user attribution.
Template pipelines are being used to simplify the establishment of this processing pipeline.
The sample BlueCoat Proxy log will be transformed into an intermediate simple XML key value pair structure, then into the Stroom Event Logging XML Schema format.
Assumptions
The following assumptions are used in this document.
- The user successfully deployed Stroom
- The following Stroom content packages have been installed:
- Template Pipelines
- XML Schemas
Event Source
As mentioned, we will use BlueCoat Proxy logs as a sample event source. Although BlueCoat logs can be customised, the default is to use the W3C Extended Log File Format (ELF). Our sample data set looks like
#Software: SGOS 3.2.4.28
#Version: 1.0
#Date: 2005-04-27 20:57:09
#Fields: date time time-taken c-ip sc-status s-action sc-bytes cs-bytes cs-method cs-uri-scheme cs-host cs-uri-path cs-uri-query cs-username s-hierarchy s-supplier-name rs(Content-Type) cs(User-Agent) sc-filter-result sc-filter-category x-virus-id s-ip s-sitename x-virus-details x-icap-error-code x-icap-error-details
2005-05-04 17:16:12 1 45.110.2.82 200 TCP_HIT 941 729 GET http www.inmobus.com /wcm/assets/images/imagefileicon.gif - george DIRECT 38.112.92.20 image/gif "Mozilla/4.0 (compatible; MSIE 6.0; Windows NT 5.1; SV1; .NET CLR 1.1.4322)" PROXIED none - 192.16.170.42 SG-HTTP-Service - none -
2005-05-04 17:16:12 2 45.110.2.82 200 TCP_HIT 941 729 GET http www.inmobus.com /wcm/assets/images/imagefileicon.gif - george DIRECT 38.112.92.20 image/gif "Mozilla/4.0 (compatible; MSIE 6.0; Windows NT 5.1; SV1; .NET CLR 1.1.4322)" PROXIED none - 192.16.170.42 SG-HTTP-Service - none -
2005-05-04 17:16:12 2 45.110.2.82 200 TCP_HIT 941 729 GET http www.inmobus.com /wcm/assets/images/imagefileicon.gif - george DIRECT 38.112.92.20 image/gif "Mozilla/4.0 (compatible; MSIE 6.0; Windows NT 5.1; SV1; .NET CLR 1.1.4322)" PROXIED none - 192.16.170.42 SG-HTTP-Service - none -
2005-05-04 17:16:12 1 45.110.2.82 200 TCP_HIT 941 729 GET http www.inmobus.com /wcm/assets/images/imagefileicon.gif - george DIRECT 38.112.92.20 image/gif "Mozilla/4.0 (compatible; MSIE 6.0; Windows NT 5.1; SV1; .NET CLR 1.1.4322)" PROXIED none - 192.16.170.42 SG-HTTP-Service - none -
2005-05-04 17:16:12 1 45.110.2.82 200 TCP_HIT 941 729 GET http www.inmobus.com /wcm/assets/images/imagefileicon.gif - george DIRECT 38.112.92.20 image/gif "Mozilla/4.0 (compatible; MSIE 6.0; Windows NT 5.1; SV1; .NET CLR 1.1.4322)" PROXIED none - 192.16.170.42 SG-HTTP-Service - none -
2005-05-04 17:16:12 1 45.110.2.82 200 TCP_HIT 941 729 GET http www.inmobus.com /wcm/assets/images/imagefileicon.gif - george DIRECT 38.112.92.20 image/gif "Mozilla/4.0 (compatible; MSIE 6.0; Windows NT 5.1; SV1; .NET CLR 1.1.4322)" PROXIED none - 192.16.170.42 SG-HTTP-Service - none -
2005-05-04 17:16:12 51 45.14.4.127 200 TCP_NC_MISS 926 1104 GET http images.google.com /imgres ?imgurl=http://www.bettercomponents.be/images/linux-logo.gif&imgrefurl=http://www.bettercomponents.be/index.php%253FcPath%253D96&h=360&w=327&sz=132&tbnid=UKfPlBMXgToJ:&tbnh=117&tbnw=106&hl=en&prev=/images%253Fq%253Dlinux%252Blogo%2526hl%253Den%2526lr%253D&frame=small sally DIRECT images.google.com text/html "Mozilla/5.0 (Macintosh; U; PPC Mac OS X; en) AppleWebKit/312.1 (KHTML, like Gecko) Safari/312" PROXIED Hacking/Proxy%20Avoidance - 192.16.170.42 SG-HTTP-Service - none -
2005-05-04 17:16:12 2 45.110.2.82 200 TCP_HIT 941 729 GET http www.inmobus.com /wcm/assets/images/imagefileicon.gif - george DIRECT 38.112.92.20 image/gif "Mozilla/4.0 (compatible; MSIE 6.0; Windows NT 5.1; SV1; .NET CLR 1.1.4322)" PROXIED none - 192.16.170.42 SG-HTTP-Service - none -
2005-05-04 17:16:12 1 45.110.2.82 200 TCP_HIT 941 729 GET http www.inmobus.com /wcm/assets/images/imagefileicon.gif - george DIRECT 38.112.92.20 image/gif "Mozilla/4.0 (compatible; MSIE 6.0; Windows NT 5.1; SV1; .NET CLR 1.1.4322)" PROXIED none - 192.16.170.42 SG-HTTP-Service - none -
2005-05-04 17:16:12 1 45.110.2.82 200 TCP_HIT 941 729 GET http www.inmobus.com /wcm/assets/images/imagefileicon.gif - george DIRECT 38.112.92.20 image/gif "Mozilla/4.0 (compatible; MSIE 6.0; Windows NT 5.1; SV1; .NET CLR 1.1.4322)" PROXIED none - 192.16.170.42 SG-HTTP-Service - none -
2005-05-04 17:16:12 1 45.110.2.82 200 TCP_HIT 941 729 GET http www.inmobus.com /wcm/assets/images/imagefileicon.gif - george DIRECT 38.112.92.20 image/gif "Mozilla/4.0 (compatible; MSIE 6.0; Windows NT 5.1; SV1; .NET CLR 1.1.4322)" PROXIED none - 192.16.170.42 SG-HTTP-Service - none -
2005-05-04 17:16:12 1 45.110.2.82 200 TCP_HIT 941 729 GET http www.inmobus.com /wcm/assets/images/imagefileicon.gif - george DIRECT 38.112.92.20 image/gif "Mozilla/4.0 (compatible; MSIE 6.0; Windows NT 5.1; SV1; .NET CLR 1.1.4322)" PROXIED none - 192.16.170.42 SG-HTTP-Service - none -
2005-05-04 17:16:12 98 45.14.3.52 200 TCP_HIT 14258 321 GET http www.cedardalechurch.ca /birdscp2.gif - brad DIRECT 209.135.103.13 image/gif "Mozilla/4.0 (compatible; MSIE 6.0; Windows NT 5.1)" PROXIED none - 192.16.170.42 SG-HTTP-Service - none -
2005-05-04 17:16:12 1 45.110.2.82 200 TCP_HIT 941 729 GET http www.inmobus.com /wcm/assets/images/imagefileicon.gif - george DIRECT 38.112.92.20 image/gif "Mozilla/4.0 (compatible; MSIE 6.0; Windows NT 5.1; SV1; .NET CLR 1.1.4322)" PROXIED none - 192.16.170.42 SG-HTTP-Service - none -
2005-05-04 17:16:12 2 45.110.2.82 200 TCP_HIT 941 729 GET http www.inmobus.com /wcm/assets/images/imagefileicon.gif - george DIRECT 38.112.92.20 image/gif "Mozilla/4.0 (compatible; MSIE 6.0; Windows NT 5.1; SV1; .NET CLR 1.1.4322)" PROXIED none - 192.16.170.42 SG-HTTP-Service - none -
2005-05-04 17:16:12 2717 45.110.2.82 200 TCP_NC_MISS 3926 1051 GET http www.inmobus.com /wcm/isocket/iSocket.cfm ?requestURL=http://www.inmobus.com/wcm/html/../isocket/image_manager_search.cfm?dsn=InmobusWCM&projectid=26&SetModule=WCM&iSocketAction=response&responseContainer=leftTopDiv george DIRECT www.inmobus.com text/html;%20charset=UTF-8 "Mozilla/4.0 (compatible; MSIE 6.0; Windows NT 5.1; SV1; .NET CLR 1.1.4322)" PROXIED none - 192.16.170.42 SG-HTTP-Service - none -
2005-05-04 17:16:12 1 45.110.2.82 200 TCP_HIT 941 729 GET http www.inmobus.com /wcm/assets/images/imagefileicon.gif - george DIRECT 38.112.92.20 image/gif "Mozilla/4.0 (compatible; MSIE 6.0; Windows NT 5.1; SV1; .NET CLR 1.1.4322)" PROXIED none - 192.16.170.42 SG-HTTP-Service - none -
2005-05-04 17:16:12 1 45.110.2.82 200 TCP_HIT 941 729 GET http www.inmobus.com /wcm/assets/images/imagefileicon.gif - george DIRECT 38.112.92.20 image/gif "Mozilla/4.0 (compatible; MSIE 6.0; Windows NT 5.1; SV1; .NET CLR 1.1.4322)" PROXIED none - 192.16.170.42 SG-HTTP-Service - none -
2005-05-04 17:16:12 47 45.14.4.127 200 TCP_NC_MISS 2620 926 GET http images.google.com /images ?q=tbn:UKfPlBMXgToJ:http://www.bettercomponents.be/images/linux-logo.gif jane DIRECT images.google.com image/jpeg "Mozilla/5.0 (Macintosh; U; PPC Mac OS X; en) AppleWebKit/312.1 (KHTML, like Gecko) Safari/312" PROXIED Hacking/Proxy%20Avoidance - 192.16.170.42 SG-HTTP-Service - none -
2005-05-04 17:16:12 1 45.110.2.82 200 TCP_HIT 941 729 GET http www.inmobus.com /wcm/assets/images/imagefileicon.gif - george DIRECT 38.112.92.20 image/gif "Mozilla/4.0 (compatible; MSIE 6.0; Windows NT 5.1; SV1; .NET CLR 1.1.4322)" PROXIED none - 192.16.170.42 SG-HTTP-Service - none -
2005-05-04 17:16:13 139 45.112.2.73 207 TCP_NC_MISS 819 418 PROPFIND http idisk.mac.com /patrickarnold/Public/Show - bill DIRECT idisk.mac.com text/xml;charset=utf-8 "WebDAVFS/1.2.7 (01278000) Darwin/7.8.0 (Power Macintosh)" PROXIED Computers/Internet - 192.16.170.42 SG-HTTP-Service - none -
2005-05-04 17:16:13 2 45.106.2.66 200 TCP_HIT 559 348 GET http aim-charts.pf.aol.com / ?action=aim&fields=snpghlocvAa&syms=INDEX:COMPX,INDEX:INDU,INDEX:INX,TWX sally DIRECT 205.188.136.217 text/plain "AIM/30 (Mozilla 1.24b; Windows; I; 32-bit)" PROXIED Web%20Communications - 192.16.170.42 SG-HTTP-Service - none -
2005-05-04 17:16:13 9638 45.106.3.71 200 TCP_NC_MISS 46052 1921 POST http home.silverstar.com /cgi-bin/mailman.cgi - carol DIRECT home.silverstar.com text/html "Mozilla/5.0 (Windows; U; Windows NT 5.1; en-US; rv:1.7.6) Gecko/20050317 Firefox/1.0.2" PROXIED Computers/Internet - 192.16.170.42 SG-HTTP-Service - none -
2005-05-04 17:16:13 173 45.112.2.73 207 TCP_NC_MISS 647 436 PROPFIND http idisk.mac.com /patrickarnold/Public/Show/nuvio_05_what.swf - bill DIRECT idisk.mac.com text/xml;charset=utf-8 "WebDAVFS/1.2.7 (01278000) Darwin/7.8.0 (Power Macintosh)" PROXIED Computers/Internet - 192.16.170.42 SG-HTTP-Service - none -
2005-05-04 17:17:26 495 45.108.2.100 401 TCP_NC_MISS 1007 99884 PUT http idisk.mac.com /fayray_account_transfer_holding_area_for_pictures_to_homepage_temporary/Documents/85bT9bmviawEbbBb4Sie/Image-2743371ABCC011D9.jpg - - DIRECT idisk.mac.com text/html;charset=iso-8859-1 "DotMacKit/1.1 (10.4.0; iPho)" PROXIED Computers/Internet - 192.16.170.42 SG-HTTP-Service - none -
Sample BlueCoat logs
(
Download sampleBluecoat.log
)
Later in this HOWTO, one will be required to upload this file. If you save this file now, ensure the file is saved as a text document with ANSI encoding.
Establish the Processing Pipeline
We will create the components that make up the processing pipeline for transforming these raw logs into the Stroom Event Logging XML Schema. They will be placed a folder appropriately named BlueCoat in the path System/Event Sources/Proxy. See Folder Creation for details on creating such a folder.
There will be four components
- the Event Feed to group the BlueCoat log files
- the Text Converter to convert the BlueCoat raw logs files into simple XML
- the XSLT Translation to translate the simple XML formed by the Text Converter into the Stroom Event Logging XML form, and
- the Processing pipeline which manages how the processing is performed.
All components will have the same Name BlueCoat-Proxy-V1.0-EVENTS.
It should be noted that the default Stroom FeedName pattern will not accept this name.
One needs to modify the stroom.feedNamePattern stroom property to change the default pattern to ^[a-zA-Z0-9_-\.]{3,}$.
See the HOWTO on System Properties document to see how to make this change.
Create the Event Feed
We first select (with a left click) the System/Event Sources/Proxy/BlueCoat folder in the Explorer tab then right click and select:
This will open the New Feed configuration window into which we enter BlueCoat-Proxy-V1.0-EVENTS into the Name: entry box
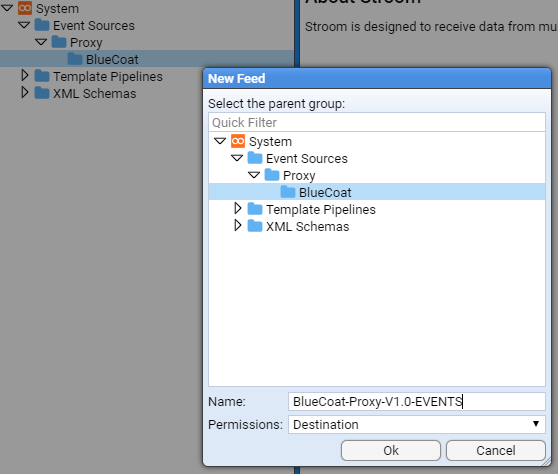
and press to see the new Event Feed tab
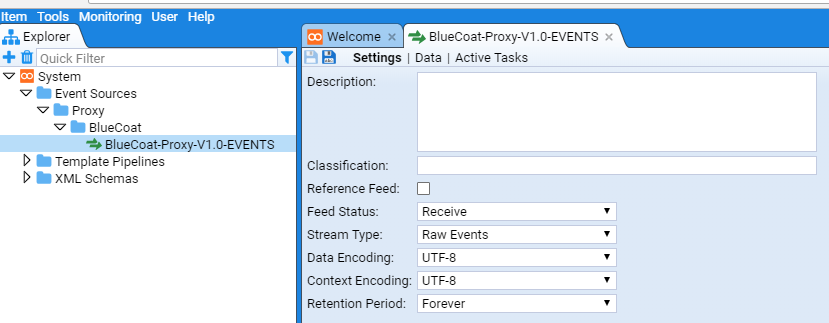
and its corresponding reference in the Explorer display.
The configuration items for an Event Feed are
- Description - a description of the feed
- Classification - the classification or sensitivity of the Event Feed data
- Reference Feed Flag - to indicate if this is a
Reference Feedor not - Feed Status - which indicates if we accept data, reject it or silently drop it
- Stream Type - to indicate if the
Feedcontains raw log data or reference data - Data Encoding - the character encoding of the data being sent to the
Feed - Context Encoding - the character encoding of context data associated with this
Feed - Retention Period - the amount of time to retain the Event data
In our example, we will set the above to
- Description - BlueCoat Proxy log data sent in W3C Extended Log File Format ( ELFF ELFF The Extended Log File Format. A W3C standard format for log files produced by web servers.Click to see more details...)
- Classification - We will leave this blank
- Reference Feed Flag - We leave the check-box unchecked as this is not a Reference Feed
- Feed Status - We set to Receive
- Stream Type - We set to Raw Events as we will be sending batches (streams) of raw event logs
- Data Encoding - We leave at the default of UTF-8 as this is the proposed character encoding
- Context Encoding - We leave at the default of UTF-8 as there are no Context Events for this Feed
- Retention Period - We leave at Forever as we do not want to delete any collected BlueCoat event data.
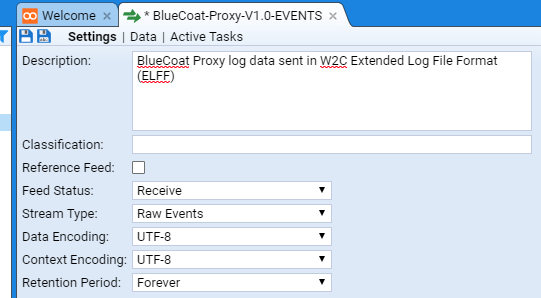
One should note that the Feed tab
* BlueCoat-Proxy-V1.0-EVENTS
has been marked as having unsaved changes.
This is indicated by the asterisk character * between the Feed icon and the name of the feed BlueCoat-Proxy-V1.0-EVENTS.
We can save the changes to our feed by pressing the Save icon in the top left of the BlueCoat-Proxy-V1.0-EVENTS tab.
At this point one should notice two things, the first is that the asterisk
has disappeared from the Feed tab and the second is that the Save icon is now disabled.
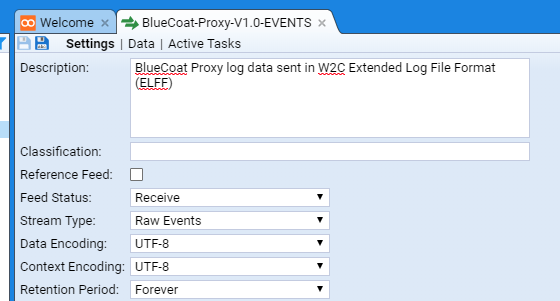
Create the Text Converter
We now create the Text Converter for this Feed in a similar fashion to the Event Feed.
We first select (with a left click) the System/Event Sources/Proxy/BlueCoat folder in the Explorer tab then right click and select
Enter BlueCoat-Proxy-V1.0-EVENTS into the Name: entry box and press the
which results in the creation of the Text Converter tab
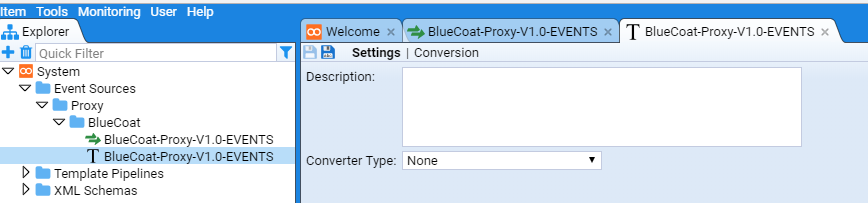
and its corresponding reference in the Explorer display.
We set the configuration for this Text Converter to be
- Description - Simple XML transform for BlueCoat Proxy log data sent in W3C Extended Log File Format ( ELFF ELFF The Extended Log File Format. A W3C standard format for log files produced by web servers.Click to see more details...)
- Converter Type - We set to Data Splitter as we will be using the Stroom Data Splitter facility to convert the raw log data into simple XML.
Again, press the Save icon to save the configuration items.
Create the XSLT Translation
We now create the XSLT translation for this Feed in a similar fashion to the Event Feed or Text Converter.
We first select (with a left click) the System/Event Sources/Proxy/BlueCoat folder in the Explorer tab then right click and select:
Enter BlueCoat-Proxy-V1.0-EVENTS into the Name: entry box and press the
which results in the creation of the XSLT Translation tab

and its corresponding reference in the Explorer display.
We set the configuration for this XSLT Translation to be
- Description - Transform simple XML of BlueCoat Proxy log data into Stroom Event Logging XML form
Again, press the Save icon to save the configuration items.
Create the Pipeline
We now create the Pipeline for this Feed in a similar fashion to the Event Feed, Text Converter or XSLT Translation.
We first select (with a left click) the System/Event Sources/Proxy/BlueCoat folder in the Explorer tab then right click and select:
Enter BlueCoat-Proxy-V1.0-EVENTS into the Name: entry box and press the
which results in the creation of the Pipeline tab

and its corresponding reference in the Explorer display.
We set the configuration for this Pipeline to be
- Description - Processing of XML of BlueCoat Proxy log data into Stroom Event Logging XML
- Type - We leave as Event Data as this is an Event Data pipeline
Configure Pipeline Structure
We now need to configure the Structure of this Pipeline.
We do this by selecting the Structure hyper-link of the *BlueCoat-Proxy-V1.0-EVENTS Pipeline tab.
At this point, we see the Pipeline Structure configuration tab
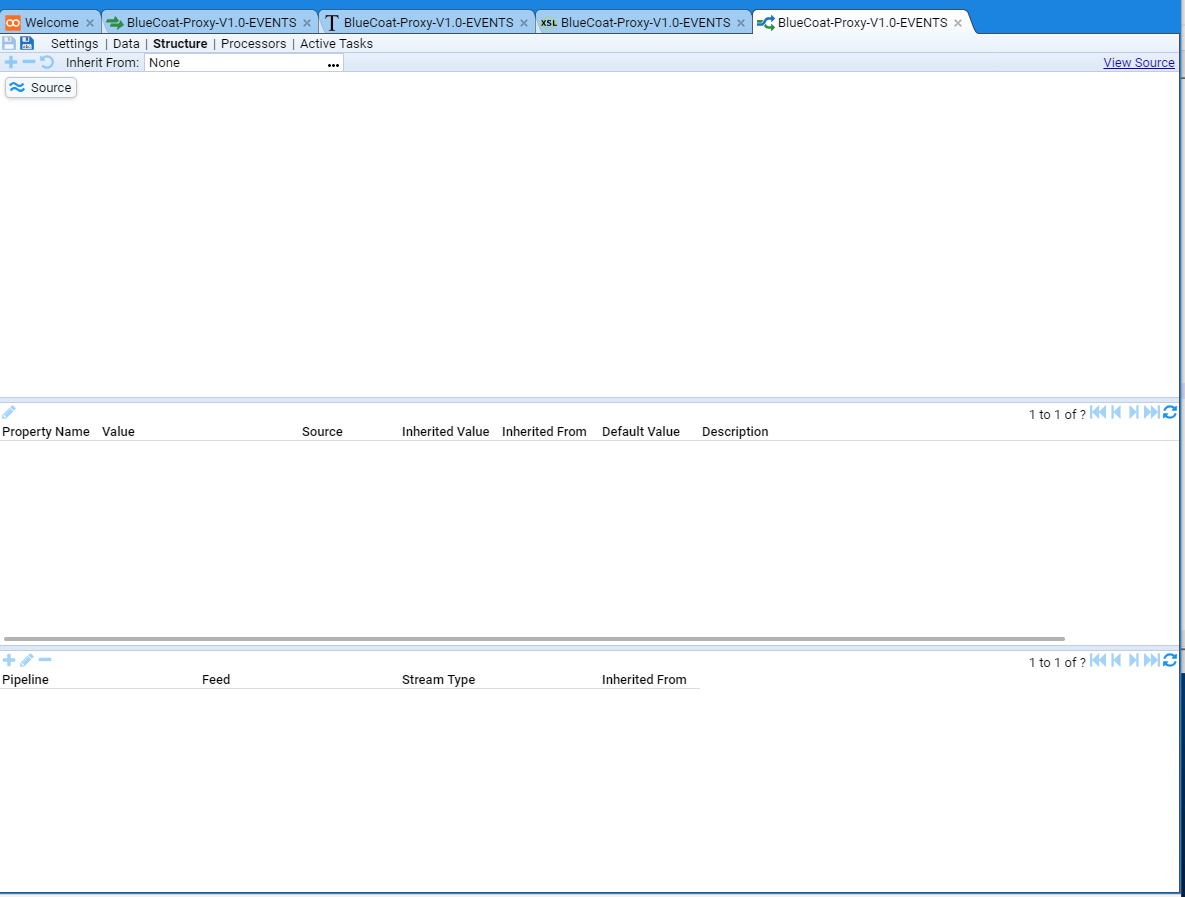
As noted in the Assumptions at the start, we have loaded the Template Pipeline content pack, so that we can Inherit a pipeline structure from this content pack and configure it to support this specific feed.
We find a template by selecting the Inherit From: None entry box to reveal a Choose Item configuration item window.
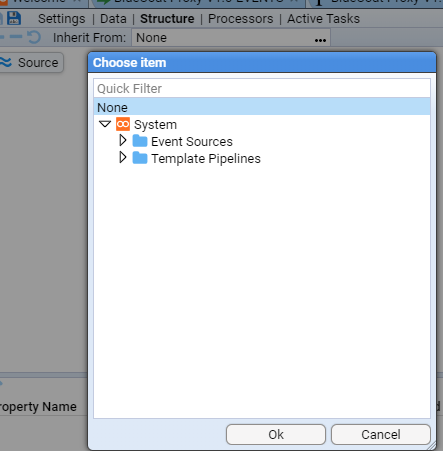
Select the Template Pipelines folder by pressing the icon to the left of the folder to reveal the choice of available templates.
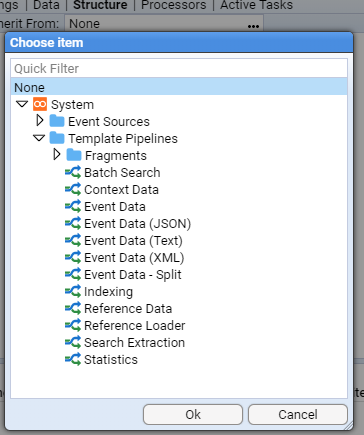
For our BlueCoat feed we will select the Event Data (Text) template.
This is done by moving the cursor to the relevant line and select via a left click
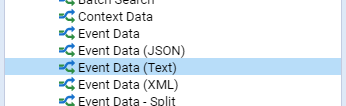
then pressing to see the inherited pipeline structure

Configure Pipeline Elements
For the purpose of this HOWTO, we are only interested in two of the eleven (11) elements in this pipeline
- the Text Converter labelled dsParser
- the XSLT Translation labelled translationFilter
We need to assign our BlueCoat-Proxy-V1.0-EVENTS Text Converter and XSLT Translation to these elements respectively.
Text Converter Configuration
We do this by first selecting (left click) the dsParser element at which we see the Property sub-window displayed

We then select (left click) the textConverter Property Name

then press the Edit Property button .
At this, the Edit Property configuration window is displayed.
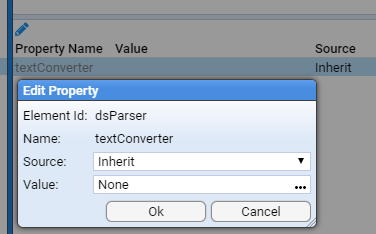
We select the Value: None entry box labelled to reveal a Choose Item configuration item window.
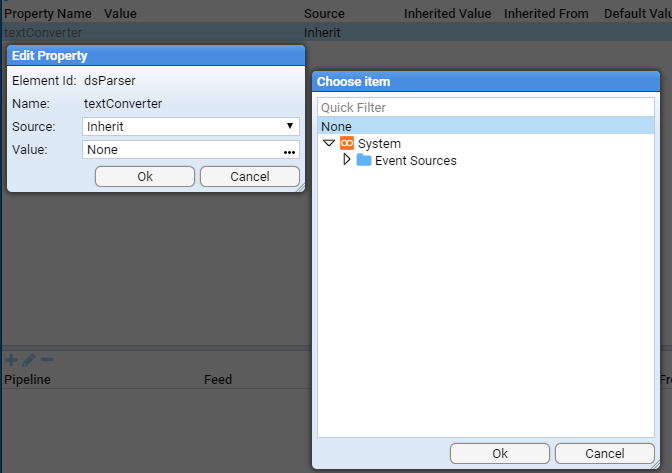
We traverse the folder structure until we can select the BlueCoat-Proxy-V1.0-EVENTS Text Converter as per
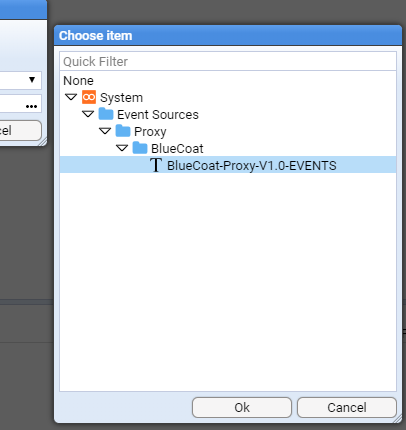
and then press the to see that the Property Value: has been selected.
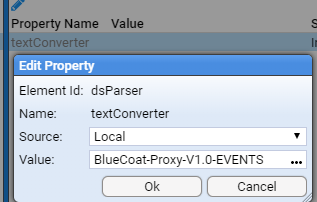
and pressing the
button of the Edit Property configuration window results in the pipelines dsParser property being set.

XSLT Translation Configuration
We do this by first selecting (left click) the translationFilter element at which we see the Property sub-window displayed

We then select (left click) the xslt Property Name

and following the same steps as for the Text Converter property selection, we assign the BlueCoat-Proxy-V1.0-EVENTS XSLT Translation to the xslt property.
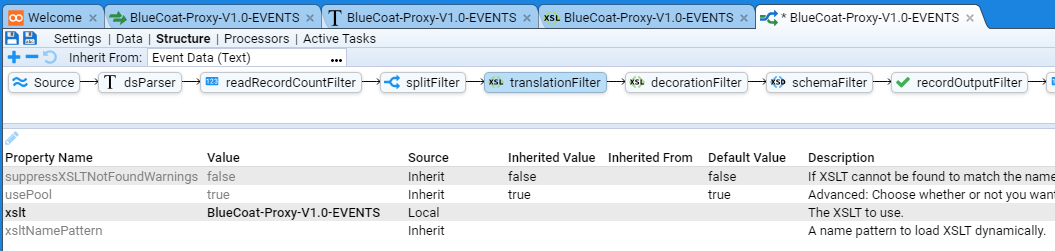
At this point, we save these changes by pressing the Save icon .
Authoring the Translation
We are now ready to author the translation.
Close all tabs except for the Welcome and BlueCoat-Proxy-V1.0-EVENTS Feed tabs.
On the BlueCoat-Proxy-V1.0-EVENTS Feed tab, select the Data hyper-link to be presented with the Data pane of our tab.
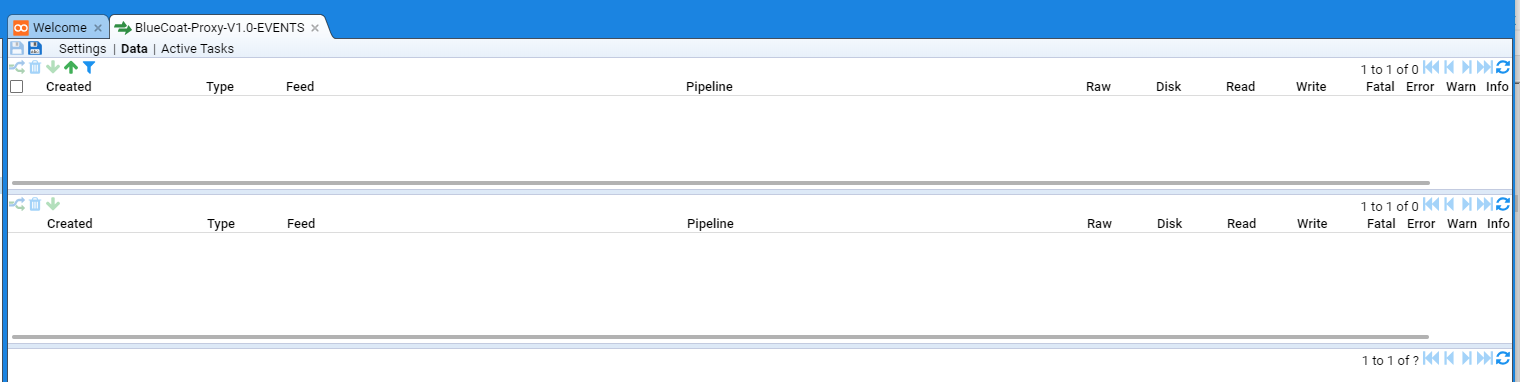
Although we can post our test data set to this feed, we will manually upload it via the Data pane.
To do this we press the Upload button in the top Data pane to display the Upload configuration window
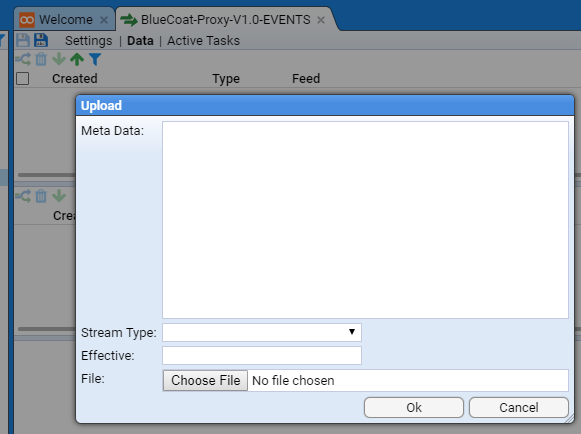
In a Production situation, where we would post log files to Stroom, we would include certain HTTP Header variables that, as we shall see, will be used as part of the translation. These header variables typically provide situational awareness of the source system sending the events.
For our purposes we set the following HTTP Header variables
Environment:Development
LogFileName:sampleBluecoat.log
MyHost:"somenode.strmdev00.org"
MyIPaddress:"192.168.2.220 192.168.122.1"
MyMeta:"FQDN:somenode.strmdev00.org\nipaddress:192.168.2.220\nipaddress_eth0:192.168.2.220\nipaddress_lo:127.0.0.1\nipaddress_virbr0:192.168.122.1\n"
MyNameServer:"gateway.strmdev00.org."
MyTZ:+1000
Shar256:056f0d196ffb4bc6c5f3898962f1708886bb48e2f20a81fb93f561f4d16cb2aa
System:Site http://log-sharing.dreamhosters.com/ Bluecoat Logs
Version:V1.0
These are set by entering them into the Meta Data: entry box.
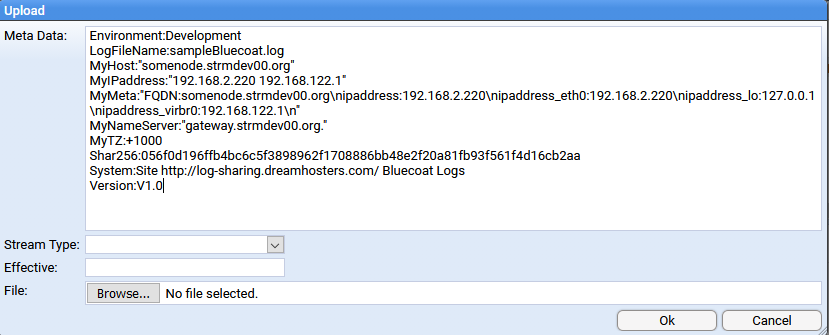
Having done this we select a Stream Type: of Raw Events
We leave the Effective: entry box empty as this stream of raw event logs does not have an Effective Date (only Reference Feeds set this).
And we choose our file sampleBluecoat.log, by clicking on the Browse button in the File: entry box, which brings up the browser’s standard file upload selection window.
Having selected our file, we see
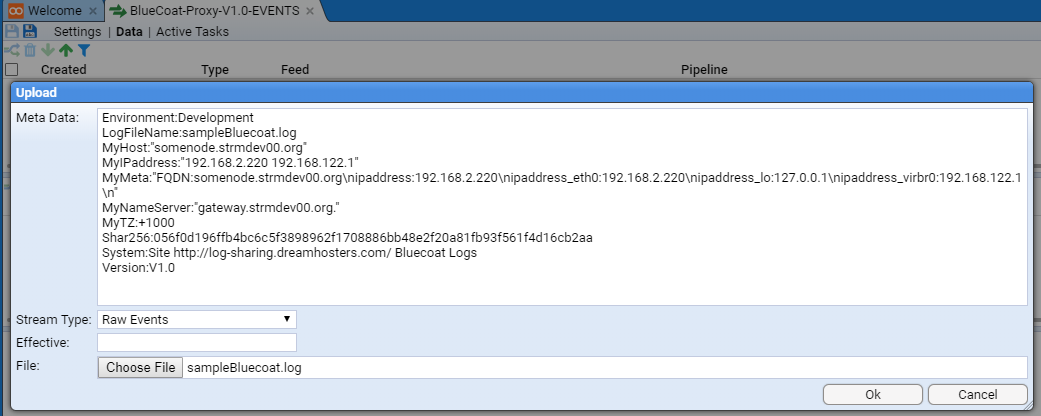
On pressing
an Alert pop-up window is presented indicating the file was uploaded

Again press to show that the data has been uploaded as a Stream into the BlueCoat-Proxy-V1.0-EVENTS Event Feed.
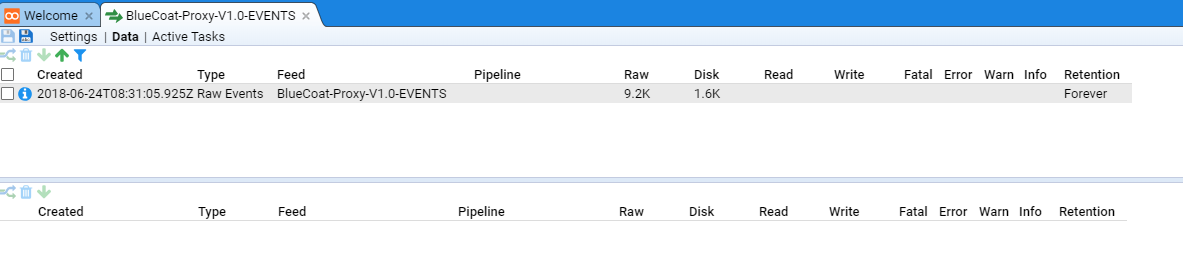
The top pane holds a table of the latest streams that pertain to the feed. We see the one item which is the stream we uploaded. If we select it, we see that a stream summary is also displayed in the centre pane (which shows details of the specific selected feed and associated streams. We also see that the bottom pane displays the data associated with the selected item. In this case, the first lines of content from the BlueCoat sample log file.
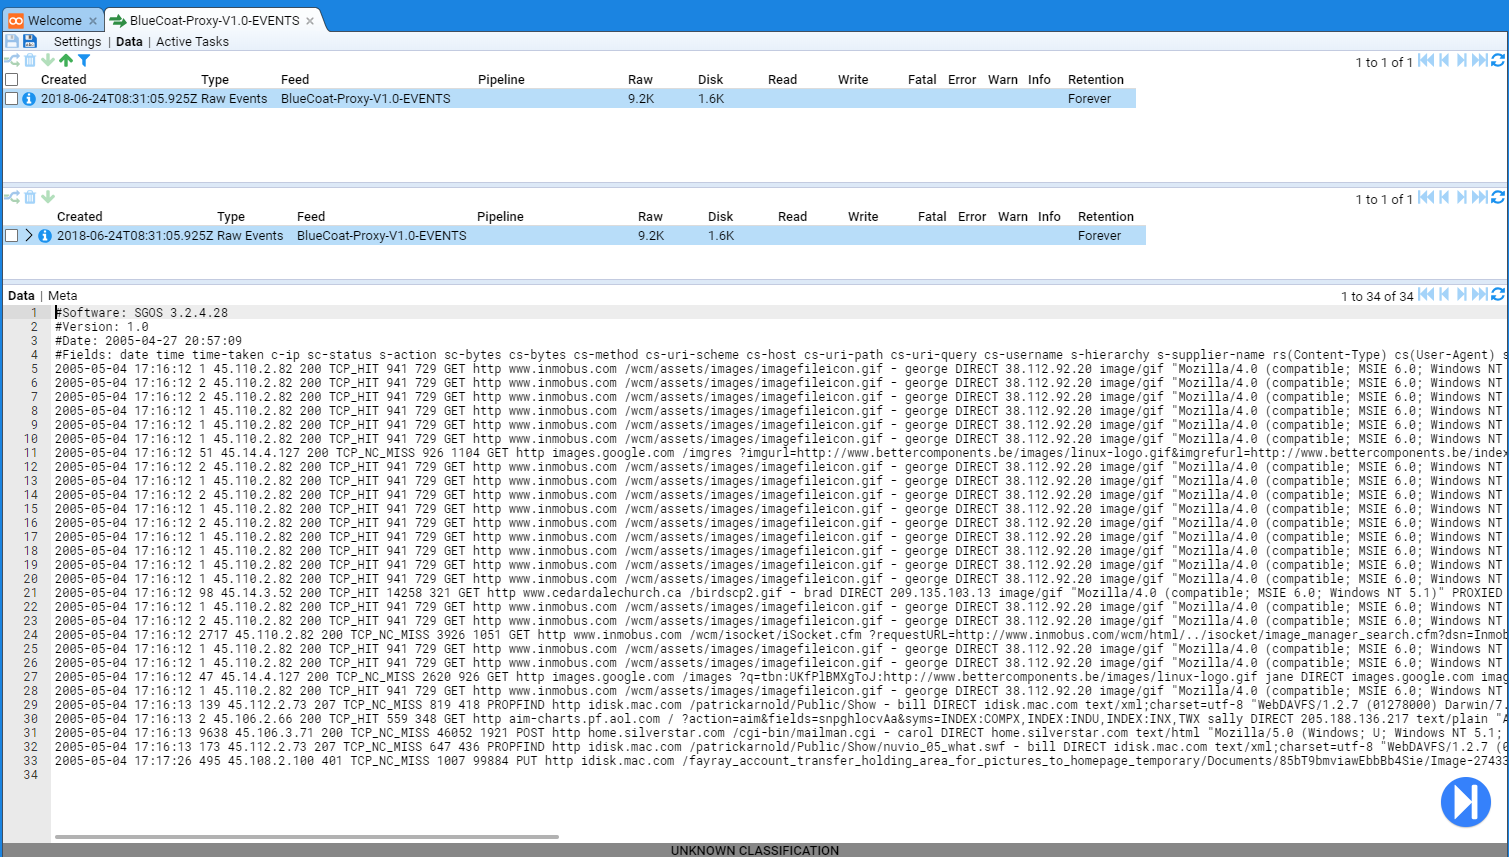
If we were to select the Meta hyper-link of the lower pane, one would see the metadata Stroom records for this Stream of data.
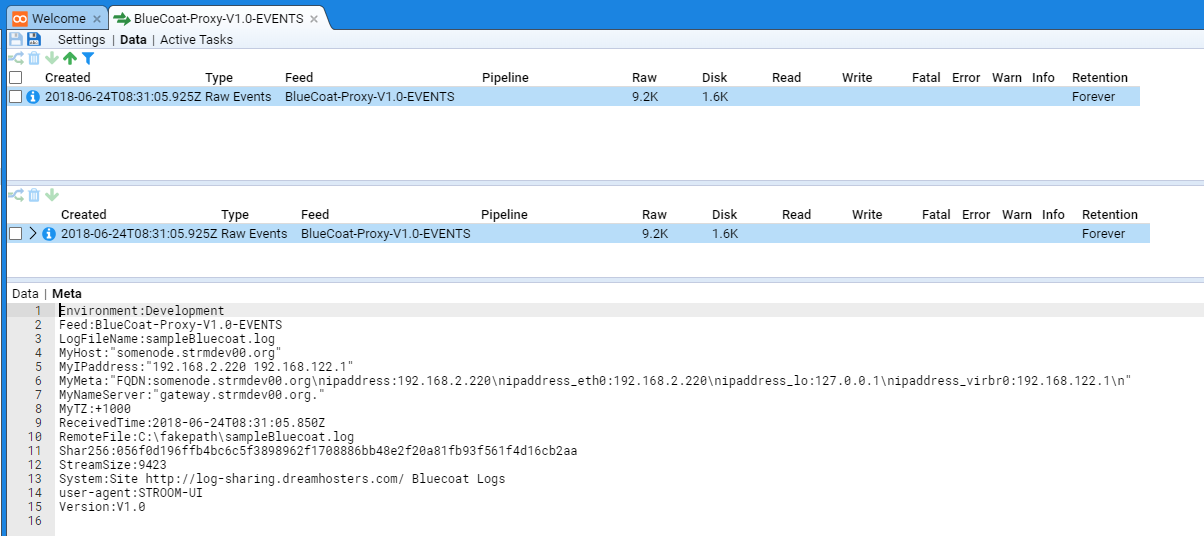
You should see all the HTTP variables we set as part of the Upload step as well as some that Stroom has automatically set.
We now switch back to the Data hyper-link before we start to develop the actual translation.
Stepping the Pipeline
We will now author the two translation components of the pipeline, the data splitter that will transform our lines of BlueCoat data into a simple xml format and then the XSLT translation that will take this simple xml format and translate it into appropriate Stroom Event Logging XML form.
We start by ensuring our Raw Events Data stream is selected and we press the Enter Stepping Mode button on the lower right hand side of the bottom Stream Data pane.
You will be prompted to select a pipeline to step with.
Choose the BlueCoat-Proxy-V1.0-EVENTS pipeline

then press .
Stepping the Pipeline - Source
You will be presented with the Source element of the pipeline that shows our selected stream’s raw data.
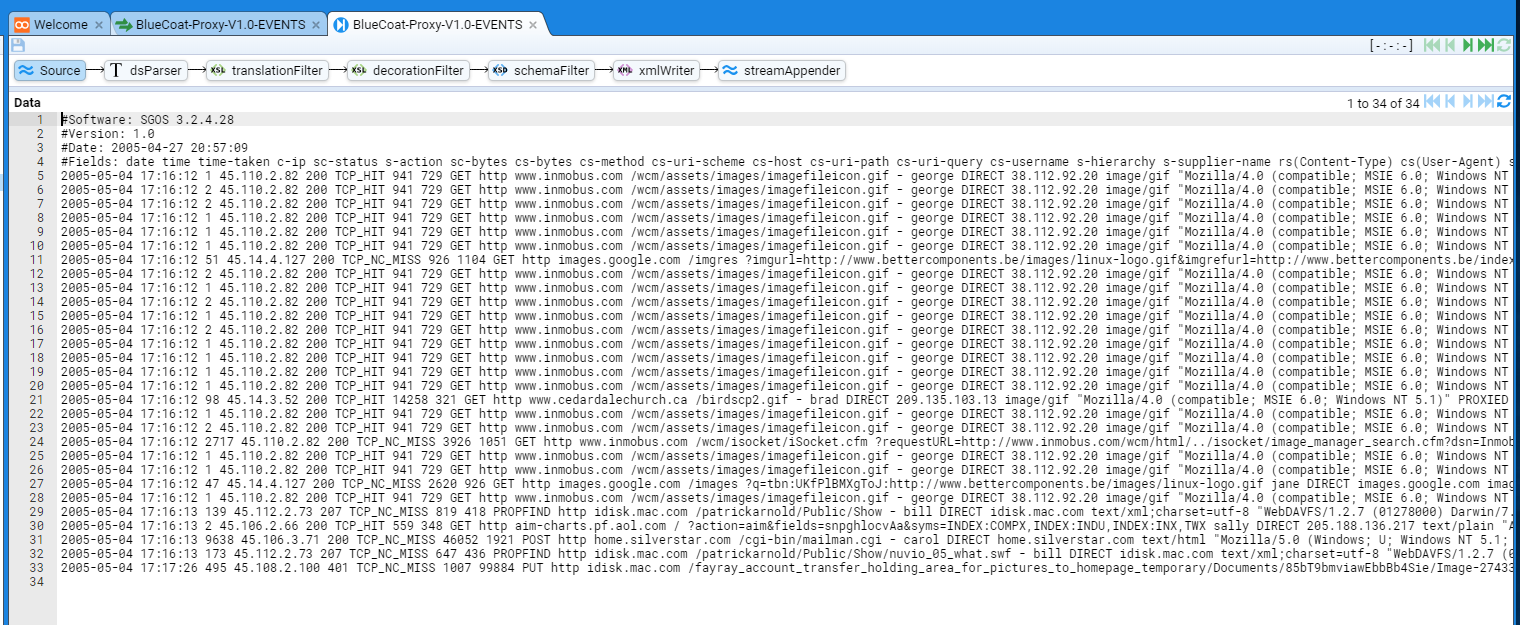
We see two panes here.
The top pane displays the Pipeline structure with Source selected (we could refer to this as the stepping pane) and it also displays a step indicator (three colon separated numbers enclosed in square brackets initially the numbers are dashes i.e. [-:-:-] as we have yet to step) and a set of green Stepping Actions.
The step indicator and Stepping Actions allows one the step through a log file, selecting data event by event (an event is typically a line, but some events can be multi-line).
The bottom pane displays the first page (up to 100 lines) of data along with a set of blue Data Selection Actions. The Data Selection Actions are used to step through the source data 100 lines at a time. When multiple source log files have been aggregated into a single stream, two Data Selection Actions control buttons will be offered. The right hand one will allow a user to step though the source data as before, but the left hand set of control buttons allows one to step between files from the aggregated event log files.
Stepping the Pipeline - dsParser
We now select the dsParser pipeline element that results in the window below
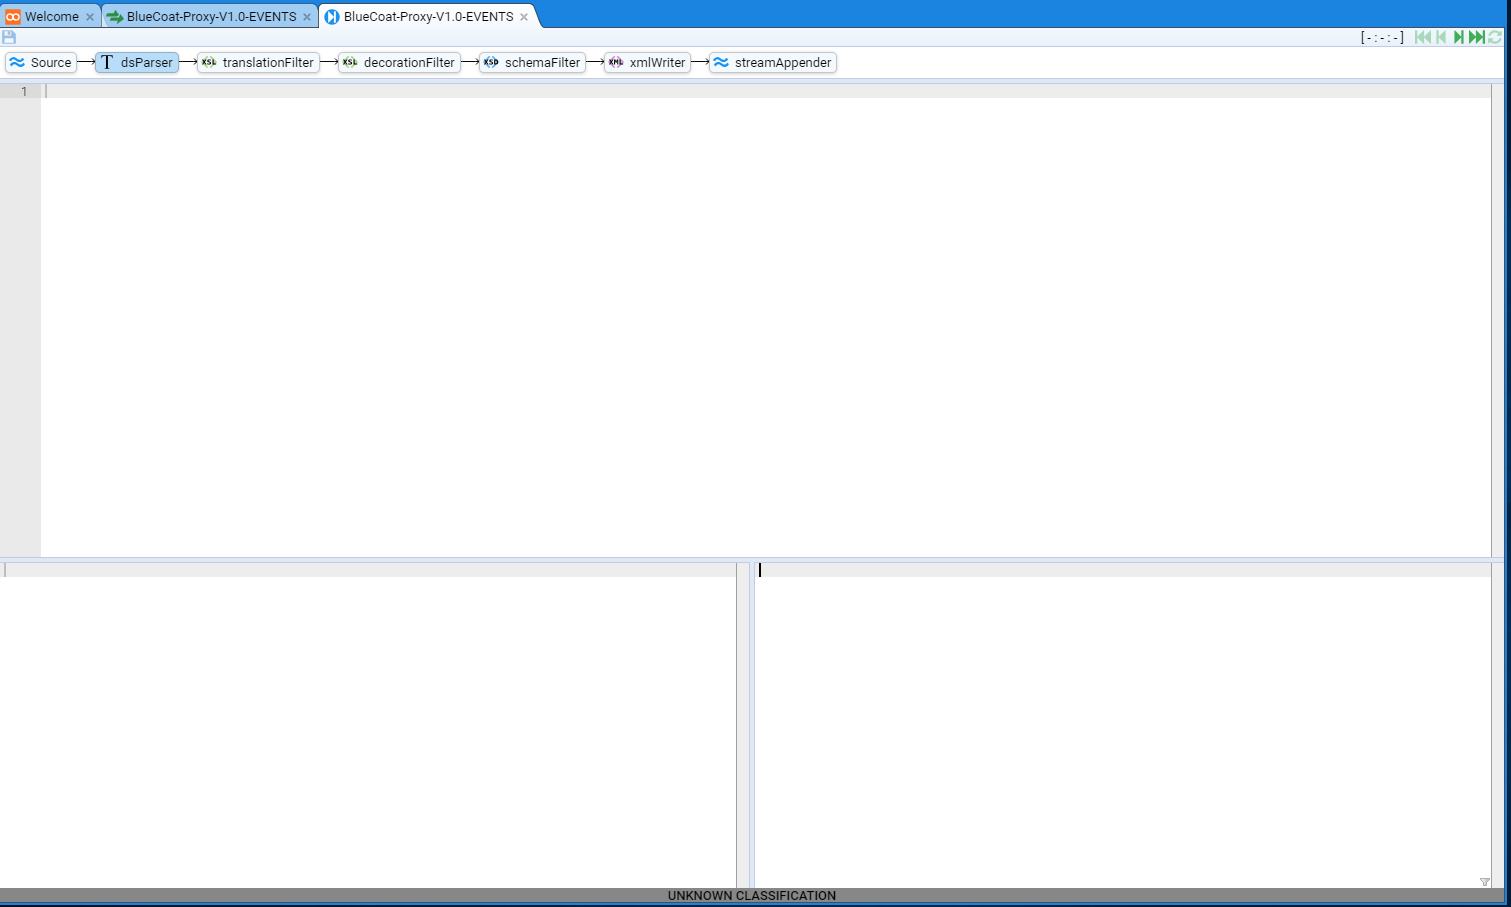
This window is made up of four panes.
The top pane remains the same - a display of the pipeline structure and the step indicator and green Stepping Actions.
The next pane down is the editing pane for the Text Converter. This pane is used to edit the text converter that converts our line based BlueCoat Proxy logs into a XML format. We make use of the Stroom Data Splitter facility to perform this transformation. See here for complete details on the data splitter.
The lower two panes are the input and output displays for the text converter.
The authoring of this data splitter translation is outside the scope of this HOWTO. It is recommended that one reads up on the Data Splitter and review the various samples found in the Stroom Context packs published, or the Pull Requests of github.com/gchq/stroom-content .
For the purpose of this HOWTO, the Data Splitter appears below. The author believes the comments should support the understanding of the transformation.
<?xml version="1.0" encoding="UTF-8"?>
<dataSplitter
bufferSize="5000000"
xmlns="data-splitter:3"
xmlns:xsi="http://www.w3.org/2001/XMLSchema-instance"
xsi:schemaLocation="data-splitter:3 file://data-splitter-v3.0.xsd"
version="3.0"
ignoreErrors="true">
<!--
This datasplitter gains the Software and and Proxy version strings along with the log field names from the comments section of the log file.
That is from the lines ...
#Software: SGOS 3.2.4.28
#Version: 1.0
#Date: 2005-04-27 20:57:09
#Fields: date time time-taken c-ip sc-status s-action sc-bytes cs-bytes cs-method ... x-icap-error-code x-icap-error-details
We use the Field values as the header for the subsequent log fields
-->
<!-- Match the software comment line and save it in _bc_software -->
<regex id="software" pattern="^#Software: (.+) ?\n*">
<data name="_bc_software" value="$1" />
</regex>
<!-- Match the version comment line and save it in _bc_version -->
<regex id="version" pattern="^#Version: (.+) ?\n*">
<data name="_bc_version" value="$1" />
</regex>
<!-- Match against a Fields: header comment and save all the field names in a headings -->
<regex id="heading" pattern="^#Fields: (.+) ?\n*">
<group value="$1">
<regex pattern="^(\S+) ?\n*">
<var id="headings" />
</regex>
</group>
</regex>
<!-- Skip all other comment lines -->
<regex pattern="^#.+\n*">
<var id="ignorea" />
</regex>
<!-- We now match all other lines, applying the headings captured at the start of the file to each field value -->
<regex id="body" pattern="^[^#].+\n*">
<group>
<regex pattern="^"([^"]*)" ?\n*">
<data name="$headings$1" value="$1" />
</regex>
<regex pattern="^([^ ]+) *\n*">
<data name="$headings$1" value="$1" />
</regex>
</group>
</regex>
<!-- -->
</dataSplitter>
BlueCoat data Spliter
(
Download BlueCoat.ds
)
It should be entered into the Text Converter’s editing pane as per
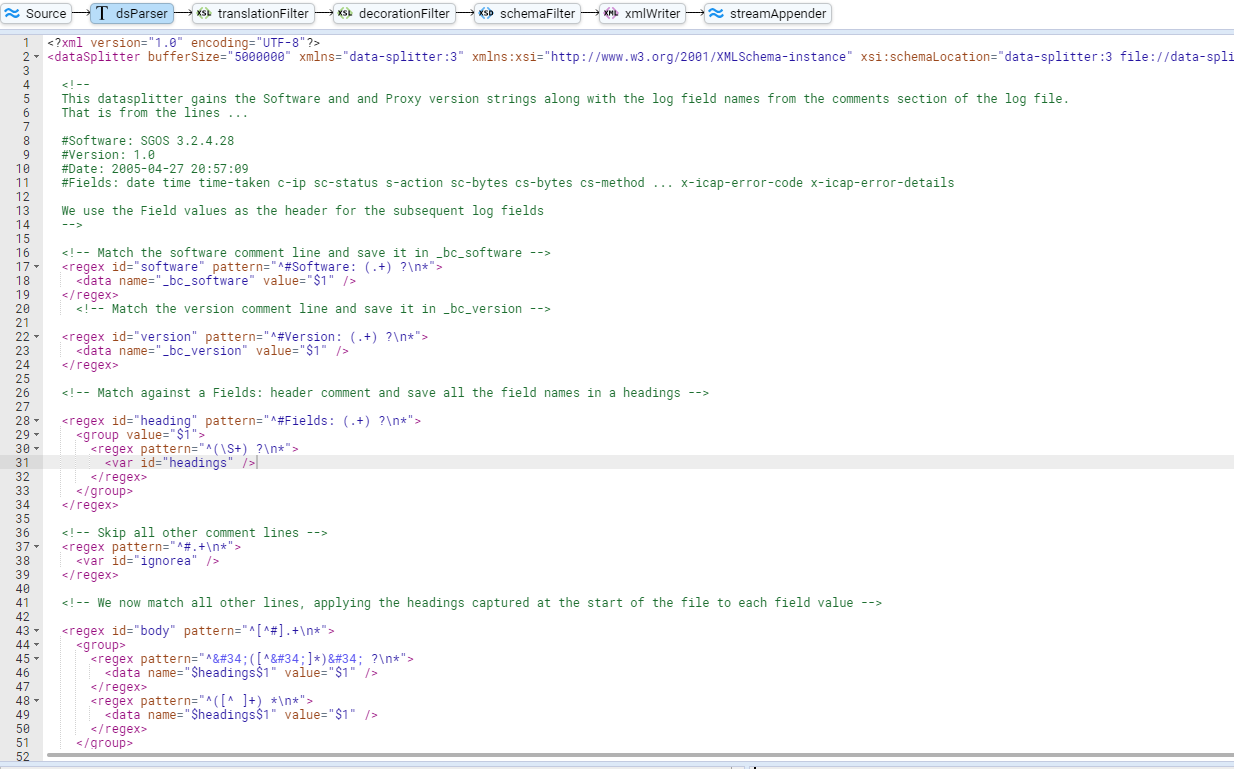
As mentioned earlier, to step the translation, one uses the green Stepping Actions.
The actions are
- - progress the transformation to the first line of the translation input
- - progress the transformation one step backward
- - progress the transformation one step forward
- - progress the transformation to the end of the translation input
- - refresh the transformation based on the current translation input
So, if one was to press the stepping action we would be presented with
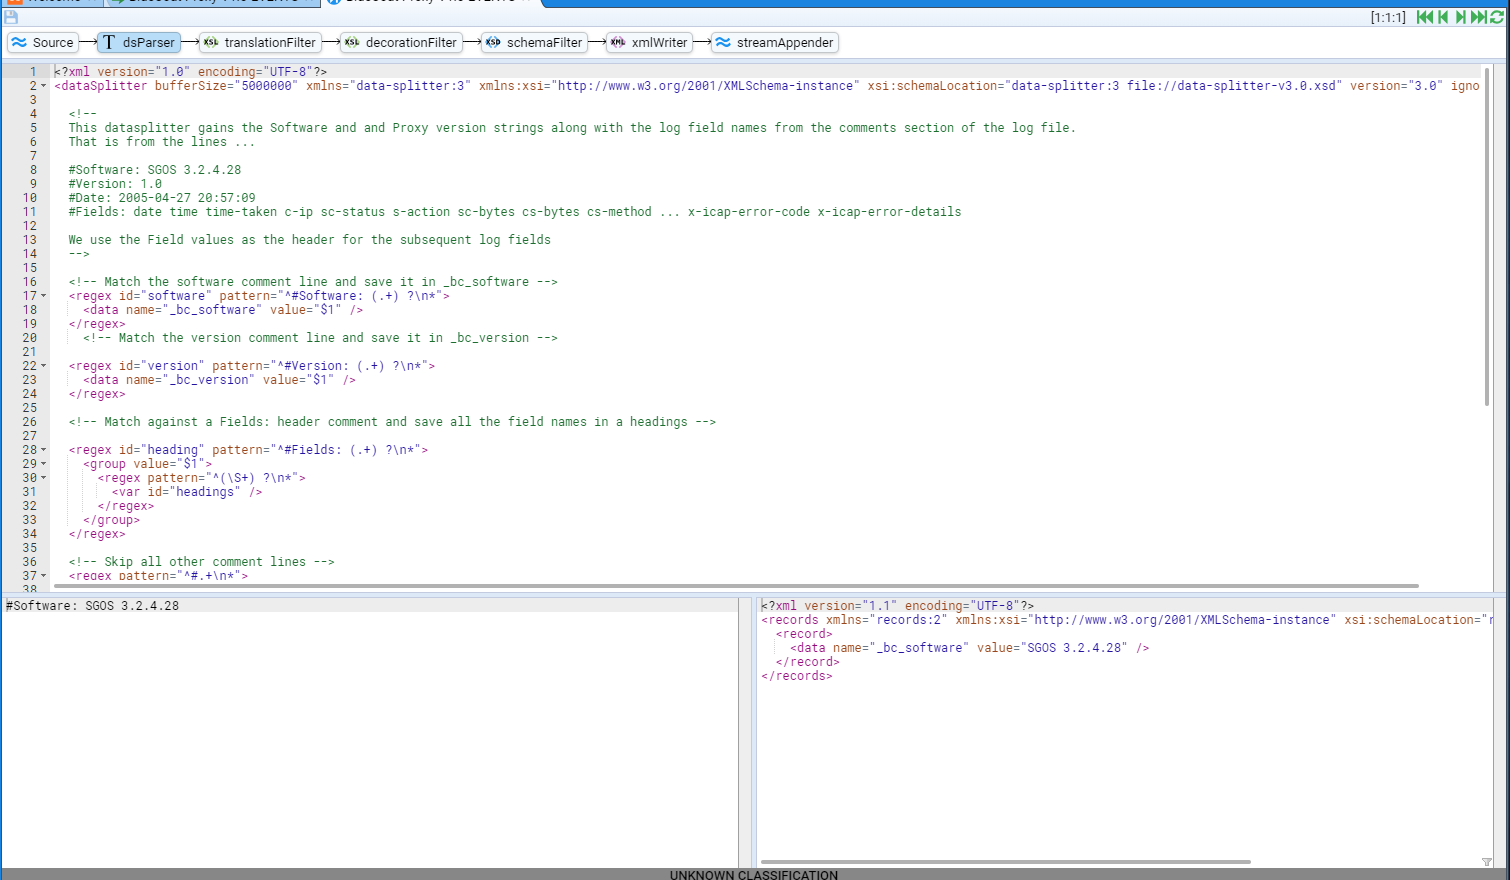
We see that the input pane has the first line of input from our sample file and the output pane has an XML record structure where we have defined a data element with the name attribute of bc_software and its value attribute of SGOS 3.2.4.28.
The definition of the record structure can be found in the System/XML Schemas/records folder.
This is the result of the code in our editor
<!-- Match the software comment line and save it in _bc_software -->
<regex id="software" pattern="^#Software: (.+) ?\n*">
<data name="_bc_software" value="$1" />
</regex>
If one presses the stepping action again, we see that we have moved to the second line of the input file with the resultant output of a data element with the name attribute of bc_version and its value attribute of 1.0.
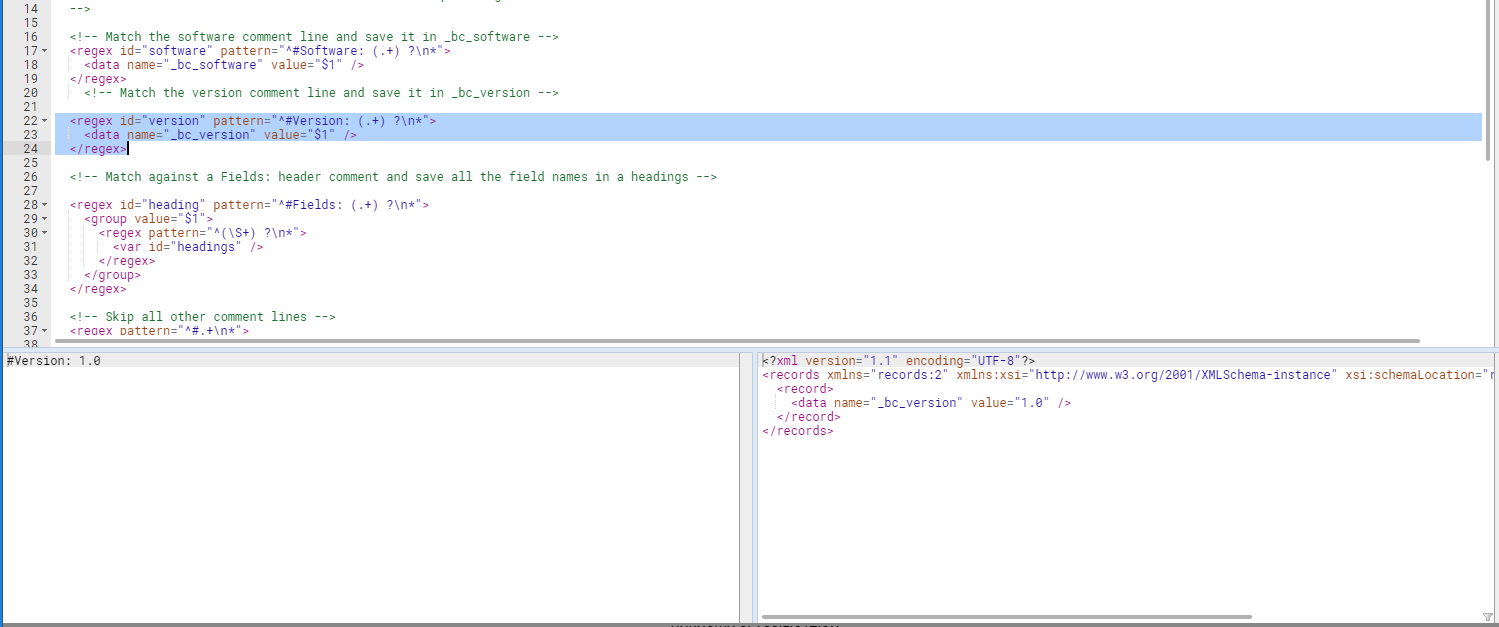
Stepping forward once more causes the translation to ignore the Date comment line, define a Data Splitter $headings variable from the Fields comment line and transform the first line of actual event data.
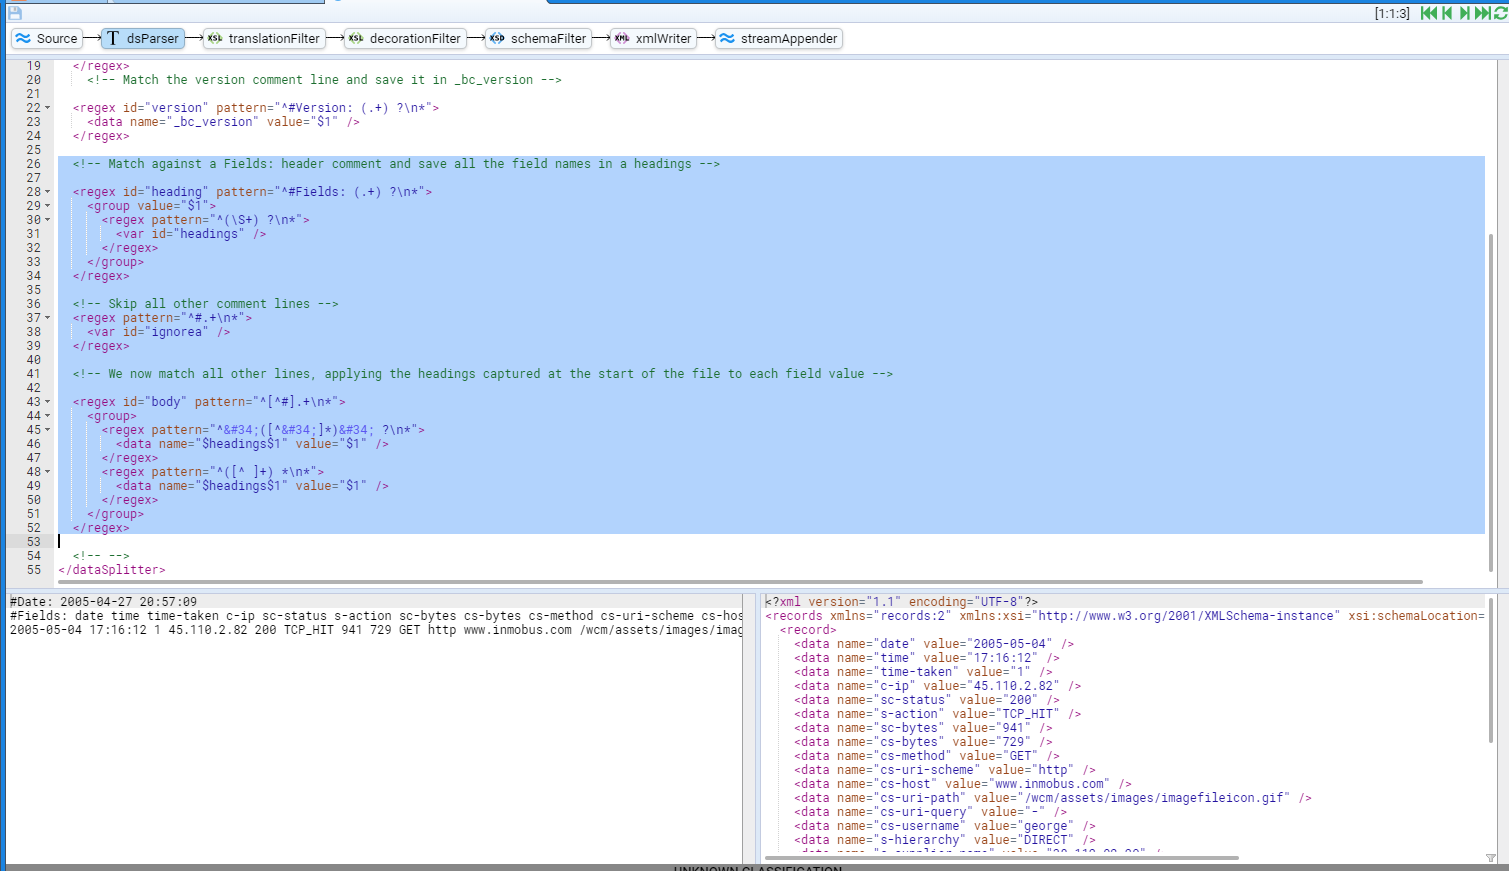
We see that a <record> element has been formed with multiple key value pair <data> elements where the name attribute is the key and the value attribute the value.
You will note that the keys have been taken from the Fields comment line which where placed in the $headings variable.
You should also take note that the stepping indicator has been incrementing the last number, so at this point it is displaying [1:1:3].
The general form of this indicator is
'[' streamId ':' subStreamId ':' recordNo ']'
where
- streamId - is the stream ID and won’t change when stepping through the selected stream,
- subStreamId - is the sub stream ID. When Stroom aggregates multiple event sources for a feed, it aggregates multiple input files and this is, in effect, the file number.
- recordNo - is the record number within the sub stream.
One can double click on either the subStreamId or recordNo entry and enter a new value. This allows you to jump around a stream rather than just relying on first, previous, next and last movements.
Hovering the mouse over the stepping indicator will change the cursor to a hand pointer.
Selecting (by a left click) the recordNo will allow you to edit its value (and the other values for that matter).
You will see the display change from
to


If we change the record number from 3 to 12 then either press Enter or press the action we see

And note that a new record has been processed in the input and output panes.
Further, if one steps back to the Source element of the pipeline to view the raw source file, we see that the highlighted current line is the 12th line of processed data.
It is the 10th actual Bluecoat event, but remember the #Software, #Version lines are considered as processed data (2+10 = 12).
Also noted that the #Date and #Fields lines are not considered processed data, and hence do not contribute to the recordNo value.
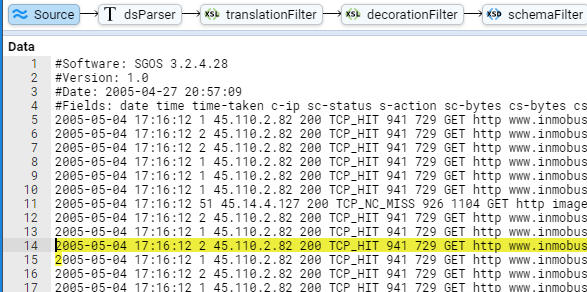
If we select the dsParser pipeline element then press the action we see the recordNo jump to 31 which is the last processed line of our sample log file.
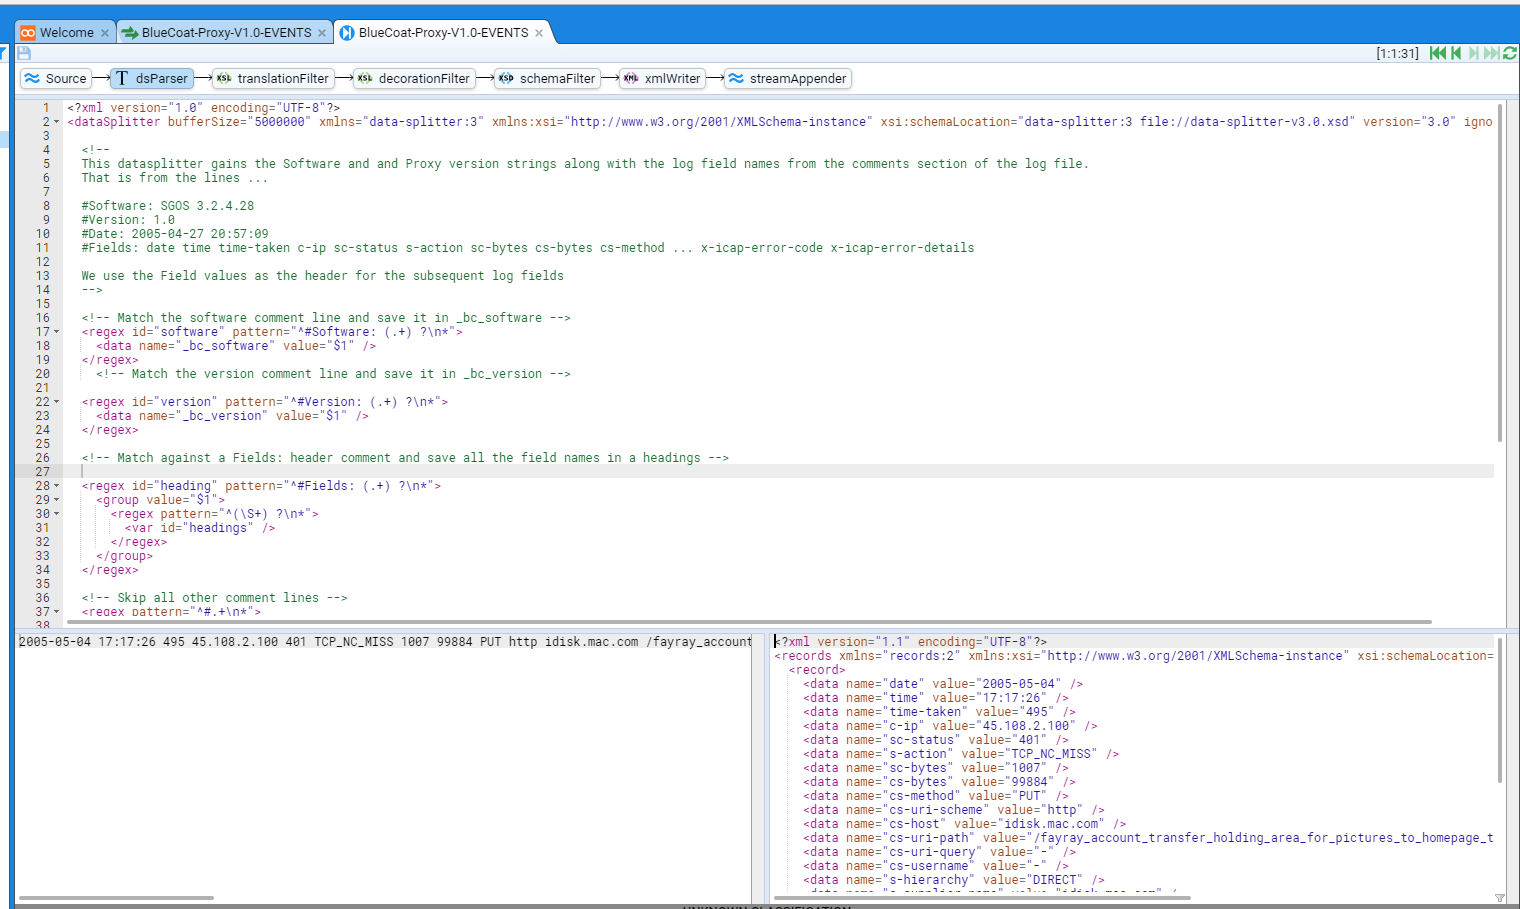
Stepping the Pipeline - translationFilter
We now select the translationFilter pipeline element that results in
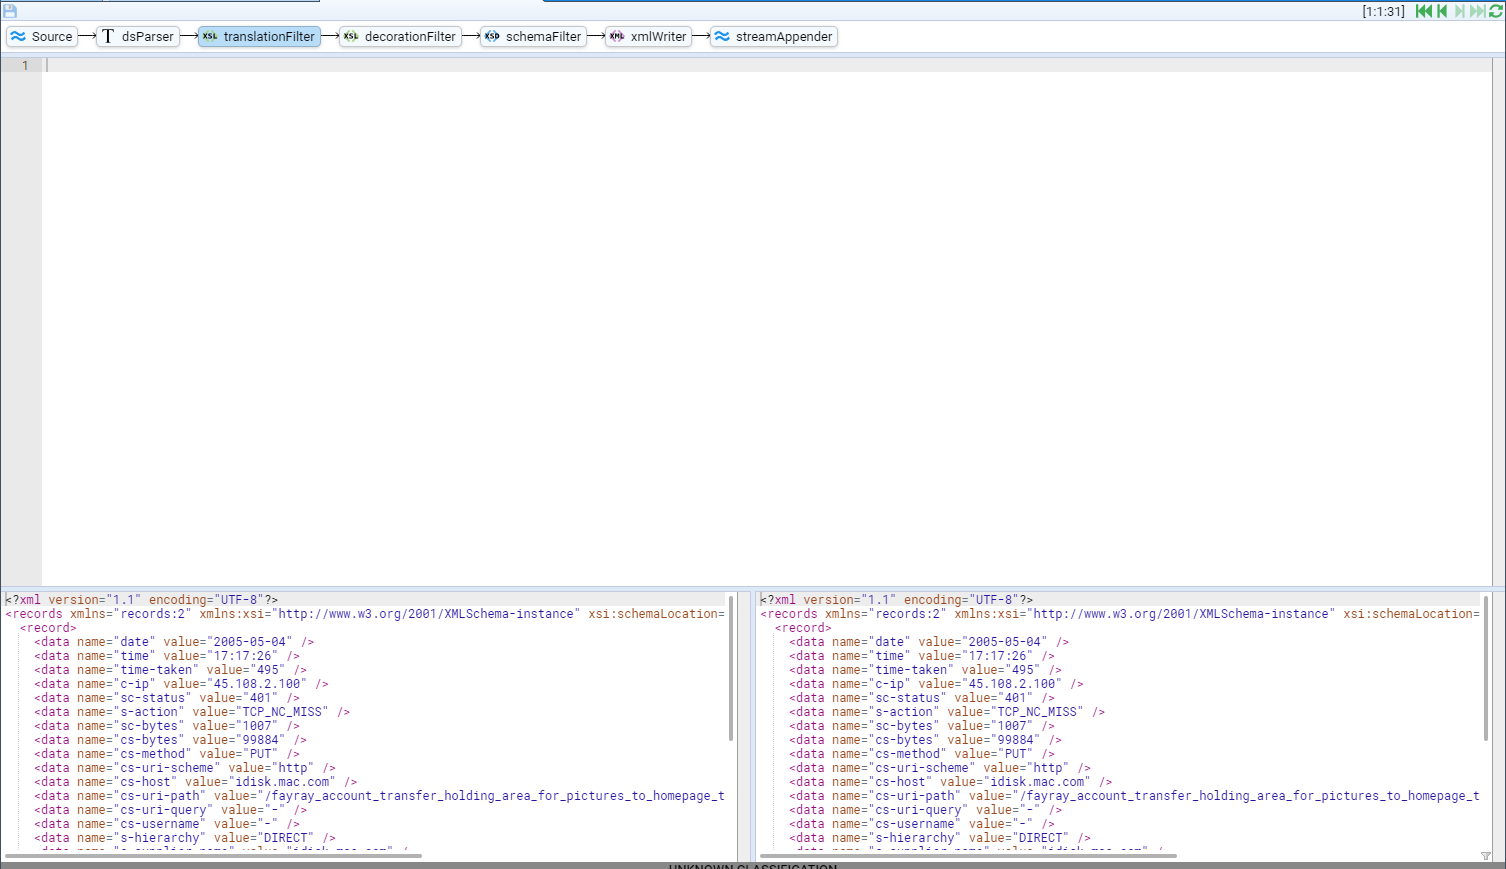
As for the dsParser, this window is made up of four panes.
The top pane remains the same - a display of the pipeline structure and the step indicator and green Stepping Actions.
The next pane down is the editing pane for the Translation Filter.
This pane is used to edit an xslt translation that converts our simple key value pair <records> XML structure into another XML form.
The lower two panes are the input and output displays for the xslt translation. You will note that the input and output displays are identical for a null xslt translation is effectively a direct copy.
In this HOWTO we will transform the <records> XML structure into the GCHQ Stroom Event Logging XML Schema form which is documented
here
.
The authoring of this xslt translation is outside the scope of this HOWTO, as is the use of the Stroom XML Schema. It is recommended that one reads up on XSLT Conversion and the Stroom Event Logging XML Schema and review the various samples found in the Stroom Context packs published, or the Pull Requests of https://github.com/gchq/stroom-content .
We will build the translation in steps.
We enter an initial portion of our xslt transformation that just consumes the Software and Version key values and converts the date and time values (which are in UTC) into the EventTime/TimeCreated element.
This code segment is
<?xml version="1.0" encoding="UTF-8" ?>
<xsl:stylesheet
xpath-default-namespace="records:2"
xmlns="event-logging:3"
xmlns:stroom="stroom"
xmlns:xsl="http://www.w3.org/1999/XSL/Transform"
xmlns:xsi="http://www.w3.org/2001/XMLSchema-instance"
xmlns:xs="http://www.w3.org/2001/XMLSchema"
version="3.0">
<!-- Bluecoat Proxy logs in W3C Extended Log File Format (ELF) -->
<!-- Ingest the record key value pair elements -->
<xsl:template match="records">
<Events xsi:schemaLocation="event-logging:3 file://event-logging-v3.2.4.xsd" Version="3.2.4">
<xsl:apply-templates />
</Events>
</xsl:template>
<!-- Main record template for single event -->
<xsl:template match="record">
<xsl:choose>
<!-- Store the Software and Version information of the Bluecoat log file for use
in the Event Source elements which are processed later -->
<xsl:when test="data[@name='_bc_software']">
<xsl:value-of select="stroom:put('_bc_software', data[@name='_bc_software']/@value)" />
</xsl:when>
<xsl:when test="data[@name='_bc_version']">
<xsl:value-of select="stroom:put('_bc_version', data[@name='_bc_version']/@value)" />
</xsl:when>
<!-- Process the event logs -->
<xsl:otherwise>
<Event>
<xsl:call-template name="event_time" />
</Event>
</xsl:otherwise>
</xsl:choose>
</xsl:template>
<!-- Time -->
<xsl:template name="event_time">
<EventTime>
<TimeCreated>
<xsl:value-of select="concat(data[@name = 'date']/@value,'T',data[@name='time']/@value,'.000Z')" />
</TimeCreated>
</EventTime>
</xsl:template>
</xsl:stylesheet>
After entering this translation and pressing the action shows the display
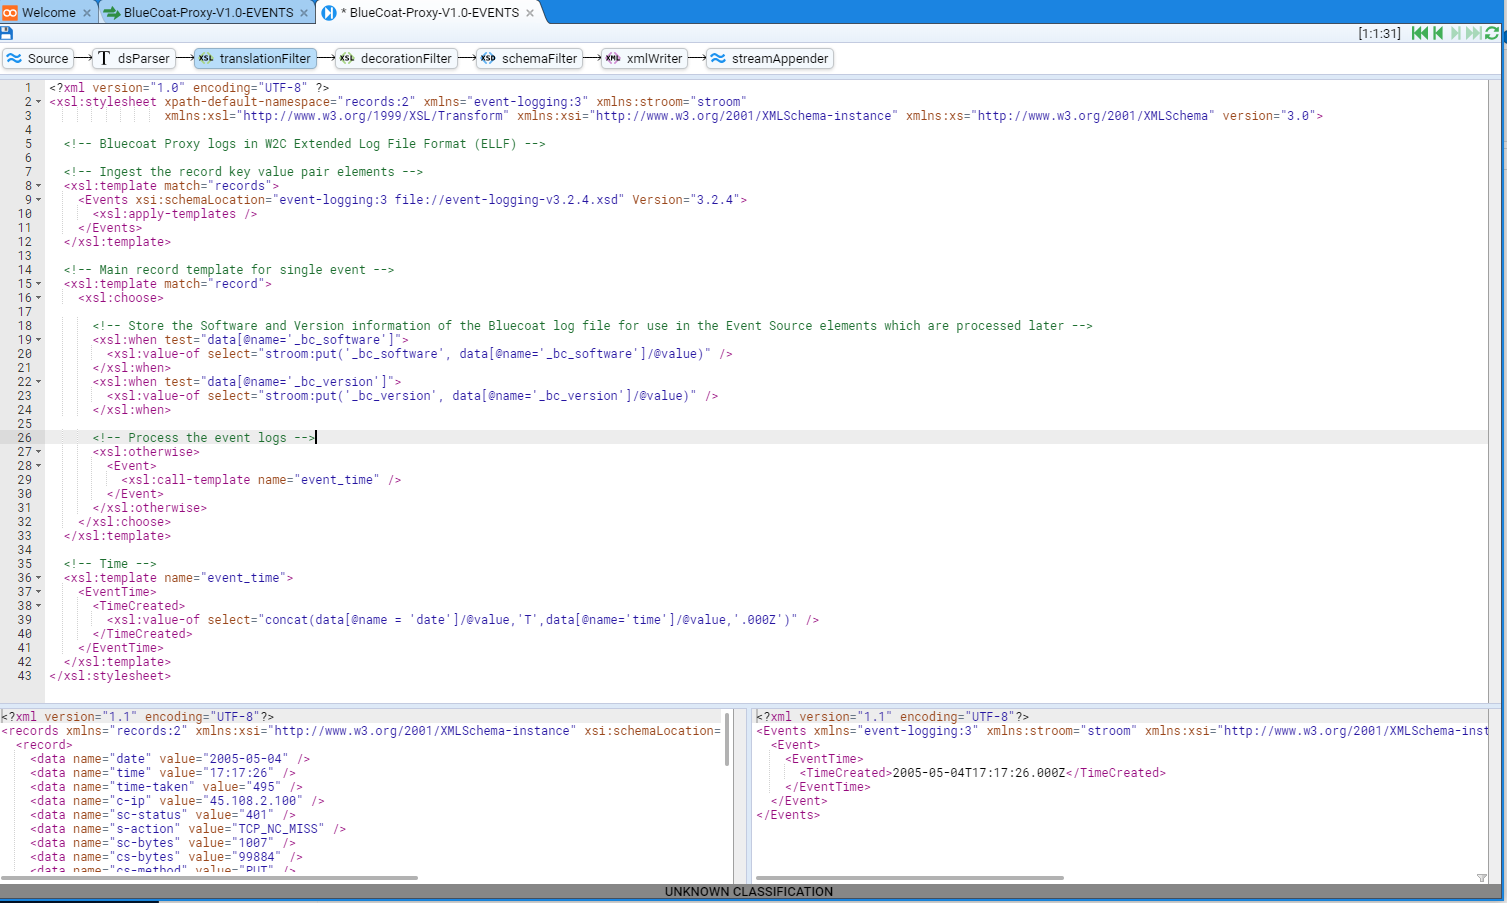
Note that this is the 31st record, so if we were to jump to the first record using the action, we see that the input and output change appropriately.

You will note that there is no Event element in the output pane as the record template in our xslt translation above is only storing the input’s key value (_bc_software’s value).
Further note that the BlueCoat_Proxy-V1.0-EVENTS tab * BlueCoat_Proxy-V1.0-EVENTS has a star in front of it and also the Save icon is highlighted. This indicates that a component of the pipeline needs to be saved. In this case, the XSLT translation.
By pressing the Save icon, you will save the XSLT translation as it currently stands and both the star will be removed from the tab BlueCoat_Proxy-V1.0-EVENTS and the Save icon will no longer be highlighted.

We next extend our translation by authoring a event_source template to form an appropriate Stroom Event Logging EventSource element structure.
Thus our translation now is
<?xml version="1.0" encoding="UTF-8" ?>
<xsl:stylesheet
xpath-default-namespace="records:2"
xmlns="event-logging:3"
xmlns:stroom="stroom"
xmlns:xsl="http://www.w3.org/1999/XSL/Transform"
xmlns:xsi="http://www.w3.org/2001/XMLSchema-instance"
xmlns:xs="http://www.w3.org/2001/XMLSchema"
version="3.0">
<!-- Bluecoat Proxy logs in W3C Extended Log File Format (ELF) -->
<!-- Ingest the record key value pair elements -->
<xsl:template match="records">
<Events xsi:schemaLocation="event-logging:3 file://event-logging-v3.2.4.xsd" Version="3.2.4">
<xsl:apply-templates />
</Events>
</xsl:template>
<!-- Main record template for single event -->
<xsl:template match="record">
<xsl:choose>
<!-- Store the Software and Version information of the Bluecoat log file for use in
the Event Source elements which are processed later -->
<xsl:when test="data[@name='_bc_software']">
<xsl:value-of select="stroom:put('_bc_software', data[@name='_bc_software']/@value)" />
</xsl:when>
<xsl:when test="data[@name='_bc_version']">
<xsl:value-of select="stroom:put('_bc_version', data[@name='_bc_version']/@value)" />
</xsl:when>
<!-- Process the event logs -->
<xsl:otherwise>
<Event>
<xsl:call-template name="event_time" />
<xsl:call-template name="event_source" />
</Event>
</xsl:otherwise>
</xsl:choose>
</xsl:template>
<!-- Time -->
<xsl:template name="event_time">
<EventTime>
<TimeCreated>
<xsl:value-of select="concat(data[@name = 'date']/@value,'T',data[@name='time']/@value,'.000Z')" />
</TimeCreated>
</EventTime>
</xsl:template>
<!-- Template for event source-->
<xsl:template name="event_source">
<!--
We extract some situational awareness information that the posting script includes when posting the event data
-->
<xsl:variable name="_mymeta" select="translate(stroom:meta('MyMeta'),'"', '')" />
<!-- Form the EventSource node -->
<EventSource>
<System>
<Name>
<xsl:value-of select="stroom:meta('System')" />
</Name>
<Environment>
<xsl:value-of select="stroom:meta('Environment')" />
</Environment>
</System>
<Generator>
<xsl:variable name="gen">
<xsl:if test="stroom:get('_bc_software')">
<xsl:value-of select="concat(' Software: ', stroom:get('_bc_software'))" />
</xsl:if>
<xsl:if test="stroom:get('_bc_version')">
<xsl:value-of select="concat(' Version: ', stroom:get('_bc_version'))" />
</xsl:if>
</xsl:variable>
<xsl:value-of select="concat('Bluecoat', $gen)" />
</Generator>
<xsl:if test="data[@name='s-computername'] or data[@name='s-ip']">
<Device>
<xsl:if test="data[@name='s-computername']">
<Name>
<xsl:value-of select="data[@name='s-computername']/@value" />
</Name>
</xsl:if>
<xsl:if test="data[@name='s-ip']">
<IPAddress>
<xsl:value-of select=" data[@name='s-ip']/@value" />
</IPAddress>
</xsl:if>
<xsl:if test="data[@name='s-sitename']">
<Data Name="ServiceType" Value="{data[@name='s-sitename']/@value}" />
</xsl:if>
</Device>
</xsl:if>
<!-- -->
<Client>
<xsl:if test="data[@name='c-ip']/@value != '-'">
<IPAddress>
<xsl:value-of select="data[@name='c-ip']/@value" />
</IPAddress>
</xsl:if>
<!-- Remote Port Number -->
<xsl:if test="data[@name='c-port']/@value !='-'">
<Port>
<xsl:value-of select="data[@name='c-port']/@value" />
</Port>
</xsl:if>
</Client>
<!-- -->
<Server>
<HostName>
<xsl:value-of select="data[@name='cs-host']/@value" />
</HostName>
</Server>
<!-- -->
<xsl:variable name="user">
<xsl:value-of select="data[@name='cs-user']/@value" />
<xsl:value-of select="data[@name='cs-username']/@value" />
<xsl:value-of select="data[@name='cs-userdn']/@value" />
</xsl:variable>
<xsl:if test="$user !='-'">
<User>
<Id>
<xsl:value-of select="$user" />
</Id>
</User>
</xsl:if>
<Data Name="MyMeta">
<xsl:attribute name="Value" select="$_mymeta" />
</Data>
</EventSource>
</xsl:template>
</xsl:stylesheet>
Stepping to the 3 record (the first real data record in our sample log) will reveal that our output pane has gained an EventSource element.
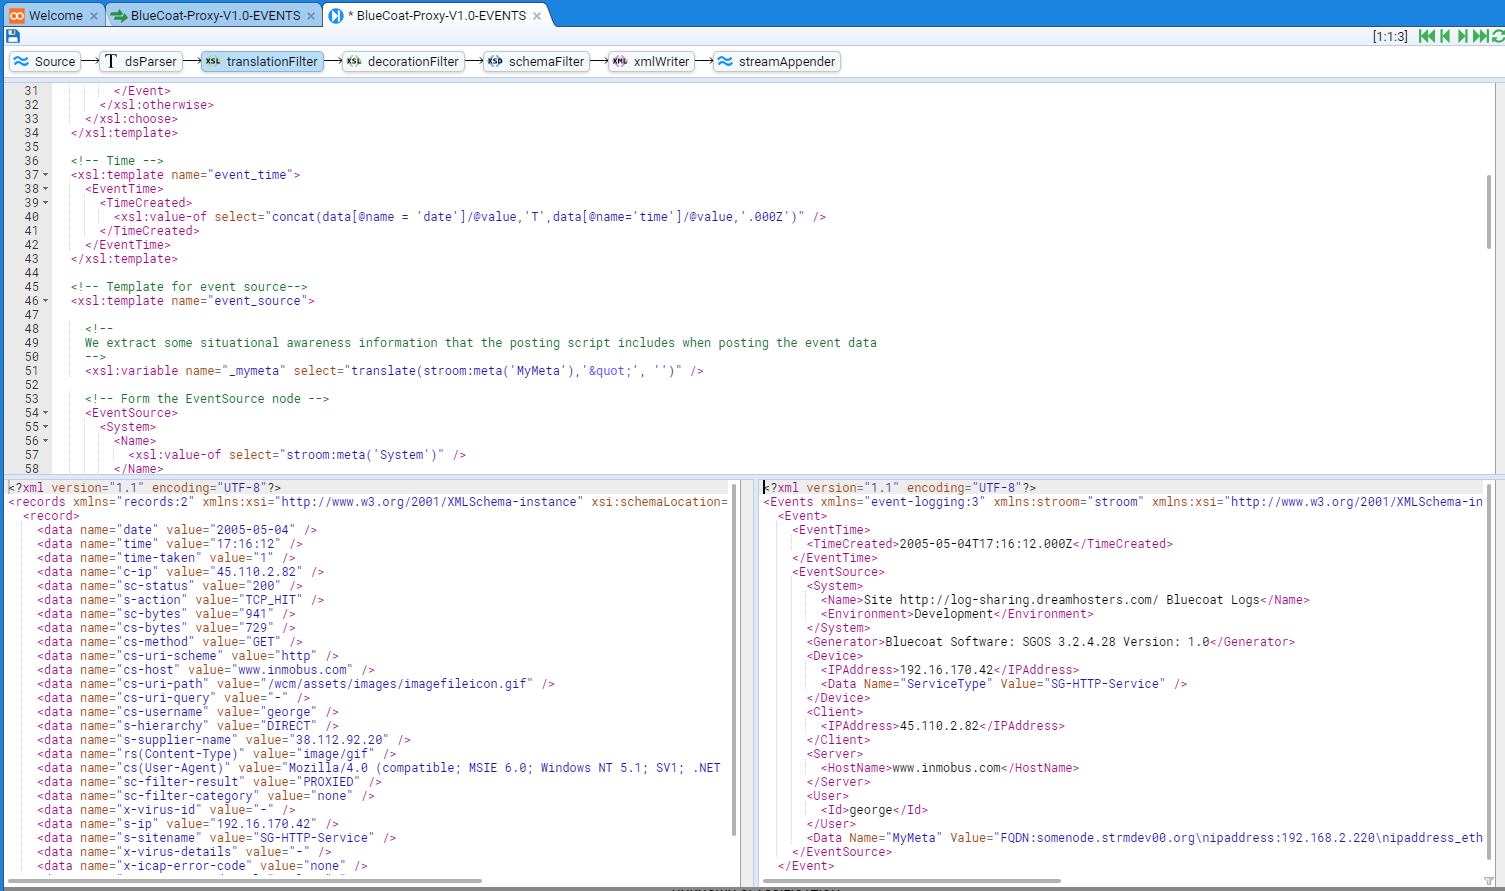
Note also, that our Save icon is also highlighted, so we should at some point save the extensions to our translation.
The complete translation now follows.
<?xml version="1.0" encoding="UTF-8" ?>
<xsl:stylesheet
xpath-default-namespace="records:2"
xmlns="event-logging:3"
xmlns:stroom="stroom"
xmlns:xsl="http://www.w3.org/1999/XSL/Transform"
xmlns:xsi="http://www.w3.org/2001/XMLSchema-instance"
xmlns:xs="http://www.w3.org/2001/XMLSchema"
version="3.0">
<!-- Bluecoat Proxy logs in W3C Extended Log File Format (ELF) -->
<!-- Ingest the record key value pair elements -->
<xsl:template match="records">
<Events xsi:schemaLocation="event-logging:3 file://event-logging-v3.2.4.xsd" Version="3.2.4">
<xsl:apply-templates />
</Events>
</xsl:template>
<!-- Main record template for single event -->
<xsl:template match="record">
<xsl:choose>
<!-- Store the Software and Version information of the Bluecoat log file for use in the Event
Source elements which are processed later -->
<xsl:when test="data[@name='_bc_software']">
<xsl:value-of select="stroom:put('_bc_software', data[@name='_bc_software']/@value)" />
</xsl:when>
<xsl:when test="data[@name='_bc_version']">
<xsl:value-of select="stroom:put('_bc_version', data[@name='_bc_version']/@value)" />
</xsl:when>
<!-- Process the event logs -->
<xsl:otherwise>
<Event>
<xsl:call-template name="event_time" />
<xsl:call-template name="event_source" />
<xsl:call-template name="event_detail" />
</Event>
</xsl:otherwise>
</xsl:choose>
</xsl:template>
<!-- Time -->
<xsl:template name="event_time">
<EventTime>
<TimeCreated>
<xsl:value-of select="concat(data[@name = 'date']/@value,'T',data[@name='time']/@value,'.000Z')" />
</TimeCreated>
</EventTime>
</xsl:template>
<!-- Template for event source-->
<xsl:template name="event_source">
<!-- We extract some situational awareness information that the posting script includes when
posting the event data -->
<xsl:variable name="_mymeta" select="translate(stroom:meta('MyMeta'),'"', '')" />
<!-- Form the EventSource node -->
<EventSource>
<System>
<Name>
<xsl:value-of select="stroom:meta('System')" />
</Name>
<Environment>
<xsl:value-of select="stroom:meta('Environment')" />
</Environment>
</System>
<Generator>
<xsl:variable name="gen">
<xsl:if test="stroom:get('_bc_software')">
<xsl:value-of select="concat(' Software: ', stroom:get('_bc_software'))" />
</xsl:if>
<xsl:if test="stroom:get('_bc_version')">
<xsl:value-of select="concat(' Version: ', stroom:get('_bc_version'))" />
</xsl:if>
</xsl:variable>
<xsl:value-of select="concat('Bluecoat', $gen)" />
</Generator>
<xsl:if test="data[@name='s-computername'] or data[@name='s-ip']">
<Device>
<xsl:if test="data[@name='s-computername']">
<Name>
<xsl:value-of select="data[@name='s-computername']/@value" />
</Name>
</xsl:if>
<xsl:if test="data[@name='s-ip']">
<IPAddress>
<xsl:value-of select=" data[@name='s-ip']/@value" />
</IPAddress>
</xsl:if>
<xsl:if test="data[@name='s-sitename']">
<Data Name="ServiceType" Value="{data[@name='s-sitename']/@value}" />
</xsl:if>
</Device>
</xsl:if>
<!-- -->
<Client>
<xsl:if test="data[@name='c-ip']/@value != '-'">
<IPAddress>
<xsl:value-of select="data[@name='c-ip']/@value" />
</IPAddress>
</xsl:if>
<!-- Remote Port Number -->
<xsl:if test="data[@name='c-port']/@value !='-'">
<Port>
<xsl:value-of select="data[@name='c-port']/@value" />
</Port>
</xsl:if>
</Client>
<!-- -->
<Server>
<HostName>
<xsl:value-of select="data[@name='cs-host']/@value" />
</HostName>
</Server>
<!-- -->
<xsl:variable name="user">
<xsl:value-of select="data[@name='cs-user']/@value" />
<xsl:value-of select="data[@name='cs-username']/@value" />
<xsl:value-of select="data[@name='cs-userdn']/@value" />
</xsl:variable>
<xsl:if test="$user !='-'">
<User>
<Id>
<xsl:value-of select="$user" />
</Id>
</User>
</xsl:if>
<Data Name="MyMeta">
<xsl:attribute name="Value" select="$_mymeta" />
</Data>
</EventSource>
</xsl:template>
<!-- Event detail -->
<xsl:template name="event_detail">
<EventDetail>
<!--
We model Proxy events as either Receive or Send events depending on the method.
We make use of the Receive/Send sub-elements Source/Destination to map
the Client/Destination Proxy values and the Payload sub-element to map
the URL and other details of the activity. If we have a query, we model
it as a Criteria
-->
<TypeId>
<xsl:value-of select="concat('Bluecoat-', data[@name='cs-method']/@value, '-', data[@name='cs-uri-scheme']/@value)" />
<xsl:if test="data[@name='cs-uri-query']/@value != '-'">-Query</xsl:if>
</TypeId>
<xsl:choose>
<xsl:when test="matches(data[@name='cs-method']/@value, 'GET|OPTIONS|HEAD')">
<Description>Receipt of information from a Resource via Proxy</Description>
<Receive>
<xsl:call-template name="setupParticipants" />
<xsl:call-template name="setPayload" />
<xsl:call-template name="setOutcome" />
</Receive>
</xsl:when>
<xsl:otherwise>
<Description>Transmission of information to a Resource via Proxy</Description>
<Send>
<xsl:call-template name="setupParticipants" />
<xsl:call-template name="setPayload" />
<xsl:call-template name="setOutcome" />
</Send>
</xsl:otherwise>
</xsl:choose>
</EventDetail>
</xsl:template>
<!-- Establish the Source and Destination nodes -->
<xsl:template name="setupParticipants">
<Source>
<Device>
<xsl:if test="data[@name='c-ip']/@value != '-'">
<IPAddress>
<xsl:value-of select="data[@name='c-ip']/@value" />
</IPAddress>
</xsl:if>
<!-- Remote Port Number -->
<xsl:if test="data[@name='c-port']/@value !='-'">
<Port>
<xsl:value-of select="data[@name='c-port']/@value" />
</Port>
</xsl:if>
</Device>
</Source>
<Destination>
<Device>
<HostName>
<xsl:value-of select="data[@name='cs-host']/@value" />
</HostName>
</Device>
</Destination>
</xsl:template>
<!-- Define the Payload node -->
<xsl:template name="setPayload">
<Payload>
<xsl:if test="data[@name='cs-uri-query']/@value != '-'">
<Criteria>
<DataSources>
<DataSource>
<xsl:value-of select="concat(data[@name='cs-uri-scheme']/@value, '://', data[@name='cs-host']/@value)" />
<xsl:if test="data[@name='cs-uri-path']/@value != '/'">
<xsl:value-of select="data[@name='cs-uri-path']/@value" />
</xsl:if>
</DataSource>
</DataSources>
<Query>
<Raw>
<xsl:value-of select="data[@name='cs-uri-query']/@value" />
</Raw>
</Query>
</Criteria>
</xsl:if>
<Resource>
<!-- Check for auth groups the URL belongs to -->
<xsl:variable name="authgroups">
<xsl:value-of select="data[@name='cs-auth-group']/@value" />
<xsl:if test="exists(data[@name='cs-auth-group']) and exists(data[@name='cs-auth-groups'])">,</xsl:if>
<xsl:value-of select="data[@name='cs-auth-groups']/@value" />
</xsl:variable>
<xsl:choose>
<xsl:when test="contains($authgroups, ',')">
<Groups>
<xsl:for-each select="tokenize($authgroups, ',')">
<Group>
<Id>
<xsl:value-of select="." />
</Id>
</Group>
</xsl:for-each>
</Groups>
</xsl:when>
<xsl:when test="$authgroups != '-' and $authgroups != ''">
<Groups>
<Group>
<Id>
<xsl:value-of select="$authgroups" />
</Id>
</Group>
</Groups>
</xsl:when>
</xsl:choose>
<!-- Re-form the URL -->
<URL>
<xsl:value-of select="concat(data[@name='cs-uri-scheme']/@value, '://', data[@name='cs-host']/@value)" />
<xsl:if test="data[@name='cs-uri-path']/@value != '/'">
<xsl:value-of select="data[@name='cs-uri-path']/@value" />
</xsl:if>
</URL>
<HTTPMethod>
<xsl:value-of select="data[@name='cs-method']/@value" />
</HTTPMethod>
<xsl:if test="data[@name='cs(User-Agent)']/@value !='-'">
<UserAgent>
<xsl:value-of select="data[@name='cs(User-Agent)']/@value" />
</UserAgent>
</xsl:if>
<!-- Inbound activity -->
<xsl:if test="data[@name='sc-bytes']/@value !='-'">
<InboundSize>
<xsl:value-of select="data[@name='sc-bytes']/@value" />
</InboundSize>
</xsl:if>
<xsl:if test="data[@name='sc-bodylength']/@value !='-'">
<InboundContentSize>
<xsl:value-of select="data[@name='sc-bodylength']/@value" />
</InboundContentSize>
</xsl:if>
<!-- Outbound activity -->
<xsl:if test="data[@name='cs-bytes']/@value !='-'">
<OutboundSize>
<xsl:value-of select="data[@name='cs-bytes']/@value" />
</OutboundSize>
</xsl:if>
<xsl:if test="data[@name='cs-bodylength']/@value !='-'">
<OutboundContentSize>
<xsl:value-of select="data[@name='cs-bodylength']/@value" />
</OutboundContentSize>
</xsl:if>
<!-- Miscellaneous -->
<RequestTime>
<xsl:value-of select="data[@name='time-taken']/@value" />
</RequestTime>
<ResponseCode>
<xsl:value-of select="data[@name='sc-status']/@value" />
</ResponseCode>
<xsl:if test="data[@name='rs(Content-Type)']/@value != '-'">
<MimeType>
<xsl:value-of select="data[@name='rs(Content-Type)']/@value" />
</MimeType>
</xsl:if>
<xsl:if test="data[@name='cs-categories']/@value != 'none' or data[@name='sc-filter-category']/@value != 'none'">
<Category>
<xsl:value-of select="data[@name='cs-categories']/@value" />
<xsl:value-of select="data[@name='sc-filter-category']/@value" />
</Category>
</xsl:if>
<!-- Take up other items as data elements -->
<xsl:apply-templates select="data[@name='s-action']" />
<xsl:apply-templates select="data[@name='cs-uri-scheme']" />
<xsl:apply-templates select="data[@name='s-hierarchy']" />
<xsl:apply-templates select="data[@name='sc-filter-result']" />
<xsl:apply-templates select="data[@name='x-virus-id']" />
<xsl:apply-templates select="data[@name='x-virus-details']" />
<xsl:apply-templates select="data[@name='x-icap-error-code']" />
<xsl:apply-templates select="data[@name='x-icap-error-details']" />
</Resource>
</Payload>
</xsl:template>
<!-- Generic Data capture template so we capture all other Bluecoat objects not already consumed -->
<xsl:template match="data">
<xsl:if test="@value != '-'">
<Data Name="{@name}" Value="{@value}" />
</xsl:if>
</xsl:template>
<!--
Set up the Outcome node.
We only set an Outcome for an error state. The absence of an Outcome infers success
-->
<xsl:template name="setOutcome">
<xsl:choose>
<!-- Favour squid specific errors first -->
<xsl:when test="data[@name='sc-status']/@value > 500">
<Outcome>
<Success>false</Success>
<Description>
<xsl:call-template name="responseCodeDesc">
<xsl:with-param name="code" select="data[@name='sc-status']/@value" />
</xsl:call-template>
</Description>
</Outcome>
</xsl:when>
<!-- Now check for 'normal' errors -->
<xsl:when test="tCliStatus > 400">
<Outcome>
<Success>false</Success>
<Description>
<xsl:call-template name="responseCodeDesc">
<xsl:with-param name="code" select="data[@name='sc-status']/@value" />
</xsl:call-template>
</Description>
</Outcome>
</xsl:when>
</xsl:choose>
</xsl:template>
<!-- Response Code map to Descriptions -->
<xsl:template name="responseCodeDesc">
<xsl:param name="code" />
<xsl:choose>
<!-- Informational -->
<xsl:when test="$code = 100">Continue</xsl:when>
<xsl:when test="$code = 101">Switching Protocols</xsl:when>
<xsl:when test="$code = 102">Processing</xsl:when>
<!-- Successful Transaction -->
<xsl:when test="$code = 200">OK</xsl:when>
<xsl:when test="$code = 201">Created</xsl:when>
<xsl:when test="$code = 202">Accepted</xsl:when>
<xsl:when test="$code = 203">Non-Authoritative Information</xsl:when>
<xsl:when test="$code = 204">No Content</xsl:when>
<xsl:when test="$code = 205">Reset Content</xsl:when>
<xsl:when test="$code = 206">Partial Content</xsl:when>
<xsl:when test="$code = 207">Multi Status</xsl:when>
<!-- Redirection -->
<xsl:when test="$code = 300">Multiple Choices</xsl:when>
<xsl:when test="$code = 301">Moved Permanently</xsl:when>
<xsl:when test="$code = 302">Moved Temporarily</xsl:when>
<xsl:when test="$code = 303">See Other</xsl:when>
<xsl:when test="$code = 304">Not Modified</xsl:when>
<xsl:when test="$code = 305">Use Proxy</xsl:when>
<xsl:when test="$code = 307">Temporary Redirect</xsl:when>
<!-- Client Error -->
<xsl:when test="$code = 400">Bad Request</xsl:when>
<xsl:when test="$code = 401">Unauthorized</xsl:when>
<xsl:when test="$code = 402">Payment Required</xsl:when>
<xsl:when test="$code = 403">Forbidden</xsl:when>
<xsl:when test="$code = 404">Not Found</xsl:when>
<xsl:when test="$code = 405">Method Not Allowed</xsl:when>
<xsl:when test="$code = 406">Not Acceptable</xsl:when>
<xsl:when test="$code = 407">Proxy Authentication Required</xsl:when>
<xsl:when test="$code = 408">Request Timeout</xsl:when>
<xsl:when test="$code = 409">Conflict</xsl:when>
<xsl:when test="$code = 410">Gone</xsl:when>
<xsl:when test="$code = 411">Length Required</xsl:when>
<xsl:when test="$code = 412">Precondition Failed</xsl:when>
<xsl:when test="$code = 413">Request Entity Too Large</xsl:when>
<xsl:when test="$code = 414">Request URI Too Large</xsl:when>
<xsl:when test="$code = 415">Unsupported Media Type</xsl:when>
<xsl:when test="$code = 416">Request Range Not Satisfiable</xsl:when>
<xsl:when test="$code = 417">Expectation Failed</xsl:when>
<xsl:when test="$code = 422">Unprocessable Entity</xsl:when>
<xsl:when test="$code = 424">Locked/Failed Dependency</xsl:when>
<xsl:when test="$code = 433">Unprocessable Entity</xsl:when>
<!-- Server Error -->
<xsl:when test="$code = 500">Internal Server Error</xsl:when>
<xsl:when test="$code = 501">Not Implemented</xsl:when>
<xsl:when test="$code = 502">Bad Gateway</xsl:when>
<xsl:when test="$code = 503">Service Unavailable</xsl:when>
<xsl:when test="$code = 504">Gateway Timeout</xsl:when>
<xsl:when test="$code = 505">HTTP Version Not Supported</xsl:when>
<xsl:when test="$code = 507">Insufficient Storage</xsl:when>
<xsl:when test="$code = 600">Squid: header parsing error</xsl:when>
<xsl:when test="$code = 601">Squid: header size overflow detected while parsing/roundcube: software configuration error</xsl:when>
<xsl:when test="$code = 603">roundcube: invalid authorization</xsl:when>
<xsl:otherwise>
<xsl:value-of select="concat('Unknown Code:', $code)" />
</xsl:otherwise>
</xsl:choose>
</xsl:template>
</xsl:stylesheet>
BlueCoat XSLT Translation
(
Download BlueCoat.xslt
)
Refreshing the current event will show the output pane contains
<?xml version="1.1" encoding="UTF-8"?>
<Events
xmlns="event-logging:3"
xmlns:stroom="stroom"
xmlns:xsi="http://www.w3.org/2001/XMLSchema-instance"
xmlns:xs="http://www.w3.org/2001/XMLSchema"
xsi:schemaLocation="event-logging:3 file://event-logging-v3.2.4.xsd"
Version="3.2.4">
<Event>
<EventTime>
<TimeCreated>2005-05-04T17:16:12.000Z</TimeCreated>
</EventTime>
<EventSource>
<System>
<Name>Site http://log-sharing.dreamhosters.com/ Bluecoat Logs</Name>
<Environment>Development</Environment>
</System>
<Generator>Bluecoat Software: SGOS 3.2.4.28 Version: 1.0</Generator>
<Device>
<IPAddress>192.16.170.42</IPAddress>
<Data Name="ServiceType" Value="SG-HTTP-Service" />
</Device>
<Client>
<IPAddress>45.110.2.82</IPAddress>
</Client>
<Server>
<HostName>www.inmobus.com</HostName>
</Server>
<User>
<Id>george</Id>
</User>
<Data Name="MyMeta" Value="FQDN:somenode.strmdev00.org\nipaddress:192.168.2.220\nipaddress_eth0:192.168.2.220\nipaddress_lo:127.0.0.1\nipaddress_virbr0:192.168.122.1\n" />
</EventSource>
<EventDetail>
<TypeId>Bluecoat-GET-http</TypeId>
<Description>Receipt of information from a Resource via Proxy</Description>
<Receive>
<Source>
<Device>
<IPAddress>45.110.2.82</IPAddress>
</Device>
</Source>
<Destination>
<Device>
<HostName>www.inmobus.com</HostName>
</Device>
</Destination>
<Payload>
<Resource>
<URL>http://www.inmobus.com/wcm/assets/images/imagefileicon.gif</URL>
<HTTPMethod>GET</HTTPMethod>
<UserAgent>Mozilla/4.0 (compatible; MSIE 6.0; Windows NT 5.1; SV1; .NET CLR 1.1.4322)</UserAgent>
<InboundSize>941</InboundSize>
<OutboundSize>729</OutboundSize>
<RequestTime>1</RequestTime>
<ResponseCode>200</ResponseCode>
<MimeType>image/gif</MimeType>
<Data Name="s-action" Value="TCP_HIT" />
<Data Name="cs-uri-scheme" Value="http" />
<Data Name="s-hierarchy" Value="DIRECT" />
<Data Name="sc-filter-result" Value="PROXIED" />
<Data Name="x-icap-error-code" Value="none" />
</Resource>
</Payload>
</Receive>
</EventDetail>
</Event>
</Events>
for the given input
<?xml version="1.1" encoding="UTF-8"?>
<records xmlns="records:2" xmlns:xsi="http://www.w3.org/2001/XMLSchema-instance" xsi:schemaLocation="records:2 file://records-v2.0.xsd" version="2.0">
<record>
<data name="date" value="2005-05-04" />
<data name="time" value="17:16:12" />
<data name="time-taken" value="1" />
<data name="c-ip" value="45.110.2.82" />
<data name="sc-status" value="200" />
<data name="s-action" value="TCP_HIT" />
<data name="sc-bytes" value="941" />
<data name="cs-bytes" value="729" />
<data name="cs-method" value="GET" />
<data name="cs-uri-scheme" value="http" />
<data name="cs-host" value="www.inmobus.com" />
<data name="cs-uri-path" value="/wcm/assets/images/imagefileicon.gif" />
<data name="cs-uri-query" value="-" />
<data name="cs-username" value="george" />
<data name="s-hierarchy" value="DIRECT" />
<data name="s-supplier-name" value="38.112.92.20" />
<data name="rs(Content-Type)" value="image/gif" />
<data name="cs(User-Agent)" value="Mozilla/4.0 (compatible; MSIE 6.0; Windows NT 5.1; SV1; .NET CLR 1.1.4322)" />
<data name="sc-filter-result" value="PROXIED" />
<data name="sc-filter-category" value="none" />
<data name="x-virus-id" value="-" />
<data name="s-ip" value="192.16.170.42" />
<data name="s-sitename" value="SG-HTTP-Service" />
<data name="x-virus-details" value="-" />
<data name="x-icap-error-code" value="none" />
<data name="x-icap-error-details" value="-" />
</record>
</records>
Do not forget to Save the translation as we are complete.
Schema Validation
One last point, validating the use of the Stroom Event Logging Schema is performed in the schemaFilter component of the pipeline.
Had our translation resulted in a malformed Event, this pipeline component displays any errors.
In the screen below, we have purposely changed the EventTime/TimeCreated element to be EventTime/TimeCreatd (misspelled).
If one selects the schemaFilter component and then Refresh the current step, we will see that
-
there is an error as indicated by a square Red box in the top right hand corner
-
there is a Red rectangle line indicator mark on the right hand side in the display slide bar
-
there is a Red error marker in the left hand gutter.

Hovering over the error marker on the left hand side will bring a pop-up describing the error.

At this point, close the BlueCoat-Proxy-V1.0-EVENTS stepping tab, acknowledging you do not want to save your errant changes
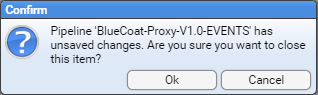
by pressing the button.
Automated Processing
Now that we have authored our translation, we want to enable Stroom to automatically process streams of raw event log data as it arrives.
We do this by configuring a Processor in the BlueCoat-Proxy-V1.0-EVENTS pipeline.
Adding a Pipeline Processor
Open the BlueCoat-Proxy-V1.0-EVENTS pipeline by selecting it (double left click) in the Explorer display to show
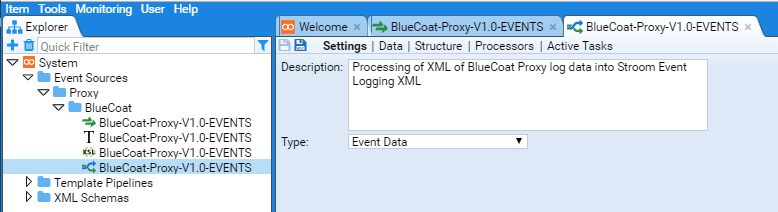
To configure a Processor we select the Processors hyper-link of the BlueCoat-Proxy-V1.0-EVENTS Pipeline tab to reveal

We add a Processor by pressing the add processor button in the top left hand corner.
At this point, you will be presented with an Add Filter configuration window.
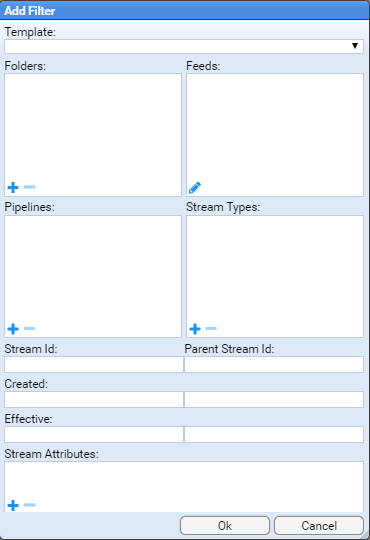
As we wish to create a Processor that will automatically process all BlueCoat-Proxy-V1.0-EVENTS feed Raw Events we will select the BlueCoat-Proxy-V1.0-EVENTS Feed and Raw Event Stream Type.
To select the feed, we press the Edit button .
At this, the Choose Feeds To Include And Exclude configuration window is displayed.
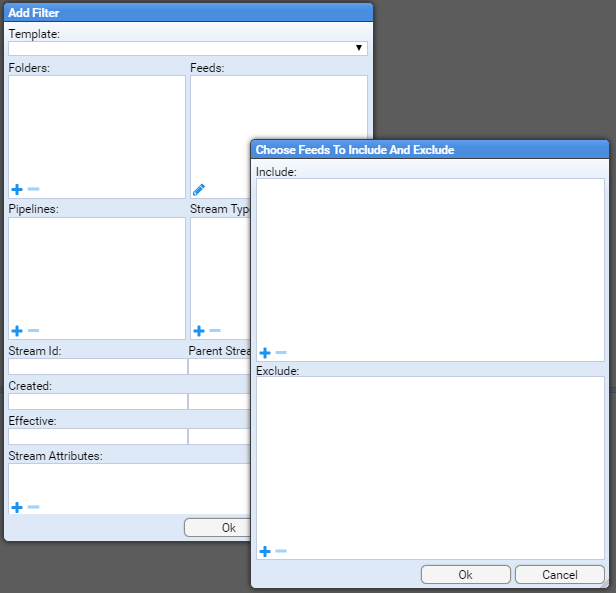
As we need to Include the BlueCoat-Proxy-V1.0-EVENTS Feed in our selection, press the button in the Include: pane of the window to be presented with a Choose Item configuration window.
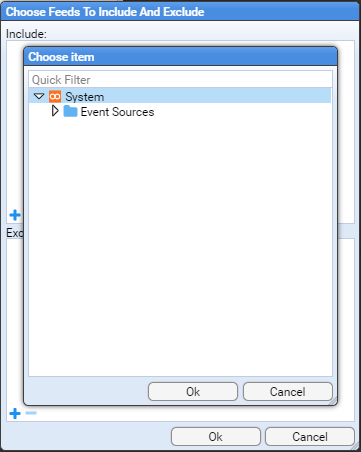
Navigate to the Event Sources/Proxy/BlueCoat folder and select the BlueCoat-Proxy-V1.0-EVENTS Feed
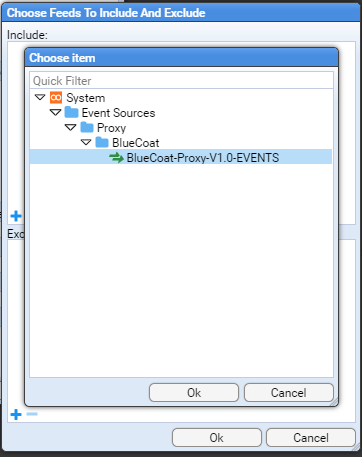
then press the button to select and see that the feed is included.
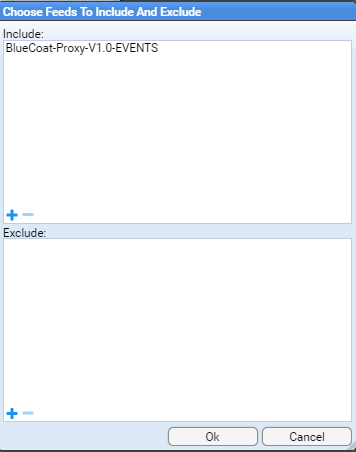
Again press the
button to close the Choose Feeds To Include And Exclude window to show that we have selected our feed in the Feeds: selection pane of the Add Filter configuration window.
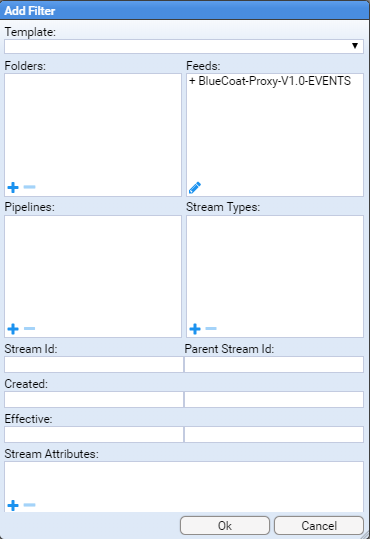
We now need to select our Stream Type.
Press the button in the Stream Types: pane of the window to be presented with a Add Stream Type window with a Stream Type: selection drop down.
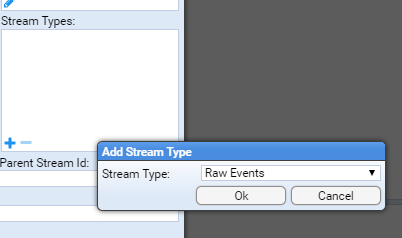
We select (left click) the drop down selection to display the types of Stream we can choose
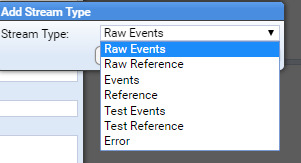
and as we are selecting Raw Events we select that item then press the
button at which point we see that our Add Filter configuration window displays
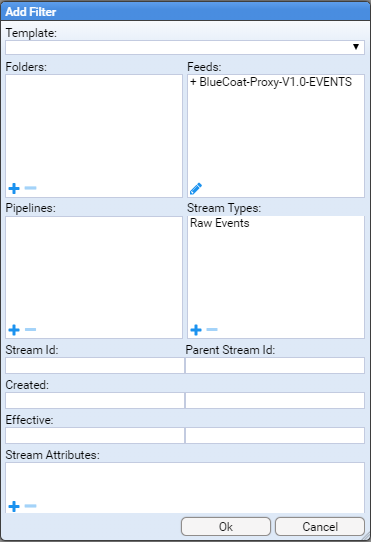
As we have selected our filter items, press the button to display our configured Processors.
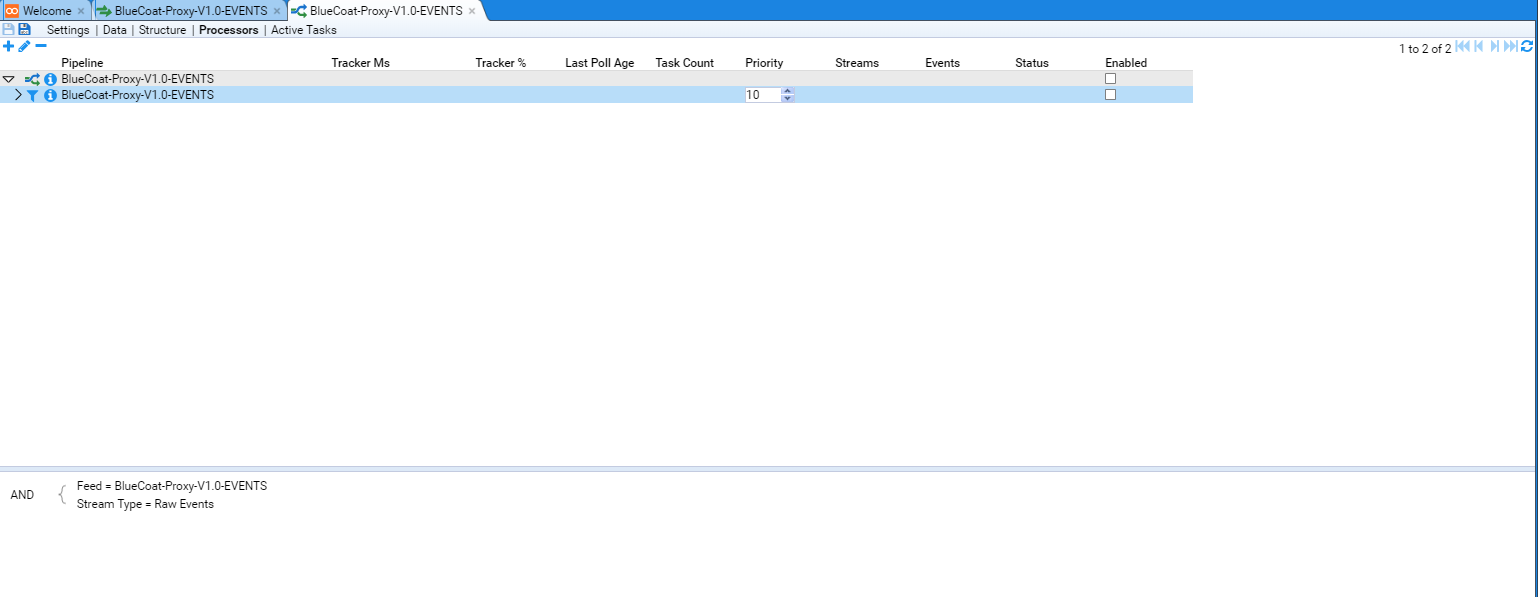
We now see our display is divided into two panes.
The Processors table pane at the top and the specific Processor pane below.
In our case, our filter selection has left the BlueCoat-Proxy-V1.0-EVENTS Filter selected in the Processors table

and the specific filter’s details in the bottom pane.

The column entries in the Processors Table pane describe
- Pipeline - the name of the Processor pipeline ()
- Tracker Ms - the last time the tracker updated
- Tracker % - the percentage of available streams completed
- Last Poll Age - the last time the processor found new streams to process
- Task Count - the number of processor tasks currently running
- Priority - the queue scheduling priority of task submission to available stream processors
- Streams - the number of streams that have been processed (includes currently running streams)
- Events - ??
- Status - the status of the processor.
- Normally empty if the number of stream is open-ended.
- If only are subset of streams were chosen (e.g. a time range in the filter) then the status will be Complete
- Enabled - check box to indicate the processor is enabled
We now need only Enable both the pipeline Processor and the pipeline Filter for automatic processing to occur.
We do this by selecting both check boxes in the Enabled column.

If we refresh our Processor table by pressing the button in the top right hand corner, we will see that more table entries have been filled in.

We see that the tracker last updated at 2018-07-14T04:00:35.289Z, the percentage complete is 100 (we only had one stream after all), the last time active streams were checked for was 2.3 minutes ago, there are no tasks running and that 1 stream has completed.
Note that the Status column is blank as we have an open ended filter in that the processor will continue to select and process any new stream of Raw Events coming into the BlueCoat-Proxy-V1.0-EVENTS feed.
If we return to the BlueCoat-Proxy-V1.0-EVENTS* Feed tab, ensuring the Data hyper-link is selected and then refresh () the top pane that holds the summary of the latest Feed streams

We see a new entry in the table. The columns display
- Created - The time the stream was created.
- Type - The type of stream.
Our new entry has a type of ‘Events’ as we have processed our
Raw Eventsdata. - Feed - The name of the stream’s feed
- Pipeline - The name of the pipeline involved in the generation of the stream
- Raw - The size in bytes of the raw stream data
- Disk - The size in bytes of the raw stream data when stored in compressed form on the disk
- Read - The number of records read by a pipeline
- Write - The number of records (events) written by a pipeline.
In this case the difference is that we did not generate events for the
SoftwareorVersionrecords we read. - Fatal - The number of fatal errors the pipeline encountered when processing this stream
- Error - The number of errors the pipeline encountered when processing this stream
- Warn - The number of warnings the pipeline encountered when processing this stream
- Info - The number of informational alerts the pipeline encountered when processing this stream
- Retention - The retention period for this stream of data
If we also refresh () the specific feed pane (middle) we again see a new entry of the Events Type

If we select (left click) on the Events Type in either pane, we will see that the data pane displays the first event in the GCHQ Stroom Event Logging XML Schema form.
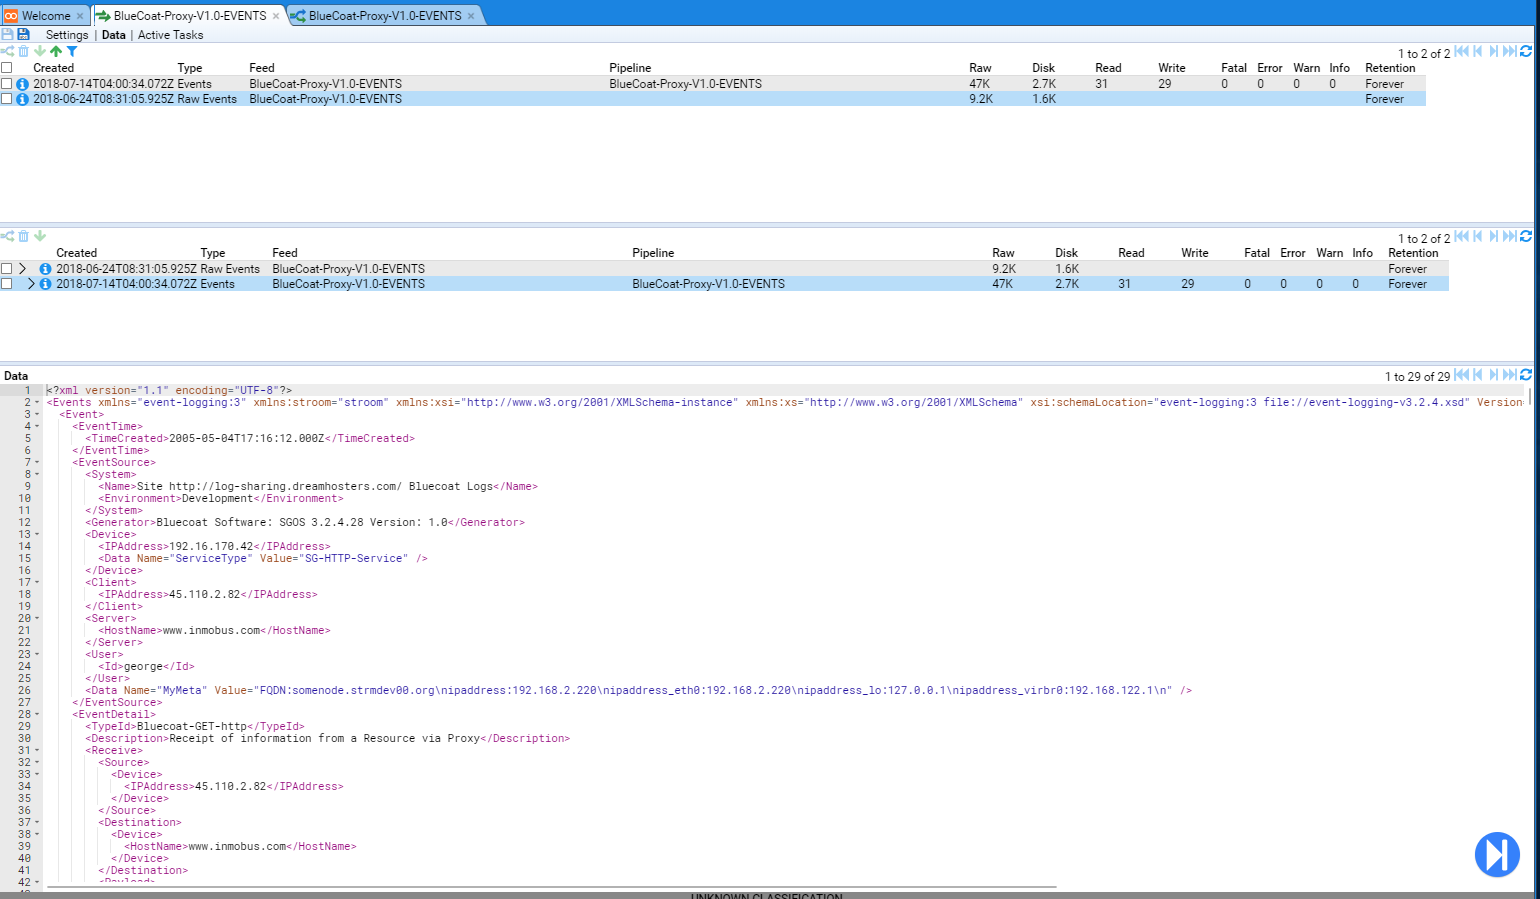
We can now send a file of BlueCoat Proxy logs to our Stroom instance from a Linux host using curl command and see how Stroom will automatically processes the file. Use the command
After Stroom’s Proxy aggregation has occurred, we will see that the new file posted via curl has been loaded into Stroom as per

and this new Raw Event stream is automatically processed a few seconds later as per

We note that since we have used the same sample file again, the Stream sizes and record counts are the same.
If we switch to the Processors tab of the pipeline we see that the Tracker timestamp has changed and the number of Streams processed has increased.

4.6 - Reference Feeds
4.6.1 - Use a Reference Feed
How to use a reference data feed to perform temporal lookups to enrich events.
Introduction
Reference feeds are temporal stores of reference data that a translation can look up to enhance an Event with additional data.
For example, rather than storing a person’s full name and phone number in every event, we can just store their user id and, based on this value, look up the associated user data and decorate the event.
In the description below, we will make use of the GeoHost-V1.0-REFERENCE reference feed defined in separate HOWTO document.
Using a Reference Feed
To use a Reference Feed, one uses the Stroom xslt function stroom:lookup(). This function is found within the xml namespace xmlns:stroom=“stroom”.
The lookup function has two mandatory arguments and three optional as per
- lookup(String map, String key) Look up a reference data map using the period start time
- lookup(String map, String key, String time) Look up a reference data map using a specified time, e.g. the event time
- lookup(String map, String key, String time, Boolean ignoreWarnings) Look up a reference data map using a specified time, e.g. the event time, and ignore any warnings generated by a failed lookup
- lookup(String map, String key, String time, Boolean ignoreWarnings, Boolean trace) Look up a reference data map using a specified time, e.g. the event time, ignore any warnings generated by a failed lookup and get trace information for the path taken to resolve the lookup.
Let’s say, we have the Event fragment
<Event>
<EventTime>
<TimeCreated>2020-01-18T20:39:04.000Z</TimeCreated>
</EventTime>
<EventSource>
<System>
<Name>LinuxWebServer</Name>
<Environment>Production</Environment>
</System>
<Generator>Apache HTTPD</Generator>
<Device>
<HostName>stroomnode00.strmdev00.org</HostName>
<IPAddress>192.168.2.245</IPAddress>
</Device>
<Client>
<IPAddress>192.168.4.220</IPAddress>
<Port>61801</Port>
</Client>
<Server>
<HostName>stroomnode00.strmdev00.org</HostName>
<Port>443</Port>
</Server>
...
</EventSource>
then the following XSLT would lookup our GeoHost-V1.0-REFERENCE Reference map to find the FQDN of our client
<xsl:variable name="chost" select="stroom:lookup('IP_TO_FQDN', data[@name = 'clientip']/@value)" />
And the XSLT to find the IP Address for our Server would be
<xsl:variable name="sipaddr" select="stroom:lookup('FQDN_TO_IP', data[@name = 'vserver']/@value)" />
In practice, one would also pass the time element as well as setting ignoreWarnings to true(). i.e.
<xsl:variable name="chost" select="stroom:lookup('IP_TO_FQDN', data[@name = 'clientip']/@value, $formattedDate, true())" />
...
<xsl:variable name="sipaddr" select="stroom:lookup('FQDN_TO_IP', data[@name = 'vserver']/@value, $formattedDate, true())" />
Modifying an Event Feed to use a Reference Feed
We will now modify an Event feed to have it lookup our GeoHost-V1.0-REFERENCE reference maps to add additional information to the event.
The feed for this exercise is the Apache-SSL-BlackBox-V2.0-EVENTS event feed which processes Apache HTTPD SSL logs which make use of a variation on the BlackBox log format.
We will step through a Raw Event stream and modify the translation directly.
This way, we see the changes directly.
Using the Explorer pane’s Quick Filter, entry box, we will find the Apache feed.
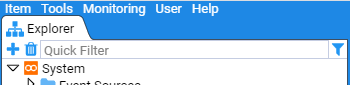
First, select the Quick Filter text entry box and type Apache (the Quick Filter is case insensitive).
At this you will see the Explorer pane system group structure reduce down to just the Event Sources.
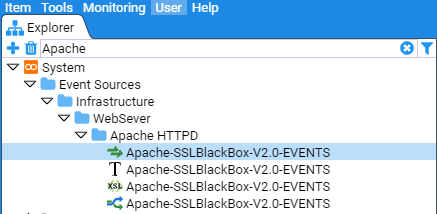
The Explorer pane will display any resources that match our Apache string.
Double clicking on the Apache-SSL-BlackBox-V2.0-EVENTS Feed will select it, and bring up the Feed’s tab in the main window.
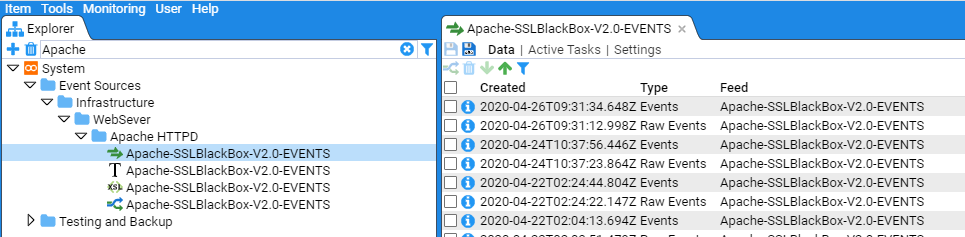
We click on the tab’s Data sub-item and then select the most recent Raw Events stream.
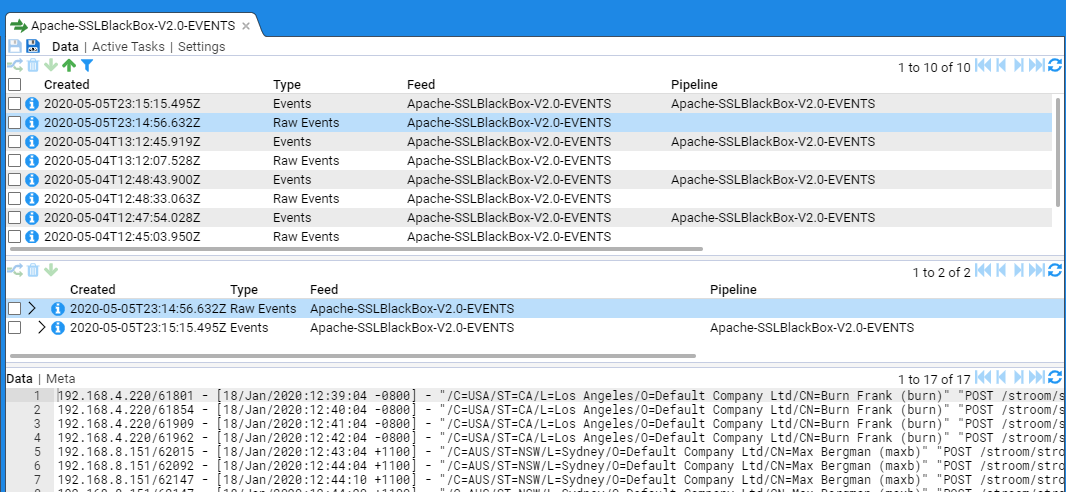
Now, select the check box on the Raw Events stream in the Specific Stream (middle) pane.
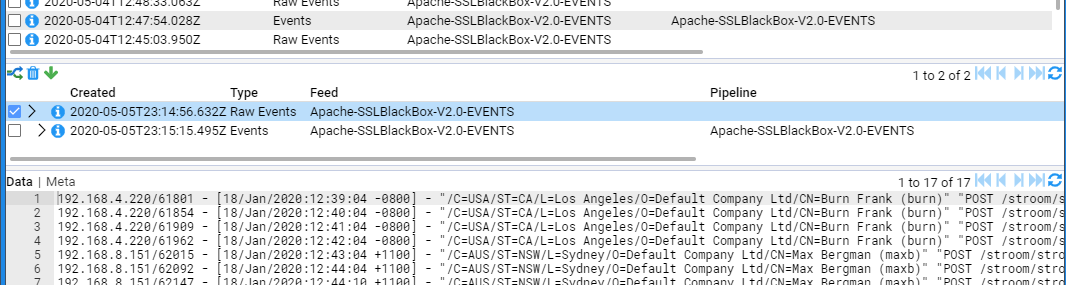
Note that, when we check the box, we see that the Process, Delete and Download icons ( ) are enabled.
We enter Stepping Mode by pressing the stepping button found at the bottom right corner of the Data/Meta-data pane. You will then be requested to choose a pipeline to step with, with the selection already pre-selected
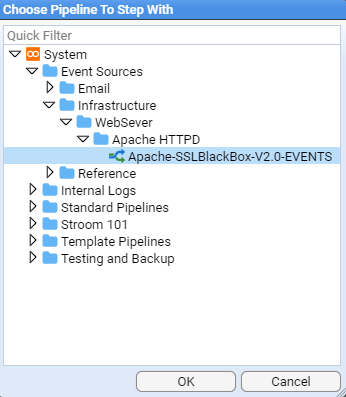
This auto pre-selection is a simple pattern matching action by Stroom. Press OK to start the stepping which displays the pipeline stepping tab
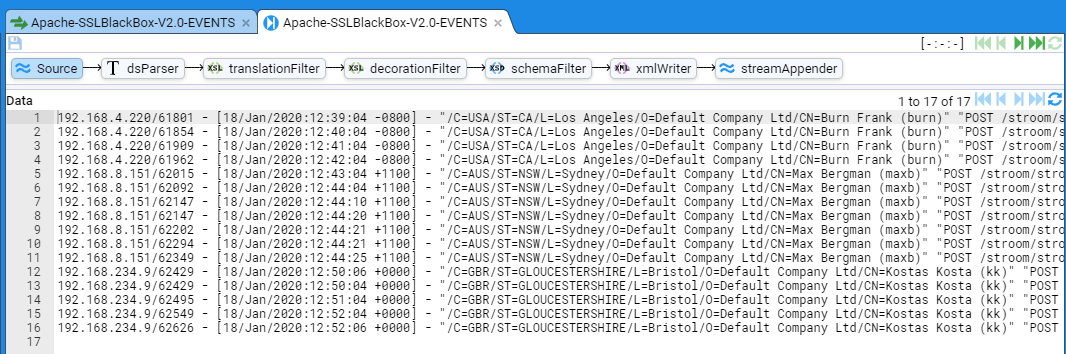
Select the translationFilter element to reveal the translation we plan to modify.

To bring up the first event from the stream, press the Step Forward button to show
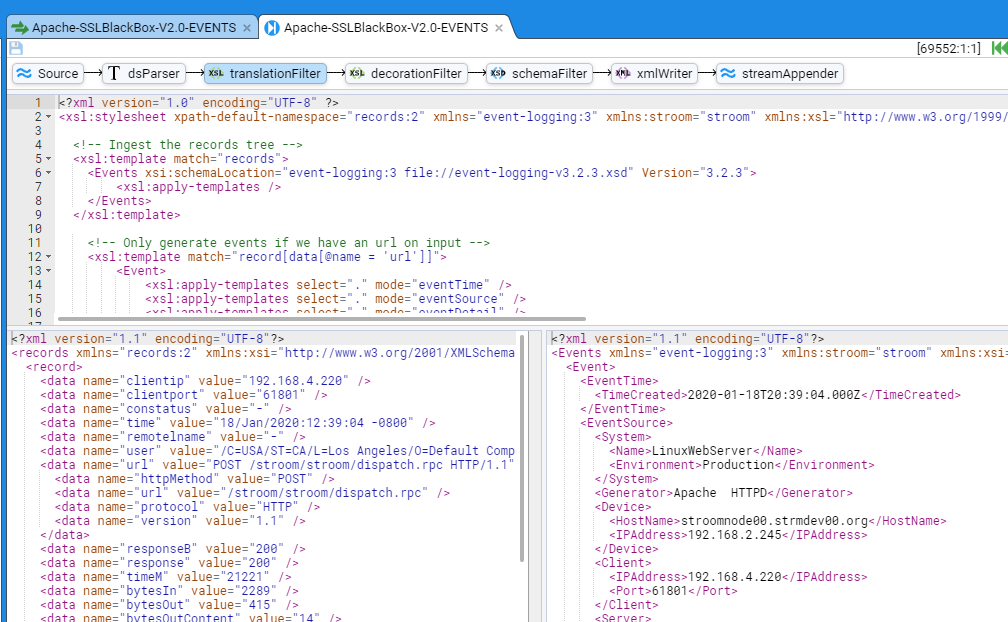
We scroll the translation pane to show the XSLT segment that deals with the
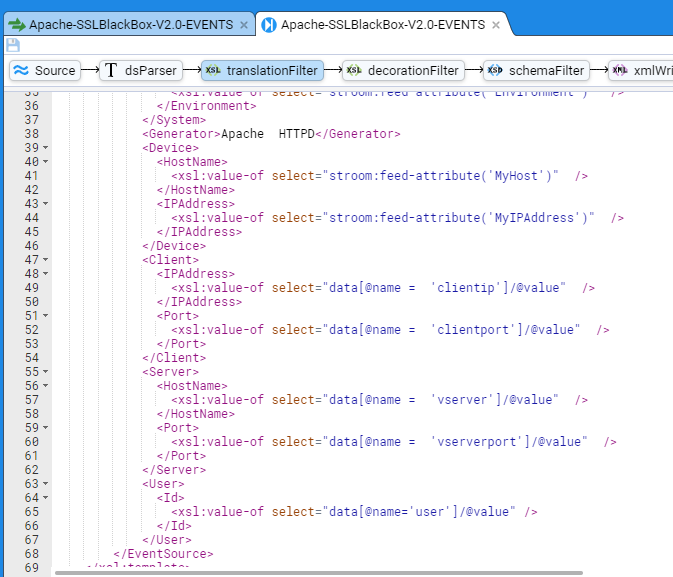
and also scroll the translation output pane to display the
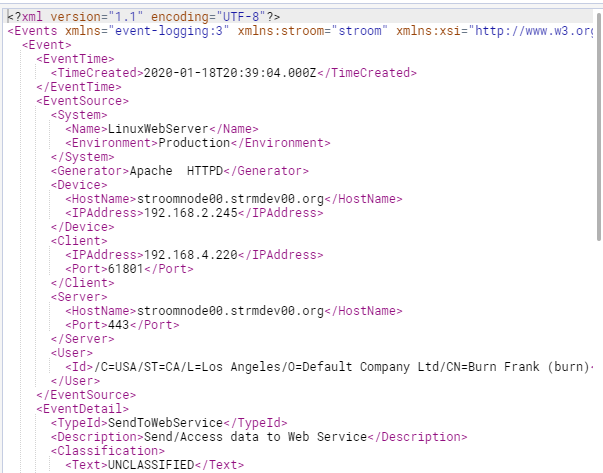
We modify the Client xslt segment to change
<Client>
<IPAddress>
<xsl:value-of select="data[@name = 'clientip']/@value" />
</IPAddress>
<Port>
<xsl:value-of select="data[@name = 'clientport']/@value" />
</Port>
</Client>
to
<Client>
<xsl:variable name="chost" select="stroom:lookup('IP_TO_FQDN', data[@name = 'clientip']/@value)" />
<xsl:if test="$chost">"
<HostName>
<xsl:value-of select="$chost" />
</HostName>
</xsl:if>
<IPAddress>
<xsl:value-of select="data[@name = 'clientip']/@value" />
</IPAddress>
<xsl:if test="data[@name = 'clientport']/@value !='-'">
<Port>
<xsl:value-of select="data[@name = 'clientport']/@value" />
</Port>
</xsl:if>
</Client>
and then we press the Refresh Current Step icon .
BUT NOTHING CHANGES !!!
Not quite, you will note in the top right of the translation pane some yellow boxes.

If you click on the top square box, you will see the WARN: 1 selection window
Clicking on the yellow rectangle box below the yellow square box, the translation pane will automatically scroll back to the top of the translation and show the icon.
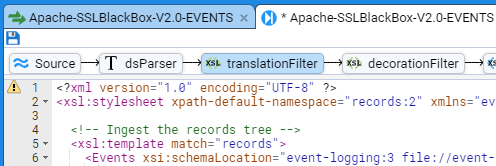
Clicking on the icon will reveal the actual warning message.
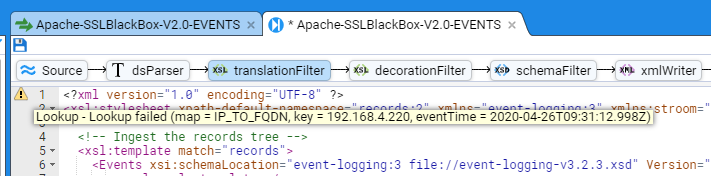
The problem is that, the pipeline cannot find the Reference.
To allow a pipeline to find reference feeds, we need to modify the translation parameters within the pipeline.
The pipeline for this Event feed is called APACHE-SSLBlack-Box-V2.0-EVENTS.
Open this pipeline by double clicking on its entry in the Explorer window
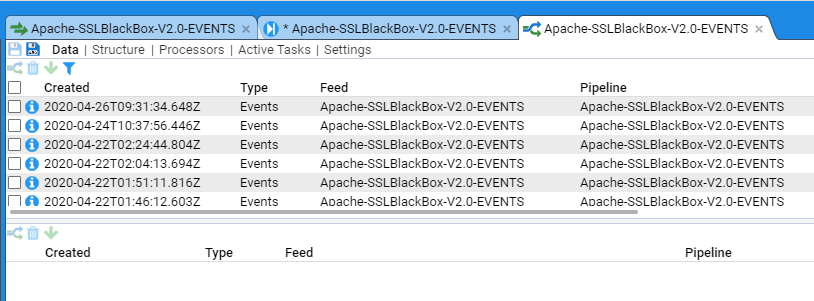
then switch to the Structure sub-item

and then select the translationFilter element to reveal
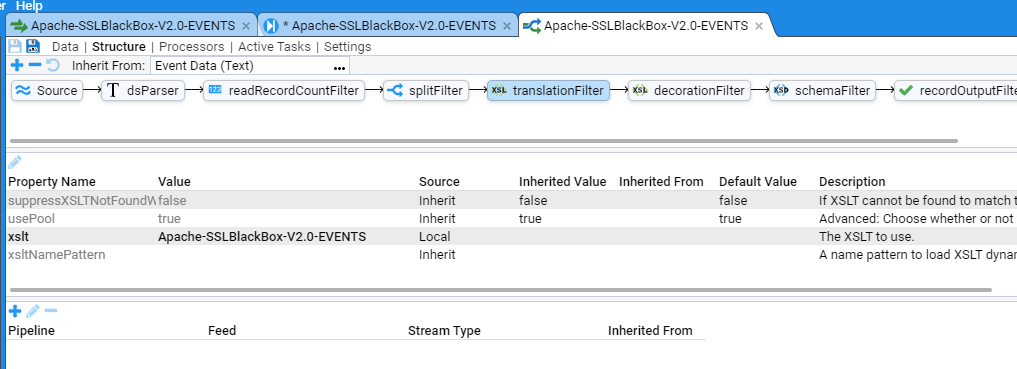
The top pane shows the pipeline, in this case, the selected translation filter element of the pipeline.
The middle pane shows the Properties for this element - we see that it has an xslt property of the APACHE-BlackBoxV2.0-EVENTS translation.
The bottom pane is the one we are interested in.
In the case of translation Filters, this pane allows one to associate Reference streams with the translation Filter.
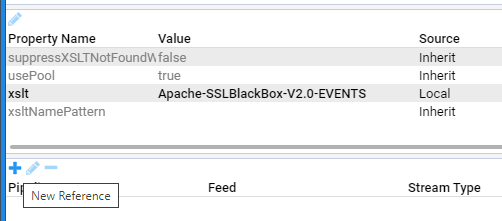
So, to associate our GeoHost-V1.0-REFERENCE reference feed with this translation filter, click on the New Reference icon to bring up the New Pipeline Reference selection window
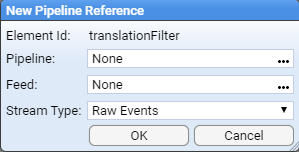
For Pipeline: use the menu selector and choose the Reference Loader pipeline and then press OK
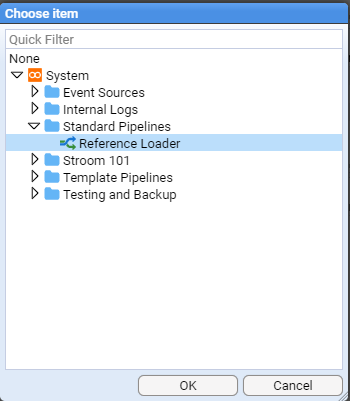
For Feed:, navigate to the reference feed we want, that is the GeoHost-V1.0-REFERENCE reference feed and press OK
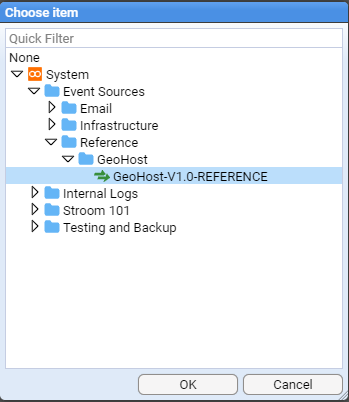
And finally, for Stream Type: choose Reference from the drop-down menu
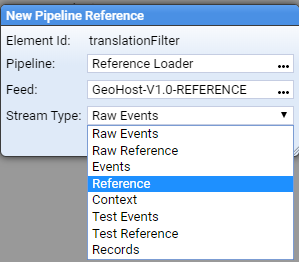
then press OK to save the new reference. We now see
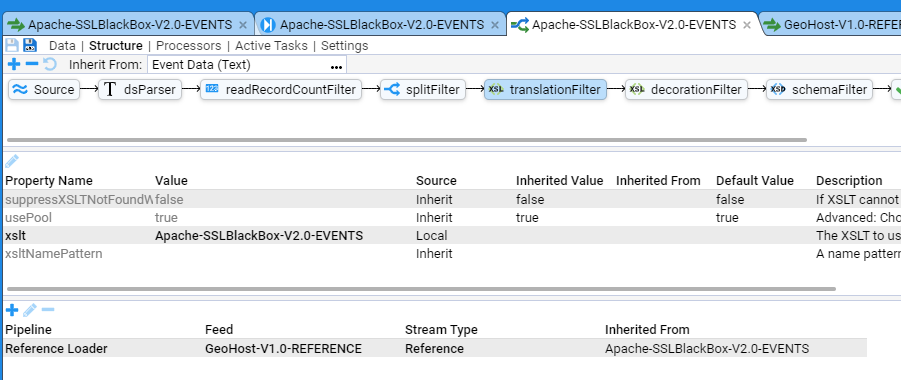
Save these pipeline changes by pressing the icon in the top left then switch back to the APACHE-SSLBlackBox-V2.0-EVENTS stepping tab.
Pressing the Refresh Current Step icon will remove the warning and we now note that the output pane now shows the <Client/HostName> element.
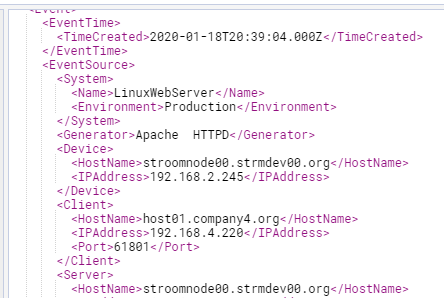
To complete the translation, we will add reference lookups for the <Server/HostName> element and we will also add <Location> elements to both the <Client> and <Server> elements.
The completed code segment looks like
...
<!-- Set some variables to enable lookup functionality -->
<xsl:variable name="formattedDate" select="stroom:format-date(data[@name = 'time']/@value, 'dd/MMM/yyyy:HH:mm:ss XX')" />
<!-- For Version 2.0 of Apache audit we have the virtual server, so this will be our server -->
<xsl:variable name="vServer" select="data[@name = 'vserver']/@value" />
<xsl:variable name="vServerPort" select="data[@name = 'vserverport']/@value" />
...
<!-- -->
<Client>
<!-- See if we can get the client HostName from the given IP address -->
<xsl:variable name="chost" select="stroom:lookup('IP_TO_FQDN',data[@name = 'host']/@value, $formattedDate, true())" />
<xsl:if test="$chost">
<HostName>
<xsl:value-of select="$chost" />
</HostName>
</xsl:if>
<IPAddress>
<xsl:value-of select="data[@name = 'clientip']/@value" />
</IPAddress>
<xsl:if test="data[@name = 'clientport']/@value !='-'">
<Port>
<xsl:value-of select="data[@name = 'clientport']/@value" />
</Port>
</xsl:if>
<!-- See if we can get the client Location for the client FQDN if we have it -->
<xsl:variable name="cloc" select="stroom:lookup('FQDN_TO_LOC', $chost, $formattedDate, true())" />
<xsl:if test="$chost != '' and $cloc">
<xsl:copy-of select="$cloc" />
</xsl:if>
</Client>
<!-- -->
<Server>
<HostName>
<xsl:value-of select="$vServer" />
</HostName>
<!-- See if we can get the service IPAddress -->
<xsl:variable name="sipaddr" select="stroom:lookup('FQDN_TO_IP',$vServer, $formattedDate, true())" />
<xsl:if test="$sipaddr">
<IPAddress>
<xsl:value-of select="$sipaddr" />
</IPAddress>
</xsl:if>
<!-- Server Port Number -->
<xsl:if test="$vServerPort !='-'">
<Port>
<xsl:value-of select="$vServerPort" />
</Port>
</xsl:if>
<!-- See if we can get the Server location -->
<xsl:variable name="sloc" select="stroom:lookup('FQDN_TO_LOC', $vServer, $formattedDate, true())" />
<xsl:if test="$sloc">
<xsl:copy-of select="$sloc" />
</xsl:if>
</Server>
Once the above modifications have been made to the XSLT, save these by pressing the icon in the top left corner of the pane.
Note the use of the fourth Boolean ignoreWarnings argument in the lookups. We set this to true() as we may not always have the item in the reference map we want and Warnings consume space in the Stroom store file system.
Thus, the fragment from the output pane for our first event shows

and the fragment from the output pane for our last event of this stream shows
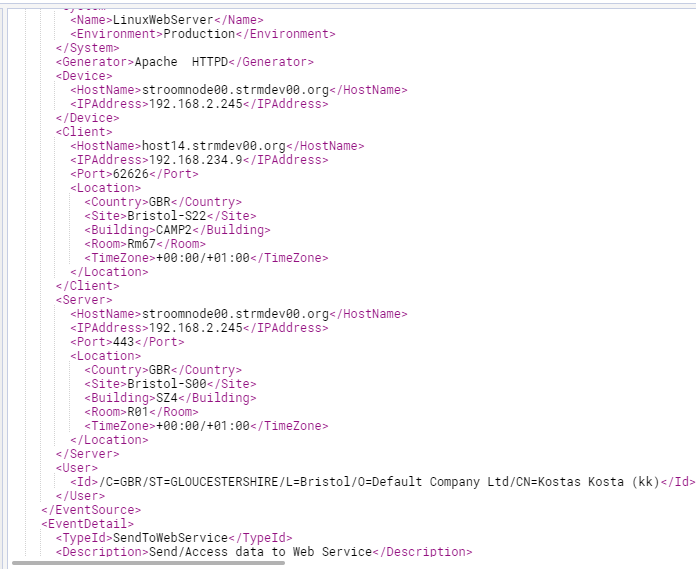
This is the XSLT Translation.
<?xml version="1.0" encoding="UTF-8" ?>
<xsl:stylesheet xpath-default-namespace="records:2" xmlns="event-logging:3" xmlns:stroom="stroom" xmlns:xsl="http://www.w3.org/1999/XSL/Transform" xmlns:xsi="http://www.w3.org/2001/XMLSchema-instance" xmlns:xs="http://www.w3.org/2001/XMLSchema" version="3.0">
<!-- Ingest the records tree -->
<xsl:template match="records">
<Events xsi:schemaLocation="event-logging:3 file://event-logging-v3.2.3.xsd" Version="3.2.3">
<xsl:apply-templates />
</Events>
</xsl:template>
<!-- Only generate events if we have an url on input -->
<xsl:template match="record[data[@name = 'url']]">
<Event>
<xsl:apply-templates select="." mode="eventTime" />
<xsl:apply-templates select="." mode="eventSource" />
<xsl:apply-templates select="." mode="eventDetail" />
</Event>
</xsl:template>
<xsl:template match="node()" mode="eventTime">
<EventTime>
<TimeCreated>
<xsl:value-of select="stroom:format-date(data[@name = 'time']/@value, 'dd/MMM/yyyy:HH:mm:ss XX')" />
</TimeCreated>
</EventTime>
</xsl:template>
<xsl:template match="node()" mode="eventSource">
<!-- Set some variables to enable lookup functionality -->
<xsl:variable name="formattedDate" select="stroom:format-date(data[@name = 'time']/@value, 'dd/MMM/yyyy:HH:mm:ss XX')" />
<!-- For Version 2.0 of Apache audit we have the virtual server, so this will be our server -->
<xsl:variable name="vServer" select="data[@name = 'vserver']/@value" />
<xsl:variable name="vServerPort" select="data[@name = 'vserverport']/@value" />
<EventSource>
<System>
<Name>
<xsl:value-of select="stroom:feed-attribute('System')" />
</Name>
<Environment>
<xsl:value-of select="stroom:feed-attribute('Environment')" />
</Environment>
</System>
<Generator>Apache HTTPD</Generator>
<Device>
<HostName>
<xsl:value-of select="stroom:feed-attribute('MyHost')" />
</HostName>
<IPAddress>
<xsl:value-of select="stroom:feed-attribute('MyIPAddress')" />
</IPAddress>
</Device>
<Client>
<xsl:variable name="chost" select="stroom:lookup('IP_TO_FQDN', data[@name = 'clientip']/@value, $formattedDate, true())" />
<xsl:if test="$chost">
<HostName>
<xsl:value-of select="$chost" />
</HostName>
</xsl:if>
<IPAddress>
<xsl:value-of select="data[@name = 'clientip']/@value" />
</IPAddress>
<xsl:if test="data[@name = 'clientport']/@value !='-'">
<Port>
<xsl:value-of select="data[@name = 'clientport']/@value" />
</Port>
</xsl:if>
<xsl:variable name="cloc" select="stroom:lookup('FQDN_TO_LOC', $chost, $formattedDate, true())" />
<xsl:if test="$chost != '' and $cloc">
<xsl:copy-of select="$cloc" />
</xsl:if>
</Client>
<Server>
<HostName>
<xsl:value-of select="$vServer" />
</HostName>
<!-- See if we can get the service IPAddress -->
<xsl:variable name="sipaddr" select="stroom:lookup('FQDN_TO_IP',$vServer, $formattedDate, true())" />
<xsl:if test="$sipaddr">
<IPAddress>
<xsl:value-of select="$sipaddr" />
</IPAddress>
</xsl:if>
<!-- Server Port Number -->
<xsl:if test="$vServerPort !='-'">
<Port>
<xsl:value-of select="$vServerPort" />
</Port>
</xsl:if>
<!-- See if we can get the Server location -->
<xsl:variable name="sloc" select="stroom:lookup('FQDN_TO_LOC', $vServer, $formattedDate, true())" />
<xsl:if test="$sloc">
<xsl:copy-of select="$sloc" />
</xsl:if>
</Server>
<User>
<Id>
<xsl:value-of select="data[@name='user']/@value" />
</Id>
</User>
</EventSource>
</xsl:template>
<xsl:template match="node()" mode="eventDetail">
<EventDetail>
<TypeId>SendToWebService</TypeId>
<Description>Send/Access data to Web Service</Description>
<Classification>
<Text>UNCLASSIFIED</Text>
</Classification>
<Send>
<Source>
<Device>
<IPAddress>
<xsl:value-of select="data[@name = 'clientip']/@value"/>
</IPAddress>
<Port>
<xsl:value-of select="data[@name = 'vserverport']/@value"/>
</Port>
</Device>
</Source>
<Destination>
<Device>
<HostName>
<xsl:value-of select="data[@name = 'vserver']/@value"/>
</HostName>
<Port>
<xsl:value-of select="data[@name = 'vserverport']/@value"/>
</Port>
</Device>
</Destination>
<Payload>
<Resource>
<URL>
<xsl:value-of select="data[@name = 'url']/@value"/>
</URL>
<Referrer>
<xsl:value-of select="data[@name = 'referer']/@value"/>
</Referrer>
<HTTPMethod>
<xsl:value-of select="data[@name = 'url']/data[@name = 'httpMethod']/@value"/>
</HTTPMethod>
<HTTPVersion>
<xsl:value-of select="data[@name = 'url']/data[@name = 'version']/@value"/>
</HTTPVersion>
<UserAgent>
<xsl:value-of select="data[@name = 'userAgent']/@value"/>
</UserAgent>
<InboundSize>
<xsl:value-of select="data[@name = 'bytesIn']/@value"/>
</InboundSize>
<OutboundSize>
<xsl:value-of select="data[@name = 'bytesOut']/@value"/>
</OutboundSize>
<OutboundContentSize>
<xsl:value-of select="data[@name = 'bytesOutContent']/@value"/>
</OutboundContentSize>
<RequestTime>
<xsl:value-of select="data[@name = 'timeM']/@value"/>
</RequestTime>
<ConnectionStatus>
<xsl:value-of select="data[@name = 'constatus']/@value"/>
</ConnectionStatus>
<InitialResponseCode>
<xsl:value-of select="data[@name = 'responseB']/@value"/>
</InitialResponseCode>
<ResponseCode>
<xsl:value-of select="data[@name = 'response']/@value"/>
</ResponseCode>
<Data Name="Protocol">
<xsl:attribute select="data[@name = 'url']/data[@name = 'protocol']/@value" name="Value"/>
</Data>
</Resource>
</Payload>
<!-- Normally our translation at this point would contain an <Outcome> attribute.
Since all our sample data includes only successful outcomes we have ommitted the <Outcome> attribute
in the translation to minimise complexity-->
</Send>
</EventDetail>
</xsl:template>
</xsl:stylesheet>
Apache BlackBox with Lookups Translation XSLT
(
Download ApacheHPPTDwithLookups-TranslationXSLT.xslt
)
Troubleshooting lookup issues
If your lookup is not working as expected you can use the 5th argument of the lookup function to help investigate the issue.
If we return to the element of the pipeline and change the xslt from
<Client>
<xsl:variable name="chost" select="stroom:lookup('IP_TO_FQDN', data[@name = 'clientip']/@value, $formattedDate, true())" />
to
<Client>
<xsl:variable name="chost" select="stroom:lookup('IP_TO_FQDN', data[@name = 'clientip']/@value, $formattedDate, true(), true())" />
and then we press the Refresh Current Step icon
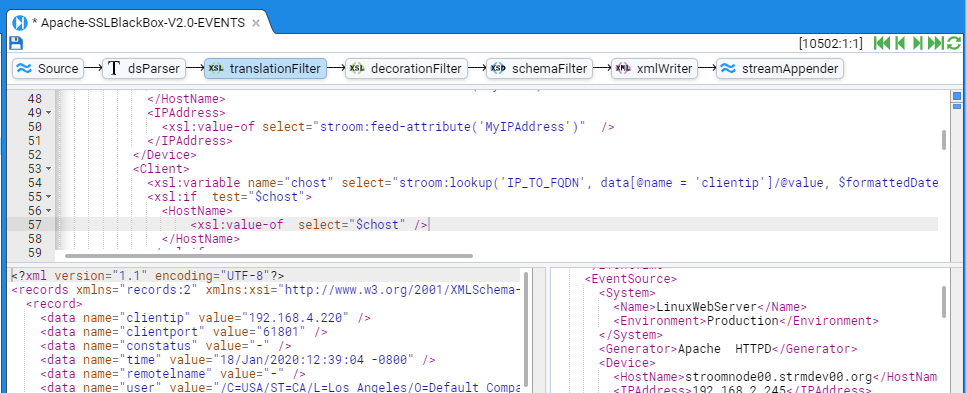
you will notice the two blue squares at the top right of the code pane

If you click on the lower blue square then the code screen will reposition to the beginning of the xslt. Note the icon at the top left of the screen. If you hover over this information icon you will see information about the path taken to resolve the lookup. Hopefully this additional information guides resolution of the lookup issue.
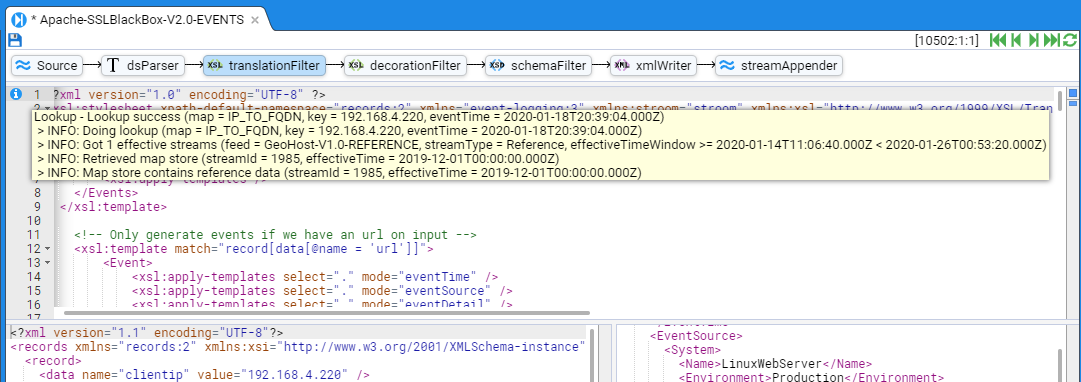
Once you have completed your troubleshooting you can either remove the 5th argument from the lookup function, or set to false.
4.6.2 - Create a Simple Reference Feed
How to create a reference feed for decorating event data using reference data lookups.
Introduction
A Reference Feed is a temporal set of data that a pipeline’s translation can look up to gain additional information to decorate the subject data of the translation. For example, an XML Event.
A Reference Feed is temporal, in that, each time a new set of reference data is loaded into Stroom, the effective date (for the data) is also recorded. Thus by using a timestamp field with the subject data, the appropriate batch of reference data can be accessed.
A typical reference data set to support the Stroom XML Event schema might be one that relates to devices. Such a data set can contain the device logical identifiers such as fully qualified domain name and ip address and their geographical location information such as country, site, building, room and time zone.
The following example will describe how to create a reference feed for such device data.
We will call the reference feed GeoHost-V1.0-REFERENCE.
Reference Data
Our reference data will be supplied in a TAB separated file containing the fields
- the device Fully Qualified Domain Name
- the device IP Address
- the device Country location (using ISO 3166-1 alpha-3 codes)
- the device Site location
- the device Building location
- the device Time Zone location (both standard then daylight time zone offsets from UTC)
For simplicity, our example will use a file with just 5 entries

A copy of this sample data source can be found here. Save a copy of this data to your local environment for use later in this HOWTO. Save this file as a text document with ANSI encoding.
Creation
To create our Reference Event stream we need to create:
- the Feed
- a Pipeline to automatically process and store the Reference data
- a Text Parser to convert the text file into simple XML record format, and
- a Translation to create reference data maps
Create Feed
First, within the Explorer pane, and with the cursor having selected the Event Sources group, right click the mouse to have the object context menu appear.
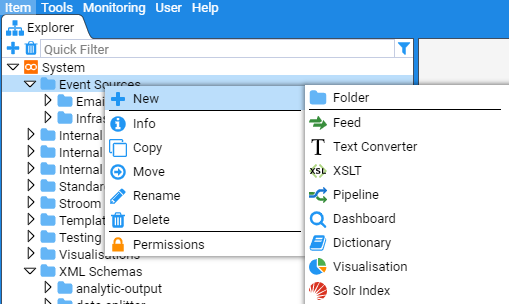
If you hover over the New icon then the New sub-context menu will be revealed.
Now hover the mouse over the Feed icon and right click to select.
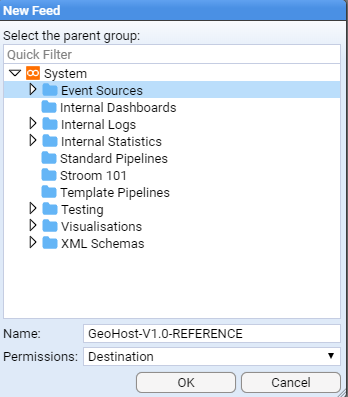
When the New Feed selection windows comes up, navigate to the Event Sources system group.
Then enter the name of the reference feed GeoHost-V1.0-REFERENCE onto the Name: text entry box.
On pressing the
button we will see the following Feed configuration tab appear.
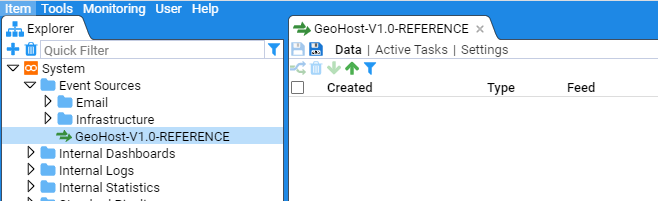
Click on the Settings sub-item in the GeoHost-V1.0-REFERENCE Feed tab to populate the initial Settings configuration.
Enter an appropriate description, classification and click on the Reference Feed check box
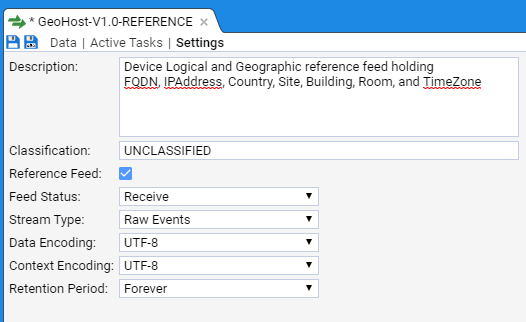
and we then use the Stream Type drop-down menu to set the stream type as Raw Reference. At this point we save our configuration so far, by clicking on the save icon. The save icon becomes ghosted and our feed configuration has been saved.
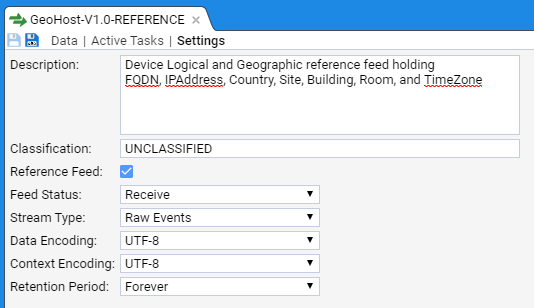
Load sample Reference data
At this point we want to load our sample reference data, in order to develop our reference feed. We can do this two ways - posting the file to our Stroom web server, or directly upload the data using the user interface. For this example we will use Stroom’s user interface upload facility.
First, open the Data sub-item in the GeoHost-V1.0-REFERENCE feed configuration tab to reveal
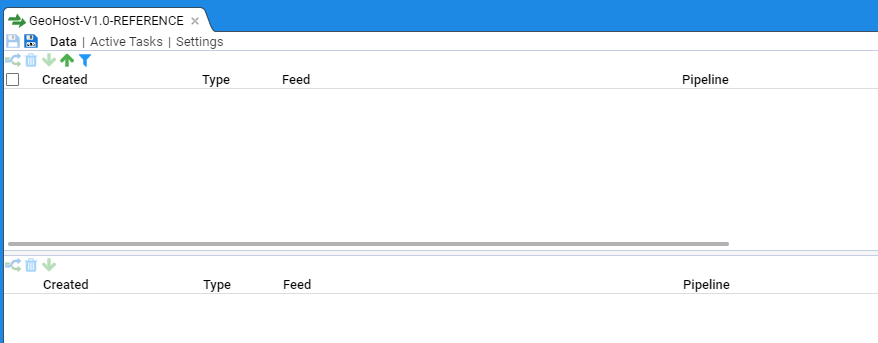
Note the Upload icon in the bottom left of the Stream table (top pane). On clicking the Upload icon, we are presented with the data upload selection window.
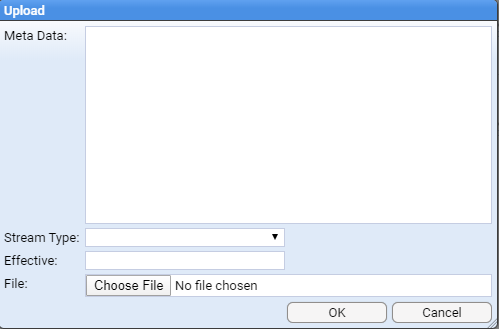
Naturally, as this is a reference feed we are creating and this is raw data we are uploading, we select a Stream Type: of Raw Reference. We need to set the Effective: date (really a timestamp) for this specific stream of reference data. Clicking in the Effective: entry box will cause a calendar selection window to be displayed (initially set to the current date).
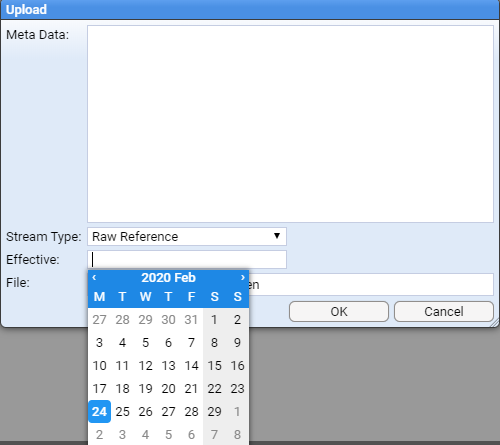
We are going to set the effective date to be late in 2019.
Normally, you would choose a time stamp that matches the generation of the reference data.
Click on the blue Previous Month icon (a less than symbol <) on the Year/Month line to move back to December 2019.

Select the 1st (clicking on 1) at which point the calendar selection window will disappear and a time of 2019-12-01T00:00:00.000Z is displayed. This is the default whenever using the calendar selection window in Stroom - the resultant timestamp is that of the day selected at 00:00:00 (Zulu time). To get the calendar selection window to disappear, click anywhere outside of the timestamp entry box.
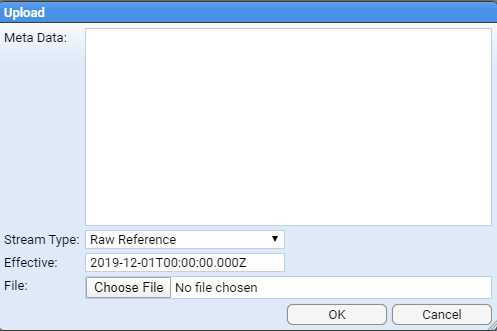
Note, if you happen to click on the button before selecting the File (or Stream Type for that matter), an appropriate Alert dialog box will be displayed
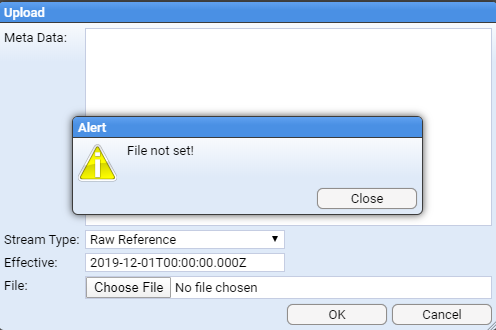
We don’t need to set Meta Data for this stream of reference data, but we (obviously) need to select the file. For the purposes of this example, we will utilise the file GeoHostReference.log you downloaded earlier in the Reference Data section of this document. This file contains a header and five lines of reference data as per
When we construct the pipeline for this reference feed, we will see how to make use of the header line.
So, click on the Choose File button to bring up a file selector window. Navigate within the selector window to the location on your local machine where you have saved the GeoHostReference.log file. On clicking Open we return to the Upload window with the file selected.
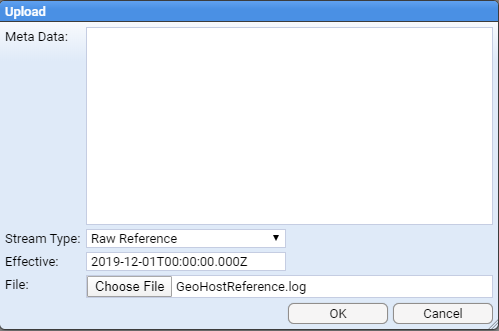
On clicking we get an Alert dialog window to advise a file has been uploaded.

at which point we press Close.
At this point, the Upload selection window closes, and we see our file displayed in the GeoHost-V1.0-REFERENCE Data stream table.
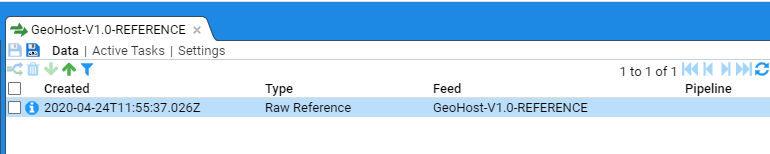
When we click on the newly up-loaded stream in the Stream Table pane we see the other two panes fill with information.

The middle pane shows the selected or Specific feed and any linked streams. A linked stream could be the resultant Reference data set generated from a Raw Reference stream. If errors occur during processing of the stream, then a linked stream could be an Error stream.
The bottom pane displays the selected stream’s data or meta-data. If we click on the Meta link at the top of this pane, we will see the Metadata associated with this stream. We also note that the Meta link at the bottom of the pane is now embolden.
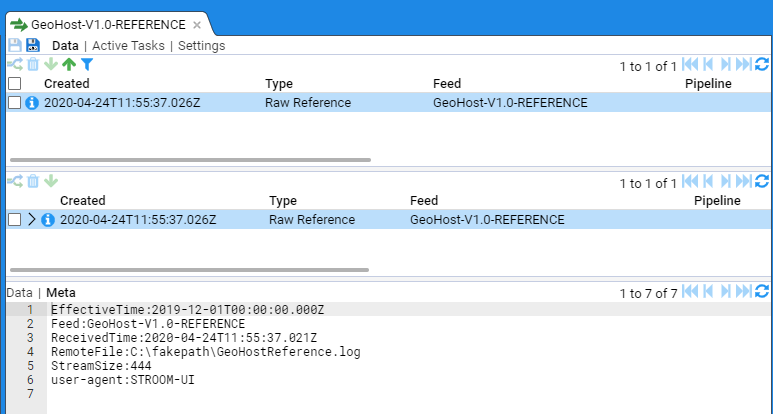
We can see the metadata we set - the EffectiveTime, and implicitly, the Feed but we also see additional fields that Stroom has added that provide more detail about the data and its delivery to Stroom such as how and when it was received. We now need to switch back to the Data display as we need to author our reference feed translation.
Create Pipeline
We now need to create the pipeline for our reference feed so that we can create our translation and hence create reference data for our feed.
Within the Explorer pane, and having selected the Event Sources system group, right click to bring up the object context menu, then the New sub-context menu.
Move to the and left click to select.
When the New Pipeline selection window appears, navigate to, then select the Feeds and Translations system group then enter the name of the reference feed, GeoHost-V1.0-REFERENCE in the Name: text entry box.
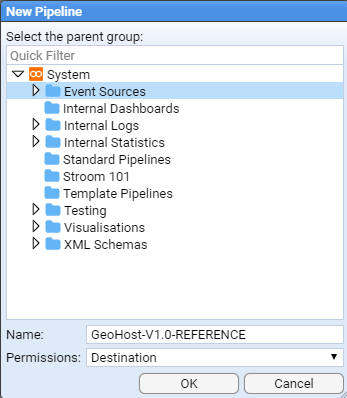
On pressing the button you will be presented with the new pipeline’s configuration tab
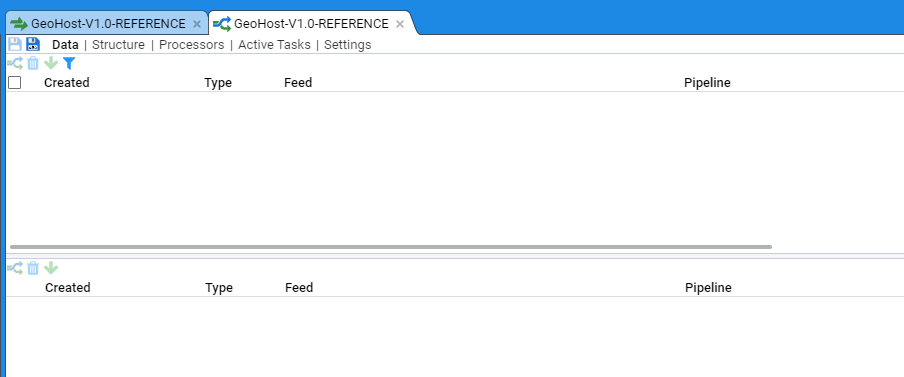
Within Settings, enter an appropriate description as per
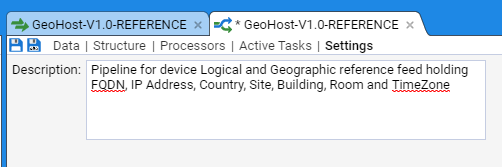
We now need to select the structure this pipeline will use. We need to move from the Settings sub-item on the pipeline configuration tab to the Structure sub-item. This is done by clicking on the Structure link, at which we will see
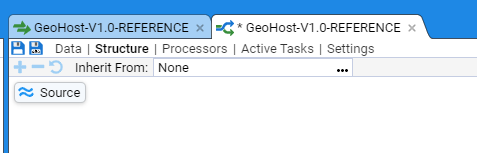
As this pipeline will be processing reference data, we would use a Reference Data pipeline.
This is done by inheriting it from a defined set of Standard Pipelines.
To do this, click on the menu selection icon to the right of the Inherit From: test display box.
When the Choose item selection window appears, navigate to the Template Pipelines system group (if not already displayed), and select (left click) the Reference Data pipeline.
You can find further information about the Template Pipelines
here
.

Then press . At this point we will see the inherited pipeline structure of

Noting that this pipeline has not yet been saved - indicated by the * in the tab label and the highlighted to save, which results in

This ends the first stage of the pipeline creation. We need to author the feed’s translation.
Create Text Converter
To turn our tab delimited data in Stroom reference data, we first need to convert the text into simple XML. We do this using a Text Converter. Test Converters use a Stroom Data Splitter to convert text into simple XML.
Within the Explorer pane, and having selected the Event Sources system group, right click to bring up the object context menu.
Navigate to the item and left click to select.
When the New Text Converter selection window comes up, navigate to and select Event Sources system group, then enter the name of the feed, GeoHost-V1.0-REFERENCE into the Name: text entry box as per
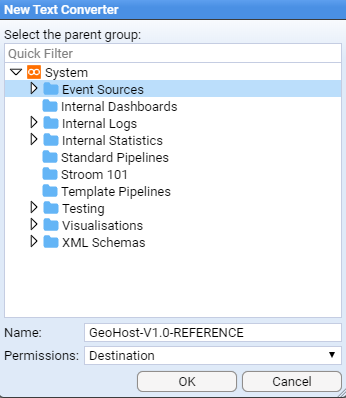
On pressing the button we see the next text converter’s configuration tab displayed.
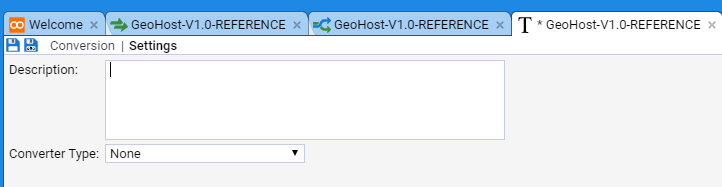
Enter an appropriate description into the Description: text entry box, for instance
Text converter for device Logical and Geographic reference feed holding FQDN, IPAddress, Country, Site, Building, Room and Time Zones.
Feed has a header and is tab separated.
Set the Converter Type: to be Data Splitter from the drop-down menu.

We next press the Conversion sub-item on the TextConverter tab to bring up the Data Splitter editing window.
The following is our Data Splitter code (see Data Splitter documentation for more complete details)
<?xml version="1.1" encoding="UTF-8"?>
<dataSplitter xmlns="data-splitter:3" xmlns:xsi="http://www.w3.org/2001/XMLSchema-instance" xsi:schemaLocation="data-splitter:3 file://data-splitter-v3.0.1.xsd" version="3.0">
<!--
GEOHOST REFERENCE FEED:
CHANGE HISTORY
v1.0.0 - 2020-02-09 John Doe
This is a reference feed for device Logical and Geographic data.
The feed provides for each device
* the device FQDN
* the device IP Address
* the device Country location (using ISO 3166-1 alpha-3 codes)
* the device Site location
* the device Building location
* the device Room location
*the device TimeZone location (both standard then daylight time zone offsets from UTC)
The data is a TAB delimited file with the first line providing headings.
Example data:
FQDN IPAddress Country Site Building Room TimeZones
stroomnode00.strmdev00.org 192.168.2.245 GBR Bristol-S00 GZero R00 +00:00/+01:00
stroomnode01.strmdev01.org 192.168.3.117 AUS Sydney-S04 R6 5-134 +10:00/+11:00
host01.company4.org 192.168.4.220 USA LosAngeles-S19 ILM C5-54-2 -08:00/-07:00
-->
<!-- Match the heading line - split on newline and match a maximum of one line -->
<split delimiter="\n" maxMatch="1">
<!-- Store each heading and note we split fields on the TAB (	) character -->
<group>
<split delimiter="	">
<var id="heading"/>
</split>
</group>
</split>
<!-- Match all other data lines - splitting on newline -->
<split delimiter="\n">
<group>
<!-- Store each field using the column heading number for each column ($heading$1) and note we split fields on the TAB (	) character -->
<split delimiter="	">
<data name="$heading$1" value="$1"/>
</split>
</group>
</split>
</dataSplitter>
At this point we want to save our Text Converter, so click on the icon.
A copy of this data splitter can be found here.
Assign Text Converter to Pipeline
To test our Text Converter, we need to modify our GeoHost-V1.0-REFERENCE pipeline to use it.
Select the GeoHost-V1.0-REFERENCE pipeline tab and then select the Structure sub-item

To associate our new Text Converter with the pipeline, click on the CombinedParser pipeline element then move the cursor to the Property (middle) pane then double click on the textConverter Property Name to allow you to edit the property as per
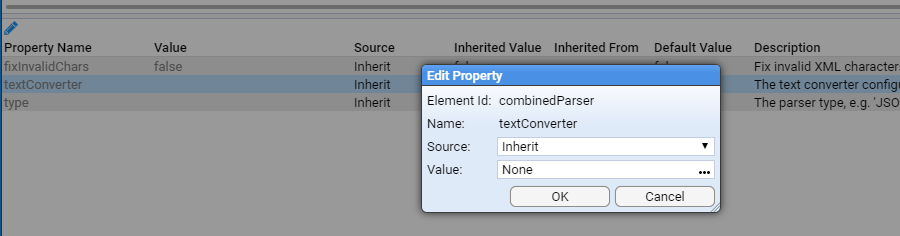
We leave the Property Source: as Inherit but we need to change the Property Value: from None to be our newly created GeoHost-V1.0-REFERENCE text Converter
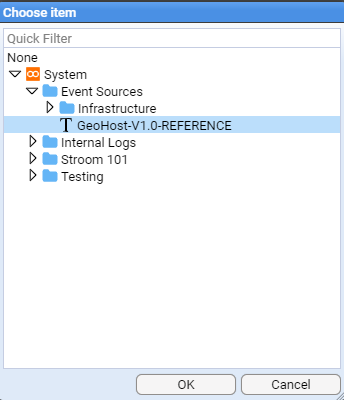
then press . At this point we will see the Property Value set
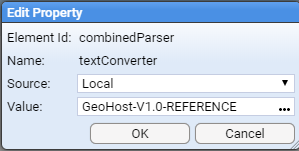
Again press to finish editing this property and we then see that the textConverter property has been set to GeoHost-V1.0-REFERENCE. Similarly set the type property Value to “Data Splitter”.
At this point, we should save our changes, by clicking on the highlighted icon. The combined Parser window panes should now look like
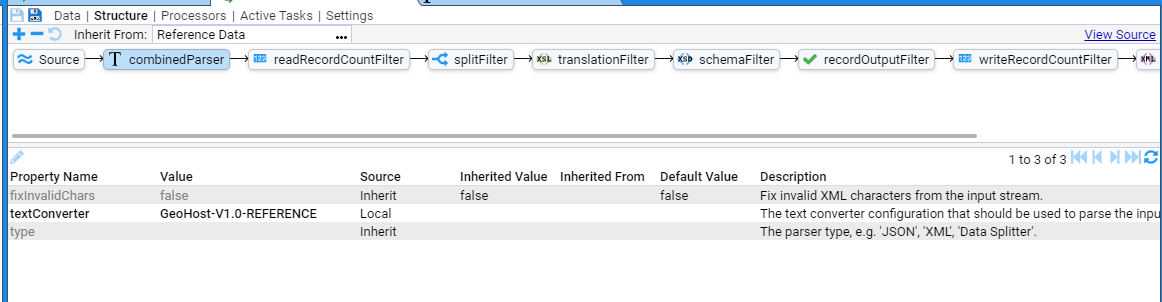
Test Text Converter
To test our Text Converter, we select the GeoHost-V1.0-REFERENCE tab then click on our uploaded stream in the Stream Table pane, then click the check box of the Raw Reference stream in the Specific Stream table (middle pane)
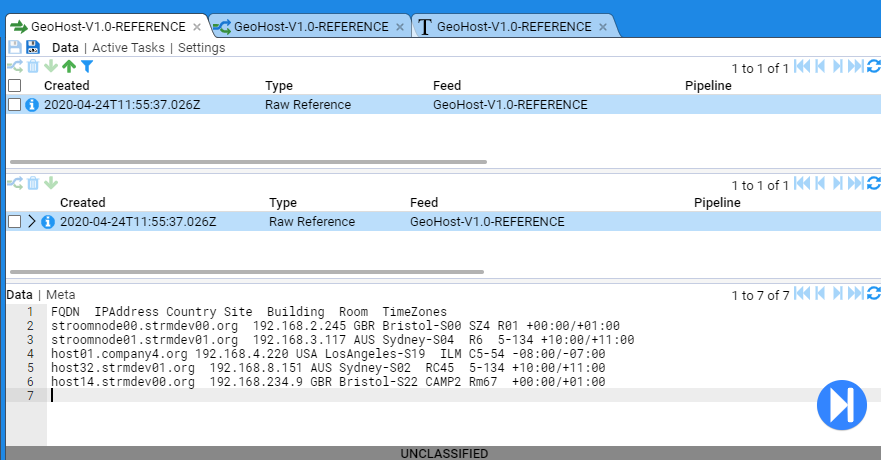
We now want to step our data through the Text Converter. We enter Stepping Mode by pressing the stepping button found at the bottom of the right of the stream Raw Data display.
You will then be requested to choose a pipeline to step with, at which, you should navigate to the GeoHost-V1.0-REFERENCE pipeline as per
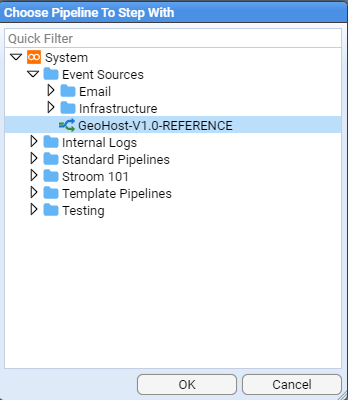
then press .
At this point we enter the pipeline Stepping tab
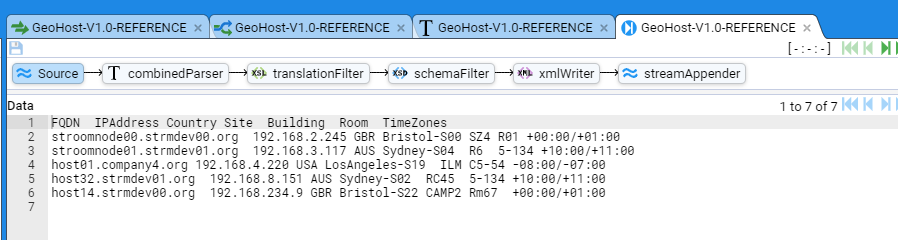
which initially displays the Raw Reference data from our stream.
We click on the CombinedParser icon, to display.
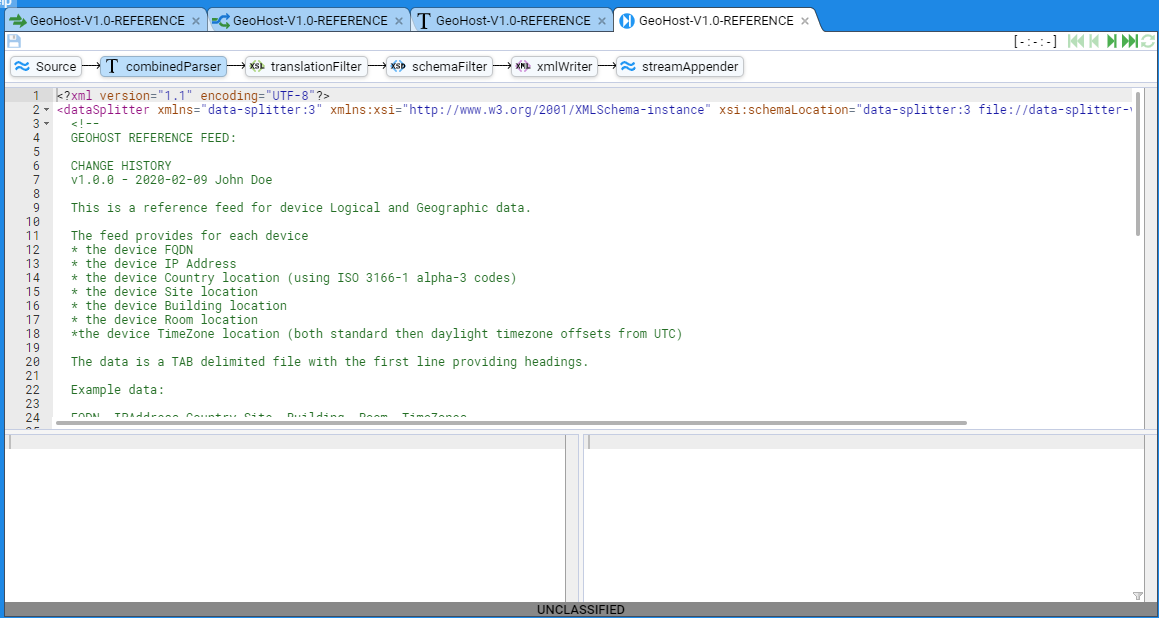
This stepping window is divided into three sub-panes. the top one is the Text Converter editor and it will allow you to adjust the text conversion should you wish too. The bottom left window displays the input to the Text Converter. The bottom right window displays the output from the Text Converter for the given input.
We now click on the pipeline Step Forward button to single step the Raw reference data throughout text converter. We see that the Stepping function has displayed the heading and first data line of our raw reference data in the input sub-pane and the resultant simple records XML (adhering to the Stroom records v2.0 schema) in the output pane.

If we again press the button we see the second line in our raw reference data in the input sub-pane and the resultant simple records XML in the output pane.
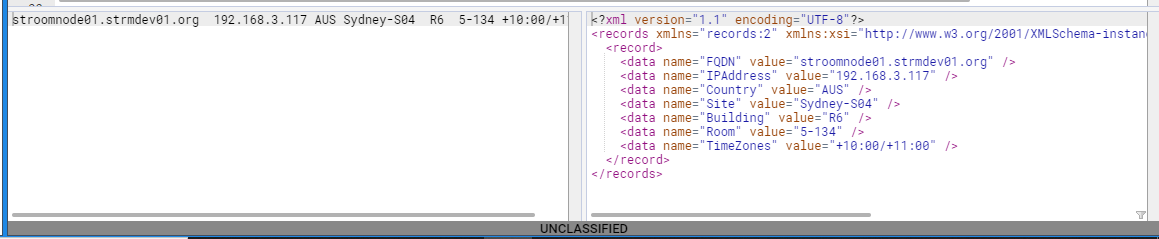
Pressing the Step Forward button again displays our third line of our raw and converted data. Repeat this process to view the fourth and fifth lines of converted data.

We have now successfully tested the Text Converter for our reference feed. Our next step is to author our translation to generate reference data records that Stroom can use.
Create XSLT Translation
We now need to create our translation. This XSLT translation will convert simple records XML data into ReferenceData records - see the Stroom reference-data v2.0.1 Schema for details. More information can be found here .
We first need to create an XSLT translation for our feed. Move back to the Explorer tree, right click on Event Sources folder then select:
When the New XSLT selection window comes up, navigate to the Event Sources system group and enter the name of the reference feed - GeoHost-V1.0-REFERENCE into the Name: text entry box as per
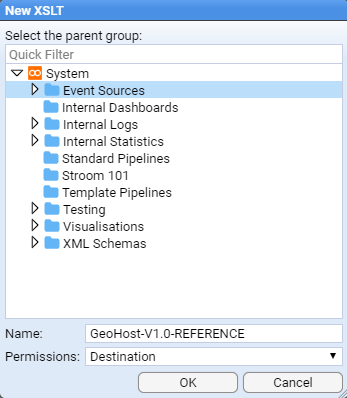
On pressing the button we see the XSL tab for our translation and as previously, we enter an appropriate description before selecting the XSLT sub-item.

On selection of the XSLT sub-item, we are presented with the XSLT editor window

At this point, rather than edit the translation in this editor and then assign this translation to the GeoHost-V1.0-REFERENCE pipeline, we will first make the assignment in the pipeline and then develop the translation whilst stepping through the raw data. This is to demonstrate there are a number of ways to develop a translation.
So, to start, save the XSLT by clicking on the GeoHost-V1.0-REFERENCE Pipeline tab to raise the GeoHost-V1.0-REFERENCE pipeline. Then select the Structure sub-item followed by selecting the translationFilter element. We now see the XSL translationFilter Property Table for our pipeline in the middle pane.
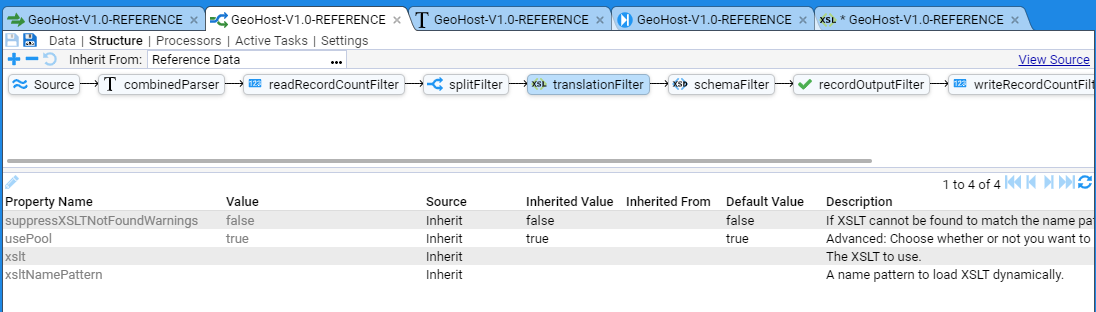
To associate our new translation with the pipeline, move the cursor to the Property Table, click on the greyed out xslt Property Name and then click on the Edit Property icon to allow you to edit the property as per
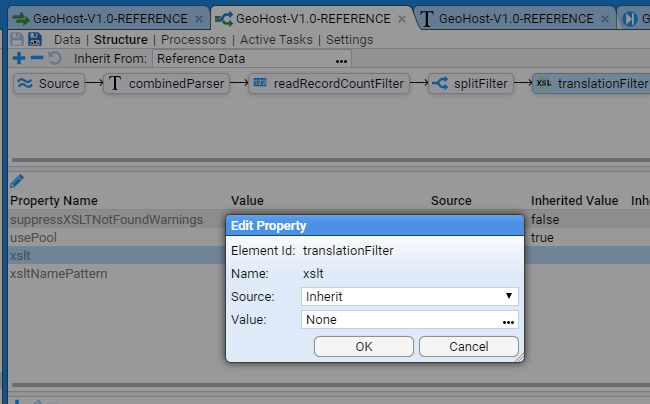
We leave the Property Source: as Inherit and we need to change the Property Value: from None to be our newly created GeoHost-V1.0-REFERENCE XSL translation.
To do this, position the cursor over the menu selection icon of the Value: chooser and right click, at which the Choose item selection window appears.
Navigate to the Event Sources system group then select the GeoHost-V1.0-REFERENCE xsl translation.
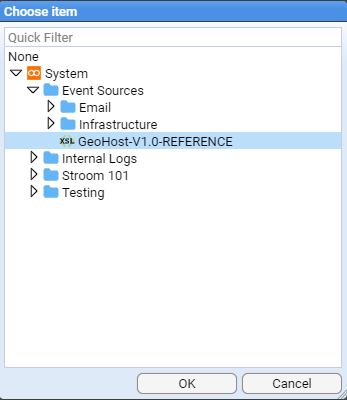
then press . At this point we will see the property Value: set
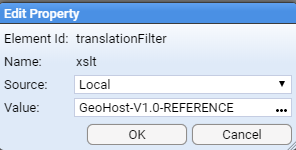
Again press to finish editing this property and we see that the xslt property has been set to GeoHost-V1.0-REFERENCE.

At this point, we should save our changes, by clicking on the highlighted save icon.
Test XSLT Translation
We now go back to the GeoHost-V1.0-REFERENCE tab then click on our uploaded stream in the Stream Table pane. Next click the check box of the Raw Reference stream in the Specific Stream table (middle pane) as per
We now want to step our data through the xslt Translation. We enter Stepping Mode by pressing the stepping button found at the bottom of the right of the stream Raw Data display.
You will then be requested to choose a pipeline to step with, at which, you should navigate to the GeoHost-V1.0-REFERENCE pipeline as per
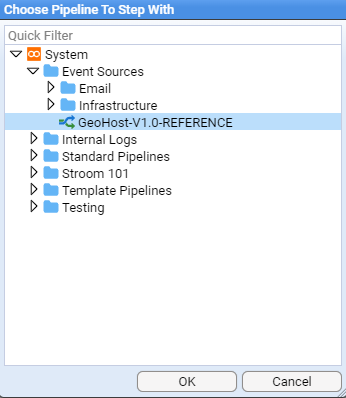
then press .
At this point we enter the pipeline through the Stepping tab
which initially displays the Raw Reference data from our stream.
We click on the translationFilter element to enter the xslt Translation stepping window and all panes are empty.
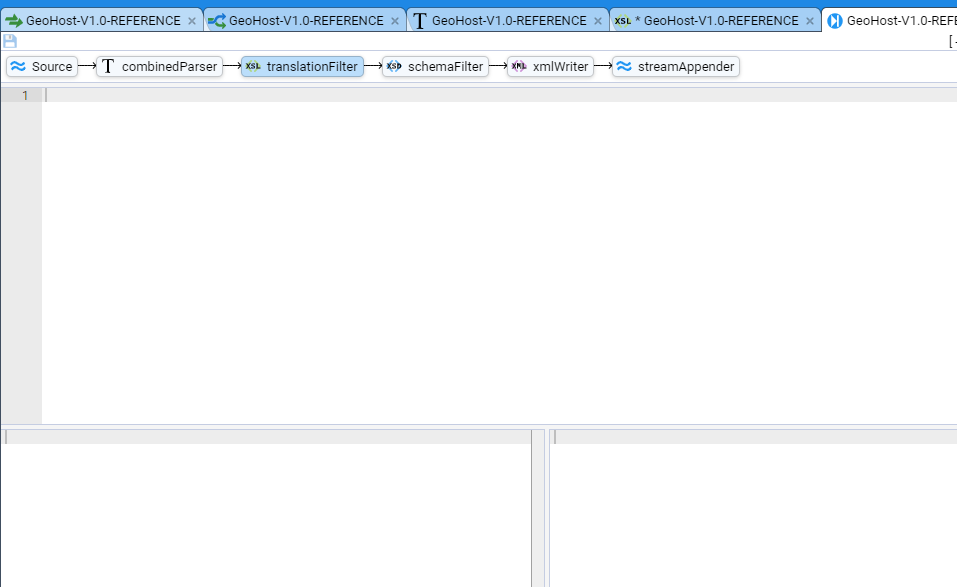
As for the Text Converter, this translation stepping window is divided into three sub-panes. The top one is the XSLT Translation. The bottom right window displays the output from the XSLT Translation for the given input.
We now click on the pipeline Step Forward button to single step the Raw reference data through our translation. We see that the Stepping function has displayed the first records XML entry in the input sub-pane and the same data is displayed in the output sub-pane.
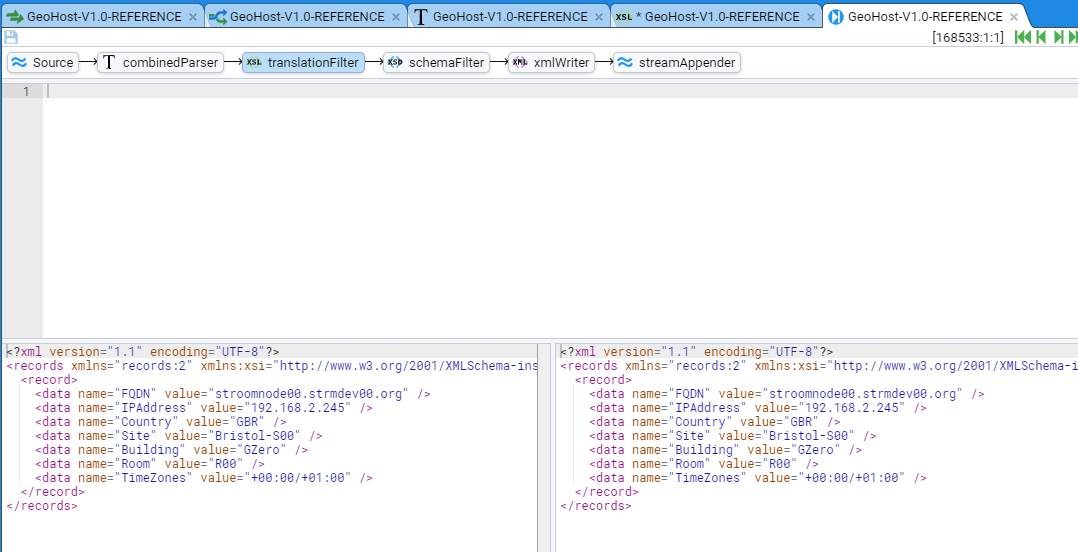
But we also note if we move along the pipeline structure to the icon.
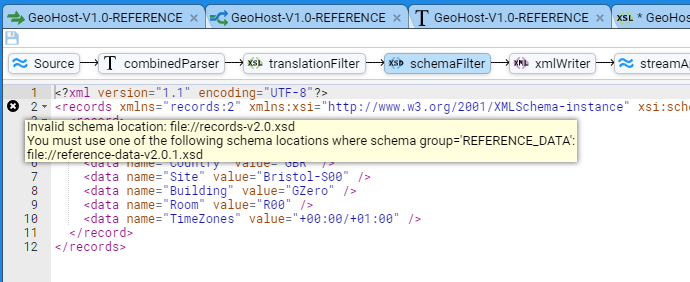
In essence, since the translation has done nothing, and the data is simple records XML, the system is indicating that it expects the output data to be in the reference-data v2.0.1 format.
We can correct this by adding the skeleton xslt translation for reference data into our translationFilter. Move back to the translationFilter element on the pipeline structure and add the following to the xsl window.
<?xml version="1.1" encoding="UTF-8" ?>
<xsl:stylesheet xpath-default-namespace="records:2"
xmlns="reference-data:2"
xmlns:xsl="http://www.w3.org/1999/XSL/Transform"
xmlns:xsi="http://www.w3.org/2001/XMLSchema-instance"
xmlns:stroom="stroom"
xmlns:evt="event-logging:3"
version="2.0">
<xsl:template match="records">
<referenceData xmlns="reference-data:2"
xsi:schemaLocation="reference-data:2 file://reference-data-v2.0.xsd" version="2.0.1"
xmlns:xsi="http://www.w3.org/2001/XMLSchema-instance">
<xsl:apply-templates/>
</referenceData>
</xsl:template>
<!-- MAIN TEMPLATE -->
<xsl:template match="record">
<reference>
<map></map>
<key></key>
<value></value>
</reference>
</xsl:template>
</xsl:stylesheet>
And on pressing the refresh button we see that the output window is an empty ReferenceData element.
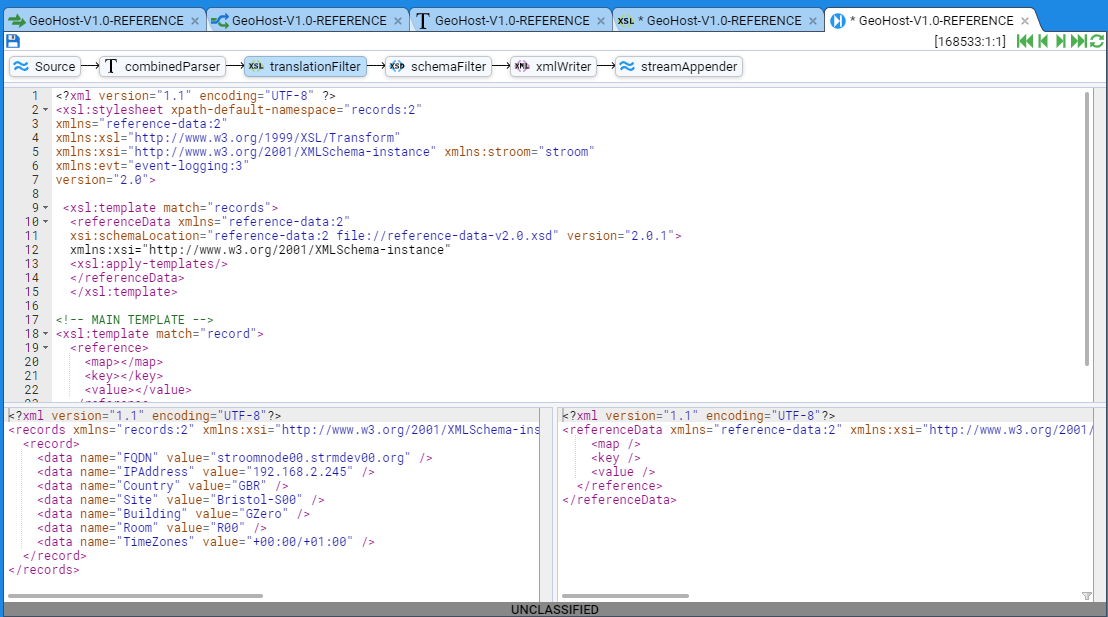
Also note that if we move to the SchemaFilter element on the pipeline structure, we no longer have an “Invalid Schema Location” error.
We next extend the translation to actually generate reference data. The translation will now look like
<?xml version="1.1" encoding="UTF-8" ?>
<xsl:stylesheet xpath-default-namespace="records:2"
xmlns="reference-data:2"
xmlns:xsl="http://www.w3.org/1999/XSL/Transform"
xmlns:xsi="http://www.w3.org/2001/XMLSchema-instance"
xmlns:stroom="stroom"
xmlns:evt="event-logging:3"
version="2.0">
<!--
GEOHOST REFERENCE FEED:
CHANGE HISTORY
v1.0.0 - 2020-02-09 John Doe
This is a reference feed for device Logical and Geographic data.
The feed provides for each device
* the device FQDN
* the device IP Address
* the device Country location (using ISO 3166-1 alpha-3 codes)
* the device Site location
* the device Building location
* the device Room location
*the device TimeZone location (both standard then daylight time zone offsets from UTC)
The reference maps are
FQDN_TO_IP - Fully Qualified Domain Name to IP Address
IP_TO_FQDN - IP Address to FQDN (HostName)
FQDN_TO_LOC - Fully Qualified Domain Name to Location element
-->
<xsl:template match="records">
<referenceData xmlns="reference-data:2"
xsi:schemaLocation="reference-data:2 file://reference-data-v2.0.xsd" version="2.0.1">
<xsl:apply-templates/>
</referenceData>
</xsl:template>
<!-- MAIN TEMPLATE -->
<xsl:template match="record">
<!-- FQDN_TO_IP map -->
<reference>
<map>FQDN_TO_IP</map>
<key>
<xsl:value-of select="lower-case(data[@name='FQDN']/@value)" />
</key>
<value>
<IPAddress>
<xsl:value-of select="data[@name='IPAddress']/@value" />
</IPAddress>
</value>
</reference>
<!-- IP_TO_FQDN map -->
<reference>
<map>IP_TO_FQDN</map>
<key>
<xsl:value-of select="lower-case(data[@name='IPAddress']/@value)" />
</key>
<value>
<HostName>
<xsl:value-of select="data[@name='FQDN']/@value" />
</HostName>
</value>
</reference>
</xsl:template>
</xsl:stylesheet>
and when we refresh, by pressing the Refresh Current Step button we see that the output window now has Reference elements within the parent ReferenceData element

If we press the Step Forward button we see the second record of our raw reference data in the input sub-pane and the resultant Reference elements
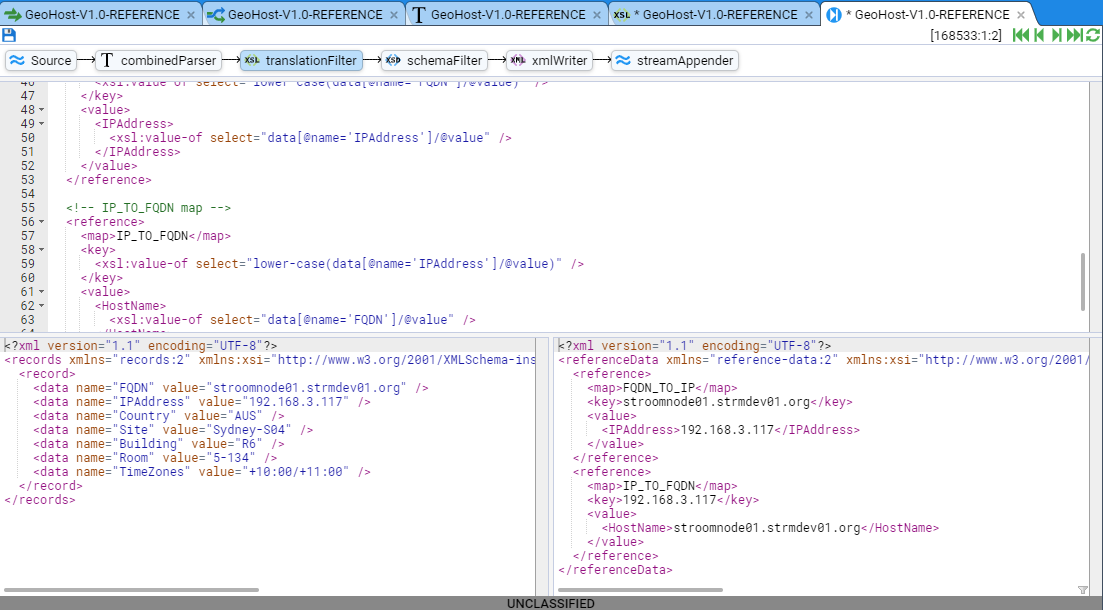
At this point it would be wise to save our translation. This is done by clicking on the highlighted icon in the top left-hand area of the window under the tabs.
We can now further our Reference by adding a Fully Qualified Domain Name to Location reference - FQDN_TO_LOC and so now the translation looks like
<?xml version="1.1" encoding="UTF-8" ?>
<xsl:stylesheet xpath-default-namespace="records:2"
xmlns="reference-data:2"
xmlns:xsl="http://www.w3.org/1999/XSL/Transform"
xmlns:xsi="http://www.w3.org/2001/XMLSchema-instance"
xmlns:stroom="stroom"
xmlns:evt="event-logging:3"
version="2.0">
<!--
GEOHOST REFERENCE FEED:
CHANGE HISTORY
v1.0.0 - 2020-02-09 John Doe
This is a reference feed for device Logical and Geographic data.
The feed provides for each device
* the device FQDN
* the device IP Address
* the device Country location (using ISO 3166-1 alpha-3 codes)
* the device Site location
* the device Building location
* the device Room location
*the device TimeZone location (both standard then daylight time zone offsets from UTC)
The reference maps are
FQDN_TO_IP - Fully Qualified Domain Name to IP Address
IP_TO_FQDN - IP Address to FQDN (HostName)
FQDN_TO_LOC - Fully Qualified Domain Name to Location element
-->
<xsl:template match="records">
<referenceData xmlns="reference-data:2"
xsi:schemaLocation="reference-data:2 file://reference-data-v2.0.xsd" version="2.0.1">
<xsl:apply-templates/>
</referenceData>
</xsl:template>
<!-- MAIN TEMPLATE -->
<xsl:template match="record">
<!-- FQDN_TO_IP map -->
<reference>
<map>FQDN_TO_IP</map>
<key>
<xsl:value-of select="lower-case(data[@name='FQDN']/@value)" />
</key>
<value>
<IPAddress>
<xsl:value-of select="data[@name='IPAddress']/@value" />
</IPAddress>
</value>
</reference>
<!-- IP_TO_FQDN map -->
<reference>
<map>IP_TO_FQDN</map>
<key>
<xsl:value-of select="lower-case(data[@name='IPAddress']/@value)" />
</key>
<value>
<HostName>
<xsl:value-of select="data[@name='FQDN']/@value" />
</HostName>
</value>
</reference>
<!-- FQDN_TO_LOC map -->
<reference>
<map>FQDN_TO_LOC</map>
<key>
<xsl:value-of select="lower-case(data[@name='FQDN']/@value)" />
</key>
<value>
<!--
Note, when mapping to a XML node set, we make use of the Event namespace - i.e. evt:
defined on our stylesheet element. This is done, so that, when the node set is returned,
it is within the correct namespace.
-->
<evt:Location>
<evt:Country>
<xsl:value-of select="data[@name='Country']/@value" />
</evt:Country>
<evt:Site>
<xsl:value-of select="data[@name='Site']/@value" />
</evt:Site>
<evt:Building>
<xsl:value-of select="data[@name='Building']/@value" />
</evt:Building>
<evt:Room>
<xsl:value-of select="data[@name='Room']/@value" />
</evt:Room>
<evt:TimeZone>
<xsl:value-of select="data[@name='TimeZones']/@value" />
</evt:TimeZone>
</evt:Location>
</value>
</reference>
</xsl:template>
</xsl:stylesheet>
and our second ReferenceData element would now look like
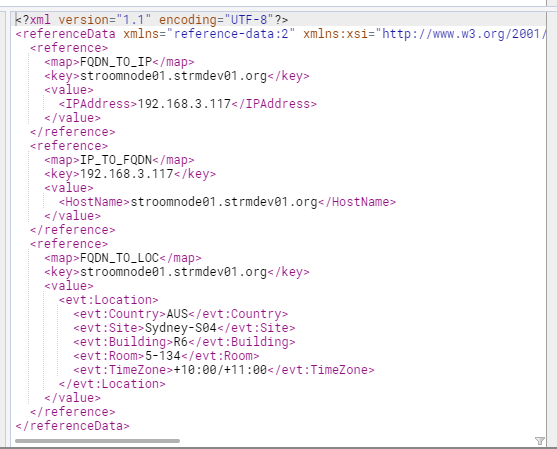
We have completed the translation and have hence completed the development of our GeoHost-V1.0-REFERENCE reference feed.
At this point, the reference feed is set up to accept Raw Reference data, but it will not automatically process the raw data and hence it will not place reference data into the reference data store. To have Stroom automatically process Raw Reference streams, you will need to enable Processors for this pipeline.
Enabling the Reference Feed Processors
We now create the pipeline Processors for this feed, so that the raw reference data will be transformed into Reference Data on ingest and save to Reference Data stores.
Open the reference feed pipeline by selecting the GeoHost-V1.0-REFERENCE tab to raise the GeoHost-V1.0-REFERENCE pipeline. Then select the Processors sub-tab to show

This configuration tab is divided into two panes. The top pane shows the current enabled Processors and any recently processed streams and the bottom pane provides meta-data about each Processor or recently processed streams.
First, move the mouse to the Add Processor icon at the top left of the top pane. Select by left clicking this icon to have displayed the Add Filter selection window
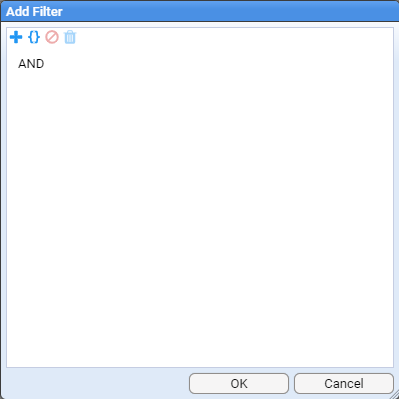
This selection window allows us to filter what set of data streams we want our Processor to process. As our intent is to enable processing for all GeoHost-V1.0-REFERENCE streams, both already received and yet to be received, then our filtering criteria is just to process all Raw Reference for this feed, ignoring all other conditions.
To do this, first click on the Add Term icon to navigate to the desired feed name (GeoHost-V1.0-REFERENCE) object
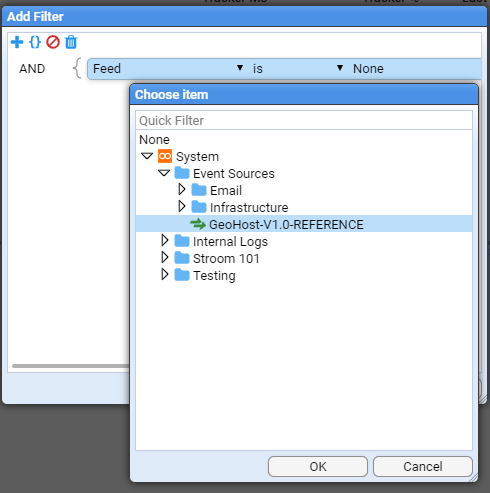
and press to make the selection.
Next, we select the required stream type. To do this click on the Add Term icon again. Click on the down arrow to change the Term selection from Feed to Type. Click in the Value position on the highlighted line (it will be currently empty). Once you have clicked here a drop-down box will appear as per
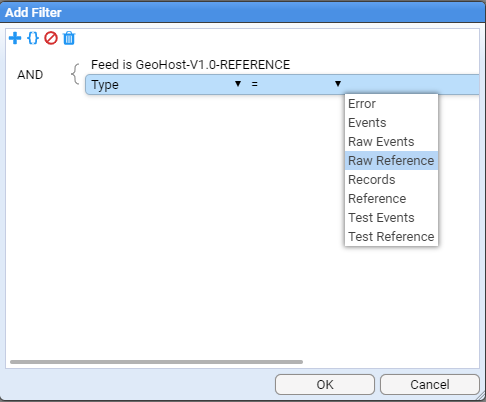
at which point, select the Stream Type of Raw Reference and then press . At this point we return to the Add Processor selection window to see that the Raw Reference stream type has been added.
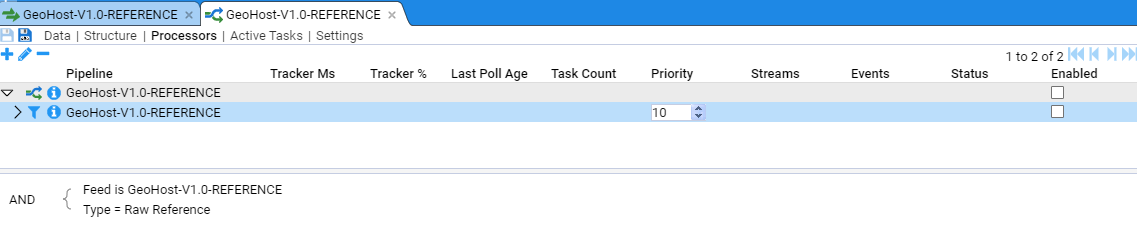
Note the Processor has been added but it is in a disabled state. We enable both pipeline processor and the processor filter

Note - if this is the first time you have set up pipeline processing on your Stroom instance you may need to check that the Stream Processor job is enabled on your Stroom instance. To do this go to the Stroom main menu and select Monitoring>Jobs> Check the status of the Stream Processor job and enable if required. If you need to enable the job also ensure you enable the job on the individual nodes as well (go to the bottom window pane and select the enable box on the far right)
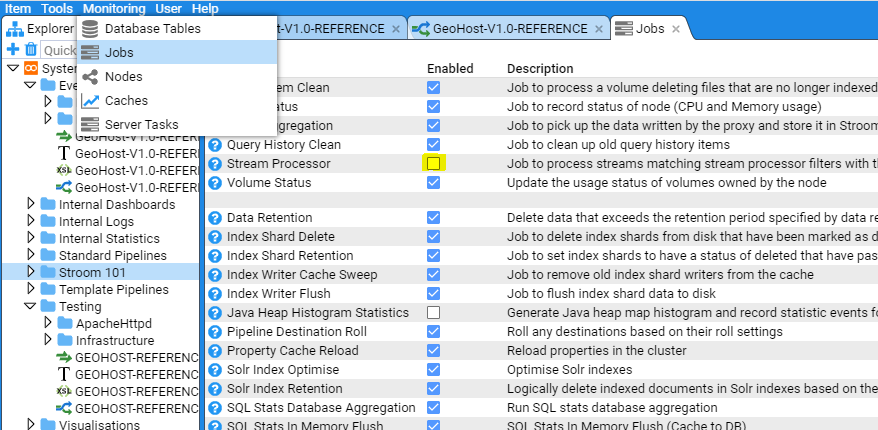

Returning to the GeoHost-V1.0-REFERENCE tab, Processors sub-item, if everything is working on your Stroom instance you should now see that Raw Reference streams are being processed by your processor - the Streams count is incrementing and the Tracker% is incrementing (when the Tracker% is 100% then all streams you selected (Filtered for) have been processed)

Navigating back to the Data sub-item and clicking on the reference feed stream in the Stream Table we see
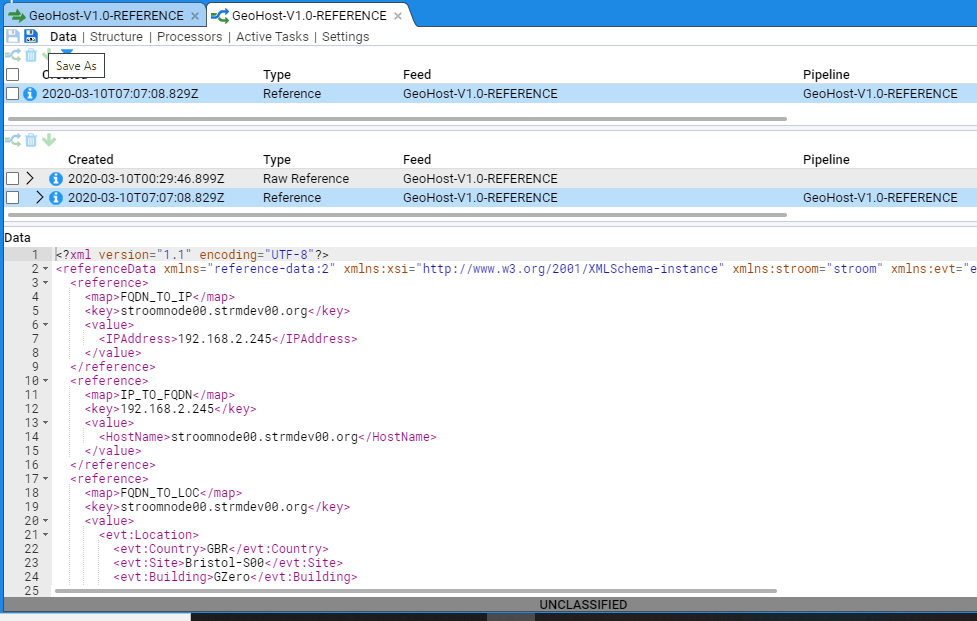
In the top pane, we see the Streams table as per normal, but in the Specific stream table we see that we have both a Raw Reference stream and its child Reference stream. By clicking on and highlighting the Reference stream we see its content in the bottom pane.
The complete ReferenceData for this stream is
<?xml version="1.1" encoding="UTF-8"?>
<referenceData xmlns="reference-data:2" xmlns:xsi="http://www.w3.org/2001/XMLSchema-instance" xmlns:stroom="stroom" xmlns:evt="event-logging:3" xsi:schemaLocation="reference-data:2 file://reference-data-v2.0.xsd" version="2.0.1">
<reference>
<map>FQDN_TO_IP</map>
<key>stroomnode00.strmdev00.org</key>
<value>
<IPAddress>192.168.2.245</IPAddress>
</value>
</reference>
<reference>
<map>IP_TO_FQDN</map>
<key>192.168.2.245</key>
<value>
<HostName>stroomnode00.strmdev00.org</HostName>
</value>
</reference>
<reference>
<map>FQDN_TO_LOC</map>
<key>stroomnode00.strmdev00.org</key>
<value>
<evt:Location>
<evt:Country>GBR</evt:Country>
<evt:Site>Bristol-S00</evt:Site>
<evt:Building>GZero</evt:Building>
<evt:Room>R00</evt:Room>
<evt:TimeZone>+00:00/+01:00</evt:TimeZone>
</evt:Location>
</value>
</reference>
<reference>
<map>FQDN_TO_IP</map>
<key>stroomnode01.strmdev01.org</key>
<value>
<IPAddress>192.168.3.117</IPAddress>
</value>
</reference>
<reference>
<map>IP_TO_FQDN</map>
<key>192.168.3.117</key>
<value>
<HostName>stroomnode01.strmdev01.org</HostName>
</value>
</reference>
<reference>
<map>FQDN_TO_LOC</map>
<key>stroomnode01.strmdev01.org</key>
<value>
<evt:Location>
<evt:Country>AUS</evt:Country>
<evt:Site>Sydney-S04</evt:Site>
<evt:Building>R6</evt:Building>
<evt:Room>5-134</evt:Room>
<evt:TimeZone>+10:00/+11:00</evt:TimeZone>
</evt:Location>
</value>
</reference>
<reference>
<map>FQDN_TO_IP</map>
<key>host01.company4.org</key>
<value>
<IPAddress>192.168.4.220</IPAddress>
</value>
</reference>
<reference>
<map>IP_TO_FQDN</map>
<key>192.168.4.220</key>
<value>
<HostName>host01.company4.org</HostName>
</value>
</reference>
<reference>
<map>FQDN_TO_LOC</map>
<key>host01.company4.org</key>
<value>
<evt:Location>
<evt:Country>USA</evt:Country>
<evt:Site>LosAngeles-S19</evt:Site>
<evt:Building>ILM</evt:Building>
<evt:Room>C5-54-2</evt:Room>
<evt:TimeZone>-08:00/-07:00</evt:TimeZone>
</evt:Location>
</value>
</reference>
</referenceData>
<reference>
<map>FQDN_TO_IP</map>
<key>host32.strmdev01.org</key>
<value>
<IPAddress>192.168.8.151</IPAddress>
</value>
</reference>
<reference>
<map>IP_TO_FQDN</map>
<key>192.168.8.151</key>
<value>
<HostName>host32.strmdev01.org</HostName>
</value>
</reference>
<reference>
<map>FQDN_TO_LOC</map>
<key>host32.strmdev01.org</key>
<value>
<evt:Location>
<evt:Country>AUS</evt:Country>
<evt:Site>Sydney-S02</evt:Site>
<evt:Building>RC45</evt:Building>
<evt:Room>5-134</evt:Room>
<evt:TimeZone>+10:00/+11:00</evt:TimeZone>
</evt:Location>
</value>
</reference>
<reference>
<map>FQDN_TO_IP</map>
<key>host14.strmdev00.org</key>
<value>
<IPAddress>192.168.234.9</IPAddress>
</value>
</reference>
<reference>
<map>IP_TO_FQDN</map>
<key>192.168.234.9</key>
<value>
<HostName>host14.strmdev00.org</HostName>
</value>
</reference>
<reference>
<map>FQDN_TO_LOC</map>
<key>host14.strmdev00.org</key>
<value>
<evt:Location>
<evt:Country>GBR</evt:Country>
<evt:Site>Bristol-S22</evt:Site>
<evt:Building>CAMP2</evt:Building>
<evt:Room>Rm67</evt:Room>
<evt:TimeZone>+00:00/+01:00</evt:TimeZone>
</evt:Location>
</value>
</reference>
</referenceData>
If we go back to the reference feed itself (and click on the button on the far right of the top and middle panes), we now see both the Reference and Raw Reference streams in the Streams Table pane.

Selecting the Reference stream in the Stream Table will result in the Specific stream pane displaying the Raw Reference and its child Reference stream (highlighted) and the actual ReferenceData output in the Data pane at the bottom.
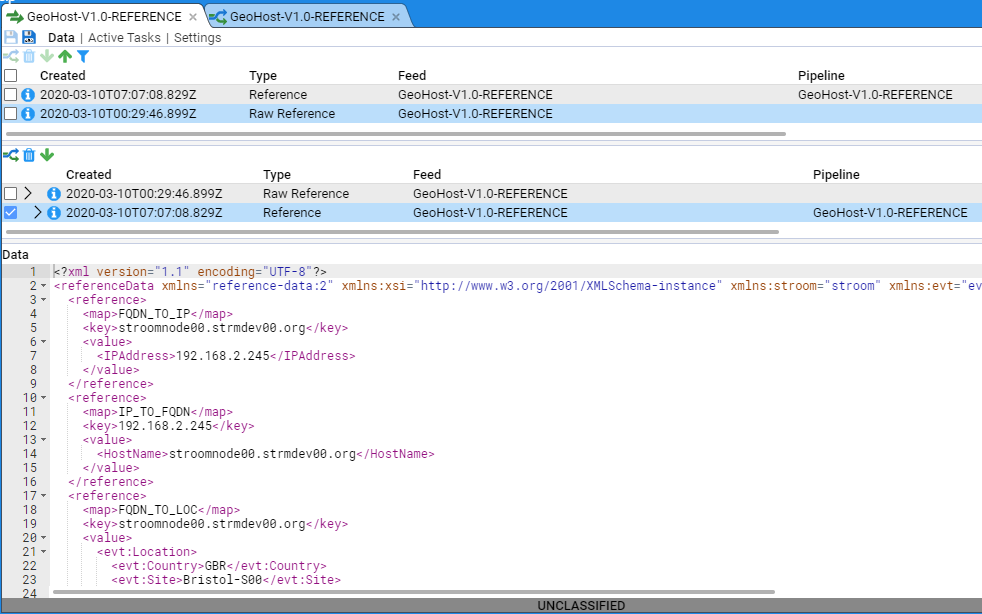
Selecting the Raw Reference stream in the Streams Table will result in the Specific stream pane displaying the Raw Reference and its child Reference stream as before, but with the Raw Reference stream highlighted and the actual Raw Reference input data displayed in the Data pane at the bottom.
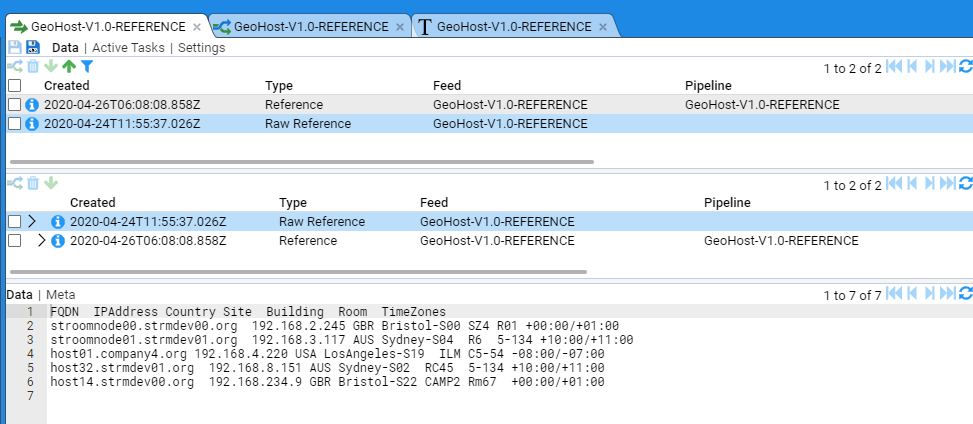
The creation of the Raw Reference is now complete.
At this point you may wish to organise the resources you have created within the Explorer pane to a more appropriate location such as Reference/GeoHost.
Because Stroom Explorer is a flat structure you can move resources around to reorganise the content without any impact on directory paths, configurations etc.
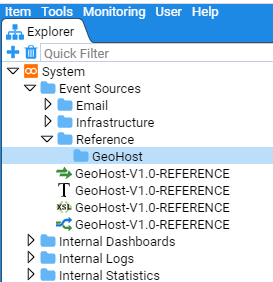
Now you have created the new folder structure you can move the various GeoHost resources to this location. Select all four resources by using the mouse right-click button while holding down the Shift key. Then right click on the highlighted group to display the action menu

Select move and the Move Multiple Items window will display.
Navigate to the Reference/GeoHost folder to move the items to this destination.

The final structure is seen below
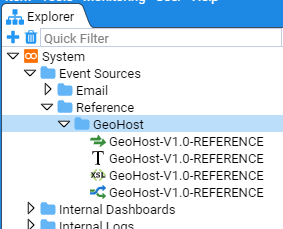
4.7 - Indexing and Search
4.7.1 - Elasticsearch
Using Stroom to leverage Elasticsearch for event indexing and perform queries using Stroom dashboards or external tools.
4.7.2 - Apache Solr
This document will show how to use Solr from within Stroom. A single Solr node will be used running in a docker container.
Assumptions
- You are familiar with Lucene indexing within Stroom
- You have some data to index
Points to note
- A Solr core is the home for exactly one Stroom index.
- Cores must initially be created in Solr.
- It is good practice to name your Solr core the same as your Stroom Index.
Method
-
Start a docker container for a single solr node.
-
Check your Solr node. Point your browser at http://yourSolrHost:8983
-
Create a core in Solr using the CLI.
-
Create a SolrIndex in Stroom
-
Update settings for your new Solr Index in Stroom then press “Test Connection”. If successful then press Save. Note the “Solr URL” field is a reference to the newly created Solr core.
-
Add some Index fields. e.g.EventTime, UserId
-
Retention is different in Solr, you must specify an expression that matches data that can be deleted.
-
Your Solr Index can now be used as per a Stroom Lucene Index. However, your Indexing pipeline must use a SolrIndexingFilter instead of an IndexingFilter.
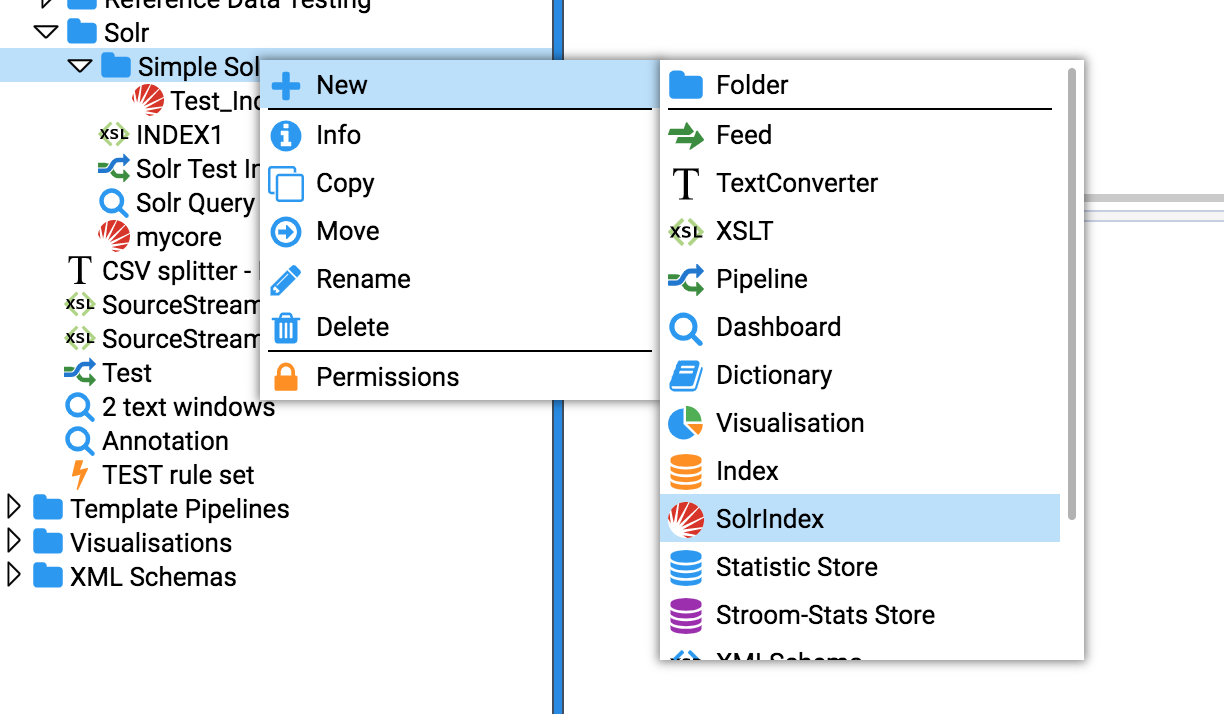

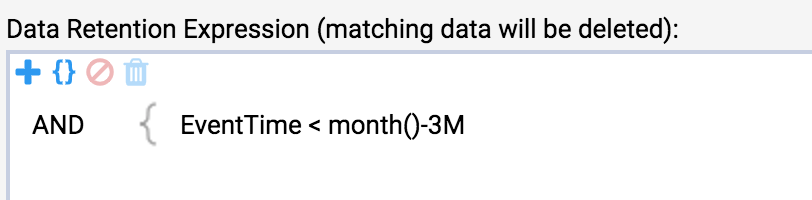
4.7.3 - Stroom Search API
Stroom v6 introduced an API that allows a user to perform queries against Stroom resources such as indices and statistics. This is a guide to show how to perform a Stroom Query directly from bash using Stroom v7.
-
Create an API Key for yourself, this will allow the API to authenticate as you and run the query with your privileges.
-
Create a Dashboard that extracts the data you are interested in. You should create a Query and Table.
-
Download the JSON for your Query. Press the download icon in the Query Pane to generate a file containing the JSON. Save the JSON to a file named query.json.
-
Use curl to send the query to Stroom.
-
The query response should be in a file named response.out.
-
Optional step: reformat the response to csv using
jq.
4.8 - Event Post Processing
How to do further processing on Events.
4.8.1 - Event Forwarding
How to write processed events to the file system for use by other systems.
See Also
Introduction
In some situations, you will want to automatically extract stored Events in their XML format to forward to the file system. This is achieved via a Pipeline with an appropriate XSLT translation that is used to decide what events are forwarded. Once the Events have been chosen, the Pipeline would need to validate the Events (via a schemaFilter) and then the Events would be passed to an xmlWriter and then onto a file system writer (fileSystemOutputStreamProvider or RollingFileAppender).
Example Event Forwarding - Multiple destinations
In this example, we will create a pipeline that writes Events to the file system, but to multiple destinations based on the location of the Event Client element.
We will use the EventSource/Client/Location/Country element to decided where to store the events. Specifically, we store events from clients in AUS in one location, and events from clients in GBR to another. All other client locations will be ignored.
Create translations
First, we will create two translations - one for each country location Australia (AUS) and Great Britain (GBR). The AUS selection translation is
<?xml version="1.0" encoding="UTF-8" ?>
<xsl:stylesheet
version="3.0"
xmlns:xsl="http://www.w3.org/1999/XSL/Transform"
xmlns="event-logging:3"
xmlns:stroom="stroom"
xpath-default-namespace="event-logging:3
xmlns:xsi="http://www.w3.org/2001/XMLSchema-instance"
xmlns:xs="http://www.w3.org/2001/XMLSchema">
<!--
ClientAUS Translation: CHANGE HISTORY
v1.0.0 - 2015-01-19
v1.5.0 - 2020-04-15
This translation find all events where the EventSource/Client/Location/Country element
contains the string 'AUS' and then copies them.
-->
<!-- Match all events -->
<xsl:template match="/Events|/Events/@*">
<xsl:copy>
<xsl:apply-templates select="node()|@*" />
</xsl:copy>
</xsl:template>
<!-- Find all events whose Client location is in the AUS -->
<xsl:template match="Event">
<xsl:apply-templates select="EventSource/Client/Location/Country[contains(upper-case(text()), 'AUS')]" />
</xsl:template>
<!-- Country template - deep copy the event -->
<xsl:template match="Country">
<xsl:copy-of select="ancestor::Event" />
</xsl:template>
</xsl:stylesheet>
The Great Britain selection translation is
<?xml version="1.0" encoding="UTF-8" ?>
<xsl:stylesheet
version="3.0"
xmlns:xsl="http://www.w3.org/1999/XSL/Transform"
xmlns="event-logging:3"
xmlns:stroom="stroom"
xpath-default-namespace="event-logging:3
xmlns:xsi="http://www.w3.org/2001/XMLSchema-instance"
xmlns:xs="http://www.w3.org/2001/XMLSchema">
<!--
ClientGBR Translation: CHANGE HISTORY
v1.0.0 - 2015-01-19
v1.5.0 - 2020-04-15
This translation find all events where the EventSource/Client/Location/Country
element contains the string 'GBR' and then copies them.
-->
<!-- Match all events -->
<xsl:template match="/Events|/Events/@*">
<xsl:copy>
<xsl:apply-templates select="node()|@*" />
</xsl:copy>
</xsl:template>
<!-- Find all events whose Client location is in the GBR -->
<xsl:template match="Event">
<xsl:apply-templates select="EventSource/Client/Location/Country[contains(upper-case(text()), 'GBR')]" />
</xsl:template>
<!-- Country template - deep copy the event -->
<xsl:template match="Country">
<xsl:copy-of select="ancestor::Event" />
</xsl:template>
</xsl:stylesheet>
We will store this capability in the Explorer Folder MultiGeoForwarding. Create two new XSLT under this folder, one called ClientAUS and one called ClientGBR. Copy and paste the relevant XSL from the above code blocks into its comparable XSLT windows. Save the XSLT by clicking on the save icon. Having created the two translations we see
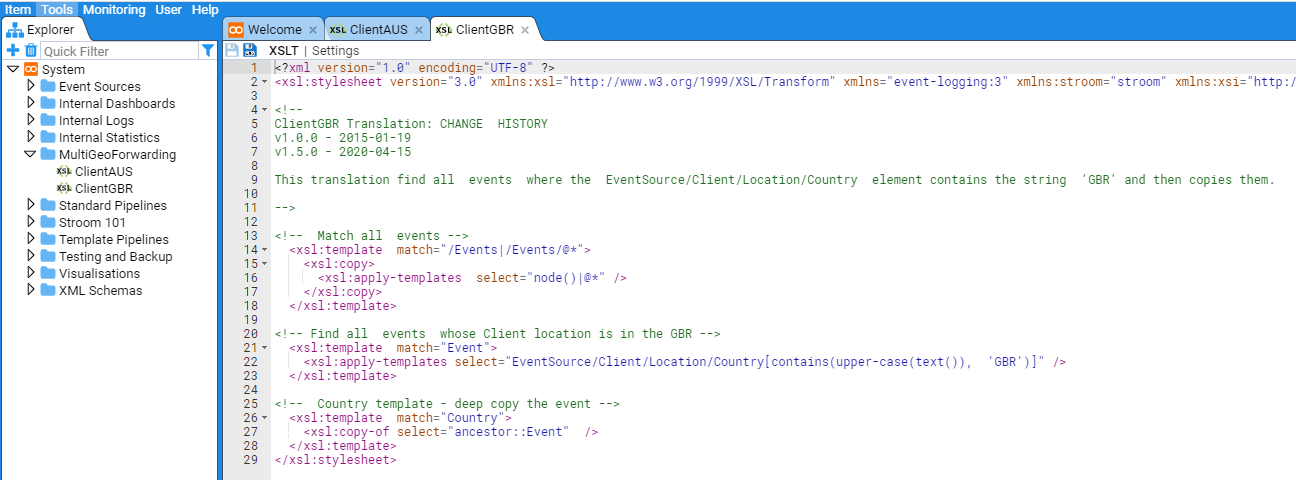
Create Pipeline
We now create a Pipeline called MultiGeoFwd in the Explorer tree. Within the MultiGeoForwarding folder right click to bring up the object context menu and sub-menu then create a New Pipeline called MultiGeoFwd. The Explorer should now look like
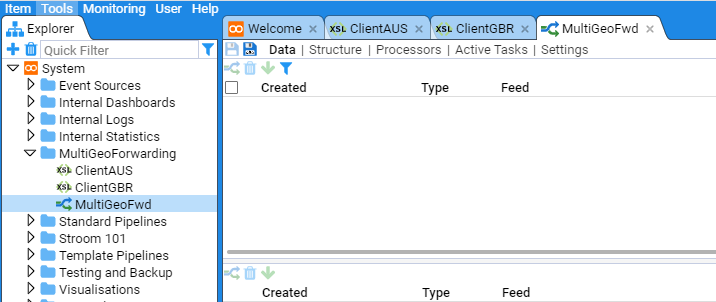
Clicking on the Pipeline Settings sub-item and add an appropriate description
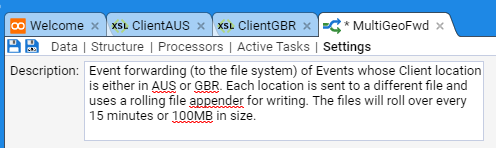
Now switch to the Structure sub-item and select the Source element.
Next click on the Add New Pipeline Element icon .
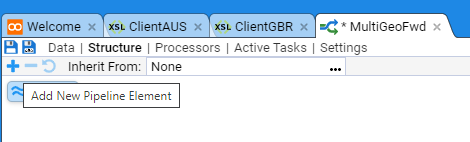
Select Parser, XMLParser from the Element context menu
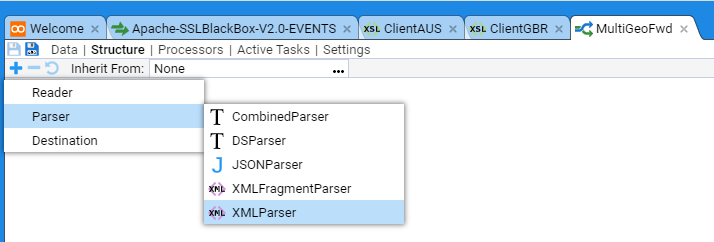
Click on OK in the Create Element dialog box to accept the default for the parser Id.
We continue building the pipeline structure by sequentially selecting the last Element and adding the next required Element. We next add a SplitFilter Element
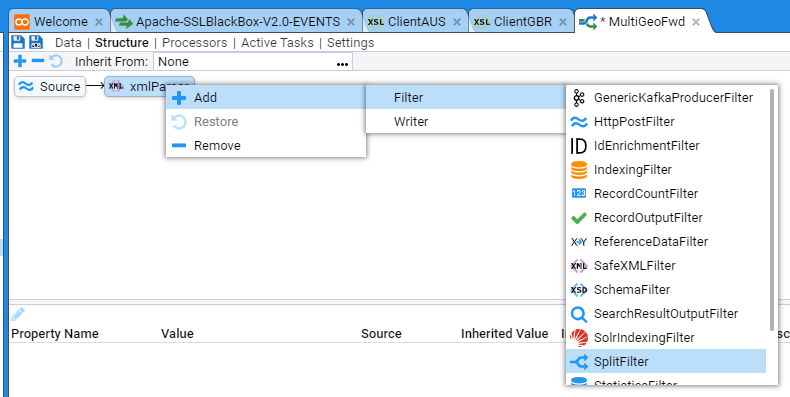
We change the SplitFilter Id: from splitFilter to multiGeoSplitFilter and click on OK to add the Element to the Pipeline
Our Pipeline currently looks like

We now add the two XSLT translation elements, ClientAUS and ClientGBR to the split Filter. Left click on the split Filter then left click on the Add New Pipeline Element to bring up the pipeline Element context menu and select the XSLTFilter item
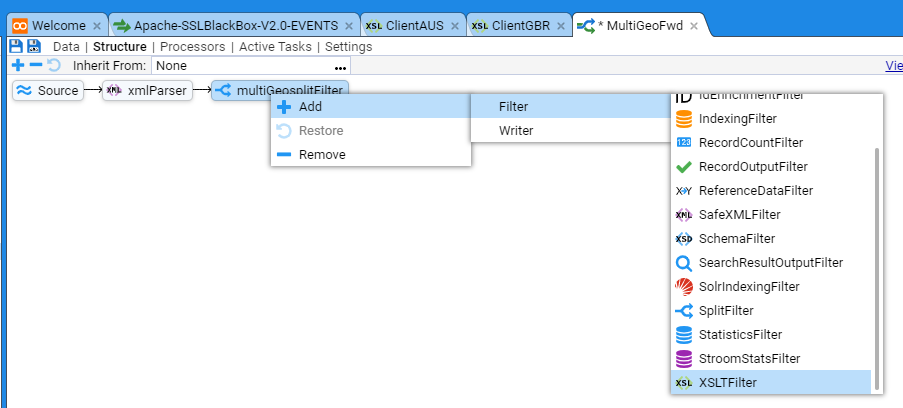
And change the Id: from xsltFilter to ClientAUSxsltFilter
Now select the multiGeoSplitFilter Element again and add another XSLTFilter as previously
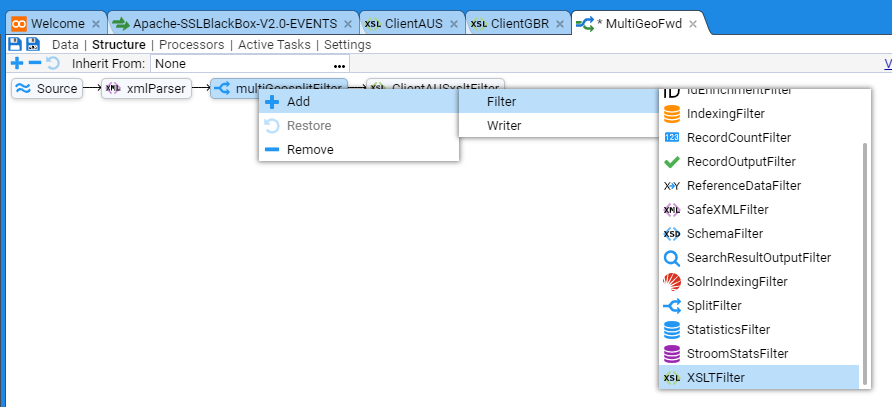
Name this xsltFilter ClientGBRxsltFilter.
At this stage the Pipeline should look like
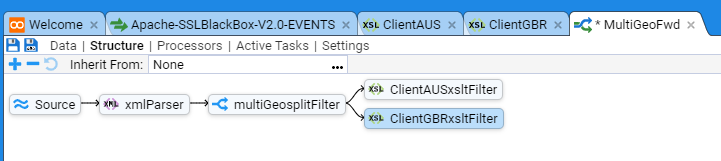
To continue building the Pipeline Structure, left click the ClientAUSxlstFilter
ClientAUSxsltFilter element then left click on the Add New Pipeline Element to bring up the pipeline Element context menu and select the SchemaFilter item.
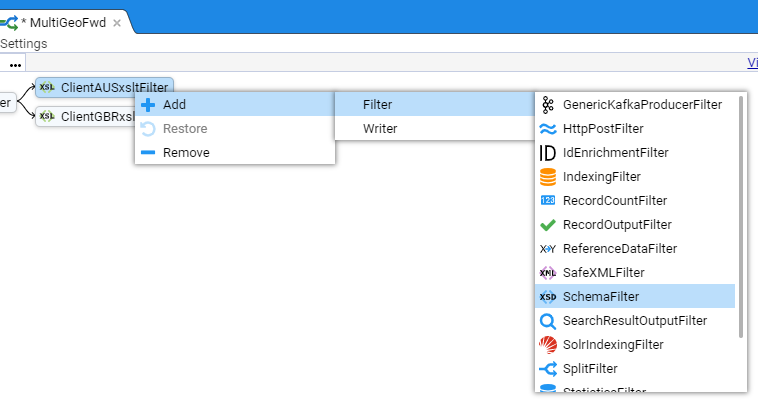
And change the Id: from schemaFilter to AUSschemaFilter to show
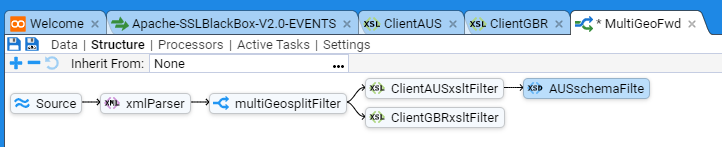
Now, left click the AUSschemaFilter element then right click on the Add New Pipeline Element to bring up the pipeline Element context menu and select the XMLWriter item
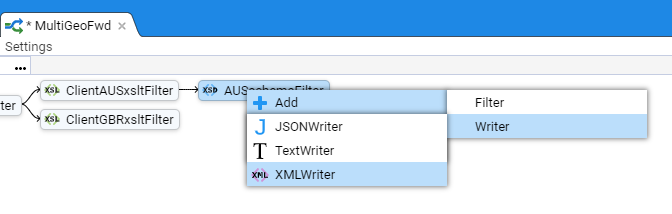
And change the Id: from xmlWriter to AUSxmlWriter
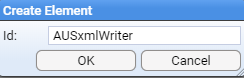
Your Pipeline should now look like
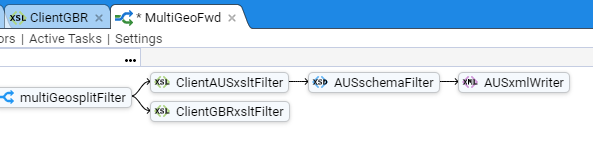
Finally, left click the AUSxmlWriter element then right click on the Add New Pipeline Element to bring up the Destination pipeline Element context menu.
Select RollingFileAppender
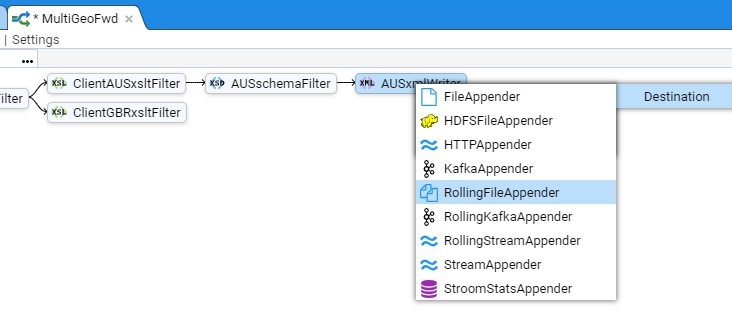
And change the Id: from rollingFileAppender to AUSrollingFileAppender to show
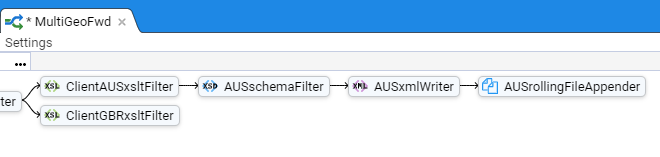
This completes the pipeline structure for the AUS branch of the pipeline. Replicate the process of adding schemaFilter, xmlWriter, and rollingFileAppender Elements for the GBR branch of the pipeline to get the complete pipeline structure as below

Save your Pipeline development work by clicking on the icon at the top left of the MultiGeoFwd pipeline tab.
We will now assign appropriate properties to each of the pipeline’s elements. First, the client xsltFilters. Click the ClientAUSxsltFilter element to show
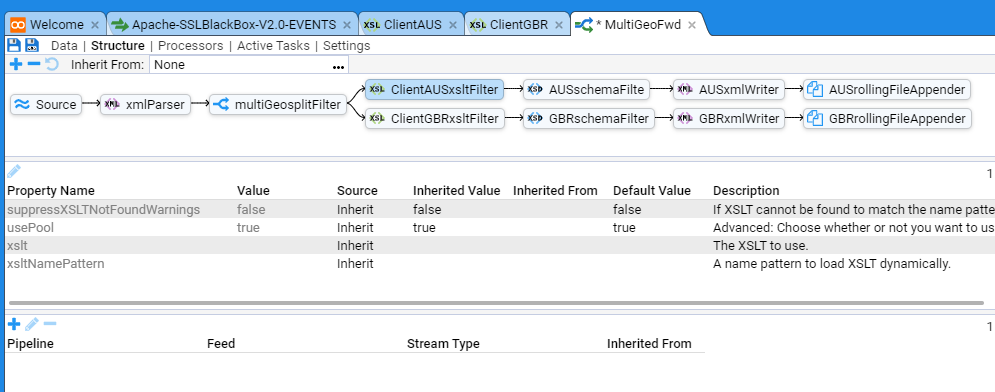
In the middle pane click on the xslt Property Name line. Now click on the Edit Property icon
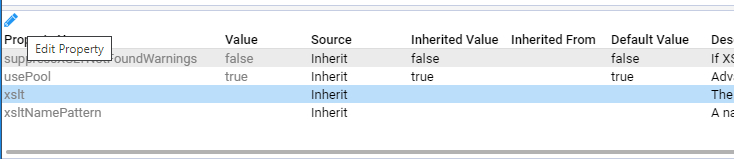
This will bring up the Edit Property selection window
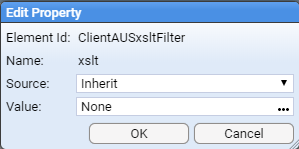
Select the Value: to be the ClientAUS translation.
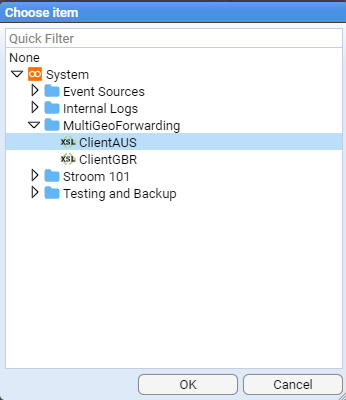
Click on OK twice to get your back to main MultiGeoFwd tab which should now have an updated middle pane that looks like

Now go back to the top pane of the Pipeline Structure and select the AUSschemaFilter element on the pipeline.
Then click the schemaGroup Property Name line.
Now click on the Edit Property icon.
Set the Property Value to be EVENTS.
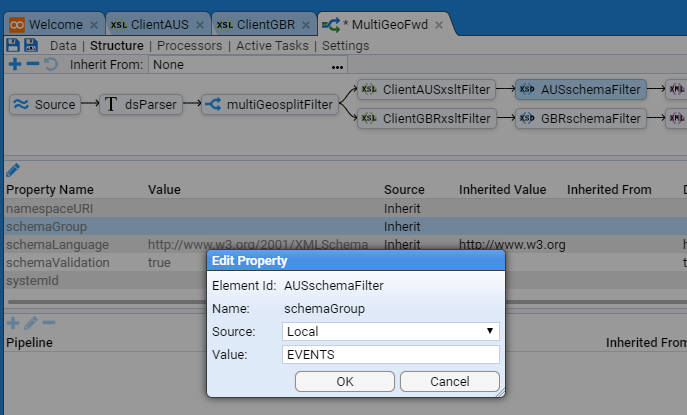
then press OK.
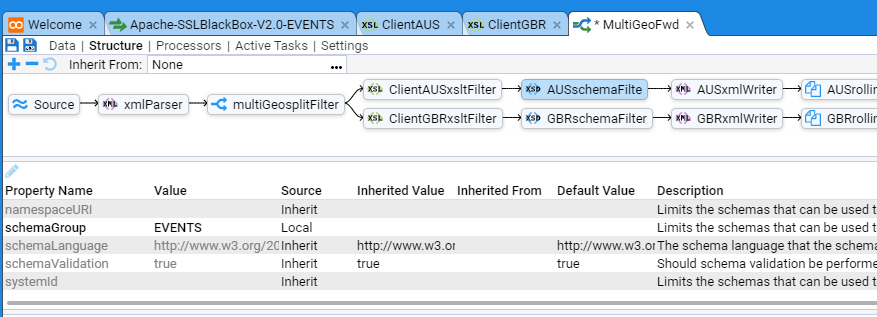
Now select the AUSxmlWriter element in the pipeline structure and click the indentOutput Property Name line.
Click on the Edit Property icon.
Set the Property Value to be true.
The completed Element should look like
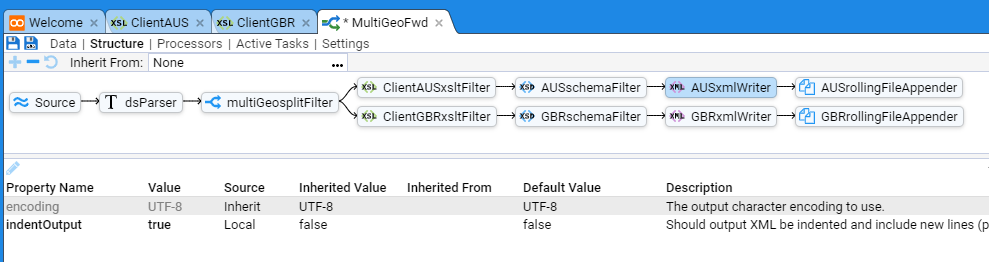
Next, select the AUSrollingFileAppender and change the Properties as per
- fileName to be
fwd_${ms}.lock - frequency to be
15m - outputPaths to be
/stroom/volumes/defaultStreamVolume/forwarding/AUS00 - rolledFileName to be
fwd_${ms}.ready
Note that these settings are for demonstration purposes only and will depend on your unique Stroom instance’s configuration. The outputPath can contain replacement variables to provide more structure if desired, see File Output substitution variables.
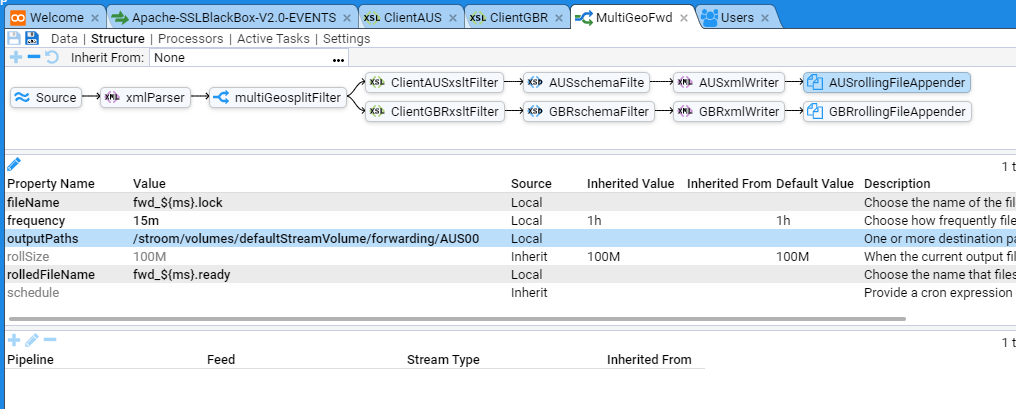
Repeat this Element Property Name assignment for the GBR branch of the pipeline substituting the ClientGBR translation and /stroom/volumes/defaultStreamVolume/forwarding/GBR00 for rollingFileAppender outputPaths where appropriate.
Note, if you expect lots of events to be processed by the pipeline, you may wish to create multiple outputPaths. For example, you could have
/stroom/volumes/defaultStreamVolume/forwarding/_AUS00_,
/stroom/volumes/defaultStreamVolume/forwarding/_AUS01_,
/stroom/volumes/defaultStreamVolume/forwarding/_AUS0n_
and
/stroom/volumes/defaultStreamVolume/forwarding/_GBR00_,
/stroom/volumes/defaultStreamVolume/forwarding/_GBR01_,
/stroom/volumes/defaultStreamVolume/forwarding/_GBR0n_
As appropriate.
Save the pipeline by pressing the Save icon.
Test Pipeline
We first select a stream of Events which we know to have both AUS and GBR Client locations. We have such a stream from our Apache-SSLBlackBox-V2.0-EVENTS Feed.
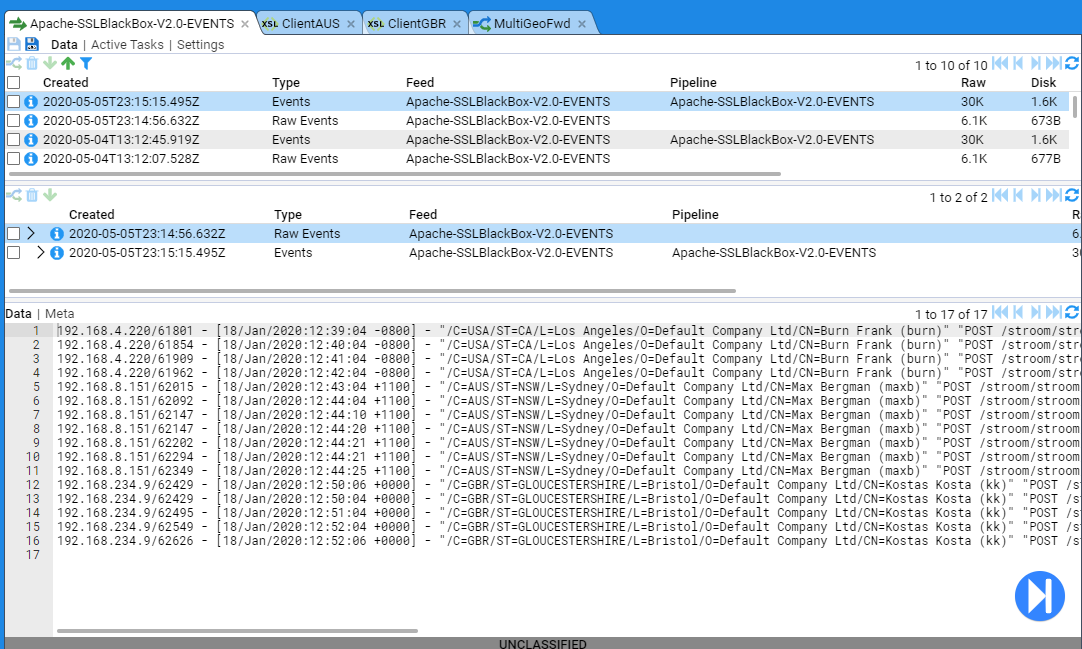
We select the Events stream and Enter Stepping Mode by pressing the large button in the bottom right.
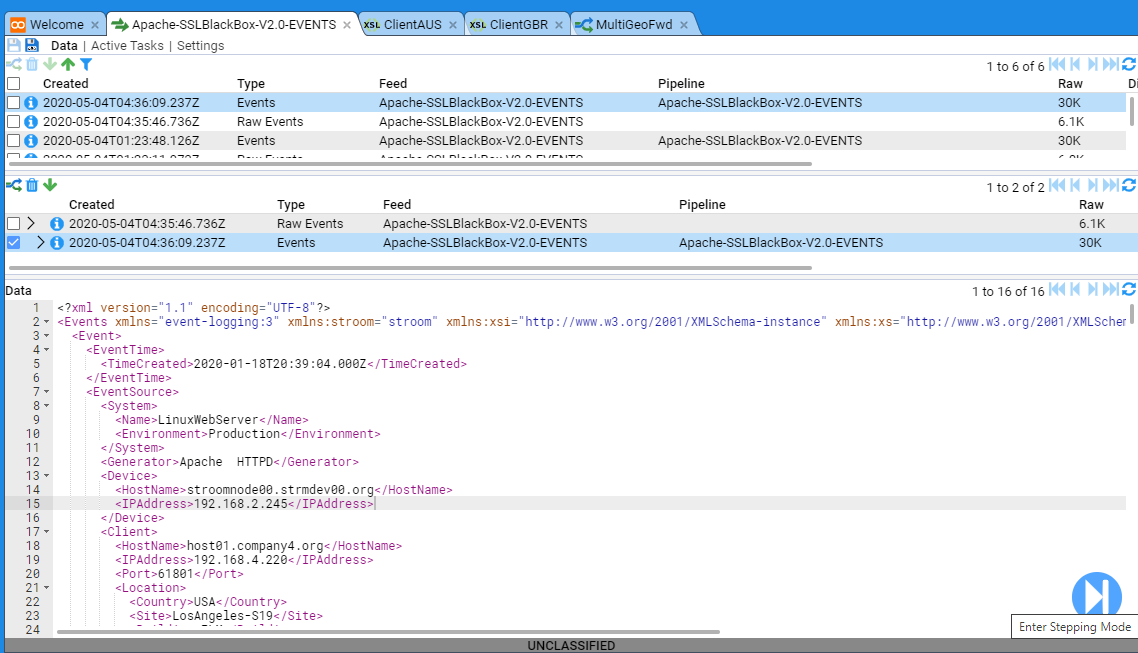
And we will choose the MultiGeoFwd to step with.
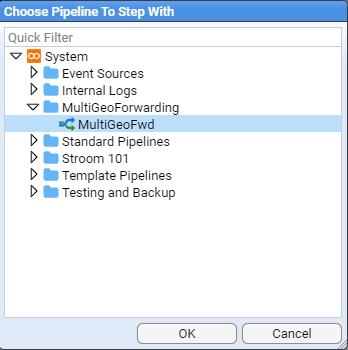
We are now presented with the Stepping tab positioned at the start

If we step forward by clicking on the icon we will see that our first event in our source stream has a Client Country location of USA.

If we now click on the ClientAUSxsltFilter element we will see the ClientAUS translation in the code pane. The first Event in the input pane and an empty event in the output pane. The output is empty as the Client/Location/Country is NOT the string AUS, which is what the translation is matching on.
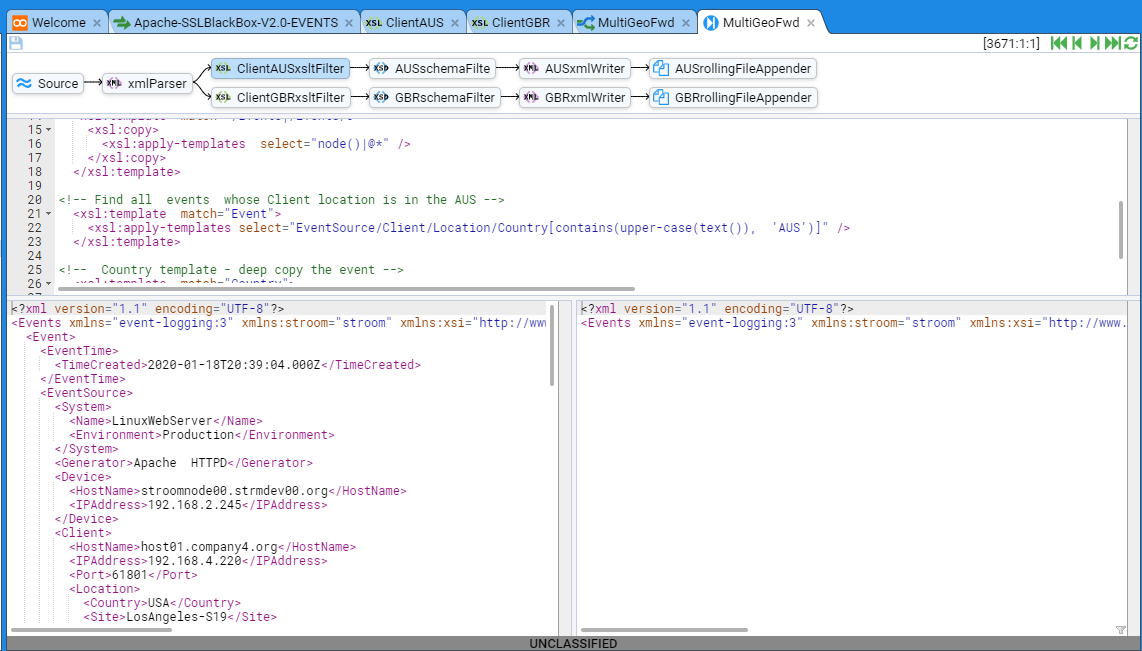
If we step forward to the 5th Event we will see the output pane change and become populated. This is because this Event’s Client/Location/Country value is the string AUS.
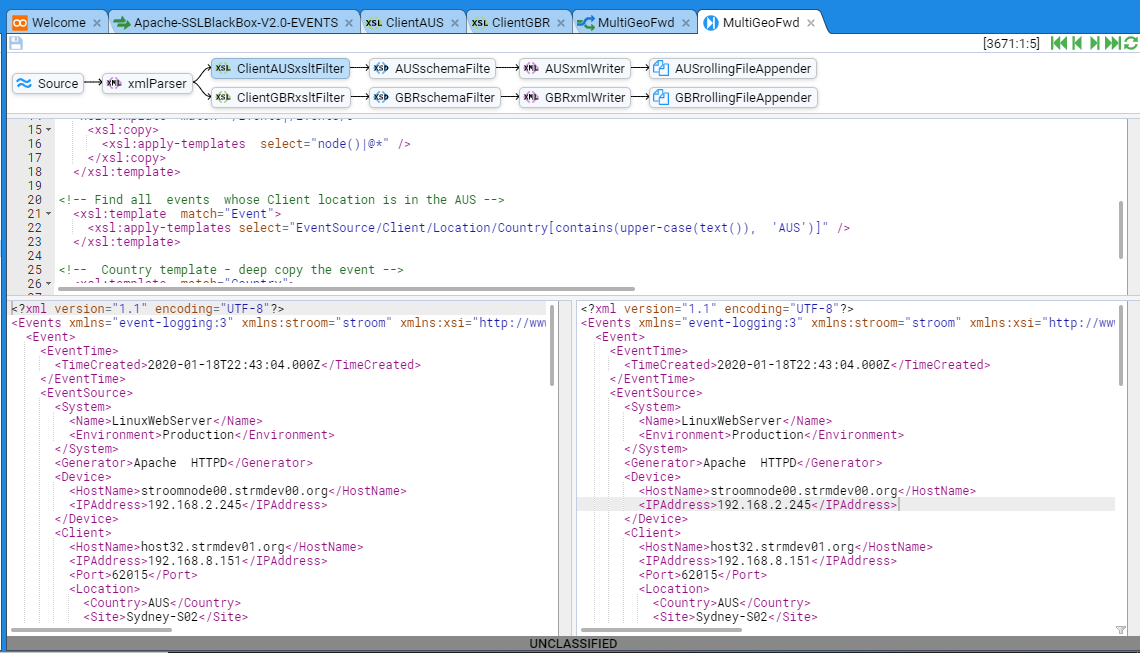
Note, that you can move to the 5th Event on the pipeline by clicking on the icon repeatedly until you get to the 5th event, or you can insert your cursor into the recordNo of the stepping key to manually change the recordNo from 1 to 5
and then press Enter. This jumps the stepping process to the RecordNo you specify, in this particular case “5”.
If you repeatedly click on the icon seven more times you will continue to see Events in the output pane, as our stream source Client/Location/Country value is AUS for Events 5-11.
Now, double click on the ClientGBRxsltFilter element. The output pane will once again be empty as the Client/Location/Country value of this Event (AUS) does not match what your translation is filtering on (GBR).
If you now step forward one event using the icon, you will see the ClientGBR translation output pane populate as Events 12-16 have a Client/Location/Country of GRC.
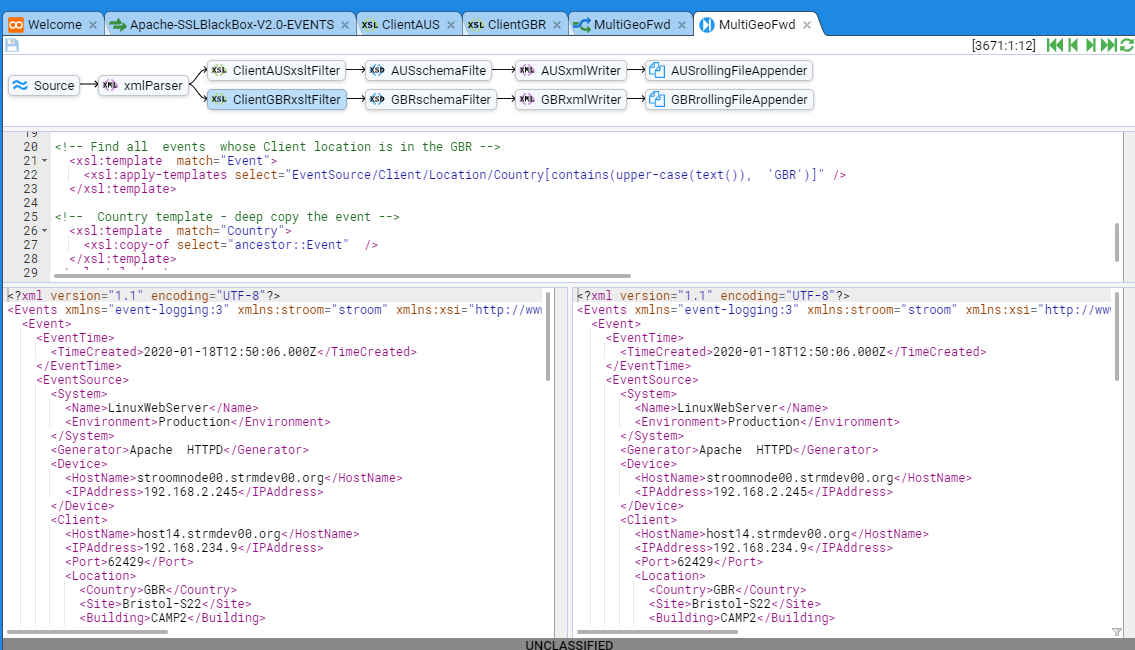
We have thus tested the ‘splitting’ effect of our pipeline. We now need to turn it on and produce files.
Enabling Processors for Multi Forwarding Pipeline
To enable the Processors for the pipeline, select the MultiGeoFwd pipeline tab and then select the Processors sub-item.
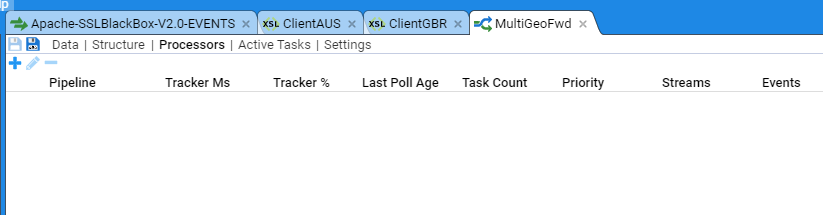
For testing purposes, we will only apply this pipeline to our Apache-SSLBlackBox-V2.0-EVENTS feed to minimise the test output files.
To create the Processor, click the Add Processor icon to bring up the Add Processor selection window.
Add the following items to the processor:
- Feed is
Apache-SSLBlackBox-V2.0-EVENTS - Type =
Events

Then press OK to see
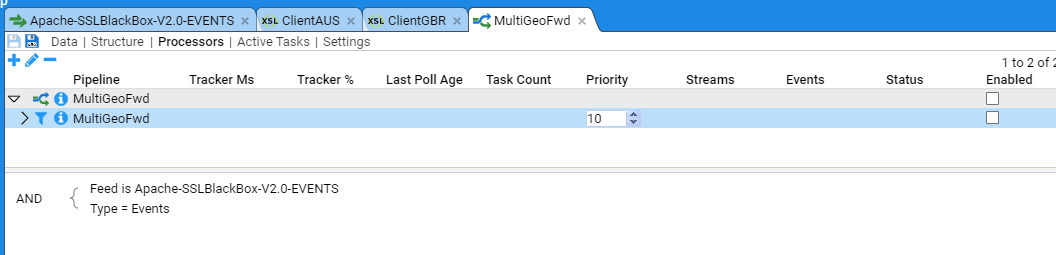
Enable the processors by checking both Enabled check boxes
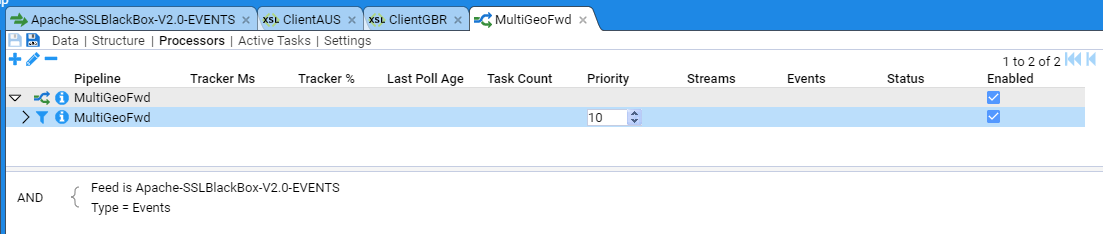
If we switch to the Active Tasks tab of the MultiGeoFwd pipeline, a refresh of the panes will show that we have passed streams from the APACHE-SSLBlackBox-V2.0-EVENTS feed to completion. If we select the MultiGeoFwd pipeline in the top pane we will see each stream that has run.
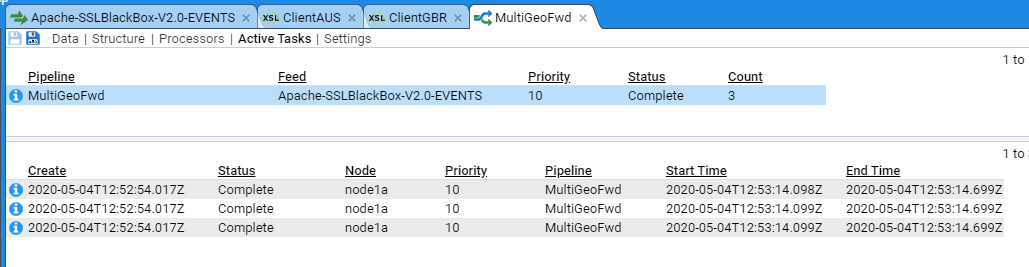
Take note that all streams have processed on Node node1a.
Examine Output Files on Destination Node
If we navigate to the /stroom/volumes/defaultStreamVolume/forwarding directory on the processing node we should be able to view the expected output files.
The output directory contains files with suffixes of *.lock or *.ready. All the files that are ‘currently processing’ have a nomenclature of *.lock suffix. These are the files that our pipeline is currently writing to. Remember we configured the rollingFileAppender to roll the files at a frequency of 15 minutes. We may need to wait up to 15 minutes before a file move from .lock to .ready status.
If we check one of the AUS00 output files we see the expected result
Similarly, if we look at one of the GBR00 output files we also see the expected output
At this point, you can manage the .ready files in any manner you see fit.
5 - User Guide
Reference documentation for how to use Stroom.
5.1 - Application Programming Interfaces (API)
Stroom’ public REST APIs for querying and interacting with all aspects of Stroom.
Stroom has many public REST
APIs
API
Application Programming Interface. An interface that one system can present so other systems can use it to communicate. Stroom has a number of APIs, e.g. its many REST APIs and its /datafeed interface for data receipt.Click to see more details... to allow other systems to interact with Stroom.
Everything that can be done via the user interface can also be done using the API.
All methods on the API will are authenticated and authorised, so the permissions will be exactly the same as if the API user is using the Stroom user interface directly.
5.1.1 - API Specification
Details of the API specification and how to find what API endpoints are available.
Swagger UI
The APIs are available as a Swagger Open API specification in the following forms:
- JSON - stroom.json
- YAML - stroom.yaml
A dynamic Swagger user interface is also available for viewing all the API endpoints with details of parameters and data types. This can be found in two places.
- Published on GitHub for each minor version Swagger user interface .
- Published on a running stroom instance at the path
/stroom/noauth/swagger-ui.
API Endpoints in Application Logs
The API methods are also all listed in the application logs when Stroom first boots up, e.g.
INFO 2023-01-17T11:09:30.244Z main i.d.j.DropwizardResourceConfig The following paths were found for the configured resources:
GET /api/account/v1/ (stroom.security.identity.account.AccountResourceImpl)
POST /api/account/v1/ (stroom.security.identity.account.AccountResourceImpl)
POST /api/account/v1/search (stroom.security.identity.account.AccountResourceImpl)
DELETE /api/account/v1/{id} (stroom.security.identity.account.AccountResourceImpl)
GET /api/account/v1/{id} (stroom.security.identity.account.AccountResourceImpl)
PUT /api/account/v1/{id} (stroom.security.identity.account.AccountResourceImpl)
GET /api/activity/v1 (stroom.activity.impl.ActivityResourceImpl)
POST /api/activity/v1 (stroom.activity.impl.ActivityResourceImpl)
POST /api/activity/v1/acknowledge (stroom.activity.impl.ActivityResourceImpl)
GET /api/activity/v1/current (stroom.activity.impl.ActivityResourceImpl)
...
You will also see entries in the logs for the various servlets exposed by Stroom, e.g.
INFO ... main s.d.common.Servlets Adding servlets to application path/port:
INFO ... main s.d.common.Servlets stroom.core.servlet.DashboardServlet => /stroom/dashboard
INFO ... main s.d.common.Servlets stroom.core.servlet.DynamicCSSServlet => /stroom/dynamic.css
INFO ... main s.d.common.Servlets stroom.data.store.impl.ImportFileServlet => /stroom/importfile.rpc
INFO ... main s.d.common.Servlets stroom.receive.common.ReceiveDataServlet => /stroom/noauth/datafeed
INFO ... main s.d.common.Servlets stroom.receive.common.ReceiveDataServlet => /stroom/noauth/datafeed/*
INFO ... main s.d.common.Servlets stroom.receive.common.DebugServlet => /stroom/noauth/debug
INFO ... main s.d.common.Servlets stroom.data.store.impl.fs.EchoServlet => /stroom/noauth/echo
INFO ... main s.d.common.Servlets stroom.receive.common.RemoteFeedServiceRPC => /stroom/noauth/remoting/remotefeedservice.rpc
INFO ... main s.d.common.Servlets stroom.core.servlet.StatusServlet => /stroom/noauth/status
INFO ... main s.d.common.Servlets stroom.core.servlet.SwaggerUiServlet => /stroom/noauth/swagger-ui
INFO ... main s.d.common.Servlets stroom.resource.impl.SessionResourceStoreImpl => /stroom/resourcestore/*
INFO ... main s.d.common.Servlets stroom.dashboard.impl.script.ScriptServlet => /stroom/script
INFO ... main s.d.common.Servlets stroom.security.impl.SessionListServlet => /stroom/sessionList
INFO ... main s.d.common.Servlets stroom.core.servlet.StroomServlet => /stroom/ui
5.1.2 - Calling an API
How to call a method on the Stroom API using curl.
Authentication
In order to use the API endpoints you will need to authenticate. Authentication is achieved using an API Key API Key API Keys are a form of authentication token that are created within Stroom for use by Stroom-Proxy instances or other clients that want to use Stroom’s API. It is an encrypted string that contains details of the user and the expiration date of the token. Possession of a valid API Key for a user account means that you can do anything that the user can do in the user interface via the API.Click to see more details... or Token Token Typically refers to an authentication token that may be used for user authentication. A Stroom API Key is a form of authentication token.Click to see more details....
You will either need to create an API key for your personal Stroom user account or for a shared processing user account. Whichever user account you use it will need to have the necessary permissions for each API endpoint it is to be used with.
To create an API key (token) for a user:
- In the top menu, select:
- Click Create.
- Enter a suitable expiration date. Short expiry periods are more secure in case the key is compromised.
- Select the user account that you are creating the key for.
- Click
- Select the newly created API Key from the list of keys and double click it to open it.
- Click to copy the key to the clipboard.
To make an authenticated API call you need to provide a header of the form Authorization:Bearer ${TOKEN}, where ${TOKEN} is your API Key as copied from Stroom.
Calling an API method with curl
This section describes how to call an API method using the command line tool curl as an example client.
Other clients can be used, e.g. using python, but these examples should provide enough help to get started using another client.
HTTP Requests Without a Body
Typically HTTP GET requests will have no body/payload
Often PUT and DELETE requests will also have no body/payload.
The following is an example of how to call an HTTP GET method (i.e. a method that does not require a request body) on the API using curl.
Example output:
{"discoverTime":"2022-02-16T17:28:37.710Z","buildInfo":{"buildDate":"2022-01-19T15:27:25.024677714Z","buildVersion":"7.0-beta.175","upDate":"2022-02-16T09:28:11.733Z"},"nodeName":"node1a","endpointUrl":"http://192.168.1.64:8080","itemList":[{"nodeName":"node1a","active":true,"master":true}],"ping":2}
Warning
The --insecure argument is used in this example which means certificate verification will not take place.
It is recommended not to use this argument and instead supply curl with client and certificate authority certificates to make a secure connection.
You can either call the API via Nginx (or similar reverse proxy) at https://stroom-fqdn/api/some/path or if you are making the call from one of the stroom hosts you can go direct using http://localhost:8080/api/some/path. The former is preferred as it is more secure.
Requests With a Body
A lot of the API methods in Stroom require complex bodies/payloads for the request.
The following example is an HTTP POST to perform a reference data lookup on the local host.
Create a file req.json containing:
{
"mapName": "USER_ID_TO_STAFF_NO_MAP",
"effectiveTime": "2024-12-02T08:37:02.772Z",
"key": "user2",
"referenceLoaders": [
{
"loaderPipeline" : {
"name" : "Reference Loader",
"uuid" : "da1c7351-086f-493b-866a-b42dbe990700",
"type" : "Pipeline"
},
"referenceFeed" : {
"name": "STAFF-NO-REFERENCE",
"uuid": "350003fe-2b6c-4c57-95ed-2e6018c5b3d5",
"type" : "Feed"
}
}
]
}
Now send the request with curl.
This API method returns plain text or XML depending on the reference data value.
Note
This assumes you are using curl version 7.82.0 or later that supports the --json argument.
If not you will need to replace --json with --data and add these arguments:
--header "Content-Type: application/json"
--header "Accept: application/json"
Handling JSON
jq is a utility for processing JSON and is very useful when using the API methods.
For example to get just the build version from the node info endpoint:
5.1.3 - Query APIs
The APIs to allow other systems to query the data held in Stroom.
The Query APIs use common request/response models and end points for querying each type of data source held in Stroom. The request/response models are defined in stroom-query .
Currently Stroom exposes a set of query endpoints for the following data source types. Each data source type will have its own endpoint due to differences in the way the data is queried and the restrictions imposed on the query terms. However they all share the same API definition.
- stroom-index Queries - The Lucene based search indexes.
- Sql Statistics Query - Stroom’s SQL Statistics store.
- Searchable - Searchables are various data sources that allow you to search the internals of Stroom, e.g. local reference data store, annotations, processor tasks, etc.
The detailed documentation for the request/responses is contained in the Swagger definition linked to above.
Common endpoints
The standard query endpoints are
Datasource
The Data source Data source The source of data for a Query, e.g. a Lucene based Index, a SQL Statistics Data source, etc.Click to see more details... endpoint is used to query Stroom for the details of a data source with a given Doc Ref Doc Ref A Doc Ref (or Document Reference) is an identifier used to identify most documents/entities in Stroom, e.g. an XSLT will have a Doc Ref.Click to see more details.... The details will include such things as the fields available and any restrictions on querying the data.
Search
The search endpoint is used to initiate a search against a data source or to request more data for an active search. A search request can be made using iterative mode, where it will perform the search and then only return the data it has immediately available. Subsequent requests for the same queryKey will also return the data immediately available, expecting that more results will have been found by the query. Requesting a search in non-iterative mode will result in the response being returned when the query has completed and all known results have been found.
The SearchRequest model is fairly complicated and contains not only the query terms but also a definition of how the data should be returned. A single SearchRequest can include multiple ResultRequest sections to return the queried data in multiple ways, e.g. as flat data and in an alternative aggregated form.
Stroom as a query builder
Stroom is able to export the json form of a SearchRequest model from its dashboards. This makes the dashboard a useful tool for building a query and the table settings to go with it. You can use the dashboard to define the data source, define the query terms tree and build a table definition (or definitions) to describe how the data should be returned. Then, clicking the download icon on the query pane of the dashboard will generate the SearchRequest json which can be immediately used with the /search API or modified to suit.
Destroy
This endpoint is used to kill an active query by supplying the queryKey for query in question.
Keep alive
Stroom will only hold search results from completed queries for a certain length of time. It will also terminate running queries that are too old. In order to prevent queries being aged off you can hit this endpoint to indicate to Stroom that you still have an interest in a particular query by supplying the query key.
5.1.4 - Export Content API
An API method for exporting all Stroom content to a zip file.
Stroom has
API
API
Application Programming Interface. An interface that one system can present so other systems can use it to communicate. Stroom has a number of APIs, e.g. its many REST APIs and its /datafeed interface for data receipt.Click to see more details... methods for exporting
Content
Content
Content in Stroom typically means the user created documents/entities created in Stroom and as seen in the explorer tree. Content can be created/modified by Stroom users and imported/exported for sharing between different Stroom instances.Click to see more details... in Stroom to a single zip file.
Export All - /api/export/v1
This method will export all content in Stroom to a single zip file. This is useful as an alternative backup of the content or where you need to export the content for import into another Stroom instance.
In order to perform a full export, the user (identified by their API Key) performing the export will need to ensure the following:
- Have created an API Key
- The system property
stroom.export.enabledis set totrue. - The user has the application permission
Export ConfigurationorAdministrator.
Only those items that the user has Read permission on will be exported, so to export all items, the user performing the export will need Read permission on all items or have the Administrator application permission.
Performing an Export
To export all readable content to a file called export.zip do something like the following:
Note
If you encounter problems then replace--silent with --verbose to get more information.
Export Zip Format
The export zip will contain a number of files for each Document Document Typically refers to an item that can be created in the Explorer Tree, e.g. a Feed, a Pipeline, a Dashboard, etc. May also be known as an Entity.Click to see more details... exported. The number and type of these files will depend on the type of document, however every document will have the following two file types:
.node- This file represents the document’s location in the explorer tree along with its name and UUID..meta- This is the metadata for the document independent of the explorer tree. It contains the name, type and UUID of the document along with the unique identifier for the version of the document.
Documents may also have files like these (a non-exhaustive list):
.json- JSON data holding the content of the document, as used for Dashboards..txt- Plain text data holding the content of the document, as used for Dictionaries..xml- XML data holding the content of the document, as used for Pipelines..xsd- XML Schema content..xsl- XSLT content.
The following is an example of the content of an export zip file:
TEST_FEED_CERT.Feed.fcee4270-a479-4cc0-a79c-0e8f18a4bad8.meta
TEST_FEED_CERT.Feed.fcee4270-a479-4cc0-a79c-0e8f18a4bad8.node
TEST_FEED_PROXY.Feed.f06d4416-8b0e-4774-94a9-729adc5633aa.meta
TEST_FEED_PROXY.Feed.f06d4416-8b0e-4774-94a9-729adc5633aa.node
TEST_REFERENCE_DATA_EVENTS_XXX.XSLT.4f74999e-9d69-47c7-97f7-5e88cc7459f7.meta
TEST_REFERENCE_DATA_EVENTS_XXX.XSLT.4f74999e-9d69-47c7-97f7-5e88cc7459f7.xsl
TEST_REFERENCE_DATA_EVENTS_XXX.XSLT.4f74999e-9d69-47c7-97f7-5e88cc7459f7.node
Standard_Pipelines/Reference_Loader.Pipeline.da1c7351-086f-493b-866a-b42dbe990700.xml
Standard_Pipelines/Reference_Loader.Pipeline.da1c7351-086f-493b-866a-b42dbe990700.meta
Standard_Pipelines/Reference_Loader.Pipeline.da1c7351-086f-493b-866a-b42dbe990700.node
Filenames
When documents are added to the zip, they are added with a directory structure that mirrors the explorer tree.
The filenames are of the form:
<name>.<type>.<UUID>.<extension>
As Stroom allows characters in document and folder names that would not be supported in operating system paths (or cause confusion), some characters in the name/directory parts are replaced by _ to avoid this. e.g. Dashboard 01/02/2020 would become Dashboard_01_02_2020.
If you need to see the contents of the zip as if viewing it within Stroom you can run this bash script in the root of the extracted zip.
#!/usr/bin/env bash
shopt -s globstar
for node_file in **/*.node; do
name=
name="$(grep -o -P "(?<=name=).*" "${node_file}" )"
path=
path="$(grep -o -P "(?<=path=).*" "${node_file}" )"
echo "./${path}/${name} (./${node_file})"
done
This will output something like:
5.1.5 - Reference Data API
How to perform reference data loads and lookups using the API.
The reference data store has an API to allow other systems to access the reference data store.
/api/refData/v1/lookup
The /lookup endpoint requires the caller to provide details of the reference feed and loader pipeline so if the effective stream is not in the store it can be loaded prior to performing the lookup.
It is useful for forcing a reference load into the store and for performing ad-hoc lookups.
Note
As reference data stores are local to a node, it is best to send the request to a node that does processing as it is more likely to have already loaded the data. If you send it to a UI node that does not do processing, it is likely to trigger a load as the data will not be there.Below is an example of a lookup request file req.json.
{
"mapName": "USER_ID_TO_LOCATION",
"effectiveTime": "2020-12-02T08:37:02.772Z",
"key": "jbloggs",
"referenceLoaders": [
{
"loaderPipeline" : {
"name" : "Reference Loader",
"uuid" : "da1c7351-086f-493b-866a-b42dbe990700",
"type" : "Pipeline"
},
"referenceFeed" : {
"name": "USER_ID_TOLOCATION-REFERENCE",
"uuid": "60f9f51d-e5d6-41f5-86b9-ae866b8c9fa3",
"type" : "Feed"
}
}
]
}
This is an example of how to perform the lookup on the local host.
5.1.6 - Data Download API
The API for downloading stream data in ZIP form.
Download ZIP
This endpoint provides the means to download one or more streams (and their associated meta data and child streams) that match the supplied criteria as a single ZIP file.
The Swagger specification for the endpoint can be found here .
The endpoint requires a JSON payload in the POST request to provide the filter criteria.
The following is an example of a criteria object to fetch the Raw Events streams for a given Feed and time range.
{
"expression" : {
"type" : "operator",
"children" : [ {
"type" : "term",
"field" : "Feed",
"condition" : "IS_DOC_REF",
"docRef" : {
"type" : "Feed",
"uuid" : "cb305f67-a460-40f2-a9bb-d855010e2922",
"name" : "ZIP_TEST-DATA_SPLITTER-EVENTS"
}
}, {
"type" : "term",
"field" : "Status",
"condition" : "EQUALS",
"value" : "Unlocked"
}, {
"type" : "term",
"field" : "Create Time",
"condition" : "BETWEEN",
"value" : "2025-08-13T00:00:00.000Z,2026-05-13T00:00:00.000Z"
}, {
"type" : "term",
"field" : "Type",
"condition" : "EQUALS",
"value" : "Raw Events"
} ]
}
}
If the above JSON has been written to the file criteria.json, the following curl command will download all streams that match the criteria to data.zip.
5.1.7 - Authentication Proxy
An endpoint to use Stroom as a proxy for an external IDP to obtain access tokens.
During provisioning of a Stroom instance that is configured to use an external IDP, it is sometimes required to call Stroom’s API to provision the system in an automated way. In order to call the API, some form of authentication will be needed, e.g. an access token from IDP.
To make it easier to obtain an access token, Stroom has the /api/authproxy/v1/noauth/fetchClientCredsToken endpoint.
This endpoint is not authenticated and essentially calls out to the configured external IDP to obtain an access token for the provided client credentials (client ID and secret).
In order to use it you must obtain these credentials for the user identity you want a token for.
Typically these will be the credentials for Stroom’s own IDP client, which can be obtained from Stroom’s config.yml file.
The following is an example of a bash script that uses jq and yq to obtain a token that can be used to call Stroom’s authenticated APIs.
if ! command -v jq 1>/dev/null; then
echo "jq is not installed, please install it." >&2
exit 1
fi
if ! command -v yq 1>/dev/null; then
echo "yq is not installed, please install it." >&2
exit 1
fi
local config_file="config/config.yml"
local client_id_path='.appConfig.security.authentication.openId.clientId'
local client_secret_path='.appConfig.security.authentication.openId.clientSecret'
local client_id
client_id="$(yq -r "${client_id_path}" < "${config_file}")"
local client_secret
client_secret="$(yq -r "${client_secret_path}" < "${config_file}")"
if [[ -z "${client_id}" || "${client_id}" = "null" ]]; then
echo "'${client_id_path}' not found in ${config_file}" >&2
exit 1
fi
if [[ -z "${client_secret}" || "${client_secret}" = "null" ]]; then
echo "'${client_secret_path}' not found in ${config_file}" >&2
exit 1
fi
local req_json
req_json="$( \
jq \
-n \
--arg client_id "${client_id}" \
--arg client_secret "${client_secret}" \
'{clientId: $client_id, clientSecret: $client_secret}')"
curl \
-s \
-k \
--header "Content-Type: application/json" \
--request POST \
--data "${req_json}" \
"${SCHEME}://${HOST}:${PORT}/api/authproxy/v1/noauth/fetchClientCredsToken"
5.1.8 - Explorer API
The API for managing the folders and documents in the explorer tree.
Creating a New Document
The explorer API is responsible for creation of all document types. The explorer API is used to create the initial skeleton of a document then the API specific to the document type in question is used to update the document skeleton with additional settings/content.
This is an example request file req.json:
{
"docType": "Feed",
"docName": "MY_FEED",
"destinationFolder": {
"type": "Folder",
"uuid": "3dfab6a2-dbd5-46ee-b6e9-6df45f90cd85",
"name": "My Folder",
"rootNodeUuid": "0"
},
"permissionInheritance": "DESTINATION"
}
You need to set the following properties in the JSON:
docType- The type of the document being created, see Documents.docName- The name of the new document.destinationFolder.uuid- The UUID UUID A Universally Unique Identifier for uniquely identifying something. UUIDs are used as the identifier in Doc Refs. An example of a UUID is4ffeb895-53c9-40d6-bf33-3ef025401ad3.Click to see more details... of the destination folder (or0if the document is being created in the System root.rootNodeUuid- This is always0for the System root.
To create the skeleton document run the following:
This will create the document and return its new UUID to stdout.
5.1.9 - Feed API
The API for fetching and updating feeds.
Creating a Feed
In order to create a Feed you must first create the skeleton document using the Explorer API.
Updating a Feed
To modify a feed you must first fetch the existing Feed document. This is done as follows:
Where ${feed_uuid} is the
UUID
UUID
A Universally Unique Identifier for uniquely identifying something. UUIDs are used as the identifier in Doc Refs. An example of a UUID is 4ffeb895-53c9-40d6-bf33-3ef025401ad3.Click to see more details... of the feed in question.
This will return the Feed document JSON.
{
"type": "Feed",
"uuid": "0dafc9c2-dcd8-4bb6-88ce-5ee228babe78",
"name": "MY_FEED",
"version": "32dae12f-a696-4e0e-8acb-47cf0ad3c77f",
"createTimeMs": 1718103980225,
"updateTimeMs": 1718103980225,
"createUser": "admin",
"updateUser": "admin",
"reference": false,
"streamType": "Raw Events",
"status": "RECEIVE"
}
You can use jq to modify this JSON to add/change any of the document settings.
Example Script
The following is an example bash script for creating and modifying multiple Feeds.
It requires curl and jq to run.
#!/usr/bin/env bash
set -e -o pipefail
main() {
# Your API key
local TOKEN="sak_d5752a32b2_mv1JYUYUuvRUDpikW75G5w4kQUq7EEjShQ9DiRjN14yEFonKTW42KbeQogui52gTjq9RDRufNEz2MXt1PRCThudzHU5RVpLMbZKThCgyyEX2y2sBrk31rYMJRKNg2yMG"
# UUID of the dest folder
local FOLDER_UUID="fc617580-8cf0-4ac3-93dd-93604603aef0"
local feed_name
local create_feed_req
local feed_uuid
local feed_doc
for i in {1..2}; do
# Use date to make a unique name for the test
feed_name="MY_FEED_$(date +%s)_${i}"
# Set the feed name and its destination
create_feed_req=$(cat <<-END
{
"docType": "Feed",
"docName": "${feed_name}",
"destinationFolder": {
"type": "Folder",
"uuid": "${FOLDER_UUID}",
"rootNodeUuid": "0"
},
"permissionInheritance": "DESTINATION"
}
END
)
# Create the skeleton feed and extract its new UUID from the response
feed_uuid=$( \
curl \
-s \
-X POST \
-H "Authorization:Bearer ${TOKEN}" \
-H 'Content-Type: application/json' \
--data "${create_feed_req}" \
http://localhost:8080/api/explorer/v2/create/ \
| jq -r '.uuid'
)
echo "Created feed $i with name '${feed_name}' and UUID '${feed_uuid}'"
# Fetch the created feed
feed_doc=$( \
curl \
-s \
-H "Authorization:Bearer ${TOKEN}" \
"http://localhost:8080/api/feed/v1/${feed_uuid}" \
)
echo -e "Skeleton Feed doc for '${feed_name}'\n$(jq '.' <<< "${feed_doc}")"
# Add/modify properties on the feed doc
feed_doc=$(jq '
.classification="HUSH HUSH"
| .encoding="UTF8"
| .contextEncoding="ASCII"
| .streamType="Events"
| .volumeGroup="Default Volume Group"' <<< "${feed_doc}")
#echo -e "Updated feed doc for '${feed_name}'\n$(jq '.' <<< "${feed_doc}")"
# Update the feed with the new properties
curl \
-s \
-X PUT \
-H "Authorization:Bearer ${TOKEN}" \
-H 'Content-Type: application/json' \
--data "${feed_doc}" \
"http://localhost:8080/api/feed/v1/${feed_uuid}" \
> /dev/null
# Fetch the created feed
feed_doc=$( \
curl \
-s \
-H "Authorization:Bearer ${TOKEN}" \
"http://localhost:8080/api/feed/v1/${feed_uuid}" \
)
echo -e "Updated Feed doc for '${feed_name}'\n$(jq '.' <<< "${feed_doc}")"
echo
done
}
main "$@"
5.2 - Background Jobs
Managing background jobs.
There are various jobs that run in the background within Stroom. Among these are jobs that control pipeline processing, removing old files from the file system, checking the status of nodes and volumes etc. Each job executes at a different time depending on the purpose of the job. There are three ways that a job can be executed:
- Cron scheduled jobs execute periodically according to a Cron Cron Cron is a command line utility found on most linux/unix systems that is used for scheduling background tasks. Cron expressions (or variants of them) are widely used in other schedulers.Click to see more details... schedule. These include jobs such as cleaning the file system where Stroom only needs to perform this action once a day and can do so overnight.
- Frequency controlled jobs are executed every X seconds, minutes, hours etc. Most of the jobs that execute with a given frequency are status checking jobs that perform a short lived action fairly frequently.
- Distributed jobs are only applicable to stream processing with a pipeline. Distributed jobs are executed by a worker node as soon as a worker has available threads to execute a jobs and the task distributor has work available.
A list of job types and their execution method can be seen by opening Jobs from the main menu.
Each job can be enabled/disabled at the job level. If you click on a job you will see an entry for each Stroom node in the lower pane. The job can be enabled/disabled at the node level for fine grained control of which nodes are running which jobs.
For a full list of all the jobs and details of what each one does, see the Job reference.
5.2.1 - Scheduler
How background jobs are scheduled.
Stroom has two main types of schedule, a simple frequency schedule that runs the job at a fixed time interval or a more complex Cron Cron Cron is a command line utility found on most linux/unix systems that is used for scheduling background tasks. Cron expressions (or variants of them) are widely used in other schedulers.Click to see more details... schedule.
Note
This scheduler and its syntax are also used for Analytic Rules .
Frequency Schedules
A frequency schedule is expressed as a fixed time interval.
The frequency schedule expression syntax is stroom’s standard duration syntax and takes the form of a value followed by an optional unit suffix, e.g. 10m for ten minutes.
| Prefix | Time Unit |
|---|---|
| milliseconds | |
ms |
milliseconds |
s |
seconds |
m |
minutes |
h |
hours |
d |
days |
Cron Schedules
Cron Cron Cron is a command line utility found on most linux/unix systems that is used for scheduling background tasks. Cron expressions (or variants of them) are widely used in other schedulers.Click to see more details... is a syntax for expressing schedules.
For full details of cron expressions see Cron Syntax
Stroom uses a scheduler called Quartz which supports cron expressions for scheduling.
5.3 - Concepts
Describes a number of core concepts involved in using Stroom.
5.3.1 - Streams
The unit of data that Stroom operates on, essentially a bounded stream of data.
Streams can either be created when data is directly POSTed in to Stroom or during the proxy aggregation process. When data is directly POSTed to Stroom the content of the POST will be stored as one Stream. With proxy aggregation multiple files in the proxy repository will/can be aggregated together into a single Stream.
Anatomy of a Stream
A Stream is made up of a number of parts of which the raw or cooked data is just one. In addition to the data the Stream can contain a number of other child stream types, e.g. Context and Meta Data.
The hierarchy of a stream is as follows:
- Stream nnn
- Part [1 to *]
- Data [1-1]
- Context [0-1]
- Meta Data [0-1]
- Part [1 to *]
Although all streams conform to the above hierarchy there are three main types of Stream that are used in Stroom:
- Non-segmented Stream - Raw events, Raw Reference
- Segmented Stream - Events, Reference
- Segmented Error Stream - Error
Segmented means that the data has been demarcated into segments or records.
Child Stream Types
Data
This is the actual data of the stream, e.g. the XML events, raw CSV, JSON, etc.
Context
This is additional contextual data that can be sent with the data. Context data can be used for reference data lookups.
Meta Data
This is the data about the Stream (e.g. the feed name, receipt time, user agent, etc.). This meta data either comes from the HTTP headers when the data was POSTed to Stroom or is added by Stroom or Stroom-Proxy on receipt/processing.
Non-Segmented Stream
The following is a representation of a non-segmented stream with three parts, each with Meta Data and Context child streams.

Raw Events and Raw Reference streams contain non-segmented data, e.g. a large batch of CSV, JSON, XML, etc. data. There is no notion of a record/event/segment in the data, it is simply data in any form (including malformed data) that is yet to be processed and demarcated into records/events, for example using a Data Splitter or an XML parser.
The Stream may be single-part or multi-part depending on how it is received. If it is the product of proxy aggregation then it is likely to be multi-part. Each part will have its own context and meta data child streams, if applicable.
Segmented Stream
The following is a representation of a segmented stream that contains three records (i.e. events) and the Meta Data.

Cooked Events and Reference data are forms of segmented data. The raw data has been parsed and split into records/events and the resulting data is stored in a way that allows Stroom to know where each record/event starts/ends. These streams only have a single part.
Error Stream

Error streams are similar to segmented Event/Reference streams in that they are single-part and have demarcated records (where each error/warning/info message is a record). Error streams do not have any Meta Data or Context child streams.
5.4 - Data Receipt
Describes the varisous aspects of Stroom (& Stroom Proxy) receiving data via its /datafeed or event endpoints.
5.4.1 - Feed Status Checking
The process of checking a Feed’s status on data receipt to determine what to do with that data.
Feed status checking is Stroom’s legacy method for controlling data receipt. For a richer method of controlling data receipt, see Data Receipt Rules
If the property stroom.receive.receiptCheckMode is set to FEED_STATUS, the Feed Status value that has been set on the Feed is used to determine the action to perform on that data.
Feed Status Values
A Feed can have the following Feed Status values:
-
Receive - All data for this Feed will be received into Stroom / Stroom Proxy.
-
Reject - All data for this feed will be rejected. The client will get HTTP
406error with the message110 - Feed is not set to receive data. -
Drop - All data for this Feed will be silently dropped by Stroom / Stroom Proxy, i.e. discarded and not stored. The client will receive a HTTP
200response as if the data had been successfully received. This is for use if you do not want the client to know their data is being discarded.
Stroom Proxy
Stroom Proxy is also able to perform Feed status checking. Stroom Proxy does not have direct access to the Feed settings so has to perform the Feed status check by making a request to a downstream Stroom Proxy or Stroom. If a Stroom Proxy receives a Feed status check it will proxy that request to its own downstream Stroom / Stroom Proxy.
Stroom Proxy will cache the response it gets from the downstream, so that it doesn’t need to make a call for every stream received.
To configure Stroom Proxy for Feed status checking you need to set the following properties:
proxyConfig:
receive:
# The action to take if there is a problem with the data receipt rules, e.g.
# Stroom Proxy has been unable to contact Stroom to fetch the rules.
fallbackReceiveAction: "RECEIVE"
receiptCheckMode: "FEED_STATUS"
downstreamHost:
# The API key to use for authentication (unless OpenID Connect is being used)
apiKey: null
# The hostname of the downstream
hostname: null
# The port to connect to the downstream on
# If not set, will default to 80/443 depending on scheme.
port: null
# The scheme to connect to the downstream on
scheme: "https"
5.4.2 - Data Receipt Rules
Describes the process of creating Data Receipt Rules to control whether data received by Stroom or Stroom Proxy is Accepted, Rejected or Dropped.
Data Receipt Rules serves as an alternative to the legacy Feed status checking performed by Stroom Proxy and Stroom. It provides a much richer mechanism for controlling which received data streams are Received, Rejected or Dropped. It allows anyone with the Manage Data Receipt Rules Application Permission to create one or more rules to controls the receipt of data.
Data Receipt Rules can be accessed as follows:
Each rule is defined by a boolean expression (as used in Dashboards and Stream filtering) and the Action (Receive, Reject, Drop_ that will be performed if the data matches the rule. Rules are evaluated in ascending order by Rule Number. The action is taken from the first rule to match.
If no rules match then the data will be rejected by default, i.e. the rules are include rather than exclude filters.
If you want data to be received if no rules match then you can create a rule at the end of the list with an Action of Receive and no expression terms.
If a stream matches a rule that has an Accept action, it will still be subject to a check to see if the Feed actually exists.
This means that the rules do not need to contain an Accept rule to cover all of the Feeds in the system.
They only need to cover
The client will receive a 101 Feed is not defined error if it does not exist.

The screen operates in a similar way to Data Retention Rules in that rules can be moved up/down to change their importance, or enabled/disabled.
Fields
The fields available to use in the expression terms can be defined in the Fields tab. The terms will be evaluated against the stream’s meta data, i.e. a combination of the HTTP headers sent by the client and any that have been populated by Stroom Proxy or Stroom. This allows for the use of custom headers to aid in the filtering of data into Stroom.
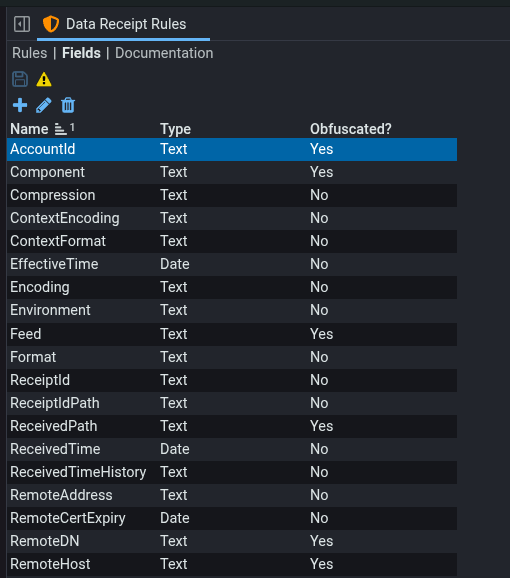
Dictionaries are supported for use with the in dictionary condition.
The contents of the dictionary and any of the dictionaries that it inherits will be included in the data fetched by Stroom Proxy.
Note
You cannot use the same dictionary for multiple fields if any one of those fields is obfuscated.
Should you need to use the same dictionary for an obfuscated and a non-obfuscated field, you can create one empty dictionary for each and make them both import from the same source dictionary.
Stroom Configuration
Data Receipt Rules are controlled by the following configuration:
appConfig:
receiptPolicy:
# List of fields whose values will be obfuscated when the rules
# are fetched by Stroom Proxy
obfuscatedFields:
- "AccountId"
- "AccountName"
- "Component"
# ... truncated
- "UploadUserId"
- "UploadUsername"
- "X-Forwarded-For"
# The hash algorithm used to hash obfuscated values, one of:
# * SHA3_256
# * SHA2_256
# * BCRYPT
# * ARGON_2
# * SHA2_512
obfuscationHashAlgorithm: "SHA2_512"
# The initial list of fields to bootstrap a Stroom environment.
# Changing this has no effect one an environment has been started up.
receiptRulesInitialFields:
AccountId: "Text"
Component: "Text"
Compression: "Text"
content-length: "Text"
# ... truncated
Type: "Text"
UploadUsername: "Text"
UploadUserId: "Text"
user-agent: "Text"
X-Forwarded-For: "Text"
receive:
# The action to take if there is a problem with the data receipt rules, e.g.
# Stroom Proxy has been unable to contact Stroom to fetch the rules.
fallbackReceiveAction: "RECEIVE"
# The data receipt checking mode, one of:
# * FEED_STATUS - Use the legacy Feed Status Check method
# * RECEIPT_POLICY - Use the new Data Receipt Rules
# * RECEIVE_ALL - Receive ALL data with no checks
# * DROP_ALL - Drop ALL data with no checks
# * REJECT_ALL - Reject ALL data with no checks
receiptCheckMode: "RECEIPT_POLICY"
Stroom Proxy Configuration
appConfig:
receiptPolicy:
# Only set this if you need to supply a non-standard full url
# By default Proxy will use the known path for the Data Receipt Rules resource
# combined with the host/port/scheme from the `downstreamHost` config property.
receiveDataRulesUrl: null
# The frequency that the rules will be fetched from the downstream Stroom instance.
syncFrequency: "PT1M"
# Identical configuration to Stroom as described above.
# Stroom and Stroom Proxy can use different `receiptCheckMode` values, but typically
# they will be the same.
receiptPolicy:
Stroom Proxy Rule Synchronisation
If Stroom Proxy is configured with receiptCheckMode set to RECEIPT_POLICY and has downstreamHost configured, then it will periodically send a request to Stroom to fetch the latest copy of the Data Receipt Rules.
If Stroom Proxy is unable to contact Stroom it will use the latest copy of the rules that it has.
Given that Stroom Proxy will only synchronise periodically, once a change is made to the rule set, there will be a delay before the new rules take effect.
Term Value Obfuscation
As a Stroom administrator you may not want the values used in the Data Receipt Rule expression terms to be visible when they are fetched by a remote Stroom Proxy (that may be maintained by another team).
It is therefore possible to obfuscate the values used for the expression terms for certain configured fields.
The fields that are obfuscated are controlled by the property stroom.receiptPolicy.obfuscatedFields.
For example, in the default configuration, Feed is an obfuscated field.
Thus a term like Feed != FEED_XYZ would have its value obfuscated when fetched by Stroom Proxy.
Stroom Proxy is able to similarly obfuscate meta data values for obfuscated fields in the same way to allow it to test the rule expression.
Warning
Due to the way obfuscation works, you are limited by the expression conditions that can be used, e.g.contains, >, < etc. are not allowed, but == and != are.
Stroom will tell you if you are using an unsupported condition for the field.
This prevents the Stroom Proxy administrator from being able to see the values used in the rules as they are not in plain text.
Each value is salted with its own unique salt then hashed.
The hash algorithm can be configured using stroom.receiptPolicy.obfuscationHashAlgorithm.
Note
Obfuscation is not encryption. The fetched data includes the salt values and given enough compute/time it would be possible to brute force the reversal of the hashing. Strong hashing algorithms such as BCrypt or Argon2 can mitigate against this but not remove the risk. If the rule values are too sensitive then you will have to let the Stroom Proxy accept the data and have Stroom do the full rule based checking.5.4.3 - Feed Name Generation
The auto-generation of Feed names using a Feed name template and various header values.
Auto-generation of Feed names allows Stroom and Stroom Proxy to generate the Feed name based on a configured template and the values of various mandatory and optional headers. This feature was conceived for Data Feed Identities but can be used in isolation if required.
When the property (app|proxy)Config.receive.feedNameGenerationEnabled is set to true, the Feed header is no longer required on data receipt and auto-generation of a Feed name will be attempted.
When data is supplied without the Feed header, the meta keys specified in (app|proxy)Config.receive.feedNameGenerationMandatoryHeaders become mandatory.
If the mandatory headers are not supplied, the data will be rejected.
The property (app|proxy)Config.receive.feedNameTemplate is used to control the format of the generated Feed name.
The template uses values from the headers, so should be configured in tandem with .receive.feedNameGenerationMandatoryHeaders, though can use optional headers that the client may or may not supply.
If the template parameter is not in the headers, then it will be replaced with nothing.
The variables in the template (e.g. ${accountId}) are case-insensitive.
If enabled, Feed name generation happens on data receipt in both Stroom-Proxy and Stroom. You should therefore ensure the configuration for this feature is identical in Stroom and Stroom-Proxy.
The default configuration for Feed name generation is:
appConfig|proxyConfig: # applicable to both appConfig: and proxyConfig:
receive:
...
feedNameGenerationEnabled: false
feedNameGenerationMandatoryHeaders:
- "AccountId" # A unique identifier for the owner of the system sending the data.
- "Component" # The system/component that is sending the data (an account may have multiple).
- "Format" # The data format (e.g. XML, JSON, etc.).
- "Schema" # The schema that the data conforms to (e.g. event-logging).
feedNameTemplate: "${accountid}-${component}-${format}-${schema}"
See Also
For more explanation of the receive configuration branch, see Receive Configuration.
Assuming the above default configuration and that the client sends the following headers:
AccountId: 1234
Component: av-scanner
Format: XML
Schema: event-logging
This will result in an auto-generated Feed name of 1234-AV_SCANNER-XML-EVENT_LOGGING.
Note
When a template variable is replaced with a value from the headers, it is converted to upper case and any characters that are NOT in the regular expression character class [A-Z0-9_], will be replaced by a _ character.
Any static text in the template will also be converted to upper case and the supported characters for static text are [A-Z0-9_-], with all other characters being replaced with a _.
5.4.4 - Content Templates
Describes how Stroom can auto-generate content (i.e. Feeds and Pipelines) upon receipt of new data.
The aim of the Content Templates feature is to simplify the process of client systems sending data into Stroom. Instead of having to pre-create a Feed and Pipeline before a client can send data, Content Templates can be created to auto-create the content on receipt of the first Stream Stream A Stream is the unit of data that Stroom works with and will typically contain many Events.Click to see more details....
Content Templates are a set of expression rules with associated template content to generate when the rule matches on incoming data. If a client has used the correct headers and a Content Template matches, all the content required to process the data will be created and the data will be processed without any further involvement from the Stroom administrator.
In order to use Content Templates, the property appConfig.autoContentCreation.enable must be set to true.
Content Templates Screen
Content Templates can be managed in the Content Templates screen that is accessed from the main menu:
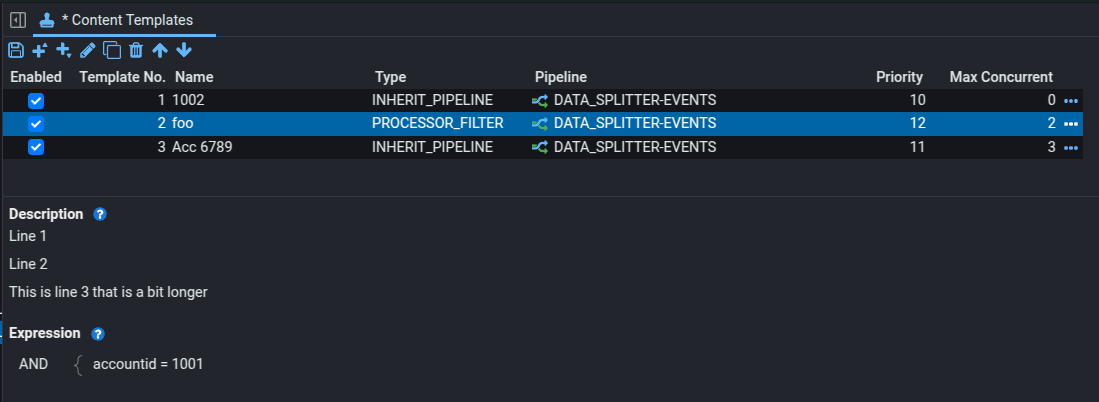
This screen allows a user with the Manage Content Templates application permission to create a number of content templates.
The settings available on a Content Template are as follows:
- Template Name
- A name for the template to aid the administrator when looking through a list of different templates.
- Descriptions
- An optional and more detailed description of the purpose of the template.
- Template Type
- Determines how the Pipeline specified by the Pipeline setting is used.
-
INHERIT_PIPELINE- A new pipeline will be created that inherits from the pipeline specified by Pipeline. The new pipeline will be created in the explorer tree folder defined by(app|proxy)Config.receive.destinationExplorerPathTemplate. -
PROCESSOR_FILTER- A new processor filter will be added to the existing pipeline specified in the template. No new documents will be created.
-
- Copy Pipeline Element Dependencies
- If Copy Pipeline Element Dependencies is ticked and the Template Type is
INHERIT_PIPELINE, any documents that are direct dependencies of the specified Pipeline (e.g. Text Converter or XSLT ) will be copied into the destination folder. The new Pipeline will have its dependencies changed to use the copied dependencies, allowing them to be edited without affecting the parent Pipeline. - Pipeline
- An existing Pipeline to either inherit from or add a processor filter to, depending on the Template Type.
- Processor Priority
- The priority to assign to the pipeline processor when created. The higher the number the higher the priority. Value must be between 1 and 100. The default priority is 10.
- Processor Max Concurrent Tasks
- The maximum number of concurrent tasks to assign to the pipeline processor when created. Zero means un-bounded.
- Expression
- Each template has an expression that will be used to match on the headers when auto-generation of content has been triggered.
The template expressions are evaluated in order from the top, the first to match the data is used.
If a template’s expression matches, content will be created according to settings in the template.
Configuration
The configuration for the Content Templates can be found here.
Content Auto-Creation
Depending on the configuration and the settings in the Content Template that matches on the data, the following will happen if the feed does not already exist. If the feed already exists then it is assumed the content creation has already happened or has been done manually, so nothing will happen.
INHERIT_PIPELINE Mode
-
Create a stroom user for the authenticated identity that has sent the data.
-
Create a stroom user group using the template defined by property
groupTemplate.- Add the created stroom user to this group.
- Add this group to the group defined by
groupParentGroupName.
-
If Copy Pipeline Element Dependencies is ticked:
- Create a stroom user group using the template defined by property
additionalGroupTemplate.- Add the created stroom user to this group.
- If
additionalGroupParentGroupNameis defined and doesn’t exist:- Create the Stroom user group specified in this property.
- Create a stroom user group using the template defined by property
-
Create an explorer tree folder using the template defined by property
destinationExplorerPathTemplate.- Grant
VIEWpermission to the created group. - Grant
VIEWpermission to the created additional group.
- Grant
-
If Copy Pipeline Element Dependencies is ticked:
- Create an explorer tree sub folder using the template defined by property
destinationExplorerSubPathTemplate.- Grant
VIEWpermission to the created group. - Grant
EDITpermission to the created additional group.
- Grant
- Create an explorer tree sub folder using the template defined by property
-
Create a Feed in the folder defined by
destinationExplorerPathTemplate.- Grant
VIEWpermission to the created group. - Grant
VIEWpermission to the created additional group (if Copy Pipeline Dependencies is ticked).
- Grant
-
Create a Pipeline in the folder defined by
destinationExplorerPathTemplateand set it to inherit from the Pipeline defined in the Content Template.-
Grant
VIEWpermission to the created group. -
If Copy Pipeline Element Dependencies is ticked:
- Copy the dependency documents of the parent Pipeline into this folder.
- Grant
VIEWpermission to the created additional group.
-
Create a Processor Filter on the new Pipeline (using the priority and concurrency setting taken from the Content Template) with the following expression:
Feed
isX AND Type=Y[Where X is the Feed created above and Y is the stream type of the received data.]
-
-
If
groupParentGroupNameis defined:- Create the Stroom user group specified in this property if it doesn’t exist.
- Add the group defined by
groupTemplateto this group.
-
If Copy Pipeline Element Dependencies is ticked and
additionalGroupParentGroupNameis defined:- Create the Stroom user group specified in this property if it doesn’t exist.
- Add the group defined by
additionalGroupTemplateto this group.
Copy Dependencies Example
The following is an example of the content that will be created with the following assumptions:
- The Feed name is
1234-AV_SCANNER-XML-EVENT_LOGGING. AccountId: 1234in the Meta data.- Copy Pipeline Element Dependencies is ticked on the Content Template.
- Default
autoContentCreationconfiguration.
System
Feeds(Administrators: OWNER)
1234(Administrators: OWNER, grp-1234: VIEW, grp-1234-dev: VIEW)
Content(Administrators: OWNER, grp-1234: VIEW, grp-1234-dev: EDIT)
1234-AV_SCANNER-XML-EVENT_LOGGING-dsParser(Administrators: OWNER, grp-1234: VIEW, grp-1234-dev: EDIT)
1234-AV_SCANNER-XML-EVENT_LOGGING-translationFilter(Administrators: OWNER, grp-1234: VIEW, grp-1234-dev: EDIT)
1234-AV_SCANNER-XML-EVENT_LOGGING(Administrators: OWNER, grp-1234: VIEW, grp-1234-dev: VIEW)
1234-AV_SCANNER-XML-EVENT_LOGGING(Administrators: OWNER, grp-1234: VIEW, grp-1234-dev: VIEW)
Don’t Copy Dependencies Example
The following is an example of the content that will be created with the following assumptions:
- The Feed name is
1234-AV_SCANNER-XML-EVENT_LOGGING. AccountId: 1234in the Meta data.- Copy Pipeline Element Dependencies is NOT ticked on the Content Template.
- Default
autoContentCreationconfiguration.
System
Feeds(Administrators: OWNER)
1234(Administrators: OWNER, grp-1234: VIEW)
1234-AV_SCANNER-XML-EVENT_LOGGING(Administrators: OWNER, grp-1234: VIEW)
1234-AV_SCANNER-XML-EVENT_LOGGING(Administrators: OWNER, grp-1234: VIEW)
PROCESSOR_FILTER Mode
-
Create a stroom user for the authenticated identity that has sent the data.
-
Create a stroom user group using the template defined by property
groupTemplate.- Add the created stroom user to this group.
-
Create an explorer tree folder using the template defined by property
destinationExplorerPathTemplate.- Grant
VIEWpermission to the created group.
- Grant
-
Create a Feed in the folder defined by
destinationExplorerPathTemplate.- Grant
VIEWpermission to the created group.
- Grant
-
Create a Processor Filter on the new Pipeline (using the priority and concurrency setting taken from the Content Template) with the following expression:
Feed
isX AND Type=Y[Where X is the Feed created above and Y is the stream type of the received data.]
-
If
groupParentGroupNameis defined:- Create the Stroom user group specified in this property if it doesn’t exist.
- Add the group defined by
groupTemplateto this group.
Example
The following is an example of the content that will be created with the following assumptions:
- The Feed name is
1234-AV_SCANNER-XML-EVENT_LOGGING. AccountId: 1234in the Meta data.- Default
autoContentCreationconfiguration.
System
Feeds(Administrators: OWNER)
1234(Administrators: OWNER, grp-1234: VIEW)
1234-AV_SCANNER-XML-EVENT_LOGGING(Administrators: OWNER, grp-1234: VIEW)
Expression Fields
When creating the expression in a Content Template, the user will be limited to a set of fields to match on.
These fields will be matched against the meta data of the Stream.
The list of fields that can be used are configured using the property .autoContentCreation.templateMatchFields.
5.4.5 - Data Feed Identities
Data Feed Identities is an authentication mechanism designed specifically for the
/datafeed API.Data Feed Identities are a new authentication mechanism for data receipt into both Stroom-Proxy and Stroom. It combines a set of authentication identities with a pre-defined set of static meta entries.
There are currently two types of Data Feed Identities:
- Data Feed Keys - Similar to an API Key.
- Certificate Identities - Uses an X509 Distinguished Name for authentication.
Both types of identity are written to one or more files that are placed on the Stroom or Stroom Proxy Host in a directory configured by .receive.dataFeedIdentitiesDir.
The following is an example of a file containing one of each type:
{
"dataFeedIdentities" : [ {
"type" : "DATA_FEED_KEY",
"expiryDateEpochMs" : 1775237109581,
"hash" : "$2a$10$JdngdVGxg6RGBeerku.JNusZdyyh4rNHYN5UeNKXRVdNUSNbg3NP6",
"hashAlgorithm" : "BCRYPT_2A",
"salt" : "$2a$10$JdngdVGxg6RGBeerku.JNu",
"streamMetaData" : {
"AccountId" : "1000",
"MetaKey2" : "MetaKey2Val-1000",
"MetaKey1" : "MetaKey1Val-1000"
}
}, {
"type" : "CERTIFICATE_DN",
"certificateDn" : "/DC=com/DC=example/DC=corp/OU=Users/CN=John Doe 2/emailAddress=john_doe@example.com",
"expiryDateEpochMs" : 1775237109581,
"streamMetaData" : {
"AccountId" : "2002",
"MetaKey2" : "MetaKey2Val-2002",
"MetaKey1" : "MetaKey1Val-2002"
}
} ]
}
The file can contain zero-many of either type and the directory can contain zero-many of these files. This allows for generating Data Feed Keys with a life of say 26hrs, adding a new file every day and deleting files older than 2 days.
The file(s) will be read on boot and all hashed keys will be stored in memory for receipt authentication. Files added to this directory while Stroom-Proxy/Stroom is running will be read and added to the in-memory store of hashed keys. Files deleted from this directory will result in all entries associated with the file path being removed from the in-memory store of hashed keys.
Common properties
The following JSON properties are common to both types:
-
type- The type of the identity, one of (DATA_FEED_KEY|CERTIFICATE_DN). -
expiryDateEpochMs- The time the identity expires expressed as milliseconds since the epoch. -
streamMetaData- A map of Meta key/value pairs to set on the Stream’s Meta Data on receipt. The attributes instreamMetaDatawill overwrite any matching attribute keys in the received data.
The property .receive.dataFeedOwnerMetaKey defines the Meta key that will be used to extract the owner of the Data Feed Identity.
By default this key is set to accountId.
It is typically an identifier for a client team that may have one or more systems that require one or more Feeds in Stroom.
An accountID can have many active Data Feed Identities.
Data Feed Keys
They allow for a set of hashed short life keys to be placed in a directory accessible to Stroom-Proxy/Stroom for receipt requests to be authenticated against.
{
"type" : "DATA_FEED_KEY",
"expiryDateEpochMs" : 1775237109581,
"hash" : "$2a$10$JdngdVGxg6RGBeerku.JNusZdyyh4rNHYN5UeNKXRVdNUSNbg3NP6",
"hashAlgorithm" : "BCRYPT_2A",
"salt" : "$2a$10$JdngdVGxg6RGBeerku.JNu",
"streamMetaData" : {
"AccountId" : "1000",
"MetaKey2" : "MetaKey2Val-1000",
"MetaKey1" : "MetaKey1Val-1000"
}
}
type must always be DATA_FEED_KEY for a Data Feed Key.
Data Feed Identities have an expiry date after which they will no longer work. Multiple files can be placed in the directory and all valid keys will be loaded.
The hashAlgorithmId is the identifier for the hash algorithm used to hash the key.
The system creating the hashed data feed keys must use the same hash algorithm and parameters when hashing the key as Stroom will use when it hashes the key used in data receipt to validate them.
Currently the only hash algorithm available for use is Argon2 with an ID of 000 and the following parameters:
- Hash length: 48
- Iterations: 2
- Memory KB: 65536
A Data Feed Key takes the following form:
sdk_<3 char hash algorithm ID>_<128 char random Base58 string>
The regular expression pattern for a Data Feed Key is
^sdk_[0-9]{3}_[A-HJ-NP-Za-km-z1-9]{128}$
Data Feed Identities are used in the same way as API Keys or OAuth2 tokens, i.e. using the Header Authorization: Bearer <data feed key>.
Certificate Identities
These identities allow client systems to authenticate with an X509 certificate.
Typically the TLS will be terminated by an Nginx or load balancer sitting in front of Stroom/Stroom-Proxy, and it will pass the DN as a header (configured by .receive.x509CertificateDnHeader).
{
"type" : "CERTIFICATE_DN",
"certificateDn" : "/DC=com/DC=example/DC=corp/OU=Users/CN=John Doe 2/emailAddress=john_doe@example.com",
"expiryDateEpochMs" : 1775237109581,
"streamMetaData" : {
"AccountId" : "2002",
"MetaKey2" : "MetaKey2Val-2002",
"MetaKey1" : "MetaKey1Val-2002"
}
}
type must always be CERTIFICATE_DN for a Certificate Identity.
certificateDn is the certificate’s DN (Distinguished Name) in the format defined by .receive.x509CertificateDnFormat.
When a client sends data, the DN extracted from the header will be checked against all the DNs in the Certificate Identities.
If one matches and is not expired, it will authenticate using the owner and set the Meta entries using streamMetaData.
5.5 - Data Retention
Controlling the purging/retention of old data.
By default Stroom will retain all the data it ingests and creates forever. It is likely that storage constraints/costs will mean that data needs to be deleted after a certain time. It is also likely that certain types of data may need to be kept for longer than other types.
Rules
Stroom allows for a set of data retention policy rules to be created to control at a fine grained level what data is deleted and what is retained.
The data retention rules are accessible by selecting Data Retention from the Tools menu. On first use the Rules tab of the Data Retention screen will show a single rule named Default Retain All Forever Rule. This is the implicit rule in stroom that retains all data and is always in play unless another rule overrides it. This rule cannot be edited, moved or removed.
Rule Precedence
Rules have a precedence, with a lower rule number being a higher priority.
When running the data retention job, Stroom will look at each stream held on the system and the retention policy of the first rule (starting from the lowest numbered rule) that matches that stream will apply.
Once a matching rule is found all other rules with higher rule numbers (lower priority) are ignored.
For example if rule 1 says to retain streams from feed X-EVENTS for 10 years and rule 2 says to retain streams from feeds *-EVENTS for 1 year then rule 1 would apply to streams from feed X-EVENTS and they would be kept for 10 years, but rule 2 would apply to feed Y-EVENTS and they would only be kept for 1 year.
Rules are re-numbered as new rules are added/deleted/moved.
Creating a Rule
To create a rule do the following:
- Click the icon to add a new rule.
- Edit the expression to define the data that the rule will match on.
- Provide a name for the rule to help describe what its purpose is.
- Set the retention period for data matching this rule, i.e. Forever or a set time period.
The new rule will be added at the top of the list of rules, i.e. with the highest priority. The and icons can be used to change the priority of the rule.
Rules can be enabled/disabled by clicking the checkbox next to the rule.
Changes to rules will not take effect until the icon is clicked.
Rules can also be deleted ( ) and copied ( ).
Impact Summary
When you have a number of complex rules it can be difficult to determine what data will actually be deleted next time the Policy Based Data Retention job runs. To help with this, Stroom has the Impact Summary tab that acts as a dry run for the active rules. The impact summary provides a count of the number of streams that will be deleted broken down by rule, stream type and feed name. On large systems with lots of data or complex rules, this query may take a long time to run.
The impact summary operates on the current state of the rules on the Rules tab whether saved or un-saved. This allows you to make a change to the rules and test its impact before saving it.
5.6 - Data Splitter
Data Splitter was created to transform text into XML. The XML produced is basic but can be processed further with XSLT to form any desired XML output.
Data Splitter works by using regular expressions to match a region of content or tokenisers to split content. The whole match or match group can then be output or passed to other expressions to further divide the matched data.
The root <dataSplitter> element controls the way content is read and buffered from the source.
It then passes this content on to one or more child expressions that attempt to match the content.
The child expressions attempt to match content one at a time in the order they are specified until one matches.
The matching expression then passes the content that it has matched to other elements that either emit XML or apply other expressions to the content matched by the parent.
This process of content supply, match, (supply, match)*, emit is best illustrated in a simple CSV example. Note that the elements and attributes used in all examples are explained in detail in the element reference.
5.6.1 - Simple CSV Example
The following CSV data will be split up into separate fields using Data Splitter.
01/01/2010,00:00:00,192.168.1.100,SOMEHOST.SOMEWHERE.COM,user1,logon,
01/01/2010,00:01:00,192.168.1.100,SOMEHOST.SOMEWHERE.COM,user1,create,c:\test.txt
01/01/2010,00:02:00,192.168.1.100,SOMEHOST.SOMEWHERE.COM,user1,logoff,
The first thing we need to do is match each record. Each record in a CSV file is delimited by a new line character. The following configuration will split the data into records using ‘\n’ as a delimiter:
<?xml version="1.0" encoding="UTF-8"?>
<dataSplitter
xmlns="data-splitter:3"
xmlns:xsi="http://www.w3.org/2001/XMLSchema-instance"
xsi:schemaLocation="data-splitter:3 file://data-splitter-v3.0.xsd"
version="3.0">
<!-- Match each line using a new line character as the delimiter -->
<split delimiter="\n"/>
</dataSplitter>
In the above example the ‘split’ tokeniser matches all of the supplied content up to the end of each line ready to pass each line of content on for further treatment.
We can now add a <group> element within <split> to take content matched by the tokeniser.
<?xml version="1.0" encoding="UTF-8"?>
<dataSplitter
xmlns="data-splitter:3"
xmlns:xsi="http://www.w3.org/2001/XMLSchema-instance"
xsi:schemaLocation="data-splitter:3 file://data-splitter-v3.0.xsd"
version="3.0">
<!-- Match each line using a new line character as the delimiter -->
<split delimiter="\n">
<!-- Take the matched line (using group 1 ignores the delimiters,
without this each match would include the new line character) -->
<group value="$1">
</group>
</split>
</dataSplitter>
The <group> within the <split> chooses to take the content from the <split> without including the new line ‘\n’ delimiter by using match group 1, see expression match references for details.
01/01/2010,00:00:00,192.168.1.100,SOMEHOST.SOMEWHERE.COM,user1,logon,
The content selected by the <group> from its parent match can then be passed onto sub expressions for further matching:
<?xml version="1.0" encoding="UTF-8"?>
<dataSplitter
xmlns="data-splitter:3"
xmlns:xsi="http://www.w3.org/2001/XMLSchema-instance"
xsi:schemaLocation="data-splitter:3 file://data-splitter-v3.0.xsd"
version="3.0">
<!-- Match each line using a new line character as the delimiter -->
<split delimiter="\n">
<!-- Take the matched line (using group 1 ignores the delimiters,
without this each match would include the new line character) -->
<group value="$1">
<!-- Match each value separated by a comma as the delimiter -->
<split delimiter=",">
</split>
</group>
</split>
</dataSplitter>
In the above example the additional <split> element within the <group> will match the content provided by the group repeatedly until it has used all of the group content.
The content matched by the inner <split> element can be passed to a <data> element to emit XML content.
<?xml version="1.0" encoding="UTF-8"?>
<dataSplitter
xmlns="data-splitter:3"
xmlns:xsi="http://www.w3.org/2001/XMLSchema-instance"
xsi:schemaLocation="data-splitter:3 file://data-splitter-v3.0.xsd"
version="3.0">
<!-- Match each line using a new line character as the delimiter -->
<split delimiter="\n">
<!-- Take the matched line (using group 1 ignores the delimiters,
without this each match would include the new line character) -->
<group value="$1">
<!-- Match each value separated by a comma as the delimiter -->
<split delimiter=",">
<!-- Output the value from group 1 (as above using group 1
ignores the delimiters, without this each value would include
the comma) -->
<data value="$1" />
</split>
</group>
</split>
</dataSplitter>
In the above example each match from the inner <split> is made available to the inner <data> element that chooses to output content from match group 1, see expression match references for details.
The above configuration results in the following XML output for the whole input:
<?xml version="1.0" encoding="UTF-8"?>
<records
xmlns="records:2"
xmlns:xsi="http://www.w3.org/2001/XMLSchema-instance"
xsi:schemaLocation="records:2 file://records-v2.0.xsd"
version="3.0">
<record>
<data value="01/01/2010" />
<data value="00:00:00" />
<data value="192.168.1.100" />
<data value="SOMEHOST.SOMEWHERE.COM" />
<data value="user1" />
<data value="logon" />
</record>
<record>
<data value="01/01/2010" />
<data value="00:01:00" />
<data value="192.168.1.100" />
<data value="SOMEHOST.SOMEWHERE.COM" />
<data value="user1" />
<data value="create" />
<data value="c:\test.txt" />
</record>
<record>
<data value="01/01/2010" />
<data value="00:02:00" />
<data value="192.168.1.100" />
<data value="SOMEHOST.SOMEWHERE.COM" />
<data value="user1" />
<data value="logoff" />
</record>
</records>
5.6.2 - Simple CSV example with heading
In addition to referencing content produced by a parent element it is often desirable to store content and reference it later. The following example of a CSV with a heading demonstrates how content can be stored in a variable and then referenced later on.
Input
This example will use a similar input to the one in the previous CSV example but also adds a heading line.
Date,Time,IPAddress,HostName,User,EventType,Detail
01/01/2010,00:00:00,192.168.1.100,SOMEHOST.SOMEWHERE.COM,user1,logon,
01/01/2010,00:01:00,192.168.1.100,SOMEHOST.SOMEWHERE.COM,user1,create,c:\test.txt
01/01/2010,00:02:00,192.168.1.100,SOMEHOST.SOMEWHERE.COM,user1,logoff,
Configuration
<?xml version="1.0" encoding="UTF-8"?>
<dataSplitter
xmlns="data-splitter:3"
xmlns:xsi="http://www.w3.org/2001/XMLSchema-instance"
xsi:schemaLocation="data-splitter:3 file://data-splitter-v3.0.xsd"
version="3.0">
<!-- Match heading line (note that maxMatch="1" means that only the
first line will be matched by this splitter) -->
<split delimiter="\n" maxMatch="1">
<!-- Store each heading in a named list -->
<group>
<split delimiter=",">
<var id="heading" />
</split>
</group>
</split>
<!-- Match each record -->
<split delimiter="\n">
<!-- Take the matched line -->
<group value="$1">
<!-- Split the line up -->
<split delimiter=",">
<!-- Output the stored heading for each iteration and the value
from group 1 -->
<data name="$heading$1" value="$1" />
</split>
</group>
</split>
</dataSplitter>
Output
<?xml version="1.0" encoding="UTF-8"?>
<records
xmlns="records:2"
xmlns:xsi="http://www.w3.org/2001/XMLSchema-instance"
xsi:schemaLocation="records:2 file://records-v2.0.xsd"
version="3.0">
<record>
<data name="Date" value="01/01/2010" />
<data name="Time" value="00:00:00" />
<data name="IPAddress" value="192.168.1.100" />
<data name="HostName" value="SOMEHOST.SOMEWHERE.COM" />
<data name="User" value="user1" />
<data name="EventType" value="logon" />
</record>
<record>
<data name="Date" value="01/01/2010" />
<data name="Time" value="00:01:00" />
<data name="IPAddress" value="192.168.1.100" />
<data name="HostName" value="SOMEHOST.SOMEWHERE.COM" />
<data name="User" value="user1" />
<data name="EventType" value="create" />
<data name="Detail" value="c:\test.txt" />
</record>
<record>
<data name="Date" value="01/01/2010" />
<data name="Time" value="00:02:00" />
<data name="IPAdress" value="192.168.1.100" />
<data name="HostName" value="SOMEHOST.SOMEWHERE.COM" />
<data name="User" value="user1" />
<data name="EventType" value="logoff" />
</record>
</records>
5.6.3 - Complex example with regex and user defined names
The following example uses a real world Apache log and demonstrates the use of regular expressions rather than simple ‘split’ tokenisers. The usage and structure of regular expressions is outside of the scope of this document but Data Splitter uses Java’s standard regular expression library that is POSIX compliant and documented in numerous places.
This example also demonstrates that the names and values that are output can be hard coded in the absence of field name information to make XSLT conversion easier later on. Also shown is that any match can be divided into further fields with additional expressions and the ability to nest data elements to provide structure if needed.
Input
192.168.1.100 - "-" [12/Jul/2012:11:57:07 +0000] "GET /doc.htm HTTP/1.1" 200 4235 "-" "Mozilla/4.0 (compatible; MSIE 8.0; Windows NT 5.1; Trident/4.0; .NET CLR 1.1.4322; .NET CLR 2.0.50727; .NET4.0C; .NET4.0E; .NET CLR 3.0.4506.2152; .NET CLR 3.5.30729)"
192.168.1.100 - "-" [12/Jul/2012:11:57:07 +0000] "GET /default.css HTTP/1.1" 200 3494 "http://some.server:8080/doc.htm" "Mozilla/4.0 (compatible; MSIE 7.0; Windows NT 5.1; Trident/4.0; .NET CLR 1.1.4322; .NET CLR 2.0.50727; .NET4.0C; .NET4.0E; .NET CLR 3.0.4506.2152; .NET CLR 3.5.30729)"
Configuration
<?xml version="1.0" encoding="UTF-8"?>
<dataSplitter
xmlns="data-splitter:3"
xmlns:xsi="http://www.w3.org/2001/XMLSchema-instance"
xsi:schemaLocation="data-splitter:3 file://data-splitter-v3.0.xsd"
version="3.0">
<!--
Standard Apache Format
%h - host name should be ok without quotes
%l - Remote logname (from identd, if supplied). This will return a dash unless IdentityCheck is set On.
\"%u\" - user name should be quoted to deal with DNs
%t - time is added in square brackets so is contained for parsing purposes
\"%r\" - URL is quoted
%>s - Response code doesn't need to be quoted as it is a single number
%b - The size in bytes of the response sent to the client
\"%{Referer}i\" - Referrer is quoted so that’s ok
\"%{User-Agent}i\" - User agent is quoted so also ok
LogFormat "%h %l \"%u\" %t \"%r\" %>s %b \"%{Referer}i\" \"%{User-Agent}i\"" combined
-->
<!-- Match line -->
<split delimiter="\n">
<group value="$1">
<!-- Provide a regular expression for the whole line with match
groups for each field we want to split out -->
<regex pattern="^([^ ]+) ([^ ]+) "([^"]+)" \[([^\]]+)] "([^"]+)" ([^ ]+) ([^ ]+) "([^"]+)" "([^"]+)"">
<data name="host" value="$1" />
<data name="log" value="$2" />
<data name="user" value="$3" />
<data name="time" value="$4" />
<data name="url" value="$5">
<!-- Take the 5th regular expression group and pass it to
another expression to divide into smaller components -->
<group value="$5">
<regex pattern="^([^ ]+) ([^ ]+) ([^ /]*)/([^ ]*)">
<data name="httpMethod" value="$1" />
<data name="url" value="$2" />
<data name="protocol" value="$3" />
<data name="version" value="$4" />
</regex>
</group>
</data>
<data name="response" value="$6" />
<data name="size" value="$7" />
<data name="referrer" value="$8" />
<data name="userAgent" value="$9" />
</regex>
</group>
</split>
</dataSplitter>
Output
<?xml version="1.0" encoding="UTF-8"?>
<records
xmlns="records:2"
xmlns:xsi="http://www.w3.org/2001/XMLSchema-instance"
xsi:schemaLocation="records:2 file://records-v2.0.xsd"
version="3.0">
<record>
<data name="host" value="192.168.1.100" />
<data name="log" value="-" />
<data name="user" value="-" />
<data name="time" value="12/Jul/2012:11:57:07 +0000" />
<data name="url" value="GET /doc.htm HTTP/1.1">
<data name="httpMethod" value="GET" />
<data name="url" value="/doc.htm" />
<data name="protocol" value="HTTP" />
<data name="version" value="1.1" />
</data>
<data name="response" value="200" />
<data name="size" value="4235" />
<data name="referrer" value="-" />
<data name="userAgent" value="Mozilla/4.0 (compatible; MSIE 8.0; Windows NT 5.1; Trident/4.0; .NET CLR 1.1.4322; .NET CLR 2.0.50727; .NET4.0C; .NET4.0E; .NET CLR 3.0.4506.2152; .NET CLR 3.5.30729)" />
</record>
<record>
<data name="host" value="192.168.1.100" />
<data name="log" value="-" />
<data name="user" value="-" />
<data name="time" value="12/Jul/2012:11:57:07 +0000" />
<data name="url" value="GET /default.css HTTP/1.1">
<data name="httpMethod" value="GET" />
<data name="url" value="/default.css" />
<data name="protocol" value="HTTP" />
<data name="version" value="1.1" />
</data>
<data name="response" value="200" />
<data name="size" value="3494" />
<data name="referrer" value="http://some.server:8080/doc.htm" />
<data name="userAgent" value="Mozilla/4.0 (compatible; MSIE 7.0; Windows NT 5.1; Trident/4.0; .NET CLR 1.1.4322; .NET CLR 2.0.50727; .NET4.0C; .NET4.0E; .NET CLR 3.0.4506.2152; .NET CLR 3.5.30729)" />
</record>
</records>
5.6.4 - Multi Line Example
Example multi line file where records are split over many lines. There are various ways this data could be treated but this example forms a record from data created when some fictitious query starts plus the subsequent query results.
Input
09/07/2016 14:49:36 User = user1
09/07/2016 14:49:36 Query = some query
09/07/2016 16:34:40 Results:
09/07/2016 16:34:40 Line 1: result1
09/07/2016 16:34:40 Line 2: result2
09/07/2016 16:34:40 Line 3: result3
09/07/2016 16:34:40 Line 4: result4
09/07/2009 16:35:21 User = user2
09/07/2009 16:35:21 Query = some other query
09/07/2009 16:45:36 Results:
09/07/2009 16:45:36 Line 1: result1
09/07/2009 16:45:36 Line 2: result2
09/07/2009 16:45:36 Line 3: result3
09/07/2009 16:45:36 Line 4: result4
Configuration
<?xml version="1.0" encoding="UTF-8"?>
<dataSplitter
xmlns="data-splitter:3"
xmlns:xsi="http://www.w3.org/2001/XMLSchema-instance"
xsi:schemaLocation="data-splitter:3 file://data-splitter-v3.0.xsd"
version="3.0">
<!-- Match each record. We want to treat the query and results as a single event so match the two sets of data separated by a double new line -->
<regex pattern="\n*((.*\n)+?\n(.*\n)+?\n)|\n*(.*\n?)+">
<group>
<!-- Split the record into query and results -->
<regex pattern="(.*?)\n\n(.*)" dotAll="true">
<!-- Create a data element to output query data -->
<data name="query">
<group value="$1">
<!-- We only want to output the date and time from the first line. -->
<regex pattern="([^\t]*)\t([^\t]*)[\t]*([^=:]*)[=:]*(.*)" maxMatch="1">
<data name="date" value="$1" />
<data name="time" value="$2" />
<data name="$3" value="$4" />
</regex>
<!-- Output all other values -->
<regex pattern="([^\t]*)\t([^\t]*)[\t]*([^=:]*)[=:]*(.*)">
<data name="$3" value="$4" />
</regex>
</group>
</data>
<!-- Create a data element to output result data -->
<data name="results">
<group value="$2">
<!-- We only want to output the date and time from the first line. -->
<regex pattern="([^\t]*)\t([^\t]*)[\t]*([^=:]*)[=:]*(.*)" maxMatch="1">
<data name="date" value="$1" />
<data name="time" value="$2" />
<data name="$3" value="$4" />
</regex>
<!-- Output all other values -->
<regex pattern="([^\t]*)\t([^\t]*)[\t]*([^=:]*)[=:]*(.*)">
<data name="$3" value="$4" />
</regex>
</group>
</data>
</regex>
</group>
</regex>
</dataSplitter>
Output
<?xml version="1.0" encoding="UTF-8"?>
<records
xmlns="records:2"
xmlns:xsi="http://www.w3.org/2001/XMLSchema-instance"
xsi:schemaLocation="records:2 file://records-v2.0.xsd"
version="2.0">
<record>
<data name="query">
<data name="date" value="09/07/2016" />
<data name="time" value="14:49:36" />
<data name="User" value="user1" />
<data name="Query" value="some query" />
</data>
<data name="results">
<data name="date" value="09/07/2016" />
<data name="time" value="16:34:40" />
<data name="Results" />
<data name="Line 1" value="result1" />
<data name="Line 2" value="result2" />
<data name="Line 3" value="result3" />
<data name="Line 4" value="result4" />
</data>
</record>
<record>
<data name="query">
<data name="date" value="09/07/2016" />
<data name="time" value="16:35:21" />
<data name="User" value="user2" />
<data name="Query" value="some other query" />
</data>
<data name="results">
<data name="date" value="09/07/2016" />
<data name="time" value="16:45:36" />
<data name="Results" />
<data name="Line 1" value="result1" />
<data name="Line 2" value="result2" />
<data name="Line 3" value="result3" />
<data name="Line 4" value="result4" />
</data>
</record>
</records>
5.6.5 - Element Reference
There are various elements used in a Data Splitter configuration to control behaviour. Each of these elements can be categorised as one of the following:
5.6.5.1 - Content Providers
Content providers take some content from the input source or elsewhere (see fixed strings and provide it to one or more expressions.
Both the root element <dataSplitter> and <group> elements are content providers.
Root element <dataSplitter>
The root element of a Data Splitter configuration is <dataSplitter>.
It supplies content from the input source to one or more expressions defined within it.
The way that content is buffered is controlled by the root element and the way that errors are handled as a result of child expressions not matching all of the content it supplies.
Attributes
The following attributes can be added to the <dataSplitter> root element:
ignoreErrors
Data Splitter generates errors if not all of the content is matched by the regular expressions beneath the <dataSplitter> or within <group> elements.
The error messages are intended to aid the user in writing good Data Splitter configurations.
The intent is to indicate when the input data is not being matched fully and therefore possibly skipping some important data.
Despite this, in some cases it is laborious to have to write expressions to match all content.
In these cases it is preferable to add this attribute to ignore these errors.
However it is often better to write expressions that capture all of the supplied content and discard unwanted characters.
This attribute also affects errors generated by the use of the minMatch attribute on <regex> which is described later on.
Take the following example input:
Name1,Name2,Name3
value1,value2,value3 # a useless comment
value1,value2,value3 # a useless comment
This could be matched with the following configuration:
<?xml version="1.0" encoding="UTF-8"?>
<dataSplitter
xmlns="data-splitter:3"
xmlns:xsi="http://www.w3.org/2001/XMLSchema-instance"
xsi:schemaLocation="data-splitter:3 file://data-splitter-v3.0.xsd"
version="3.0">
<regex id="heading" pattern=".+" maxMatch="1">
…
</regex>
<regex id="body" pattern="\n[^#]+">
…
</regex>
</dataSplitter>
The above configuration would only match up to a comment for each record line, e.g.
Name1,Name2,Name3
value1,value2,value3 # a useless comment
value1,value2,value3 # a useless comment
This may well be the desired functionality but if there was useful content within the comment it would be lost. Because of this Data Splitter warns you when expressions are failing to match all of the content presented so that you can make sure that you aren’t missing anything important. In the above example it is obvious that this is the required behaviour but in more complex cases you might be otherwise unaware that your expressions were losing data.
To maintain this assurance that you are handling all content it is usually best to write expressions to explicitly match all content even though you may do nothing with some matches, e.g.
<?xml version="1.0" encoding="UTF-8"?>
<dataSplitter
xmlns="data-splitter:3"
xmlns:xsi="http://www.w3.org/2001/XMLSchema-instance"
xsi:schemaLocation="data-splitter:3 file://data-splitter-v3.0.xsd"
version="3.0">
<regex id="heading" pattern=".+" maxMatch="1">
…
</regex>
<regex id="body" pattern="\n([^#]+)#.+">
…
</regex>
</dataSplitter>
The above example would match all of the content and would therefore not generate warnings. Sub-expressions of ‘body’ could use match group 1 and ignore the comment.
However as previously stated it might often be difficult to write expressions that will just match content that is to be discarded.
In these cases ignoreErrors can be used to suppress errors caused by unmatched content.
bufferSize (Advanced)
This is an optional attribute used to tune the size of the character buffer used by Data Splitter. The default size is 20000 characters and should be fine for most translations. The minimum value that this can be set to is 20000 characters and the maximum is 1000000000. The only reason to specify this attribute is when individual records are bigger than 10000 characters which is rarely the case.
Group element <group>
Groups behave in a similar way to the root element in that they provide content for one or more inner expressions to deal with, e.g.
<group value="$1">
<regex pattern="([^\t]*)\t([^\t]*)[\t]*([^=:]*)[=:]*(.*)" maxMatch="1">
...
<regex pattern="([^\t]*)\t([^\t]*)[\t]*([^=:]*)[=:]*(.*)">
...
Attributes
As the <group> element is a content provider it also includes the same ignoreErrors attribute which behaves in the same way.
The complete list of attributes for the <group> element is as follows:
id
When Data Splitter reports errors it outputs an XPath to describe the part of the configuration that generated the error, e.g.
DSParser [2:1] ERROR: Expressions failed to match all of the content provided by group: regex[0]/group[0]/regex[3]/group[1] : <group>
It is often a little difficult to identify the configuration element that generated the error by looking at the path and the element description, particularly when multiple elements are the same, e.g. many <group> elements without attributes.
To make identification easier you can add an ‘id’ attribute to any element in the configuration resulting in error descriptions as follows:
DSParser [2:1] ERROR: Expressions failed to match all of the content provided by group: regex[0]/group[0]/regex[3]/group[1] : <group id="myGroupId">
value
This attribute determines what content to present to child expressions.
By default the entire content matched by a group’s parent expression is passed on by the group to child expressions.
If required, content from a specific match group in the parent expression can be passed to child expressions using the value attribute, e.g. value="$1".
In addition to this content can be composed in the same way as it is for data names and values.
See Also
Match references for a full description of match references.
ignoreErrors
This behaves in the same way as for the root element.
matchOrder
This is an optional attribute used to control how content is consumed by expression matches.
Content can be consumed in sequence or in any order using matchOrder="sequence" or matchOrder="any".
If the attribute is not specified, Data Splitter will default to matching in sequence.
When matching in sequence, each match consumes some content and the content position is moved beyond the match ready for the subsequent match. However, in some cases the order of these constructs is not predictable, e.g. we may sometimes be presented with:
Value1=1 Value2=2
… or sometimes with:
Value2=2 Value1=1
Using a sequential match order the following example would work to find both values in Value1=1 Value2=2
<group>
<regex pattern="Value1=([^ ]*)">
...
<regex pattern="Value2=([^ ]*)">
...
… but this example would skip over Value2 and only find the value of Value1 if the input was Value2=2 Value1=1.
To be able to deal with content that contains these constructs in either order we need to change the match order to any.
When matching in any order, each match removes the matched section from the content rather than moving the position past the match so that all remaining content can be matched by subsequent expressions.
In the following example the first expression would match and remove Value1=1 from the supplied content and the second expression would be presented with Value2=2 which it could also match.
<group matchOrder="any">
<regex pattern="Value1=([^ ]*)">
...
<regex pattern="Value2=([^ ]*)">
...
If the attribute is omitted by default the match order will be sequential. This is the default behaviour as tokens are most often in sequence and consuming content in this way is more efficient as content does not need to be copied by the parser to chop out sections as is required for matching in any order. It is only necessary to use this feature when fields that are identifiable with a specific match can occur in any order.
reverse
Occasionally it is desirable to reverse the content presented by a group to child expressions. This is because it is sometimes easier to form a pattern by matching content in reverse.
Take the following example content of name, value pairs delimited by = but with no spaces between names, multiple spaces between values and only a space between subsequent pairs:
ipAddress=123.123.123.123 zones=Zone 1, Zone 2, Zone 3 location=loc1 A user=An end user serverName=bigserver
We could write a pattern that matches each name value pair by matching up to the start of the next name, e.g.
<regex pattern="([^=]+)=(.+?)( [^=]+=)">
This would match the following:
ipAddress=123.123.123.123 zones=
Here we are capturing the name and value for each pair in separate groups but the pattern has to also match the name from the next name value pair to find the end of the value. By default Data Splitter will move the content buffer to the end of the match ready for subsequent matches so the next name will not be available for matching.
In addition to matching too much content the above example also uses a reluctant qualifier .+?. Use of reluctant qualifiers almost always impacts performance so they are to be avoided if at all possible.
A better way to match the example content is to match the input in reverse, reading characters from right to left.
The following example demonstrates this:
<group reverse="true">
<regex pattern="([^=]+)=([^ ]+)">
<data name="$2" value="$1" />
</regex>
</group>
Using the reverse attribute on the parent group causes content to be supplied to all child expressions in reverse order. In the above example this allows the pattern to match values followed by names which enables us to cope with the fact that values have multiple spaces but names have no spaces.
Content is only presented to child regular expressions in reverse. When referencing values from match groups the content is returned in the correct order, e.g. the above example would return:
<data name="ipAddress" value="123.123.123.123" />
<data name="zones" value="Zone 1, Zone 2, Zone 3" />
<data name="location" value="loc1" />
<data name="user" value="An end user" />
<data name="serverName" value="bigserver" />
The reverse feature isn’t needed very often but there are a few cases where it really helps produce the desired output without the complexity and performance overhead of a reluctant match.
An alternative to using the reverse attribute is to use the original reluctant expression example but tell Data Splitter to make the subsequent name available for the next match by not advancing the content beyond the end of the previous value. This is done by using the advance attribute on the <regex>. However, the reverse attribute represents a better way to solve this particular problem and allows a simpler and more efficient regular expression to be used.
5.6.5.2 - Expressions
Expressions match some data supplied by a parent content provider. The content matched by an expression depends on the type of expression and how it is configured.
The <split>, <regex> and <all> elements are all expressions and match content as described below.
The <split> element
The <split> element directs Data Splitter to break up content using a specified character sequence as a delimiter.
In addition to this it is possible to specify characters that are used to escape the delimiter as well as characters that contain or “quote” a value that may include the delimiter sequence but allow it to be ignored.
Attributes
The <split> element has the following attributes:
id
Optional attribute used to debug the location of expressions causing errors, see id.
delimiter
A required attribute used to specify the character string that will be used as a delimiter to split the supplied content unless it is preceded by an escape character or within a container if specified. Several of the previous examples use this attribute.
escape
An optional attribute used to specify a character sequence that is used to escape the delimiter. Many delimited text formats have an escape character that is used to tell any parser that the following delimiter should be ignored, e.g. often a character such as ‘' is used to escape the character that follows it so that it is not treated as a delimiter. When specified this escape sequence also applies to any container characters that may be specified.
containerStart
An optional attribute used to specify a character sequence that will make this expression ignore the presence of delimiters until an end container is found. If the character is preceded by the specified escape sequence then this container sequence will be ignored and the expression will continue matching characters up to a delimiter.
If used containerEnd must also be specified.
If the container characters are to be ignored from the match then match group 1 must be used instead of 0.
containerEnd
An optional attribute used to specify a character sequence that will make this expression stop ignoring the presence of delimiters if it believes it is currently in a container. If the character is preceded by the specified escape sequence then this container sequence will be ignored and the expression will continue matching characters while ignoring the presence of any delimiter.
If used containerStart must also be specified.
If the container characters are to be ignored from the match then match group 1 must be used instead of 0.
maxMatch
An optional attribute used to specify the maximum number of times this expression is allowed to match the supplied content. If you do not supply this attribute then the Data Splitter will keep matching the supplied content until it reaches the end. If specified Data Splitter will stop matching the supplied content when it has matched it the specified number of times.
This attribute is used in the ‘CSV with header line’ example to ensure that only the first line is treated as a header line.
minMatch
An optional attribute used to specify the minimum number of times this expression should match the supplied content. If you do not supply this attribute then Data Splitter will not enforce that the expression matches the supplied content. If specified Data Splitter will generate an error if the expression does not match the supplied content at least as many times as specified.
Unlike maxMatch, minMatch does not control the matching process but instead controls the production of error messages generated if the parser is not seeing the expected input.
onlyMatch
Optional attribute to use this expression only for specific instances of a match of the parent expression, e.g. on the 4th, 5th and 8th matches of the parent expression specified by ‘4,5,8’. This is used when this expression should only be used to subdivide content from certain parent matches.
The <regex> element
The <regex> element directs Data Splitter to match content using the specified regular expression pattern.
In addition to this the same match control attributes that are available on the <split> element are also present as well as attributes to alter the way the pattern works.
Attributes
The <regex> element has the following attributes:
id
Optional attribute used to debug the location of expressions causing errors, see id.
pattern
This is a required attribute used to specify a regular expression to use to match on the supplied content.
The pattern is used to match the content multiple times until the end of the content is reached while the maxMatch and onlyMatch conditions are satisfied.
dotAll
An optional attribute used to specify if the use of ‘.’ in the supplied pattern matches all characters including new lines. If ’true’ ‘.’ will match all characters including new lines, if ‘false’ it will only match up to a new line. If this attribute is not specified it defaults to ‘false’ and will only match up to a new line.
This attribute is used in many of the multi-line examples above.
caseInsensitive
An optional attribute used to specify if the supplied pattern should match content in a case insensitive way. If ’true’ the expression will match content in a case insensitive manner, if ‘false’ it will match the content in a case sensitive manner. If this attribute is not specified it defaults to ‘false’ and will match the content in a case sensitive manner.
maxMatch
This is used in the same way it is on the <split> element, see maxMatch.
minMatch
This is used in the same way it is on the <split> element, see minMatch.
onlyMatch
This is used in the same way it is on the <split> element, see onlyMatch.
advance
After an expression has matched content in the buffer, the buffer start position is advanced so that it moves to the end of the entire match. This means that subsequent expressions operating on the content buffer will not see the previously matched content again. This is normally required behaviour, but in some cases some of the content from a match is still required for subsequent matches. Take the following example of name value pairs:
name1=some value 1 name2=some value 2 name3=some value 3
The first name value pair could be matched with the following expression:
<regex pattern="([^=]+)=(.+?) [^= ]+=">
The above expression would match as follows:
name1=some value 1 name2=some value 2 name3=some value 3
In this example we have had to do a reluctant match to extract the value in group 2 and not include the subsequent name. Because the reluctant match requires us to specify what we are reluctantly matching up to, we have had to include an expression after it that matches the next name.
By default the parser will move the character buffer to the end of the entire match so the next expression will be presented with the following:
some value 2 name3=some value 3
Therefore name2 will have been lost from the content buffer and will not be available for matching.
This behaviour can be altered by telling the expression how far to advance the character buffer after matching. This is done with the advance attribute and is used to specify the match group whose end position should be treated as the point the content buffer should advance to, e.g.
<regex pattern="([^=]+)=(.+?) [^= ]+=" advance="2">
In this example the content buffer will only advance to the end of match group 2 and subsequent expressions will be presented with the following content:
name2=some value 2 name3=some value 3
Therefore name2 will still be available in the content buffer.
It is likely that the advance feature will only be useful in cases where a reluctant match is performed. Reluctant matches are discouraged for performance reasons so this feature should rarely be used. A better way to tackle the above example would be to present the content in reverse, however this is only possible if the expression is within a group, i.e. is not a root expression. There may also be more complex cases where reversal is not an option and the use of a reluctant match is the only option.
The <all> element
The <all> element matches the entire content of the parent group and makes it available to child groups or <data> elements.
The purpose of <all> is to act as a catch all expression to deal with content that is not handled by a more specific expression, e.g. to output some other unknown, unrecognised or unexpected data.
<group>
<regex pattern="^\s*([^=]+)=([^=]+)\s*">
<data name="$1" value="$2" />
</regex>
<!-- Output unexpected data -->
<all>
<data name="unknown" value="$" />
</all>
</group>
The <all> element provides the same functionality as using .* as a pattern in a <regex> element and where dotAll is set to true, e.g. <regex pattern=".*" dotAll="true">.
However it performs much faster as it doesn’t require pattern matching logic and is therefore always preferred.
Attributes
The <all> element has the following attributes:
id
Optional attribute used to debug the location of expressions causing errors, see id.
5.6.5.3 - Variables
A variable is added to Data Splitter using the <var> element. A variable is used to store matches from a parent expression for use in a reference elsewhere in the configuration, see variable reference.
The most recent matches are stored for use in local references, i.e. references that are in the same match scope as the variable. Multiple matches are stored for use in references that are in a separate match scope. The concept of different variable scopes is described in scopes.
The <var> element
The <var> element is used to tell Data Splitter to store matches from a parent expression for use in a reference.
Attributes
The <var> element has the following attributes:
id
Mandatory attribute used to uniquely identify it within the configuration (see id) and is the means by which a variable is referenced, e.g. $VAR_ID$.
5.6.5.4 - Output
As with all other aspects of Data Splitter, output XML is determined by adding certain elements to the Data Splitter configuration.
The <data> element
Output is created by Data Splitter using one or more <data> elements in the configuration.
The first <data> element that is encountered within a matched expression will result in parent <record> elements being produced in the output.
Attributes
The <data> element has the following attributes:
id
Optional attribute used to debug the location of expressions causing errors, see id.
name
Both the name and value attributes of the <data> element can be specified using match references.
value
Both the name and value attributes of the <data> element can be specified using match references.
Single <data> element example
The simplest example that can be provided uses a single <data> element within a <split> expression.
Given the following input:
This is line 1
This is line 2
This is line 3
… and the following configuration:
<?xml version="1.0" encoding="UTF-8"?>
<dataSplitter
xmlns="data-splitter:3"
xmlns:xsi="http://www.w3.org/2001/XMLSchema-instance"
xsi:schemaLocation="data-splitter:3 file://data-splitter-v3.0.xsd"
version="3.0">
<split delimiter="\n" >
<data value="$1"/>
</split>
</dataSplitter>
… you would get the following output:
<?xml version="1.0" encoding="UTF-8"?>
<records
xmlns="records:2"
xmlns:xsi="http://www.w3.org/2001/XMLSchema-instance"
xsi:schemaLocation="records:2 file://records-v2.0.xsd"
version="3.0">
<record>
<data value="This is line 1" />
</record>
<record>
<data value="This is line 2" />
</record>
<record>
<data value="This is line 3" />
</record>
</records>
Multiple <data> element example
You could also output multiple <data> elements for the same <record> by adding multiple elements within the same expression:
Given the following input:
ip=1.1.1.1 user=user1
ip=2.2.2.2 user=user2
ip=3.3.3.3 user=user3
… and the following configuration:
<?xml version="1.0" encoding="UTF-8"?>
<dataSplitter
xmlns="data-splitter:3"
xmlns:xsi="http://www.w3.org/2001/XMLSchema-instance"
xsi:schemaLocation="data-splitter:3 file://data-splitter-v3.0.xsd"
version="3.0">
<regex pattern="ip=([^ ]+) user=([^ ]+)\s*">
<data name="ip" value="$1"/>
<data name="user" value="$2"/>
</split>
</dataSplitter>
… you would get the following output:
<?xml version="1.0" encoding="UTF-8"?>
<records
xmlns="records:2"
xmlns:xsi="http://www.w3.org/2001/XMLSchema-instance"
xsi:schemaLocation="records:2 file://records-v2.0.xsd"
version="3.0">
<record>
<data name="ip" value="1.1.1.1" />
<data name="user" value="user1" />
</record>
<record>
<data name="ip" value="2.2.2.2" />
<data name="user" value="user2" />
</record>
<record>
<data name="ip" value="3.3.3.3" />
<data name="user" value="user3" />
</record>
</records>
Multi level <data> elements
As long as all data elements occur within the same parent/ancestor expression, all data elements will be output within the same record.
Given the following input:
ip=1.1.1.1 user=user1
ip=2.2.2.2 user=user2
ip=3.3.3.3 user=user3
… and the following configuration:
<?xml version="1.0" encoding="UTF-8"?>
<dataSplitter
xmlns="data-splitter:3"
xmlns:xsi="http://www.w3.org/2001/XMLSchema-instance"
xsi:schemaLocation="data-splitter:3 file://data-splitter-v3.0.xsd"
version="3.0">
<split delimiter="\n" >
<data name="line" value="$1"/>
<group value="$1">
<regex pattern="ip=([^ ]+) user=([^ ]+)">
<data name="ip" value="$1"/>
<data name="user" value="$2"/>
</regex>
</group>
</split>
</dataSplitter>
… you would get the following output:
<?xml version="1.0" encoding="UTF-8"?>
<records
xmlns="records:2"
xmlns:xsi="http://www.w3.org/2001/XMLSchema-instance"
xsi:schemaLocation="records:2 file://records-v2.0.xsd"
version="3.0">
<record>
<data name="line" value="ip=1.1.1.1 user=user1" />
<data name="ip" value="1.1.1.1" />
<data name="user" value="user1" />
</record>
<record>
<data name="line" value="ip=2.2.2.2 user=user2" />
<data name="ip" value="2.2.2.2" />
<data name="user" value="user2" />
</record>
<record>
<data name="line" value="ip=3.3.3.3 user=user3" />
<data name="ip" value="3.3.3.3" />
<data name="user" value="user3" />
</record>
</records>
Nesting <data> elements
Rather than having <data> elements all appear as children of <record> it is possible to nest them either as direct children or within child groups.
Direct children
Given the following input:
ip=1.1.1.1 user=user1
ip=2.2.2.2 user=user2
ip=3.3.3.3 user=user3
… and the following configuration:
<?xml version="1.0" encoding="UTF-8"?>
<dataSplitter
xmlns="data-splitter:3"
xmlns:xsi="http://www.w3.org/2001/XMLSchema-instance"
xsi:schemaLocation="data-splitter:3 file://data-splitter-v3.0.xsd"
version="3.0">
<regex pattern="ip=([^ ]+) user=([^ ]+)\s*">
<data name="line" value="$">
<data name="ip" value="$1"/>
<data name="user" value="$2"/>
</data>
</split>
</dataSplitter>
… you would get the following output:
<?xml version="1.0" encoding="UTF-8"?>
<record
xmlns="records:2"
xmlns:xsi="http://www.w3.org/2001/XMLSchema-instance"
xsi:schemaLocation="records:2 file://records-v2.0.xsd"
version="3.0">
<record>
<data name="line" value="ip=1.1.1.1 user=user1">
<data name="ip" value="1.1.1.1" />
<data name="user" value="user1" />
</data>
</record>
<record>
<data name="line" value="ip=2.2.2.2 user=user2">
<data name="ip" value="2.2.2.2" />
<data name="user" value="user2" />
</data>
</record>
<record>
<data name="line" value="ip=3.3.3.3 user=user3">
<data name="ip" value="3.3.3.3" />
<data name="user" value="user3" />
</data>
</record>
</records>
Within child groups
Given the following input:
ip=1.1.1.1 user=user1
ip=2.2.2.2 user=user2
ip=3.3.3.3 user=user3
… and the following configuration:
<?xml version="1.0" encoding="UTF-8"?>
<dataSplitter
xmlns="data-splitter:3"
xmlns:xsi="http://www.w3.org/2001/XMLSchema-instance"
xsi:schemaLocation="data-splitter:3 file://data-splitter-v3.0.xsd"
version="3.0">
<split delimiter="\n" >
<data name="line" value="$1">
<group value="$1">
<regex pattern="ip=([^ ]+) user=([^ ]+)">
<data name="ip" value="$1"/>
<data name="user" value="$2"/>
</regex>
</group>
</data>
</split>
</dataSplitter>
… you would get the following output:
<?xml version="1.0" encoding="UTF-8"?>
<records
xmlns="records:2"
xmlns:xsi="http://www.w3.org/2001/XMLSchema-instance"
xsi:schemaLocation="records:2 file://records-v2.0.xsd"
version="3.0">
<record>
<data name="line" value="ip=1.1.1.1 user=user1">
<data name="ip" value="1.1.1.1" />
<data name="user" value="user1" />
</data>
</record>
<record>
<data name="line" value="ip=2.2.2.2 user=user2">
<data name="ip" value="2.2.2.2" />
<data name="user" value="user2" />
</data>
</record>
<record>
<data name="line" value="ip=3.3.3.3 user=user3">
<data name="ip" value="3.3.3.3" />
<data name="user" value="user3" />
</data>
</record>
</records>
The above example produces the same output as the previous but could be used to apply much more complex expression logic to produce the child <data> elements, e.g. the inclusion of multiple child expressions to deal with different types of lines.
5.6.6 - Match References, Variables and Fixed Strings
The <group> and <data> elements can reference match groups from parent expressions or from stored matches in variables. In the case of the <group> element, referenced values are passed on to child expressions whereas the <data> element can use match group references for name and value attributes. In the case of both elements the way of specifying references is the same.
5.6.6.1 - Expression match references
Referencing matches in expressions is done using $. In addition to this a match group number may be added to just retrieve part of the expression match. The applicability and effect that this has depends on the type of expression used.
References to <split> Match Groups
In the following example a line matched by a parent <split> expression is referenced by a child <data> element.
<split delimiter="\n" >
<data name="line" value="$"/>
</split>
A <split> element matches content up to and including the specified delimiter, so the above reference would output the entire line plus the delimiter. However there are various match groups that can be used by child <group> and <data> elements to reference sections of the matched content.
To illustrate the content provided by each match group, take the following example:
"This is some text\, that we wish to match", "This is the next text"
And the following <split> element:
<split delimiter="," escape="\">
The match groups are as follows:
- $ or $0: The entire content that is matched including the specified delimiter at the end
"This is some text\, that we wish to match",
- $1: The content up to the specified delimiter at the end
"This is some text\, that we wish to match"
- $2: The content up to the specified delimiter at the end and filtered to remove escape characters (more expensive than $1)
"This is some text, that we wish to match"
In addition to this behaviour match groups 1 and 2 will omit outermost whitespace and container characters if specified, e.g. with the following content:
" This is some text\, that we wish to match " , "This is the next text"
And the following <split> element:
<split delimiter="," escape="\" containerStart=""" containerEnd=""">
The match groups are as follows:
- $ or $0: The entire content that is matched including the specified delimiter at the end
" This is some text\, that we wish to match " ,
- $1: The content up to the specified delimiter at the end and strips outer containers.
This is some text\, that we wish to match
- $2: The content up to the specified delimiter at the end and strips outer containers and filtered to remove escape characters (more computationally expensive than $1)
This is some text, that we wish to match
References to Match Groups
Like the <split> element various match groups can be referenced in a <regex> expression to retrieve portions of matched content. This content can be used as values for <group> and <data> elements.
Given the following input:
ip=1.1.1.1 user=user1
And the following <regex> element:
<regex pattern="ip=([^ ]+) user=([^ ]+)">
The match groups are as follows:
- $ or $0: The entire content that is matched by the expression
ip=1.1.1.1 user=user1
- $1: The content of the first match group
1.1.1.1
- $2: The content of the second match group
user1
Match group numbers in regular expressions are determined by the order that their open bracket appears in the expression.
References to <any> Match Groups
The <any> element does not have any match groups and always returns the entire content that was passed to it when referenced with $.
5.6.6.2 - Variable reference
Variables are added to Data Splitter configuration using the <var> element, see variables. Each variable must have a unique id so that it can be referenced. References to variables have the form $VARIABLE_ID$, e.g.
<data name="$heading$" value="$" />
Identification
Data Splitter validates the configuration on load and ensures that all element ids are unique and that referenced ids belong to a variable.
A variable will only store data if it is referenced so variables that are not referenced will do nothing. In addition to this a variable will only store data for match groups that are referenced, e.g. if $heading$1 is the only reference to a variable with an id of ‘heading’ then only data for match group 1 will be stored for reference lookup.
Scopes
Variables have two scopes which affect how data is retrieved when referenced:
Local Scope
Variables are local to a reference if the reference exists as a descendant of the variables parent expression, e.g.
<split delimiter="\n" >
<var id="line" />
<group value="$1">
<regex pattern="ip=([^ ]+) user=([^ ]+)">
<data name="line" value="$line$"/>
<data name="ip" value="$1"/>
<data name="user" value="$2"/>
</regex>
</group>
</split>
In the above example, matches for the outermost <split> expression are stored in the variable with the id of line. The only reference to this variable is in a data element that is a descendant of the variables parent expression <split>, i.e. it is nested within split/group/regex.
Because the variable is referenced locally only the most recent parent match is relevant, i.e. no retrieval of values by iteration, iteration offset or fixed position is applicable. These features only apply to remote variables that store multiple values.
Remote Scope
The CSV example with a heading is an example of a variable being referenced from a remote scope.
<?xml version="1.0" encoding="UTF-8"?>
<dataSplitter
xmlns="data-splitter:3"
xmlns:xsi="http://www.w3.org/2001/XMLSchema-instance"
xsi:schemaLocation="data-splitter:3 file://data-splitter-v3.0.xsd"
version="3.0">
<!-- Match heading line (note that maxMatch="1" means that only the first line will be matched by this splitter) -->
<split delimiter="\n" maxMatch="1">
<!-- Store each heading in a named list -->
<group>
<split delimiter=",">
<var id="heading" />
</split>
</group>
</split>
<!-- Match each record -->
<split delimiter="\n">
<!-- Take the matched line -->
<group value="$1">
<!-- Split the line up -->
<split delimiter=",">
<!-- Output the stored heading for each iteration and the value from group 1 -->
<data name="$heading$1" value="$1" />
</split>
</group>
</split>
</dataSplitter>
In the above example the parent expression of the variable is not the ancestor of the reference in the <data> element. This makes the <data> elements reference to the variable a remote one. In this situation the variable knows that it must store multiple values as the remote reference <data> may retrieve one of many values from the variable based on:
- The match count of the parent expression.
- The match count of the parent expression, plus or minus an offset.
- A fixed position in the variable store.
Retrieval of value by iteration
In the above example the first line is taken then repeatedly matched by delimiting with commas. This results in multiple values being stored in the ‘heading’ variable. Once this is done subsequent lines are matched and then also repeatedly matched by delimiting with commas in the same way the heading is.
Each time a line is matched the internal match count of all sub expressions, (e.g. the <split> expression that is delimited by comma) is reset to 0. Every time the sub <split> expression matches up to a comma delimiter the match count is incremented. Any references to remote variables will, by default, use the current match count as an index to retrieve one of the many values stored in the variable. This means that the <data> element in the above example will retrieve the corresponding heading for each value as the match count of the values will match the storage position of each heading.
Retrieval of value by iteration offset
In some cases there may be a mismatch between the position where a value is stored in a variable and the match count applicable when remotely referencing the variable.
Take the following input:
BAD,Date,Time,IPAddress,HostName,User,EventType,Detail
01/01/2010,00:00:00,192.168.1.100,SOMEHOST.SOMEWHERE.COM,user1,logon,
In the above example we can see that the first heading ‘BAD’ is not correct for the first value of every line. In this situation we could either adjust the way the heading line is parsed to ignore ‘BAD’ or just adjust the way the heading variable is referenced.
To make this adjustment the reference just needs to be told what offset to apply to the current match count to correctly retrieve the stored value. In the above example this would be done like this:
<data name="$heading$1[+1]" value="$1" />
The above reference just uses the match count plus 1 to retrieve the stored value. Any integral offset plus or minus may be used, e.g. [+4] or [-10]. Offsets that result in a position that is outside of the storage range for the variable will not return a value.
Retrieval of value by fixed position
In addition to retrieval by offset from the current match count, a stored value can be returned by a fixed position that has no relevance to the current match count.
In the following example the value retrieved from the ‘heading’ variable will always be ‘IPAddress’ as this is the fourth value stored in the ‘heading’ variable and the position index starts at 0.
<data name="$heading$1[3]" value="$1" />
5.6.6.3 - Use of fixed strings
Any <group> value or <data> name and value can use references to matched content, but in addition to this it is possible just to output a known string, e.g.
<data name="somename" value="$" />
The above example would output somename as the <data> name attribute. This can often be useful where there are no headings specified in the input data but we want to associate certain names with certain values.
Given the following data:
01/01/2010,00:00:00,192.168.1.100,SOMEHOST.SOMEWHERE.COM,user1,logon,
We could provide useful headings with the following configuration:
<regex pattern="([^,]*),([^,]*),([^,]*),([^,]*),([^,]*),([^,]*),">
<data name="date" value="$1" />
<data name="time" value="$2" />
<data name="ipAddress" value="$3" />
<data name="hostName" value="$4" />
<data name="user" value="$5" />
<data name="action" value="$6" />
</regex>
5.6.6.4 - Concatenation of references
It is possible to concatenate multiple fixed strings and match group references using the + character. As with all references and fixed strings this can be done in <group> value and <data> name and value attributes. However concatenation does have some performance overhead as new buffers have to be created to store concatenated content.
A good example of concatenation is the production of ISO8601 date format from data in the previous example:
01/01/2010,00:00:00
Here the following <regex> could be used to extract the relevant date, time groups:
<regex pattern="(\d{2})/(\d{2})/(\d{4}),(\d{2}):(\d{2}):(\d{2})">
The match groups from this expression can be concatenated with the following value output pattern in the data element:
<data name="dateTime" value="$3+’-‘+$2+’-‘+$1+’-‘+’T’+$4+’:’+$5+’:’+$6+’.000Z’" />
Using the original example, this would result in the output:
<data name="dateTime" value="2010-01-01T00:00:00.000Z" />
Note that the value output pattern wraps all fixed strings in single quotes. This is necessary when concatenating strings and references so that Data Splitter can determine which parts are to be treated as fixed strings. This also allows fixed strings to contain $ and + characters.
As single quotes are used for this purpose, a single quote needs to be escaped with another single quote if one is desired in a fixed string, e.g.
‘this ‘’is quoted text’’’
This will result in:
this ‘is quoted text’
5.7 - Event Feeds
Feeds provide the means to logically group data common to a data format and source system.
In order for Stroom to be able to handle the various data types as described in the previous section, Stroom must be told what the data is when it is received. This is achieved using Event Feeds. Each feed has a unique name within the system.
Event Feeds can be related to one or more Reference Feed. Reference Feeds are used to provide lookup data for a translation. For example, look up a computer name by its IP address.
Feeds can also have associated context data. Context data is used to provide lookup information that is only applicable for the events file it relates to. For example, if the events file is missing information relating to the computer it was generated on, and you don’t want to create separate feeds for each computer, an associated context file could be used to provide this information.
Feed Identifiers
Feed identifiers must be unique within the system. Identifiers can be in any format, but an established convention is to use the following format:
<SYSTEM>-<ENVIRONMENT>-<TYPE>-<EVENTS/REFERENCE>-<VERSION>
If feeds in a certain site need different reference data, then the site can be broken down further.
_ may be used to represent a space.
5.8 - Indexing data
Indexing data for querying.
5.8.1 - Elasticsearch
Using Elasticsearch to index data
5.8.1.1 - Introduction
Concepts, assumptions and key differences to Solr and built-in Lucene indexing
Stroom supports using an external Elasticsearch cluster to index event data. This allows you to leverage all the features of the Elastic Stack, such as shard allocation, replication, fault tolerance and aggregations.
With Elasticsearch as an external service, your search infrastructure can scale independently of your Stroom data processing cluster, enhancing interoperability with other platforms by providing a performant and resilient time-series event data store. For instance, you can:
- Deploy Kibana to search and visualise Elasticsearch data.
- Index Stroom’s stream meta and
Errorstreams so monitoring systems can generate metrics and alerts. - Use Apache Spark to perform stateful data processing and enrichment, through the use of the Elasticsearch-Hadoop connector.
Stroom achieves indexing and search integration by interfacing securely with the Elasticsearch REST API using the Java high-level client.
This guide will walk you through configuring a Stroom indexing pipeline, creating an Elasticsearch index template, activating a stream processor and searching the indexed data in both Stroom and Kibana.
Assumptions
- You have created an Elasticsearch cluster. Elasticsearch 8.x is recommended, though the latest supported 7.x version will also work. For test purposes, you can quickly create a single-node cluster using Docker by following the steps in the Elasticsearch Docs .
- The Elasticsearch cluster is reachable via HTTPS from all Stroom nodes participating in stream processing.
- Elasticsearch security is enabled. This is mandatory and is enabled by default in Elasticsearch 8.x and above.
- The Elasticsearch HTTPS interface presents a trusted X.509 server certificate. The Stroom node(s) connecting to Elasticsearch need to be able to verify the certificate, so for custom PKI, a Stroom truststore entry may be required.
- You have a feed containing
Eventstreams to index.
Key differences
Indexing data with Elasticsearch differs from Solr and built-in Lucene methods in a number of ways:
- Unlike with Solr and built-in Lucene indexing, Elasticsearch field mappings are managed outside Stroom, through the use of index and component templates . These are normally created either via the Elasticsearch API, or interactively using Kibana.
- Aside from creating the mandatory
StreamIdandEventIdfield mappings, explicitly defining mappings for other fields is optional. Elasticsearch will use dynamic mapping by default, to infer each field’s type at index time. Explicitly defining mappings is recommended where consistency or greater control are required, such as for IP address fields (Elasticsearch mapping typeip).
Next page - Getting Started
5.8.1.2 - Getting Started
Establishing an Elasticsearch cluster connection
Establish an Elasticsearch cluster connection in Stroom
The first step is to configure Stroom to connect to an Elasticsearch cluster.
You can configure multiple cluster connections if required, such as a separate one for production and another for development.
Each cluster connection is defined by an Elastic Cluster document within the Stroom UI.
- In the Stroom Explorer pane (), right-click on the folder where you want to create the
Elastic Clusterdocument. - Select:
- Give the cluster document a name and press .
- Complete the fields as explained in the section below. Any fields not marked as “Optional” are mandatory.
- Click
Test Connection. A dialog will display with the test result. IfConnection Success, details of the target cluster will be displayed. Otherwise, error details will be displayed. - Click to commit changes.
Warning
Ensure you restrict permissions to theElastic Cluster document.
The Read privilege permits retrieval of the Elasticsearch API key and secret, granting the holder the same level of privilege as Stroom.
Users authorised to search Elasticsearch indices via Stroom dashboards should only be assigned the Use privilege.
Elastic Cluster document fields
Description
(Optional) You might choose to enter the Elasticsearch cluster name or purpose here.
Connection URLs
Enter one or more node or cluster addresses, including protocol, hostname and port. Only HTTPS is supported; attempts to use plain-text HTTP will fail.
Examples
- Local development node:
https://localhost:9200 - FQDN:
https://elasticsearch.example.com:9200 - Kubernetes service:
https://prod-es-http.elastic.svc:9200
CA certificate
PEM-format CA certificate chain used by Stroom to verify TLS connections to the Elasticsearch HTTPS REST interface. This is usually your organisation’s root enterprise CA certificate. For development, you can provide a self-signed certificate.
Use authentication
(Optional) Tick this box if Elasticsearch requires authentication. This is enabled by default from Elasticsearch version 8.0.
API key ID
Required if Use authentication is checked.
Specifies the Elasticsearch API key ID for a valid Elasticsearch user account.
This user requires at a minimum the following
privileges
:
Cluster privileges
- monitor
- manage_own_api_key
Index privileges
- all
API key secret
Required if Use authentication is checked.
Socket timeout (ms)
Number of milliseconds to wait for an Elasticsearch indexing or search REST call to complete.
Set to -1 (the default) to wait indefinitely, or until Elasticsearch closes the connection.
Next page - Indexing data
5.8.1.3 - Indexing data
Indexing event data to Elasticsearch
A typical workflow is for a Stroom pipeline to convert XML Event elements into the XML equivalent of JSON, complying with the schema http://www.w3.org/2005/xpath-functions, using a format identical to the output of the XML function xml-to-json().
Understanding JSON XML representation
In an Elasticsearch indexing pipeline translation, you model JSON documents in a compatible XML representation.
Common JSON primitives and examples of their XML equivalents are outlined below.
Arrays
Array of maps
<array key="users" xmlns="http://www.w3.org/2005/xpath-functions">
<map>
<string key="name">John Smith</string>
</map>
</array>
Array of strings
<array key="userNames" xmlns="http://www.w3.org/2005/xpath-functions">
<string>John Smith</string>
<string>Jane Doe</string>
</array>
Maps and properties
<map key="user" xmlns="http://www.w3.org/2005/xpath-functions">
<string key="name">John Smith</string>
<boolean key="active">true</boolean>
<number key="daysSinceLastLogin">42</number>
<string key="loginDate">2022-12-25T01:59:01.000Z</string>
<null key="emailAddress" />
<array key="phoneNumbers">
<string>1234567890</string>
</array>
</map>
Note
It is recommended to insert a schema validation filter into your pipeline XML (with schema groupJSON), to make it easier to diagnose JSON conversion errors.
We will now explore how to create an Elasticsearch index template, which specifies field mappings and settings for one or more indices.
Create an Elasticsearch index template
For information on what index and component templates are, consult the Elastic documentation .
When Elasticsearch first receives a document from Stroom targeting an index, whose name matches any of the index_patterns entries in the index template, it will create a new index / data stream using the settings and mappings properties from the template.
In this way, the index does not need to be manually created in advance.
Note
If an index doesn’t match a template when it is created, data will still be indexed - with default mappings and settings. This may be appropriate for small indices, but with a default shard count of5, the indexing and search performance will likely be inadequate for large indices.
The following example creates a basic index template stroom-events-v1 in a local Elasticsearch cluster, with the following explicit field mappings:
StreamId– mandatory, data typelongorkeyword.EventId– mandatory, data typelongorkeyword.@timestamp– required if the index is to be part of a data stream (recommended).User– An object containing propertiesId,NameandActive, each with their own data type.Tags– An array of one or more strings.Message– Contains arbitrary content such as unstructured raw log data. Supports full-text search. Nested fieldwildcardsupports regexp queries .
Note
Elasticsearch does not have a dedicated array field mapping data type.
An Elasticsearch field may contain zero or more values by default.
See:
Arrays
in the Elastic documentation.
In Kibana Dev Tools, execute the following query:
PUT _index_template/stroom-events-v1
{
"index_patterns": [
"stroom-events-v1*" // Apply this template to index names matching this pattern.
],
"data_stream": {}, // For time-series data. Recommended for event data.
"template": {
"settings": {
"number_of_replicas": 1, // Replicas impact indexing throughput. This setting can be changed at any time.
"number_of_shards": 10, // Consider the shard sizing guide: https://www.elastic.co/guide/en/elasticsearch/reference/current/size-your-shards.html#shard-size-recommendation
"refresh_interval": "10s", // How often to refresh the index. For high-throughput indices, it's recommended to increase this from the default of 1s
"lifecycle": {
"name": "stroom_30d_retention_policy" // (Optional) Apply an ILM policy https://www.elastic.co/guide/en/elasticsearch/reference/current/set-up-lifecycle-policy.html
}
},
"mappings": {
"dynamic_templates": [],
"properties": {
"StreamId": { // Required.
"type": "long"
},
"EventId": { // Required.
"type": "long"
},
"@timestamp": { // Required if the index is part of a data stream.
"type": "date"
},
"User": {
"properties": {
"Id": {
"type": "keyword"
},
"Name": {
"type": "keyword"
},
"Active": {
"type": "boolean"
}
}
},
"Tags": {
"type": "keyword"
},
"Message": {
"type": "text",
"fields": {
"wildcard": {
"type": "wildcard"
}
}
}
}
}
},
"composed_of": [
// Optional array of component template names.
]
}
Create an Elasticsearch indexing pipeline template
An Elasticsearch indexing pipeline is similar in structure to the built-in packaged Indexing template pipeline.
It typically consists of the following pipeline elements:
-
XSLTFilter
contains the translation mapping
Eventsto JSONarray. -
SchemaFilter
uses schema group
JSON.
It is recommended to create a template Elasticsearch indexing pipeline, which can then be re-used.
Procedure
- Right-click on the
Template Pipelinesfolder in the Stroom Explorer pane (). - Select:
- Enter the name
Indexing (Elasticsearch)and click . - Define the pipeline structure as above, and customise the following pipeline elements:
- Set the Split Filter
splitCountproperty to a sensible default value, based on the expected source XML element count (e.g.100). - Set the Schema Filter
schemaGroupproperty toJSON. - Set the Elastic Indexing Filter
clusterproperty to point to theElastic Clusterdocument you created earlier. - Set the Write Record Count filter
countReadproperty tofalse.
- Set the Split Filter
Now you have created a template indexing pipeline, it’s time to create a feed-specific pipeline that inherits this template.
Create an Elasticsearch indexing pipeline
Procedure
- Right-click on a folder in the Stroom Explorer pane .
- Enter a name for your pipeline and click .
- Click the
Inherit Frombutton. - In the dialog that appears, select the template pipeline you created named
Indexing (Elasticsearch)and click . - Select the Elastic Indexing Filter pipeline element.
- Set the
indexNameproperty to the name of the destination index or data stream.indexNamemay be a simple string (static) or dynamic. - If using dynamic index names, configure the translation to output named element(s) that will be interpolated into
indexNamefor each document indexed.
Choosing between simple and dynamic index names
Indexing data to a single, named data stream or index, is a simple and convenient way to manage data. There are cases however, where indices may contain significant volumes of data spanning long periods - and where a large portion of indexing will be performed up-front (such as when processing a feed with a lot of historical data). As Elasticsearch data stream indices roll over based on the current time (not event time), it is helpful to be able to partition data streams by user-defined properties such as year. This use case is met by Stroom’s dynamic index naming.
Note
An Elasticsearch data stream consists of one or more backing indices, which automatically roll over once a size or date threshold are met. This abstraction assists with the lifecycle management of time-series log data, enabling users to define time and sized-based rules that can for instance, delete indices after they reach a certain age - or move older indices to different data tiers (e.g. cold storage).
Single named index or data stream
This is the simplest use case and is suitable where you want to write all data for a particular pipeline, to a single data stream or index.
Whether data is written to an actual index or data stream depends on your index template, specifically whether you have declared data_stream: {}.
If this property exists in the index template matching indexName, a data stream is created when the first document is indexed.
Data streams, amongst many other features, provide the option to use Elasticsearch
Index Lifecycle Management (ILM) policies
to manage their lifecycle.
Note
When indexing to a data stream, ensure to include astring field named @timestamp in the output JSON XML.
This is mandatory and indexing will fail if this field isn’t a valid date value.
Dynamic data stream names
With a dynamic stream name, indexName contains the names of elements, for example: stroom-events-v1-{year}.
For each document, the final index name is computed based on the values of the corresponding elements within the resulting JSON XML.
For example, if the JSON XML representation of an event consists of the following, the document will be indexed to the index or data stream named stroom-events-v1-2022:
<?xml version="1.1" encoding="UTF-8"?>
<array
xmlns="http://www.w3.org/2005/xpath-functions"
xmlns:xsi="http://www.w3.org/2001/XMLSchema-instance"
xsi:schemaLocation="http://www.w3.org/2005/xpath-functions file://xpath-functions.xsd">
<map>
<number key="StreamId">3045516</number>
<number key="EventId">1</number>
<string key="@timestamp">2022-12-16T02:46:29.218Z</string>
<number key="year">2022</number>
</map>
</array>
This is due to the value of /map/number[@key='year'] being 2022.
This approach can be useful when you need to apply different ILM policies, such as maintaining older data on slower storage tiers.
Warning
Any element names defined inindexName must exist in the JSON XML (unless it is an empty document).
If a blank value is desired, output an empty string element.
Note
If an element name begins with_ (underscore), its value is only used for indexName interpolation, and it is not included in the final JSON.
Other applications for dynamic data stream names
Dynamic data stream names can also help in other scenarios, such as implementing fine-grained retention policies, such as deleting documents that aren’t user-attributed after 12 months.
While Stroom ElasticIndex supports data retention expressions, deleting documents in Elasticsearch by query is highly inefficient and doesn’t cause disk space to be freed (this requires an index to be force-merged, an expensive operation).
A better solution therefore, is to use dynamic data stream names to partition data and assign certain partitions to specific ILM policies and/or data tiers.
Migrating older data streams to other data tiers
Say a feed is indexed, spanning data from 2020 through 2023.
Assuming most searches only need to query data from the current year, the data streams stroom-events-v1-2020 and stroom-events-v1-2021 can be moved to cold storage.
To achieve this, use
index-level shard allocation filtering
.
In Kibana Dev Tools, execute the following command:
PUT stroom-events-v1-2020,stroom-events-v1-2021/_settings
{
"index.routing.allocation.include._tier_preference": "data_cold"
}
This example assumes a cold data tier has been defined for the cluster. If the command executes successfully, shards from the specified data streams are gradually migrated to the nodes comprising the destination data tier.
Create an indexing translation
In this example, let’s assume you have event data that looks like the following:
<?xml version="1.1" encoding="UTF-8"?>
<Events
xmlns="event-logging:3"
xmlns:xsi="http://www.w3.org/2001/XMLSchema-instance"
xsi:schemaLocation="event-logging:3 file://event-logging-v3.5.2.xsd"
Version="3.5.2">
<Event>
<EventTime>
<TimeCreated>2022-12-16T02:46:29.218Z</TimeCreated>
</EventTime>
<EventSource>
<System>
<Name>Nginx</Name>
<Environment>Development</Environment>
</System>
<Generator>Filebeat</Generator>
<Device>
<HostName>localhost</HostName>
</Device>
<User>
<Id>john.smith1</Id>
<Name>John Smith</Name>
<State>active</State>
</User>
</EventSource>
<EventDetail>
<View>
<Resource>
<URL>http://localhost:8080/index.html</URL>
</Resource>
<Data Name="Tags" Value="dev,testing" />
<Data
Name="Message"
Value="TLSv1.2 AES128-SHA 1.1.1.1 "Mozilla/5.0 (X11; Linux x86_64; rv:45.0) Gecko/20100101 Firefox/45.0"" />
</View>
</EventDetail>
</Event>
<Event>
...
</Event>
</Events>
We need to write an XSL transform (XSLT) to form a JSON document for each stream processed.
Each document must consist of an array element one or more map elements (each representing an Event), each with the necessary properties as per our index template.
See XSLT Conversion for instructions on how to write an XSLT.
The output from your XSLT should match the following:
<?xml version="1.1" encoding="UTF-8"?>
<array
xmlns="http://www.w3.org/2005/xpath-functions"
xmlns:xsi="http://www.w3.org/2001/XMLSchema-instance"
xsi:schemaLocation="http://www.w3.org/2005/xpath-functions file://xpath-functions.xsd">
<map>
<number key="StreamId">3045516</number>
<number key="EventId">1</number>
<string key="@timestamp">2022-12-16T02:46:29.218Z</string>
<map key="User">
<string key="Id">john.smith1</string>
<string key="Name">John Smith</string>
<boolean key="Active">true</boolean>
</map>
<array key="Tags">
<string>dev</string>
<string>testing</string>
</array>
<string key="Message">TLSv1.2 AES128-SHA 1.1.1.1 "Mozilla/5.0 (X11; Linux x86_64; rv:45.0) Gecko/20100101 Firefox/45.0"</string>
</map>
<map>
...
</map>
</array>
Assign the translation to the indexing pipeline
Having created your translation, you need to reference it in your indexing pipeline.
- Open the pipeline you created.
- Select the
Structuretab. - Select the XSLTFilter pipeline element.
- Double-click the
xsltproperty value cell. - Select the XSLT you created and click .
- Click .
Step the pipeline
At this point, you will want to step the pipeline to ensure there are no errors and that output looks as expected.
Execute the pipeline
Create a pipeline processor and filter to run the pipeline against one or more feeds. Stroom will distribute processing tasks to enabled nodes and send documents to Elasticsearch for indexing.
You can monitor indexing status via your Elasticsearch monitoring tool of choice.
Detecting and handling errors
If any errors occur while a stream is being indexed, an Error stream is created, containing details of each failure.
Error streams can be found under the Data tab of either the indexing pipeline or receiving Feed.
Note
You can filter the selected pipeline or feed to list only Error streams.
Click then add a condition Type = Error.
Once you have addressed the underlying cause for a particular type of error (such as an incorrect field mapping), reprocess affected streams:
- Select any
Errorstreams relating for reprocessing, by clicking the relevant checkboxes in the stream list (top pane). - Click .
- In the dialog that appears, check
Reprocess dataand click . - Click for any confirmation prompts that follow.
Stroom will re-send data from the selected Event streams to Elasticsearch for indexing.
Any existing documents matching the StreamId of the original Event stream are first deleted automatically to avoid duplication.
Tips and tricks
Use a common schema for your indices
An example is Elastic Common Schema (ECS) . This helps users understand the purpose of each field and to build cross-index queries more simply by using a set of common fields (such as a user ID).
With this in mind, it is important that common fields also have the same data type in each index. Component templates help make this easier and reduce the chance of error, by centralising the definition of common fields to a single component.
Use a version control system (such as git) to track index and component templates
This helps keep track of changes over time and can be an important resource for both administrators and users.
Rebuilding an index
Sometimes it is necessary to rebuild an index. This could be due to a change in field mapping, shard count or responding to a user feature request.
To rebuild an index:
- Drain the indexing pipeline by deactivating any processor filters and waiting for any running tasks to complete.
- Delete the index or data stream via the Elasticsearch API or Kibana.
- Make the required changes to the index template and/or XSL translation.
- Create a new processor filter either from scratch or using the button.
- Activate the new processor filter.
Use a versioned index naming convention
As with the earlier example stroom-events-v1, a version number is appended to the name of the index or data stream.
If a new field is added, or some other change occurred requiring the index to be rebuilt, users would experience downtime.
This can be avoided by incrementing the version and performing the rebuild against a new index: stroom-events-v2.
Users could continue querying stroom-events-v1 until it is deleted.
This approach involves the following steps:
- Create a new Elasticsearch index template targeting the new index name (in this case,
stroom-events-v2). - Create a copy of the indexing pipeline, targeting the new index in the Elastic Indexing Filter.
- Create and activate a processing filter for the new pipeline.
- Once indexing is complete, update the Elastic Index document to point to
stroom-events-v2. Users will now be searching against the new index. - Drain any tasks for the original indexing pipeline and delete it.
- Delete index
stroom-events-v1using either the Elasticsearch API or Kibana.
If you created a data view in Kibana, you’ll also want to update this to point to the new index / data stream.
5.8.1.4 - Exploring Data in Kibana
Using Kibana to search, aggregate and explore data indexed in Stroom
Kibana is part of the Elastic Stack and provides users with an interactive, visual way to query, visualise and explore data in Elasticsearch.
It is highly customisable and provides users and teams with tools to create and share dashboards, searches, reports and other content.
Once data has been indexed by Stroom into Elasticsearch, it can be explored in Kibana. You will first need to create a data view in order to query your indices.
Why use Kibana?
There are several use cases that benefit from Kibana:
- Convenient and powerful drag-and-drop charts and other visualisation types using Kibana Lens. Much more performant and easier to customise than built-in Stroom dashboard visualisations.
- Field statistics and value summaries with Kibana Discover. Great for doing initial audit data survey.
- Geospatial analysis and visualisation.
- Search field auto-completion.
- Runtime fields . Good for data exploration, at the cost of performance.
5.8.2 - Lucene Indexes
Stroom’s built in Apache Lucene based indexing.
Stroom uses Apache Lucene for its built-in indexing solution. Index documents are stored in a Volume Volume In Stroom a Volume is a logical storage area that Stroom can write data to. Volumes are associated with a path on a file system that can either be local to the Stroom node or on a shared file system.Click to see more details....
TODO
Complete this page.Field configuration
Field Types
Id- Treated as aLong.Boolean- True/False values.Integer- Whole numbers from -2,147,483,648 to 2,147,483,647.Long- Whole numbers from -9,223,372,036,854,775,808 to 9,223,372,036,854,775,807.Float- Fractional numbers. Sufficient for storing 6 to 7 decimal digits.Double- Fractional numbers. Sufficient for storing 15 decimal digits.Date- Date and time values.Text- Text data.Number- An alias forLong.
Stored fields
If a field is Stored then it means the complete field value will be stored in the index. This means the value can be retrieved from the index when building search results rather than using the slower Search Extraction process. Storing field values comes at the cost of high storage requirements for the index. If storage space is not an issue then storing all fields that you want to return in search results is the optimum.
Indexed fields
An Indexed field is one that will be processed by Lucene so that the field can be queried. How the field is indexed will depend on the Field type and the Analyser used.
If you have fields that you do not want to be able to filter (i.e. that you won’t use as a query term) then you can include them as non-Indexed fields. Including a non-indexed field means it will be available for the user to select in the Dashboard Dashboard A Dashboard is a configurable entity for querying one or more Data Sources and displaying the results as a table, a visualisation or some other form.Click to see more details... table. A non-indexed field would either need to be Stored in the index or added via Search Extraction to be available in the search results.
Positions
If Positions is selected then Lucene will store the positions of all the field terms in the document.
Analyser types
The Analyser determines how Lucene reads the fields value and extracts tokens from it. The choice of Analyser will depend on the data in the field and how you want to search it.
Keyword- Treats the whole field value as one token. Useful for things like IDs and post codes. Supports the Case Sensitivity setting.Alpha- Tokenises on any non-letter characters, e.g.one1 two2 three 3=>onetwothree. Strips non-letter characters. Supports the Case Sensitivity setting.Numeric-Alpha numeric- Tokenises on any non-letter/digit characters, e.g.one1 two2 three 3=>one1two2three3. Supports the Case Sensitivity setting.Whitespace- Tokenises only on white space. Not affected by the Case Sensitivity setting, case sensitive.Stop words- Tokenises based on non-letter characters and removes Stop Words, e.g.and. Not affected by the Case Sensitivity setting. Case insensitive.Standard- The most common analyser. Tokenises the value on spaces and punctuation but recognises URLs and email addresses. Removes Stop Words, e.g.and. Not affected by the Case Sensitivity setting. Case insensitive. e.g.Find Stroom at github.com/stroom=>FindStroomatgithub.com/stroom.
Stop words
Some of the Analysers use a set of stop words for the tokenisers. This is the list of stop words that will not be indexed.
a, an, and, are, as, at, be, but, by, for, if, in, into, is, it, no, not, of, on, or, such, that, the, their, then, there, these, they, this, to, was, will, with
Case sensitivity
Some of the Analyser types support case (in)sensitivity.
For example if the Analyser supports it the value TWO two would either be tokenised as TWO two or two two.
5.8.3 - Solr Integration
Indexing data using a Solr cluster.
TODO
Complete this section.5.9 - Nodes
Configuring the nodes in a Stroom cluster.
All nodes in a Stroom cluster must be configured correctly for them to communicate with each other.
Configuring nodes
Open Monitoring/Nodes from the top menu. The nodes screen looks like this:
TODO
ScreenshotYou need to edit each line by selecting it and then clicking the edit icon at the bottom.
The URL for each node needs to be set as above but obviously substituting in the host name of the individual node, e.g. http://<HOST_NAME>:8080/stroom/clustercall.rpc
Nodes are expected to communicate with each other on port 8080 over http. Ensure you have configured your firewall to allow nodes to talk to each other over this port. You can configure the URL to use a different port and possibly HTTPS but performance will be better with HTTP as no SSL termination is required.
Once you have set the URLs of each node you should also set the master assignment priority for each node to be different to all of the others. In the image above the priorities have been set in a random fashion to ensure that node3 assumes the role of master node for as long as it is enabled. You also need to check all of the nodes are enabled that you want to take part in processing or any other jobs.
Keep refreshing the table until all nodes show healthy pings as above. If you do not get ping results for each node then they are not configured correctly.
Once a cluster is configured correctly you will get proper distribution of processing tasks and search will be able to access all nodes to take part in a distributed query.
5.10 - Pipelines
Pipelines are the mechanism for processing and transforming ingested data.
Stroom uses Pipelines to process its data. A pipeline is a set of pipeline elements connected together. Pipelines are very powerful and flexible and allow the user to transform, index, store and forward data in a wide variety of ways.
Example Pipeline
Pipelines can take many forms and be used for a wide variety of purposes, however a typical pipeline to convert CSV data into cooked events might look like this:
Input Data
Pipelines process data in batches. This batch of data is referred to as a Stream Stream A Stream is the unit of data that Stroom works with and will typically contain many Events.Click to see more details.... The input for the pipeline is a single Stream that exists within a Feed and this data is fed into the left-hand side of the pipeline at Source . Pipelines can accept streams from multiple Feeds assuming those feeds contain similar data.
The data in the Stream is always text data (XML, JSON, CSV, fixed-width, etc.) in a known Character encoding Character encoding Character Encoding is the means of encoding character data (i.e. text) into binary form. Therefore to decode character data from a stream of bytes, the character encoding must be known (or guessed).Click to see more details.... Stroom does not currently support processing binary formats.
XML
The working format for pipeline processing is XML XML Extensible Markup Language is a markup language for storing/transmitting structured data. It is the working format for most Pipeline processing in Stroom and is the standard normalised format for event data.Click to see more details... (with the exception of raw streaming). Data can be input and output in other forms, e.g. JSON, CSV, fixed-width, etc. but the majority of pipelines do most of their processing in XML. Input data is converted into XML SAX events, processed using XSLT to transform it into different shapes of XML then either consumed as XML (e.g. an IndexingFilter ) or converted into a desired output format for storage/forwarding.
Forks
Pipelines can also be forked at any point in the pipeline. This allows the same data to be processed in different ways.
Note
Rather than creating complicated pipelines with forks, it is sometimes better to create multiple pipelines as this makes it easier to handle errors in one fork of the processing. It also makes it easier to re-use common simple pipelines. For example if you have a pipeline to transform CSV events into normalised XML then index it and forward it to a remote server, it may be better to have a pipeline to cook the events, then a common one to index those XML events and one to forward XML events.Pipeline Inheritance
It is possible for pipelines to inherit from other pipelines. This allows for the creation of a standard abstract pipelines with a set structure, though not fully configured, to be inherited by many concrete pipelines.
For example you may have a standard pipeline for indexing XML events, i.e. read XML data and pass it to an IndexingFilter , but the IndexingFilter is not configured with the actual Index to send documents to. A pipeline that inherits this one can then be simply configured with the Index to use.
Pipeline inheritance allows for changes to the inherited structure, e.g. adding additional elements in line. Multi level inheritance is also supported.
Pipeline Element Types
Stroom has a number of categories of pipeline element.
Reader
Readers are responsible for reading the raw bytes of the input data and converting it to character data using the Feed’s character encoding. They also provide functionality to modify the data before or after it is decoded to characters, e.g. Byte order mark Byte order mark A special Unicode character at the start of a text stream that indicates the byte order (or endianness) of the stream.Click to see more details... removal, or doing find/replace on the character data. You can chain multiple Readers.
Parser
A parser is designed to convert the character data into XML for processing. For example, the JSONParser will use a JSON parser to read the character data as JSON and convert it into XML elements and attributes that represent the JSON structure, so that it can be transformed downstream using XSLT.
Parsers have a built in reader so if they are not preceded by a Reader they will decode the raw bytes into character data before parsing.
Filter
A filter is an element that handles XML SAX events (e.g. element, attribute, character data, etc.) and can either return those events unchanged or modify them. An example of Filter is an XSLTFilter element. Multiple filters can be chained, with each one consuming the events output by the one preceding it, therefore you can have lots of common reusable XSLTFilters that all do small incremental changes to a document.
Writer
A writer is an element that handles XML SAX events (e.g. element, attribute, character data, etc.) and converts them into encoded character data (using a specified encoding) of some form. The preceding filter may have been an XSLTFilter which transformed XML into plain text, in which case only character data events will be output and a TextWriter can just write these out as text data. Other writers will handle the XML SAX events to convert them into another format, e.g. the JSONWriter before encoding them as character data.
Destination
A destination element is a consumer of character data, as produced by a writer. A typical destination is a StreamAppender that writes the character data (which may be XML, JSON, CSV, etc.) to a new Stream in Stroom’s stream store. Other destinations can be used for sending the encoded character data to Kafka, a file on a file system or forwarding to an HTTP URL.
5.10.1 - Pipeline Recipes
A set of basic pipeline structure recipes for common use cases.
The following are a basic set of pipeline recipes for doing typical tasks in Stroom. It is not an exhaustive list, as the possibilities with Pipelines are vast. They are intended as a rough guide to get you started with building Pipelines.
Data Ingest and Transformation
CSV to Normalised XML
-
CSV
CSV
Comma Separated Values is a file format with typically one record per line and fields delimited by a
,. Fields may be optionally enclosed with double quotes, though there is no fixed standard for CSV data, particularly when it comes to escaping of double quotes and/or commas.Click to see more details... data is ingested. - The Data Splitter parser parses the records and fields into
recordsformat XML using an XML based TextConverter document. - The first XSLTFilter is used to normalise the events in
recordsXML intoevent-loggingXML. - The second XSLTFilter is used to decorate the events with additional data, e.g.
<UserDetails>using reference data lookups. - The SchemaFilter ensures that the XML output by the stages of XSLT transformation conforms to the
event-loggingXMLSchema. - The XML events are then written out as an
EventStream to the Stream store.
Configured Content
-
Data Splitter
- A TextConverter containing XML conforming to
data-splitter:3. -
Normalise
- An XSLT transforming
records:2=>event-logging:3. -
Decorate
- An XSLT transforming
event-logging:3=>event-logging:3. -
SchemaFilter
- XMLSchema
event-logging:3
JSON to Normalised XML
The same as ingesting CSV data above, except the input JSON is converted into an XML representation of the JSON by the JSONParser. The Normalise XSLTFilter will be specific to the format of the JSON being ingested. The Decorate XSLTFilter will likely be identical to that used for the CSV ingest above, demonstrating reuse of pipeline element content.
Configured Content
-
Normalise
- An XSLT transforming
http://www.w3.org/2013/XSL/json=>event-logging:3. -
Decorate
- An XSLT transforming
event-logging:3=>event-logging:3. -
SchemaFilter
- XMLSchema
event-logging:3
XML (not event-logging) to Normalised XML
As above except that the input data is already XML, though not in event-logging format.
The XMLParser simply reads the XML character data and converts it to XML SAX events for processing.
The Normalise XSLTFilter will be specific to the format of this XML and will transform it into event-logging format.
Configured Content
-
Normalise
- An XSLT transforming a 3rd party schema =>
event-logging:3. -
Decorate
- An XSLT transforming
event-logging:3=>event-logging:3. -
SchemaFilter
- XMLSchema
event-logging:3
XML (event-logging) to Normalised XML
As above except that the input data is already in event-logging XML format, so no normalisation is required.
Decoration is still needed though.
Configured Content
-
Decorate
- An XSLT transforming
event-logging:3=>event-logging:3. -
SchemaFilter
- XMLSchema
event-logging:3
XML Fragments to Normalised XML
XML Fragments are where the input data looks like:
<Event>
...
</Event>
<Event>
...
</Event>
In other words, it is technically badly formed XML as it has no root element or declaration.
This format is however easier for client systems to send as they can send multiple <Event> blocks in one stream (e.g. just appending them together in a rolled log file) but don’t need to wrap them with an outer <Events> element.
The XMLFragmentParser understands this format and will add the wrapping element to make well-formed XML.
If the XML fragments are already in event-logging format then no Normalise XSLTFilter is required.
Configured Content
-
XMLFragParser
- Content similar to:
<?xml version="1.1" encoding="utf-8"?> <!DOCTYPE Records [ <!ENTITY fragment SYSTEM "fragment">]> <Events xmlns="event-logging:3" xmlns:stroom="stroom" xmlns:xsi="http://www.w3.org/2001/XMLSchema-instance" xsi:schemaLocation="event-logging:3 file://event-logging-v3.4.2.xsd" Version="3.4.2"> &fragment; </Events> -
Decorate
- An XSLT transforming
event-logging:3=>event-logging:3. -
SchemaFilter
- XMLSchema
event-logging:3
Handling Malformed Data
Cleaning Malformed XML data
In some cases client systems may send XML containing characters that are not supported by the XML standard. These can be removed using the InvalidXMLCharFilterReader .
The input data may also be known to contain other sets of characters that will cause problems in processing. The FindReplaceFilter can be used to remove/replace either a fixed string or a Regex pattern.
[Pipeline truncated]
Raw Streaming
In cases where you want to export the raw (or cooked) data from a feed you can have a very simple pipeline to pipe the source data directly to an appender. This may be so that the raw data can be ingested into another system for analysis. In this case the data is being written to disk using a file appender.
Note
Be careful when specifying the directory structure for the FileAppender so that you don’t end up with too many files in one folder, which can cause some OS issues.Indexing
XML to Stroom Lucene Index
This use case is for indexing XML event data that had already been normalised using one of the ingest pipelines above.
The
XSLTFilter
is used to transform the event into records format, extracting the fields to be indexed from the event.
The
IndexingFilter
reads the records XML and loads each one into Stroom’s internal Lucene index .
Configured Content
-
XSLTFilter
- An XSLT transforming
event-logging:3=>records:2. -
SchemaFilter
- XMLSchema
records:2
The records:2 XML looks something like this, with each <data> element representing an indexed field value.
<?xml version="1.1" encoding="UTF-8"?>
<records
xmlns="records:2"
xmlns:stroom="stroom"
xmlns:sm="stroom-meta"
xmlns:xsi="http://www.w3.org/2001/XMLSchema-instance"
xsi:schemaLocation="records:2 file://records-v2.0.xsd"
version="2.0">
<record>
<data name="StreamId" value="1997" />
<data name="EventId" value="1" />
<data name="Feed" value="MY_FEED" />
<data name="EventTime" value="2010-01-01T00:00:00.000Z" />
<data name="System" value="MySystem" />
<data name="Generator" value="CSV" />
<data name="IPAddress" value="1.1.1.1" />
<data name="UserId" analyzer="KEYWORD" value="user1" />
<data name="Action" value="Authenticate" />
<data name="Description" value="Some message 1" />
</record>
</records>
XML to Stroom Lucene Index (Dynamic)
Dynamic indexing in Stroom allows you to use the XSLT to define the fields that are being indexed and how each field should be indexed.
This avoids having to define all the fields up front in the Index and allows for the creation of fields based on the actual data received.
The only difference with normal indexing in Stroom is that is uses the
DynamicIndexingFilter
and rather than transforming the event into records:2 XML, it is transformed into index-documents:1 XML as shown in the example below.
<?xml version="1.1" encoding="UTF-8"?>
<index-documents
xmlns="index-documents:1"
xmlns:stroom="stroom"
xmlns:sm="stroom-meta"
xmlns:xsi="http://www.w3.org/2001/XMLSchema-instance"
xsi:schemaLocation="index-documents:1 file://index-documents-v1.0.xsd"
version="1.0">
<document>
<field><name>StreamId</name><type>Id</type><indexed>true</indexed><stored>true</stored><value>1997</value></field>
<field><name>EventId</name><type>Id</type><indexed>true</indexed><stored>true</stored><value>1</value></field>
<field><name>Feed</name><type>Text</type><analyser>Alpha numeric</analyser><indexed>true</indexed><value>MY_FEED</value></field>
<field><name>EventTime</name><type>Date</type><indexed>true</indexed><value>2010-01-01T00:00:00.000Z</value></field>
<field><name>System</name><type>Text</type><analyser>Alpha numeric</analyser><indexed>true</indexed><value>MySystem</value></field>
<field><name>Generator</name><type>Text</type><analyser>Alpha numeric</analyser><indexed>true</indexed><value>CSV</value></field>
<field><name>IPAddress</name><type>Text</type><indexed>true</indexed><value>1.1.1.1</value></field>
<field><name>UserId</name><type>Text</type><indexed>true</indexed><value>user1</value></field>
<field><name>Action</name><type>Text</type><analyser>Alpha numeric</analyser><indexed>true</indexed><value>Authenticate</value></field>
<field><name>Description</name><type>Text</type><analyser>Alpha numeric</analyser><indexed>true</indexed><value>Some message 1</value></field>
</document>
</index-documents>
Configured Content
-
XSLTFilter
- An XSLT transforming
event-logging:3=>index-documents:1. -
SchemaFilter
- XMLSchema
index-documents:1
XML to an Elastic Search Index
This use case is for indexing XML event data that had already been normalised using one of the ingest pipelines above.
The
XSLTFilter
is used to transform the event into records format, extracting the fields to be indexed from the event.
The
ElasticIndexingFilter
reads the records XML and loads each one into an external Elasticsearch index .
Configured Content
-
XSLTFilter
- An XSLT transforming
event-logging:3=>records:2. -
SchemaFilter
- XMLSchema
records:2
Search Extraction
Search extraction is the process of combining the data held in the index with data obtained from the original indexed document, i.e. the event. Search extraction is useful when you do not want to store the whole of an event in the index (to reduce storage used) but still want to be able to access all the event data in a Dashboard/View. An extraction pipeline is required to combine data in this way. Search extraction pipelines are referenced in Dashboard and View settings.
Standard Lucene Index Extraction
This is a non-dynamic search extraction pipeline for a Lucene index.
Configured Content
-
XSLTFilter
- An XSLT transforming
event-logging:3=>records:2.
Dynamic Lucene Index Extraction
This is a dynamic search extraction pipeline for a Lucene index.
Configured Content
-
XSLTFilter
- An XSLT transforming
event-logging:3=>index-documents:1.
Data Egress
XML to CSV File
A recipe for writing normalised XML events (as produced by an ingest pipeline above) to a file, but in a flat file format like CSV. The XSLTFilter transforms the events XML into CSV data with XSLT including this:
<xsl:output method="text" omit-xml-declaration="yes" indent="no"/>
The TextWriter converts the XML character events into a stream of characters encoded using the desired output character encoding. The data is appended to a file on a file system, with one file per Stream.
Configured Content
-
XSLTFilter
- An XSLT transforming
event-logging:3=> schemaless plain text. -
SchemaFilter
- XMLSchema
records:2
XML to JSON Rolling File
This is similar to the above recipe for writing out CSV, except that the XSLTFilter converts the event XML into XML conforming to the https://www.w3.org/2013/XSL/json/ XMLSchema. The JSONWriter can read this format of XML and convert it into JSON using the desired character encoding. The RollingFileAppender will append the encoded JSON character data to a file on the file system that is rolled based on a size/time threshold.
Configured Content
-
XSLTFilter
- An XSLT transforming
event-logging:3=>http://www.w3.org/2013/XSL/json. -
SchemaFilter
- XMLSchema
http://www.w3.org/2013/XSL/json.
XML to HTTP Destination
This recipe is for sending normalised XML events to another system over HTTP. The HTTPAppender is configured with the URL and any TLS Transport Sayer Security (TLS) Transport Sayer Security (TLS) is the evolution of Secure Sockets Layer (SSL) and refers to the encryption of traffic between client and server.Click to see more details... certificates/keys/credentials.
Reference Data
Reference Loader
A typical pipeline for loading XML reference data (conforming to the reference-data:2 XMLSchema) into the reference data store.
The
ReferenceDataFilter
reads the reference-data:2 format data and loads each entry into the appropriate map in the store.
As an example, the reference-data:2 XML for mapping userIDs to staff numbers looks something like this:
<?xml version="1.1" encoding="UTF-8"?>
<referenceData
xmlns="reference-data:2"
xmlns:evt="event-logging:3"
xmlns:xsi="http://www.w3.org/2001/XMLSchema-instance"
xsi:schemaLocation="reference-data:2 file://reference-data-v2.0.1.xsd"
version="2.0.1">
<reference>
<map>USER_ID_TO_STAFF_NO_MAP</map>
<key>user1</key>
<value>staff1</value>
</reference>
<reference>
<map>USER_ID_TO_STAFF_NO_MAP</map>
<key>user2</key>
<value>staff2</value>
</reference>
...
</referenceData>
Statistics
This recipe takes normalised XML data and converts it into statistic events (conforming to the statistics:4 XMLSchema).
Stroom’s Statistic Stores are a way to store aggregated counts or averaged values over time periods.
For example you may want counts of certain types of event, aggregated over fixed time buckets.
Each XML event is transformed using the
XSLTFilter
to either return no output or a statistic event.
An example of statistics:4 data for two statistic events is:
<?xml version="1.1" encoding="UTF-8"?>
<statistics
xmlns="statistics:2"
xmlns:xsi="http://www.w3.org/2001/XMLSchema-instance"
xsi:schemaLocation="statistics:2 file://statistics-v2.0.xsd">
<statistic>
<time>2023-12-22T00:00:00.000Z</time>
<count>1</count>
<tags>
<tag name="user" value="user1" />
</tags>
</statistic>
<statistic>
<time>2023-12-23T00:00:00.000Z</time>
<count>5</count>
<tags>
<tag name="user" value="user6" />
</tags>
</statistic>
</statistics>
Configured Content
-
XSLTFilter
- An XSLT transforming
event-logging:3=>statistics:2. -
SchemaFilter
- XMLSchema
statistics:2.
5.10.2 - Parser
Parsing input data.
The following capabilities are available to parse input data:
- XML - XML input can be parsed with the XML parser.
- XML Fragment - Treat input data as an XML fragment, i.e. XML that does not have an XML declaration or root elements.
- Data Splitter - Delimiter and regular expression based language for turning non XML data into XML (e.g. CSV)
5.10.2.1 - XML Fragments
Handling XML data without root level elements.
Some input XML data may be missing an XML declaration and root level enclosing elements. This data is not a valid XML document and must be treated as an XML fragment. To use XML fragments the input type for a translation must be set to ‘XML Fragment’. A fragment wrapper must be defined in the XML conversion that tells Stroom what declaration and root elements to place around the XML fragment data.
Here is an example:
<?xml version="1.1" encoding="UTF-8"?>
<!DOCTYPE records [
<!ENTITY fragment SYSTEM "fragment">
]>
<records
xmlns="records:2"
xmlns:xsi="http://www.w3.org/2001/XMLSchema-instance"
xsi:schemaLocation="records:2 file://records-v2.0.xsd"
version="2.0">
&fragment;
</records>
During conversion Stroom replaces the fragment text entity with the input XML fragment data. Note that XML fragments must still be well formed so that they can be parsed correctly.
5.10.3 - XSLT Conversion
Using Extensible Stylesheet Language Transformations (XSLT) to transform data.
XSLT
XSLT
Extensible Stylesheet Language Transformations is a language for transforming XML documents into other XML documents. XSLTs are the primary means of transforming data in Stroom.Click to see more details... is a language that is typically used for transforming XML documents into either a different XML document or plain text.
XSLT is key part of Stroom’s pipeline processing as it is used to normalise bespoke events into a common XML audit event document conforming to the event-logging
XML Schema
XML Schema
XML Schema is a language used to define the permitted structure of an XML document. An XML Schema can be used to validate an XML document to ensure it conforms to that schema such that onward processing of the XML document can be done with confidence that the document is correct.Click to see more details....
Once a text file has been converted into intermediary XML (or the feed is already XML),
XSLT
XSLT
Extensible Stylesheet Language Transformations is a language for transforming XML documents into other XML documents. XSLTs are the primary means of transforming data in Stroom.Click to see more details... is used to
translate the XML into the event-logging XML format.
The XSLTFilter pipeline element defines the XSLT document and is used to do the transformation of the input XML into XML or plain text. You can have multiple XSLTFilter elements in a pipeline if you want to break the transformation into steps, or wish to have simpler XSLTs that can be reused.
Raw Event Feeds are typically translated into the event-logging:3 schema and Raw Reference into the reference-data:2 schema.
5.10.3.1 - XSLT Basics
The basics of using XSLT and the XSLTFilter element.
XSLT XSLT Extensible Stylesheet Language Transformations is a language for transforming XML documents into other XML documents. XSLTs are the primary means of transforming data in Stroom.Click to see more details... is a very powerful language and allows the user to perform very complex transformations of XML data. This documentation does not aim to document how to write XSLT documents, for that, we strongly recommend you refer to online references (e.g. W3Schools or obtain a book covering XSLT 2.0 and XPath XPath XPath is an expression language for selecting a node or nodes in an XML document. It is used heavily in XSLT to define the match criteria for templates and to select values.Click to see more details...). It does however aim to document aspects of XSLT that are specific to the use of XSLT in Stroom.
Examples
Event Normalisation
Here is an example XSLT document that transforms XML data in the records:2
Namespace
Namespace
In Stroom Namespace typically refers to an XML Namespace. Namespaces are used in XML to distinguish different elements, e.g. where an XSLT is transforming XML in the records:2 Namespace into XML in the event-logging:3 Namespace.Click to see more details... (which is the output of the
DSParser
element) into event XML in the event-logging:3 namespace.
It is an example of event normalisation from a bespoke format.
Warning
This example aims to show some typical uses of XSLT in a typical Stroom use case. It does not necessarily represent best practice in terms of creation of a normalised event.<?xml version="1.1" encoding="UTF-8" ?>
<xsl:stylesheet
xpath-default-namespace="records:2"
xmlns="event-logging:3"
xmlns:stroom="stroom"
xmlns:xsl="http://www.w3.org/1999/XSL/Transform"
xmlns:xsi="http://www.w3.org/2001/XMLSchema-instance"
version="2.0">
<!-- Match the root element -->
<xsl:template match="records">
<Events
xsi:schemaLocation="event-logging:3 file://event-logging-v3.0.0.xsd"
Version="3.0.0">
<xsl:apply-templates />
</Events>
</xsl:template>
<!-- Match each 'record' element -->
<xsl:template match="record">
<xsl:variable name="user" select="data[@name='User']/@value" />
<Event>
<xsl:call-template name="header" />
<xsl:value-of select="stroom:log('info', concat('Processing user: ', $user))"/>
<EventDetail>
<TypeId>0001</TypeId>
<Description>
<xsl:value-of select="data[@name='Message']/@value" />
</Description>
<Authenticate>
<Action>Logon</Action>
<LogonType>Interactive</LogonType>
<User>
<Id>
<xsl:value-of select="$user" />
</Id>
</User>
<Data Name="FileNo">
<xsl:attribute name="Value" select="data[@name='FileNo']/@value" />
</Data>
<Data Name="LineNo">
<xsl:attribute name="Value" select="data[@name='LineNo']/@value" />
</Data>
</Authenticate>
</EventDetail>
</Event>
</xsl:template>
<xsl:template name="header">
<xsl:variable name="date" select="data[@name='Date']/@value" />
<xsl:variable name="time" select="data[@name='Time']/@value" />
<xsl:variable name="dateTime" select="concat($date, $time)" />
<xsl:variable name="formattedDateTime" select="stroom:format-date($dateTime, 'dd/MM/yyyyHH:mm:ss')" />
<xsl:variable name="user" select="data[@name='User']/@value" />
<EventTime>
<TimeCreated>
<xsl:value-of select="$formattedDateTime" />
</TimeCreated>
</EventTime>
<EventSource>
<System>
<Name>Test</Name>
<Environment>Test</Environment>
</System>
<Generator>CSV</Generator>
<Device>
<IPAddress>1.1.1.1</IPAddress>
<MACAddress>00-00-00-00-00-00</MACAddress>
<xsl:variable name="location" select="stroom:lookup('FILENO_TO_LOCATION_MAP', data[@name='FileNo']/@value, $formattedDateTime)" />
<xsl:if test="$location">
<xsl:copy-of select="$location" />
</xsl:if>
<Data Name="Zone1">
<xsl:attribute name="Value" select="stroom:lookup('IPToLocation', stroom:numeric-ip('192.168.1.1'))" />
</Data>
</Device>
<User>
<Id>
<xsl:value-of select="$user" />
</Id>
</User>
</EventSource>
</xsl:template>
</xsl:stylesheet>
Reference Data
Here is an example of transforming Reference Data in the records:2
Namespace
Namespace
In Stroom Namespace typically refers to an XML Namespace. Namespaces are used in XML to distinguish different elements, e.g. where an XSLT is transforming XML in the records:2 Namespace into XML in the event-logging:3 Namespace.Click to see more details... (which is the output of the
DSParser
element) into XML in the reference-data:2 namespace that is suitable for loading using the
ReferenceDataFilter
<?xml version="1.0" encoding="UTF-8" ?>
<xsl:stylesheet
xpath-default-namespace="records:2"
xmlns="reference-data:2"
xmlns:evt="event-logging:3"
xmlns:xsi="http://www.w3.org/2001/XMLSchema-instance"
xmlns:xsl="http://www.w3.org/1999/XSL/Transform"
version="2.0">
<xsl:template match="records">
<referenceData
xsi:schemaLocation="reference-data:2 file://reference-data-v2.0.1.xsd event-logging:3 file://event-logging-v3.0.0.xsd"
version="2.0.1">
<xsl:apply-templates/>
</referenceData>
</xsl:template>
<xsl:template match="record">
<reference>
<map>USER_ID_TO_STAFF_NO_MAP</map>
<key><xsl:value-of select="data[@name='userId']/@value"/></key>
<value><xsl:value-of select="data[@name='staffNo']/@value"/></value>
</reference>
</xsl:template>
</xsl:stylesheet>
Identity Transformation
If you want an XSLT to decorate an Events XML document with some additional data or to change it slightly without changing its namespace then a good starting point is the identity transformation.
<xsl:stylesheet
version="1.0"
xpath-default-namespace="event-logging:3"
xmlns="event-logging:3"
xmlns:xsl="http://www.w3.org/1999/XSL/Transform">
<!-- Match Root Object -->
<xsl:template match="Events">
<Events
xmlns="event-logging:3"
xmlns:xsi="http://www.w3.org/2001/XMLSchema-instance"
xsi:schemaLocation="event-logging:3 file://event-logging-v3.4.2.xsd"
Version="3.4.2">
<xsl:apply-templates />
</Events>
</xsl:template>
<!-- Whenever you match any node or any attribute -->
<xsl:template match="node( )|@*">
<!-- Copy the current node -->
<xsl:copy>
<!-- Including any attributes it has and any child nodes -->
<xsl:apply-templates select="@*|node( )" />
</xsl:copy>
</xsl:template>
</xsl:stylesheet>
This XSLT will copy every node and attribute as they are, returning the input document completely un-changed.
You can then add additional templates to match on specific elements and modify them, for example decorating a user’s UserDetails elements with value obtained from a reference data lookup on a user ID.
Note
You can insert this identity skeleton into an XSLT editor using this editor snippet.
<xsl:message>
Stroom supports the standard <xsl:message> element from the
http://www.w3.org/1999/XSL/Transform
.
This element behaves in a similar way to the stroom:log() XSLT function.
The element text is logged to the Error stream with a default severity of ERROR.
A child element can optionally be used to set the severity level (one of FATAL|ERROR|WARN|INFO).
The namespace of this element does not matter.
You can also set the attribute terminate="yes" to log the message at severity FATAL and halt processing of that stream part.
If the stream is multi-part then processing will continue with the next part.
Note
Settingterminate="yes" will trump any severity defined by a child element.
It will always be logged at FATAL.
The following are some examples of using <xsl:message>.
<!-- Log a message using default severity of ERROR -->
<xsl:message>Invalid length</xsl:message>
<!-- terminate="yes" means log the message as a FATAL ERROR and halt processing of the stream part -->
<xsl:message terminate="yes">Invalid length</xsl:message>
<!-- Log a message with a child element name specifying the severity. -->
<xsl:message>
<warn>Invalid length</warn>
</xsl:message>
<!-- Log a message with a child element name specifying the severity. -->
<xsl:message>
<info>Invalid length</info>
</xsl:message>
<!-- Log a message, specifying the severity and using a dynamic value. -->
<xsl:message>
<info>
<xsl:value-of select="concat('User ID ', $userId, ' is invalid')" />
</info>
</xsl:message>
5.10.3.2 - XSLT Functions
Custom XSLT functions available in Stroom.
By including the following namespace:
xmlns:stroom="stroom"
E.g.
<?xml version="1.0" encoding="UTF-8" ?>
<xsl:stylesheet
xmlns="event-logging:3"
xmlns:stroom="stroom"
xmlns:xsl="http://www.w3.org/1999/XSL/Transform"
xmlns:xsi="http://www.w3.org/2001/XMLSchema-instance"
version="2.0">
The following functions are available to aid your translation:
add-meta(String key, String value)- Add meta to be written to output destination.bitmap-lookup(String map, String key)- Bitmap based look up against reference data map using the period start timebitmap-lookup(String map, String key, String time)- Bitmap based look up against reference data map using a specified time, e.g. the event timebitmap-lookup(String map, String key, String time, Boolean ignoreWarnings)- Bitmap based look up against reference data map using a specified time, e.g. the event time, and ignore any warnings generated by a failed lookupbitmap-lookup(String map, String key, String time, Boolean ignoreWarnings, Boolean trace)- Bitmap based look up against reference data map using a specified time, e.g. the event time, and ignore any warnings generated by a failed lookup and get trace information for the path taken to resolve the lookup.cidr-to-numeric-ip-range()- Converts a CIDR IP address range to an array of numeric IP addresses representing the start and end addresses of the range.classification()- The classification of the feed for the data being processedcol-from()- The column in the input that the current record begins on (can be 0).col-to()- The column in the input that the current record ends at.current-time()- The current system timecurrent-unixTime()- The current system time shown as milliseconds since the epochcurrent-user()- The current user logged into Stroom (only relevant for interactive use, e.g. search)decode-url(String encodedUrl)- Decode the provided url.dictionary(String name)- Loads the contents of the named dictionary for use within the translationencode-url(String url)- Encode the provided url.feed-attribute(String attributeKey)- NOTE: This function is deprecated, usemeta(String key)instead. The value for the supplied feedattributeKey.feed-name()- Name of the feed for the data being processedfetch-json(String url)- Simplistic version ofhttp-callthat sends a request to the passedurland converts the JSON response body to XML usingjson-to-xml. Currently does not support SSL configuration likehttp-calldoes.format-date(String date, String pattern)- Format a date that uses the specified pattern using the default time zoneformat-date(String date, String pattern, String timeZone)- Format a date that uses the specified pattern with the specified time zoneformat-date(String date, String patternIn, String timeZoneIn, String patternOut, String timeZoneOut)- Parse a date with the specified input pattern and time zone and format the output with the specified output pattern and time zoneformat-date(String milliseconds)- Format a date that is specified as a number of milliseconds since a standard base time known as “the epoch”, namely January 1, 1970, 00:00:00 GMTformat-dateTime(DateTime dateTime)- Format a dateTime with the default patternformat-dateTime(DateTime dateTime, String pattern)- Format a dateTime with the specified patternformat-dateTime(DateTime dateTime, String pattern, String timeZone)- Format a dateTime with the specified pattern and time zonefrom-unixTime(Integer milliseconds)- Returns the specified number of milliseconds since the epoch as a dateTimeget(String key)- Returns the value associated with akeythat has been stored in a map using theput()function. The map is in the scope of the current pipeline process so values do not live after the stream has been processed.hash(String value)- Hash a string value using the defaultSHA-256algorithm and no salthash(String value, String algorithm, String salt)- Hash a string value using the specified hashing algorithm and supplied salt value. Supported hashing algorithms includeSHA-256,SHA-512,MD5.hex-to-dec(String hex)- Convert hex to dec representation.hex-to-oct(String hex)- Convert hex to oct representation.hex-to-string(String hex, String textEncoding)- Convert hex to string using the specified text encoding.host-address(String hostname)- Convert a hostname into an IP address.host-name(String ipAddress)- Convert an IP address into a hostname.http-call(String url, String headers, String mediaType, String data, String clientConfig)- Makes an HTTP(S) request to a remote server.ip-in-cidr(String ipAddress, String cidr)- Return whether an IPv4 address is within the specified CIDR (e.g.192.168.1.0/24).json-to-xml(String json)- Returns an XML representation of the supplied JSON value for use in XPath expressionsline-from()- The line in the input that the current record begins on (1 based).line-to()- The line in the input that the current record ends at.link(String url)- Creates a stroom dashboard table link.link(String title, String url)- Creates a stroom dashboard table link.link(String title, String url, String type)- Creates a stroom dashboard table link.log(String severity, String message)- Logs a message to the processing log with the specified severitylookup(String map, String key)- Look up a reference data map using the period start timelookup(String map, String key, String time)- Look up a reference data map using a specified time, e.g. the event timelookup(String map, String key, String time, Boolean ignoreWarnings)- Look up a reference data map using a specified time, e.g. the event time, and ignore any warnings generated by a failed lookuplookup(String map, String key, String time, Boolean ignoreWarnings, Boolean trace)- Look up a reference data map using a specified time, e.g. the event time, ignore any warnings generated by a failed lookup and get trace information for the path taken to resolve the lookup.manifest- Returns an XML structure with thestroom-metanamespace detailing the manifest meta of the current stream being processedmanifest-for-id(String streamId)- Returns an XML structure with thestroom-metanamespace detailing the manifest meta of the specified streammeta(String key)- Lookup a meta data value for the current stream using the specified key. The key can beFeed,StreamType,CreatedTime,EffectiveTime,Pipelineor any other attribute supplied when the stream was sent to Stroom, e.g. meta(‘System’).meta-keys()- Returns an array of meta keys for the current stream. Each key can then be used to retrieve its corresponding meta value, by callingmeta($key).meta-stream()- Returns an XML structure with thestroom-metanamespace detailing the meta data of the current stream being processedmeta-stream-for-id(String streamId, Integer partNo)- Returns an XML structure with thestroom-metanamespace detailing the meta data of the specified stream and part number (1 based)numeric-ip(String ipAddress)- Convert an IP address to a numeric representation for range comparisonparent-for-id(String streamId)- Get the parent id of the specified input streamparent-id()- Get the parent id of the current input stream this is being processedpart-no()- The current part within a multi part aggregated input stream (AKA the substream number) (1 based)parse-dateTime(String dateTime)- Returns the dateTime of a specified ISO 8601 formatted stringparse-dateTime(String dateTime, String pattern)- Returns the dateTime for a specified string using the patternparse-dateTime(String dateTime, String pattern, String timeZone)- Returns the dateTime for a specified string using the pattern and time zoneparse-uri(String URI)- Returns an XML structure of the URI providingauthority,fragment,host,path,port,query,scheme,schemeSpecificPart, anduserInfocomponents if present.pipeline-name()- Get the name of the pipeline currently processing the stream.pointIsInsideXYPolygon(Number xPos, Number yPos, Number[] xPolyData, Number[] yPolyData)- Determines whether a given point (xPos, yPos) lies inside the polygon defined by the provided x and y coordinate arrays.random()- Get a system generated random number between 0 and 1.record-no()- The current record number within the current part (substream) (1 based).search-id()- Get the id of the batch search when a pipeline is processing as part of a batch searchsource()- Returns an XML structure with thestroom-metanamespace detailing the current source location.source-id()- Get the id of the current input stream that is being processedsplit-document(String doc, String segmentSize, String overlapSize)- Split a document for LLM tokenisation (experimental).stream-id()- An alias forsource-idincluded for backward compatibility.to-unixTime(DateTime dateTime)- Returns milliseconds since the epoch for a specified dateTimeput(String key, String value)- Store a value for use later on in the translation
bitmap-lookup()
The bitmap-lookup() function looks up a bitmap key from reference or context data a value (which can be an XML node set) for each set bit position and adds it to the resultant XML.
bitmap-lookup(String map, String key)
bitmap-lookup(String map, String key, String time)
bitmap-lookup(String map, String key, String time, Boolean ignoreWarnings)
bitmap-lookup(String map, String key, String time, Boolean ignoreWarnings, Boolean trace)
map- The name of the reference data map to perform the lookup against.key- The bitmap value to lookup. This can either be represented as a decimal integer (e.g.14) or as hexadecimal by prefixing with0x(e.g.0xE).time- Determines which set of reference data was effective at the requested time. If no reference data exists with an effective time before the requested time then the lookup will fail. Time is in the formatyyyy-MM-dd'T'HH:mm:ss.SSSXX, e.g.2010-01-01T00:00:00.000Z.ignoreWarnings- If true, any lookup failures will be ignored, else they will be reported as warnings.trace- If true, additional trace information is output as INFO messages.
If the look up fails no result will be returned.
The key is a bitmap expressed as either a decimal integer or a hexadecimal value, e.g. 14/0xE is 1110 as a binary bitmap.
For each bit position that is set, (i.e. has a binary value of 1) a lookup will be performed using that bit position as the key.
In this example, positions 1, 2 & 3 are set so a lookup would be performed for these bit positions.
The result of each lookup for the bitmap are concatenated together in bit position order, separated by a space.
If ignoreWarnings is true then any lookup failures will be ignored and it will return the value(s) for the bit positions it was able to lookup.
This function can be useful when you have a set of values that can be represented as a bitmap and you need them to be converted back to individual values. For example if you have a set of additive account permissions (e.g. Admin, ManageUsers, PerformExport, etc.), each of which is associated with a bit position, then a user’s permissions could be defined as a single decimal/hex bitmap value. Thus a bitmap lookup with this value would return all the permissions held by the user.
For example the reference data store may contain:
| Key (Bit position) | Value |
|---|---|
| 0 | Administrator |
| 1 | Manage_Users |
| 2 | Perform_Export |
| 3 | View_Data |
| 4 | Manage_Jobs |
| 5 | Delete_Data |
| 6 | Manage_Volumes |
The following are example lookups using the above reference data:
| Lookup Key (decimal) | Lookup Key (Hex) | Bitmap | Result |
|---|---|---|---|
0 |
0x0 |
0000000 |
- |
1 |
0x1 |
0000001 |
Administrator |
74 |
0x4A |
1001010 |
Manage_Users View_Data Manage_Volumes |
2 |
0x2 |
0000010 |
Manage_Users |
96 |
0x60 |
1100000 |
Delete_Data Manage_Volumes |
cidr-to-numeric-ip-range()
Converts a CIDR IP address range to an array of numeric IP addresses representing the start and end (broadcast) of the range.
When storing the result in a variable, ensure you indicate the type as a string array (xs:string*), as shown in the below example.
Example XSLT
<xsl:variable name="range" select="stroom:cidr-to-numeric-ip-range('192.168.1.0/24')" as="xs:string*" />
<Range>
<Start><xsl:value-of select="$range[1]" /></Start>
<End><xsl:value-of select="$range[2]" /></End>
</Range>
Example output
<Range>
<Start>3232235776</Start>
<End>3232236031</End>
</Range>
dictionary()
The dictionary() function gets the contents of the specified dictionary for use during translation. The main use for this function is to allow users to abstract the management of a set of keywords from the XSLT so that it is easier for some users to make quick alterations to a dictionary that is used by some XSLT, without the need for the user to understand the complexities of XSLT.
format-date()
The format-date() function combines parsing and formatting of date strings. In its simplest form it will parse a date string and return the parsed date in the XML standard Date Format. It also supports supplying a custom format pattern to output the parsed date in a specified format.
Function Signatures
The following are the possible forms of the format-date function.
<!-- Convert time in millis to standard date format -->
format-date(long millisSinceEpoch)
<!-- Convert inputDate to standard date format -->
format-date(String inputDate, String inputPattern)
<!-- Convert inputDate to standard date format using specified input time zone -->
format-date(String inputDate, String inputPattern, String inputTimeZone)
<!-- Convert inputDate to a custom date format using optional input time zone inputTimeZone -->
format-date(String inputDate, String inputPattern, String inputTimeZone, String outputPattern)
<!-- Convert inputDate to a custom date format using optional input time zone and a specified output time zone -->
format-date(String inputDate, String inputPattern, String inputTimeZone, String outputPattern, String outputTimeZone)
millisSinceEpoch- The date/time expressed as the number of milliseconds since the UNIX epoch .inputDate- The input date string, e.g.2009/08/01 12:34:11.inputPattern- The pattern that defines the structure ofinputDate(see Custom Date Formats).inputTimeZone- Optional time zone of theinputDate. Ifnullthen the UTC/Zulu time zone will be used. IfinputTimeZoneis present, the inputPattern must not include the time zone pattern tokens (zandZ).outputPattern- The pattern that defines the format of the output date (see Custom Date Formats).inputTimeZone- Optional time zone of the output date. Ifnullthen the UTC/Zulu time zone will be used.
Time Zones
The following is a list of some common time zone values:
| Values | Zone Name |
|---|---|
GMT/BST |
A Stroom specific value for UK daylight saving time (see below) |
UTC, UCT, Zulu, Universal, +00:00, -00:00, +00, +0 |
Coordinated Universal Time (UTC) |
GMT, GMT0, Greenwich |
Greenwich Mean Time (GMT) |
GB, GB-Eire, Europe/London |
British Time |
NZ, Pacific/Auckland |
New Zealand Time |
Australia/Canberra, Australia/Sydney |
Eastern Australia Time |
CET |
Central European Time |
EET |
Eastern European Time |
Canada/Atlantic |
Atlantic Time |
Canada/Central |
Central Time |
Canada/Pacific |
Pacific Time |
US/Central |
Central Time |
US/Eastern |
Eastern Time |
US/Mountain |
Mountain Time |
US/Pacific |
Pacific Time |
+02:00, +02, +2 |
UTC +2hrs |
-03:00, -03, -3 |
UTC -3hrs |
A special time zone value of GMT/BST can be used when the inputDate is in local wall clock time with time zone information.
In this case, the date/time will be used to determine whether the date is in British Summer Time or in GMT and adjust the output accordingly.
See the examples below.
Parsing Examples
The following table shows various examples of calls to stroom:format-date() with their output.
The stroom:format-date part has been omitted for brevity.
<!-- Date in millis since UNIX epoch -->
stroom:format-date('1269270011640')
-> '2010-03-22T15:00:11.640Z'
<!-- Simple date UK style date -->
stroom:format-date('29/08/24', 'dd/MM/yy')
-> '2024-08-29T00:00:00.000Z'
<!-- Simple date US style date -->
stroom:format-date('08/29/24', 'MM/dd/yy')
-> '2024-08-29T00:00:00.000Z'
<!-- ISO date with no delimiters -->
stroom:format-date('20010801184559', 'yyyyMMddHHmmss')
-> '2001-08-01T18:45:59.000Z'
<!-- Standard output, no TZ -->
stroom:format-date('2001/08/01 18:45:59', 'yyyy/MM/dd HH:mm:ss')
-> '2001-08-01T18:45:59.000Z'
<!-- Standard output, date only, with TZ -->
stroom:format-date('2001/08/01', 'yyyy/MM/dd', '-07:00')
-> '2001-08-01T07:00:00.000Z'
<!-- Standard output, with TZ -->
stroom:format-date('2001/08/01 01:00:00', 'yyyy/MM/dd HH:mm:ss', '-08:00')
-> '2001-08-01T09:00:00.000Z'
<!-- Standard output, with TZ -->
stroom:format-date('2001/08/01 01:00:00', 'yyyy/MM/dd HH:mm:ss', '+01:00')
-> '2001-08-01T00:00:00.000Z'
<!-- Single digit day and month, no padding -->
stroom:format-date('2001 8 1', 'yyyy MM dd')
-> '2001-08-01T00:00:00.000Z'
<!-- Double digit day and month, no padding -->
stroom:format-date('2001 12 28', 'yyyy MM dd')
-> '2001-12-28T00:00:00.000Z'
<!-- Single digit day and month, with optional padding -->
stroom:format-date('2001 8 1', 'yyyy ppMM ppdd')
-> '2001-08-01T00:00:00.000Z'
<!-- Double digit day and month, with optional padding -->
stroom:format-date('2001 12 31', 'yyyy ppMM ppdd')
-> '2001-12-31T00:00:00.000Z'
<!-- With abbreviated day of week month -->
stroom:format-date('Wed Aug 14 2024', 'EEE MMM dd yyyy')
-> '2024-08-14T00:00:00.000Z'
<!-- With long form day of week and month -->
stroom:format-date('Wednesday August 14 2024', 'EEEE MMMM dd yyyy')
-> '2024-08-14T00:00:00.000Z'
<!-- With 12 hour clock, AM -->
stroom:format-date('Wed Aug 14 2024 10:32:58 AM', 'E MMM dd yyyy hh:mm:ss a')
-> '2024-08-14T10:32:58.000Z'
<!-- With 12 hour clock, PM (lower case) -->
stroom:format-date('Wed Aug 14 2024 10:32:58 pm', 'E MMM dd yyyy hh:mm:ss a')
-> '2024-08-14T22:32:58.000Z'
<!-- Using minimal symbols -->
stroom:format-date('2001 12 31 22:58:32.123', 'y M d H:m:s.S')
-> '2001-12-31T22:58:32.123Z'
<!-- Optional time portion, with time -->
stroom:format-date('2001/12/31 22:58:32.123', 'yyyy/MM/dd[ HH:mm:ss.SSS]')
-> '2001-12-31T22:58:32.123Z'
<!-- Optional time portion, without time -->
stroom:format-date('2001/12/31', 'yyyy/MM/dd[ HH:mm:ss.SSS]')
-> '2001-12-31T00:00:00.000Z'
<!-- Optional millis portion, with millis -->
stroom:format-date('2001/12/31 22:58:32.123', 'yyyy/MM/dd HH:mm:ss[.SSS]')
-> '2001-12-31T22:58:32.123Z'
<!-- Optional millis portion, without millis -->
stroom:format-date('2001/12/31 22:58:32', 'yyyy/MM/dd HH:mm:ss[.SSS]')
-> '2001-12-31T22:58:32.000Z'
<!-- Optional millis/nanos portion, with nanos -->
stroom:format-date('2001/12/31 22:58:32.123456', 'yyyy/MM/dd HH:mm:ss[.SSS]')
-> '2001-12-31T22:58:32.123Z'
<!-- Fixed text -->
stroom:format-date('Date: 2001/12/31 Time: 22:58:32.123', ''Date: 'yyyy/MM/dd 'Time: 'HH:mm:ss.SSS')
-> '2001-12-31T22:58:32.123Z'
<!-- GMT/BST date that is BST -->
stroom:format-date('2009/06/01 12:34:11', 'yyyy/MM/dd HH:mm:ss', 'GMT/BST')
-> '2009-06-01T11:34:11.000Z'
<!-- GMT/BST date that is GMT -->
stroom:format-date('2009/02/01 12:34:11', 'yyyy/MM/dd HH:mm:ss', 'GMT/BST')
-> '2009-02-01T12:34:11.000Z'
<!-- Time zone offset -->
stroom:format-date('2009/02/01 12:34:11', 'yyyy/MM/dd HH:mm:ss', '+01:00')
-> '2009-02-01T11:34:11.000Z'
<!-- Named time zone -->
stroom:format-date('2009/02/01 23:34:11', 'yyyy/MM/dd HH:mm:ss', 'US/Eastern')
-> '2009-02-02T04:34:11.000Z'
Note
Parsing is done in lenient mode so, the count of each symbol is not critical, e.g. you can parse the year 2024 with y, yy, yyy or yyyy.
Despite this, it is advisable to use a pattern that matches the known format of the input dates, e.g. in this example yyyy, to avoid confusing with anyone else reading your XSLT.
The count of each symbol is however critical when it comes to formatting.
Formatting Examples
<!-- Specific output, no input or output TZ -->
stroom:format-date('2001/08/01 14:30:59', 'yyyy/MM/dd HH:mm:ss', null, 'E dd MMM yyyy HH:mm (s 'secs')')
-> 'Wed 01 Aug 2001 14:30 (59 secs)'
<!-- Specific output, UTC input, no output TZ -->
stroom:format-date('2001/08/01 14:30:59', 'yyyy/MM/dd HH:mm:ss', 'UTC', 'E dd MMM yyyy HH:mm (s 'secs')')
-> 'Wed 01 Aug 2001 14:30 (59 secs)'
<!-- Specific output, no output TZ -->
stroom:format-date('2001/08/01 14:30:59', 'yyyy/MM/dd HH:mm:ss', '+01:00', 'E dd MMM yyyy HH:mm (s 'secs')')
-> 'Wed 01 Aug 2001 13:30 (59 secs)'
<!-- Specific output, with input and output TZ -->
stroom:format-date('2001/08/01 14:30:59', 'yyyy/MM/dd HH:mm:ss', '+01:00', 'E dd MMM yyyy HH:mm', '+02:00')
-> 'Wed 01 Aug 2001 15:30'
<!-- Padded 12 hour clock output -->
stroom:format-date('2001/08/01 14:07:05.123', 'yyyy/MM/dd HH:mm:ss.SSS', 'UTC', 'E dd MMM yyyy pph:ppm:pps a')
-> 'Wed 01 Aug 2001 2: 7: 5 PM'
<!-- Padded 12 hour clock output -->
stroom:format-date('2001/08/01 22:27:25.123', 'yyyy/MM/dd HH:mm:ss.SSS', 'UTC', 'E dd MMM yyyy pph:ppm:pps a')
-> 'Wed 01 Aug 2001 10:27:25 PM'
<!-- Non-Padded 12 hour clock output -->
stroom:format-date('2001/08/01 14:07:05.123', 'yyyy/MM/dd HH:mm:ss.SSS', 'UTC', 'E dd MMM yyyy h:m:s a')
-> 'Wed 01 Aug 2001 2:7:5 PM'
<!-- Long form text -->
stroom:format-date('2001/08/01 14:07:05.123', 'yyyy/MM/dd HH:mm:ss.SSS', 'UTC', 'EEEE d MMMM yyyy HH:mm:ss')
-> 'Wednesday 1 August 2001 14:07:05'
Reference Time
When parsing a date string that does not contain a full zoned date and time, certain assumptions will be made.
If there is no time zone in inputDate and no inputTimeZone argument has been passed then the time zone of the input date will be assumed to be in the UTC time zone.
If any of the date parts are not present, e.g. an input of 28 Oct then Stroom will use a reference date to fill in the gaps.
The reference date is the first of these values that is non-null
- The create time of the stream being processed by the XSLT.
- The current time, i.e. now().
For example for a call of stroom:format-date('28 Oct', 'dd MMM') and a stream create time of 2024, it will return 2024-10-28T00:00:00.000Z.
format-dateTime()
Formats the dateTime as a string according to the specified pattern and time zone.
Function Signatures
The following are the possible forms of the format-dateTime function.
<!-- Format dateTime to standard date format -->
format-dateTime(DateTime dateTime)
<!-- Format dateTime to a custom date format-->
format-dateTime(DateTime dateTime, String pattern)
<!-- Convert dateTime to standard date format using specified input time zone -->
format-dateTime(DateTime dateTime, String pattern, String timeZone)
dateTime- The input dateTime.pattern- The pattern that defines the format of the output string (see Custom Date Formats).timeZone- Optional time zone of the output. Ifnullthen the UTC/Zulu time zone will be used.
Examples
<!-- Default format -->
stroom:format-dateTime('xs:dateTime("2024-08-29T00:00:00Z")')
-> '2024-08-29T00:00:00.000Z'
<!-- Default format +2hr zone offset -->
stroom:format-dateTime('xs:dateTime("2001-08-01T18:45:59.123+02:00")')
-> '2001-08-01T16:45:59.123Z'
<!-- Default format +2hr30min zone offset -->
stroom:format-dateTime('xs:dateTime("2001-08-01T18:45:59.123+02:30")')
-> '2001-08-01T16:15:59.123Z'
<!-- Default format -3hr zone offset -->
stroom:format-dateTime('xs:dateTime("2001-08-01T18:45:59.123-03:00")')
-> '2001-08-01T21:45:59.123Z'
<!-- Simple date format UK style date -->
stroom:format-dateTime('xs:dateTime("2024-08-29T00:00:00Z")', 'dd/MM/yy')
-> '29/08/24'
<!-- Simple date format US style date -->
stroom:format-dateTime('xs:dateTime("2024-08-29T00:00:00Z")', 'MM/dd/yy')
-> '08/29/24'
<!-- With no delimiters -->
stroom:format-dateTime('xs:dateTime("2001-08-01T18:45:59Z")', 'yyyyMMddHHmmss')
-> '20010801184559'
<!-- Standard output, no TZ -->
stroom:format-dateTime('xs:dateTime("2001-08-01T18:45:59Z")', 'yyyy/MM/dd HH:mm:ss')
-> '2001/08/01 18:45:59'
<!-- Format with nanos -->
stroom:format-dateTime('xs:dateTime("2010-01-01T23:59:59.123456Z")', 'yyyy-MM-dd'T'HH:mm:ss.SSSSSSXX')
-> '2010-01-01T23:59:59.123456Z'
<!-- Standard output, with TZ -->
stroom:format-dateTime('xs:dateTime("2001-08-01T09:00:00Z")', 'yyyy/MM/dd HH:mm:ss', '-08:00')
-> '2001/08/01 01:00:00'
<!-- Standard output, with TZ -->
stroom:format-dateTime('xs:dateTime("2001-08-01T00:00:00Z")', 'yyyy/MM/dd HH:mm:ss', '+01:00')
-> '2001/08/01 01:00:00'
<!-- GMT/BST date that is BST -->
stroom:format-dateTime('xs:dateTime("2009-06-01T11:34:11Z")', 'yyyy/MM/dd HH:mm:ss', 'GMT/BST')
-> '2009/06/01 12:34:11'
<!-- GMT/BST date that is GMT -->
stroom:format-dateTime('xs:dateTime("2009-02-01T12:34:11Z")', 'yyyy/MM/dd HH:mm:ss', 'GMT/BST')
-> '2009/02/01 12:34:11'
<!-- Named time zone -->
stroom:format-dateTime('xs:dateTime("2009-02-02T04:34:11Z")', 'yyyy/MM/dd HH:mm:ss', 'US/Eastern')
-> '2009/02/01 23:34:11'
hex-to-string()
For a hexadecimal input string, decode it using the specified character set to its original form.
Valid character set names are listed at: https://www.iana.org/assignments/character-sets/character-sets.xhtml.
Common examples are: ASCII, UTF-8 and UTF-16.
Input
<string><xsl:value-of select="hex-to-string('74 65 73 74 69 6e 67 20 31 32 33', 'UTF-8')" /></string>
Output
<string>testing 123</string>
http-call()
Executes an HTTP(S) request to a remote server and returns the response.
http-call(String url, [String headers], [String mediaType], [String data], [String clientConfig])
The arguments are as follows:
url- The URL to send the request to.headers- A newline ( ) delimited list of HTTP headers to send. Each header is of the formkey:value.mediaType- The media (or MIME) type of the requestdata, e.g.application/json. If not setapplication/json; charset=utf-8will be used.data- The data to send. The data type should be consistent withmediaType. Supplying thedataargument means a POST request method will be used rather than the default GET.clientConfig- A JSON object containing the configuration for the HTTP client to use, including any SSL configuration.
The function returns the response as XML with namespace stroom-http.
The XML includes the body of the response in addition to the status code, success status, message and any headers.
clientConfig
The client can be configured using a JSON object containing various optional configuration items. The following is an example of the client configuration object with all keys populated.
{
"callTimeout": "PT30S",
"connectionTimeout": "PT30S",
"followRedirects": false,
"followSslRedirects": false,
"httpProtocols": [
"http/2",
"http/1.1"
],
"readTimeout": "PT30S",
"retryOnConnectionFailure": true,
"sslConfig": {
"keyStorePassword": "password",
"keyStorePath": "/some/path/client.jks",
"keyStoreType": "JKS",
"trustStorePassword": "password",
"trustStorePath": "/some/path/ca.jks",
"trustStoreType": "JKS",
"sslProtocol": "TLSv1.2",
"hostnameVerificationEnabled": false
},
"writeTimeout": "PT30S"
}
If you are using two-way SSL then you may need to set the protocol to HTTP/1.1.
"httpProtocols": [
"http/1.1"
],
Example output
The following is an example of the XML returned from the http-call function:
<response xmlns="stroom-http">
<successful>true</successful>
<code>200</code>
<message>OK</message>
<headers>
<header>
<key>cache-control</key>
<value>public, max-age=600</value>
</header>
<header>
<key>connection</key>
<value>keep-alive</value>
</header>
<header>
<key>content-length</key>
<value>108</value>
</header>
<header>
<key>content-type</key>
<value>application/json;charset=iso-8859-1</value>
</header>
<header>
<key>date</key>
<value>Wed, 29 Jun 2022 13:03:38 GMT</value>
</header>
<header>
<key>expires</key>
<value>Wed, 29 Jun 2022 13:13:38 GMT</value>
</header>
<header>
<key>server</key>
<value>nginx/1.21.6</value>
</header>
<header>
<key>vary</key>
<value>Accept-Encoding</value>
</header>
<header>
<key>x-content-type-options</key>
<value>nosniff</value>
</header>
<header>
<key>x-frame-options</key>
<value>sameorigin</value>
</header>
<header>
<key>x-xss-protection</key>
<value>1; mode=block</value>
</header>
</headers>
<body>{"buildDate":"2022-06-29T09:22:41.541886118Z","buildVersion":"SNAPSHOT","upDate":"2022-06-29T11:06:26.869Z"}</body>
</response>
Example usage
This is an example of how to use the function call in your XSLT.
It is recommended to place the clientConfig JSON in a
Dictionary
Dictionary
A entity for storing static content, e.g. lists of terms for use in a query with the in dictionary condition. They can also be used to hold arbitrary text for use in XSLT with the dictionary function.Click to see more details... to make it easier to edit and to avoid having to escape all the quotes.
...
<xsl:template match="record">
...
<!-- Read the client config from a Dictionary into a variable -->
<xsl:variable name="clientConfig" select="stroom:dictionary('HTTP Client Config')" />
<!-- Make the HTTP call and store the response in a variable -->
<xsl:variable name="response" select="stroom:http-call('https://reqbin.com/echo', null, null, null, $clientConfig)" />
<!-- Apply 'response' templates to the response -->
<xsl:apply-templates mode="response" select="$response" />
...
</xsl:template>
<xsl:template mode="response" match="http:response">
<!-- Extract just the body of the response -->
<val><xsl:value-of select="./http:body/text()" /></val>
</xsl:template>
...
link()
Create a string that represents a hyperlink for display in a dashboard table.
link(url)
link(title, url)
link(title, url, type)
Example
link('https://www.somehost.com/somepath')
> [https://www.somehost.com/somepath](https://www.somehost.com/somepath)
link('Click Here','https://www.somehost.com/somepath')
> [Click Here](https://www.somehost.com/somepath)
link('Click Here','https://www.somehost.com/somepath', 'dialog')
> [Click Here](https://www.somehost.com/somepath){dialog}
link('Click Here','https://www.somehost.com/somepath', 'dialog|Dialog Title')
> [Click Here](https://www.somehost.com/somepath){dialog|Dialog Title}
Type can be one of:
dialog: Display the content of the link URL within a stroom popup dialog.tab: Display the content of the link URL within a stroom tab.browser: Display the content of the link URL within a new browser tab.dashboard: Used to launch a stroom dashboard internally with parameters in the URL.
If you wish to override the default title or URL of the target link in either a tab or dialog you can. Both dialog and tab types allow titles to be specified after a |, e.g. dialog|My Title.
log()
The log() function writes a message to the processing log with the specified severity. Severities of INFO, WARN, ERROR and FATAL can be used. Severities of ERROR and FATAL will result in records being omitted from the output if a RecordOutputFilter is used in the pipeline. The counts for RecWarn, RecError will be affected by warnings or errors generated in this way therefore this function is useful for adding business rules to XML output.
E.g. Warn if a SID is not the correct length.
<xsl:if test="string-length($sid) != 7">
<xsl:value-of select="stroom:log('WARN', concat($sid, ' is not the correct length'))"/>
</xsl:if>
The same functionality can also be achieved using the standard xsl:message element, see <xsl:message>
lookup()
The lookup() function looks up from reference or context data a value (which can be an XML node set) and adds it to the resultant XML.
lookup(String map, String key)
lookup(String map, String key, String time)
lookup(String map, String key, String time, Boolean ignoreWarnings)
lookup(String map, String key, String time, Boolean ignoreWarnings, Boolean trace)
map- The name of the reference data map to perform the lookup against.key- The key to lookup. The key can be a simple string, an integer value in a numeric range or a nested lookup key.time- Determines which set of reference data was effective at the requested time. If no reference data exists with an effective time before the requested time then the lookup will fail. Time is in the formatyyyy-MM-dd'T'HH:mm:ss.SSSXX, e.g.2010-01-01T00:00:00.000Z.ignoreWarnings- If true, any lookup failures will be ignored, else they will be reported as warnings.trace- If true, additional trace information is output as INFO messages.
If the look up fails no result will be returned. By testing the result a default value may be output if no result is returned.
E.g. Look up a SID given a PF
<xsl:variable name="pf" select="PFNumber"/>
<xsl:if test="$pf">
<xsl:variable name="sid" select="stroom:lookup('PF_TO_SID', $pf, $formattedDateTime)"/>
<xsl:choose>
<xsl:when test="$sid">
<User>
<Id><xsl:value-of select="$sid"/></Id>
</User>
</xsl:when>
<xsl:otherwise>
<data name="PFNumber">
<xsl:attribute name="Value"><xsl:value-of select="$pf"/></xsl:attribute>
</data>
</xsl:otherwise>
</xsl:choose>
</xsl:if>
Range lookups
Reference data entries can either be stored with single string key or a key range that defines a numeric range, e.g. 1-100. When a lookup is preformed the passed key is looked up as if it were a normal string key. If that lookup fails Stroom will try to convert the key to an integer (long) value. If it can be converted to an integer than a second lookup will be performed against entries with key ranges to see if there is a key range that includes the requested key.
Range lookups can be used for looking up an IP address where the reference data values are associated with ranges of IP addresses.
In this use case, the IP address must first be converted into a numeric value using numeric-ip(), e.g.:
stroom:lookup('IP_TO_LOCATION', numeric-ip($ipAddress))
Similarly the reference data must be stored with key ranges whose bounds were created using this function.
Nested Maps
The lookup function allows you to perform chained lookups using nested maps.
For example you may have a reference data map called USER_ID_TO_LOCATION that maps user IDs to some location information for that user and a map called USER_ID_TO_MANAGER that maps user IDs to the user ID of their manager.
If you wanted to decorate a user’s event with the location of their manager you could use a nested map to achieve the lookup chain.
To perform the lookup set the map argument to the list of maps in the lookup chain, separated by a /, e.g. USER_ID_TO_MANAGER/USER_ID_TO_LOCATION.
This will perform a lookup against the first map in the list using the requested key.
If a value is found the value will be used as the key in a lookup against the next map.
The value from each map lookup is used as the key in the next map all the way down the chain.
The value from the last lookup is then returned as the result of the lookup() call.
If no value is found at any point in the chain then that results in no value being returned from the function.
In order to use nested map lookups each intermediate map must contain simple string values. The last map in the chain can either contain string values or XML fragment values.
parse-dateTime()
Parses a string to a dateTime according to the specified pattern and time zone.
Function Signatures
The following are the possible forms of the parse-dateTime function.
<!-- Converts inputDate to a dateTime -->
parse-dateTime(String inputDate)
<!-- Converts inputDate to a dateTime using a custom date format -->
parse-dateTime(DateTime inputDate, String pattern)
<!-- Converts inputDate to a dateTime using a custom date format in the specified time zone -->
parse-dateTime(DateTime inputDate, String pattern, String timeZone)
inputDate- The input string.pattern- The pattern that defines the format of the input string (see Custom Date Formats).timeZone- Optional time zone of the output. Ifnullthen the UTC/Zulu time zone will be used.
Examples
<!-- ISO 8061 -->
stroom:parse-dateTime('2024-08-29T00:00:00Z')
-> '2024-08-29T00:00:00Z'
<!-- ISO 8061 with nanos -->
stroom:parse-dateTime('2010-01-01T23:59:59.123456Z')
-> '2010-01-01T23:59:59.123456Z'
<!-- ISO 8061 with millis -->
stroom:parse-dateTime('2010-01-01T23:59:59.123Z')
-> '2010-01-01T23:59:59.123Z'
<!-- ISO 8061 Zulu/UTC -->
stroom:parse-dateTime('2001-08-01T18:45:59.123+00:00')
-> '2001-08-01T18:45:59.123Z'
<!-- ISO 8061 +2hr zone offset -->
stroom:parse-dateTime('2001-08-01T18:45:59.123+02')
-> '2001-08-01T16:45:59.123Z'
<!-- ISO 8061 +2hr zone offset -->
stroom:parse-dateTime('2001-08-01T18:45:59.123+02:00')
-> '2001-08-01T16:45:59.123Z'
<!-- ISO 8061 +2hr30min zone offset -->
stroom:parse-dateTime('2001-08-01T18:45:59.123+02:30')
-> '2001-08-01T16:15:59.123Z'
<!-- ISO 8061 -3hr zone offset -->
stroom:parse-dateTime('2001-08-01T18:45:59.123-03:00')
-> '2001-08-01T21:45:59.123Z'
<!-- Simple date UK style date -->
stroom:parse-dateTime('29/08/24', 'dd/MM/yy')
-> '2024-08-29T00:00:00Z'
<!-- Simple date US style date -->
stroom:parse-dateTime('08/29/24', 'MM/dd/yy')
-> '2024-08-29T00:00:00Z'
<!-- ISO date with no delimiters -->
stroom:parse-dateTime('20010801184559', 'yyyyMMddHHmmss')
-> '2001-08-01T18:45:59Z'
<!-- Standard output, no TZ -->
stroom:parse-dateTime('2001/08/01 18:45:59', 'yyyy/MM/dd HH:mm:ss')
-> '2001-08-01T18:45:59Z'
<!-- Standard output, date only, with TZ -->
stroom:parse-dateTime('2001/08/01', 'yyyy/MM/dd', '-07:00')
-> '2001-08-01T07:00:00Z'
<!-- Standard output, with TZ -->
stroom:parse-dateTime('2001/08/01 01:00:00', 'yyyy/MM/dd HH:mm:ss', '-08:00')
-> '2001-08-01T09:00:00Z'
<!-- Standard output, with TZ -->
stroom:parse-dateTime('2001/08/01 01:00:00', 'yyyy/MM/dd HH:mm:ss', '+01:00')
-> '2001-08-01T00:00:00Z'
put() and get()
You can put values into a map using the put() function.
These values can then be retrieved later using the get() function.
Values are stored against a key name so that multiple values can be stored.
These functions can be used for many purposes but are most commonly used to count a number of records that meet certain criteria.
The map is in the scope of the current pipeline process so values do not live after the stream has been processed.
Also, the map will only contain entries that were put() within the current pipeline process.
An example of how to count records is shown below:
<!-- Get the current record count -->
<xsl:variable name="currentCount" select="number(s:get('count'))" />
<!-- Increment the record count -->
<xsl:variable name="count">
<xsl:choose>
<xsl:when test="$currentCount">
<xsl:value-of select="$currentCount + 1" />
</xsl:when>
<xsl:otherwise>
<xsl:value-of select="1" />
</xsl:otherwise>
</xsl:choose>
</xsl:variable>
<!-- Store the count for future retrieval -->
<xsl:value-of select="stroom:put('count', $count)" />
<!-- Output the new count -->
<data name="Count">
<xsl:attribute name="Value" select="$count" />
</data>
meta-keys()
When calling this function and assigning the result to a variable, you must specify the variable data type of xs:string* (array of strings).
The following fragment is an example of using meta-keys() to emit all meta values for a given stream, into an Event/Meta element:
<Event>
<xsl:variable name="metaKeys" select="stroom:meta-keys()" as="xs:string*" />
<Meta>
<xsl:for-each select="$metaKeys">
<string key="{.}"><xsl:value-of select="stroom:meta(.)" /></string>
</xsl:for-each>
</Meta>
</Event>
parse-uri()
The parse-uri() function takes a Uniform Resource Identifier (URI) in string form and returns an XML node with a namespace of uri containing the URI’s individual components of authority, fragment, host, path, port, query, scheme, schemeSpecificPart and userInfo. See either RFC 2306: Uniform Resource Identifiers (URI): Generic Syntax or Java’s java.net.URI Class for details regarding the components.
The following xml
<!-- Display and parse the URI contained within the text of the rURI element -->
<xsl:variable name="u" select="stroom:parseUri(rURI)" />
<URI>
<xsl:value-of select="rURI" />
</URI>
<URIDetail>
<xsl:copy-of select="$v"/>
</URIDetail>
Given the rURI text contains
http://foo:bar@w1.superman.com:8080/very/long/path.html?p1=v1&p2=v2#more-details
Would provide
<URL>http://foo:bar@w1.superman.com:8080/very/long/path.html?p1=v1&p2=v2#more-details</URL>
<URIDetail>
<authority xmlns="uri">foo:bar@w1.superman.com:8080</authority>
<fragment xmlns="uri">more-details</fragment>
<host xmlns="uri">w1.superman.com</host>
<path xmlns="uri">/very/long/path.html</path>
<port xmlns="uri">8080</port>
<query xmlns="uri">p1=v1&p2=v2</query>
<scheme xmlns="uri">http</scheme>
<schemeSpecificPart xmlns="uri">//foo:bar@w1.superman.com:8080/very/long/path.html?p1=v1&p2=v2</schemeSpecificPart>
<userInfo xmlns="uri">foo:bar</userInfo>
</URIDetail>
pointIsInsideXYPolygon()
Returns true if the specified point is inside the specified polygon. Useful for determining if a user is inside a physical zone based on their location and the boundary of that zone.
pointIsInsideXYPolygon(Number xPos, Number yPos, Number[] xPolyData, Number[] yPolyData)
Arguments:
xPos- The X value of the point to be tested.yPos- The Y value of the point to be tested.xPolyData- A sequence of X values that define the polygon.yPolyData- A sequence of Y values that define the polygon.
The list of values supplied for xPolyData must correspond with the list of values supplied for yPolyData.
The points that define the polygon must be provided in order, i.e. starting from one point on the polygon and then travelling round the path of the polygon until it gets back to the beginning.
5.10.3.3 - XSLT Includes
Using an XSLT import to include XSLT from another translation.
You can use an XSLT import to include XSLT from another translation. E.g.:
<xsl:import href="ApacheAccessCommon" />
This would include the XSLT from the ApacheAccessCommon translation.
5.10.4 - File Output
Substitution variables for use in output file names and paths.
When outputting files with Stroom, the output file names and paths can include various substitution variables to form the file and path names.
Context Variables
The following replacement variables are specific to the current processing context.
${feed}- The name of the feed that the stream being processed belongs to${pipeline}- The name of the pipeline that is producing output${sourceId}- The id of the input data being processed${partNo}- The part number of the input data being processed where data is in aggregated batches${searchId}- The id of the batch search being performed. This is only available during a batch search${node}- The name of the node producing the output
Time Variables
The following replacement variables can be used to include aspects of the current time in UTC.
${year}- Year in 4 digit form, e.g. 2000${month}- Month of the year padded to 2 digits${day}- Day of the month padded to 2 digits${hour}- Hour padded to 2 digits using 24 hour clock, e.g. 22${minute}- Minute padded to 2 digits${second}- Second padded to 2 digits${millis}- Milliseconds padded to 3 digits${ms}- Milliseconds since the epoch
System (Environment) Variables
System variables (environment variables) can also be used, e.g. ${TMP}.
File Name References
rolledFileName in RollingFileAppender can use references to the fileName to incorporate parts of the non rolled file name.
${fileName}- The complete file name${fileStem}- Part of the file name before the file extension, i.e. everything before the last ‘.’${fileExtension}- The extension part of the file name, i.e. everything after the last ‘.’
Other Variables
${uuid}- A randomly generated UUID to guarantee unique file names
5.10.5 - Reference Data
Performing temporal reference data lookups to decorate event data.
In Stroom reference data is primarily used to decorate events using stroom:lookup() calls in XSLTs.
For example you may have reference data feed that associates the FQDN of a device to the details of its physical location, or reference data that associates usernames with employee details such as name and job title.
You can then perform a stroom:lookup() in the XSLT to decorate an event with the physical location of a device by looking up the FQDN found in the event.
Reference Data Sources
Reference data can come from two different sources:
- Reference stream - A separate Feed containing Raw Reference streams that have been translated into Reference streams conforming to
reference-data:2XML. - Context sub-stream - A Context stream that is a sub-stream of the Events stream. This sub-stream contains contextual data relevant to the events in the Events stream.
Reference Stream
Reference data is often time sensitive, e.g. an employee’s job title will change over time, so each stream of reference data has an Effective Date set against it. This allows reference data lookups to be performed using the date of the event to ensure the reference data that was actually effective at the time of the event is used.
Warning
There is currently no mechanism in Stroom to place dependencies between Feeds, i.e. an Events Feed being dependent on a Reference Feed. When performing a lookup Stroom can only use the Reference streams that it has available. If a Reference stream has been delayed (in receipt or translation), then Stroom will have to use the most recent one it has.Using Reference stream based reference data involves the following steps/processes:
- Ingesting the Raw Reference data into a Feed Feed A Feed is a means of organising and categorising data in Stroom. A Feed contains multiple Streams of data that have been ingested into Stroom or output by a Pipeline. Typically a Feed will contain Streams of data that are all from one system and have a common data format.Click to see more details... in Stroom.
- Creating a pipeline (and associated processors/filters) to transform the Raw Reference into a Reference stream containing
reference-data:2format XML. - Creating a reference loader pipeline with a ReferenceDataFilter element to load cooked reference data into the reference data store. This pipeline does not need any processors or processor filters as it is used on demand when a lookup is performed and the required reference stream is not in the store.
- Adding reference pipeline/feeds to an XSLT Filter in your event pipeline.
The Pipeline is set to the reference loader pipeline created above.
The Feed is set to the Feed containing the Reference streams.
The Stream Type is set to
Reference. - Adding the lookup call to the XSLT.
- Processing the raw events through the event pipeline.
The following is an example of a reference loader pipeline:
The process of creating a reference data pipeline is described in the HOWTO linked at the top of this document.
Note
It is possible to not eagerly convert the Raw Reference streams into Reference streams and instead do this as part of the reference loader pipeline. While this saves having to store all the cooked Reference streams, it means every node that uses a Raw Reference stream for a lookup will have to do the transformation before it can go into the reference data store. This can result in a lot of duplicated work on a multi-node Stroom.Context Sub-Stream
Some Events streams have a Context sub-stream associated with them. Context streams allow the system sending the events to Stroom to supply an additional stream of data that provides context to the Raw Events stream. This can be useful when the system sending the events has no control over the event content but needs to supply additional information. The Context stream can be used in lookups as a reference source to decorate events on receipt.
Context reference data is specific to a single event stream so is transient in nature, therefore the On Heap Store is used to hold it for the duration of the event stream processing only. As soon as the Events stream has been processed, the transient store will be destroyed.
As the Context sub-stream sits alongside the Events stream, there is no concept of Effective Date so no date/time argument is needed in the lookup() call.
Using Context sub-stream based reference data involves the following steps/processes:
- Creating a context loader pipeline to transform the raw context data into
reference-data:2XML and pass that into a ReferenceDataFilter element. This pipeline does not need any processors or processor filters as it is used on demand when the first lookup call is made in an Events stream. - Adding reference pipeline/feeds to an XSLT Filter in your event pipeline.
The Pipeline is set to the context loader pipeline created above.
The Feed is set to the Feed containing the Events streams.
The Stream Type is set to
Context. - Adding the lookup call to the XSLT.
- Processing the raw events through the event pipeline.
The following is an example of a context loader pipeline that takes in raw context data in a text format that is converted into reference-data:2 XML using a
DSParser
and
XSLTFilter
.
Reference Data Structure
The ReferenceDataFilter requires the reference data to be XML that conforms to the reference-data:2 XMLSchema.
A reference data entry essentially consists of the following:
- Effective time - The data/time that the entry was effective from, i.e. the time the raw reference data was received.
- Map name - A unique name for the key/value map that the entry will be stored in. The name only needs to be unique within all map names that may be loaded within an XSLT Filter. In practice it makes sense to keep map names globally unique. A reference stream can contain more than one map and the entries for a map can be spread over more than one reference feed. A map can contain a mixture of key and range based entries.
- Key - The text that will be used to lookup the value in the reference data map. The key is case sensitive. Mutually exclusive with Range.
- Range - The inclusive range of integer keys that the entry applies to. Mutually exclusive with Key.
- Value - The value can either be simple text, e.g. an IP address, or an XML fragment that can be inserted into another XML document. XML values must be correctly namespaced.
The following is an example of some reference data that has been converted from its raw form into reference-data:2 XML.
In this example the reference data contains three entries that each belong to a different map.
Two of the entries are simple text values and the last has an XML value.
<?xml version="1.1" encoding="UTF-8"?>
<referenceData
xmlns="reference-data:2"
xmlns:xsi="http://www.w3.org/2001/XMLSchema-instance"
xmlns:stroom="stroom"
xmlns:evt="event-logging:3"
xsi:schemaLocation="reference-data:2 file://reference-data-v2.0.xsd"
version="2.0.1">
<!-- A simple string value -->
<reference>
<map>FQDN_TO_IP</map>
<key>stroomnode00.strmdev00.org</key>
<value>192.168.2.245</value>
</reference>
<!-- A simple string value -->
<reference>
<map>IP_TO_FQDN</map>
<key>192.168.2.245</key>
<value>stroomnode00.strmdev00.org</value>
</reference>
<!-- A key range -->
<reference>
<map>USER_ID_TO_COUNTRY_CODE</map>
<range>
<from>1</from>
<to>1000</to>
</range>
<value>GBR</value>
</reference>
<!-- An XML fragment value -->
<reference>
<map>FQDN_TO_LOC</map>
<key>stroomnode00.strmdev00.org</key>
<value>
<evt:Location>
<evt:Country>GBR</evt:Country>
<evt:Site>Bristol-S00</evt:Site>
<evt:Building>GZero</evt:Building>
<evt:Room>R00</evt:Room>
<evt:TimeZone>+00:00/+01:00</evt:TimeZone>
</evt:Location>
</value>
</reference>
</referenceData>
Reference Data Namespaces
When XML reference data values are created, as in the example XML above, the XML elements in the value must be qualified with a namespace to distinguish them from the reference-data:2 XML that surrounds them.
In the above example the XML fragment will become as follows when injected into an event:
<evt:Location xmlns:evt="event-logging:3" >
<evt:Country>GBR</evt:Country>
<evt:Site>Bristol-S00</evt:Site>
<evt:Building>GZero</evt:Building>
<evt:Room>R00</evt:Room>
<evt:TimeZone>+00:00/+01:00</evt:TimeZone>
</evt:Location>
Even if evt is already declared in the XML being injected into it, if it has been declared for the reference fragment then it will be explicitly declared in the destination.
While duplicate namespacing may appear odd it is valid XML.
The namespacing can also be achieved like this:
<?xml version="1.1" encoding="UTF-8"?>
<referenceData
xmlns="reference-data:2"
xmlns:xsi="http://www.w3.org/2001/XMLSchema-instance"
xmlns:stroom="stroom"
xsi:schemaLocation="reference-data:2 file://reference-data-v2.0.xsd"
version="2.0.1">
<!-- An XML value -->
<reference>
<map>FQDN_TO_LOC</map>
<key>stroomnode00.strmdev00.org</key>
<value>
<Location xmlns="event-logging:3">
<Country>GBR</Country>
<Site>Bristol-S00</Site>
<Building>GZero</Building>
<Room>R00</Room>
<TimeZone>+00:00/+01:00</TimeZone>
</Location>
</value>
</reference>
</referenceData>
This reference data will be injected into event XML exactly as is, i.e.:
<Location xmlns="event-logging:3">
<Country>GBR</Country>
<Site>Bristol-S00</Site>
<Building>GZero</Building>
<Room>R00</Room>
<TimeZone>+00:00/+01:00</TimeZone>
</Location>
Reference Data Storage
Reference data is stored in two different places on a Stroom node. All reference data is only visible to the node where it is located. Each node that is performing reference data lookups will need to load and store its own reference data. While this will result in duplicate data being held by nodes it makes the storage of reference data and its subsequent lookup very performant.
On-Heap Store
The On-Heap store is the reference data store that is held in memory in the Java Heap. This store is volatile and will be lost on shut down of the node. The On-Heap store is only used for storage of context data which is destroyed once processing of the Events stream is complete.
Off-Heap Store
The Off-Heap store is the reference data store that is held in memory outside of the Java Heap and is persisted to local disk. As the store is also persisted to local disk it means the reference data will survive the shutdown of the stroom instance. Storing the data off-heap means Stroom can run with a much smaller Java Heap size.
The Off-Heap store is based on the Lightning Memory-Mapped Database (LMDB). LMDB makes use of the Linux page cache to ensure that hot portions of the reference data are held in the page cache (making use of all available free memory). Infrequently used portions of the reference data will be evicted from the page cache by the Operating System. Given that LMDB utilises the page cache for holding reference data in memory the more free memory the host has the better as there will be less shifting of pages in/out of the OS page cache. When storing large amounts of data you may experience the OS reporting very little free memory as a large amount will be in use by the page cache. This is not an issue as the OS will evict pages when memory is needed for other applications, e.g. the Java Heap.
Local Disk
The Off-Heap store is intended to be located on local disk on the Stroom node.
The location of the store is set using the property stroom.pipeline.referenceData.localDir.
Using LMDB on remote storage is NOT advised, see http://www.lmdb.tech/doc.
Using the fastest storage (i.g. fast SSDs) is advised to reduce load times and lookups of data that is not in memory.
Warning
If you are running stroom on AWS EC2 instances then you will need to attach some local instance storage to the host, e.g. SSD, to use for the reference data store. In tests EBS storage was found to be VERY slow.
It should be noted that AWS instance storage is not persistent between instance stops, terminations and hardware failure. However any loss of the reference data store will mean that the next time Stroom boots a new store will be created and reference data will be loaded on demand as normal.
Transactions
LMDB is a transactional database with ACID semantics. All interaction with LMDB is done within a read or write transaction. There can only be one write transaction at a time so if there are a number of concurrent reference data loads then they will have to wait in line.
Read transactions, i.e. lookups, are not blocked by each other but may be blocked by a write transaction depending on the value of the system property stroom.pipeline.referenceData.lmdb.readerBlockedByWriter.
LMDB can operate such that readers are not blocked by writers but if there is an open read transaction while a write transaction is writing data to the store then it is unable to make use of free space (from previous deletes, see Store Size & Compaction) so will result in the store increasing in size.
If read transactions are likely while writes are taking place then this can lead to excessive growth of the store.
Setting stroom.pipeline.referenceData.lmdb.readerBlockedByWriter to true will block all reads while a load is happening so any free space can be re-used, at the cost of making all lookups wait for the load to complete.
Use of this setting will depend on how likely it is that loads will clash with lookups and the store size should be monitored.
Read-Ahead Mode
When data is read from the store, if the data is not already in the page cache then it will be read from disk and added to the page cache by the OS.
Read-ahead is the process of speculatively reading ahead to load more pages into the page cache than were requested.
This is on the basis that future requests for data may need the pages speculatively read into memory as it is more efficient to read multiple pages at once.
If the reference data store is very large or is larger than the available memory then it is recommended to turn read-ahead off as the result will be to evict hot reference data from the page cache to make room for speculative pages that may not be needed.
It can be tuned off with the system property stroom.pipeline.referenceData.readAheadEnabled.
Key Size
When reference data is created care must be taken to ensure that the Key used for each entry is less than 507 bytes. For simple ASCII characters then this means less than 507 characters. If non-ASCII characters are in the key then these will take up more than one byte per character so the length of the key in characters will be less. This is a limitation inherent to LMDB.
Commit intervals
The property stroom.pipeline.referenceData.maxPutsBeforeCommit controls the number of entries that are put into the store between each commit.
As there can be only one transaction writing to the store at a time, committing periodically allows other process to jump in and make writes.
There is a trade off though as reducing the number of entries put between each commit can seriously affect performance.
For the fastest single process performance a value of 0 should be used which means it will not commit mid-load.
This however means all other processes wanting to write to the store will need to wait.
Low values (e.g. in the hundreds) mean very frequent commits so will hamper performance.
Cloning The Off Heap Store
If you are provisioning a new stroom node it is possible to copy the off heap store from another node.
Stroom should not be running on the node being copied from.
Simply copy the contents of stroom.pipeline.referenceData.localDir into the same configured location on the other node.
The new node will use the copied store and have access to its reference data.
Store Size & Compaction
Due to the way LMDB works the store can only grow in size, it will never shrink, even if reference data is deleted. Deleted data frees up space for new writes to the store so will be reused but will never be freed back to the operating system. If there is a regular process of purging old data and adding new reference data then this should not be an issue as the new reference data will use the space made available by the purged data.
If store size becomes an issue then it is possible to compact the store.
lmdb-utils is package that is available on some package managers and this has an mdb_copy command that can be used with the -c switch to copy the LMDB environment to a new one, compacting it in the process.
This should be done when Stroom is down to avoid writes happening to the store while the copy is happening.
The following is an example of how to compact the store assuming Stroom has been shut down first.
Now you can re-start Stroom and it will use the new compacted store, creating a lock file for it.
The compaction process is fast. A test compaction of a 4Gb store, compacted down to 1.6Gb took about 7s on non-flash HDD storage.
Alternatively, given that the store is essentially a cache and all data can be re-loaded another option is to delete the contents of stroom.pipeline.referenceData.localDir when Stroom is not running.
On boot Stroom will create a brand new empty store and reference data will be re-loaded as required.
This approach will result in all data having to be re-loaded so will slow lookups down until it has been loaded.
The Loading Process
Reference data is loaded into the store on demand during the processing of a stroom:lookup() method call.
Reference data will only be loaded if it does not already exist in the store, however it is always loaded as a complete stream, rather than entry by entry.
The test for existence in the store is based on the following criteria:
- The UUID of the reference loader pipeline.
- The version of the reference loader pipeline.
- The Stream ID for the stream of reference data that has been deemed effective for the lookup.
- The Stream Number (in the case of multi part streams).
If a reference stream has already been loaded matching the above criteria then no additional load is required.
IMPORTANT: It should be noted that as the version of the reference data pipeline forms part of the criteria, if the reference loader pipeline is changed, for whatever reason, then this will invalidate ALL existing reference data associated with that reference loader pipeline.
Typically the reference loader pipeline is very static so this should not be an issue.
Standard practice is to convert raw reference data into reference:2 XML on receipt using a pipeline separate to the reference loader.
The reference loader is then only concerned with reading cooked reference:2 into the Reference Data Filter.
In instances where reference data streams are infrequently used it may be preferable to not convert the raw reference on receipt but instead to do it in the reference loader pipeline.
Duplicate Keys
The Reference Data Filter pipeline element has a property overrideExistingValues which if set to true means if an entry is found in an effective stream with the same key as an entry already loaded then it will overwrite the existing one.
Entries are loaded in the order they are found in the reference:2 XML document.
If set to false then the existing entry will be kept.
If warnOnDuplicateKeys is set to true then a warning will be logged for any duplicate keys, whether an overwrite happens or not.
Value De-Duplication
Only unique values are held in the store to reduce the storage footprint. This is useful given that typically, reference data updates may be received daily and each one is a full snapshot of the whole reference data. As a result this can mean many copies of the same value being loaded into the store. The store will only hold the first instance of duplicate values.
Querying the Reference Data Store
The reference data store can be queried within a Dashboard in Stroom by selecting Reference Data Store in the data source selection pop-up.
Querying the store is currently an experimental feature and is mostly intended for use in fault finding.
Given the localised nature of the reference data store the dashboard can currently only query the store on the node that the user interface is being served from.
In a multi-node environment where some nodes are UI only and most are processing only, the UI nodes will have no reference data in their store.
Purging Old Reference Data
Reference data loading and purging is done at the level of a reference stream. Whenever a reference lookup is performed the last accessed time of the reference stream in the store is checked. If it is older than one hour then it will be updated to the current time. This last access time is used to determine reference streams that are no longer in active use and thus can be purged.
The Stroom job Ref Data Off-heap Store Purge is used to perform the purge operation on the Off-Heap reference data store.
No purge is required for the On-Heap store as that only holds transient data.
When the purge job is run it checks the time since each reference stream was accessed against the purge cut-off age.
The purge age is configured via the property stroom.pipeline.referenceData.purgeAge.
It is advised to schedule this job for quiet times when it is unlikely to conflict with reference loading operations as they will fight for access to the single write transaction.
Lookups
Lookups are performed in XSLT Filters using the XSLT functions.
In order to perform a lookup one or more reference loaders must be specified on the XSLT Filter pipeline element.
Each reference loader feed is specified along with a reference loader pipeline that will ingest the specified feed (optionally converting it into reference:2 XML if it is not already) and pass it into a Reference Data Filter pipeline element.
The following is an example of making a lookup() call in an XSLT that will return a simple string value.
<Data Name="StaffNumber" Value="stroom:lookup('USER_ID_TO_STAFF_NUMBER_MAP', $userId, $eventTime)" />
The following is an example of making a lookup() call in an XSLT that will return a fragment of XML.
<xsl:variable name="location" select="stroom:lookup('FQDN_TO_LOCATION_MAP', $fqdn, $eventTime)" />
<xsl:if test="$location">
<xsl:copy-of select="$location" />
</xsl:if>
Note
The above examples are equally applicable for abitmap-lookup() call.
Reference Feeds & Loaders
In the XSLT Filter pipeline element multiple combinations of feed and reference loader pipeline can be specified. There must be at least one in order to perform lookups. If there are multiple then when a lookup is called for a given time, the effective stream for each feed/loader combination is determined. The effective stream for each feed/loader combination will be loaded into the store, unless it is already present.
When the actual lookup is performed Stroom will try to find the key in each of the effective streams that have been loaded and that contain the map in the lookup call. If the lookup is unsuccessful in the effective stream for the first feed/loader combination then it will try the next, and so on until it has tried all of them. For this reason if you have multiple feed/loader combinations then order is important. It is possible for multiple effective streams to contain the same map/key so a feed/loader combination higher up the list will trump one lower down with the same map/key. Also if you have some lookups that may not return a value and others that should always return a value then the feed/loader for the latter should be higher up the list so it is searched first.
To perform a lookup using context data, set the stream type to Context.
Effective Streams
Reference data lookups have the concept of Effective Streams.
An effective stream is the most recent stream for a given
Feed
Feed
A Feed is a means of organising and categorising data in Stroom. A Feed contains multiple Streams of data that have been ingested into Stroom or output by a Pipeline. Typically a Feed will contain Streams of data that are all from one system and have a common data format.Click to see more details... that has an Effective Date that is less than or equal to the date used for the lookup() call.
If an effective time argument is not supplied, then it will default to the create time of the Raw Events stream being processed and if that is not available, the current time.
When performing a lookup, Stroom will search the stream store to find all the effective streams in a time bucket that surrounds the lookup time.
These sets of effective streams are cached so if a new reference stream is created it will not be used until the cached set has expired.
To rectify this you can clear the cache Reference Data - Effective Stream Cache on the Caches screen accessed from:
Standard Key/Value Lookups
Standard key/value lookups consist of a simple string key and a value that is either a simple string or an XML fragment.
Standard lookups are performed using the various forms of the stroom:lookup() XSLT function.
Note
If the key is not found and the key is an integer then it will attempt a range lookup using the same key. This is to allow for maps that contain a mixture of key/value pairs and range/value pairs.Range Lookups
Range lookups consist of a key that is an integer and a value that is either a simple string or an XML fragment.
For more detail on range lookups see the XSLT function stroom:lookup().
Note
The lookup will initially look for a single key that matches the lookup key. If an exact match is not found then it will look for a range that contains the key. This is to allow for maps that contain a mixture of key/value pairs and range/value pairs.Nested Map Lookups
Nested map lookups involve chaining a number of lookups with the value of each map being used as the key for the next.
For more detail on nested lookups see the XSLT function stroom:lookup().
Bitmap Lookups
A bitmap lookup is a special kind of lookup that actually performs a lookup for each enabled bit position of the passed bitmap value.
For more detail on bitmap lookups see the XSLT function stroom:bitmap-lookup().
Values can either be a simple string or an XML fragment.
Context data lookups
Some event streams have a Context stream associated with them. Context streams allow the system sending the events to Stroom to supply an additional stream of data that provides context to the raw event stream. This can be useful when the system sending the events has no control over the event content but needs to supply additional information. The context stream can be used in lookups as a reference source to decorate events on receipt. Context reference data is specific to a single event stream so is transient in nature, therefore the On Heap Store is used to hold it for the duration of the event stream processing only.
Typically the reference loader for a context stream will include a translation step to convert the raw context data into reference:2 XML.
Reference Data API
See Reference Data API.
5.10.6 - Context Data
Context data is additional contextual data Stream that is sent alongside the main event data Stream.
TODO
This section needs some explanation.Context File
Input File:
<?xml version="1.0" encoding="UTF-8"?>
<SomeData>
<SomeEvent>
<SomeTime>01/01/2009:12:00:01</SomeTime>
<SomeAction>OPEN</SomeAction>
<SomeUser>userone</SomeUser>
<SomeFile>D:\TranslationKit\example\VerySimple\OpenFileEvents.txt</SomeFile>
</SomeEvent>
</SomeData>
Context File:
<?xml version="1.0" encoding="UTF-8"?>
<SomeContext>
<Machine>MyMachine</Machine>
</SomeContext>
Context XSLT:
<?xml version="1.0" encoding="UTF-8" ?>
<xsl:stylesheet
xmlns="reference-data:2"
xmlns:evt="event-logging:3"
xmlns:xsi="http://www.w3.org/2001/XMLSchema-instance"
xmlns:xsl="http://www.w3.org/1999/XSL/Transform"
version="2.0">
<xsl:template match="SomeContext">
<referenceData
xsi:schemaLocation="event-logging:3 file://event-logging-v3.0.0.xsd reference-data:2 file://reference-data-v2.0.1.xsd"
version="2.0.1">
<xsl:apply-templates/>
</referenceData>
</xsl:template>
<xsl:template match="Machine">
<reference>
<map>CONTEXT</map>
<key>Machine</key>
<value><xsl:value-of select="."/></value>
</reference>
</xsl:template>
</xsl:stylesheet>
Context XML Translation:
<?xml version="1.0" encoding="UTF-8"?>
<referenceData xmlns:evt="event-logging:3"
xmlns:xsi="http://www.w3.org/2001/XMLSchema-instance"
xmlns="reference-data:2"
xsi:schemaLocation="event-logging:3 file://event-logging-v3.0.0.xsd reference-data:2 file://reference-data-v2.0.1.xsd"
version="2.0.1">
<reference>
<map>CONTEXT</map>
<key>Machine</key>
<value>MyMachine</value>
</reference>
</referenceData>
Input File:
<?xml version="1.0" encoding="UTF-8"?>
<SomeData>
<SomeEvent>
<SomeTime>01/01/2009:12:00:01</SomeTime>
<SomeAction>OPEN</SomeAction>
<SomeUser>userone</SomeUser>
<SomeFile>D:\TranslationKit\example\VerySimple\OpenFileEvents.txt</SomeFile>
</SomeEvent>
</SomeData>
Main XSLT (Note the use of the context lookup):
<?xml version="1.0" encoding="UTF-8" ?>
<xsl:stylesheet
xmlns="event-logging:3"
xmlns:xsl="http://www.w3.org/1999/XSL/Transform"
xmlns:xsi="http://www.w3.org/2001/XMLSchema-instance"
version="2.0">
<xsl:template match="SomeData">
<Events xsi:schemaLocation="event-logging:3 file://event-logging-v3.0.0.xsd" Version="3.0.0">
<xsl:apply-templates/>
</Events>
</xsl:template>
<xsl:template match="SomeEvent">
<xsl:if test="SomeAction = 'OPEN'">
<Event>
<EventTime>
<TimeCreated>
<xsl:value-of select="s:format-date(SomeTime, 'dd/MM/yyyy:hh:mm:ss')"/>
</TimeCreated>
</EventTime>
<EventSource>
<System>Example</System>
<Environment>Example</Environment>
<Generator>Very Simple Provider</Generator>
<Device>
<IPAddress>182.80.32.132</IPAddress>
<Location>
<Country>UK</Country>
<Site><xsl:value-of select="s:lookup('CONTEXT', 'Machine')"/></Site>
<Building>Main</Building>
<Floor>1</Floor>
<Room>1aaa</Room>
</Location>
</Device>
<User><Id><xsl:value-of select="SomeUser"/></Id></User>
</EventSource>
<EventDetail>
<View>
<Document>
<Title>UNKNOWN</Title>
<File>
<Path><xsl:value-of select="SomeFile"/></Path>
</File>
</Document>
</View>
</EventDetail>
</Event>
</xsl:if>
</xsl:template>
</xsl:stylesheet>
Main Output XML:
<?xml version="1.0" encoding="UTF-8"?>
<Events xmlns:xsi="http://www.w3.org/2001/XMLSchema-instance"
xmlns="event-logging:3"
xsi:schemaLocation="event-logging:3 file://event-logging-v3.0.0.xsd"
Version="3.0.0">
<Event Id="6:1">
<EventTime>
<TimeCreated>2009-01-01T00:00:01.000Z</TimeCreated>
</EventTime>
<EventSource>
<System>Example</System>
<Environment>Example</Environment>
<Generator>Very Simple Provider</Generator>
<Device>
<IPAddress>182.80.32.132</IPAddress>
<Location>
<Country>UK</Country>
<Site>MyMachine</Site>
<Building>Main</Building>
<Floor>1</Floor>
<Room>1aaa</Room>
</Location>
</Device>
<User>
<Id>userone</Id>
</User>
</EventSource>
<EventDetail>
<View>
<Document>
<Title>UNKNOWN</Title>
<File>
<Path>D:\TranslationKit\example\VerySimple\OpenFileEvents.txt</Path>
</File>
</Document>
</View>
</EventDetail>
</Event>
</Events>
5.11 - Properties
Configuration of Stroom’s application properties.
Properties are the means of configuring the Stroom application and are typically maintained by the Stroom system administrator. The value of some properties are required in order for Stroom to function, e.g. database connection details, and thus need to be set prior to running Stroom. Some properties can be changed at runtime to alter the behaviour of Stroom.
Sources
Property values can be defined in the following locations.
System Default
The system defaults are hard-coded into the Stroom application code by the developers and can’t be changed. These represent reasonable defaults, where applicable, but may need to be changed, e.g. to reflect the scale of the Stroom system or the specific environment.
The default property values can either be viewed in the Stroom user interface or in the file config/config-defaults.yml in the Stroom distribution.
Properties can be accessed in the user interface by selecting this from the top menu:
Global Database Value
Global database values are property values stored in the database that are global across the whole cluster.
The global database value is defined as a record in the config table in the database.
The database record will only exist if a database value has explicitly been set.
The database value will apply to all nodes in the cluster, overriding the default value, unless a node also has a value set in its YAML configuration.
Database values can be set from the Stroom user interface, accessed by selecting this from the top menu:
Some properties are marked Read Only which means they cannot have a database value set for them. These properties can only be altered via the YAML configuration file on each node. Such properties are typically used to configure values required for Stroom to be able to boot, so it does not make sense for them to be configurable from the User Interface.
YAML Configuration file
Stroom is built on top of a framework called Dropwizard.
Dropwizard uses a YAML configuration file on each node to configure the application.
This is typically config.yml and is located in the config directory.
For details of the structure of this file, see Stroom and Stroom-Proxy Common Configuration
Source Precedence
The three sources (Default, Database & YAML) are listed in increasing priority, i.e. YAML trumps Database, which trumps Default.
For example, in a two node cluster, this table shows the effective value of a property on each node.
A - indicates the value has not been set in that source.
NULL indicates that the value has been explicitly set to NULL.
| Source | Node1 | Node2 |
|---|---|---|
| Default | red | red |
| Database | - | - |
| YAML | - | blue |
| Effective | red | blue |
Or where a Database value is set.
| Source | Node1 | Node2 |
|---|---|---|
| Default | red | red |
| Database | green | green |
| YAML | - | blue |
| Effective | green | blue |
Or where a YAML value is explicitly set to NULL.
| Source | Node1 | Node2 |
|---|---|---|
| Default | red | red |
| Database | green | green |
| YAML | - | NULL |
| Effective | green | NULL |
Data Types
Stroom property values can be set using a number of different data types. Database property values are currently set in the user interface using the string form of the value. For each of the data types defined below, there will be an example of how the data type is recorded in its string form.
| Data Type | Example UI String Forms | Example YAML form |
|---|---|---|
| Boolean | true false |
true false |
| String | This is a string |
"This is a string" |
| Integer/Long | 123 |
123 |
| Float | 1.23 |
1.23 |
| Stroom Duration | P30D P1DT12H PT30S 30d 30s 30000 |
"P30D" "P1DT12H" "PT30S" "30d" "30s" "30000" See Stroom Duration Data Type. |
| List | #red#Green#Blue ,1,2,3 |
See List Data Type |
| Map | ,=red=FF0000,Green=00FF00,Blue=0000FF |
See Map Data Type |
| DocRef | ,docRef(MyType,a56ff805-b214-4674-a7a7-a8fac288be60,My DocRef name) |
See DocRef Data Type |
| Enum | HIGH LOW |
"HIGH" "LOW" |
| Path | /some/path/to/a/file |
"/some/path/to/a/file" |
| ByteSize | 32, 512Kib |
32, 512Kib See Byte Size Data Type |
Stroom Duration Data Type
The Stroom Duration data type is used to specify time durations, for example the time to live of a cache or the time to keep data before it is purged. Stroom Duration uses a number of string forms to support legacy property values.
ISO 8601 Durations
Stroom Duration can be expressed using
ISO 8601
duration strings.
It does NOT support the full ISO 8601 format, only D, H, M and S.
For details of how the string is parsed to a Stroom Duration, see
Duration
The following are examples of ISO 8601 duration strings:
P30D- 30 daysP1DT12H- 1 day 12 hours (36 hours)PT30S- 30 secondsPT0.5S- 500 milliseconds
Legacy Stroom Durations
This format was used in versions of Stroom older than v7 and is included to support legacy property values.
The following are examples of legacy duration strings:
30d- 30 days12h- 12 hours10m- 10 minutes30s- 30 seconds500- 500 milliseconds
Combinations such as 1m30s are not supported.
List Data Type
This type supports ordered lists of items, where an item can be of any supported data type, e.g. a list of strings or list of integers.
The following is an example of how a property (statusValues) that is a List of strings is represented in the YAML:
annotation:
statusValues:
- "New"
- "Assigned"
- "Closed"
This would be represented as a string in the User Interface as:
|New|Assigned|Closed.
See Delimiters in String Conversion for details of how the items are delimited in the string.
The following is an example of how a property (cpu) that is a List of DocRefs is represented in the YAML:
statistics:
internal:
cpu:
- type: "StatisticStore"
uuid: "af08c4a7-ee7c-44e4-8f5e-e9c6be280434"
name: "CPU"
- type: "StroomStatsStore"
uuid: "1edfd582-5e60-413a-b91c-151bd544da47"
name: "CPU"
This would be represented as a string in the User Interface as:
|,docRef(StatisticStore,af08c4a7-ee7c-44e4-8f5e-e9c6be280434,CPU)|,docRef(StroomStatsStore,1edfd582-5e60-413a-b91c-151bd544da47,CPU)
See Delimiters in String Conversion for details of how the items are delimited in the string.
Map Data Type
This type supports a collection of key/value pairs where the key is unique within the collection. The type of the key must be string, but the type of the value can be any supported type.
The following is an example of how a property (mapProperty) that is a map of string => string would be represented in the YAML:
mapProperty:
red: "FF0000"
green: "00FF00"
blue: "0000FF"
This would be represented as a string in the User Interface as:
,=red=FF0000,Green=00FF00,Blue=0000FF
The delimiter between pairs is defined first, then the delimiter for the key and value.
See Delimiters in String Conversion for details of how the items are delimited in the string.
DocRef Data Type
A DocRef (or Document Reference) is a type specific to Stroom that defines a reference to an instance of a Document within Stroom, e.g. an XSLT, Pipeline, Dictionary, etc. A DocRef consists of three parts, the type, the UUID and the name of the Document.
The following is an example of how a property (aDocRefProperty) that is a DocRef would be represented in the YAML:
aDocRefProperty:
type: "MyType"
uuid: "a56ff805-b214-4674-a7a7-a8fac288be60"
name: "My DocRef name"
This would be represented as a string in the User Interface as:
,docRef(MyType,a56ff805-b214-4674-a7a7-a8fac288be60,My DocRef name)
See Delimiters in String Conversion for details of how the items are delimited in the string.
Byte Size Data Type
The Byte Size data type is used to represent a quantity of bytes using the IEC standard. Quantities are represented as powers of 1024, i.e. a Kib (Kibibyte) means 1024 bytes.
Examples of Byte Size values in string form are (a YAML value would optionally be surrounded with double quotes):
32,32b,32B,32bytes- 32 bytes32K,32KB,32KiB- 32 kibibytes32M,32MB,32MiB- 32 mebibytes32G,32GB,32GiB- 32 gibibytes32T,32TB,32TiB- 32 tebibytes32P,32PB,32PiB- 32 pebibytes
The *iB form is preferred as it is more explicit and avoids confusion with SI units.
Delimiters in String Conversion
The string conversion used for collection types like List, Map etc. relies on the string form defining the delimiter(s) to use for the collection.
The delimiter(s) are added as the first n characters of the string form, e.g. |red|green|blue or |=red=FF0000|Green=00FF00|Blue=0000FF.
It is possible to use a number of different delimiters to allow for delimiter characters appearing in the actual value, e.g. #some text#some text with a | in it
The following are the delimiter characters that can be used.
|, :, ;, ,, !, /, \, #, @, ~, -, _, =, +, ?
When Stroom records a property value to the database it may use a delimiter of its own choosing, ensuring that it picks a delimiter that is not used in the property value.
Paths
File and directory paths can either be absolute (e.g. /some/path/) or relative (e.g. some/path).
All relative paths will be resolved to an absolute path using the value of stroom.home as the base.
Path values also support variable substitution. For full details on the possible variable substitution options, see File Output.
Restart Required
Some properties are marked as requiring a restart. There are two scopes for this:
Requires UI Refresh
If a property is marked in UI as requiring a UI refresh then this means that a change to the property requires that the Stroom nodes serving the UI are restarted for the new value to take effect.
Requires Restart
If a property is marked in UI as requiring a restart then this means that a change to the property requires that all Stroom nodes are restarted for the new value to take effect.
5.12 - Searching Data
Searching the data held in Stroom using Dashboards, Queries, Views and Analytic Rules.
Data in stroom (and in external Elastic indexes) can be searched using a number of ways:
-
Dashboard Combines multiple query expressions, result tables and visualisations in one configurable layout.
-
Query Executes a single search query written in StroomQl StroomQl Stroom Query Language is Stroom’s own query language. It has similarities with Structured Query Language (SQL) as used in databases. StroomQL is sometimes referred to as sQL to distinguish it from SQL.Click to see more details... and displays the results as a table or visualisation.
-
Analytic Rule Executes a StroomQl StroomQl Stroom Query Language is Stroom’s own query language. It has similarities with Structured Query Language (SQL) as used in databases. StroomQL is sometimes referred to as sQL to distinguish it from SQL.Click to see more details... search query either against data as it is ingested into Stroom or on a scheduled basis.
5.12.1 - Data Sources
Stroom has multiple different types of data sources that can be queried by Stroom using Dashboards, Queries and Analytic Rules.
5.12.1.1 - Lucene Index Data Source
Stroom’s own Lucene based index for indexing and searching its stream data.
Stroom’s primary data source is its internal Lucene based search indexes. For details of how data is indexed see Lucene Indexes.
TODO
Complete this section5.12.1.2 - Statistics
Using Stroom’s statistic stores as a data source.
TODO
Complete this section5.12.1.3 - Elasticsearch
Using Elasticsearch as a data source.
Stroom can integrate with external Elasticsearch indexes to allow querying using Stroom’s various mechanisms for querying data sources. These indexes may have been populated using a Stroom pipeline (See here).
Searching using a Stroom dashboard
Searching an Elasticsearch index (or data stream) using a Stroom dashboard is conceptually similar to the process described in Dashboards.
Before you set the dashboard’s data source, you must first create an Elastic Index document to tell Stroom which index (or indices) you wish to query.
Create an Elastic Index document
- Right-click a folder in the Stroom Explorer pane ().
- Select:
- Enter a name for the index document and click .
- Click next to the
Cluster configurationfield label. - In the dialog that appears, select the Elastic Cluster document where the index exists, and click .
- Enter the name of an index or data stream in
Index name or pattern. Data view (formerly known as index pattern) syntax is supported, which enables you to query multiple indices or data streams at once. For example:stroom-events-v1. - (Optional) Set
Search slices, which is the number of parallel workers that will query the index. For very large indices, increasing this value up to and including the number of shards can increase scroll performance, which will allow you to download results faster. - (Optional) Set
Search scroll size, which specifies the number of documents to return in each search response. Greater values generally increase efficiency. By default, Elasticsearch limits this number to10,000. - Click
Test Connection. A dialog will appear with the result, which will stateConnection Successif the connection was successful and the index pattern matched one or more indices. - Click .
Set the Elastic Index document as the dashboard data source
- Open or create a dashboard.
- Click in the
Querypanel. - Click next to the
Data Sourcefield label. - Select the Elastic Index document you created and click .
- Configure the query expression as explained in Dashboards. Note the tips for particular Elasticsearch field mapping data types.
- Configure the table.
Query expression tips
Certain Elasticsearch field mapping types support special syntax when used in a Stroom dashboard query expression.
To identify the field mapping type for a particular field:
- Click in the
Querypanel to add a new expression item. - Select the Elasticsearch field name in the drop-down list.
- Note the blue data type indicator to the far right of the row.
Common examples are:
keyword,textandnumber.
After you identify the field mapping type, move the mouse cursor over the mapping type indicator. A tooltip appears, explaining various types of queries you can perform against that particular field’s type.
Searching multiple indices
Using data view (index pattern) syntax, you can create powerful dashboards that query multiple indices at a time.
An example of this is where you have multiple indices covering different types of email systems.
Let’s assume these indices are named: stroom-exchange-v1, stroom-domino-v1 and stroom-mailu-v1.
There is a common set of fields across all three indices: @timestamp, Subject, Sender and Recipient.
You want to allow search across all indices at once, in effect creating a unified email dashboard.
You can achieve this by creating an Elastic Index document called (for example) Elastic-Email-Combined and setting the property Index name or pattern to: stroom-exchange-v1,stroom-domino-v1,stroom-mailu-v1.
Click and re-open the dashboard.
You’ll notice that the available fields are a union of the fields across all three indices.
You can now search by any of these - in particular, the fields common to all three.
5.12.1.4 - Internal Data Sources
A set of data sources for querying the inner workings of Stroom.
Stroom provides a number of built in data sources for querying the inner workings of stroom. These data sources do not have a corresponding Document Document Typically refers to an item that can be created in the Explorer Tree, e.g. a Feed, a Pipeline, a Dashboard, etc. May also be known as an Entity.Click to see more details... so do not feature in the explorer tree.
These data sources appear as children of the root folder when selecting a data source in a Dashboard , View . They are also available in the list of data sources when editing a Query .
Analytics
TODO
CompleteAnnotations
Annotations are a means of annotating search results with additional information and for assigning those annotations to users. The Annotations data source allows you to query the annotations that have been created.
| Field | Type | Description |
|---|---|---|
annotation:Id |
Long | Annotation unique identifier. |
annotation:CreatedOn |
Date | Date created. |
annotation:CreatedBy |
String | Username of the user that created the annotation. |
annotation:UpdatedOn |
Date | Date last updated. |
annotation:UpdatedBy |
String | Username of the user that last updated the annotation. |
annotation:Title |
String | |
annotation:Subject |
String | |
annotation:AssignedTo |
String | Username the annotation is assigned to. |
annotation:Comment |
String | Any comments on the annotation. |
annotation:History |
String | History of changes to the annotation. |
Dual
The Dual data source is one with a single field that always returns one row with the same value.
This data source can be useful for testing expression functions.
It can also be useful when combined with an extraction pipeline that uses the stroom:http-call() XSLT function in order to make a single HTTP call using Dashboard parameter values.
| Field | Type | Description |
|---|---|---|
Dummy |
String | Always one row that has the value X |
Index Shards
Exposes the details of the index shards that make up Stroom’s Lucene based index. Each index is split up into one or more partitions and each partition is further divided into one or more shards. Each row represents one index shard.
| Field | Type | Description |
|---|---|---|
Node |
String | The name of the node that the index belongs to. |
Index |
String | The name of the index document. |
Index Name |
String | The name of the index document. |
Volume Path |
String | The file path for the index shard. |
Volume Group |
String | The name of the volume group the index is using. |
Partition |
String | The name of the partition that the shard is in. |
Doc Count |
Integer | The number of documents in the shard. |
File Size |
Long | The size of the shard on disk in bytes. |
Status |
String | The status of the shard (Closed, Open, Closing, Opening, New, Deleted, Corrupt). |
Last Commit |
Date | The time and date of the last commit to the shard. |
Meta Store
Exposes details of the streams held in Stroom’s Stream Stream A Stream is the unit of data that Stroom works with and will typically contain many Events.Click to see more details... (aka meta) store. Each row represents one stream.
| Field | Type | Description |
|---|---|---|
Feed |
String | The name of the feed the stream belongs to. |
Pipeline |
String | The name of the pipeline that created the stream. [Optional] |
Pipeline Name |
String | The name of the pipeline that created the stream. [Optional] |
Status |
String | The status of the stream (Unlocked, Locked, Deleted). |
Type |
String | The
Stream Type
Stream Type
All Streams must have a Stream Type. The list of Stream Types is configured using the Property stroom.data.meta.metaTypes.Click to see more details..., e.g. Events, Raw Events, etc. |
Id |
Long | The unique ID (within this Stroom cluster) for the stream . |
Parent Id |
Long | The unique ID (within this Stroom cluster) for the parent stream, e.g. the Raw stream that spawned an Events stream. [Optional] |
Processor Id |
Long | The unique ID (within this Stroom cluster) for the processor that produced this stream. [Optional] |
Processor Filter Id |
Long | The unique ID (within this Stroom cluster) for the processor filter that produced this stream. [Optional] |
Processor Task Id |
Long | The unique ID (within this Stroom cluster) for the processor task that produced this stream. [Optional] |
Create Time |
Date | The time the stream was created. |
Effective Time |
Date | The time that the data in this stream is effective for. This is only used for reference data streams and is the time that the snapshot of reference data was captured. [Optional] |
Status Time |
Date | The time that the status was last changed. |
Duration |
Long | The time it took to process the stream in milliseconds. [Optional] |
Read Count |
Long | The number of records read in segmented streams. [Optional] |
Write Count |
Long | The number of records written in segmented streams. [Optional] |
Info Count |
Long | The number of INFO messages. |
Warning Count |
Long | The number of WARNING messages. |
Error Count |
Long | The number of ERROR messages. |
Fatal Error Count |
Long | The number of FATAL_ERROR messages. |
File Size |
Long | The compressed size of the stream on disk in bytes. |
Raw Size |
Long | The un-compressed size of the stream on disk in bytes. |
Processor Tasks
Exposes details of the tasks spawned by the processor filters. Each row represents one processor task.
| Field | Type | Description |
|---|---|---|
Create Time |
Date | The time the task was created. |
Create Time Ms |
Long | The time the task was created (milliseconds). |
Start Time |
Date | The time the task was executed. |
Start Time Ms |
Long | The time the task was executed (milliseconds). |
End Time |
Date | The time the task finished. |
End Time Ms |
Long | The time the task finished (milliseconds). |
Status Time |
Date | The time the status of the task was last updated. |
Status Time Ms |
Long | The time the status of the task was last updated (milliseconds). |
Meta Id |
Long | The unique ID (unique within this Stroom cluster) of the stream the task was for. |
Node |
String | The name of the node that the task was executed on. |
Pipeline |
String | The name of the pipeline that spawned the task. |
Pipeline Name |
String | The name of the pipeline that spawned the task. |
Processor Filter Id |
Long | The ID of the processor filter that spawned the task. |
Processor Filter Priority |
Integer | The priority of the processor filter when the task was executed. |
Processor Id |
Long | The unique ID (unique within this Stroom cluster) of the pipeline processor that spawned this task. |
Feed |
String | |
Status |
String | The status of the task (Created, Queued, Processing, Complete, Failed, Deleted). |
Task Id |
Long | The unique ID (unique within this Stroom cluster) of this task. |
Reference Data Store
Warning
This data source is for advanced users only and is primarily aimed at debugging issues with reference data.Reference data is written to a persistent cache on storage local to the node. This data source exposes the data held in the store on the local node only. Given that most Stroom deployments are clustered and the UI nodes are typically not doing processing, this means the UI node will have no reference data.
Task Manager
This data source exposes the background tasks currently running across the Stroom cluster. Each row represents a single background server task.
Requires the Manage Tasks application permission.
| Field | Type | Description |
|---|---|---|
Node |
String | The name of the node that the task is running on. |
Name |
String | The name of the task. |
User |
String | The user name of the user that the task is running as. |
Submit Time |
Date | The time the task was submitted. |
Age |
Duration | The time the task has been running for. |
Info |
String | The latest information message from the task. |
5.12.2 - Dashboards
A Dashboard document is a way to combine multiple search queries, tables and visualisations in a configurable layout.
5.12.2.1 - Queries
How to query the data in Stroom.
Dashboard queries are created with the query expression builder. The expression builder allows for complex boolean logic to be created across multiple index fields. The way in which different index fields may be queried depends on the type of data that the index field contains.
Date Time Fields
Time fields can be queried for times equal, greater than, greater than or equal, less than, less than or equal or between two times.
Times can be specified in two ways:
-
Absolute times
-
Relative times
Absolute Times
An absolute time is specified in ISO 8601 date time format, e.g. 2016-01-23T12:34:11.844Z
Relative Times
In addition to absolute times it is possible to specify times using expressions. Relative time expressions create a date time that is relative to the execution time of the query. Supported expressions are as follows:
now()- The current execution time of the query.second()- The current execution time of the query rounded down to the nearest second.minute()- The current execution time of the query rounded down to the nearest minute.hour()- The current execution time of the query rounded down to the nearest hour.day()- The current execution time of the query rounded down to the nearest day.week()- The current execution time of the query rounded down to the first day of the week (Monday).month()- The current execution time of the query rounded down to the start of the current month.year()- The current execution time of the query rounded down to the start of the current year.
Adding/Subtracting Durations
With relative times it is possible to add or subtract durations so that queries can be constructed to provide for example, the last week of data, the last hour of data etc.
To add/subtract a duration from a query term the duration is simply appended after the relative time, e.g.
now() + 2d
Multiple durations can be combined in the expression, e.g.
now() + 2d - 10h
now() + 2w - 1d10h
Durations consist of a number and duration unit. Supported duration units are:
s- Secondsm- Minutesh- Hoursd- Daysw- WeeksM- Monthsy- Years
Using these durations a query to get the last week’s data could be as follows:
between now() - 1w and now()
Or midnight a week ago to midnight today:
between day() - 1w and day()
Or if you just wanted data for the week so far:
greater than week()
Or all data for the previous year:
between year() - 1y and year()
Or this year so far:
greater than year()
5.12.2.2 - Internal Links
Adding links within Stroom to internal features/items or external URLs.
Within Stroom, links can be created in dashboard tables or dashboard text panes that will direct Stroom to display an item in various ways.
Links are inserted in the form:
[Link Text](URL and parameters){Link Type}
In dashboard tables links can be inserted using the link() function or more specialised functions such as data() or stepping().
In dashboard text panes, links can be inserted into the HTML as link attributes on elements.
Note
The text pane must be set toShow As HTML for links to operate.
<div style="padding: 5px;">
<span style="text-decoration:underline;color:blue;cursor:pointer" link="[link](uuid=e177cf16-da6c-4c7d-a19c-09a201f5a2da&params=user%3Duser1&title=Details%20For%20user1){dashboard}">Details For user1</span>
</div>
The link type can be one of the following:
dialog: Display the content of a link URL within a stroom popup dialog.tab: Display the content of a link URL within a stroom tab.browser: Display the content of a link URL within a new browser tab.dashboard: Used to launch a Stroom dashboard internally with parameters in the URL.stepping: Used to launch Stroom stepping internally with parameters in the URL.data: Used to show Stroom data internally with parameters in the URL.annotation: Used to show a Stroom annotation internally with parameters in the URL.
Dialog
Dialog links are used to embed any referenced URL in a Stroom popup Dialog. Dialog links look something like this in HTML:
<div style="padding: 5px;">
<span style="text-decoration:underline;color:blue;cursor:pointer"
link="[Show](https://www.somehost.com/somepath){dialog|Embedded In Stroom}">
Show In Stroom Dialog
</span>
</div>
Note
The dialog title can be controlled by adding a| and required title after the type, e.g.
{dialog|Embedded In Stroom}
Tab
Tab links are similar to dialog links are used to embed any referenced URL in a Stroom tab. Tab links look something like this in HTML:
<div style="padding: 5px;">
<span style="text-decoration:underline;color:blue;cursor:pointer"
link="[Show](https://www.somehost.com/somepath){tab|Embedded In Stroom}">
Show In Stroom Tab
</span>
</div>
Note
The tab title can be controlled by adding a| and required title after the type, e.g.
{tab|Embedded In Stroom}
Browser
Browser links are used to open any referenced URL in a new browser tab.
In most cases this is easily accomplished via a normal hyperlink but Stroom also provides a mechanism to do this as a link event so that dashboard tables are also able to open new browser tabs.
This can be accomplished by using the link() table function.
In a dashboard text pane the HTML could look like this:
<div style="padding: 5px;">
<span style="text-decoration:underline;color:blue;cursor:pointer"
link="[Show](https://www.somehost.com/somepath){browser}">
Show In Browser Tab
</span>
</div>
Note
Unlike the other link types there is no way to control the browser tab title.Dashboard
In addition to viewing/embedding external URLs, Stroom links can be used to direct Stroom to show an internal item or feature.
The dashboard link type allows Stroom to open a new tab and show a dashboard with the specified parameters.
The format for a dashboard link is as follows:
[Link Text](uuid=<UUID>¶ms=<PARAMS>&title=<CUSTOM_TITLE>){dashboard}
The parameters for dashboard links are:
uuid- The UUID of the dashboard to open.params- A URL encoded list of params to supply to the dashboard, e.g.params=user%3Duser1.title- An optional URL encoded title to better identify the specific instance of the dashboard, e.g.title=Details%20For%20user1.
Note
Parameter values can be URL encoded in XSLT using theencode-for-uri function.
An example of this type of link in HTML:
<div style="padding: 5px;">
<span style="text-decoration:underline;color:blue;cursor:pointer"
link="[link](uuid=e177cf16-da6c-4c7d-a19c-09a201f5a2da&params=user%3Duser1&title=Details%20For%20user1){dashboard}">
Details For user1
</span>
</div>
Note
By using a pipeline with the appropriate XSLT it is possible to dynamically generate links in dashboard text panes that will be specific to the data being displayed.Data
A link can be created to open a sub-set of a source of data (i.e. part of a stream) for viewing.
The data can either be opened in a popup dialog (dialog) or in another stroom tab (tab).
It can also be display in preview form (with formatting and syntax highlighting) or unaltered source form.
Note
To make full use of data links for viewing raw data, you need to use the stroom:source() XSLT Function to decorate an event with the details of the source location it derived from.
The format for a data link is as follows:
[Link Text](id=<STREAM_ID>&partNo=<PART_NO>&recordNo=<RECORD_NO>&lineFrom=<LINE_FROM>&colFrom=<COL_FROM>&lineTo=<LINE_TO>&colTo=<COL_TO>&viewType=<VIEW_TYPE>&displayType=<DISPLAY_TYPE>){data}
Stroom deals in two main types of stream, segmented and non-segmented (see Streams).
Data in a non-segmented (i.e. raw) stream is identified by an id, a partNo and optionally line and column positions to define the sub-set of that stream part to display.
Data in a segmented (i.e. cooked) stream is identified by an id, a recordNo and optionally line and column positions to define the sub-set of that record (i.e. event) within that stream.
The parameters for data links are:
id- The stream ID.partNo- The part number of the stream (one based). Always1for segmented (cooked) streams.recordNo- The record number within a segmented stream (optional). Not applicable for non-segmented streams so usenull()instead.lineFrom- The line number of the start of the sub-set of data (optional, one based).colFrom- The column number of the start of the sub-set of data (optional, one based).lineTo- The line number of the end of the sub-set of data (optional, one based).colTo- The column number of the end of the sub-set of data (optional, one based).viewType- The type of view of the data (optional, defaults topreview):preview: Display the data as a formatted preview of a limited portion of the data.source: Display the un-formatted data in its original form with the ability to navigate around all of the data source.
displayType- The way of displaying the data (optional, defaults todialog):dialog: Open as a modal popup dialog.tab: Open as a top level tab within the Stroom browser tab.
In preview mode the line and column positions will limit the data displayed to the specified selection.
In source mode the line and column positions define a highlight block of text within the part/record.
Warning
The displayType value tab is not supported if the dashboard is viewed via a Direct URL.
This is because a direct URL displays only the dashboard without Stroom’s top level tab bar so it is not possible to open it as a top level tab.
An example of this type of link in HTML:
<div style="padding: 5px;">
<span style="text-decoration:underline;color:blue;cursor:pointer"
link="[link](id=1822&partNo=1&recordNo=1){data}">
Show Source</span>
</div>
View Type
The additional parameter viewType can be used to switch the data view mode from preview (default) to source.
In preview mode the optional parameters lineFrom, colFrom, lineTo, colTo can be used to limit the portion of the data that is displayed.
<div style="padding: 5px;">
<span style="text-decoration:underline;color:blue;cursor:pointer"
link="[link](id=1822&partNo=1&recordNo=1&viewType=preview&lineFrom=1&colFrom=1&lineTo=10&colTo=8){data}">
Show Source Preview
</span>
</div>
In source mode the optional parameters lineFrom, colFrom, lineTo, colTo can be used to highlight a portion of the data that is displayed.
<div style="padding: 5px;">
<span style="text-decoration:underline;color:blue;cursor:pointer"
link="[link](id=1822&partNo=1&recordNo=1&viewType=source&lineFrom=1&colFrom=1&lineTo=10&colTo=8){data}">
Show Source
</span>
</div>
Display Type
Choose whether to display data in a dialog (default) or a Stroom tab.
Stepping
A stepping link can be used to launch the data stepping feature with the specified data. The format for a stepping link is as follows:
[Link Text](id=<STREAM_ID>&partNo=<PART_NO>&recordNo=<RECORD_NO>){stepping}
The parameters for stepping links are as follows:
- id - The id of the stream to step.
- partNo - The sub part no within the stream to step (usually 1).
- recordNo - The record or event number within the stream to step.
An example of this type of link in HTML:
<div style="padding: 5px;">
<span style="text-decoration:underline;color:blue;cursor:pointer"
link="[link](id=1822&partNo=1&recordNo=1){stepping}">
Step Source</span>
</div>
Annotation
A link can be used to edit or create annotations. To view or edit an existing annotation the id must be known or one can be found using a stream and event id. If all parameters are specified an annotation will either be created or edited depending on whether it exists or not. The format for an annotation link is as follows:
[Link Text](annotationId=<ANNOTATION_ID>&streamId=<STREAM_ID>&eventId=<EVENT_ID>&title=<TITLE>&subject=<SUBJECT>&status=<STATUS>&assignedTo=<ASSIGNED_TO>&comment=<COMMENT>){annotation}
The parameters for annotation links are as follows:
- annotationId - The optional existing id of an annotation if one already exists.
- streamId - An optional stream id to link to a newly created annotation, or used to lookup an existing annotation if no annotation id is provided.
- eventId - An optional event id to link to a newly created annotation, or used to lookup an existing annotation if no annotation id is provided.
- title - An optional default title to give the annotation if a new one is created.
- subject - An optional default subject to give the annotation if a new one is created.
- status - An optional default status to give the annotation if a new one is created.
- assignedTo - An optional initial assignedTo value to give the annotation if a new one is created.
- comment - An optional initial comment to give the annotation if a new one is created.
5.12.2.3 - Direct URLs
Navigating directly to a specific Stroom dashboard using a direct URL.
It is possible to navigate directly to a specific Stroom dashboard using a direct URL. This can be useful when you have a dashboard that needs to be viewed by users that would otherwise not be using the Stroom user interface.
URL format
The format for the URL is as follows:
https://<HOST>/stroom/dashboard?type=Dashboard&uuid=<DASHBOARD UUID>[&title=<DASHBOARD TITLE>][¶ms=<DASHBOARD PARAMETERS>]
Example:
https://localhost/stroom/dashboard?type=Dashboard&uuid=c7c6b03c-5d47-4b8b-b84e-e4dfc6c84a09&title=My%20Dash¶ms=userId%3DFred%20Bloggs
Host and path
The host and path are typically https://<HOST>/stroom/dashboard where <HOST> is the hostname/IP for Stroom.
type
type is a required parameter and must always be Dashboard since we are opening a dashboard.
uuid
uuid is a required parameter where <DASHBOARD UUID> is the UUID for the dashboard you want a direct URL to, e.g. uuid=c7c6b03c-5d47-4b8b-b84e-e4dfc6c84a09
The UUID for the dashboard that you want to link to can be found by right clicking on the dashboard icon in the explorer tree and selecting Info.
The Info dialog will display something like this and the UUID can be copied from it:
DB ID: 4
UUID: c7c6b03c-5d47-4b8b-b84e-e4dfc6c84a09
Type: Dashboard
Name: Stroom Family App Events Dashboard
Created By: INTERNAL
Created On: 2018-12-10T06:33:03.275Z
Updated By: admin
Updated On: 2018-12-10T07:47:06.841Z
title (Optional)
title is an optional URL parameter where <DASHBOARD TITLE> allows the specification of a specific title for the opened dashboard instead of the default dashboard name.
The inclusion of ${name} in the title allows the default dashboard name to be used and appended with other values, e.g. 'title=${name}%20-%20' + param.name
params (Optional)
params is an optional URL parameter where <DASHBOARD PARAMETERS> includes any parameters that have been defined for the dashboard in any of the expressions, e.g. params=userId%3DFred%20Bloggs
Permissions
In order for a user to view a dashboard they will need the necessary permission on the various entities that make up the dashboard.
For a Lucene index query and associated table the following permissions will be required:
- Read permission on the Dashboard entity.
- Use permission on any Index entities being queried in the dashboard.
- Use permission on any Pipeline entities set as search extraction Pipelines in any of the dashboard’s tables.
- Use permission on any XSLT entities used by the above search extraction Pipeline entities.
- Use permission on any ancestor pipelines of any of the above search extraction Pipeline entities (if applicable).
- Use permission on any Feed entities that you want the user to be able to see data for.
For a SQL Statistics query and associated table the following permissions will be required:
- Read permission on the Dashboard entity.
- Use permission on the StatisticStore entity being queried.
For a visualisation the following permissions will be required:
- Read permission on any Visualisation entities used in the dashboard.
- Read permission on any Script entities used by the above Visualisation entities.
- Read permission on any Script entities used by the above Script entities.
5.12.3 - Query
A Query document defines a search query in text form using the Stroom Query Language and displays the results as a table or a visualisation.
TODO
Complete this section.5.12.3.1 - Stroom Query Language
Stroom Query Language (StroomQL) is a query language for retrieving data in Stroom.
Query Format
Stroom Query Language (StroomQL) is a text based replacement for the existing Dashboard Dashboard A Dashboard is a configurable entity for querying one or more Data Sources and displaying the results as a table, a visualisation or some other form.Click to see more details... query builder and allows you to express the same queries in text form as well as providing additional functionality. It is currently used on the Query entity as the means of defining a query.
The following shows the supported syntax for a StroomQL query.
from <DATA_SOURCE>
where <FIELD> <CONDITION> <VALUE> [and|or|not]
[and|or|not]
[window] <TIME_FIELD> by <WINDOW_SIZE> [advance <ADVANCE_WINDOW_SIZE>]
[filter] <FIELD> <CONDITION> <VALUE> [and|or|not]
[and|or|not]
[eval...] <FIELD> = <EXPRESSION>
[having] <FIELD> <CONDITION> <VALUE> [and|or|not]
[group by] <FIELD>
[sort by] <FIELD> [desc|asc] // asc by default
[limit] <MAX_ROWS>
select <FIELD> [as <COLUMN NAME>], ...
[show as] <VIS_NAME> (<VIS_CONTROL_ID_1> = <COLUMN_1>, <VIS_CONTROL_ID_2> = <COLUMN_2>)
Fields
Fields are the fields in a data source. Fields are case-sensitive.
If the field name contains white space then it must be surround by braces and preceded by a dollar sign, e.g ${Create Time}.
If the field name does not contain spaces it can be written with or without the braces, e.g. Status or ${Status}.
Fields can added to the query text in one of three ways:
- Directly typing the field name (with braces as required).
- Double clicking the field name in the Field picker in the left hand pane. Field names with spaces will be pasted in with braces.
- Using code completion. In the query editor hit Ctrl ^ + Space ␣ to bring up a list of context aware completion terms, e.g. field names, then hit tab to insert it. You could also type a few characters from the name before hitting Ctrl ^ + Space ␣ to pre-filter the list. Field names with spaces will be pasted in with braces.
Keywords
Keywords are the reserved words that define the structure of the query, e.g. from, select, where.
Unlike fields, they are case-insensitive.
From
The first part of a StroomQL expression is the from clause that defines the single data source to query.
All queries must include the from clause.
Select the data source to query, e.g.
from my_source
If the name of the data source contains white space then it must be quoted using " double quotes, e.g.
from "my source"
Where
Use where to construct query criteria, e.g.
where feed = "my feed"
Add boolean logic with and, or and not to build complex criteria, e.g.
where feed = "my feed"
or feed = "other feed"
Use brackets to group logical sub expressions, e.g.
where user = "bob"
and (feed = "my feed" or feed = "other feed")
Conditions
Supported conditions are:
=- Equals.!=- Not equals.>- Greater than.>=- Greater than or equal to.<- Less than.<=- Less than or equal to.is null- The value isnull.is not null- The value is notnull.in- The value is in a list of allowed values.
e.g.StreamId in (1001, 1002, 2009)
orFeed in ("FEED_X", "FEED_Y").in dictionary- The value is in a list of allowed values that are contained in a Dictionary .
e.g.Feed in dictionary "My Dict"(using the dictionary’s unique name)
orFeed in dictionary "fb7a8cea-e6b4-4d94-8f7e-47ff3b3c7711"(using the dictionary’s UUID UUID A Universally Unique Identifier for uniquely identifying something. UUIDs are used as the identifier in Doc Refs. An example of a UUID is4ffeb895-53c9-40d6-bf33-3ef025401ad3.Click to see more details...).
And|Or|Not
Logical operators to add to where and filter clauses.
Bracket groups
You can force evaluation of items in a specific order using bracketed groups.
and X = 5 OR (name = foo and surname = bar)
Window
window <TIME_FIELD> by <WINDOW_SIZE> [advance <ADVANCE_WINDOW_SIZE>]
Windowing groups data by a specified window size applied to a time field. A window inserts additional rows for future periods so that rows for future periods contain count columns for previous periods.
Specify the field to window by and a duration.
Durations are specified in simple terms e.g. 1d, 2w etc.
By default, a window will insert a count into the next period row. This is because by default we advance by the specified window size. If you wish to advance by a different duration you can specify the advance amount which will insert counts into multiple future rows.
Filter
Use filter to filter values that have not been indexed during search retrieval.
This is used the same way as the where clause but applies to data after being retrieved from the index, e.g.
filter obscure_field = "some value"
Add boolean logic with and, or and not to build complex criteria as supported by the where clause.
Use brackets to group logical sub expressions as supported by the where clause.
Note
As filters do not make use of the index they can be considerably slower than awhere clause, however they allow filtering on fields that have not been indexed for some reason.
Frequent use of filter on a field suggests you may want to consider including that field in an index.
Eval
Use eval to assign the value returned from an Expression Function to a named variable, e.g.
eval my_count = count()
Here the result of the count() function is being stored in a variable called my_count.
Functions can be nested and applied to variables, e.g.
eval new_name = concat(
substring(name, 3, 5),
substring(name, 8, 9))
Note that all fields in the data source selected using from will be available as variables by default.
Multiple eval statements can also be used to breakup complex function expressions and make it easier to comment out individual evaluations, e.g.
eval name_prefix = substring(name, 3, 5)
eval name_suffix = substring(name, 8, 9)
eval new_name = concat(
name_prefix,
name_suffix)
Variables can be reused, e.g.
eval name_prefix = substring(name, 3, 5)
eval new_name = substring(name, 8, 9)
eval new_name = concat(
name_prefix,
new_name)
In this example, the second assignment of new_name will override the value initially assigned to it.
Note that when reusing a variable name, the assignment can depend on the previous value assigned to that variable.
Add boolean logic with and, or and not to build complex criteria, e.g.
where feed = "my feed" or feed = "other feed"
Use brackets to group logical sub expressions, e.g.
where user = "bob" and (feed = "my feed" or feed = "other feed")
Having
A post aggregate filter that is applied at query time to return only rows that match the having conditions.
having count > 3
Group By
Use to group by columns, e.g.
group by feed
You can group across multiple columns, e.g.
group by feed, name
You can create nested groups, e.g.
group by feed
group by name
Sort By
Use to sort by columns, e.g.
sort by feed
You can sort across multiple columns, e.g.
sort by feed, name
You can change the sort direction, e.g.
sort by feed asc
Or
sort by feed desc
Limit
Limit the number of results, e.g.
limit 10
Select
The select keyword is used to define the fields that will be selected out of the data source (and any eval’d fields) for display in the table output.
select feed, name
You can optionally rename the fields so that they appear in the table with more human friendly names.
select feed as 'my feed column',
name as 'my name column'
Show
The show keyword is used to tell StroomQL how to show the data resulting from the select.
A Stroom visualisation can be specified and then passed column values from the select for the visualisation control properties.
show LineChart(x = EventTime, y = count)
show Doughnut(names = Feed, values = count)
For visualisations that contain spaces in their names it is necessary to use quotes, e.g.
show "My Visualisation" (x = EventTime, y = count)
Comments
Single line
StroomQL supports single line comments using //.
For example:
from "index_view" // view
where EventTime > now() - 1227d
// and StreamId = 1210
select StreamId as "Stream Id", EventTime as "Event Time"
Multi line
Multiple lines can be commented by surrounding sections with /* and */.
For example:
from "index_view" // view
where EventTime > now() - 1227d
/*
eval FirstName = lowerCase(substringBefore(UserId, '.'))
eval FirstName = any(FirstName)
*/
select StreamId as "Stream Id", EventTime as "Event Time"
Examples
The following are various example queries.
// add a where
from "index_view" // view
where EventTime > now() - 1227d
// and StreamId = 1210
eval UserId = any(upperCase(UserId))
eval FirstName = lowerCase(substringBefore(UserId, '.'))
eval FirstName = any(FirstName)
eval Sl = stringLength(FirstName)
eval count = count()
group by StreamId
sort by Sl desc
select Sl, StreamId as "Stream Id", EventId as "Event Id", EventTime as "Event Time", UserId as "User Id", FirstName, count
limit 10
from "index_view" // view
// add a where
where EventTime > now() - 1227d
// and StreamId = 1210
eval UserId = any(upperCase(UserId))
eval FirstName = lowerCase(substringBefore(UserId, '.'))
eval FirstName = any(FirstName)
eval Sl = stringLength(FirstName)
// eval count = count()
// group by StreamId
// sort by Sl desc
select StreamId as "Stream Id", EventId as "Event Id"
// limit 10
from "index_view" // view
// add a where
where EventTime > now() - 1227d
// and StreamId = 1210
eval UserId = any(upperCase(UserId))
eval FirstName = lowerCase(substringBefore(UserId, '.'))
eval FirstName = any(FirstName)
eval Sl = stringLength(FirstName)
eval count = count()
group by StreamId
sort by Sl desc
select Sl, StreamId as "Stream Id", EventId as "Event Id", EventTime as "Event Time", UserId as "User Id", FirstName, count
limit 10
Help Pane
The left hand pane of the Query editor provides help for building a StroomQL query. It contains the following items:
- Data Sources - The list of data sources (visible to the user) that can be queried.
- Structure - The list of keywords available to use, e.g.
select. - Annotation Fields - The list of special fields for accessing data from Annotations linked to the data being queried.
The fields list will only be available once a complete
from ...clause has been added that uses a data source that supports Annotations, e.g. an Index. - Fields - The list of fields that can be used in the Query.
The fields list will only be available once a complete
from ...clause has been added. - Functions - The list of Expression Functions that can be used.
- Visualisations - The list of Visualisation documents that can be included in the Query .
- Dictionaries - The list of
Dictionary
documents that can be used in
in dictionaryterms.
Clicking on an item will show some detailed help about that item in the bottom of the pane.
Double clicking on the item will insert it into the query editor. It will be inserted with double quotes or braces as appropriate to the item being inserted.
Code Completion
The StroomQL editor benefits from code completion to speed up the writing of queries.
Pressing Ctrl ^ , Space ␣ in the query editor will bring up a context aware context menu listing items that can be inserted into the query, e.g. fields, functions, keywords, dictionaries, data sources, etc.
If you type some letters of the item you want, e.g. sub then
Ctrl ^
,
Space ␣
, it will bring up a list of items that contain the letters sub in that order, e.g. substring(..), isDouble(..), etc.
You can either use the cursor keys to scroll up/down the list or continue typing letters to further refine the filtering of the list. Hit Enter ↵ or Tab ↹ to insert the item into the editor.
The context menu also includes completion snippets.
The context menu also shows some more detailed help, e.g. to describe the argument to functions.
Functions
Expression Functions are inserted with tab stops to enable fast population of the function arguments. For example:
- Type
subthen hit Ctrl ^ , Space ␣ . - Select
substring(..)from the list and hit Tab ↹ .
substring(input, startIndex, endIndex)is inserted, withinputhighlighted. - Type
Feedto replaceinputwithFeed, then hit Tab ↹ .
substring(Feed, startIndex, endIndex)is displayed, withstartIndexhighlighted. - Type
0to replacestartIndexwith0, then hit Tab ↹ .
substring(Feed, 0, endIndex)is displayed, withendIndexhighlighted. - Type
5to replaceendIndexwith5, then hit Tab ↹ .
substring(Feed, 0, 5)is displayed, with the cursor now positioned after the closing bracket.
5.12.4 - Analytic Rules
Analytic Rules are queries that can be run against the data either as it is ingested or on a scheduled basis.
TODO
Complete this section.5.12.5 - Search Extraction
The process of combining data extracted from events with the data stored in an index.
When indexing data it is possible to store (see Stored Fields all data in the index. This comes with a storage cost as the data is then held in two places; the event; and the index document.
Stroom has the capability of doing Search Extraction at query time. This involves combining the data stored in the index document with data extracted using a search extraction pipeline. Extracting data in this way is slower but reduces the data stored in the index, so it is a trade off between performance and storage space consumed.
Search Extraction relies on the StreamId and EventId being stored in the Index. Stroom can then use these two fields to locate the event in the stream store and process it with the search extraction pipeline.
TODO
Add more detail5.12.6 - Dictionaries
Creating
Right click on a folder in the explorer tree that you want to create a dictionary in. Choose ‘New/Dictionary’ from the popup menu:
Call the dictionary something like ‘My Dictionary’ and click .
Now just add any search terms you want to the newly created dictionary and click .
You can add multiple terms.
- Terms on separate lines act as if they are part of an ‘OR’ expression when used in a search.
apple banana orange - Terms on a single line separated by spaces act as if they are part of an ‘AND’ expression when used in a search.
apple,banana,orange
Using the Dictionary
To perform a search using your dictionary, just choose the newly created dictionary as part of your search expression:
TODO: Fix image
5.13 - Security
All aspects of securing Stroom and the content within it. Includes application security, user and group accounts and the permissions model.
5.13.1 - Deployment
There are many aspects of security that should be considered when installing and running Stroom.
Shared Storage
For most large installations Stroom uses shared storage for its data store. This storage could be a CIFS, NFS or similar shared file system. It is recommended that access to this shared storage is protected so that only the application can access it. This could be achieved by placing the storage and application behind a firewall and by requiring appropriate authentication to the shared storage. It should be noted that NFS is unauthenticated so should be used with appropriate safeguards.
MySQL
Accounts
It is beyond the scope of this article to discuss this in detail but all MySQL accounts should be secured on initial install. Official guidance for doing this can be found here .
Communication
Communication between MySQL and the application should be secured. This can be achieved in one of the following ways:
- Placing MySQL and the application behind a firewall
- Securing communication through the use of iptables
- Making MySQL and the application communicate over SSL (see here for instructions)
The above options are not mutually exclusive and may be combined to better secure communication.
Application
Node to node communication
In a multi node Stroom deployment each node communicates with the master node. This can be configured securely in one of several ways:
- Direct communication to Tomcat on port 8080 - Secured by being behind a firewall or using iptables
- Direct communication to Tomcat on port 8443 - Secured using SSL and certificates
- Removal of Tomcat connectors other than AJP and configuration of Apache to communicate on port 443 using SSL and certificates
Application to Stroom Proxy Communication
The application can be configured to share some information with Stroom Proxy so that Stroom Proxy can decide whether or not to accept data for certain feeds based on the existence of the feed or its reject/accept status. The amount of information shared between the application and the proxy is minimal but could be used to discover what feeds are present within the system. Securing this communication is harder as both the application and the proxy will not typically reside behind the same firewall. Despite this communication can still be performed over SSL thus protecting this potential attack vector.
Admin port
Stroom (v6 and above) and its associated family of stroom-* Dropwizard based services all expose an admin port (8081 in the case of stroom). This port serves up various health check and monitoring pages as well as a number of restful services for initiating admin tasks. There is currently no authentication on this admin port so it is assumed that access to this port will be tightly controlled using a firewall, iptables or similar.
Servlets
There are several servlets in Stroom that are accessible by certain URLs. Considerations should be made about what URLs are made available via Apache and who can access them. The servlets, path and function are described below:
| Servlet | Path | Function | Risk |
|---|---|---|---|
| DataFeed | /datafeed or /datafeed/* | Used to receive data | Possible denial of service attack by posting too much data/noise |
| RemoteFeedService | /remoting/remotefeedservice.rpc |
Used by proxy to ask application about feed status (described in previous section) | Possible to systematically discover which feeds are available. Communication with this service should be secured over SSL discussed above |
| DynamicCSSServlet | /stroom/dynamic.css |
Serves dynamic CSS based on theme configuration | Low risk as no important data is made available by this servlet |
| DispatchService | /stroom/dispatch.rpc |
Service for UI and server communication | All back-end services accessed by this umbrella service are secured appropriately by the application |
| ImportFileServlet | /stroom/importfile.rpc |
Used during configuration upload | Users must be authenticated and have appropriate permissions to import configuration |
| ScriptServlet | /stroom/script |
Serves user defined visualisation scripts to the UI | The visualisation script is considered to be part of the application just as the CSS so is not secured |
| ClusterCallService | /clustercall.rpc |
Used for node to node communication as discussed above | Communication must be secured as discussed above |
| ExportConfig | /export/* |
Servlet used to export configuration data | Servlet access must be restricted with Apache to prevent configuration data being made available to unauthenticated users |
| Status | /status |
Shows the application status including volume usage | Needs to be secured so that only appropriate users can see the application status |
| Echo | /echo |
Block GZIP data posted to the echo servlet is sent back uncompressed. This is a utility servlet for decompression of external data | URL should be secured or not made available |
| Debug | /debug |
Servlet for echoing HTTP header arguments including certificate details | Should be secured in production environments |
| SessionList | /sessionList |
Lists the logged in users | Needs to be secured so that only appropriate users can see who is logged in |
| SessionResourceStore | /resourcestore/* |
Used to create, download and delete temporary files linked to a user’s session such as data for export | This is secured by using the users session and requiring authentication |
HDFS, Kafka, HBase, Zookeeper
Stroom and stroom-stats can integrate with HDFS, Kafka, HBase and Zookeeper. It should be noted that communication with these external services is currently not secure. Until additional security measures (e.g. authentication) are put in place it is assumed that access to these services will be carefully controlled (using a firewall, iptables or similar) so that only stroom nodes can access the open ports.
Content
It may be possible for a user to write XSLT, Data Splitter or other content that may expose data that we do not wish to or to cause the application some harm. At present processing operations are not isolated processes and so it is easy to cripple processing performance with a badly written translation whether written accidentally or on purpose. To mitigate this risk it is recommended that users that are given permission to create XSLT, Data Splitter and Pipeline configurations are trusted to do so.
Visualisations can be completely customised with javascript. The javascript that is added is executed in a clients browser potentially opening up the possibility of XSS attacks, an attack on the application to access data that a user shouldn’t be able to access, an attack to destroy data or simply failure/incorrect operation of the user interface. To mitigate this risk all user defined javascript is executed within a separate browser IFrame. In addition all javascript should be examined before being added to a production system unless the author is trusted. This may necessitate the creation of a separate development and testing environment for user content.
5.13.2 - Credentials
Authentication against other systems.
Sometimes Stroom needs to connect to other systems:
- Git repositories
- Stroom AI connections
- In the future, all credentials for third-party systems will be managed by this user-interface.
The Credentials module is intended to centralise the management of these credentials within Stroom.
Accessing Credentials Manager
The Credentials Manager can be accessed via the Stroom Menu
Types of Credentials
Stroom supports different types of credentials. Different systems can use different types of credentials.
| User | Username / Password | Access Token | SSH Key | Key Store |
|---|---|---|---|---|
| GitRepo | ||||
| Content Store | ||||
| Stroom AI |
Username / Password
The username and password are passed to the server unchanged.
Access Token
This is a variation of username / password authentication. Stroom will pass the token in place of the password.
SSH Key
This is used when connecting to SSH servers. SSH authentication is not intuitive, thus the basics are explained here.
The user generates a key pair.
The public part of the key pair is given to the SSH server, via the command line ssh-copy-id command or via an application-specific web user-interface.
The private part is stored on the user’s machine and is secured via a pass-phrase.
The pass-phrase ensures that if an attacker gains access to the user’s file they cannot access the private key.
Thus Stroom needs to know the private key and the pass-phrase.
There is one more key pair involved. It is important that the client is confident that they are connecting to the correct SSH server. Otherwise, an attacker might trick the user into connecting to the wrong server. This is secured by the server’s key pair. The server has a private key and allows the client to download the server’s public key.
Stroom can optionally check the server’s key, if the server’s public key is provided.
If no key is provided then Stroom will accept any server.
This can be useful when getting things working but is not recommended for production use.
To enable this setting, check the checkbox “Verify Hosts” and add the entry from your ~/.ssh/known_hosts file.
Note
Note that some systems hash the values in~/.ssh/known_hosts.
This format is not currently supported.
Key Store
Create a key store in JKS or PXCS12 format.
Key Store Type
Stroom supports these two keystore formats:
-
JKS - Original Java keystore format.
-
PKCS12 - Standardised format, developed by RSA, which stores cryptography objects in a single file.
Key Store Pass Phrase
The keystore should be protected by a pass-phrase. Stroom needs this pass-phrase to read the keystore.
Upload Key Store File
Select the keystore and upload it to enter it into Stroom.
5.13.3 - User Accounts
User accounts for authentication when using Stroom’s internal identity provider.
TODO
The Users, Groups and Permissions screens are undergoing significant change in Stroom v7.6. Therefore this section will be updated with more detail in v7.6.Note
If Stroom is configured to use an external Identity Provider (IDP) Identity Provider (IDP) An Identity Provider is a system or service that can authenticate a user and assert their identity. Identity providers can support single sign on (SSO), which allows the user to sign in once to the Identity Provider so they are then authenticated to all systems using that IDP.Click to see more details… (e.g. Azure Active Directory or AWS Cognito) then all user accounts are managed within that Identity Provider (IDP) Identity Provider (IDP) An Identity Provider is a system or service that can authenticate a user and assert their identity. Identity providers can support single sign on (SSO), which allows the user to sign in once to the Identity Provider so they are then authenticated to all systems using that IDP.Click to see more details… and the Manage Accounts screen in Stroom will not be available. For more details about external Identity Providers, see Open ID Connect.
Accounts vs Stroom Users
See Accounts vs Users for details on the difference between a Stroom User Account and a Stroom User.
Creating User Accounts
User accounts can only be created by a user that holds the Manage Users or Administrator
Application permission
Application permission
This is a permission that is not specific to a single document. It applies to all documents or is not related to documents in any way.Click to see more details....
Create a new user account by selecting
from the main menu.
As a minimum a user account must have a unique identifier that will be used to identify them in Stroom.
If the user’s email address is added then Stroom will be able to email the user to reset their password.
This functionality is configured using the properties starting with this prefix stroom.security.identity.email..
Account Flags
User accounts have a number of flags that can be set by an administrator or automatically by Stroom.
-
Enabled - Enables/disables the account. A disabled account cannot login. Useful for disabling a user that is temporarily on leave.
-
Locked - Set when a user has too many failed login attempts (controlled by the property
stroom.security.identity.failedLoginLockThreshold). Can be un-set by a user withManage UsersApplication permission Application permission This is a permission that is not specific to a single document. It applies to all documents or is not related to documents in any way.Click to see more details.... A locked account cannot login. -
Inactive - Set automatically in one of these cases:
- A brand new account has not been used for a duration greater than
stroom.security.identity.passwordPolicy.neverUsedAccountDeactivationThreshold. - An account has not been used for a duration greater than
stroom.security.identity.passwordPolicy.unusedAccountDeactivationThreshold. An inactive account cannot login.
- A brand new account has not been used for a duration greater than
5.13.4 - Users and Groups
The Stroom user and group entities that can be granted application and document permissions.
TODO
The Users, Groups and Permissions screens are undergoing significant change in Stroom v7.6. Therefore this section will be updated with more detail in v7.6.Accounts vs Stroom Users
See Accounts vs Users for details on the difference between a Stroom User Account and a Stroom User.
User
A Stroom User represents a human user and is linked to either a User Account in Stroom or to a user account in an external
Identity Provider (IDP)
Identity Provider (IDP)
An Identity Provider is a system or service that can authenticate a user and assert their identity. Identity providers can support single sign on (SSO), which allows the user to sign in once to the Identity Provider so they are then authenticated to all systems using that IDP.Click to see more details....
It can also represent a non-human processing user, e.g. where a Stroom User is created and has an
API Key
API Key
API Keys are a form of authentication token that are created within Stroom for use by Stroom-Proxy instances or other clients that want to use Stroom’s API. It is an encrypted string that contains details of the user and the expiration date of the token. Possession of a valid API Key for a user account means that you can do anything that the user can do in the user interface via the API.Click to see more details... created for it to allow a client system to use Stroom’s
API
API
Application Programming Interface. An interface that one system can present so other systems can use it to communicate. Stroom has a number of APIs, e.g. its many REST APIs and its /datafeed interface for data receipt.Click to see more details....
All audited activity in Stroom will be attributed to a Stroom User and their unique identifier will be included in the audit events.
A User can have the following:
- Membership of one or more Groups.
- One or more Application Permissions Application permission This is a permission that is not specific to a single document. It applies to all documents or is not related to documents in any way.Click to see more details... granted to it.
- One or more Document Permissions Document permission Document permissions control the access that users and/or groups have to a Document.Click to see more details... granted to it.
Group
A Group represents a collection of Stroom Users and/or other Groups. A Group can be used to ease the management of application and document permissions by granting permissions to one Group then adding users to that Group. For example if all the users in a team require the same application and document permissions, then a Group can be created for them and the permissions assigned to the Group. When a user joins or leaves the team it is simply a case of editing the membership of the Group.
A Group can have the following:
- One or more members (Users and/or other Groups).
- Membership of one or more other Groups.
- One or more Application Permissions Application permission This is a permission that is not specific to a single document. It applies to all documents or is not related to documents in any way.Click to see more details... granted to it.
- One or more Document Permissions Document permission Document permissions control the access that users and/or groups have to a Document.Click to see more details... granted to it.
5.13.5 - Application Permissions
Assigning application level permissions (such as ‘Manage Users’) to users or groups.
TODO
The Users, Groups and Permissions screens are undergoing significant change in Stroom v7.6. Therefore this section will be updated with more detail in v7.6.An Application Permission is a permission to perform an action that is not associated with a single Document Document Typically refers to an item that can be created in the Explorer Tree, e.g. a Feed, a Pipeline, a Dashboard, etc. May also be known as an Entity.Click to see more details... or is unrelated to Documents. Application Permissions can be granted to Users or Groups.
In order to grant Application Permissions to yourself or to other Users/Groups you must have the Manage Users or Administrator Application Permissions.
If you have one of these permissions then you can access the Application Permissions screen from the main menu:
Application Permission Types
The following is the list of different application permissions that can be granted to users/groups.
| Permission | Description |
|---|---|
| Administrator | Full administrator rights to access and manage all data, documents and screens, i.e. everything. |
| Annotations | Create and view annotations in query results. |
| Change Owner | Change the ownership of a document or folder to another user. |
| Data - Delete | Delete streams. |
| Data - Export | Download/export streams from a feed. |
| Data - Import | Upload stream data into a feed. |
| Data - View | View stream data (e.g. in the Data Viewer or a Dashboard text pane). |
| Data - View With Pipeline | View data in a Dashboard text pane that uses a pipeline. |
| Download Search Results | Download search result data on a Dashboard. |
| Export Configuration | Export Content Content Content in Stroom typically means the user created documents/entities created in Stroom and as seen in the explorer tree. Content can be created/modified by Stroom users and imported/exported for sharing between different Stroom instances.Click to see more details... (i.e. documents, that you have permission to view) to a file. |
| Import Configuration | Import Content Content Content in Stroom typically means the user created documents/entities created in Stroom and as seen in the explorer tree. Content can be created/modified by Stroom users and imported/exported for sharing between different Stroom instances.Click to see more details... from a file. |
| Manage API Keys | Access the API Keys screen to view, create, edit, delete the user’s own API keys. ‘Manage Users’ permission is also required to manage other users API keys |
| Manage Cache | Access the Caches screen to view and clear system caches. |
| Manage DB | Access the Monitoring -> Database Tables screen to view the state of the tables in the database. |
| Manage Index Shards | Access the Shards sub-tab on an Index document. |
| Manage Jobs | Access the Jobs screen to manage Stroom’s background jobs. |
| Manage Nodes | Access the Nodes screen to view the nodes the cluster and manage their priority and enabled states. |
| Manage Policies | Access the Data Retention screen to manage data retention rules. |
| Manage Processors | Access the Processors tab and manage the processors/filters used to process stream data through pipelines. |
| Manage Properties | Access to the Properties to manage the system configuration. |
| Manage Tasks | Access the Server Tasks screen to view/stop tasks running on the nodes. |
| Manage Users | Access the screens to manage users, groups, document/application permissions. Also gives the user the ability to manage API keys for other users. |
| Manage Volumes | Access the Data Volumes and Index Volumes screens to create/edit/delete the index/data volumes used for Lucene indexing and the stream store. |
| Pipeline Stepping | Step data through a pipeline using the Stepper. |
| View System Information | Use the System Information API. This is used by the administrators for viewing some of the internal working of Stroom to aid in debugging issues. |
5.13.6 - Document Permissions
Assigning document level permissions (such as ‘View’) to users or groups.
TODO
The Users, Groups and Permissions screens are undergoing significant change in Stroom v7.6. Therefore this section will be updated with more detail in v7.6.Document Permissions are permissions that are granted to Users or Groups for a specific Document Document Typically refers to an item that can be created in the Explorer Tree, e.g. a Feed, a Pipeline, a Dashboard, etc. May also be known as an Entity.Click to see more details.... They control what documents a user/group can see and what they can do to those documents. They allow very fine grained control over what a user/group can see or do in Stroom.
For example, User jbloggs may be granted Use permission on the Index named Alert Index in order for him to be able to query that index in a dashboard, but not be able to see it in the explorer tree or change it in any way.
By default a new user with no Application Permissions, Document Permissions or Group memberships cannot view/use/modify any documents. They do not even have permission to create any documents. When logging into Stroom, they will simply see an empty explorer tree.
A user can gain varying levels of access to documents in a number of ways:
- Being added to a Group that has direct or inherited permissions on one or more existing documents.
- Being added to a Group that has direct or inherited permissions to create one or more document types.
- Being directly granted permissions one or more existing documents.
- Being directly granted the permission to create one or more document types.
- Being granted the
AdministratorApplication Permission which gives them access to ALL documents.
In order to modify the permissions on a document, you must either hold Owner permission on the document or have the Administrator Application Permission.
The Document Permissions screen for a document/folder can be accessed by right clicking on it in the explorer tree and selecting:
Permission Types
The following is the list of different permissions that can be granted to users/groups on a document.
| Permission | Description |
|---|---|
| Owner | Same as delete plus ability to change the document’s permissions (i.e. grant permissions on this document to other users/groups). |
| Delete | Same as edit plus permission to delete the document. |
| Edit | Same as view plus permission to edit, move, rename or add tags to the document. |
| View | Permission to see the document in the explorer tree, open it as read-only, copy it or export it (subject to also having the Export Configuration application permission). |
| Use | Only allow use of a document, e.g. allow use of an index as part of a search process but do not allow viewing of the document itself. |
The following is the list of different permissions that can be granted to users/groups on a folder .
| Permission | Description |
|---|---|
| Owner | Same as delete plus ability to change the folder’s permissions (i.e. grant permissions on this folder to other users/groups). |
| Delete | Same as edit plus permission to delete the folder. |
| Edit | Same as view plus permission to edit, move, rename or add tags to the folder. |
| View | Permission to see the folder in the explorer tree (and its child items that you also have View permission on), open it as read-only, copy it or export it (subject to also having the Export Configuration application permission). |
| Use | Only allow use of a folder, e.g. allow use of an index as part of a search process but do not allow viewing of the folder itself. |
Implied Permissions
Note that each permission in the two tables above also includes all the permissions below it in the table, e.g. a user with Edit permission on a document will also have the implied permissions View and Use.
There is no need to grant these lower permissions to the user, though doing so will have no impact as Stroom will use the highest value permission when checking permissions.
Inherited Permissions
If a User jbloggs is a member of Group Team A and that group is a member of group Division 123, then jbloggs will inherit all permissions from both Team A and Division 123. A User/Group will inherit all permissions of the groups that they are a member of and also from any ancestor groups of those groups.
| User/Group | Permissions | Direct/Inherited |
|---|---|---|
| Division 123 | View on Dictionary IP Allow List | Direct |
| Team A | View on Dictionary IP Allow List | Inherited |
| Team A | Owner on Dashboard Team Dashboard | Direct |
| jbloggs | View on Dictionary IP Allow List | Inherited |
| jbloggs | Owner on Dashboard Team Dashboard | Inherited |
| jbloggs | View on Dashboard Frank’s Dashboard | Direct |
Owner Permission
A document can have multiple owners.
An owner can be a user or a group.
When a document is created by a user they are automatically made an owner of it.
Any user with the Administrator role has implied ownership of ALL documents.
Having Owner permission on a document means the user can grant permissions on that document to other users, or revoke permissions from other users.
Use Permission
This permission allows users to access a document but not actually see it in the explorer tree or open the document in Stroom. They can however make use of the document, e.g. selecting and querying an Index in a Dashboard .
The Use permission is not relevant to all document types.
Permissions on Folders
Folders in the explorer tree work mostly in the same way as documents when it comes to permissions. There are a couple of exceptions to this.
Permission on Folder Contents
The permissions on a folder apply only to the folder itself and has no bearing on what you can/can’t do to its child items. The permissions on each child item in the folder control what you can/can’t do to those items.
For example, if you only have View permission on a folder, but have Delete on a document in that folder, then you are able to delete that document and thus change the contents of the folder.
Similarly, if you have View permission on a folder but have no permission on any of its child items, then you will just see an empty folder.
Ancestor Folder Visibility
A folder will be visible to a user in the explorer tree if the user has View permission on it OR if the user has View permission on any single document/folder that is a descendant of it.
For example, if a user has View permission on a Dictionary Dictionary_XYZ with path
System / Folder_A / Folder_B / Dictionary_XYZ
but no permissions on Folder A or Folder B, they will be able to see both Folders in the explorer tree in addition to the Dictionary. They will however not be able to open those Folders as they do not have the permission.
Therefore, when granting permissions on a document/folder to a user/group, you are also implicitly granting visibility (but not View permission) on all ancestor folders.
Create Permissions
Folders can have one or more Create Permissions granted on them to users/groups.
There is a Create Permission for each document type, e.g. Index, Dictionary, Feed, etc. A Create Permission is the ability to create a new document of that type in that folder.
For example, user jbloggs is an analyst and is granted Create Dashboard and Create Query permissions on the Folder named Joe's Folder.
This means Joe can only create Dashboard or Query documents in that folder and nothing else.
Applying Changes to Descendants
When making changes to the permissions on a Folder you have the option of making the changes to just that folder or to all descendants of that folder. Selecting to apply to all descendants will make all permission changes apply to every descendant, i.e. including any sub-folders and their contents or own sub-folders.
Moving and Copying Documents
When you move or copy a document/folder you have the choice of how the destination document/folder’s permissions should be derived. The move/copy dialog offers the following choices:
- None - Removes all current permissions. Ignores permissions of the destination folder. You will be the owner of the moved document if not already.
- Source - Keep the current permissions and ownership as they are.
- Destination - Removes all current permissions. Adds the permissions of the destination folder. You will be the owner of the moved document if not already.
- Combined - Keep the current permissions and add the permissions of the destination folder. You will be the owner of the moved document if not already.
Note
You must have Owner permission on the source document/folder (or Administrator
Application permission
Application permission
This is a permission that is not specific to a single document. It applies to all documents or is not related to documents in any way.Click to see more details…) if you wish to use None, Destination or Combined as these all involve a change of permissions.
5.14 - Tools
Various additional tools to assist in administering Stroom and accessing its data.
5.14.1 - Command Line Tools
Command line actions for administering Stroom.
Stroom has a number of tools that are available from the command line in addition to starting the main application.
Running commands
The basic structure of the shell command for starting one of stroom’s commands depends on whether you are running the zip distribution of stroom or a docker stack.
In either case, COMMAND is the name of the stroom command to run, as specified by the various headings on this page.
Each command value is described in its own section and may take no arguments or a mixture of mandatory and optional arguments.
Note
These commands are very powerful and potentially dangerous in the wrong hands, e.g. they allow the changing of user’s passwords. Access to these commands should be strictly limited. Also, each command will run in its own JVM so are not really intended to be run when Stroom is running on the node.Running commands with the zip distribution
The commands are run by passing the command and any of its arguments to the java command.
The jar file is in the bin directory of the zip distribution.
For example:
Running commands in a stroom Docker stack
Commands are run in a Docker stack using the command.sh script found in the root of the stack directory structure.
Note
You do not specify the config file location as the script does this for you.For example:
Command reference
Note
All the examples below assume you are running stroom as part of the zip distribution. If you are running a Docker stack then you will need to use thecommand.sh script (as described above) with the same arguments but omitting the config file path.
server
This is the normal command for starting the Stroom application using the supplied YAML configuration file.
The example above will start the application as a foreground process.
Stroom would typically be started using the start.sh shell script, but the command above is listed for completeness.
When stroom starts it will check the database to see if any migration is required. If migration from an earlier version (including from an empty database) is required then this will happen as part of the application start process.
migrate
There may be occasions where you want to migrate an old version but not start the application, e.g. during migration testing or to initiate the migration before starting up a cluster. This command will run the process that checks for any required migrations and then performs them. On completion of the process it exits. This runs as a foreground process.
create_account
Where the named arguments are:
-u--user- The username for the user.-p--password- The password for the user.-e--email- The email address of the user.-f--firstName- The first name of the user.-s--lastName- The last name of the user.--noPasswordChange- If set do not require a password change on first login.--neverExpires- If set, the account will never expire.
This command will create an account in the internal identity provider within Stroom. Stroom is able to use an external OpenID identity providers such as Google or AWS Cognito but by default will use its own. When configured to use its own (the default) it will auto create an admin account when starting up a fresh instance. There are times when you may wish to create this account manually which this command allows.
Authentication Accounts and Stroom Users
The user account used for authentication is distinct to the Stroom user entity that is used for authorisation within Stroom. If an external IDP is used then the mechanism for creating the authentication account will be specific to that IDP. If using the default internal Stroom IDP then an account must be created in order to authenticate, either from within the UI if you are already authenticated as a privileged user or using this command. In either case a Stroom user will need to exist with the same username as the authentication account.
The command will fail if the user already exists. This command should NOT be run if you are using an external identity provider.
This command will also run any necessary database migrations to ensure it is working with the correct version of the database schema.
reset_password
Where the named arguments are:
-u--user- The username for the user.-p--password- The password for the user.
This command is used for changing the password of an existing account in Stroom’s internal identity provider. It will also reset all locked/inactive/disabled statuses to ensure the account can be logged into.
This command should NOT be run if you are using an external identity provider as the external identity provider is responsible for managing authentication accounts.
This command will fail if the account does not exist, i.e. create_account should have already been run or Stroom should be configured with stroom.security.identity.allowCertificateAuthentication set to true.
This command will also run any necessary database migrations to ensure it is working with the correct version of the database schema.
manage_users
Where the named arguments are:
--createUserUSER_IDENTIFIER- Creates a Stroom user with the supplied user identifier. See below for the format of this argument.--createGroupGROUP_IDENTIFIER- Creates a Stroom user group with the supplied group name.--addToGroupUSER_OR_GROUP_IDENTIFIERTARGET_GROUP- Adds a user/group to an existing group.--removeFromGroupUSER_OR_GROUP_IDENTIFIERTARGET_GROUP- Removes a user/group from an existing group.--grantPermissionUSER_OR_GROUP_IDENTIFIERPERMISSION_IDENTIFIER- Grants the named application permission to the user/group.--revokePermissionUSER_OR_GROUP_IDENTIFIERPERMISSION_IDENTIFIER- Revokes the named application permission from the user/group.--listPermissions- Lists all the valid permission names.
This command allows you to manage the user permissions within Stroom regardless of whether the internal identity provider or an external party is used. A typical use case for this is when using an external identity provider. In this instance Stroom has no way of auto creating an admin user when first started so the association between the account on the 3rd party IDP and the stroom user needs to be made manually.
This command is not intended for automation of user management tasks on a running Stroom instance that you can authenticate with.
It is only intended for cases where you cannot authenticate with Stroom, i.e. when setting up a new Stroom with a 3rd party IDP or when scripting the creation of a test environment.
If you want to automate actions that can be performed in the UI then you can make use of the REST API that is described at /stroom/noauth/swagger-ui.
Warning
See the section above about the distinction between authentication accounts and stroom users.
This command does not create an account for authentication.
See create_account for that.
The following is an example command to create a new stroom user jbloggs, create a group called Administrators with the Administrator application permission and then add jbloggs to the Administrators group.
This is a typical command to bootstrap a stroom instance with one admin user so they can login to stroom with full privileges to manage other users from within the application.
Where jbloggs is the user name of the account on the identity provider.
This command will also run any necessary database migrations to ensure it is working with the correct version of the database schema.
The named arguments can be used as many times as you like so you can create multiple users/groups/grants/etc. Regardless of the order of the arguments, the changes are executed in the following order:
- Create users
- Create groups
- Add users/groups to a group
- Remove users/groups from a group
- Grant permissions to users/groups
- Revoke permissions from users/groups
The command is idempotent. It can be run multiple times with the same value with no error.
The manage_users command is particularly useful for provisioning a new Stroom installation.
It allows you to automate the setup of some or all Stroom users and their group membership and application permissions.
Note
See below for examples of using this command.
External OIDC identity providers have a unique identifier for each user (this may be called sub or oid) and this often takes the form of a
UUID
UUID
A Universally Unique Identifier for uniquely identifying something. UUIDs are used as the identifier in Doc Refs. An example of a UUID is 4ffeb895-53c9-40d6-bf33-3ef025401ad3.Click to see more details....
Stroom stores this unique identifier (known as a Subject ID in stroom) against a user so it is able to associate the stroom user with the identity provider user.
USER_IDENTIFIER
The USER_IDENTIFIER is of the form subject_id[,display_name[,full_name]] e.g.:
eaddac6e-6762-404c-9778-4b74338d4a17eaddac6e-6762-404c-9778-4b74338d4a17,jbloggseaddac6e-6762-404c-9778-4b74338d4a17,jbloggs,Joe Bloggs
The optional parts are so that stroom can display more human friendly identifiers for a user. They are only initial values and will always be over written with the values from the identity provider when the user logs in.
The following are examples of various uses of the --createUser argument group.
GROUP_IDENTIFIER
The GROUP_IDENTIFIER is the name of the group in stroom, e.g. Administrators, Analysts, etc.
Groups are created by an admin to help manage permissions for large number of similar users.
Groups relate only to stroom and have nothing to do with the identity provider.
USER_OR_GROUP_IDENTIFIER
The USER_OR_GROUP_IDENTIFIER can either be the identifier for a user or a group, e.g. when granting a permission to a user/group.
It takes the following forms (with examples for each):
user_subject_ideaddac6e-6762-404c-9778-4b74338d4a17
user_display_namejbloggs
group_nameAdministrators
The value for the argument will first be treated as a unique identifier (i.e. the subject ID or group name). If the user cannot be found it will fall back to using the display name to find the user.
create_api_key
The create_api_key command can be used to create an API Key for a user.
This is useful if, when bootstrapping a cluster, you want to set up a user and associated API Key to allow an external process to monitor/manage that Stroom cluster, e.g. using an Operator in Kubernetes.
The arguments to the command are as follows:
uuser- The identity of the user to create the API Key for. This is the unique subject ID of the user.nkeyName- The name of the key. This must be unique for the user.eexpiresDays- Optional number of days after which the key should expire. This must not be greater than the configured propertystroom.security.authentication.maxApiKeyExpiryAge. If not set, it will be defaulted to the maximum configured age.ccomments- Optional string to set the comments for the API Key.ooutFile- Optional path to use to output the API Key string to. If not set, the API Key string will be output to stdout.
Typical Use Cases
Creating an Internal IDP Administrator
If you have installed a new Stroom instance (and are not using the stroom_core_test Docker stack) that is using the default Internal IDP, then you will need to create an administrator account in order to login and set up your stroom instance.
Assuming that you are running the stroom_core docker stack that is configured to use the internal IDP and want to setup johndoe and janedoe as administrators, you need to do the following:
First create the Stroom user accounts:
Now create the corresponding Stroom users and grant the admin permissions.
Note
The username in arguments--user (in create_account), --createUser (in manage_users) and --addToGroup (in manage_users) must match exactly.
See above for how to run the commands on a Stroom ZIP distribution (i.e. without the docker stack).
Creating an External IDP Administrator
If you have installed a new Stroom instance that has been configured to use an external IDP, you will need to create as a minimum a Stroom user (but not an account) that corresponds to the user identity (on the external IDP) of the person that will be an administrator.
If you don’t do this, the person will be able to login, but will have no permissions to set up any other users or create any content.
First you need to establish the claim in the authentication tokens that will be used to uniquely identify the user.
This is configured using the property stroom.authentication.openiId.uniqueIdentityClaim, which has a default value of sub.
This may need to be changed if the IDP in use has a different claim to uniquely identify the user identity.
Once you have established the claim that will be used to identify the user and have configured Stroom accordingly, you need to find the value of this claim in the IDP for the user that will be the administrator.
This value may look like an email address, or a
UUID
UUID
A Universally Unique Identifier for uniquely identifying something. UUIDs are used as the identifier in Doc Refs. An example of a UUID is 4ffeb895-53c9-40d6-bf33-3ef025401ad3.Click to see more details... or something else.
Assuming the unique identifier for John Doe is b6e06181-9e10-44eb-a33a-537509ec3abd, do the following to set them up as an administrator.
Identity providers may also have a more friendly Display Name and Full Name for the user, though these may not be unique. The above command will set initial values for these fields, so that you have more human friendly values in the Stroom UI, but once the user has logged in, the values will be obtained from the IDP tokens.
The properties stroom.authentication.openiId.userDisplayNameClaim (defaults to preferred_username) and stroom.authentication.openiId.fullNameClaimTemplate (defaults to ${name}) allow you to control which IDP claims are used for the Display Name and Full Name fields in Stroom.
5.14.2 - Stream Dump Tool
A tool for exporting stream data from Stroom.
Data within Stroom can be exported to a directory using the StreamDumpTool.
The tool is contained within the core Stroom Java library and can be accessed via the command line, e.g.
java -cp "apache-tomcat-7.0.53/lib/*:lib/*:instance/webapps/stroom/WEB-INF/lib/*" stroom.util.StreamDumpTool outputDir=output
Note the classpath may need to be altered depending on your installation.
The above command will export all content from Stroom and output it to a directory called output. Data is exported to zip files in the same format as zip files in proxy repositories. The structure of the exported data is ${feed}/${pathId}/${id} by default with a .zip extension.
To provide greater control over what is exported and how the following additional parameters can be used:
feed - Specify the name of the feed to export data for (all feeds by default).
streamType - The single stream type to export (all stream types by default).
createPeriodFrom - Exports data created after this time specified in ISO8601 UTC format, e.g. 2001-01-01T00:00:00.000Z (exports from earliest data by default).
createPeriodTo - Exports data created before this time specified in ISO8601 UTC format, e.g. 2001-01-01T00:00:00.000Z (exports up to latest data by default).
outputDir - The output directory to write data to (required).
format - The format of the output data directory and file structure (${feed}/${pathId}/${id} by default).
Format
The format parameter can include several replacement variables:
feed - The name of the feed for the exported data.
streamType - The data type of the exported data, e.g. RAW_EVENTS.
streamId - The id of the data being exported.
pathId - An incrementing numeric id that creates sub directories when required to ensure no directory ends up containing too many files.
id - An incrementing numeric id similar to pathId but without sub directories.
5.15 - User Content
This section relates to the content created in Stroom by the user, e.g. Dashboards, Translations, Feeds, etc.
5.15.1 - Content Store
Import packages of content to extend Stroom.
Motivation
Setting up Stroom is complex. Reusing other people’s work is much easier. The Content Store allows you to import packages of tested, consistent content.
How to find it
The Content Store can be accessed via the Stroom Menu:
What is a Content Store?
A Content Store is a
YAML
YAML
YAML Ain’t Markup Language. A human readable data format often used for configuration files. YAML is used in stroom for various things, e.g. Stroom & Stroom Proxy’s main configuration file, Content Store definition files. YAML files will typically have the file extension .yaml or .yml.Click to see more details... text file that references a number of sources of content.
The content needs to be available via Git.
The default Content Store can be found here:
https://github.com/gchq/stroom-content/blob/master/source/content-store.yml
.
You can add extra or completely different Content Stores for your instance of Stroom by defining them within your local.yml configuration file.
See below for details.
Security Considerations
The content within a Content Pack has full access to your Stroom system. You should examine the content carefully before trusting it.
Managing Content Packs
Importing
Open the Content Store via the Stroom Menu Tools > Content Store.
Select the Content Pack you are interested in and click the Install button.
A new Git Repo document will be created in the Explorer Tree and content pulled from Git.
Some Content Packs might be marked as requiring authentication. In this case you will need to contact the provider of the Content Pack for credentials.
Deleting
Select the Git Repo document in the Explorer Tree. Right click the document and select Delete. Confirm the deletion and the Content Pack will be removed.
Updating
There are two types of update that may be available:
- The content within Git may have been updated
- The values within the Content Store may be referencing new content; for example a new Git URL or a new Git commit.
Updating via the Content Store
Both of these update routes are managed within the Content Store.
Open the Content Store via the Stroom Menu Tools > Content Store.
The Content Store will check whether updates are available in the background. This may take a few minutes. If an update is available the Upgrade button will be enabled. Clicking that button will immediately start the upgrade process. Once the upgrade is complete a summary is shown.
Updating via the Git Repo Document
You can also update the content within the Git Repo document, although this won’t update any changes to the Content Store such as a new Git URL or Commit Hash. Double-click the Git Repo document in the Explorer Tree to open a tab showing the details.
On the Settings tab, click Check for updates.
Any available changes to the content within the Git Repository will be shown in
diff format
.
To update click Pull from Git.
Any updates will immediately be imported into Stroom.
The difference between a Content Pack and a Git Repo
You will notice that the settings tab of Git Repo documents created manually looks slightly different to those created via the Content Store. This is because some of the fields should be controlled by the Content Store, otherwise upgrades might do unexpected things. It isn’t possible to push changes to content packs back into Git.
If you need to push content back into Git then it is recommended that you create a Git Repo document manually.
Defining a Content Store
A Content Store is a
YAML
YAML
YAML Ain’t Markup Language. A human readable data format often used for configuration files. YAML is used in stroom for various things, e.g. Stroom & Stroom Proxy’s main configuration file, Content Store definition files. YAML files will typically have the file extension .yaml or .yml.Click to see more details... text file.
The
default Content Store
is annotated so see that file for full definitions of all the fields.
The overall format is:
metasection at the start, with information about the person or organisation that created and manages the Content Store.contentPackssection, listing all the Content Packs.
Each content pack has the following fields:
id - Unique ID for the Content Pack within the Content Store.
uiName - The name for the Content Pack, as shown in the Content Store user-interface.
iconUrl - URL to get the icon.
Any image format is supported.
licenseName - Short form for the license.
For example; Apache 2.0.
stroomPath - Where the Git Repo will be created within the Explorer Tree.
gitRepoName - The name of the Git Repo.
If not specified then the value of the uiName is used.
details - Description of the Content Pack, formatted in
Markdown
.
gitUrl - The URL of the Git repository; for example
https://github.com/gchq/stroom-content.git
or git@github.com:gchq/stroom-content.git
gitBranch - The name of the Git branch within the repository.
For example master or main.
gitPath - The relative path to the root of the content to import or export.
gitCommit - Optional Git commit hash for the content to import.
If this is specified the Git repository is effectively locked to that version.
Thus any updates will require an updated version of the Content Store file.
gitNeedsAuth - true, if the user needs to enter credentials to access the Content Pack, or false if the content is freely downloadable.
Adding extra Content Stores
The Content Stores that are available for a user to use are defined in the Stroom configuration file (see below) or via the System Property stroom.contentStore.urls.
If nothing is specified in the configuration file then the
default Content Store URL
is used.
Extra URLs can be added to the YAML array of URLs; for example:
appConfig:
contentStore:
urls:
- "https://raw.githubusercontent.com/gchq/stroom-content/refs/heads/master/source/content-store.yml"
- "https://intranet.local/stroom/myorg-content-store.yml"
5.15.2 - Editing Text
How to edit user defined text content within Stroom.
Stroom uses the Ace text editor for editing and viewing text, such as XSLTs, raw data, cooked events, stepping, etc. The editor provides various useful features:
- Syntax highlighting
- Themes
- Find/replace (see Keyboard Shortcuts)
- Code auto-completion
Keyboard shortcuts
See Keyboard Shortcuts for details of the keyboard shortcuts available when using the Ace editor.
Vim key bindings
If you are familiar with the Vi/Vim text editors then it is possible to enable Vim key bindings in Stroom. This can be done in two ways.
Either globally by setting Editor Key Bindings to Vim in your user preferences:
Or within an editor using the context menu. This latter option allows you to temporarily change your bindings.
The Ace editor does not support all features of Vim however the core navigation/editing key bindings are present. The key supported features of Vim are:
- Visual mode and visual block mode.
- Searching with
/(javascript flavour regex) - Search/replace with commands like
:%s/foo/bar/g - Incrementing/decrementing numbers with Ctrl ^ + a / Ctrl ^ + b
- Code (un-)folding with z , o , z , c , etc.
- Text objects, e.g.
>,),],',",pparagraph,wword. - Repetition with the
.command. - Jumping to a line with
:<line no>.
Notable features not supported by the Ace editor:
- The following text objects are not supported
b- Braces, i.e.{or[.t- Tags, i.e. XML tags<value>.s- Sentence.
- The
gcommand mode command, i.e.:g/foo/d - Splits
For a list of useful Vim key bindings see this cheat sheet , though not all bindings will be available in Stroom’s Ace editor.
Use of Esc key in Vim mode
The Esc key is bound to the close action in Stroom, so pressing Esc will typically close a popup, dialog, selection box, etc. Dialogs will not be closed if the Ace editor has focus but as Esc is used so frequently with Vim bindings it may be advisable to use an alternative key to exit insert mode to avoid accidental closure. You can use the standard Vim binding of Ctrl ^ + [ or the custom binding of k , b as alternatives to Esc .
Auto-Completion And Snippets
The editor supports a number of different types of auto-completion of text. Completion suggestions are triggered by the following mechanisms:
- Ctrl ^ + Space ␣ - when live auto-complete is disabled.
- Typing - when live auto-complete is enabled.
When completion suggestions are triggered the follow types of completion may be available depending on the text being edited.
- Local - any word/token found in the existing document. Useful if you have typed a long word and need to type it again.
- Keyword - A word/token that has been defined in the syntax highlighting rules for the text type, i.e.
functionis a keyword when editing Javascript. - Snippet - A block of text that has been defined as a snippet for the editor mode (XML, Javascript, etc.).
Snippets
Snippets allow you to quickly enter pre-defined blocks of common text into the editor.
For example when editing an XSLT you may want to insert a call-template with parameters.
To do this using snippets you can do the following:
-
Type
callthen hit Ctrl ^ + Space ␣ . -
In the list of options use the cursor keys to select
call-template with-paramthen hit Enter ↵ or Tab ↹ to insert the snippet. The snippet will look like<xsl:call-template name="template"> <xsl:with-param name="param"></xsl:with-param> </xsl:call-template> -
The cursor will be positioned on the first tab stop (the template name) with the tab stop text selected.
-
At this point you can type in your template name, e.g.
MyTemplate, then hit Tab ↹ to advance to the next tab stop (the param name) -
Now type the name of the param, e.g.
MyParam, then hit Tab ↹ to advance to the last tab stop positioned within the<with-param>ready to enter the param value.
Snippets can be disabled from the list of suggestions by selecting the option in the editor context menu.
Tab triggers
Some snippets can be triggered by typing an abbreviation and then hitting Tab ↹ to insert the snippet. This mechanism is faster than hitting Ctrl ^ + Space ␣ and selecting the snippet, if you can remember the snippet tab trigger abbreviations.
Available snippets
For a list of the available completion snippets see the Completion Snippet Reference.
Theme
The editor has a number of different themes that control what colours are used for the different elements in syntax highlighted text. The theme can be set User Preferences, from the main menu , select:
The list of themes available match the main Stroom theme, i.e. dark Ace editor themes for a dark Stroom theme.
5.15.3 - Naming Conventions
A set of guidelines for how to name and organise your content.
Stroom has been in use by GCHQ for many years and is used to process logs from a large number of different systems. This sections aims to provide some guidelines on how to name and organise your content, e.g. Feeds, XSLTs, Pipelines, Folders, etc. These are not hard rules and you do not have to follow them, however it may help when it comes to sharing content.
See Also
TODO
Complete this section5.15.4 - Documenting content
The ability to document each entity created in Stroom.
The screen for each Entity Entity Typically refers to an item that can be created in the Explorer Tree, e.g. a Feed, a Pipeline, a Dashboard, etc. May also be known as a Document.Click to see more details... in Stroom has a Documentation sub-tab. The purpose of this sub-tab is to allow the user to provide any documentation about the Entity Entity Typically refers to an item that can be created in the Explorer Tree, e.g. a Feed, a Pipeline, a Dashboard, etc. May also be known as a Document.Click to see more details... that is relevant. For example a user might want to provide information about the system that a Feed Feed A Feed is a means of organising and categorising data in Stroom. A Feed contains multiple Streams of data that have been ingested into Stroom or output by a Pipeline. Typically a Feed will contain Streams of data that are all from one system and have a common data format.Click to see more details... receives data from, or document the purpose of a complex XSLT translation.
In previous versions of stroom this documentation was a small and simple Description text field, however now it is a full screen of rich text. This screen defaults to its read-only preview mode, but the user can toggle it to the edit mode to edit the content. In the edit mode, the documentation can be created/edited using plain text, or Markdown Markdown Markdown is a simple markup language for creating rich formatted text using a text editor. Due to the simplicity of the Markdown it is still very readable in its raw form that contains the markup. Markdown is used in Stroom on the Documentation tab of each Document type and in the Documentation Document type.Click to see more details.... Markdown is a fairly simple markup language for producing richly formatted text from plain text.
There are many variants of markdown that all have subtly different features or syntax. Stroom uses the Showdown markdown converter to render users’ markdown content into formatted text. This link is the definitive source for supported markdown syntax.
Note
The Showdown markdown processor used in stroom is not the same as the markdown processor used within this documentation site (stroom-docs), so there may be some subtle differences in syntax.Example Markdown Content
The following is a brief guide to the most common formatting that can be done with markdown and that is supported in Stroom.
# Markdown Example
This is an example of a markdown document.
## Headings Example
This is at level 2.
### Heading Level 3
This is at level 3.
#### Heading Level 4
This is at level 4.
## Text Styles
**bold**, __bold__, *italic*, _italic_, ***bold and italic***, ~~strike-through~~
## Bullets
Use four spaces to indent a sub-item.
* Bullet 1
* Bullet 1a
* Bullet 2
* Bullet 2a
## Numbered Lists
Use four spaces to indent a sub-item.
Using `1` for all items means the markdown processor will replace them with the correct number, making it easier to re-order items.
1. Item 1
1. Item 1a
1. Item 1b
1. Item 2
1. Item 2a
1. Item 2b
## Quoted Text
> This is a quote.
Text
> This is another quote.
> It has multiple lines...
>
> ...and gaps and bullets
> * Item 1
> * Item 2
## Tables
Note `---:` to right align a column, `:---:` to center align it.
| Syntax | Description | Value | Fruit |
| ----------- | ----------- | -----:| :----: |
| Row 1 | Title | 1 | Pear |
| Row 2 | Text | 10 | Apple |
| Row 3 | Text | 100 | Kiwi |
| Row 4 | Text | 1000 | Orange |
Table using `<br>` for multi-line cells.
| Name | Description |
|-----------|-----------------|
| Row 1 | Line 1<br>Line2 |
| Row 2 | Line 1<br>Line2 |
## Links
Line: [title](https://www.example.com)
## Simple Lists
Add two spaces to the end of each line to stop each line being treated as a paragraph.
One
Two
Three
## Paragraphs
Lines not separated by a blank line will be joined together with a space between them.
Stroom will wrap long lines when rendered.
Lorem ipsum dolor sit amet, consectetur adipiscing elit, sed do eiusmod tempor incididunt ut labore et dolore magna aliqua.
Ut enim ad minim veniam, quis nostrud exercitation ullamco laboris nisi ut aliquip ex ea commodo consequat.
Duis aute irure dolor in reprehenderit in voluptate velit esse cillum dolore eu fugiat nulla pariatur.
Excepteur sint occaecat cupidatat non proident, sunt in culpa qui officia deserunt mollit anim id est laborum.
## Task Lists
The `X` indicates a task has been completed.
* [x] Write the press release
* [ ] Update the website
* [ ] Contact the media
## Images
A non-standard syntax is supported to render images at a set size in the form of `<width>x<height>`.
Use a `*` for one of the dimensions to scale it proportionately.

## Separator
This is a horizontal rule separator
---
## Code
Code can be represented in-line like this `echo "hello world"` by surround it with single back-ticks.
Multi-line blocks of code can rendered with the appropriate syntax highlighting using a fenced block comprising three back-ticks.
Specify the language after the first set of three back ticks, or `text` for plain text.
Only certain languages are supported in Stroom.
**JSON**
```json
{
"key1": "some text",
"key2": 123
}
```
**XML**
```xml
<record>
<data name="dateTime" value="2020-09-28T14:30:33.476" />
<data name="machineIp" value="19.141.201.14" />
</record>
```
**bash**
```bash
#!/bin/bash
now="$(date)"
computer_name="$(hostname)"
echo "Current date and time : $now"
echo "Computer name : $computer_name"
```
Wrapping
Long paragraphs will be wrapped
Code Syntax Highlighting
This is an example of a fenced code block.
```xml
<record>
<data name="dateTime" value="2020-09-28T14:30:33.476" />
</record>
```
In this example, xml defines the language used within the fenced block.
Stroom supports the following languages for fenced code blocks.
If you require additional languages then please raised a ticket
here
. If your language is not currently supported or is just plain text then use text.
- text
- sh
- bash
- xml
- css
- javascript
- csv
- regex
- powershell
- sql
- json
- yaml
- properties
- toml
Fenced blocks with content that is wider than the pane will result in the fenced block having its own horizontal scroll bar.
Escaping Characters
It is common to use _ characters in
Feed
Feed
A Feed is a means of organising and categorising data in Stroom. A Feed contains multiple Streams of data that have been ingested into Stroom or output by a Pipeline. Typically a Feed will contain Streams of data that are all from one system and have a common data format.Click to see more details... names, however if there are two of these in a word then the markdown processor will interpret them as italic markup.
To prevent this, either surround the word with back ticks to be rendered as code or escape each underscore with a \, i.e. THIS\_IS\_MY\_FEED. THIS_IS_MY_FEED.
HTML
While it is possible to use HTML in the documentation, its use is not recommended as it increases the complexity of the documentation content and requires that other users have knowledge of HTML. Markdown should be sufficient for most cases, with the possible exception of complex tables where HTML may be preferable.
Note
No form of HTML scripting (i.e. Javascript) is supported within the documentation content.5.15.5 - Git Repo
Import and export from Git Repositories.
Motivation
The Git Repo configuration item allows users to synchronise Stroom configuration via Git Git Git is a free and open source distributed version control system. It is used for controlling, organizing, and tracking different versions in history of computer files, typically text files but also any other type of file. It allows all changes made to a file to be viewed and tracked over time and for branching/merging of the repository for separate strands of work.Click to see more details... repositories. Stroom content can be stored in the Git repository and downloaded to other Stroom clusters.
Appearance
A Git Repo document appears in the Explorer Tree with this icon: . Any Stroom content can be added below it. All that content will be managed by the Git Repo instance.
Git Repo instances can have other Git Repo instances under them in the Explorer Tree. However, the top-level Git Repo will not manage the lower-level Git Repos nor their contents. So Git Repos can be nested, and each will work independently.
Creation
Git Repo instances can be created by:
-
Pressing the button in the top-left of the Explorer Tree, then
-
Right-clicking on an item within the Explorer Tree and selecting
-
Importing a Content Pack from the Content Store. This is described elsewhere in the documentation.
Settings
Note
Git Repo instances created from Content Packs have a slightly different appearance.This page describes Git Repo instances created by adding them manually.
Git repository URL
The URL that identifies the Git repository.
For example,
https://github.com/gchq/stroom-content.git
or git@github.com:gchq/stroom-content.git.
Git branch
The branch within the repository.
Branches can be used to separate out content for different versions of Stroom, or content that is in development.
Examples might be 7.1, 7.2, 7.5, 7.10.
Git path
The path within the Git repository to the content to be imported. Within the overall Git repository there may be multiple sets of content that could be imported. For example, the Stroom Content repository contains multiple sets of content under the stroom-content/source path.
Examples in this case include:
-
source/core-xml-schemas/stroomContent core-xml-schemas content pack
-
source/example-index/stroomContent example-index content pack
-
source/stroom-101/stroomContent stroom-101 content pack, providing the content for the introductory example.
If the content is stored in the 7.11 format (import export format version 2.0) then the path can point to anywhere within the content. This means Stroom can import a subset of the content available within Git. However, with earlier import/export formats the path must point to the root of the content pack.
You’ll know when you are at the root of the Stroom import/export content as you’ll see files and folders that look like these:
Stroom_101.Folder.71fed11d-7aff-409d-82ff-d7c2fef45eb1.nodeXML_Schemas.Folder.428918b8-4088-42ad-8c49-663b7a428ea9index_documents_v1_0.XMLSchema.b5c7bd44-ca00-448d-ba64-66b48f926ec4.meta
You can tell which format the data is in by opening one of the *.node files in a text editor.
If the file contains the line version=V2 the file is in version 2 format.
If the line is missing or contains the line version=V1 then the data is in version 1 format.
Git commit
Each update to a Git repository is known as a Commit.
These commits are labelled with a number that look like this: ca82a6dff817ec66f44342007202690a93763949 or a shorter version like this: ca82a6d.
The short version is the first 7 characters of the full number.
Git will recognise this as long as the number has enough characters to be unique in the repository.
The number identifies the state of the whole repository - every file - at that point in time.
If you want to always get the same version of content, regardless of what else may have been committed to that repository, you can set the Git Repo Git commit field.
Automatically push
If this is checked then the Git Repo Push job will automatically push any changes into Git every minute.
Credentials
See the Credentials page for full details.
Git Repo can use credentials of type:
- Username / Password
- Access Token
- SSH Key
Push to Git
This button will attempt to push any changes into the remote Git repository.
Check for updates
This button will determine whether there are any newer versions available in the remote Git repository.
Pull from Git
This button will pull down any newer version from the remote Git repository.
Warning
Note that any local changes may be deleted or overridden.5.15.6 - Finding Things
How to find things in Stroom, for example content, simple string values, etc.
Explorer Tree
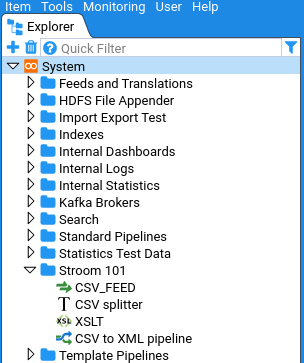
The Explorer Tree in stroom is the primary means of finding user created content, for example Feeds, XSLTs, Pipelines, etc.
Branches of the Explorer Tree can be expanded and collapsed to reveal/hide the content at different levels.
Filtering by Type
The Explorer Tree can be filtered by the type of content, e.g. to display only Feeds, or only Feeds and XSLTs. This is done by clicking the filter icon . The following is an example of filtering by Feeds and XSLTs.
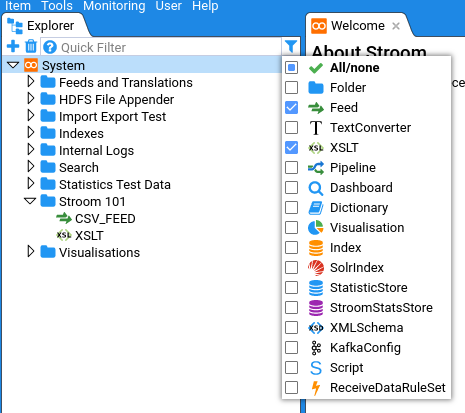
Clicking All/None toggles between all types selected and no types selected.
Filtering by type can also be achieved using the Quick Filter by entering the type name (or a partial form of the type name), prefixed with type:.
I.e:
type:feed
For example:
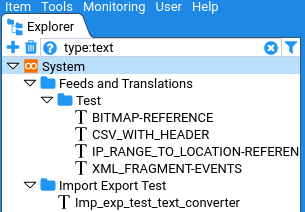
NOTE: If both the type picker and the Quick Filter are used to filter on type then the two filters will be combined as an AND.
Filtering by Name
The Explorer Tree can be filtered by the name of the entity. This is done by entering some text in the Quick Filter field. The tree will then be updated to only show entities matching the Quick Filter. The way the matching works for entity names is described in Common Fuzzy Matching
Filtering by UUID
What is a UUID?
The Explorer Tree can be filtered by the UUID of the entity. The UUID Universally unique identifier is an identifier that can be relied on to be unique both within the system and universally across all other systems. Stroom uses UUIDs as the primary identifier for all content (Feeds, XSLTs, Pipelines, etc.) created in Stroom. An entity’s UUID is generated randomly by Stroom upon creation and is fixed for the life of that entity.
When an entity is exported it is exported with its UUID and if it is then imported into another instance of Stroom the same UUID will be used. The name of an entity can be changed within Stroom but its UUID remains un-changed.
With the exception of Feeds, Stroom allows multiple entities to have the same name. This is because entities may exist that a user does not have access to see so restricting their choice of names based on existing invisible entities would be confusing. Where there are multiple entities with the same name the UUID can be used to distinguish between them.
The UUID of an entity can be viewed using the context menu for the entity. The context menu is accessed by right-clicking on the entity.
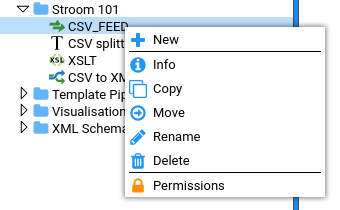
Clicking Info displays the entity’s UUID.
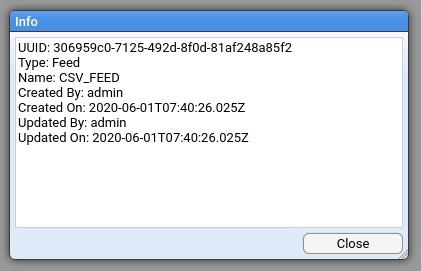
The UUID can be copied by selecting it and then pressing Ctrl ^ + c .
UUID Quick Filter Matching
In the Explorer Tree Quick Filter you can filter by UUIDs in the following ways:
To show the entity matching a UUID, enter the full UUID value (with dashes) prefixed with the field qualifier uuid, e.g. uuid:a95e5c59-2a3a-4f14-9b26-2911c6043028.
To filter on part of a UUID you can do uuid:/2a3a to find an entity whose UUID contains 2a3a or uuid:^2a3a to find an entity whose UUID starts with 2a3a.
Quick Filters
Quick Filter controls are used in a number of screens in Stroom. The most prominent use of a Quick Filter is in the Explorer Tree as described above. Quick filters allow for quick searching of a data set or a list of items using a text based query language. The basis of the query language is described in Common Fuzzy Matching.
A number of the Quick Filters are used for filter tables of data that have a number of fields.
The quick filter query language supports matching in specified fields.
Each Quick Filter will have a number of named fields that it can filter on.
The field to match on is specified by prefixing the match term with the name of the field followed by a :, i.e. type:.
Multiple field matches can be used, each separated by a space.
E.g:
name:^xml name:$events type:feed
In the above example the filter will match on items with a name beginning xml, a name ending events and a type partially matching feed.
All the match terms are combined with an AND operator. The same field can be used multiple times in the match. The list of filterable fields and their qualifier names (sometimes a shortened form) are listed by clicking on the help icon .
One or more of the fields will be defined as default fields. This means if no qualifier is entered the match will be applied to all default fields using an OR operator. Sometimes all fields may be considered default which means a match term will be tested against all fields and an item will be included in the results if one or more of those fields match.
For example if the Quick Filter has fields Name, Type and Status, of which Name and Type are default:
feed status:ok
The above would match items where the Name OR Type fields match feed AND the Status field matches ok.
Match Negation
Each match item can be negated using the ! prefix.
This is also described in Common Fuzzy Matching.
The prefix is applied after the field qualifier.
E.g:
name:xml source:!/default
In the above example it would match on items where the Name field matched xml and the Source field does NOT match the regex pattern default.
Spaces and Quotes
If your match term contains a space then you can surround the match term with double quotes.
Also if your match term contains a double quote you can escape it with a \ character.
The following would be valid for example.
name:"csv splitter" "default field match" symbol:"\""
Multiple Terms
If multiple terms are provided for the same field then an AND is used to combine them. This can be useful where you are not sure of the order of words within the items being filtered.
For example:
User input: spain plain rain
Will match:
The rain in spain stays mainly in the plain
^^^^ ^^^^^ ^^^^^
rainspainplain
^^^^^^^^^^^^^^
spain plain rain
^^^^^ ^^^^^ ^^^^
raining spain plain
^^^^^^^ ^^^^^ ^^^^^
Won’t match: sprain, rain, spain
OR Logic
Boolean logic can be added using and, or and not, plus brackets to group terms, e.g.:
User input: status:disabled or status:locked
Will match:
Locked
^^^^^^
Disabled
^^^^^^^^
Won’t match: A MAN, HUMAN
Suggestion Input Fields
Stroom uses a number of suggestion input fields, such as when selecting Feeds, Pipelines, types, status values, etc. in the pipeline processor filter screen.
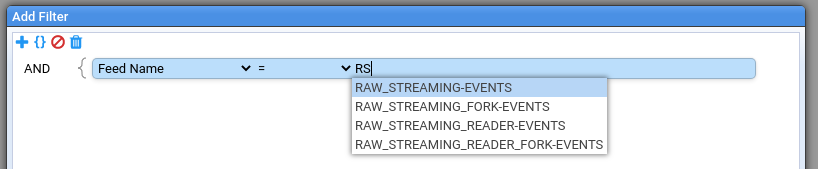
These fields will typically display the full list of values or a truncated list where the total number of values is too large. Entering text in one of these fields will use the fuzzy matching algorithm to partially/fully match on values. See CommonFuzzy Matching below for details of how the matching works.
Common Fuzzy Matching
A common fuzzy matching mechanism is used in a number of places in Stroom. It is used for partially matching the user input to a list of possible values.
In some instances, the list of matched items will be truncated to a more manageable size with the expectation that the filter will be refined.
The fuzzy matching employs a number of approaches that are attempted in the following order:
NOTE: In the following examples the ^ character is used to indicate which characters have been matched.
No Input
If no input is provided all items will match.
Contains (Default)
If no prefixes or suffixes are used then all characters in the user input will need to be contained as a whole somewhere within the string being tested. The matching is case insensitive.
User input: bad
Will match:
bad angry dog
^^^
BAD
^^^
very badly
^^^
Very bad
^^^
Won’t match: dab, ba d, ba
Characters Anywhere Matching
If the user input is prefixed with a ~ (tilde) character then characters anywhere matching will be employed.
The matching is case insensitive.
User input: bad
Will match:
Big Angry Dog
^ ^ ^
bad angry dog
^^^
BAD
^^^
badly
^^^
Very bad
^^^
b a d
^ ^ ^
bbaadd
^ ^ ^
Won’t match: dab, ba
Word Boundary Matching
If the user input is prefixed with a ? character then word boundary matching will be employed.
This approach uses upper case letters to denote the start of a word.
If you know some or all of the words in the item you are looking for, and their order, then condensing those words down to their first letters (capitalised) makes this a more targeted way to find what you want than the characters anywhere matching above.
Words can either be separated by characters like _- ()[]., or be distinguished with lowerCamelCase or upperCamelCase format.
An upper case letter in the input denotes the beginning of a word and any subsequent lower case characters are treated as contiguously following the character at the start of the word.
User input: ?OTheiMa
Will match:
the cat sat on their mat
^ ^^^^ ^^
ON THEIR MAT
^ ^^^^ ^^
Of their magic
^ ^^^^ ^^
o thei ma
^ ^^^^ ^^
onTheirMat
^ ^^^^ ^^
OnTheirMat
^ ^^^^ ^^
Won’t match: On the mat, the cat sat on there mat, On their moat
User input: ?MFN
Will match:
MY_FEED_NAME
^ ^ ^
MY FEED NAME
^ ^ ^
MY_FEED_OTHER_NAME
^ ^ ^
THIS_IS_MY_FEED_NAME_TOO
^ ^ ^
myFeedName
^ ^ ^
MyFeedName
^ ^ ^
also-my-feed-name
^ ^ ^
MFN
^^^
stroom.something.somethingElse.maxFileNumber
^ ^ ^
Won’t match: myfeedname, MY FEEDNAME
Regular Expression Matching
If the user input is prefixed with a / character then the remaining user input is treated as a Java syntax regular expression.
A string will be considered a match if any part of it matches the regular expression pattern.
The regular expression operates in case insensitive mode.
For more details on the syntax of java regular expressions see this internet link https://docs.oracle.com/en/java/javase/15/docs/api/java.base/java/util/regex/Pattern.html.
User input: /(^|wo)man
Will match:
MAN
^^^
A WOMAN
^^^^^
Manly
^^^
Womanly
^^^^^
Won’t match: A MAN, HUMAN
Exact Match
If the user input is prefixed with a ^ character and suffixed with a $ character then a case-insensitive exact match will be used.
E.g:
User input: ^xml-events$
Will match:
xml-events
^^^^^^^^^^
XML-EVENTS
^^^^^^^^^^
Won’t match: xslt-events, XML EVENTS, SOME-XML-EVENTS, AN-XML-EVENTS-PIPELINE
Note: Despite the similarity in syntax, this is NOT regular expression matching.
Starts With
If the user input is prefixed with a ^ character then a case-insensitive starts with match will be used.
E.g:
User input: ^events
Will match:
events
^^^^^^
EVENTS_FEED
^^^^^^
events-xslt
^^^^^^
Won’t match: xslt-events, JSON_EVENTS
Note: Despite the similarity in syntax, this is NOT regular expression matching.
Ends With
If the user input is prefixed with a $ character then a case-insensitive ends with match will be used.
E.g:
User input: $events
Will match:
events
^^^^^^
xslt-events
^^^^^^
JSON_EVENTS
^^^^^^
Won’t match: EVENTS_FEED, events-xslt
Note: Despite the similarity in syntax, this is NOT regular expression matching.
Wild-Carded Case Sensitive Exact Matching
If one or more * characters are found in the user input then this form of matching will be used.
This form of matching is to support those fields that accept wild-carded values, e.g. a wild-carded feed name expression term.
In this instance you are NOT picking a value from the suggestion list but entering a wild-carded value that will be evaluated when the expression/filter is actually used.
The user may want an expression term that matches on all feeds starting with XML_, in which case they would enter XML_*.
To give an indication of what it would match on if the list of feeds remains the same, the list of suggested items will reflect the wild-carded input.
User input: XML_*
Will match:
XML_
^^^^
XML_EVENTS
^^^^
Won’t match: BAD_XML_EVENTS, XML-EVENTS, xml_events
User input: XML_*EVENTS*
Will match:
XML_EVENTS
^^^^^^^^^^
XML_SEC_EVENTS
^^^^ ^^^^^^
XML_SEC_EVENTS_FEED
^^^^ ^^^^^^
Won’t match: BAD_XML_EVENTS, xml_events
Match Negation
A match can be negated, ie. the NOT operator using the prefix !.
This prefix can be applied before all the match prefixes listed above.
E.g:
!/(error|warn)
In the above example it will match everything except those matched by the regex pattern (error|warn).
5.15.7 - Content Import and Export
Importing and exporting Stroom content.
All Stroom content can be exported to a file and conversely imported from a file. Multiple entities can be exported in the same file.
Stroom exports take the form of a zip file containing the exported form of each entity. Each entity will have at least two files within the zip file. These zip files are sometimes known as Content Packs as they are essentially a pack of Stroom content.
Stroom has a number of off-the-shelf content packs available for download and import. There are packs for such things as XML schemas and standard pipelines/translations. These can be found at github.com/gchq/stroom-content and github.com/gchq/stroom-visualisations-dev .
Exporting Content
Content can be exported using two methods:
-
Via the main menu:
-
Selecting one or more items in the explorer tree then clicking Export from the right-click context menu.
From the dialog that is displayed, the user can select which items to include in the import. On clicking a confirmation dialog will be displayed confirming the number of items that will be exported, including a breakdown of counts by document type.
The export will be written to a file called StroomConfig.zip that will typically be located in the Downloads directory on the users computer.
Warning
The import/export file format has changed across different versions of Stroom. Stroom aims to support the import of older formats but older versions of Stroom may not be able to import a file exported by a newer version of Stroom.Importing Content
Content can be imported using two methods:
-
Via the main menu:
-
Right clicking anywhere in the explorer tree and clicking:
Importing Content via API
It is possible to import content programmatically via Stroom’s API. This involves a two-step process:
- Upload the content pack zip file to stroom, where it will be written to a temporary file on the Stroom server.
- Perform the import of the temporary file, referencing it using a resource key.
The process is as follows:
This will write session information to /tmp/cookie.txt (which must not exist beforehand) and return the resource key details:
#PM#success=true name=myContent.zip key=1c04efc6-1c3b-4ce2-9788-74c8b224c864#PM#
From this you will need to extract the key and name parts to use in the next request.
Create the JSON request /some/path/importRequest.json:
{
"confirmList": [],
"importSettings": {
"importMode": "CREATE_CONFIRMATION"
},
"resourceKey": {
"key": "<the key>",
"name": "<the name>"
}
}
The above is the bare minimum needed for a default import. For full details of the request format see swagger
The above steps can be done in one simple step using this bash script:
#!/usr/bin/env bash
# Script to import a single Stroom content pack ZIP file into Stroom.
# Requires that the environment variable TOKEN is set with either a
# valid API Key or an OAuth token.
# Usage:
# import_content.sh CONTENT_ZIP_FILE [URL_BASE]
# e.g. import_content.sh /some/path/StroomConfig.zip
# e.g. import_content.sh /some/path/StroomConfig.zip https://stroom.some.domain
set -e -o pipefail
main() {
local content_zip_file="${1:?content_zip_file must be provided}"; shift
local url_base
if [[ $# -gt 0 ]]; then
url_base="${1}"; shift
else
url_base="http://localhost:8080"
echo "Using default URL base '${url_base}'"
fi
local cookie_file
# dry-run so we don't create the file, else curl will error
cookie_file="$( mktemp --dry-run "/tmp/request_cookie.XXXXXXXXXX" )"
echo "Uploading file '${content_zip_file}' to a temporary file"
local response1
response1="$( \
curl \
--silent \
--cookie-jar "${cookie_file}" \
--header "Authorization: Bearer ${TOKEN:? Set TOKEN env var with API key or Oauth token}" \
--form "encoding=multipart/form-data" \
--form fileUpload="@${content_zip_file}" \
--request POST \
"${url_base}/importfile.rpc" \
)"
echo "File uploaded"
local key
key="$( \
grep \
--only-matching \
--perl-regexp \
'(?<=key=)[^ #]+' \
<<< "${response1}"
)"
# name is only really used for logging purposes in stroom, but provide
# it anyway
local name
name="$( \
grep \
--only-matching \
--perl-regexp \
'(?<=name=)[^ #]+' \
<<< "${response1}"
)"
local import_request
import_request="{ \"confirmList\": [], \"importSettings\": { \"importMode\": \"IGNORE_CONFIRMATION\" }, \"resourceKey\": { \"key\": \"${key}\", \"name\": \"${name}\" } }"
echo "Importing content"
# Not interested in the response
curl \
--silent \
--cookie "${cookie_file}" \
--request POST \
--header "Authorization:Bearer ${TOKEN:? Set TOKEN env var with API key or Oauth token}" \
--header 'Content-Type: application/json' \
--data "${import_request}" \
"${url_base}/api/content/v1/import" \
> /dev/null
echo "Content imported successfully"
echo "Done!"
}
cleanup() {
if [[ -f "${cookie_file}" ]]; then
rm "${cookie_file}"
fi
}
trap cleanup EXIT
trap cleanup SIGINT
main "$@"
5.16 - Viewing Data
How to view data in Stroom.
Viewing Data
The data viewer is shown on the Data tab when you open (by double clicking) one of these items in the explorer tree:
- Feed - to show all data for that feed.
- Folder - to show all data for all feeds that are descendants of the folder.
- System Root Folder - to show all data for all feeds that are descendants of the folder.
In all cases the data shown is dependant on the permissions of the user performing the action and any permissions set on the feeds/folders being viewed.
The Data Viewer screen is made up of the following three parts which are shown as three panes split horizontally.
Stream List
This shows all streams within the opened entity (feed or folder).
The streams are shown in reverse chronological order.
By default Deleted and Locked streams are filtered out.
The filtering can be changed by clicking on the ![]() icon.
This will show all stream types by default so may be a mixture of Raw events, Events, Errors, etc. depending on the feed/folder in question.
icon.
This will show all stream types by default so may be a mixture of Raw events, Events, Errors, etc. depending on the feed/folder in question.
Related Stream List
This list only shows data when a stream is selected in the streams list above it. It shows all streams related to the currently selected stream. It may show streams that are ‘ancestors’ of the selected stream, e.g. showing the Raw Events stream for an Events stream, or show descendants, e.g. showing the Errors stream which resulted from processing the selected Raw Events stream.
Content Viewer Pane
This pane shows the contents of the stream selected in the Related Streams List. The content of a stream will differ depending on the type of stream selected and the child stream types in that stream. For more information on the anatomy of streams, see Streams. This pane is split into multiple sub tabs depending on the different types of content available.
Info Tab
This sub-tab shows the information for the stream, such as creation times, size, physical file location, state, etc.
Error Tab
This sub-tab is only visible for an Error stream. It shows a table of errors and warnings with associated messages and locations in the stream that it relates to.
Data Preview Tab
This sub-tab shows the content of the data child stream, formatted if it is XML. It will only show a limited amount of data so if the data child stream is large then it will only show the first n characters.
If the stream is multi-part then you will see Part navigation controls to switch between parts. For each part you will be shown the first n character of that part (formatted if applicable).
If the stream is a Segmented stream stream then you will see the Record navigation controls to switch between records. Only one record is shown at once. If a record is very large then only the first n characters of the record will be shown.
This sub-tab is intended for seeing a quick preview of the data in a form that is easy to read, i.e. formatted. If you want to see the full data in its original form then click on the View Source link at the top right of the sub-tab.
The Data Preview tab shows a ‘progress’ bar to indicate what portion of the content is visible in the editor.
Context Tab
This sub-tab is only shown for non-segmented streams, e.g. Raw Events and Raw_Reference that have an associated context data child stream. For more details of context streams, see Context This sub-tab works in exactly the same way as the Data Preview sub-tab except that it shows a different child stream.
Meta Tab
This sub-tab is only shown for non-segmented streams, e.g. Raw Events and Raw_Reference that have an associated meta data child stream. For more details of meta streams, see Meta This sub-tab works in exactly the same way as the Data Preview sub-tab except that it shows a different child stream.
Source View
The source view is accessed by clicking the View Source link on the Data Preview sub-tab or from the data() dashboard column function.
Its purpose is to display the selected child stream (data, context, meta, etc.) or record in the form in which it was received, i.e. un-formatted.
The Data Preview tab shows a ‘progress’ bar to indicate what portion of the content is visible in the editor.
In order to navigate through the data you have three options
- Click on the ‘progress bar’ to show a portion of the data starting from the position clicked on.
- Page through the data using the navigation controls.
- Select a source range to display using the Set Source Range dialog which is accessed by clicking on the Lines or Chars links.
This allows you to precisely select the range to display.
You can either specify a range with just a start point or a start point and some form of size/position limit.
If no limit is specified then Stroom will limit the data shown to the configured maximum (
stroom.ui.source.maxCharactersPerFetch). If a range is entered that is too big to display Stroom will limit the data to its maximum.
A Note About Characters
Stroom does not know the size of a stream in terms of character lines/cols, it only knows the size in bytes. Due to the way character data is encoded into bytes it is not possible to say how many characters are in a stream based on its size in bytes. Stroom can only provide an estimate based on the ratio of characters to bytes seen so far in the stream.
Data Progress Bar
Stroom often handles very large streams of data and it is not feasible to show all of this data in the editor at once. Therefore Stroom will show a limited amount of the data in the editor at a time. The ‘progress’ bar at the top of the Data Preview and Source View screens shows what percentage of the data is visible in the editor and where in the stream the visible portion is located. If all of the data is visible in the editor (which includes scrolling down to see it) the bar will be green and will occupy the full width. If only some of the data is visible then the bar will be blue and the coloured part will only occupy part of the width.
5.17 - Volumes
Stroom’s logical storage volumes for storing event and index data.
TODO
Describe volumes6 - Reference Section
Reference material for common parts of Stroom.
6.1 - Cron Syntax
The syntax used in Cron schedule expressions.
Cron Cron Cron is a command line utility found on most linux/unix systems that is used for scheduling background tasks. Cron expressions (or variants of them) are widely used in other schedulers.Click to see more details... is a syntax for expressing schedules.
Stroom uses a scheduler called Quartz which supports cron expressions for scheduling. The full details of the cron syntax supported by Quartz can be found here .
Cron expressions are used in:
Field Specification
| Field Name | Mandatory | Allowed Values | Allowed Special Characters |
|---|---|---|---|
| Seconds | YES | 0-59 | , - * / |
| Minutes | YES | 0-59 | , - * / |
| Hours | YES | 0-23 | , - * / |
| Day of month | YES | 1-31 | , - * ? / L W |
| Month | YES | 1-12 or JAN-DEC | , - * / |
| Day of week | YES | 1-7 or SUN-SAT | , - * ? / L # |
| Year | NO | empty, 1970-2099 | , - * / |
Special Characters
-
*(all values) - used to select all values within a field. For example,*in the minute field meansevery minute. -
?(no specific value) - useful when you need to specify something in one of the two fields in which the character is allowed, but not the other. For example, if I want my trigger to fire on a particular day of the month (say, the 10th), but don’t care what day of the week that happens to be, I would put10in the day-of-month field, and?in the day-of-week field. See the examples below for clarification. -
-- used to specify ranges. For example,10-12in the hour field means the hours 10, 11 and 12. -
,- used to specify additional values. For example,MON,WED,FRIin the day-of-week field means the days Monday, Wednesday, and Friday. -
/- used to specify increments. For example,0/15in the seconds field means the seconds 0, 15, 30, and 45. And5/15in the seconds field means the seconds 5, 20, 35, and 50. You can also specify ‘/’ after the ‘’ character - in this case ‘’ is equivalent to having ‘0’ before the ‘/’. ‘1/3’ in the day-of-month field means fire every 3 days starting on the first day of the month. -
L(last) - has different meaning in each of the two fields in which it is allowed. For example, the valueLin the day-of-month field means the last day of the month - day 31 for January, day 28 for February on non-leap years. If used in the day-of-week field by itself, it simply means7orSAT. But if used in the day-of-week field after another value, it means the last xxx day of the month - for example6Lmeans the last friday of the month. You can also specify an offset from the last day of the month, such asL-3which would mean the third-to-last day of the calendar month. When using the ‘L’ option, it is important not to specify lists, or ranges of values, as you’ll get confusing/unexpected results. -
W(weekday) - used to specify the weekday (Monday-Friday) nearest the given day. As an example, if you were to specify15Was the value for the day-of-month field, the meaning is: the nearest weekday to the 15th of the month. So if the 15th is a Saturday, the trigger will fire on Friday the 14th. If the 15th is a Sunday, the trigger will fire on Monday the 16th. If the 15th is a Tuesday, then it will fire on Tuesday the 15th. However if you specify1Was the value for day-of-month, and the 1st is a Saturday, the trigger will fire on Monday the 3rd, as it will not ‘jump’ over the boundary of a month’s days. The ‘W’ character can only be specified when the day-of-month is a single day, not a range or list of days.Note
The ‘L’ and ‘W’ characters can also be combined in the day-of-month field to yield ‘LW’, which translates to “last weekday of the month”. -
#- used to specify the nth XXX day of the month. For example, the value of6#3in the day-of-week field means the third Friday of the month (day 6 = Friday and#3= the 3rd one in the month). Other examples:2#1= the first Monday of the month and4#5= the fifth Wednesday of the month. Note that if you specify#5and there is not 5 of the given day-of-week in the month, then no firing will occur that month.Note
The legal characters and the names of months and days of the week are not case sensitive. MON is the same as mon.
Examples
| Expression | Meaning |
|---|---|
0 0 12 * * ? |
Fire at 12pm (noon) every day |
0 15 10 ? * * |
Fire at 10:15am every day |
0 15 10 * * ? |
Fire at 10:15am every day |
0 15 10 * * ? * |
Fire at 10:15am every day |
0 15 10 * * ? 2005 |
Fire at 10:15am every day during the year 2005 |
0 * 14 * * ? |
Fire every minute starting at 2pm and ending at 2:59pm, every day |
0 0/5 14 * * ? |
Fire every 5 minutes starting at 2pm and ending at 2:55pm, every day |
0 0/5 14,18 * * ? |
Fire every 5 minutes starting at 2pm and ending at 2:55pm, AND fire every 5 minutes starting at 6pm and ending at 6:55pm, every day |
0 0-5 14 * * ? |
Fire every minute starting at 2pm and ending at 2:05pm, every day |
0 10,44 14 ? 3 WED |
Fire at 2:10pm and at 2:44pm every Wednesday in the month of March. |
0 15 10 ? * MON-FRI |
Fire at 10:15am every Monday, Tuesday, Wednesday, Thursday and Friday |
0 15 10 15 * ? |
Fire at 10:15am on the 15th day of every month |
0 15 10 L * ? |
Fire at 10:15am on the last day of every month |
0 15 10 L-2 * ? |
Fire at 10:15am on the 2nd-to-last day of every month |
0 15 10 ? * 6L |
Fire at 10:15am on the last Friday of every month |
0 15 10 ? * 6L |
Fire at 10:15am on the last Friday of every month |
0 15 10 ? * 6L 2002-2005 |
Fire at 10:15am on every last friday of every month during the years 2002, 2003, 2004 and 2005 |
0 15 10 ? * 6#3 |
Fire at 10:15am on the third Friday of every month |
0 0 12 1/5 * ? |
Fire at 12pm (noon) every 5 days every month, starting on the first day of the month. |
0 11 11 11 11 ? |
Fire every November 11th at 11:11am. |
6.2 - Dates & Times
How dates and times are parsed/formatted in Stroom.
Standard Format
Stroom’s standard format for displaying dates and times is ISO 8601 and specifically in the format
yyyy-MM-dd'T'HH:mm:ss.SSSXX
(where 'T' is the constant T and XX is the time zone offset or Z for Zulu/UTC).
The time part is always represented with three digits for the millisecond part.
Parsing
Parsing is the action of reading a string like 2010-01-01T23:59:59.123Z and converting it into a date/time value.
There are two types of parsing, standard parsing and parsing with an explicit format.
Standard Parsing
The standard format is used when parsing dates with no specific date format, for example in the EffectiveTime header that is used when sending reference data to Stroom.
There is a degree of leniency when parsing date time strings with no explicit format. The following table shows the acceptable date time strings and how they are represented in the standard form.
| Input String | Standard Form |
|---|---|
2010-01-01T23:59:59.1Z |
2010-01-01T23:59:59.100Z |
2010-01-01T23:59:59.123Z |
2010-01-01T23:59:59.123Z |
2010-01-01T23:59:59.123456Z |
2010-01-01T23:59:59.123Z |
2010-01-01T23:59:59.000123Z |
2010-01-01T23:59:59.000Z |
2010-01-01T23:59:59.0Z |
2010-01-01T23:59:59.000Z |
2010-01-01T23:59:59.000Z |
2010-01-01T23:59:59.000Z |
2010-01-01T23:59Z |
2010-01-01T23:59:00.000Z |
2010-01-01T23:59:59Z |
2010-01-01T23:59:59.000Z |
2010-01-01T23:59:59+02:00 |
2010-01-01T23:59:59.000+0200 |
2010-01-01T23:59:59.123+02 |
2010-01-01T23:59:59.123+0200 |
2010-01-01T23:59:59.123+00:00 |
2010-01-01T23:59:59.123Z |
2010-01-01T23:59:59.123+02:00 |
2010-01-01T23:59:59.123+0200 |
2010-01-01T23:59:59.123-03:00 |
2010-01-01T23:59:59.123-0300 |
Custom Date Formats
Parsing and formatting with an explicit date time format is done in a few places in Stroom.
-
The XSLT function
format-date(). This function is a bit of a misnomer as it is doing both parsing and formatting. -
The Dashboard/Query expression
parseDate().
Stroom uses Java’s DateTimeFormatter syntax for expressing an explicit date format.
All letters A to Z and a to z are reserved as pattern letters.
The following pattern letters are defined:
| Symbol | Meaning | Presentation | Examples |
|---|---|---|---|
G |
era | text | AD, Anno Domini, A |
u |
year | year | 2004, 04 |
y |
year-of-era | year | 2004, 04 |
D |
day-of-year | number | 189 |
M/L |
month-of-year | number/text | 7, 07, Jul, July, J |
d |
day-of-month | number | 10 |
g |
modified-julian-day | number | 2451334 |
Q/q |
quarter-of-year | number/text | 3, 03, Q3, 3rd quarter |
Y |
week-based-year | year | 1996, 96 |
w |
week-of-week-based-year | number | 27 |
W |
week-of-month | number | 4 |
E |
day-of-week | text | Tue, Tuesday, T |
e/c |
localized day-of-week | number/text | 2, 02, Tue, Tuesday, T |
F |
aligned-week-of-month | number | 3 |
a |
am-pm-of-day | text | PM |
B |
period-of-day | text | in the morning |
h |
clock-hour-of-am-pm (1-12) | number | 12 |
K |
hour-of-am-pm (0-11) | number | 0 |
k |
clock-hour-of-day (1-24) | number | 24 |
H |
hour-of-day (0-23) | number | 0 |
m |
minute-of-hour | number | 30 |
s |
second-of-minute | number | 55 |
S |
fraction-of-second | fraction | 978 |
A |
millisecond-of-day | number | 1234 |
n |
nano-of-second | number | 987654321 |
N |
nano-of-day | number | 1234000000 |
V |
time-zone ID | zone-id | America/Los_Angeles, Z, -08:30 |
v |
generic time-zone name | zone-name | Pacific Time, PT |
z |
time-zone name | zone-name | Pacific Standard Time, PST |
O |
localized zone-offset | offset-O | GMT+8, GMT+08:00, UTC-08:00 |
X |
zone-offset Z for zero |
offset-X | Z, -08, -0830, -08:30, -083015, -08:30:15 |
x |
zone-offset | offset-x | +0000, -08, -0830, -08:30, -083015, -08:30:15 |
Z |
zone-offset | offset-Z | +0000, -0800, -08:00 |
p |
pad next | pad modifier | 1 |
' |
escape for text | delimiter | |
'' |
single quote | literal | ' |
[ |
optional section start | ||
] |
optional section end | ||
# |
reserved for future use | ||
{ |
reserved for future use | ||
} |
reserved for future use |
The count of pattern letters determines the format.
Presentation Types
-
Text: The text style is determined based on the number of pattern letters used. Less than 4 pattern letters will use the short form Exactly 4 pattern letters will use the full form Exactly 5 pattern letters will use the narrow form Pattern letters
L,c, andqspecify the stand-alone form of the text styles. -
Number: If the count of letters is one, then the value is output using the minimum number of digits and without padding Otherwise, the count of digits is used as the width of the output field, with the value zero-padded as necessary The following pattern letters have constraints on the count of letters Only one letter of
candFcan be specified Up to two letters ofd,H,h,K,k,m, andscan be specified Up to three letters ofDcan be specified. -
Number/Text: If the count of pattern letters is 3 or greater, use the Text rules above Otherwise use the Number rules above.
-
Fraction: Outputs the nano-of-second field as a fraction-of-second The nano-of-second value has nine digits, thus the count of pattern letters is from 1 to 9 If it is less than 9, then the nano-of-second value is truncated, with only the most significant digits being output.
-
Year: The count of letters determines the minimum field width below which padding is used If the count of letters is two, then a reduced two digit form is used For printing, this outputs the rightmost two digits For parsing, this will parse using the base value of 2000, resulting in a year within the range 2000 to 2099 inclusive If the count of letters is less than four (but not two), then the sign is only output for negative years as per SignStyle.NORMAL Otherwise, the sign is output if the pad width is exceeded, as per SignStyle.EXCEEDS_PAD.
-
ZoneId: This outputs the time-zone ID, such as
Europe/ParisIf the count of letters is two, then the time-zone ID is output Any other count of letters throws IllegalArgumentException. -
Zone names: This outputs the display name of the time-zone ID If the pattern letter is
zthe output is the daylight saving aware zone name If there is insufficient information to determine whether DST applies, the name ignoring daylight saving time will be used If the count of letters is one, two or three, then the short name is output If the count of letters is four, then the full name is output Five or more letters throws IllegalArgumentException.If the pattern letter is
vthe output provides the zone name ignoring daylight saving time If the count of letters is one, then the short name is output If the count of letters is four, then the full name is output Two, three and five or more letters throw IllegalArgumentException. -
Offset X and x: This formats the offset based on the number of pattern letters One letter outputs just the hour, such as
+01, unless the minute is non-zero in which case the minute is also output, such as+0130Two letters outputs the hour and minute, without a colon, such as+0130Three letters outputs the hour and minute, with a colon, such as+01:30Four letters outputs the hour and minute and optional second, without a colon, such as+013015Five letters outputs the hour and minute and optional second, with a colon, such as+01:30:15Six or more letters throws IllegalArgumentException Pattern letterX(upper case) will outputZwhen the offset to be output would be zero, whereas pattern letterx(lower case) will output+00,+0000, or+00:00. -
Offset O: With a non-zero offset, this formats the localized offset based on the number of pattern letters One letter outputs the short form of the localized offset, which is localized offset text, such as
GMT, with hour without leading zero, optional 2-digit minute and second if non-zero, and colon, for exampleGMT+8Four letters outputs the full form, which is localized offset text, such as GMT, with 2-digit hour and minute field, optional second field if non-zero, and colon, for exampleGMT+08:00If the offset is zero, only localized text is output Any other count of letters throws IllegalArgumentException. -
Offset Z: This formats the offset based on the number of pattern letters One, two or three letters outputs the hour and minute, without a colon, such as
+0130The output will be+0000when the offset is zero Four letters outputs the full form of localized offset, equivalent to four letters of Offset-O The output will be the corresponding localized offset text if the offset is zero Five letters outputs the hour, minute, with optional second if non-zero, with colon It outputsZif the offset is zero Six or more letters throws IllegalArgumentException. -
Optional section: The optional section markers work exactly like calling DateTimeFormatterBuilder.optionalStart() and DateTimeFormatterBuilder.optionalEnd().
-
Pad modifier: Modifies the pattern that immediately follows to be padded with spaces The pad width is determined by the number of pattern letters This is the same as calling DateTimeFormatterBuilder.padNext(int).
For example, ppH outputs the hour-of-day padded on the left with spaces to a width of 2.
Any unrecognized letter is an error
Any non-letter character, other than [, ], {, }, # and the single quote will be output directly
Despite this, it is recommended to use single quotes around all characters that you want to output directly to ensure that future changes do not break your application.
For further details, see the DateTimeFormatter documentation.
For examples of the parsing/formatting patterns in use, see format-date().
Formatting
Stroom can format dates with an explicit format in a few places:
-
The XSLT function
format-date(). This function is a bit of a misnomer as it is both parsing and formatting. -
The Dashboard/Query expression
formatDate(). -
The User Preferences dialog.
When formatting a date time, the format syntax is the same as used in parsing, as shown above.
Durations
Durations are represented in Stroom in two different forms, Stroom Durations and ISO 8601 Durations.
Stroom Duration
Stroom’s standard duration syntax takes the form of a numeric value followed by an optional unit suffix, e.g. 10m for ten minutes.
| Prefix | Time Unit |
|---|---|
| milliseconds | |
ms |
milliseconds |
s |
seconds |
m |
minutes |
h |
hours |
d |
days |
Stroom Duration strings are used in a number of places in Stroom:
- Frequency Schedules.
- Date Expressions.
- Configuration properties.
- Dashboard/Query expression functions
parseDurationandformatDuration.
ISO 8601 Duration
ISO 8601 durations are an international standard format for expressing durations.
ISO 8601 duration strings are used in a number of places in Stroom:
- Configuration properties.
- Dashboard/Query expression functions
parseISODurationandformatISODuration.
Date Expressions
Date expressions are a way to represent relative dates or to express simple date arithmetic. They can be used in the following places in Stroom:
- Dashboard expression term values.
- Dashboard/Query time range settings.
- Dashboard/Query expression language.
Date expressions consist of a mixture of:
- StroomDuration.
- Relative date functions like
minute(). - Absolute date/times in the Standard Format
The available relative date functions are:
| Function | Meaning | Example |
|---|---|---|
| now() | The current time | 2024-04-26T17:41:55.239Z |
| second() | The current time rounded down to the last second | 2024-04-26T17:41:55.000Z |
| minute() | The current time rounded down to the last minute | 2024-04-26T17:41:00.000Z |
| hour() | The current time rounded down to the last hour | 2024-04-26T17:00:00.000Z |
| day() | The current time rounded down to the start of the day | 2024-04-26T00:00:00.000Z |
| week() | The current time rounded down to the start of the last Monday | 2024-04-22T00:00:00.000Z (Monday) |
| month() | The current time rounded down to the start of the month | 2024-04-01T00:00:00.000Z |
| year() | The current time rounded down to the start of the year | 2024-01-01T00:00:00.000Z |
In the examples above, the current time is taken to be 2024-04-26T17:41:55.239Z which is a Friday.
The following are some examples of date expressions:
| Expression | Result | Meaning |
|---|---|---|
now()+1d |
2024-04-27T17:41:55.239Z |
The same time tomorrow. |
day() - 1d |
2024-04-25T00:00:00.000Z |
The start of yesterday. |
day() +1d +12h |
2024-04-27T12:00:00.000Z |
Noon tomorrow. |
2024-04-27T17:41:55.239Z - 24y |
2000-04-27T17:41:55.239Z |
24 years before 2024-04-27T17:41:55.239Z |
In the examples above, the current time is taken to be 2024-04-26T17:41:55.239Z which is a Friday.
6.3 - Documents
A reference of all the different types of Document that can be created in Stroom. A Document is a user-created piece of content in Stroom that is visible in the explorer tree.
All Documents in Stroom share some common elements:
-
UUID
UUID
A Universally Unique Identifier for uniquely identifying something. UUIDs are used as the identifier in Doc Refs. An example of a UUID is
4ffeb895-53c9-40d6-bf33-3ef025401ad3.Click to see more details... - Uniquely identifies the document within Stroom and when exported into another stroom. - Type - This is the type as used in the Doc Ref Doc Ref A Doc Ref (or Document Reference) is an identifier used to identify most documents/entities in Stroom, e.g. an XSLT will have a Doc Ref.Click to see more details....
- Documentation - Every Document has a Documentation tab for recording any documentation that relates to the Document, see Documenting Content.
Some Documents are very simple with just text content and documentation, e.g. XSLT. Others are much more complex, e.g. Pipeline, with various different tabs to manage the content of the Document.
The following is a list of all Document types in Stroom.
Configuration
Documents that are used as configuration for other documents.
Dictionary
- Icon:
- Type:
Dictionary
A Dictionary is essentially a list of ‘words’, where each ‘word’ is separated by a new line.
Dictionaries can be used in filter expressions, i.e. IN DICTIONARY.
They allow for the reuse of the same set of values across many search expressions.
Dictionaries also support inheritance so one dictionary can import the contents of other dictionaries.
Documentation
- Icon:
- Type:
Documentation
A Document type for simply storing user created documentation, e.g. adding a Documentation document into a folder to describe the contents of that folder.
Elastic Cluster
- Icon:
- Type:
ElasticCluster
Defines the connection details for a single Elasticsearch cluster. This Elastic Cluster Document can then be used by one or more Elastic Index Documents.
Git Repo
- Icon:
- Type:
GitRepo
Contains the configuration for a connection to a Git repository.
Kafka Configuration
- Icon:
- Type:
KafkaConfig
Defines the connection details for a single Kafka cluster. This Kafka Configuration Document can then be used by one or more StandardKafkaProducer pipeline elements.
OpenAI Model
- Icon:
- Type:
OpenAIModel
Defines the settings required to connect to an OpenAI-compatible API and interact with a model.
S3 Configuration
- Icon:
- Type:
S3Config
Defines the config for S3
Script
- Icon:
- Type:
Script
Contains a Javascript script that is used as the source for a visualisation Document. Scripts can have dependencies on other Script Documents, e.g. to allow re-use of common code.
Scylla DB
- Icon:
- Type:
ScyllaDB
Defines the connection details for a ScyllaDB state store instance.
Visualisation
- Icon:
- Type:
Visualisation
Defines a data visualisation that can be used in a Dashboard Document. The Visualisation defines the settings that will be available to the user when it is embedded in a Dashboard. A Visualisation is dependent on a Script Document for the Javascript code to make it work.
Data Processing
Documents relating to the processing of data.
Feed
- Icon:
- Type:
Feed
The Feed Feed A Feed is a means of organising and categorising data in Stroom. A Feed contains multiple Streams of data that have been ingested into Stroom or output by a Pipeline. Typically a Feed will contain Streams of data that are all from one system and have a common data format.Click to see more details... is Stroom’s way of compartmentalising data that has been ingested or created by a Pipeline. Ingested data must specify the Feed that it is destined for.
The Feed Document defines the character encoding for the data in the Feed, the type of data that will be received into it (e.g. Raw Events) and optionally a Volume Group to use for data storage.
The Feed Document can also control the ingest of data using its Feed Status property and be used for viewing data that belonging to that feed.
Pipeline
- Icon:
- Type:
Pipeline
A Pipeline defines a chain of Pipeline elements that consumes from a source of data (a Stream of raw data or cooked events) then processes it according to the elements used in the chain. Pipelines can be linear or branching and support inheritance of other pipelines to allow re-use of common structural parts.
The Pipeline Document defines the structure of the pipeline and the configuration of each of the elements in that pipeline. It also defines the filter(s) that will be used to control what data is passed through the pipeline and the priority of processing. The Pipeline Document can be used to view the data produced by the pipeline and to monitor its processing state and progress.
See Also
Indexing
Documents relating to the process of adding data into an index, such as Lucene or Elasticsearch.
Elastic Index
- Icon:
- Type:
ElasticIndex
Defines an index that exists within an Elasticsearch cluster. This Document is used in the configuration of the ElasticIndexingFilter pipeline element.
See Also
Lucene Index
- Icon:
- Type:
Index
Lucene Index is the standard built-in index within Stroom and is one of many data sources. An index is like a catalog in a library and provides a very fast way to access documents/records/events when searching using fields that have been indexed. The index stores the field values and pointers to the document they came from (the Stream and Event IDs). Data can be indexed using multiple indexes to allow fast access in different ways.
The Lucene Index Document optionally defines the fields that will be indexed (it is possible to define the fields dynamically) and their types. It also allows for configuration of the way the data in the index will be stored, partitioned and retained.
The Lucene Index Document is used by the IndexingFilter and DynamicIndexingFilter pipeline elements.
See Also
Pathways
- Icon:
- Type:
Pathways
TODO - Add description
Plan B
- Icon:
- Type:
PlanB
Defines a place to store state
Solr Index
- Icon:
- Type:
SolrIndex
Solr Index represents an index on a Solr cluster. It defines the connection details for connecting to that cluster and the structure of the index. It is used by the SolrIndexingFilter pipeline element.
See Also
State Store
- Icon:
- Type:
StateStore
Defines a place to store state
Statistic Store
- Icon:
- Type:
StatisticStore
Defines a logical statistic store used to hold statistical data of a particular type and aggregation window. Statistics in Stroom is a way to capture counts or values from events and record how they change over time, with the counts/values aggregated (sum/mean) across time windows.
The Statistic Store Document configures the type of the statistic (Count or Value), the tags that are used to qualify a statistic event and the size of the aggregation windows.
It also supports the definition of roll-ups that allow for aggregation over all values of a tag.
Tags can be things like user, node, feed, etc. and can be used to filter data when querying the statistic store in a Dashboard/Query.
It is used by the StatisticsFilter pipeline element.
Stroom-Stats Store
- Icon:
- Type:
StroomStatsStore
The Stroom-Stats Store Document is deprecated and should not be used.
Search
Documents relating to searching for data in Stroom.
Analytic Rule
- Icon:
- Type:
AnalyticRule
Defines an analytic rule which can be run to alert on events meeting a criteria. The criteria is defined using a StroomQL query. The analytic can be processed in different ways:
- Streaming
- Table Builder
- Scheduled Query
Annotation
- Icon:
- Type:
Annotation
TODO - Add description
Dashboard
- Icon:
- Type:
Dashboard
The Dashboard Document defines a data querying and visualisation dashboard. The dashboard is highly customisable to allow querying of many different data sources of different types. Queried data can be displayed in tabular form, visualised using interactive charts/graphs or rendered as HTML.
The Dashboard Doc can either be used for ad-hoc querying/visualising of data, to construct a dashboard for others to view or to just view an already constructed dashboard. Dashboards can be parameterised so that all queries on the dashboard are displaying data for the same user, for example. For ad-hoc querying of data from one data source, you are recommended to use a Query instead.
Query
- Icon:
- Type:
Query
A Query Document defines a StroomQl StroomQl Stroom Query Language is Stroom’s own query language. It has similarities with Structured Query Language (SQL) as used in databases. StroomQL is sometimes referred to as sQL to distinguish it from SQL.Click to see more details... query and is used to execute that query and view its results. A Query can query main types of data source including Views, Lucene Indexes, and Searchables Searchable A Searchable is the term given the special searchable data sources that appear at the root of the explorer tree picker when selecting a data source. These data sources are special internal data sources that are not user managed content, unlike an Index. They provide the means to search various aspects of Stroom’s internals, such as the Meta Store or Processor Tasks.Click to see more details....
Report
- Icon:
- Type:
Report
Defines a report that can be run at scheduled intervals and sent to individuals via email. The criteria is defined using a StroomQL query.
View
- Icon:
- Type:
View
A view is an abstraction over a data source (such as a Lucene Index) and optionally an extraction pipeline. Views provide a much simpler way for users to query data as the user can simply query against the View without any knowledge of the underlying data source or extraction of that data.
Transformation
Documents relating to the transformation of data.
Text Converter
- Icon:
- Type:
TextConverter
A Text Converter Document defines the specification for splitting text data into records/fields using Data Splitter or for wrapping fragment XML with a
XMLFragmentParser
pipeline element.
The content of the Document is either XML in the data-splitter:3 namespace or a fragment parser specification (see Pipeline Recipies).
This Document is used by the following pipeline elements:
XML Schema
- Icon:
- Type:
XMLSchema
This Document defines an XML Schema XML Schema XML Schema is a language used to define the permitted structure of an XML document. An XML Schema can be used to validate an XML document to ensure it conforms to that schema such that onward processing of the XML document can be done with confidence that the document is correct.Click to see more details... that can be used within Stroom for validation of XML documents. The XML Schema Document content is the XMLSchema text. This Document also defines the following:
- Namespace URI - The XML namespace of the XMLSchema and the XML document that the schema will validate.
- System Id - An ID (that is unique in Stroom) that can be used in the
xsi:schemaLocationattribute, e.g.xsi:schemaLocation="event-logging:3 file://event-logging-v3.4.2.xsd". - Schema Group - A name to group multiple versions of the same schema. The SchemaFilter can be configured to only use schemas matching a configured group.
The XML Schema Document also provides a handy interactive viewer for viewing and navigating the XMLSchema in a graphical representation.
This Document is used by the SchemaFilter pipeline element.
XSL Translation
- Icon:
- Type:
XSLT
The content of this Document is an XSLT XSLT Extensible Stylesheet Language Transformations is a language for transforming XML documents into other XML documents. XSLTs are the primary means of transforming data in Stroom.Click to see more details... document for transforming data in a pipeline. This Document is used by the XSLTFilter pipeline element.
6.4 - Editor Completion Snippets
Reference for built in completion snippets.
Overview
Completion snippets are a way to quickly insert snippets of text into the editor. This is very useful for example when editing XSLT documents as you can quickly insert common chunks of XSLT.
This page lists all the snippets available in Stroom. Snippets are specific to the type of content being edited, e.g. When editing an XSLT, you will only be able to use XML/XSLT snippets.
Tab Positions
A snippet is not just a static block of text, it can contain various tab position placeholders. The following is an example of a snippet with multiple tab positions:
<xsl:apply-templates select="${1:*}">
<xsl:with-param name="${2:param}">${3}</xsl:with-param>
${0}
</xsl:apply-templates>
Tab positions are expressed like ${n} or ${n:xxx}, where n is a number indication the order of the tab position and xxx is the default value at that tab position. Sometimes xxx will not be a default value, but will instead be a string to hint at the kind of thing the user is expected to overtype with where no obvious default is available.
${0} is a special tab position in that it defines the last tab position.
Snippets all have a unique Tab Trigger, e.g. first is the Tab Trigger for the Eval first value snippet.
To insert a snippet do one of the following:
-
Type the whole Tab Trigger (e.g.
first) then hit Tab ↹ . The snippet will be inserted into the editor. -
Type some characters from the Name of the snippet (e.g.
evalfval), then hit Ctrl ^ + Space ␣ to see a filtered list of matches. Use the cursor keys to select the desired item or type more characters to narrow down the filter. Hit Enter ↵ or Tab ↹ to insert the snippet.
The snippet will be inserted (replacing the Tab Trigger if used) and the cursor will be positioned on the first tab position (${1} if present, otherwise ${0}).
If the tab position has a default value then the whole of that default value will be selected allowing the user to quickly over type it.
Once the user is happy with the first tab position (whether they inserted text, over typed or did nothing), they can hit tab to move to the next tab position.
Advanced Tab Positions
It is possible for a tab position to be used multiple times in a snippet, like in the following example. All subsequent uses of a tab stop will take the value entered by the user on the first use of it. The subsequent uses will not act as tab stops.
<xsl:stylesheet xmlns="${1}" xpath-default-namespace="${1}">
${0}
</xsl:stylesheet>
If you want a reused tab position to also be a tab stop so that the user can chose to override the re-used value, then you can nest the tab stops like in this example:
<xsl:stylesheet xmlns="${1}" xpath-default-namespace="${2:${1}}">
${0}
</xsl:stylesheet>
Adding Snippets to Stroom
We have plans for improving how completion snippets are defined, i.e. allowing users to define their own. Therefore, available snippets may be subject to change.
However, until then, if there are any generic snippets that you think would be useful to add to Stroom then please raise an issue on GitHub .
XML/XSLT Snippets
Apply-templates with-param (wapply)
Name: Apply-templates with-param, Tab Trigger: wapply
<xsl:apply-templates select="${1:*}">
<xsl:with-param name="${2:param}">${3}</xsl:with-param>
${0}
</xsl:apply-templates>
Apply-templates sort-by (applysort)
Name: Apply-templates sort-by, Tab Trigger: applysort
<xsl:apply-templates select="${1:*}">
<xsl:sort select="${2:node}" order="${3:ascending}" data-type="${4:text}">${5}
</xsl:apply-templates>
${0}
Apply-templates plain (apply)
Name: Apply-templates plain, Tab Trigger: apply
<xsl:apply-templates select="${1:*}" />
${0}
Attribute blank (attr)
Name: Attribute blank, Tab Trigger: attr
<xsl:attribute name="${1:name}">${2}</xsl:attribute>
${0}
Attribute value-of (attrval)
Name: Attribute value-of, Tab Trigger: attrval
<xsl:attribute name="${1:name}">
<xsl:value-of select="${2:*}" />
</xsl:attribute>
${0}
Call-template (call)
Name: Call-template, Tab Trigger: call
<xsl:call-template name="${1:template}" />
${0}
Call-template with-param (wcall)
Name: Call-template with-param, Tab Trigger: wcall
<xsl:call-template name="${1:template}">
<xsl:with-param name="${2:param}">${3}</xsl:with-param>${4}
</xsl:call-template>
${0}
Choose (choose)
Name: Choose, Tab Trigger: choose
<xsl:choose>
<xsl:when test="${1:value}">
${2}
</xsl:when>${3}
</xsl:choose>
${0}
Copy-of (copyof)
Name: Copy-of, Tab Trigger: copyof
<xsl:copy-of select="${1:*}" />
${0}
Element blank (elem)
Name: Element blank, Tab Trigger: elem
<xsl:element name="${1:name}">
${2}
</xsl:element>
${0}
For-each (foreach)
Name: For-each, Tab Trigger: foreach
<xsl:for-each select="${1:*}">
${2}
</xsl:for-each>
${0}
If (if)
Name: If, Tab Trigger: if
<xsl:if test="${1:test}">
${2}
</xsl:if>
${0}
Import (imp)
Name: Import, Tab Trigger: imp
<xsl:import href="${1:stylesheet}" />
${0}
Include (inc)
Name: Include, Tab Trigger: inc
<xsl:include href="${1:stylesheet}" />
${0}
Otherwise (otherwise)
Name: Otherwise, Tab Trigger: otherwise
<xsl:otherwise>
${1}
</xsl:otherwise>
$0
Param (param)
Name: Param, Tab Trigger: param
<xsl:param name="${1:name}">
${2}
</xsl:param>
${0}
Stylesheet (style)
Name: Stylesheet, Tab Trigger: style
<xsl:stylesheet
version="1.0"
xmlns="${1}"
xpath-default-namespace="${2:${1}}"
xmlns:xsl="http://www.w3.org/1999/XSL/Transform">
${0}
</xsl:stylesheet>
Template (temp)
Name: Template, Tab Trigger: temp
<xsl:template match="${1:*}">
${2}
</xsl:template>
$0
Template named (ntemp)
Name: Template named, Tab Trigger: ntemp
<xsl:template name="${1:name}">
${2}
</xsl:template>
$0
Text (text)
Name: Text, Tab Trigger: text
<xsl:text>${1}</xsl:text>
$0
Value-of (valof)
Name: Value-of, Tab Trigger: valof
<xsl:value-of select="${1:*}" />
${0}
Variable blank (var)
Name: Variable blank, Tab Trigger: var
<xsl:variable name="${1:name}">
${0}
</xsl:variable>
Variable select (varsel)
Name: Variable select, Tab Trigger: varsel
<xsl:variable select="${1:*}" />
${0}
When (when)
Name: When, Tab Trigger: when
<xsl:when test="${1:test}">
${0}
</xsl:when>
With-param (wparam)
Name: With-param, Tab Trigger: wparam
<xsl:with-param name="${1:name}">${2}</xsl:with-param>
${0}
With-param select (wparamsel)
Name: With-param select, Tab Trigger: wparamsel
<xsl:with-param name="${1:name}" select="${2:*}" />
${0}
Fatal message (fatal)
Name: Fatal message, Tab Trigger: fatal
<xsl:message terminate="yes">${1}</xsl:message>
${0}
Error message (error)
Name: Error message, Tab Trigger: error
<xsl:message><error>${1}</error></xsl:message>
${0}
Warning message (warn)
Name: Warning message, Tab Trigger: warn
<xsl:message><warn>${1}</warn></xsl:message>
${0}
Info message (info)
Name: Info message, Tab Trigger: info
<xsl:message><info>${1}</info></xsl:message>
${0}
Identity skeleton (ident)
Name: Identity skeleton, Tab Trigger: ident
<xsl:stylesheet version="1.0" xpath-default-namespace="${1:event-logging:3}" xmlns="${2:${1}}" xmlns:xsl="http://www.w3.org/1999/XSL/Transform">
<!-- Whenever you match any node or any attribute -->
<xsl:template match="node( )|@*">
<!-- Copy the current node -->
<xsl:copy>
<!-- Including any attributes it has and any child nodes -->
<xsl:apply-templates select="@*|node( )"/>
</xsl:copy>
</xsl:template>
${0}
</xsl:stylesheet>
Records identity skeleton (recident)
Name: Records identity skeleton, Tab Trigger: recident
<xsl:stylesheet version="1.0" xpath-default-namespace="records:2" xmlns="event-logging:3" xmlns:stroom="stroom" xmlns:xsl="http://www.w3.org/1999/XSL/Transform">
<!-- Match Root Object -->
<xsl:template match="records">
<Events xmlns="event-logging:3" xmlns:xsi="http://www.w3.org/2001/XMLSchema-instance" xsi:schemaLocation="event-logging:3 file://event-logging-v3.4.2.xsd" Version="3.4.2">
<xsl:apply-templates />
</Events>
</xsl:template>
<xsl:template match="record">
<Event>
<EventTime>
<TimeCreated>${1:time}</TimeCreated>
</EventTime>
<EventSource>
<System>
<Name>${2:name}</Name>
<Environment>${3:environment}</Environment>
</System>
<Generator>${4:generator}</Generator>
<Device>${5:device}</Device>
</EventSource>
<EventDetail>
<TypeId>${6:type}</TypeId>
${0}
<xsl:apply-templates />
</EventDetail>
</Event>
</xsl:template>
<!-- Whenever you match any node or any attribute -->
<xsl:template match="node( )|@*">
<!-- Copy the current node -->
<xsl:copy>
<!-- Including any attributes it has and any child nodes -->
<xsl:apply-templates select="@*|node( )" />
</xsl:copy>
</xsl:template>
</xsl:stylesheet>
Events identity skeleton (evtident)
Name: Events identity skeleton, Tab Trigger: evtident
<xsl:stylesheet version="1.0" xpath-default-namespace="event-logging:3" xmlns="event-logging:3" xmlns:xsl="http://www.w3.org/1999/XSL/Transform">
<!-- Match Root Object -->
<xsl:template match="Events">
<Events xmlns="event-logging:3" xmlns:xsi="http://www.w3.org/2001/XMLSchema-instance" xsi:schemaLocation="event-logging:3 file://event-logging-v3.4.2.xsd" Version="3.4.2">
<xsl:apply-templates />
</Events>
</xsl:template>
${0}
<!-- Whenever you match any node or any attribute -->
<xsl:template match="node( )|@*">
<!-- Copy the current node -->
<xsl:copy>
<!-- Including any attributes it has and any child nodes -->
<xsl:apply-templates select="@*|node( )" />
</xsl:copy>
</xsl:template>
</xsl:stylesheet>
Data Splitter Snippets
CSV Splitter (csv)
Name: CSV Splitter, Tab Trigger: csv
<?xml version="1.0" encoding="UTF-8"?>
<dataSplitter
xmlns="data-splitter:3"
xmlns:xsi="http://www.w3.org/2001/XMLSchema-instance"
xsi:schemaLocation="data-splitter:3 file://data-splitter-v3.0.xsd"
version="3.0">
<!-- Match each line using a new line character as the delimiter -->
<split delimiter="\n">
<!-- Take the matched line (using group 1 ignores the delimiters,
without this each match would include the new line character) -->
<group value="\$1">
<!-- Match each value separated by a comma as the delimiter -->
<split delimiter=",">
<!-- Output the value from group 1 (as above using group 1
ignores the delimiters, without this each value would include
the comma) -->
<data value="\$1"/>
${0}
</split>
</group>
</split>
</dataSplitter>
CSV Splitter with heading (csvh)
Name: CSV Splitter with heading, Tab Trigger: csvh
<?xml version="1.0" encoding="UTF-8"?>
<dataSplitter
xmlns="data-splitter:3"
xmlns:xsi="http://www.w3.org/2001/XMLSchema-instance"
xsi:schemaLocation="data-splitter:3 file://data-splitter-v3.0.xsd"
version="3.0">
<!-- Match heading line (note that maxMatch="1" means that only the
first line will be matched by this splitter) -->
<split delimiter="\n" maxMatch="1">
<!-- Store each heading in a named list -->
<group>
<split delimiter=",">
<var id="heading" />
</split>
</group>
</split>
<!-- Match each record -->
<split delimiter="\n">
<!-- Take the matched line -->
<group value="\$1">
<!-- Split the line up -->
<split delimiter=",">
<!-- Output the stored heading for each iteration and the value
from group 1 -->
<data name="\$heading\$1" value="\$1" />
${0}
</split>
</group>
</split>
</dataSplitter>
Data Splitter Template (ds)
Name: Data Splitter Template, Tab Trigger: ds
<?xml version="1.0" encoding="UTF-8"?>
<dataSplitter
xmlns="data-splitter:3"
xmlns:xsi="http://www.w3.org/2001/XMLSchema-instance"
xsi:schemaLocation="data-splitter:3 file://data-splitter-v3.0.xsd"
version="3.0">
${0}
</dataSplitter>
Data element with name attribute (nval)
Name: Data element with name attribute, Tab Trigger: nval
<data name="${1}" value="${2}"/>
${0}
Data element without name attribute (val)
Name: Data element without name attribute, Tab Trigger: val
<data value="${1}"/>
${0}
Var element (var)
Name: Var element, Tab Trigger: var
<var id="${1}"/>
${0}
Split element (spl)
Name: Split element, Tab Trigger: spl
<split delimiter="${1:\n}">
<group value="${2:\$1}">
${3}
</group>
</split>
${0}
Group element (gr)
Name: Group element, Tab Trigger: gr
<group value="${1:\$1}">
${2}
</group>
${0}
All element (all)
Name: All element, Tab Trigger: all
<all>
${1}
</all>
${0}
Regex element (reg)
Name: Regex element, Tab Trigger: reg
<regex ${1:dotall="true" }${2:caseInsensitive="true" }pattern="${3}">
<group>
${0}
</group>
</regex>
XMLFragmentParser Snippets
Events fragment template (evt)
Name: Events fragment template, Tab Trigger: evt
<?xml version="1.1" encoding="utf-8"?>
<!DOCTYPE Events [
<!ENTITY fragment SYSTEM "fragment">]>
<Events
xmlns="event-logging:${1:3}"
xmlns:xsi="http://www.w3.org/2001/XMLSchema-instance"
xsi:schemaLocation="event-logging:${1} file://event-logging-v${2:3.4.2}.xsd"
version="${2}">
&fragment;
</records>
${0}
Records fragment template (rec)
Name: Records fragment template, Tab Trigger: rec
<?xml version="1.1" encoding="utf-8"?>
<!DOCTYPE Records [
<!ENTITY fragment SYSTEM "fragment">]>
<records
xmlns="records:${1:2}"
xmlns:xsi="http://www.w3.org/2001/XMLSchema-instance"
xsi:schemaLocation="records:${1} file://records-v${2:2.0}.xsd"
version="${2}">
&fragment;
</records>
${0}
Documentation (Markdown) Snippets
Heading level 1 (h1)
Name: Heading level 1, Tab Trigger: h1
# ${1:heading}
${0}
Heading level 2 (h2)
Name: Heading level 2, Tab Trigger: h2
## ${1:heading}
${0}
Heading level 3 (h3)
Name: Heading level 3, Tab Trigger: h3
### ${1:heading}
${0}
Heading level 4 (h4)
Name: Heading level 4, Tab Trigger: h4
#### ${1:heading}
${0}
Heading level 5 (h5)
Name: Heading level 5, Tab Trigger: h5
##### ${1:heading}
${0}
Heading level 6 (h6)
Name: Heading level 6, Tab Trigger: h6
###### ${1:heading}
${0}
Fenced Block (fence)
Name: Fenced Block, Tab Trigger: fence
```${1:language}
${2}
```
${0}
Fenced block of XML (fxml)
Name: Fenced block of XML, Tab Trigger: fxml
```xml
${1}
```
${0}
Fenced block of plain text (ftext)
Name: Fenced block of plain text, Tab Trigger: ftext
```text
${1}
```
${0}
Inline code (inline)
Name: Inline code, Tab Trigger: inline
`${1:code}`${0}
Bold text (b)
Name: Bold text, Tab Trigger: b
**${1:bold_text}**${0}
Italic text (i)
Name: Italic text, Tab Trigger: i
_${1:italic_text}_${0}
Strike-through text (s)
Name: Strike-through text, Tab Trigger: s
~~${1:strikethrough_text}~~${0}
Bold italic text (bi)
Name: Bold italic text, Tab Trigger: bi
***${1:bold_italic_text}***${0}
Stroom Query Language Snippets
All Expression Functions are available as snippets.
They do not currently have tab triggers.
Eval first StreamId (str)
Name: Eval first StreamId, Tab Trigger: str
eval StreamId = first(StreamId)
$0
Eval first EventId (evt)
Name: Eval first EventId, Tab Trigger: evt
eval EventId = first(EventId)
$0
Eval first Stream/EventIds (ids)
Name: Eval first Stream/EventIds, Tab Trigger: ids
eval StreamId = first(StreamId)
eval EventId = first(EventId)
$0
Eval first value (first)
Name: Eval first value, Tab Trigger: first
eval ${1:field_name} = first(${1})
$0
Dashboard Table Expression Editor Snippets
All Expression Functions are available as snippets.
They do not currently have tab triggers.
6.5 - Expression functions
Expression language used to manipulate data on Stroom Dashboards and Queries.
Expressions can be used to manipulate data on Stroom Dashboards and Queries.
Each function has a name, and some have additional aliases.
In some cases, functions can be nested. The return value for some functions being used as the arguments for other functions.
The arguments to functions can either be other functions, literal values, or they can refer to fields on the input data using the field reference ${val} syntax.
Aggregate Functions
String Functions
Type Checking Functions
Link Functions
Cast Functions
Date Functions
Logic Functions
URI Functions
6.5.1 - Aggregate Functions
Functions that produce aggregates over multiple data points.
Aggregate functions require that the dashboard columns without aggregate functions have a grouping level applied. The aggregate function will then be evaluated against the values in the group.
Average
Takes an average value of the arguments
average(arg)
mean(arg)
Examples
average(${val})
${val} = [10, 20, 30, 40]
> 25
mean(${val})
${val} = [10, 20, 30, 40]
> 25
Count
Counts the number of records that are passed through it. Doesn’t take any notice of the values of any fields.
count()
Example
Supplying 3 values...
count()
> 3
Count Groups
This is used to count the number of unique values where there are multiple group levels. For Example, a data set grouped as follows
- Group by Name
- Group by Type
A groupCount could be used to count the number of distinct values of ’type’ for each value of ’name'
Count Unique
This is used to count the number of unique values passed to the function where grouping is used to aggregate values in other columns. For Example, a data set grouped as follows
- Group by Name
- Group by Type
countUnique() could be used to count the number of distinct values of ’type’ for each value of ’name'
Example
countUnique(${val})
${val} = ['bill', 'bob', 'fred', 'bill']
> 3
Distinct
Concatenates all distinct (unique) values together into a single string.
Works in the same way as joining() except that it discards duplicate values.
Values are concatenated in the order that they are given to the function.
If a delimiter is supplied then the delimiter is placed between each concatenated string.
If a limit is supplied then it will only concatenate up to limit values.
distinct(values)
distinct(values, delimiter)
distinct(values, delimiter, limit)
Examples
distinct(${val}, ', ')
${val} = ['bill', 'bill', 'bob', 'fred', 'bill']
> 'bill, bob, fred'
distinct(${val}, '|', 2)
${val} = ['bill', 'bill', 'bob', 'fred', 'bill']
> 'bill|bob'
See Also
Selection Functions that work in a similar way to distinct().
Joining
Concatenates all values together into a single string.
Works in the same way as distinct() except that duplicate values are included.
Values are concatenated in the order that they are given to the function.
If a delimiter is supplied then the delimiter is placed between each concatenated string.
If a limit is supplied then it will only concatenate up to limit values.
joining(values)
joining(values, delimiter)
joining(values, delimiter, limit)
Example
joining(${val}, ', ')
${val} = ['bill', 'bob', 'fred', 'bill']
> 'bill, bob, fred, bill'
See Also
Selection Functions that work in a similar way to joining().
Max
Determines the maximum value given in the args.
max(arg)
Examples
max(${val})
${val} = [100, 30, 45, 109]
> 109
# They can be nested
max(max(${val}), 40, 67, 89)
${val} = [20, 1002]
> 1002
Min
Determines the minimum value given in the args.
min(arg)
Examples
min(${val})
${val} = [100, 30, 45, 109]
> 30
# They can be nested
min(max(${val}), 40, 67, 89)
${val} = [20, 1002]
> 20
StDev (Standard Deviation)
Calculate the standard deviation for a set of input values.
stDev(arg)
Examples
round(stDev(${val}))
${val} = [600, 470, 170, 430, 300]
> 147
Sum
Sums all the arguments together
sum(arg)
Examples
sum(${val})
${val} = [89, 12, 3, 45]
> 149
Variance
Calculate the variance of a set of input values.
variance(arg)
Examples
variance(${val})
${val} = [600, 470, 170, 430, 300]
> 21704
6.5.2 - Cast Functions
A set of functions for converting between different data types or for working with data types.
To Boolean
Attempts to convert the passed value to a boolean data type.
toBoolean(arg1)
Examples:
toBoolean(1)
> true
toBoolean(0)
> false
toBoolean('true')
> true
toBoolean('false')
> false
To Double
Attempts to convert the passed value to a double data type.
toDouble(arg1)
Examples:
toDouble('1.2')
> 1.2
To Integer
Attempts to convert the passed value to a integer data type.
toInteger(arg1)
Examples:
toInteger('1')
> 1
To Long
Attempts to convert the passed value to a long data type.
toLong(arg1)
Examples:
toLong('1')
> 1
To String
Attempts to convert the passed value to a string data type.
toString(arg1)
Examples:
toString(1.2)
> '1.2'
6.5.3 - Date Functions
Functions for manipulating dates and times.
Parse Date
Parse a date and return a long number of milliseconds since the epoch. For details of the pattern syntax, see Dates & Times.
parseDate(aString)
parseDate(aString, pattern)
parseDate(aString, pattern, timeZone)
Example
parseDate('2014 02 22', 'yyyy MM dd', '+0400')
> 1393012800000
Format Date
Format a date supplied as milliseconds since the epoch. For details of the format pattern syntax, see Dates & Times.
formatDate(aLong)
formatDate(aLong, pattern)
formatDate(aLong, pattern, timeZone)
Example
formatDate(1393071132888, 'yyyy MM dd', '+1200')
> '2014 02 23'
Ceiling Year/Month/Day/Hour/Minute/Second
ceilingYear(args...)
ceilingMonth(args...)
ceilingDay(args...)
ceilingHour(args...)
ceilingMinute(args...)
ceilingSecond(args...)
ceilingTime(args...)
Examples
ceilingSecond("2014-02-22T12:12:12.888Z")
> "2014-02-22T12:12:13.000Z"
ceilingMinute("2014-02-22T12:12:12.888Z")
> "2014-02-22T12:13:00.000Z"
ceilingHour("2014-02-22T12:12:12.888Z")
> "2014-02-22T13:00:00.000Z"
ceilingDay("2014-02-22T12:12:12.888Z")
> "2014-02-23T00:00:00.000Z"
ceilingMonth("2014-02-22T12:12:12.888Z")
> "2014-03-01T00:00:00.000Z"
ceilingYear("2014-02-22T12:12:12.888Z")
> "2015-01-01T00:00:00.000Z"
ceilingTime("2014-02-22T12:12:12.888Z", "10m")
> "2014-02-22T12:20:00.000Z"
Floor Year/Month/Day/Hour/Minute/Second
floorYear(args...)
floorMonth(args...)
floorDay(args...)
floorHour(args...)
floorMinute(args...)
floorSecond(args...)
floorTime(args...)
Examples
floorSecond("2014-02-22T12:12:12.888Z")
> "2014-02-22T12:12:12.000Z"
floorMinute("2014-02-22T12:12:12.888Z")
> "2014-02-22T12:12:00.000Z"
floorHour("2014-02-22T12:12:12.888Z")
> "2014-02-22T12:00:00.000Z"
floorDay("2014-02-22T12:12:12.888Z")
> "2014-02-22T00:00:00.000Z"
floorMonth("2014-02-22T12:12:12.888Z")
> "2014-02-01T00:00:00.000Z"
floorYear("2014-02-22T12:12:12.888Z")
> "2014-01-01T00:00:00.000Z"
floorTime("2014-02-22T12:12:12.888Z", "10m")
> "2014-02-22T12:10:00.000Z"
Round Year/Month/Day/Hour/Minute/Second
roundYear(args...)
roundMonth(args...)
roundDay(args...)
roundHour(args...)
roundMinute(args...)
roundSecond(args...)
roundTime(args...)
Examples
roundSecond("2014-02-22T12:12:12.888Z")
> "2014-02-22T12:12:13.000Z"
roundMinute("2014-02-22T12:12:12.888Z")
> "2014-02-22T12:12:00.000Z"
roundHour("2014-02-22T12:12:12.888Z")
> "2014-02-22T12:00:00.000Z"
roundDay("2014-02-22T12:12:12.888Z")
> "2014-02-23T00:00:00.000Z"
roundMonth("2014-02-22T12:12:12.888Z")
> "2014-03-01T00:00:00.000Z"
roundYear("2014-02-22T12:12:12.888Z")
> "2014-01-01T00:00:00.000Z"
roundTime("2014-02-22T12:12:12.888Z", "10m")
> "2014-02-22T12:10:00.000Z"
roundTime("2014-02-22T12:15:12.888Z", "10m")
> "2014-02-22T12:20:00.000Z"
isWeekend(..)
Returns whether a date and time is part of the weekend or not.
For example:
isWeekend('2026-02-04T12:45:11.000Z')
> false
isWeekend('2026-02-01T12:45:11.000Z')
> true
6.5.4 - Link Functions
Functions for linking to other screens in Stroom and/or to particular sets of data.
Links can be inserted into dashboard tables using the link function.
All link types described in Internal Links can be added to dashboard tables using the link function.
In addition to the link function there are convenience functions such as annotation, dashboard, data and stepping that make it easier to supply the required link parameters.
Annotation
DEPRECATED - replaced by fully integrated Stroom annotation functionality and createAnnotation
See Also
A helper function to make forming links to annotations easier than using Link. The Annotation function allows you to create a link to open the Annotation editor, either to view an existing annotation or to begin creating one with pre-populated values.
annotation(text, annotationId)
annotation(text, annotationId, [streamId, eventId, title, subject, status, assignedTo, comment])
If you provide just the text and an annotationId then it will produce a link that opens an existing annotation with the supplied ID in the Annotation Edit dialog.
Example
annotation('Open annotation', ${annotation:Id})
> [Open annotation](?annotationId=1234){annotation}
annotation('Create annotation', '', ${StreamId}, ${EventId})
> [Create annotation](?annotationId=&streamId=1234&eventId=45){annotation}
annotation('Escalate', '', ${StreamId}, ${EventId}, 'Escalation', 'Triage required')
> [Escalate](?annotationId=&streamId=1234&eventId=45&title=Escalation&subject=Triage%20required){annotation}
If you don’t supply an annotationId then the link will open the Annotation Edit dialog pre-populated with the optional arguments so that an annotation can be created.
If the annotationId is not provided then you must provide a streamId and an eventId.
If you don’t need to pre-populate a value then you can use '' or null() instead.
Example
annotation('Create suspect event annotation', null(), 123, 456, 'Suspect Event', null(), 'assigned', 'jbloggs')
> [Create suspect event annotation](?streamId=123&eventId=456&title=Suspect%20Event&assignedTo=jbloggs){annotation}
CreateAnnotation
See Also
Since annotation editing is now performed as a primary Stroom feature via a button and context menu on dashboard and query tables we no longer need to create or edit annotations via a hyperlink.
There are some remaining use cases where users want to create and initialise some annotation values based on some table row content.
The createAnnotation function can be used for this purpose and shows a hyperlink that will open the annotation edit screen pre-populated with the supplied values ready to create a new annotation.
The function takes the arguments:
createAnnotation(text, title, subject, status, assignedTo, comment, eventIdList)
Example:
createAnnotation('Create Annotation', 'My Annotation Title', ${SubjectField}, 'New', 'UserA', 'Look at this thing', '123:2,123444:3')
Dashboard
See Also
A helper function to make forming links to dashboards easier than using Link.
dashboard(text, uuid)
dashboard(text, uuid, params)
Example
dashboard('Click Here','e177cf16-da6c-4c7d-a19c-09a201f5a2da')
> [Click Here](?uuid=e177cf16-da6c-4c7d-a19c-09a201f5a2da){dashboard}
dashboard('Click Here','e177cf16-da6c-4c7d-a19c-09a201f5a2da', 'userId=user1')
> [Click Here](?uuid=e177cf16-da6c-4c7d-a19c-09a201f5a2da¶ms=userId%3Duser1){dashboard}
Data
See Also
A helper function to make forming links to data easier than using Link.
data(text, id, partNo, [recordNo, lineFrom, colFrom, lineTo, colTo, viewType, displayType])
Example
data('Quick View', ${StreamId}, 1)
> [Quick View]?id=1234&&partNo=1)
Example of non-segmented raw data section, viewed un-formatted in a stroom tab:
data('View Raw', ${StreamId}, ${partNo}, null(), 5, 1, 5, 342, 'source', 'tab')
Example of a single record (event) from a segmented stream, viewed formatted in a popup dialog:
data('View Cooked', ${StreamId}, 1, ${eventId})
Example of a single record (event) from a segmented stream, viewed formatted in a stroom tab:
data('View Cooked', ${StreamId}, 1, ${eventId}, null(), null(), null(), null(), 'preview', 'tab')
Example of a single event metadata record from a segmented stream, viewed in a popup dialog:
data('View Cooked', ${StreamId}, 1, ${eventId}, null(), null(), null(), null(), 'info')
Link
See Also
Create a string that represents a hyperlink for display in a dashboard table.
link(url)
link(text, url)
link(text, url, type)
Example
link('https://www.somehost.com/somepath')
> [https://www.somehost.com/somepath](https://www.somehost.com/somepath)
link('Click Here','https://www.somehost.com/somepath')
> [Click Here](https://www.somehost.com/somepath)
link('Click Here','https://www.somehost.com/somepath', 'dialog')
> [Click Here](https://www.somehost.com/somepath){dialog}
link('Click Here','https://www.somehost.com/somepath', 'dialog|Dialog Title')
> [Click Here](https://www.somehost.com/somepath){dialog|Dialog Title}
Stepping
See Also
Open the Stepping tab for the requested data source.
stepping(text, id)
stepping(text, id, partNo)
stepping(text, id, partNo, recordNo)
Example
stepping('Click here to step',${StreamId})
> [Click here to step](?id=1)
6.5.5 - Logic Funtions
Equals
Evaluates if arg1 is equal to arg2
arg1 = arg2
equals(arg1, arg2)
Examples
'foo' = 'bar'
> false
'foo' = 'foo'
> true
51 = 50
> false
50 = 50
> true
equals('foo', 'bar')
> false
equals('foo', 'foo')
> true
equals(51, 50)
> false
equals(50, 50)
> true
Note that equals cannot be applied to null and error values, e.g. x=null() or x=err().
The isNull() and isError() functions must be used instead.
Greater Than
Evaluates if arg1 is greater than to arg2
arg1 > arg2
greaterThan(arg1, arg2)
Examples
51 > 50
> true
50 > 50
> false
49 > 50
> false
greaterThan(51, 50)
> true
greaterThan(50, 50)
> false
greaterThan(49, 50)
> false
Greater Than or Equal To
Evaluates if arg1 is greater than or equal to arg2
arg1 >= arg2
greaterThanOrEqualTo(arg1, arg2)
Examples
51 >= 50
> true
50 >= 50
> true
49 >= 50
> false
greaterThanOrEqualTo(51, 50)
> true
greaterThanOrEqualTo(50, 50)
> true
greaterThanOrEqualTo(49, 50)
> false
If
Evaluates the supplied boolean condition and returns one value if true or another if false
if(expression, trueReturnValue, falseReturnValue)
Examples
if(5 < 10, 'foo', 'bar')
> 'foo'
if(5 > 10, 'foo', 'bar')
> 'bar'
if(isNull(null()), 'foo', 'bar')
> 'foo'
Less Than
Evaluates if arg1 is less than to arg2
arg1 < arg2
lessThan(arg1, arg2)
Examples
51 < 50
> false
50 < 50
> false
49 < 50
> true
lessThan(51, 50)
> false
lessThan(50, 50)
> false
lessThan(49, 50)
> true
Less Than or Equal To
Evaluates if arg1 is less than or equal to arg2
arg1 <= arg2
lessThanOrEqualTo(arg1, arg2)
Examples
51 <= 50
> false
50 <= 50
> true
49 <= 50
> true
lessThanOrEqualTo(51, 50)
> false
lessThanOrEqualTo(50, 50)
> true
lessThanOrEqualTo(49, 50)
> true
And
If all supplied arguments evaluate to true then return true, else false.
and(booleanValue, booleanValue)
Or
If one or more of the supplied arguments evaluate to true then return true, else false.
or(booleanValue, booleanValue)
Not
Inverts boolean values making true, false etc.
not(booleanValue)
Examples
not(5 > 10)
> true
not(5 = 5)
> false
not(false())
> true
Case
Works much like a Java Switch/Case statement. The arguments are split into 3 parts
- The input value to test
- Pairs of test values with their respective output value
- A default result, if the input doesn’t match any of the test values
case(input, test1, result1, test2, result2, ... testN, resultN, otherwise)
Example
case(${val}, 1, 'one', 2, 'two', 3, 'three', 'unknown')
${val}=1
> one
${val}=2
> two
${val}=4
> unknown // falls back to the 'otherwise' value
InRange
Returns true if the value is between lower and upper (inclusive). All parameters must be either numbers or ISO date strings.
- The input value to test
- The lower bound (inclusive)
- The upper bound (inclusive)
inRange(value, lower, upper)
Example
inRange(5, 2, 6)
> true
inRange(5, 5, 5)
> true
inRange(5, 6, 7)
> false
inRange(5, 3, 4)
> false
6.5.6 - Mathematics Functions
Standard mathematical functions, such as add subtract, multiple, etc.
Add
arg1 + arg2
Or reduce the args by successive addition
add(args...)
Examples
34 + 9
> 43
add(45, 6, 72)
> 123
Divide
Divides arg1 by arg2
arg1 / arg2
Or reduce the args by successive division
divide(args...)
Examples
42 / 7
> 6
divide(1000, 10, 5, 2)
> 10
divide(100, 4, 3)
> 8.33
Max
Determines the maximum value given in the args
max(args...)
Examples
max(100, 30, 45, 109)
> 109
# They can be nested
max(max(${val}), 40, 67, 89)
${val} = [20, 1002]
> 1002
Min
Determines the minimum value given in the args
min(args...)
Examples
min(100, 30, 45, 109)
> 30
They can be nested
min(max(${val}), 40, 67, 89)
${val} = [20, 1002]
> 20
Modulo
Determines the modulus of the dividend divided by the divisor.
modulo(dividend, divisor)
Examples
modulo(100, 30)
> 10
Multiply
Multiplies arg1 by arg2
arg1 * arg2
Or reduce the args by successive multiplication
multiply(args...)
Examples
4 * 5
> 20
multiply(4, 5, 2, 6)
> 240
Negate
Multiplies arg1 by -1
negate(arg1)
Examples
negate(80)
> -80
negate(23.33)
> -23.33
negate(-9.5)
> 9.5
Power
Raises arg1 to the power arg2
arg1 ^ arg2
Or reduce the args by successive raising to the power
power(args...)
Examples
4 ^ 3
> 64
power(2, 4, 3)
> 4096
Random
Generates a random number between 0.0 and 1.0
random()
Examples
random()
> 0.78
random()
> 0.89
...you get the idea
Subtract
arg1 - arg2
Or reduce the args by successive subtraction
subtract(args...)
Examples
29 - 8
> 21
subtract(100, 20, 34, 2)
> 44
Sum
Sums all the arguments together
sum(args...)
Examples
sum(89, 12, 3, 45)
> 149
Rounding Functions
These functions require a value, and an optional decimal places. If the decimal places are not given it will give you nearest whole number.
Ceiling
ceiling(value, decimalPlaces<optional>)
Examples
ceiling(8.4234)
> 9
ceiling(4.56, 1)
> 4.6
ceiling(1.22345, 3)
> 1.223
Floor
floor(value, decimalPlaces<optional>)
Examples
floor(8.4234)
> 8
floor(4.56, 1)
> 4.5
floor(1.2237, 3)
> 1.223
Round
round(value, decimalPlaces<optional>)
Examples
round(8.4234)
> 8
round(4.56, 1)
> 4.6
round(1.2237, 3)
> 1.224
Statistical Functions
Average
Takes an average value of the arguments.
The alias mean can be used instead.
average(args...)
mean(args...)
Examples
average(10, 20, 30, 40)
> 25
mean(8.9, 24, 1.2, 1008)
> 260.525
StDev (Standard Deviation)
Calculate the standard deviation for a set of input values.
stDev(args...)
Examples
round(stDev(600, 470, 170, 430, 300))
> 147
Variance
Calculate the variance of a set of input values.
variance(args...)
Examples
variance(600, 470, 170, 430, 300)
> 21704
6.5.7 - Selection Functions
Functions for selecting a sub-set of a set of data.
Selection functions are a form of aggregate function operating on grouped data. They select a sub-set of the child values.
See Also
Aggregate functions joining() and distinct() that work in a similar way to these selection functions.
Any
Selects the first value found in the group that is not null() or err().
If no explicit ordering is set then the value selected is indeterminate.
any(${val})
Examples
any(${val})
${val} = [10, 20, 30, 40]
> 10
Bottom
Selects the bottom N values and returns them as a delimited string in the order they are read.
bottom(${val}, delimiter, limit)
Example
bottom(${val}, ', ', 2)
${val} = [10, 20, 30, 40]
> '30, 40'
First
Selects the first value found in the group even if it is null() or err().
If no explicit ordering is set then the value selected is indeterminate.
first(${val})
Example
first(${val})
${val} = [10, 20, 30, 40]
> 10
Last
Selects the last value found in the group even if it is null() or err().
If no explicit ordering is set then the value selected is indeterminate.
last(${val})
Example
last(${val})
${val} = [10, 20, 30, 40]
> 40
Nth
Selects the Nth value in a set of grouped values. If there is no explicit ordering on the field selected then the value returned is indeterminate.
nth(${val}, position)
Example
nth(${val}, 2)
${val} = [20, 40, 30, 10]
> 40
Top
Selects the top N values and returns them as a delimited string in the order they are read.
top(${val}, delimiter, limit)
Example
top(${val}, ', ', 2)
${val} = [10, 20, 30, 40]
> '10, 20'
6.5.8 - String Functions
Functions for manipulating strings (text data).
Concat
Appends all the arguments end to end in a single string
concat(args...)
Example
concat('this ', 'is ', 'how ', 'it ', 'works')
> 'this is how it works'
Contains
Tests if inputString contains subString.
contains(inputString, subString)
Example
contains('this', 'this')
> true
contains('this', 'that')
> false
Current User
Returns the username of the user running the query.
currentUser()
Example
currentUser()
> 'jbloggs'
Decode
The arguments are split into 3 parts
- The input value to test
- Pairs of regex matchers with their respective output value. Output values in the format ‘$n’ can be used to return the appropriate capture group value from the regex
- A default result, if the input doesn’t match any of the regexes.
decode(input, test1, result1, test2, result2, ... testN, resultN, otherwise)
It works much like a Java Switch/Case statement
Example
decode(${val}, 'red', 'rgb(255, 0, 0)', 'green', 'rgb(0, 255, 0)', 'blue', 'rgb(0, 0, 255)', 'rgb(255, 255, 255)')
${val}='blue'
> rgb(0, 0, 255)
${val}='green'
> rgb(0, 255, 0)
${val}='brown'
> rgb(255, 255, 255) // falls back to the 'otherwise' value
In Java, this would be equivalent to
String decode(value) {
switch(value) {
case "red":
return "rgb(255, 0, 0)"
case "green":
return "rgb(0, 255, 0)"
case "blue":
return "rgb(0, 0, 255)"
default:
return "rgb(255, 255, 255)"
}
}
decode('red')
> 'rgb(255, 0, 0)'
DecodeUrl
Decodes a URL
decodeUrl('userId%3Duser1')
> userId=user1
EncodeUrl
Encodes a URL
encodeUrl('userId=user1')
> userId%3Duser1
Exclude
If the supplied string matches one of the supplied match strings then return null, otherwise return the supplied string
exclude(aString, match...)
Example
exclude('hello', 'hello', 'hi')
> null
exclude('hi', 'hello', 'hi')
> null
exclude('bye', 'hello', 'hi')
> 'bye'
Hash
Cryptographically hashes a string
hash(value)
hash(value, algorithm)
hash(value, algorithm, salt)
Example
hash(${val}, 'SHA-512', 'mysalt')
> A hashed result...
If not specified the hash() function will use the SHA-256 algorithm.
Supported algorithms are determined by Java runtime environment.
HostAddress
Returns the host address (IP) for the given host string.
hostAddress(host)
Example
hostAddress('google.com')
> '142.251.29.102'
HostName
Returns the host name for the given host string.
hostName(host)
Example
hostName('142.251.29.102')
> 'google.com'
Include
If the supplied string matches one of the supplied match strings then return it, otherwise return null
include(aString, match...)
Example
include('hello', 'hello', 'hi')
> 'hello'
include('hi', 'hello', 'hi')
> 'hi'
include('bye', 'hello', 'hi')
> null
Index Of
Finds the first position (zero based) of subString in inputString or -1 if it cannot be found.
Uses a simple literal match.
indexOf(inputString, subString)
Example
indexOf('aa-bb-cc', '-')
> 2
Last Index Of
Finds the last position (zero based) of subString in inputString or -1 if it cannot be found.
Uses a simple literal match.
lastIndexOf(inputString, subString)
Example
lastIndexOf('aa-bb-cc', '-')
> 5
Lower Case
Converts the string to lower case
lowerCase(aString)
Example
lowerCase('Hello DeVeLoPER')
> 'hello developer'
Match
Test an input string using a regular expression to see if it matches
match(input, regex)
Example
match('this', 'this')
> true
match('this', 'that')
> false
Query Param
Returns the value of the requested query parameter.
queryParam(paramKey)
Examples
queryParam('user')
> 'jbloggs'
Query Params
Returns all query parameters as a space delimited string.
queryParams()
Examples
queryParams()
> 'user=jbloggs site=HQ'
Replace
Perform text replacement on an input string using a regular expression to match part (or all) of the input string and a replacement string to insert in place of the matched part
replace(input, regex, replacement)
Example
replace('this', 'is', 'at')
> 'that'
String Length
Takes the length of a string
stringLength(aString)
Example
stringLength('hello')
> 5
Substring
Take a substring based on start/end index of letters
substring(aString, startIndex, endIndex)
Example
substring('this', 1, 2)
> 'h'
Substring After
Get the substring from the first string that occurs after the presence of the second string
substringAfter(firstString, secondString)
Example
substringAfter('aa-bb', '-')
> 'bb'
Substring Before
Get the substring from the first string that occurs before the presence of the second string
substringBefore(firstString, secondString)
Example
substringBefore('aa-bb', '-')
> 'aa'
Upper Case
Converts the string to upper case
upperCase(aString)
Example
upperCase('Hello DeVeLoPER')
> 'HELLO DEVELOPER'
6.5.9 - Type Checking Functions
Functions for evaluating the type of a value.
Is Boolean
Checks if the passed value is a boolean data type.
isBoolean(arg1)
Examples:
isBoolean(toBoolean('true'))
> true
Is Double
Checks if the passed value is a double data type.
isDouble(arg1)
Examples:
isDouble(toDouble('1.2'))
> true
Is Error
Checks if the passed value is an error caused by an invalid evaluation of an expression on passed values, e.g. some values passed to an expression could result in a divide by 0 error.
Note that this method must be used to check for error as error equality using x=err() is not supported.
isError(arg1)
Examples:
isError(toLong('1'))
> false
isError(err())
> true
Is Integer
Checks if the passed value is an integer data type.
isInteger(arg1)
Examples:
isInteger(toInteger('1'))
> true
Is Long
Checks if the passed value is a long data type.
isLong(arg1)
Examples:
isLong(toLong('1'))
> true
Is Null
Checks if the passed value is null.
Note that this method must be used to check for null as null equality using x=null() is not supported.
isNull(arg1)
Examples:
isNull(toLong('1'))
> false
isNull(null())
> true
Is Number
Checks if the passed value is a numeric data type.
isNumber(arg1)
Examples:
isNumber(toLong('1'))
> true
Is String
Checks if the passed value is a string data type.
isString(arg1)
Examples:
isString(toString(1.2))
> true
Is Value
Checks if the passed value is a value data type, e.g. not null or error.
isValue(arg1)
Examples:
isValue(toLong('1'))
> true
isValue(null())
> false
Type Of
Returns the data type of the passed value as a string.
typeOf(arg1)
Examples:
typeOf('abc')
> string
typeOf(toInteger(123))
> integer
typeOf(err())
> error
typeOf(null())
> null
typeOf(toBoolean('false'))
> false
6.5.10 - URI Functions
Functions for extracting parts from a Uniform Resource Identifier (URI).
Fields containing a Uniform Resource Identifier (URI) in string form can queried to extract the URI’s individual components of authority, fragment, host, path, port, query, scheme, schemeSpecificPart and userInfo. See either RFC 2306: Uniform Resource Identifiers (URI): Generic Syntax or Java’s java.net.URI Class for details regarding the components. If any component is not present within the passed URI, then an empty string is returned.
The extraction functions are
- extractAuthorityFromUri() - extract the Authority component
- extractFragmentFromUri() - extract the Fragment component
- extractHostFromUri() - extract the Host component
- extractPathFromUri() - extract the Path component
- extractPortFromUri() - extract the Port component
- extractQueryFromUri() - extract the Query component
- extractSchemeFromUri() - extract the Scheme component
- extractSchemeSpecificPartFromUri() - extract the Scheme specific part component
- extractUserInfoFromUri() - extract the UserInfo component
If the URI is http://foo:bar@w1.superman.com:8080/very/long/path.html?p1=v1&p2=v2#more-details the table below displays the extracted components
| Expression | Extraction |
|---|---|
| extractAuthorityFromUri(${URI}) | foo:bar@w1.superman.com:8080 |
| extractFragmentFromUri(${URI}) | more-details |
| extractHostFromUri(${URI}) | w1.superman.com |
| extractPathFromUri(${URI}) | /very/long/path.html |
| extractPortFromUri(${URI}) | 8080 |
| extractQueryFromUri(${URI}) | p1=v1&p2=v2 |
| extractSchemeFromUri(${URI}) | http |
| extractSchemeSpecificPartFromUri(${URI}) | //foo:bar@w1.superman.com:8080/very/long/path.html?p1=v1&p2=v2 |
| extractUserInfoFromUri(${URI}) | foo:bar |
extractAuthorityFromUri
Extracts the Authority component from a URI
extractAuthorityFromUri(uri)
Example
extractAuthorityFromUri('http://foo:bar@w1.superman.com:8080/very/long/path.html?p1=v1&p2=v2#more-details')
> 'foo:bar@w1.superman.com:8080'
extractFragmentFromUri
Extracts the Fragment component from a URI
extractFragmentFromUri(uri)
Example
extractFragmentFromUri('http://foo:bar@w1.superman.com:8080/very/long/path.html?p1=v1&p2=v2#more-details')
> 'more-details'
extractHostFromUri
Extracts the Host component from a URI
extractHostFromUri(uri)
Example
extractHostFromUri('http://foo:bar@w1.superman.com:8080/very/long/path.html?p1=v1&p2=v2#more-details')
> 'w1.superman.com'
extractPathFromUri
Extracts the Path component from a URI
extractPathFromUri(uri)
Example
extractPathFromUri('http://foo:bar@w1.superman.com:8080/very/long/path.html?p1=v1&p2=v2#more-details')
> '/very/long/path.html'
extractPortFromUri
Extracts the Port component from a URI
extractPortFromUri(uri)
Example
extractPortFromUri('http://foo:bar@w1.superman.com:8080/very/long/path.html?p1=v1&p2=v2#more-details')
> '8080'
extractQueryFromUri
Extracts the Query component from a URI
extractQueryFromUri(uri)
Example
extractQueryFromUri('http://foo:bar@w1.superman.com:8080/very/long/path.html?p1=v1&p2=v2#more-details')
> 'p1=v1&p2=v2'
extractSchemeFromUri
Extracts the Scheme component from a URI
extractSchemeFromUri(uri)
Example
extractSchemeFromUri('http://foo:bar@w1.superman.com:8080/very/long/path.html?p1=v1&p2=v2#more-details')
> 'http'
extractSchemeSpecificPartFromUri
Extracts the SchemeSpecificPart component from a URI
extractSchemeSpecificPartFromUri(uri)
Example
extractSchemeSpecificPartFromUri('http://foo:bar@w1.superman.com:8080/very/long/path.html?p1=v1&p2=v2#more-details')
> '//foo:bar@w1.superman.com:8080/very/long/path.html?p1=v1&p2=v2'
extractUserInfoFromUri
Extracts the UserInfo component from a URI
extractUserInfoFromUri(uri)
Example
extractUserInfoFromUri('http://foo:bar@w1.superman.com:8080/very/long/path.html?p1=v1&p2=v2#more-details')
> 'foo:bar'
6.5.11 - Value Functions
Functions that return a static value.
Err
Returns err
err()
False
Returns boolean false
false()
Null
Returns null
null()
True
Returns boolean true
true()
6.6 - Background Jobs
List of Stroom’s background jobs.
The jobs in the list are in the order they appear in the Stroom UI.
Data Delete
Before data is physically removed from the database and file system it is marked as logically deleted by adding a flag to the metadata record in the database.
Data can be logically deleted by a user from the UI or via a process such as data retention.
Data is deleted logically as it is faster to do than a physical delete (important in the UI), and it also allows for data to be restored (undeleted) from the UI.
This job performs the actual physical deletion of data that has been marked logically deleted for longer than the duration configured with stroom.data.store.deletePurgeAge.
All data files associated with a metadata record are deleted from the file system before the metadata is physically removed from the database.
Data Processor
Processes data by finding data that matches processing filters on each pipeline.
When enabled, each worker node asks the master node for data processing tasks.
The master node creates tasks based on processing filters added to the Processors screen of each pipeline and supplies them to the requesting workers.
Node Status
How frequently we try to write stats about node status including JVM and memory usage.
Processor Task Creator
Create Processor Tasks from Processor Filters.
Query History Clean
How frequently items in the query history are removed from the history if their age is older than stroom.history.daysRetention or if the number of items in the history exceeds stroom.history.itemsRetention.
Account Maintenance
This job checks user accounts on the system and de-activates them under the following conditions:
- An unused account that has been inactive for longer than the age configured by
stroom.security.identity.passwordPolicy.neverUsedAccountDeactivationThreshold. - An account that has been inactive for longer than the age configured by
stroom.security.identity.passwordPolicy.unusedAccountDeactivationThreshold.
Analytic Executor: Scheduled Query
Run scheduled index query analytics periodically
Analytic Executor: Table Builder
Analytic Executor: Table Builder
Attribute Value Data Retention
Deletes Meta attribute values (additional and less valuable metadata) older than stroom.data.meta.metaValue.deleteAge.
Elastic Index Retention
Logically delete indexed documents in Elasticsearch indexes based on the specified deletion query.
File System Volume Status
Scans your data volumes to ensure they are available and determines how much free space they have. Records this status in the Volume Status table.
Index Shard Delete
How frequently index shards that have been logically deleted are physically deleted from the file system.
Index Shard Retention
How frequently index shards that are older than their retention period are logically deleted.
Index Volume Status
Scans your index volumes to ensure they are available and determines how much free space they have. Records this status in the Index Volume Status table.
Index Writer Cache Sweep
How frequently entries in the Index Shard Writer cache are evicted based on the time-to-live, time-to-idle and cache size settings.
Index Writer Flush
How frequently in-memory changes to the index shards are flushed to the file system and committed to the index.
Java Heap Histogram Statistics
How frequently heap histogram statistics will be captured. This can be useful for diagnosing issues or seeing where memory is being used. Each run will result in a JVM pause so care should be taken when running this on a production system.
Orphan File Finder
Job to find files that do not exist in the meta store.
Orphan Meta Finder
Job to find items in the meta store that have no associated data.
Pipeline Destination Roll
How frequently rolling pipeline destinations, e.g. a Rolling File Appender are checked to see if they need to be rolled. This frequency should be at least as short as the most frequent rolling frequency.
Policy Based Data Retention
Run the policy based data retention rules over the data and logically delete any data that should no longer be retained.
Processor Task Manager Disown Dead Tasks
Tasks that seem to be stuck processing due to the death of a processing node are disowned and added back to the task queue for processing after stroom.processor.disownDeadTasksAfter.
Processor Task Manager Release Old Queued Tasks
Release queued tasks from old master nodes.
Processor Task Queue Statistics
How frequently statistics about the state of the stream processing task queue are captured.
Processor Task Retention
This job is responsible for cleaning up redundant processors, tasks and filters. If it is not run then these will build up on the system consuming space in the database.
This job relies on the property stroom.processor.deleteAge to govern what is deemed old.
The deleteAge is used to derive the delete threshold, i.e. the current time minus deleteAge.
When the job runs it executes the following steps:
-
Logically Delete Processor Tasks - Logically delete all processor tasks belonging to processor filters that have been logically deleted.
-
Logically Delete Processor Filters - Logically delete old processor filters with a state of
COMPLETEand no associated tasks. Filters are considered old if the last poll time is less than the delete threshold. -
Physically Delete Processor Tasks - Physically delete all old processor tasks with a status of
COMPLETEorDELETED. Tasks are considered old if they have no status time or the status time (the time the status was last changed) is less than the delete threshold. -
Physically Delete Processor Filters - Physically delete all old processor filters that have already been logically deleted. Filters are considered old if the last update time is less than the delete threshold. A filter can be logically deleted either by the step above or explicitly by a user in the user interface.
-
Physically Delete Processors - Physically delete all old processors that have already been logically deleted. Processors are considered old if the last update time is less than the delete threshold. A processor can only be logically deleted by the user in the user interface.
Therefore for items not deleted by a user, there will be a delay equal to deleteAge before logical deletion, then another delay equal to deleteAge before final physical deletion.
Property Cache Reload
Stroom’s configuration properties can each be configured globally in the database. This job controls the frequency that each node refreshes the values of its properties cache from the global database values. See also Properties.
Ref Data Off-heap Store Purge
Purges all data older than the purge age defined by property stroom.pipeline.purgeAge.
See also Reference Data.
SQL Stats Database Aggregation
This job controls the frequency that the database statistics aggregation process is run.
This process takes the entries in SQL_STAT_VAL_SRC and merges them into the main statistics tables SQL_STAT_KEY and SQL_STAT_KEY.
As this process is reliant on data flushed by the SQL Stats In Memory Flush job it is advisable to schedule it to run after that, leaving some time for the in-memory flush to finish.
SQL Stats In Memory Flush
SQL Statistics are initially held and aggregated in memory.
This job controls the frequency that the in memory statistics are flushed from the in memory buffer to the staging table SQL_STAT_VAL_SRC in the database.
Solr Index Optimise
How frequently Solr index segments are explicitly optimised by merging them into one.
Solr Index Retention
How frequently a process is run to delete items from the Solr indexes that don’t meet the retention rule of that index.
6.7 - Templating
Jinja text templating syntax and context.
Overview
Templating is the process of creating a reusable format or layout for presenting data in a consistent manner. Templating is currently used in Stroom for creating email templates for Analytic Rule detections.
Stroom’s templating uses a sub-set of the template syntax called jinja and specifically the JinJava library. The templating syntax includes support for variables, filters, condition blocks, loops, etc. Full details of the syntax can be found here .
When a template is rendered, Stroom will populate the template context with data that can be used by the template.
Basic Templating Syntax
Jinja templating is very powerful and has a rich language so this is a quick guide to the very basic features. See the full syntax here .
Data Types
The following data types are available in the Jinja language.
| Data type | What does it represent | Example values |
|---|---|---|
| None | Represents no or lack of value. | none, None |
| Integer | Whole numbers. | 42, 12, 3134 |
| Boolean | Boolean value, i.e. true/false. | true, True, false, False |
| Float | Real numbers (with decimal separator). | 12.34, 423.52341, 3.1415, 15.0 |
| String | Any string of characters. | "dog", 'Cat' |
| List | List/array of items of any type. Can be modified after being assigned. | [1, 2, 3], ["Apple", "Orange"] |
| Tuple | Like a list but cannot be modified. | (1, 2, 3), ("Apple", "Orange") |
| Dictionary | Object containing key/value pairs, also known as a map. | { "fruit": "Apple", "weight": 320 } |
Accessing Collection Items
A List/tuple item can be accessed by its index (zero based), e.g. fruits[0] returns Apple.
A value in a dictionary can be accessed using its key, e.g. myDict['fruit'] returns Apple.
If the key does not contain special characters (with the exception of _, then you can also use this form myDict.fruit to get the same value.
Conditions
Valid conditions are:
==Compares two objects for equality!=Compares two objects for inequality>true if the left-hand side is greater than the right-hand side>=true if the left-hand side is greater or equal to the right-hand side<true if the left-hand side is lower than the right-hand side<=true if the left-hand side is lower or equal to the right-hand side
Logical Operators
The logic operators for use with boolean values are:
andBoolean andorBoolean ornotBoolean negation
Expressions
Syntax: {{ ... }}
Expressions will render the value of a variable that has been defined in the template context or in a previous statement. An example of a simple value expression is
Template
The detection time is {{detectionTime}}.
Rendered
The detection time is 2024-05-03T09:15:13.454Z.
An expression can also contain variables that are passed through one or more Filters.
Statements
Syntax: {% ... %}
Statements are used to create conditional blocks, loops, define variables, etc.
Setting Variables
Syntax: {% set <variable name> = <value or expression> %}
Template
{% set colour = '#F7761F' %}
Colour: {{colour}}
{% set fruits = ["Apple", "Orange"] %}
Top Fruit: {{ fruits | first }}
{% set fullName = "% %" | format(firstName, surname) %}
Name: {{fullName}}
Rendered
Colour: #F7761F
Top Fruit: Apple
Name: Joe Bloggs
Conditional Blocks
Syntax:
{% if <value, variable or expression> <condition> <value, variable or expression> %}
< optional content, expressions or statements>
{% elif <value, variable or expression> <condition> <value, variable or expression>%}
< optional content, expressions or statements>
{% else %}
< optional content, expressions or statements>
{% endif %}
Conditional blocks can be used to optional render content depending on the value of a variable. See conditions for the list of valid conditions.
Template
{% if (values | length) > 0 -%}
This detection has {{ values | length }} values.
{%- else -%}
This detection has no values.
{%- endif -%}
Rendered
This detection has 10 values.
Loops
Syntax:
{% for <item name> in <variable or expression> %}
<content, expressions or statements to repeat for each item>
{% endif %}
For loops allow you to loop over items in a list/tuple or entries in a dictionary.
Template
{% for key, val in values | dictsort %}
{{ key }}: {{ val }}
{% endfor %}
Rendered
fruit: Apple
weight: 320
Note
Note, the filterdictsort is used here to sort the dictionary by its keys.
Note
Note the use of - to prevent an additional line break appearing in the rendered output, see White Space below.
Filters
Syntax: ... | <filter name>
Filters are essentially functions that take an input and return an output. Some functions have additional parameters to control the behaviour of the function.
Filters can be chained together with the output of one filter becoming the input to the next filter in the chain in the same way that Stroom pipeline elements work.
Some useful filters are:
| Filter | Description | Example |
|---|---|---|
length |
The number of items in the list/sequence/tuple/string/dictionary | {{ "hello" | length }} => 5 |
escape |
Escapes any HTML special characters | <p>{{ "10 > 3" | escape }}</p> => <p>10 > 3</p> |
default |
Return the first argument if the input is undefined or empty | {{ None | default("foo", true) }} => foo |
For a full list of filters see here or here .
Comments
Syntax: {# <comment text> #}
Non-rendered Comments can be added to the template.
Template
{#- Show the time -#}
The detection time is {{detectionTime}}.
Rendered
The detection time is 2024-05-03T09:15:13.454Z.
Note
Note the use of - to prevent an additional line break appearing in the rendered output, see White Space below.
White Space
When JinJava renders the template, each expression or statement is evaluated and then removed or replaced by its output, but any white space around them, e.g. line breaks remain. This can result in unwanted line breaks in the output.
To avoid unwanted white space you can add the - character to the opening and/or closing tag to strip leading/trailing whitespace outside the block, e.g.
{{ ... }}=>{{- ... -}}{% ... %}=>{%- ... -%}
Template
{{ firstName -}}
{{ surname }}
Rendered
JoeBloggs
For a detailed guide to how white space works see here .
Template Context
The context is a data structure that contains the dynamic content to use when rendering the template. The variables and values in the context are set by Stroom depending on where the template is being used.
Rule Detections Context
When an email subject/body template is rendered for an Analytic Rule detection, field values from the detection are placed in the context which allows them to be used in the template.
For example {{ detectTime }} will render the date/time the detection happened.
The fields available in the context are those taken from the detection:1 XMLSchema with some additional fields.
The template has access to the following fields from the detection:
| Field Name | Type | Description |
|---|---|---|
| detectTime | String | When the detection occurred. |
| detectorName | String | Recommended detector detail - name of detector. This should be unique within the system. Some detectors are very specific and only ever create one kind of detection, and in these cases it is likely that the name of the detector will be very similar to the name of the detection headline that it creates. Example: detectorSourceName= Bad Thing Detector headline=Bad Thing Detected.However, it is possible to create detectors that are sufficiently configurable that they can create many kinds of detection. In these cases, this field should always be assigned to the same literal regardless of the detection/headline. Example: detectorSourceName= Really Configurable Detector headline=Good Thing Detected, and detectorSourceName=Really Configurable Detector headline=Bad Thing Detected.For detectors that run within Stroom pipelines, the name of the XSLT can be specified here. |
| detectorUuid | String | This is the
UUID
UUID
A Universally Unique Identifier for uniquely identifying something. UUIDs are used as the identifier in Doc Refs. An example of a UUID is 4ffeb895-53c9-40d6-bf33-3ef025401ad3.Click to see more details... of the Analytic Rule document. |
| detectorVersion | String | Recommended detector detail - version of detector. This is the version of the detector identified in detectorSourceName field. Different versions might produce different detections. For detectors that run within Stroom pipelines, the version of the XSLT can be specified here. Example: v1.0. |
| detectorEnvironment | String | Recommended detector detail - where the detector was deployed. For analytics that run within Stroom itself, the name of the processing pipeline can be used. Note: the XSLT function stroom: pipeline-name() can be used within Stroom XSLT processing to determine pipeline name.Other analytics might run within an external processing framework, such as Apache Spark.Example: DevOps Spark Cluster |
| headline | String | |
| detailedDescription | String | Recommended detection detail. A more detailed description of what was detected than provided by headline. This will normally include some information relating to what triggered the detection, such as a specific device, location, or user. In addition to descriptive text that will be the same for all detections of this kind, there are typically several possible variable dimensions that could be used to populate parts of the string that is assigned to this field. Normally, only one such dimension is selected, based on the likely triage process (the kind of analysis that takes place, and principal area of interest of the analysts). It should be possible to group by this field value to collect all detections that relate to the thing that the analysts are most interested in during triage. Example: Charitable Donation By 'Freya Bloggs' Detected or Charitable Donation To 'Happy Cats Cattery' Detected depending on anticipated area of analyst interest(perhaps philanthropic activities of individuals or financial transactions to organisations, respectively).For some detections, this field will have the same value as that for headline as no further information is available. |
| fullDescription | String | Recommended detection detail. Complete description of what was detected. This will normally include some detail relating to what triggered the detection. All dimensions with ordinal (literal) values that are useful for triage are output. Numeric and other continuous values such as timestamps are not included in this full description, in order that grouping by this single field will work effectively. Example: Charitable Donation By 'Freya Bloggs' to 'Happy Cats Cattery' Detected.For some detections, this field will have the same value as that for detailedDescription as no further information is available. |
| detectionUniqueId | String | This field does not need to be assigned. Any assignment should be to a value that is sufficiently unique to identify a specific detection from a specific detector. Typically, but not necessarily, the value of this field is a UUID UUID A Universally Unique Identifier for uniquely identifying something. UUIDs are used as the identifier in Doc Refs. An example of a UUID is 4ffeb895-53c9-40d6-bf33-3ef025401ad3.Click to see more details....It can be useful to assign this field in order to support analytic development / debugging. It is necessary to assign this field if detectionRevision field is assigned a value. |
| detectionRevision | Integer | Can be used, in conjunction with detectionUniqueId to allow detectors that run continuously, in a streaming fashion to revise their detections in the light of new information. For example, it might be useful to revise the same detection with additional linked events and a new standard deviation. Where more than one detection has the same detectionUniqueId value, then the one with the highest detectionRevision will be the current one and all previous revisions (lower numbers in detectionRevision field) are superseded / ignored. |
| defunct | Boolean | This field allows a detection to declare that all previous revisions (same detectionUniqueId, lower detectionRevision numbers) are now considered invalid. For example, new data might arrive later than expected and invalidate a detection that has already been sent into Stroom. Default value is false. |
| executionSchedule | String | The name of the schedule that fired this detection, if the detection was fired by a Scheduled Query. |
| executionTime | String | This is the actual wall clock time that the rule ran. |
| effectiveExecutionTime | String | This is the time used in any relative date expressions relative data expressions name in the rule’s query or time range, e.g. day() - 1w. The effective time is relevant when executing historic time ranges in a scheduled query. |
| values | Dictionary | This a dictionary with all the field/column names from the Query (with the exception of StreamId and EventId) as keys and their respective cell values as the value. |
| linkedEvents | List of DetectionLinkedEvent | This is a list of the event(s) that are linked to this detection. |
DetectionLinkedEvent fields:
| Field Name | Type | Description |
|---|---|---|
| stroom | String | The Stroom instance within which this event exists, assumed to be this instance of Stroom if not supplied. |
| streamId | String | The ID of the Stream Stream A Stream is the unit of data that Stroom works with and will typically contain many Events.Click to see more details... that contains the associated event. |
| eventId | String | The ID of the Event Event An event is a single auditable event, e.g. a user logging in to a system. A Stream typically contains multiple events.Click to see more details... that is associated with this detection. |
Warning
When choosing the names of the columns in your rule it may be beneficial to use snake_case or UpperCamelCase to make it easier to reference those columns in the detection template (see Accessing Collection Items above). E.g. myDict.some_key vs myDict['some key'].
6.8 - Keyboard Shortcuts
Keyboard shortcuts for actions in Stroom.
This section describes all the keyboard shortcuts that are available to use in Stroom. Some shortcuts apply everywhere and some are specific to the screen that you are in or the user interface component that has focus.
Keyboard shortcuts can take two forms:
- Combination - Multiple keys pressed at the same time, e.g. Ctrl ^ + Enter ↵ .
- Sequence - Multiple keys pressed in sequence with only one key pressed at a time, e.g. g , t , press
Warning
Currently these keyboard shortcuts will not work if a visualisation or documentation preview pane has focus. This is a known issue that will be addressed in the future.General Shortcuts
| Action | Shortcut | Notes |
|---|---|---|
| Cancel | Esc | Closes/cancels an open popup or dialog discarding any changes. Equivalent to clicking on a dialog. |
| Select / toggle | Space ␣ | Selects a row/item in a table, list, selection box or tab bar. Toggles a focused checkbox. Selects a radio button. |
| Execute | Enter ↵ | Selects a row/item in a table, list, selection box or tab bar. Opens a Document/Date picker dialog on a Document/Date field. |
| OK | Ctrl ^ + Enter ↵ | Equivalent to clicking on a dialog, closes the dialog accepting any changes. |
| Context Menu | Menu ☰ | Shows the context menu for the selected item, e.g. the selected item in the explorer tree. |
| Select all | Ctrl ^ + a | |
| Save | Ctrl ^ + s | Save the current tab. |
| Save all | Ctrl ^ + Shift ⇧ + s | Saves all open and un-saved tabs. |
| Close | Alt + w | Close the current tab. |
| Close all | Shift ⇧ + Alt + w | Closes all open tabs. |
Movement
Movement within lists, selection boxes or tab bars you can use the cursor keys, hjkl or wasd to move between items.
| Action | Shortcut |
|---|---|
| Up | ⬆ or k or w |
| Down | ⬇ or j or s |
| Left | ⬅ or h or a |
| Right | ➡ or l or d |
You can also move up or down by page using:
| Action | Shortcut |
|---|---|
| Page Up | PageUp |
| Page Down | PageDown |
| Home / Start | Home |
| End | End |
Finding Things
| Action | Shortcut | Notes |
|---|---|---|
| Find documents by name | Shift ⇧ + Alt + f or Shift ⇧ , Shift ⇧ | Find
documents
Document
Typically refers to an item that can be created in the Explorer Tree, e.g. a Feed, a Pipeline, a Dashboard, etc. May also be known as an Entity.Click to see more details... by name, type,
UUID
UUID
A Universally Unique Identifier for uniquely identifying something. UUIDs are used as the identifier in Doc Refs. An example of a UUID is 4ffeb895-53c9-40d6-bf33-3ef025401ad3.Click to see more details.... |
| Find in content | Ctrl ^ + Shift ⇧ + f | Find documents Document Typically refers to an item that can be created in the Explorer Tree, e.g. a Feed, a Pipeline, a Dashboard, etc. May also be known as an Entity.Click to see more details... whose content contains the search term. This is the same as clicking the icon on the explorer tree. |
| Recent items | Ctrl ^ + e | Find a Document Document Typically refers to an item that can be created in the Explorer Tree, e.g. a Feed, a Pipeline, a Dashboard, etc. May also be known as an Entity.Click to see more details... in a list of the most recently opened items. |
| Locate document | Alt + l | Locate the currently open document in the explorer tree. This is the same as clicking the icon on the explorer tree. |
| Help | F1 | Show the help popup for the currently focused screen control, e.g. a text box. This shortcut will only work if there is a help next to the control. |
| Focus the Explorer Tree filter | Ctrl ^ + / | Changes focus to the Quick Filter in the Explorer Tree pane. |
| Focus the current tab Quick Filter | / | If the currently open tab has a Quick Filter bar it will change focus to that so a filter term can be entered. |
Direct Access to Screens
The following shortcuts are all of the sequential type with the mnemonic Goto X. These shortcuts may not do anything if you do not have the required permissions for the screen in question.
| Action | Shortcut | Notes |
|---|---|---|
| Goto Application Permissions | g , a | |
| Goto Caches | g , c | |
| Goto Dependencies | g , d | |
| Goto Explorer Tree | g , e | Changes focus to the Explorer Tree so the user can use the Movement shortcuts to move around the tree to select different documents. |
| Goto Index Volumes | g , i | |
| Goto Jobs | g , j | |
| Goto API Keys | g , k | |
| Goto Nodes | g , n | |
| Goto Properties | g , p | |
| Goto Data Retention | g , r | |
| Goto Search Results | g , s | |
| Goto Server Tasks | g , t | |
| Goto User Preferences | g , u | |
| Goto Data Volumes | g , v | |
| Goto User Accounts | g , x |
Creating New Documents
The following shortcuts will open the dialog to create a new document in the currently selected explorer tree folder. If a document is currently selected in the explorer tree then the new document will be created in the same folder as the selected document. If nothing is selected or multiple items are selected then these key sequences have no effect.
| Action | Shortcut |
|---|---|
| Create Elastic Index | c , c |
| Create Dashboard | c , d |
| Create Feed | c , e |
| Create Folder | c , f |
| Create Dictionary | c , i |
| Create Lucene Index | c , l |
| Create Documentation | c , o |
| Create Pipeline | c , p |
| Create Query | c , q |
| Create Analytic Rule | c , r |
| Create Text Converter | c , t |
| Create View | c , v |
| Create XSLT | c , x |
Screen Specific Shortcuts
Dashboard
The following shortcuts are available when editing a Dashboard .
| Action | Shortcut | Notes |
|---|---|---|
| Execute all queries | Ctrl ^ + Enter ↵ | Executes all queries on the Dashboard. This is the same as clicking . |
Pipeline Stepping
The following shortcuts are available when stepping a pipeline.
| Action | Shortcut | Notes |
|---|---|---|
| Step refresh | Ctrl ^ + Enter ↵ | Refresh the current step. This is the same as clicking . |
Query
The following shortcuts are available when editing a Query .
| Action | Shortcut | Notes |
|---|---|---|
| Execute query | Ctrl ^ + Enter ↵ | Execute the current query. This is the same as clicking . |
Text Editor
The following common shortcuts are available when editing text editing text in the Ace text editor that is used on many screens in Stroom, e.g. when editing a Pipeline or Query.
| Action | Shortcut | Notes |
|---|---|---|
| Undo | Ctrl ^ + z | Undo last action. |
| Redo | Ctrl ^ + Shift ⇧ + z | Redo previously undone action. |
| Toggle comment | Ctrl ^ + / | Toggle commenting of current line/selection. Applies when editing XML, XSLT or Javascript. |
| Move line up | Alt + ⬆ | Move line/selection up. |
| Move line down | Alt + ⬇ | Move line/selection down. |
| Delete line | Ctrl ^ + d | Delete the current line. |
| Find | Ctrl ^ + f | Open find dialog. |
| Find/replace | Ctrl ^ + h | Open find/replace dialog. |
| Find next match | Ctrl ^ + k | Find next match. |
| Find previous match | Ctrl ^ + Shift ⇧ + k | Find previous match. |
| Indent selection | Tab ↹ | Indent the selected text. |
| Outdent selection | Shift ⇧ + Tab ↹ | Un-indent the selected text. |
| Upper-case | Ctrl ^ + u | Make the selected text upper-case. |
| Open Completion list | Ctrl ^ + Space ␣ | Open the code completion list to show suggestions based on the current word. See Auto-Completion. |
| Trigger snippet | Tab ↹ | Trigger the insertion of a snippet for the currently entered snippet trigger text. See Tab Triggers. |
See Ace Default keyboard shortcuts for more.
If you know Vim key bindings then the Ace editor supports a reasonable sub-set of them, see Vim Key Bindings.
6.9 - Pipeline Elements
A reference for all the pipeline elements.
Reader
Reader elements decode the data in raw byte form using the Feed’s configured character encoding. Some of them will also transform the data at the character level before the data are parsed into a structured form.
BOMRemovalFilterInput
Removes the Byte Order Mark (if present) from the stream.
BadTextXMLFilterReader
Escapes the content of a configured list of named XML elements that are known to potentially contain un-escaped XML reserved characters.
For example the element <Expression>$time < now()</Expression> would be transformed to <Expression>$time < now()</Expression> if property leafList is set to Expression.
Element properties:
| Name | Description | Default Value | Value Type |
|---|---|---|---|
| tags | A comma separated list of XML element names (case sensitive) between which non-escaped XML characters will be escaped, e.g. ‘>’ => ‘>’. | - | String |
FindReplaceFilter
Replaces strings or regexes with new strings.
Element properties:
| Name | Description | Default Value | Value Type |
|---|---|---|---|
| bufferSize | The number of characters to buffer when matching the regex. | 1000 | Integer |
| dotAll | Let ‘.’ match all characters in a regex. | false | Boolean |
| escapeFind | Whether or not to escape find pattern or text. | true | Boolean |
| escapeReplacement | Whether or not to escape replacement text. | true | Boolean |
| find | The text or regex pattern to find and replace. | - | String |
| maxReplacements | The maximum number of times to try and replace text. There is no limit by default. | - | String |
| regex | Whether the pattern should be treated as a literal or a regex. | false | Boolean |
| replacement | The replacement text. | - | String |
| showReplacementCount | Show total replacement count | true | Boolean |
InvalidCharFilterReader
Removes any characters that are not in the standard XML character set. The version of XML (e.g. 1.0 or 1.1) can be set using the ‘xmlVersion’ property.
Element properties:
| Name | Description | Default Value | Value Type |
|---|---|---|---|
| warnOnRemoval | Log a warning if any characters have been removed from the input stream. | true | Boolean |
| xmlVersion | XML version, e.g. ‘1.0’ or ‘1.1’ | 1.1 | String |
InvalidXMLCharFilterReader
Replaces any characters that are not in the standard XML character set with a ‘�’. The version of XML (e.g. 1.0 or 1.1) can be set using the ‘xmlVersion’ property.
Element properties:
| Name | Description | Default Value | Value Type |
|---|---|---|---|
| warnOnReplacement | Log a warning if any characters have been replaced in the input stream. | true | Boolean |
| xmlVersion | XML version, e.g. ‘1.0’ or ‘1.1’ | 1.1 | String |
Reader
A basic reader that simply decodes the raw bytes using the Feed’s configured character encoding. It does not transform the data in any other way.
Parser
Parser elements parse raw text data that has an expected structure (e.g. XML, JSON, CSV) into XML events (elements, attributes, text, etc.) that can be further validated or transformed using XSLT. The choice of Parser will be dictated by the structure of the data. If no Reader is used before the Parser, the Parser will also do the job of a simple Reader and decode the raw bytes using the Feed’s configured character encoding.
CombinedParser
The original general-purpose reader/parser that covers all source data types but provides less flexibility than the source format-specific parsers such as dsParser.
It effectively combines a BOMRemovalFilterInput, an InvalidCharFilterReader and Parser (based on the type property.
Warning
It is strongly recommended to instead use a combination of Readers and one of the type specific Parsers. This will make the intent of the pipeline much clearer and allow for much greater control.Element properties:
| Name | Description | Default Value | Value Type |
|---|---|---|---|
| fixInvalidChars | Fix invalid XML characters from the input stream. | false | Boolean |
| namePattern | A name pattern to load a text converter dynamically. | - | String |
| suppressDocumentNotFoundWarnings | If the text converter cannot be found to match the name pattern suppress warnings. | false | Boolean |
| textConverter | The text converter configuration that should be used to parse the input data. | - | Document |
| type | The parser type, e.g. ‘JSON’, ‘XML’, ‘Data Splitter’. | - | String |
DSParser
A parser for handling structured plain text data (e.g. CSV or fixed width fields) using the Data Splitter domain specific language. For more details see Data Splitter.
Element properties:
| Name | Description | Default Value | Value Type |
|---|---|---|---|
| namePattern | A name pattern to load a data splitter dynamically. | - | String |
| suppressDocumentNotFoundWarnings | If the data splitter cannot be found to match the name pattern suppress warnings. | false | Boolean |
| textConverter | The data splitter configuration that should be used to parse the input data. | - | Document |
JSONParser
A built-in parser for parsing JSON source data (in JSON fragment format) into an XML representation of the JSON. The Resulting XML will conform to the http://www.w3.org/2013/XSL/json namespace.
Element properties:
| Name | Description | Default Value | Value Type |
|---|---|---|---|
| addRootObject | Add a root map element. | true | Boolean |
| allowBackslashEscapingAnyCharacter | Feature that can be enabled to accept quoting of all character using backslash quoting mechanism: if not enabled, only characters that are explicitly listed by JSON specification can be thus escaped (see JSON spec for small list of these characters) | false | Boolean |
| allowComments | Feature that determines whether parser will allow use of Java/C++ style comments (both ‘/’+’*’ and ‘//’ varieties) within parsed content or not. | false | Boolean |
| allowMissingValues | Feature allows the support for “missing” values in a JSON array: missing value meaning sequence of two commas, without value in-between but only optional white space. | false | Boolean |
| allowNonNumericNumbers | Feature that allows parser to recognize set of “Not-a-Number” (NaN) tokens as legal floating number values (similar to how many other data formats and programming language source code allows it). | false | Boolean |
| allowNumericLeadingZeros | Feature that determines whether parser will allow JSON integral numbers to start with additional (ignorable) zeroes (like: 000001). | false | Boolean |
| allowSingleQuotes | Feature that determines whether parser will allow use of single quotes (apostrophe, character ‘'’) for quoting Strings (names and String values). If so, this is in addition to other acceptable markers but not by JSON specification). | false | Boolean |
| allowTrailingComma | Feature that determines whether we will allow for a single trailing comma following the final value (in an Array) or member (in an Object). These commas will simply be ignored. | false | Boolean |
| allowUnquotedControlChars | Feature that determines whether parser will allow JSON Strings to contain unquoted control characters (ASCII characters with value less than 32, including tab and line feed characters) or not. If feature is set false, an exception is thrown if such a character is encountered. | false | Boolean |
| allowUnquotedFieldNames | Feature that determines whether parser will allow use of unquoted field names (which is allowed by Javascript, but not by JSON specification). | false | Boolean |
| allowYamlComments | Feature that determines whether parser will allow use of YAML comments, ones starting with ‘#’ and continuing until the end of the line. This commenting style is common with scripting languages as well. | false | Boolean |
XMLFragmentParser
A parser to convert multiple XML fragments into an XML document. For example the data may contain:
<Event>...</Event>
<Event>...</Event>
i.e. with no root element, so not valid XML.
The XMLFragmentParser will wrap the fragments with a root element as defined in the TextConverter document configured with the textConverterRef property.
Element properties:
| Name | Description | Default Value | Value Type |
|---|---|---|---|
| namePattern | A name pattern to load a text converter dynamically. | - | String |
| suppressDocumentNotFoundWarnings | If the text converter cannot be found to match the name pattern suppress warnings. | false | Boolean |
| textConverter | The XML fragment wrapper that should be used to wrap the input XML. | - | Document |
XMLParser
A parser to parse data that is expected to be XML into a series of XML events that can be consumed by a Filter element.
Filter
Filter elements work with XML events that have been generated by a parser. They can consume the events without modifying them, e.g. RecordCountFilter or modify them in some way, e.g. XSLTFilter. Multiple filters can be used one after another with each using the output from the last as its input.
DynamicIndexingFilter
A filter to send source data to an index.
Element properties:
| Name | Description | Default Value | Value Type |
|---|---|---|---|
| index | The index to send records to. | - | Document |
DynamicSearchResultOutputFilter
DynamicSearchResultOutputFilter
Used in a search extraction pipeline for extracting field values that have not been stored in the index and where the fields are dynamic and derived from the data rather than being defined in the Index settings.
Consumes XML events in the index-documents:1 namespace to convert them into a form so that they can be used in a Dashboard/Query/Analytic.
ElasticIndexingFilter
A filter consuming XML events in the records:2 namespace to index/store the fields
and their values in an Elasticsearch Index.
Element properties:
| Name | Description | Default Value | Value Type |
|---|---|---|---|
| batchSize | Maximum number of documents to index in each bulk request. | 10000 | Integer |
| cluster | Target Elasticsearch cluster. | - | Document |
| indexName | Name of the Elasticsearch index. Variables specified such as {year} are replaced with the corresponding field values contained in the document root. Field names beginning with an underscore are not written to the document and are only used in the index name pattern. |
- | String |
| ingestPipeline | Name of the Elasticsearch ingest pipeline to execute when indexing. | - | String |
| purgeOnReprocess | When reprocessing a stream, first delete any documents from the index matching the source stream ID. | true | Boolean |
| refreshAfterEachBatch | Refresh the index after each batch is processed, making the indexed documents visible to searches. | false | Boolean |
HttpPostFilter
This element is deprecated, you should instead use the much more flexible HTTPAppender . This element will simply POST the output of the XML events to the configured URL.
Element properties:
| Name | Description | Default Value | Value Type |
|---|---|---|---|
| receivingApiUrl | The URL of the receiving API. | - | String |
IdEnrichmentFilter
Adds the attributes ‘StreamId’ and ‘EventId’ to the ’event’ element to enrich the event with its ordinal number in the stream and the ID of the stream that it belongs to.
ID enrichment is required to be able to index events as it provides them with an ID that is unique within Stroom.
It assumes that an record/event is an XML element at the first level below the root element, i.e. for ’event-logging:3’ XML this means the <Event> element.
IndexingFilter
A filter consuming XML events in the records:2 namespace to index/store the fields
and their values in a Lucene Index.
Element properties:
| Name | Description | Default Value | Value Type |
|---|---|---|---|
| index | The index to send records to. | - | Document |
MergeFilter
Merges XML that has been split into separate XML instances.
Element properties:
| Name | Description | Default Value | Value Type |
|---|---|---|---|
| mergeDepth | The depth of XML elements to merge at. | 1 | Integer |
PlanBFilter
Takes XML input (conforming to the reference-data:2 schema) and loads the data into the Plan B State Store. Reference data values can be either simple strings or XML fragments.
RecordCountFilter
Counts events/records in the stream.
An event/record is taken to be an XML element that is at the first level below the root element, i.e. for ’event-logging:3’ XML this means the <Event> element.
Element properties:
| Name | Description | Default Value | Value Type |
|---|---|---|---|
| countRead | Is this filter counting records read or records written? | true | Boolean |
| recordDepth | The depth of XML elements to count records. | 1 | Integer |
RecordOutputFilter
Filters out records/events that have raised an Error or Fatal Error during processing.
If all records/events have raised at least an Error then no XML events will be output.
It assumes that an record/event is an XML element at the first level below the root element, i.e.
for ’event-logging:3’ XML this means the <Event> element.""",
ReferenceDataFilter
Takes XML input (conforming to the reference-data:2 schema) and loads the data into the Reference Data Store. Reference data values can be either simple strings or XML fragments.
Element properties:
| Name | Description | Default Value | Value Type |
|---|---|---|---|
| overrideExistingValues | Allow duplicate keys to override existing values? | true | Boolean |
| warnOnDuplicateKeys | Warn if there are duplicate keys found in the reference data? | false | Boolean |
SafeXMLFilter
Restricts the characters to a very simple set consisting of [a-zA-Z0-9] and [ .:-_/]. All other characters are replaced by ~NNN, where NNN is a three digit codepoint for the replaced character.
SchemaFilter
Checks the format of the source data against one of a number of XML schemas. This ensures that if non-compliant data is generated, it will be flagged as in error and will not be passed to any subsequent processing elements.
Element properties:
| Name | Description | Default Value | Value Type |
|---|---|---|---|
| namespaceURI | Limits the schemas that can be used to validate data to those with a matching namespace URI. | - | String |
| schemaGroup | Limits the schemas that can be used to validate data to those with a matching schema group name. | - | String |
| schemaLanguage | The schema language that the schema is written in. | http://www.w3.org/2001/XMLSchema | String |
| schemaValidation | Should schema validation be performed? | true | Boolean |
| systemId | Limits the schemas that can be used to validate data to those with a matching system id. | - | String |
SearchResultOutputFilter
Used in a search extraction pipeline for extracting field values that have not been stored in the index and where the field definitions are defined in the Index settings.
Consumes XML events in the records:2 namespace to convert them into a form so that they can be used in a Dashboard/Query/Analytic.
SolrIndexingFilter
Delivers source data to the specified index in an external Solr instance/cluster.
Element properties:
| Name | Description | Default Value | Value Type |
|---|---|---|---|
| batchSize | How many documents to send to the index in a single post. | 1000 | Integer |
| commitWithinMs | Commit indexed documents within the specified number of milliseconds. | -1 | Integer |
| index | The index to send records to. | - | Document |
| softCommit | Perform a soft commit after every batch so that docs are available for searching immediately (if using NRT replicas). | true | Boolean |
SplitFilter
Splits multi-record source data into smaller groups of records prior to delivery to an XSLT. This allows the XSLT to process data more efficiently than loading a potentially huge input stream into memory.
Element properties:
| Name | Description | Default Value | Value Type |
|---|---|---|---|
| splitCount | The number of elements at the split depth to count before the XML is split. | 10000 | Integer |
| splitDepth | The depth of XML elements to split at. | 1 | Integer |
| storeLocations | Should this split filter store processing locations. | true | Boolean |
StateFilter
Takes XML input (conforming to the reference-data:2 schema) and loads the data into the State Store. Reference data values can be either simple strings or XML fragments.
StatisticsFilter
An element to allow the source data (conforming to the statistics XML Schema) to be sent to the MySQL based statistics data store.
Element properties:
| Name | Description | Default Value | Value Type |
|---|---|---|---|
| statisticsDataSource | The statistics data source to record statistics against. | - | Document |
StroomStatsFilter
An element to allow the source data (conforming to the statistics XML Schema) to be sent to an external stroom-stats service.
Element properties:
| Name | Description | Default Value | Value Type |
|---|---|---|---|
| flushOnSend | At the end of the stream, wait for acknowledgement from the Kafka broker for all the messages sent. This ensures errors are caught in the pipeline process. | true | Boolean |
| kafkaConfig | The Kafka config to use. | - | Document |
| statisticsDataSource | The stroom-stats data source to record statistics against. | - | Document |
XPathExtractionOutputFilter
TODO - Add description
Element properties:
| Name | Description | Default Value | Value Type |
|---|---|---|---|
| multipleValueDelimiter | The string to delimit multiple simple values. | , | String |
XSLTFilter
An element used to transform XML data from one form to another using XSLT. The specified XSLT can be used to transform the input XML into XML conforming to another schema or into other forms such as JSON, plain text, etc.
Element properties:
| Name | Description | Default Value | Value Type |
|---|---|---|---|
| suppressXSLTNotFoundWarnings | If XSLT cannot be found to match the name pattern suppress warnings. | false | Boolean |
| usePool | Advanced: Choose whether or not you want to use cached XSLT templates to improve performance. | true | Boolean |
| xslt | The XSLT to use. | - | Document |
| xsltNamePattern | A name pattern to load XSLT dynamically. | - | String |
Writer
Writers consume XML events (from Parsers and Filters) and convert them into a stream of bytes using the character encoding configured on the Writer (if applicable). The output data can then be fed to a Destination.
JSONWriter
Writer to convert XML data conforming to the http://www.w3.org/2013/XSL/json XML Schema into JSON format.
Element properties:
| Name | Description | Default Value | Value Type |
|---|---|---|---|
| encoding | The output character encoding to use. | UTF-8 | String |
| indentOutput | Should output JSON be indented and include new lines (pretty printed)? | false | Boolean |
TextWriter
Writer to convert XML character data events into plain text output.
Element properties:
| Name | Description | Default Value | Value Type |
|---|---|---|---|
| encoding | The output character encoding to use. | UTF-8 | String |
| footer | Footer text that can be added to the output at the end. | - | String |
| header | Header text that can be added to the output at the start. | - | String |
XMLWriter
Writer to convert XML events data into XML output in the specified character encoding.
Element properties:
| Name | Description | Default Value | Value Type |
|---|---|---|---|
| encoding | The output character encoding to use. | UTF-8 | String |
| indentOutput | Should output XML be indented and include new lines (pretty printed)? | false | Boolean |
| suppressXSLTNotFoundWarnings | If XSLT cannot be found to match the name pattern suppress warnings. | false | Boolean |
| xslt | A previously saved XSLT, used to modify the output via xsl:output attributes. | - | Document |
| xsltNamePattern | A name pattern for dynamic loading of an XSLT, that will modify the output via xsl:output attributes. | - | String |
Destination
Destination elements consume a stream of bytes from a Writer and persist them to a destination. This could be a file on a file system or to Stroom’s stream store.
AnnotationWriter
Consume XML documents in the annotation:1 namespace and writes them as Stroom Annotations.
Allows for the annotating of events that meet some criteria.
FileAppender
A destination used to write an output stream to a file on the file system. If multiple paths are specified in the ‘outputPaths’ property it will pick one at random to write to.
Element properties:
| Name | Description | Default Value | Value Type |
|---|---|---|---|
| compressionMethod | Compression method to apply, if compression is enabled. Supported values: bzip2, deflate, gz, lz4-block, lz4-framed, lzma, pack200, snappy-framed, xz, zip, zstd. | gz | String |
| filePermissions | Set file system permissions of finished files (example: ‘rwxr–r–’) | - | String |
| outputPaths | One or more destination paths for output files separated with commas. Replacement variables can be used in path strings such as ${feed}. | - | String |
| rollSize | When the current output file exceeds this size it will be closed and a new one created. | - | String |
| splitAggregatedStreams | Choose if you want to split aggregated streams into separate output files. | false | Boolean |
| splitRecords | Choose if you want to split individual records into separate output files. | false | Boolean |
| useCompression | Apply compression to output files. | false | Boolean |
HDFSFileAppender
A destination used to write an output stream to a file on a Hadoop Distributed File System. If multiple paths are specified in the ‘outputPaths’ property it will pick one at random.
Element properties:
| Name | Description | Default Value | Value Type |
|---|---|---|---|
| fileSystemUri | URI for the Hadoop Distributed File System (HDFS) to connect to, e.g. hdfs://mynamenode.mydomain.com:8020 | - | String |
| outputPaths | One or more destination paths for output files separated with commas. Replacement variables can be used in path strings such as ${feed}. | - | String |
| rollSize | When the current output file exceeds this size it will be closed and a new one created. | - | String |
| runAsUser | The user to connect to HDFS as | - | String |
| splitAggregatedStreams | Choose if you want to split aggregated streams into separate output files. | false | Boolean |
| splitRecords | Choose if you want to split individual records into separate output files. | false | Boolean |
HTTPAppender
A destination used to write an output stream to a remote HTTP(S) server.
This element should be preferred over the deprecated HttpPostFilter .
Element properties:
| Name | Description | Default Value | Value Type |
|---|---|---|---|
| compressionMethod | Compression method to apply, if compression is enabled. Supported values: bzip2, deflate, gz, lz4-block, lz4-framed, lzma, pack200, snappy-framed, xz, zip, zstd. | gz | String |
| connectionRequestTimeout | Returns the connection lease request timeout used when requesting a connection from the connection manager. Default: 3 minutes. The timeout is specified as either milliseconds, e.g. ‘60000’ or with a duration suffix, e.g. ‘500ms’, ‘2s’, ‘1m’, etc. | - | String |
| connectionTimeout | Determines the timeout until a new connection is fully established. This may also include transport security negotiation exchanges such as SSL or TLS protocol negotiation. A timeout value of zero is interpreted as an infinite timeout. Default: 3 minutes. The timeout is specified as either milliseconds, e.g. ‘60000’ or with a duration suffix, e.g. ‘500ms’, ‘2s’, ‘1m’, etc. | - | String |
| contentType | The content type | application/json | String |
| forwardChunkSize | Should data be sent in chunks and if so how big should the chunks be. Size is either specified in bytes e.g. ‘1024’ or with a IEC unit suffix, e.g. ‘1K’, ‘1M’, ‘1G’, etc. | - | String |
| forwardUrl | The URL to send data to. | - | String |
| hostnameVerificationEnabled | Set this to true to verify that the destination host name matches against the host names in the certificate supplied by the destination server. | true | Boolean |
| httpHeadersIncludeStreamMetaData | Provide stream metadata as HTTP headers | true | Boolean |
| httpHeadersStreamMetaDataAllowList | Comma delimited list of stream meta data keys to include as HTTP headers. Only works when httpHeadersIncludeStreamMetaData is set to true. If empty all headers are sent, unless httpHeadersStreamMetaDataDenyList is used. If httpHeadersStreamMetaDataAllowList contains keys, httpHeadersStreamMetaDataDenyList is ignored. | - | String |
| httpHeadersStreamMetaDataDenyList | Comma delimited list of stream meta data keys to exclude as HTTP headers. Only works when httpHeadersIncludeStreamMetaData is set to true. If empty all headers are sent, unless httpHeadersStreamMetaDataAllowList is used. If httpHeadersStreamMetaDataAllowList contains keys, httpHeadersStreamMetaDataDenyList is ignored. | - | String |
| httpHeadersUserDefinedHeader1 | Additional HTTP Header 1, format is ‘HeaderName: HeaderValue’ | - | String |
| httpHeadersUserDefinedHeader2 | Additional HTTP Header 2, format is ‘HeaderName: HeaderValue’ | - | String |
| httpHeadersUserDefinedHeader3 | Additional HTTP Header 3, format is ‘HeaderName: HeaderValue’ | - | String |
| keyStorePassword | The key store password | - | String |
| keyStorePath | The key store file path on the server | - | String |
| keyStoreType | The key store type. Valid values are [‘JCEKS’, ‘JKS’, ‘DKS’, ‘PKCS11’, ‘PKCS12’]. | JKS | String |
| logMetaKeys | Specifies Which meta data keys will have their values logged in the send log. A Comma delimited string of keys. | guid,receiptid,feed,system,environment,remotehost,remoteaddress | String |
| readTimeout | How long to wait for data to be available before closing the connection. The timeout is specified as either milliseconds, e.g. ‘60000’ or with a duration suffix, e.g. ‘500ms’, ‘2s’, ‘1m’, etc. | - | String |
| requestMethod | The HTTP request method. Valid values are GET, POST, HEAD, OPTIONS, PUT, DELETE and TRACE. | POST | String |
| rollSize | When the current output exceeds this size it will be closed and a new one created. Size is either specified in bytes e.g. ‘1024’ or with a IEC unit suffix, e.g. ‘1K’, ‘1M’, ‘1G’, etc. | - | String |
| splitAggregatedStreams | Choose if you want to split aggregated streams into separate output. | false | Boolean |
| splitRecords | Choose if you want to split individual records into separate output. | false | Boolean |
| sslProtocol | The SSL protocol to use | TLSv1.2 | String |
| timeToLive | The maximum time a pooled connection can stay idle (not leased to any thread) before it is shut down. Default: 1 hour. The timeout is specified as either milliseconds, e.g. ‘60000’ or with a duration suffix, e.g. ‘500ms’, ‘2s’, ‘1m’, etc. | - | String |
| timeout | Determines the timeout until arrival of a response from the opposite endpoint. A timeout value of zero is interpreted as an infinite timeout. Default: 3 minutes. The timeout is specified as either milliseconds, e.g. ‘60000’ or with a duration suffix, e.g. ‘500ms’, ‘2s’, ‘1m’, etc. | - | String |
| trustStorePassword | The trust store password | - | String |
| trustStorePath | The trust store file path on the server | - | String |
| trustStoreType | The trust store type Valid values are [‘JCEKS’, ‘JKS’, ‘DKS’, ‘PKCS11’, ‘PKCS12’]. | JKS | String |
| useCompression | Should data be compressed when sending | true | Boolean |
| useContentEncodingHeader | Whether to use the ‘Content-Encoding’ HTTP header when useCompression is ’true’. If ‘false’ (the default), the ‘Compression’ header will be used, which is supported by .Stroom/Stroom-Proxy destinations. ‘Content-Encoding’ would be required for other destinations, but is only applicable for compression types ‘gz’, ‘zstd’ or ‘deflate’. | false | Boolean |
| useJvmSslConfig | Use JVM SSL config. Set this to true if the Stroom node has been configured with key/trust stores using java system properties like ‘javax.net.ssl.keyStore’.Set this to false if you are explicitly setting key/trust store properties on this HttpAppender. | true | Boolean |
RollingFileAppender
A destination used to write an output stream to a file on the file system.
If multiple paths are specified in the ‘outputPaths’ property it will pick one at random to write to.
This is distinct from the FileAppender in that when the rollSize is reached it will move the current file to the path specified in rolledFileName and resume writing to the original path.
This allows other processes to follow the changes to a single file path, e.g. when using tail.
On system shutdown all active files will be rolled.
Element properties:
| Name | Description | Default Value | Value Type |
|---|---|---|---|
| compressionMethod | Compression method to apply, if compression is enabled. Supported values: bzip2, deflate, gz, lz4-block, lz4-framed, lzma, pack200, snappy-framed, xz, zip, zstd. | gz | String |
| fileName | Choose the name of the file to write. | - | String |
| filePermissions | Set file system permissions of finished files (example: ‘rwxr–r–’) | - | String |
| frequency | Choose how frequently files are rolled. | 1h | String |
| outputPaths | One or more destination paths for output files separated with commas. Replacement variables can be used in path strings such as ${feed}. | - | String |
| rollSize | When the current output file exceeds this size it will be closed and a new one created, e.g. 10M, 1G. | 100M | String |
| rolledFileName | Choose the name that files will be renamed to when they are rolled. | - | String |
| schedule | Provide a cron expression to determine when files are rolled. | - | String |
| useCompression | Apply GZIP compression to output files | false | Boolean |
RollingStreamAppender
A destination used to write one or more output streams to a new stream which is then rolled when it reaches a certain size or age. A new stream will be created after the size or age criteria has been met. On system shutdown all active streams will be rolled.
Element properties:
| Name | Description | Default Value | Value Type |
|---|---|---|---|
| feed | The feed that output stream should be written to. If not specified the feed the input stream belongs to will be used. | - | Document |
| frequency | Choose how frequently streams are rolled. | 1h | String |
| rollSize | Choose the maximum size that a stream can be before it is rolled. | 100M | String |
| schedule | Provide a cron expression to determine when streams are rolled. | - | String |
| segmentOutput | Should the output stream be marked with indexed segments to allow fast access to individual records? | true | Boolean |
| streamType | The stream type that the output stream should be written as. This must be specified. | - | String |
| volumeGroup | Optionally override the default volume group of the destination feed. | - | String |
S3Appender
A destination used to write an output stream to an S3 bucket.
Element properties:
| Name | Description | Default Value | Value Type |
|---|---|---|---|
| bucketNamePattern | Set the bucket name pattern if you want to override the one provided by the S3 config. | - | String |
| compressionMethod | Compression method to apply, if compression is enabled. Supported values: bzip2, deflate, gz, lz4-block, lz4-framed, lzma, pack200, snappy-framed, xz, zip, zstd. | gz | String |
| keyNamePattern | Set the key name pattern if you want to override the one provided by the S3 config. | ${type}/${year}/${month}/${day}/${idPath}/${feed}/${idPadded}.gz | String |
| rollSize | When the current output object exceeds this size it will be closed and a new one created. | - | String |
| s3Config | The S3 bucket config to use. | - | Document |
| splitAggregatedStreams | Choose if you want to split aggregated streams into separate output objects. | false | Boolean |
| splitRecords | Choose if you want to split individual records into separate output objects. | false | Boolean |
| useCompression | Apply compression to output objects. | true | Boolean |
StandardKafkaProducer
Consumes XML documents in the kafka-records:2 namespace.
For each <kafkaRecord> element converts it into a Kafka message that is passed to the Kafka producer defined by the kafkaConfig property
Element properties:
| Name | Description | Default Value | Value Type |
|---|---|---|---|
| flushOnSend | At the end of the stream, wait for acknowledgement from the Kafka broker for all the messages sent. This ensures errors are caught in the pipeline process. | true | Boolean |
| kafkaConfig | Kafka configuration details relating to where and how to send Kafka messages. | - | Document |
StreamAppender
A destination used to write the output stream to a new stream in the stream store. The configuration allows for starting a new stream once a size threshold is reached.
Element properties:
| Name | Description | Default Value | Value Type |
|---|---|---|---|
| feed | The feed that output stream should be written to. If not specified the feed the input stream belongs to will be used. | - | Document |
| rollSize | When the current output stream exceeds this size it will be closed and a new one created. | - | String |
| segmentOutput | Should the output stream be marked with indexed segments to allow fast access to individual records? | true | Boolean |
| splitAggregatedStreams | Choose if you want to split aggregated streams into separate output streams. | false | Boolean |
| splitRecords | Choose if you want to split individual records into separate output streams. | false | Boolean |
| streamType | The stream type that the output stream should be written as. This must be specified. | - | String |
| volumeGroup | Optionally override the default volume group of the destination feed. | - | String |
StroomStatsAppender
This element is deprecated and should not be used.
Element properties:
| Name | Description | Default Value | Value Type |
|---|---|---|---|
| flushOnSend | At the end of the stream, wait for acknowledgement from the Kafka broker for all the messages sent. This ensures errors are caught in the pipeline process. | true | Boolean |
| kafkaConfig | The Kafka config to use. | - | Document |
| maxRecordCount | Choose the maximum number of records or events that a message will contain | 1 | String |
| statisticsDataSource | The stroom-stats data source to record statistics against. | - | Document |
7 - Sending Data to Stroom
How to send data (event logs) into Stroom or one of its proxies.
Stroom and Stroom Proxy have a simple HTTP POST interface that requires HTTP header arguments to be supplied as described here.
Files are posted to Stroom and Stroom Proxy as described here.
Stroom will return a response code indicating the success or failure status of the post as described here
Data can be sent from any operating systems or applications. Some examples to aid in sending data can be found here
It is common practice for the developers/admins of a client system to write the translation to normalise their data as they’re in the best position to understand their logging and to generate specific events as required. See here for further details.
7.1 - Event Data Formats
The data formats to use when sending data to Stroom.
Stroom accepts data in many different forms as long as they are text data and are in one of the supported character encodings. The following is a non-exhaustive list of formats supported by Stroom:
- Event XML fragments
- Events XML
- JSON
- Delimited data, with and without a header row (e.g. CSV, TSV, etc.)
- Fixed width text data
- Multi line data (where each line can be a different format), e.g. Auditd.
Preferred format
Where the system/application generating the logs is developed by you and the log format is under your control, the preferred format is Events XML or Event XML fragments. The reason for this is that all data in Stroom will be normalised into a standard form. This standard form is controlled by the event-logging XML Schema . If data is sent in Events/Event XML then it will not require any additional translation.
7.1.1 - Character Encoding
Details of the character encodings supported by Stroom.
When data is sent to Stroom the character encoding of the data should be configured for the Feed. This tells Stroom how to decode the data that has been sent. All data sent to a feed must be encoded in the character encoding configured for that Feed.
Supported Character Encodings
The currently supported character encodings are:
UTF-8
This is the default character encoding A variable width character encoding consisting of one to four bytes per ‘character’. UTF-8 is supported with or without a Byte Order Mark.
UTF-16
A variable width character encoding consisting of two or four bytes per ‘character’. UTF-16 can be encoded with either Big (UTF16-BE) or Little (UTF16-LE) Endianness depending on the system that encoded it. The Byte Order Mark will specify the endianness but is optional.
UTF-32
A fixed width character encoding consisting of four bytes per ‘character’. UTF-32 can be encoded with either Big (UTF32-BE) or Little (UTF32-LE) Endianness depending on the system that encoded it. The Byte Order Mark will specify the endianness but is optional.
ASCII
A single byte character encoding supporting only 128 characters. This character encoding has very limited use as it does not support accented characters or emojis so should be avoided for any logs that capture user input where these characters may occur.
Byte Order Mark (BOM)
A Byte Order Mark (BOM) is a special Unicode character at the start of a text stream that indicates the byte order (or endianness) of the stream. It can also be used to determine the character encoding of the stream.
Stroom can handle the presence of BOMs in the stream and can use it to determine the character encoding.
| Encoding | BOM |
|---|---|
| UTF8 | EF BB BF |
| UTF16-LE | FF FE |
| UTF16-BE | FE FF |
| UTF32-LE | FF FE 00 00 |
| UTF32-BE | 00 00 FE FF |
7.1.2 - Event XML Fragments
Description of the Event XML Fragments
This format is a file containing multiple <Event>...</Event> element blocks but without any root element, or any XML processing instruction.
For example, a file may look like:
<Event>
...
</Event>
<Event>
...
</Event>
<Event>
...
</Event>
Each <Event> element is valid against the event-logging XML Schema but the file is not as it contains no root element.
This is the output format used by the event-logging Java library.
7.2 - Header Arguments
The various HTTP headers that can be sent with data.
The following data must be passed in as HTTP header arguments when sending files to Stroom via HTTP POST. These arguments are case insensitive.
-
System- The name by which the system is known within the organisation, e.g.PAYROLL_SYSTEM. This could be the name of a project/service or capability. -
Environment- A means to identify the deployed instance of a system. This may indicate the deployment status, e.g. DEV, REF, LIVE, OPS, etc., and/or the location where the instance is deployed. An environment may be a combination of these attributes separated with an underscore. -
Feed- The name of the feed this data relates to. This is mandatory and must match a feed defined within Stroom in order for Stroom to accept the data and know what to do with it. -
Compression- This token is optionally used when the POST payload is compressed with either gzip or zip compression. Value ofZIPandGZIPare valid. Note: TheCompressiontoken MUST not be used in conjunction with the standard HTTP header tokenContent-Encodingotherwise stroom will be unable to un-compress the data. Use eitherCompression:GZIPorContent-Encoding:gzip, not both. UsingCompressionis preferred. -
EffectiveTime- This is only applicable to reference data. It is used to indicate the point in time that the reference data is applicable to, i.e. all event data that uses the reference data that is created after the effective time will use the reference data until a new reference data item arrives with a later effective time. Note: This argument must be in ISO 8601 date time format, i.e.:yyyy-MM-ddTHH:mm:ss.sssZ. -
Authorization- This is only applicable when Stroom/Stroom-Proxy are configured for token based authentication.
Example header arguments for a feed called MY_SYSTEM-EVENTS from system MY_SYSTEM and environment OPS
System:MY_SYSTEM
Environment:OPS
Feed:MY_SYSTEM-EVENTS
The post payload must contain the events file. If the compression format is ZIP the payload must contain ZIP entries with the events files and optional context files ending in .ctx. Further details of supported payload formats can be found here.
7.3 - Response Codes
The HTTP response codes returned by stroom.
Stroom will return a HTTP response code to indicate success or failure. An additional response Header “Stroom-Status” will indicate a more precise error message code. A user readable message will appear in the response body.
| HTTP Status | Stroom-Status | Message | Reason |
|---|---|---|---|
| 200 | 0 | OK | Post of data successful |
| 406 | 100 | Feed must be specified | You must provide Feed as a header argument in the request |
| 406 | 110 | Feed is not set to receive data | The feed you have provided is not setup to receive data (maybe does not exist or is set to reject) |
| 406 | 200 | Unknown compression | Compression argument must be one of ZIP, GZIP and NONE |
| 401 | 300 | Client Certificate Required | The feed you have provided requires a client HTTPS certificate to send data |
| 403 | 310 | Client Certificate not authorised | The feed you have provided does not allow your client certificate to send data |
| 500 | 400 | Compressed stream invalid | The stream of data sent does not form a valid compressed file. Maybe it terminated unexpectedly or is corrupt. |
| 500 | 999 | Unknown error | An unknown unexpected error occurred |
In the event that data is not successfully received by Stroom, i.e. the response code is not 200, the client system should buffer data and keep trying to re-send it. Data should only be removed from the client system when it has been sent successfully.
7.4 - Payload Formats
Description of the format of the payloads when sending event (and optionally context data) data to stroom.
Stroom can support multiple payload formats with different compression applied. However all data once uncompressed must be text and not binary.
Note
This section covers the payload format rather than the format of the text based event/context data itself. For details on the format of the actual event/context data and details about character encoding, see Event Data Formats.
Stroom can receive data in the following formats:
Uncompressed
Text data is sent to Stroom and no compression flag is set in the header arguments. This format is only suitable for sending event data, if you need to send additional context data you will need to use the ZIP format. This is not recommended for large volumes of data due to the amount of data that has to be sent over the network.
The following is an example of sending uncompressed data to Stroom using cURL :
gzip
Text data is
gzip
compressed and the Compression flag is set to GZIP in the Headers.
This format is only suitable for sending event data, if you need to send additional context data you will need to use the ZIP format.
The following is an example of sending gzipped data to Stroom using cURL :
ZIP
Data can be sent to Stroom as a ZIP archive. This allows one or more text files to be sent in one go. It allows additional sidecar files to be sent.
A ZIP archive is sent to Stroom with the Compression flag set to ZIP in the Headers.
The contents of the ZIP archive is described below.
The following is an example of sending a ZIP archive to Stroom using cURL :
Stroom ZIP Format
Stroom has a standard for how to send/store data in ZIP archive. This format is used for:
- Receiving data from clients.
- Transferring data from a Stroom-Proxy to a downstream Stroom or Stroom-Proxy.
- Downloading a stream or streams from within Stroom.
Sidecar Files and File Extensions
The ZIP format allows not only multiple event data files to be sent, but each event data file can be optionally accompanied by one or more sidecar files.
Stroom has a standard set of reserved file extensions that are used for different types of sidecar file.
| Type | Extension | Legacy Extensions |
|---|---|---|
| Event Data | dat |
|
| Context | ctx |
context |
| Manifest | mf |
manifest |
| Meta | meta |
hdr, header, met |
Any file without a reserved file extension (or without any file extension) will be assumed to be an event data file. For example the following ZIP archive contains four event data files and no sidecar files.
|-- 2023-11-16.0001
|-- 2023-11-16.0002
|-- 2023-11-16.0003
`-- 2023-11-16.0004
Base File Name
Event data files are associated with their sidecar files by the base name. The base name is the part of the file name that is common to all files.
The following is an example of two event data files with associated sidecar files.
In this example, the base names are 001 and 002.
|-- 001.dat
|-- 01.ctx
|-- 01.meta
|-- 02.dat
|-- 02.ctx
`-- 02.meta
While it is very much preferred for all files to be given the appropriate reserved file extension, omitting the file extension for event data files is supported.
|-- 023-11-16.0001
|-- 023-11-16.0001.ctx
|-- 023-11-16.0002
`-- 023-11-16.0002.ctx
Warning
If you had the following files:
|-- 01.data1
|-- 01.data2
`-- 01.ctx
Then 001.data1 and 001.data2 would both be considered event data files for the base name 001 and Stroom does not allow multiple files of the same type for the same base name.
Therefore the ZIP would be rejected with a duplicate file error.
File Order
The order of files in the zip archive does not matter.
Directories
Directories within the ZIP file are supported.
A file’s base name includes its full path within the ZIP file, so an event data file and its associated sidecar files must all reside in the same directory.
The depth and names of the directories have no bearing on how Stroom processes the data.
When downloading or aggregating large numbers of streams into a ZIP file, Stroom will split the files up into directories with multiple levels to limit the number of files in each directory.
Event Data Files
An event data file is the file containing the log/audit data and has the preferred extension of .dat.
If the data is being sent to Stroom/Stroom-Proxy then this is Raw Event data.
This data may be in a variety of data formats, however the ALL event data for a Feed should conform to the same format so that all the Feed’s data can be processed in the same way.
Context Files
Context files are an optional file that provides additional context reference data for the event data file that it is associated with.
They use the preferred extension .ctx.
If provided, a context file can be used to provide a reference data source that is specific to the data file that has been sent.
Context data is supplementary information that is not contained within logged events.
For example, a system may be collating and sending event logs from a large estate of machines, where the event logs only contain some local identifier for each machine.
This may be the case where you have no control over the content/structure of the logs produced, e.g. when sending logs from a commercial product, rather than a bespoke system.
The context file can contain a record for each machine that contains the local identifier along with richer device information such as the IP address and
Fully Qualified Domain Name (FQDN)
Fully Qualified Domain Name (FQDN)
The Fully Qualified Domain Name (FQDN) is the complete, unambiguous address of a device or service on the internet, specifying all domain levels including the hostname, domain name, and top-level domain. For example server57.some.domain.com.Click to see more details....
This context data can then be used in pipeline processing to perform lookups using the local identifier in the events to decorate them.
Context data can be in a variety of data formats and does not need to be in the same format as the event data it is associated with. For example, the event data may be in CSV format, while the context data is in JSON format.
[
{
"localId": "1001",
"ip": "10.212.33.1",
"hostname": "server1.somedomain.com"
}, {
"localId": "1002",
"ip": "10.212.33.2",
"hostname": "server2.somedomain.com"
},
...
]
Meta Files
Meta files contain meta data relevant to all events in the associated event data file and have the preferred extension .meta.
Meta files are not typically supplied by client systems, instead, the HTTP headers are used to supply meta data that is applicable to all files in the ZIP.
Meta files will be present when downloading data from Stroom or when aggregated data is sent from Stroom-Proxy to a downstream Stroom/Stroom-Proxy.
A Meta file contains key value pairs delimited by :.
This is an example of a Meta file:
content-type:application/x-www-form-urlencoded
environment:example_environment
feed:test_feed
guid:73254b1c-fadf-40c3-96a9-505d2e365e66
host:localhost:8080
receivedtime:2023-10-24t12:16:53.562z
remoteaddress:[0:0:0:0:0:0:0:1]
remotehost:[0:0:0:0:0:0:0:1]
streamsize:35
system:example_system
uploaduserid:unauthenticated_user
uploadusername:unauthenticated_user
user-agent:curl/8.4.0
Manifest Files
Manifest files contain a manifest of the associated event data file, with information relating to its storage location in Stroom.
They have the preferred extension .mf.
They are generated by Stroom and are not intended to be provided by client systems.
A Manifest file will be present if a stream has been downloaded from Stroom.
Like Meta files they contain a simple list of key value pairs delimited by :.
The following is an example of a manifest file:
Create Time:1698149813565
Effective Time:1698149813565
Feed:TEST_FEED
File Size:123
Files:/volumes/store/RAW_EVENTS/2023/10/24/004/TEST_FEED=004099.revt.bgz,/volumes/store/RAW_EVENTS/2023/10/24/004/TEST_FEED=004099.revt.meta.bgz,/volumes/store/RAW_EVENTS/2023/10/24/004/TEST_FEED=004099.revt.mf.dat
Id:4099
Raw Size:35
Type:Raw Events
Warning
If you download a stream (or streams) in Stroom, the Manifest file for each stream will contain the Feed that it came from in Stroom.
If you upload this ZIP file into a different Feed in Stroom, Stroom will respect the Feed in the Manifest file so the data will be uploaded into its original Feed.
To prevent this, you can remove the Manifest file from the zip as follows:
7.5 - SSL Configuration
Configuring SSL with cURL.
This page provides a step by step guide to getting PKI authentication working correctly for Unix hosts so as to be able to sign deliveries from cURL.
First make sure you have a copy of your organisation’s CA certificate.
Check that the CA certificate works by running the following command:
If the response starts with the line:
then you do not have the correct CA certificate.
If the response contains the line
then one-way SSL authentication using the CA certificate is successful.
The VBScript file to check windows certificates is check-certs.vbs (TODO link).
Final Testing
Once one-way authentication has been tested, two-way authentication should be configured:
The server certificate and private key should be concatenated to create a PEM file:
Finally, test for 2-way authentication:
If the response contains the line
then two-way SSL authentication is successful.
Final Tidy Up
The files ca.crt and hostname.pem are the only files required for two-way authentication and should be stored permanently on the server; all other remaining files may be deleted or backed up if required.
Certificate Expiry
PKI certificates expire after 2 years. To check the expiry date of a certificate, run the following command:
This will give a response looking similar to:
7.6 - Example Clients
A collection of example client applications for sending data to Stroom or one of its proxies.
The following article provides examples to help data providers send data to Stroom via the HTTPS interface. The code for the clients is in the stroom-clients repository stroom-clients .
7.6.1 - curl (Linux)
How to use the
curl command to send data to Stroom.Curl is a standard unix tool to send data to or from a server. In the following examples -H is used to specify the header arguments required by Stroom, see Header Arguments.
Notes:
- The
@character must be used in front of the file being posted. If it is not then curl will post the file name instead of its contents. - The
--data-binaryargument must always be used even for text formats, in order to prevent data corruption by curl stripping out newlines.
Example HTTPS post without authentication:
In the above example -k is required to stop curl from authenticating the server. The next example must be used to supply the necessary CA to authenticate the server if this is required.
Example HTTPS With 1 way SSL authentication:
The above example verifies that the certificate presented by Stroom is signed by the CA. The CA is provided to curl using the ‘–cacert root_ca.crt’ parameter.
For step by step instructions for creating, configuring and testing the PKI authentication, see the SSL Guide
Example HTTPS With 2 way SSL authentication:
The above example both verifies that the certificate presented by Stroom is signed by the CA and also provides a certificate to authenticate itself with Stroom. The data provider provides a certificate using the ‘–cert example.pem’ parameter.
If your input file is not compressed you should compress it as follows:
When delivering data from a RHEL4 host, an additional header argument must be added to specify the FQDN of the host:
-H "Hostname:host.being.audited"
The hostname being sent as a header argument may be resolved upon execution using the command hostname -f.
SSL Notes
To create a .pem format key simply append the private key and certificate.
To remove the pass phrase from a openssl private key use.
The send-logs.sh script assumes the period start and end times are embedded in the file name (e.g. log_2010-01-01T12:00:00.000Z_2010-01-02T12:00:00.000Z.log).
The certificates will need to be added to the script as above.
7.6.2 - curl (Windows)
Using Curl on Windows to send data to Stroom.
There is a version of curl for Windows
Windows 10 is the latest desktop OS offering from Microsoft. From Windows 10 build 17063 and later, curl is now natively included - you can execute it directly from Cmd.exe or PowerShell.exe. Curl.exe is located at c:\windows\system32 (which is included in the standard PATH environment variable) - all you need to do is run Command Prompt with administrative rights and you can use Curl. You can execute it directly from Cmd.exe or PowerShell.exe. For older versions of Windows, the cURL project has Windows binaries.

7.6.3 - event-logging (Java library)
A Java library for logging events in Java applications.
event-logging is a Java API for logging audit events conforming to the Event Logging XML Schema . The API uses a generated Java JAXB model of the Event Logging XML Schema. Event Logging can be incorporated into your Java application to provide a means of recording and outputting audit events or user actions for compliance, security or monitoring.
This library only generates the events. By default XML events are written to a file using a logging appender. In order to send the events to Stroom either the logged files will need to be sent to stroom using one of the other clients.
7.6.4 - send_to_stroom.sh (Linux)
A shell script for sending logs to Stroom or one of its proxies
send_to_stroom.sh
is a small bash script to make it easier to send data to stroom.
To use it download the following files using wget or similar, replacing SEND_TO_STROOM_VER with the latest released version from
here
:
SEND_TO_STROOM_VER="send-to-stroom-v2.0" && \
wget "https://raw.githubusercontent.com/gchq/stroom-clients/${SEND_TO_STROOM_VER}/bash/send_to_stroom.sh" && \
wget "https://raw.githubusercontent.com/gchq/stroom-clients/${SEND_TO_STROOM_VER}/bash/send_to_stroom_args.sh" && \
chmod u+x send_to_stroom*.sh
To see the help for send_to_stroom.sh, enter ./send_to_stroom.sh --help
The following is an example of using send_to_stroom.sh to send all logs in a directory:
7.6.5 - Simple C# Client
A simple C# client for sending data files to Stroom.
The StroomCSharpClient is a C# port of the Java client and behaves in the same way. Note that this is just an example, not a fully functional client.
See
StroomCSharpClient
.
7.6.6 - Simple Java Client
A simple Java client for sending data files to Stroom.
The stroom-java-client provides an example Java client that can:
- Read a zip, gzip or uncompressed an input file.
- Perform a HTTP post of data with zip, gzip or uncompressed compression.
- Pass down arguments on the command line as HTTP request arguments.
- Supports HTTP and HTTPS with 1 or 2 way authentication.
(N.B. arguments must be in lower case).
To use the example client first compile the Java code:
Example HTTP Post:
Example HTTPS With 1 way SSL authentication:
Example HTTPS With 2 way SSL authentication:
7.6.7 - stroom-log-sender (Docker)
A Docker image for periodically sending log files generated by an application to Stroom.
stroom-log-sender is a small Docker image for sending data to Stroom.
This is the simplest way to get data into stroom if the data provider is itself running in docker. It can also be used for sending data to Stroom from data providers that are not running in Docker. stroom-log-sender makes use of the send_to_stroom.sh bash script that is described below. For details on how to use stroom-log-sender, see the Dockerhub link above.
7.6.8 - VBScript (Windows)
Using VBScript to send data to Stroom.
extract-data.vbs uses wevtutil.exe to extract Security event information from the windows event log.
This script has been tested on Windows 2008.
This script is designed to run periodically (say every 10 minutes). The first time the script is run it stores the current time in UTC format in the registry. Subsequent calls then extract event information from the last run time to the new current time. The events are stored in a zip file with the period dates embedded.
The script requires a working directory used as a buffer for the zip files. This can be set at the start of the script otherwise it will default to the working directory.
The send-data.vbs script is designed to run periodically (say every 10 minutes). The script will scan for zip files and send them to Stroom.
The script details several parameters that require setting per environment. Among these are the working directory that the zip files are stored in, the feed name and the URL of Stroom.
SSL
To send data over SSL (https) you must import a client certificate in p12 format into windows. To convert a certificate (.crt) and private key (.key) into a p12 format use the following command:
openssl pkcs12 -export -in <NAME>.crt -inkey <NAME>.key -out <NAME>.p12 -name "<NAME>"
Once in p12 format use the windows certificate wizard to import the public private key.
The send-data-tree.vbs script works through a directory for different feed types.
7.6.9 - wget (Windows)
Using
wget on Windows to send data to Stroom.There is a version of wget for windows
- Use
--post-fileargument to supply the data - Use
--certificateand--certificate-typearguments to specify your client certificate - Use
--headerargument to inform Stroom which feed and environment your data relates to
7.7 - Token Authentication
How to send data using token based authentication.
As an alternative to using SSL certificates for authentication when sending data to the /datafeed endpoint, you can use a
JSON Web Token
Token
Typically refers to an authentication token that may be used for user authentication. A Stroom API Key is a form of authentication token.Click to see more details....
Using a token for authentication requires that Stroom or Stroom-Proxy have been configured with identityProviderType set to EXTERNAL_IDP (see External IDP for details on the configuration for an external IDP and how to generate a token).
To attach a token to the request you just need to set the HTTP header Authorization with a value of the form
Bearer YOUR_TOKEN_GOES_HERE
7.8 - Java Keystores
How to create java key/trust stores for use with Java client applications.
There are many times when you may wish to create a Java keystore from certificates and keys and vice versa. This guide aims to explain how this can be done.
Import
If you need to create a Java keystore from a .crt and .key then this is how to do it.
Convert your keys to der format
ImportKey
Use the ImportKey class in the stroom-java-client library to import keys.
For example:
Export
ExportKey
Use the ExportKey class in the stroom-java-client library to export keys. If you would like to use curl or similar application but only have keys contained within a Java keystore then they can be exported.
For example:
This will print both the key and certificate to standard out. This can then be copied into a PEM file for use with cURL or other similar application.
8 - Stroom Proxy
Stroom Proxy acts as a proxy for sending data to a Stroom instance/cluster. Stroom Proxy has various modes such as storing, aggregating and forwarding the received data. Stroom Proxies can be used to forward to other Stroom Proxy instances.
Stroom-Proxy’s primary role is to act as a front door for data being sent to Stroom.
Data can be sent to Stroom-Proxy in small chunks and it will aggregate the data into larger chunks (grouped by
Feed
Feed
A Feed is a means of organising and categorising data in Stroom. A Feed contains multiple Streams of data that have been ingested into Stroom or output by a Pipeline. Typically a Feed will contain Streams of data that are all from one system and have a common data format.Click to see more details... and
Stream Type
Stream Type
All Streams must have a Stream Type. The list of Stream Types is configured using the Property stroom.data.meta.metaTypes.Click to see more details...) so that Stroom doesn’t have to process lots of small
Streams
Stream
A Stream is the unit of data that Stroom works with and will typically contain many Events.Click to see more details....
It also provides a separation between the client and Stroom, so Stroom can be taken offline while data is still being accepted by Stroom-Proxy.
See Architecture for an example of how Stroom-Proxy is typically deployed.
API
Stroom-Proxy presents an identical HTTP POST /datafeed
API
API
Application Programming Interface. An interface that one system can present so other systems can use it to communicate. Stroom has a number of APIs, e.g. its many REST APIs and its /datafeed interface for data receipt.Click to see more details... to Stroom, so clients can send the same data in the same way to either Stroom or Stroom-Proxy.
For more detail on sending data into Stroom-Proxy, see Sending Data.
It also presents a number of other APIs for administration and communication with other proxies. For more detail on Stroom-Proxy’s other APIs, see Proxy API.
Functions
Stroom-Proxy has a number of key functions:
- Receipt Filtering - The process of filtering the incoming data based on the HTTP headers. Data can either be Received, silently Dropped or Rejected with an error.
- Splitting - Splitting received
ZIP
ZIP
A compressed file format for storing a one or more files with an associated directory structure. Stroom and Stroom Proxy use the ZIP format for exporting content and data as well as its Proxy ZIP format for holding multiple streams of data with associated meta data.Click to see more details... files by
Feed
Feed
A Feed is a means of organising and categorising data in Stroom. A Feed contains multiple Streams of data that have been ingested into Stroom or output by a Pipeline. Typically a Feed will contain Streams of data that are all from one system and have a common data format.Click to see more details... and
Stream Type
Stream Type
All Streams must have a Stream Type. The list of Stream Types is configured using the Property
stroom.data.meta.metaTypes.Click to see more details.... - Aggregation - Storing received data locally and forwarding it when the aggregation limits have been reached.
- Forwarding - Forwarding the received/aggregated data to one or more forward destinations.
- Instant Forwarding - Data is streamed to a single HTTP forward destination (i.e. Stroom or another Stroom-Proxy) as the data is received. This function does not support multiple forward destinations or aggregations.
- Directory Scanning - Periodically scanning one or more directories for ZIP files in Stroom ZIP Format.
- Event Store - Stroom-Proxy presents an
API
API
Application Programming Interface. An interface that one system can present so other systems can use it to communicate. Stroom has a number of APIs, e.g. its many REST APIs and its
/datafeedinterface for data receipt.Click to see more details... for receiving individual events. This is to support applications that want to log events directly to Stroom-Proxy rather than writing them to rolled files locally.
For a more detailed explanation of each function, see Proxy Functions.
8.1 - Stroom Proxy Installation
How to install Stroom-Proxy.
Stroom-Proxy can be installed in 4 main ways:
-
App - There is an app version that runs Stroom-Proxy as a Java JAR JAR Java Archive is a file format for distributing Java class files, associated metadata and resource files. It is a compressed archive based on the {{< glossary “ZIP” >}} format, so can be inspected with any tool capable of reading a ZIP file. Stroom and Stroom-Proxy are distributed as JAR files.Click to see more details... file locally on the server and has settings contained in a configuration file that controls access to the stroom server and database.
-
Docker Stack - Stroom-Proxy, Nginx and Stroom-Log-Sender run in Docker containers, orchestrated using Docker Compose and some shell scripts. The stroom-proxy image is essentially a minimal Alpine Linux container with the appropriate Java version installed and the Stroom-Proxy JAR contained within it.
-
Docker Images - Manually run containers based on the Stroom-Proxy docker image.
-
Kubernetes - Deploy Stroom-Proxy into a Kubernetes cluster.
The document will cover the installation and configuration of the Stroom-Proxy software for both the ‘app’ and Docker stack deployments.
Note
Older versions of Stroom-Proxy ‘sent’ data to Stroom by being co-located with Stroom and using a shared repository location. Stroom-Proxy would write to the repository and Stroom would retrieve data from there.
This method is no longer used. Current versions of Stroom-Proxy forward data to Stroom over HTTP so do not need to be co-located with Stroom.
Typical Deployments
Stroom-Proxy is typically deployed in front of Stroom to act as a proxy for data receipt into Stroom. This abstracts Stroom from the clients sending the data and ensures that received data is aggregated into sensibly sized streams.
For a production Stroom cluster, it is likely that you will want multiple Stroom-Proxy instances behind a load balancer for resiliency and load management.
Note
Stroom-Proxy instances are independent and cannot form a coherent cluster. If you have a ‘cluster’ of Stroom-Proxy instances for resilience, each Stroom-Proxy instance can only work with the data it has received and loss of an instance means the loss of any data it was in the process of aggregating.
Also if you have a large ‘cluster’ of Stroom-Proxy instances, this can have an impact on aggregation as data for the same aggregation key (Feed and Stream Type) will be spread over multiple instances and thus aggregates. For low volume Feeds, this can mean smaller aggregates than is preferred.
To mitigate against this, you can use sticky sessions when load balancing or ideally use a load balancer that allows selection of the upstream instance using HTTP headers, i.e. Feed.
Assumptions
The following assumptions are used in this document.
- The user has reasonable RHEL/CentOS/Rocky System administration skills.
- Installation is on a fully patched minimal RHEL/CentOS/Rocky instance.
- The application user
stroomuserhas been created in the OS. - The user has set up the Stroom processing user as described here.
- The prerequisite software has been installed.
Firewall Configuration
For both methods of deployment, the ports used are as follows: Some may need to be opened to allow access to the ports from outside the host.
80- Nginx listens on port80but redirects onto443.443- Nginx listens on port443.8090- Stroom-Proxy listens on port8090for its main public APIs (/datafeed, REST endpoints, etc).8091- Stroom-Proxy listens on port8091for its administration APIs. Access to this port should probably be carefully controlled.
It is therefore likely that you will only want to expose 443 and maybe 80 to other hosts.
For example on a RHEL/CentOS server using firewalld the commands would be as root user:
Stroom Proxy (docker version)
The build of a stroom proxy where the Stroom-Proxy Java application (and associated services) are running in docker containers.
Because everything is running in Docker containers, the only requirement for the host is for the following:
- Docker Engine
- Docker Compose Plugin
bashv4 or greater - Used by the stack scripts.- GNU
coreutils- Used by the stack scripts. jq- Used by the stack scripts.
Download and install docker
To install Docker Engine and the Docker Composer Plugin see:
All the Stroom-Proxy logs and data will be stored in Docker managed volumes that will, by default, reside in /var/lib/docker.
It is typical that this directory will be on small mount point for the OS.
It is therefore recommended to relocate this directory to a mount with more space and sufficient resilience, i.e. RAID mirroring.
To do this you need to follow these steps:
- Stop the Docker engine.
- Move the directory to its new location.
- Edit the file
/etc/docker/daemon.jsonand ensure this field is present with the new location as the value.{ "data-root": "/path/to/new/location" } - Start the Docker engine.
Download and Install Docker Stack
The stroom_proxy Docker stack is available from stroom-resources releases on GitHub. The stack distribution is simply a collection of shell scripts and Docker Compose configuration files. The Docker images will get pulled down from DockerHub when the stack is started.
The installation example below is for stroom version 7.10.20 - but is applicable to other stroom v7 versions.
As a suitable stroom user e.g. stroomuser - download and unpack the stroom software.
For a stroom proxy, the configuration file stroom_proxy/stroom_proxy-v7.10.20/stroom_proxy.env needs to be edited, with the connection details of the stroom server that data files will be sent to.
The default network port for connection to the stroom server is 8080.
The values that need to be set are:
STROOM_PROXY_REMOTE_FEED_STATUS_API_KEY
STROOM_PROXY_REMOTE_FEED_STATUS_URL
STROOM_PROXY_REMOTE_FORWARD_URL
The ‘API key’ is generated on the stroom server and is related to a specific user e.g. proxyServiceUser. The 2 URL values also refer to the stroom server and can be a fully qualified domain name (fqdn) or the IP Address.
e.g. if the stroom server was - stroom-serve.somewhere.co.uk - the URL lines would be:
export STROOM_PROXY_REMOTE_FEED_STATUS_URL="http://stroom-serve.somewhere.co.uk:8080/api/feedStatus/v1"
export STROOM_PROXY_REMOTE_FORWARD_URL="http://stroom-serve.somewhere.co.uk:8080/stroom/datafeed"
To Start Stroom Proxy
As the stroom user, run the ‘start.sh’ script found in the stroom install:
The first time the script is run it will download the docker images from DockerHub:
- stroom-proxy-remote
- stroom-log-sender
- stroom-nginx
Once the script has completed the Stroom-Proxy server should be running.
The stack directory contains the following scripts for managing the Stroom-Proxy stack.
health.sh- Tests and displays the health of the stack.info.sh*- Displays info about the stack.pull_images.sh- Pulls all the docker images used in the stack.logs.sh- Tails the logs from all services in the stack.remove.sh- Removes all services and volumes in the stack. Warning: this will delete any data held in Stroom-Proxy.restart.sh- Restarts all or named services it the stack.send_data.sh- Script to aid POSTing data into Stroom-Proxy.set_log_levels.sh- Sets log levels for classes/packages on the running Stroom-Proxy.set_services.sh- Used for disabling services in the stack.show_config.sh- Displays the effective docker compose config taking the env file into account.start.sh- Starts all or named services it the stack.status.sh- Shows the status of the services in the stack.stop.sh- Stops all or named services it the stack.
Stroom Proxy (app version)
This is the bare bones installation method that requires installing everything manually. If you are able to use Docker we recommend doing this as there are less things to install and configure, e.g. nginx, send_to_stroom.sh, cron, etc.
Stroom-Proxy is distributed as a (
JAR
JAR
Java Archive is a file format for distributing Java class files, associated metadata and resource files. It is a compressed archive based on the {{< glossary “ZIP” >}} format, so can be inspected with any tool capable of reading a ZIP file. Stroom and Stroom-Proxy are distributed as JAR files.Click to see more details...) file so this method will run this JAR using the java executable.
The pre-requisites for this deployment are:
- RHEL/CentOS/Rocky
- Java 25+ JDK (JDK is preferred over JRE as it provides additional tools (e.g.
jmap) for capturing heap histogram statistics). bashv4 or greater - Used by the helper scripts.- GNU
coreutils- Used by the helper scripts.
For details about which Java distribution and version to use, and how to install it, see Java.
Note
Disable selinux to avoid issues with access and file permissions.Download and install Stroom v7 (app version)
Stroom-Proxy releases are available from
github.com/gchq/stroom/releases
.
Each release has a number of artefacts, the Stroom-Proxy application is stroom-proxy-app-v*.zip.
The installation example below is for stroom version v7.10.20, but is applicable to other stroom v7 versions. As a suitable stroom user e.g. stroomuser - download and unpack the stroom software.
The configuration file – stroom-proxy/config/config.yml – is the principal file that controls the configuration of Stroom-Proxy.
See Stroom Proxy Configuration.
8.2 - Proxy Configuration
How Stroom Proxy is configured.
See Stroom Proxy Configuration for details.
8.3 - Proxy Functions
The key functions and capabilities of Stroom-Proxy.
Data Receipt
Data Feed API
This is Stroom-Proxy’s traditional API for receiving data and Stroom shares the same API.
See /datafeed for more details.
Event Store API
Stroom-Proxy presents an alternative HTTP POST API at /api/event to receive individual events.
If the Stroom-Proxy instances are sufficiently resilient then client systems can use this API to send events directly without needing to buffer them locally.
It must only be used for sending a single event, not a batch of events.
The HTTP headers Feed and Type are used to provide the Feed and Stream Type, which are used as the compound aggregation key.
The request content is assumed to be UTF-8 encoded text data but can be in any format, e.g. XML, JSON, CSV, etc.
Stroom-Proxy will convert each request into the following JSON object and aggregate them by Feed and Stream Type in the Event Store, with one file per key.
The JSON combines the receipt information, the HTTP headers and the event data into one structured object that can be processed and transformed by Stroom.
{
"version": 0,
"event-id": "1771956627189_0001_P_test-proxy",
"proxy-id": "test-proxy",
"feed": "FEED_X",
"type": "Raw Events",
"receive-time": "2026-02-24T18:10:27.192Z",
"headers": [
{ "name": "Feed", "value": "FEED_X" },
{ "name": "Type", "value": "Raw Events" }
],
"detail": "this\nis some data \n with new \n\n lines"
}
version- The version of the Event structure, currently0.event-id- A unique ID for the event. This uses the Receipt ID which is a unique identifier for the event.proxy-id- The unique identity for the Stroom-Proxy instance within the estate.feed- The Feed the event is destined for, taken from theFeedHTTP header.type- The Stream Type the event is destined for, taken from theTypeHTTP header.receive-time- The ISO-8601 timestamp taken when the event was received.headers- A list of the meta attributes extracted from the HTTP headers.detail- The event payload, i.e. the HTTP request content.
Each event is written as one line in the aggregated file, delimited by a Line Feed (\n).
A file containing one JSON object per line is typically referred to as
JSON Lines Format
.
This format is mean easier to parse than a single JSON object containing many events.
If Stroom-Proxy is configured for aggregation then the Event Store essentially adds another layer of aggregation in front of Stroom-Proxy’s standard aggregation. The Event Store aggregation is configured separately to the standard aggregation. See Event Store Configuration for details on how to configure the Event Store and the aggregation thresholds.
Once a file of one or more individual event objects has met its aggregation thresholds it will be processed in the same way as data arriving via /datafeed.
Authentication
/api/event differs from the other /api/... REST endpoints in how requests are authenticated.
It does not use the same authentication as the other endpoints.
Its authentication is performed in the same way as /datafeed and is configured using Event Store Configuration.
AWS Simple Queue Service Connector
Stroom-Proxy Supports receiving individual events from one or more AWS Simple Queue Service queues. Each event received is treated in the same way as event received via the Event Store API.
Receipt Filtering
Stroom-Proxy can be configured a number of different methods of data receipt filtering:
FEED_STATUS- Data is filtered based on the Status of the Feed in Stroom.RECEIPT_POLICY- Data is filtered based on a set of policy rules that have been created in Stroom.RECEIVE_ALL- All data is accepted, regardless.DROP_ALL- All data is silently dropped.REJECT_ALL- All data is rejected with an error.
Splitting
When ZIP data is received in Stroom ZIP Format it will be examined to determine if it contains multiple groups (where a group is identified by Feed and Stream Type). ZIP data with multiple groups will be split so that data for each group will be processed separately.
Aggregation
If enabled, the aggregation function will locally store the received data and aggregate data from multiple HTTP requests together until the aggregation threshold is reached. Data will be aggregated by common group key (Feed and Stream Type).
Aggregation can be limited by one or more of:
- Item count - The number of items in the aggregate.
- Maximum uncompressed size - The total uncompressed size of the aggregate. Note, this is a target as Stroom-Proxy may received a single item of data that is larger than this limit.
- Frequency - How often data is assembled into a completed aggregate.
Forwarding
Stroom-Proxy can forward data to one or more destinations and the following destination types are supported:
- File - The data (in ZIP format) is written to a configured directory.
- HTTP - The data (in ZIP format) is POSTed to a configured URL.
If multiple destinations are configured, the ZIP to be forwarded will be copied to each of the forward destination input queues. This means the failure to send to one destination has no impact on sending to the other destinations.
Forwarding is configured using Forward Configuration.
For details of the directories used in forwarding, see /40_forwarding_input_queue/ and /50_forwarding/.
Instant Forwarding
This is a special type of forwarding that means data is streamed directly to a destination rather than being written to local disk first. The instant forwarding is only possible if there is only one forwarding destination configured. Data will still be subject to the configured receipt filtering.
Instant forwarding is enabled by setting instant to true on the forward destination configuration branch.
Forward Failure Handling
When there is a failure to forward a ZIP, Stroom-Proxy will move it to one of two places:
- Retry Queue
- If the reason for the failure is considered a recoverable one, e.g. the HTTP destination is down, it will move the ZIP onto the retry queue.
The retry behaviour is configured using Queue Configuration
- Failure Directory
- If the failure is deemed unrecoverable, the ZIP will be moved to the
03_failuresub directory within the forward destination directory. At this point the ZIP file is no longer under the control of Stroom-Proxy and will have to be dealt with manually by the administrator.If the reason for the failure is addressed it is possible to re-process the failed data by moving it into a directory that is configured for Directory Scanning.
Directory Scanning
Stroom-Proxy can periodically scan one or more directories to look for ZIP files to ingest.
Any ZIP files found will be treated as if they were received via the /datafeed API.
The scanning will recurse into any directories found.
This feature is primarily aimed at re-processing data that Stroom-Proxy has been unable to forward due to an un-recoverable error or too many retries.
This mechanism can also be used as an additional means of passing data into Stroom-Proxy (instead of via /datafeed).
Example
A typical case scenario is that some data has failed to send to Stroom and the retry age has been reached so the ZIP has been moved to the forward failure directory:
Contents of data/50_forwarding/downstream/
./03_failure/20251014/BAD_FEED/0/001/proxy.zip
./03_failure/20251014/BAD_FEED/0/001/proxy.meta
./03_failure/20251014/BAD_FEED/0/001/error.log
If you wish to re-send this ZIP you can do the following:
This will move the 001 directory into zip_file_ingest/, renaming it to a unique
UUID
UUID
A Universally Unique Identifier for uniquely identifying something. UUIDs are used as the identifier in Doc Refs. An example of a UUID is 4ffeb895-53c9-40d6-bf33-3ef025401ad3.Click to see more details... to ensure it doesn’t clash with any existing files/directories.
The name of this directory in the ingest directory has no bearing on processing, other than the order in which directories are scanned.
On the next scan, Stroom-Proxy will discover the proxy.zip file.
It will check for the presence of any of the optional associated side-car files (i.e. proxy.meta and error.log).
The entries in the .meta file will be consumed.
The error.log file will be deleted following successful ingest.
Stroom-Proxy will scan into all sub-directories within the ingest directory, regardless of depth.
The .meta sidecar file is optional, but if provided will be used to provide meta values equivalent to HTTP headers when sending to /datafeed.
For a .meta file to be consumed, it must have the same base-name as the ZIP file, e.g. data.zip and data.meta, and be in the same directory as the ZIP file.
Warning
Stroom-Proxy may be scanning at the same time as you are moving files in to the zip_file_ingest directory.
Therefore, it is important that if you are supplying sidecar files that you move a parent directory rather than the files themselves (as is shown in the above mv example).
This will ensure that the move happens atomically, so all files will be visible to the scanner.
8.4 - Proxy API
Details of the various APIs presented by Stroom-Proxy.
Application APIs
These are the public APIs of the Stroom-Proxy application and are all available on the application port (which defaults to 8090).
Administrators may still want to restrict access to specific endpoints, e.g. making the /datafeed API public, but limiting the REST API to within the Stroom estate as the REST APIs are typically called by other Stroom-Proxy instances.
/datafeed
Stroom-Proxy presents the same /datafeed API as Stroom.
This also has a legacy alias of /stroom/datafeed.
For more details of how to use this API, see Sending Data to Stroom.
/api/event
This is an alternative to the /datafeed API and is for sending individual events to Stroom-Proxy.
For more details see Event Store API.
Note
/api/event differs from the other /api/... endpoints in how requests are authenticated.
It does not use the same authentication as the other endpoints.
Its authentication is performed in the same way as /datafeed and is configured using Event Store Configuration.
/ui
This returns HTML and is intended to be used in a browser. It will display something like:
Stroom Proxy v7.10.20 built on 2026-02-25T15:32:45.708Z
Send data to http://localhost:8090/datafeed
/status
This provides a basic status response for Stroom-Proxy. It returns a JSON object like this:
{
"upTime": 1772119560408,
"buildVersion": "v7.10.20",
"buildTime": 1772033565708
}
/debug
This endpoint can be used for debugging datafeed requests. A datafeed request can be POSTed to this endpoint instead, so that the client can see what headers and payload are reaching the server.
This example POSTs a simple bit of data with one extra header.
REST API
Stroom-Proxy presents a number of REST REST REST (Representational State Transfer) is essentially an architectural style that dictates how data should be handled and “transferred” across a network. REST APIs typically use JSON to send data between the client and the server, and the HTTP methods GET, PUT, PATCH, POST and DELETE.Click to see more details... endpoints:
POST-/api/apikey/v2/verifyApiKey- Allows an upstream Stroom-Proxy to verify an API key.POST-/api/event- The Event Store API for POSTing individual events. Note that this endpoint does not use the same authentication as the other REST endpoints.POST-/api/feedStatus/v1/getFeedStatus- Allows an upstream Stroom-Proxy to check the receipt status of a Feed.POST-/api/feedStatus/v2/getFeedStatus- Allows an upstream Stroom-Proxy to check the receipt status of a Feed.GET-/api/ruleset/v2/fetchHashedRules- Allows an upstream Stroom-Proxy to fetch the obfuscated receipt policy rules.
Admin APIs
These APIs are presented on the administration port/path which by default is:
localhost:8091/proxyAdmin/....
More details about the admin APIs (with the exception of the Prometheus endpoint) can be found here Metrics Servlets .
Warning
It is important that access to the administration port/path is tightly controlled as it potentially allows access to destructive actions or exposes information about the Stroom-Proxy that should not be public.
Typically the APIs on the admin path/port should only be accessible to an administrator of the Stroom-Proxy instance.
Metrics
Proxy exposes two endpoints for capturing metrics on its inner workings:
-
Dropwizard Metrics -
http://localhost:8091/proxyAdmin/metrics. This exposes the metrics as a JSON object. For more details see Dropwizard Metrics . -
Prometheus Metrics -
http://localhost:8091/proxyAdmin/prometheusMetrics. Exposes the same data as Dropwizard Metrics, but in a format suitable for scraping by Prometheus .
Health Check
http://localhost:8091/proxyAdmin/healthcheck
http://localhost:8091/proxyAdmin/healthcheck?pretty=true
Performing a GET request on this endpoint will initiate a health check on all parts of Stroom-Proxy that have registered a health check.
Each registered health check will return healthy or unhealthy along with any details relating to its state.
If all health checks return healthy then the endpoint will return a 200 status.
It allows the Stroom-Proxy instance to self check its inner workings.
Current registered health checks are:
- deadlocks - Checks for any deadlocked threads.
- stroom.dropwizard.common.LogLevelInspector - Reports the current logger levels that have been set. This is not strictly a health check as it will always return healthy, more for information purposes.
- stroom.proxy.app.ProxyConfigHealthCheck - Displays the current configuration values. This is not strictly a health check as it will always return healthy, more for information purposes.
- stroom.proxy.app.ProxyConfigMonitor - Returns healthy if the monitoring of the config file is working correctly.
- stroom.proxy.app.ReceiveDataRuleSetClient - Returns healthy if the receipt policy rules could be fetched from the downstream host. Will return healthy if receipt policy checking is not enabled/configured.
- stroom.proxy.app.handler.RemoteFeedStatusClient - Returns healthy if a feed status check could be fetched from the downstream host. Will return healthy if receipt policy checking is not enabled/configured.
- stroom.proxy.app.security.ProxyApiKeyCheckClient - Returns healthy if an API Key check could be performed. Will return healthy if receipt policy checking is not enabled/configured.
- stroom.receive.common.DataFeedKeyDirWatcher - Returns healthy if the monitoring of the Datafeed Key directory is working correctly.
- stroom.security.common.impl.ExternalIdpConfigurationProvider - Returns healthy if the configuration of the external IDP could be fetched. Will return healthy if no external IDP is configured.
Filtered Health Check
http://localhost:8091/proxyAdmin/filteredhealthcheck
This performs the same as the Health Check, but allows for filtering of the checks, which can be useful if there are certain checks that need to be ignored.
It takes the following optional query parameters:
allow- A comma delimited list of health check names to include.deny- A comma delimited list of health check names to exclude.minimal- Set totrueto exclude all the detail in the health check response.pretty- Set totrueto format the JSON.
Queues
http://localhost:8091/proxyAdmin/queues
This endpoint returns HTML and is intended as a means for an admin to monitor the state of the various internal queues within Stroom-Proxy. It is intended to be called from a browser.
Tasks
Stroom-Proxy has a number of administrative tasks that can be executed via its tasks API.
The list of available task names can be found by performing a GET request on:
http://localhost:8091/proxyAdmin/tasks
The following is a list of the task names that are currently available:
clear-all-cache- Clears all caches in Stroom-Proxy.clear-cache-Authenticated-Data-Feed-Key-Cache- Clears the Authenticated Datafeed Key cache.clear-cache-Event-Store-Open-Appenders- Clears the Event Store Open Appenders cache.clear-cache-Remote-Feed-Status-Response-Cache- Clears the Remote Feed Status Response cache.gc- Forces a Java garbage collection to destroy unused objects in memory.log-level- Sets the log level for a named class or package.
Tasks are executed using a POST and may require form data if the task requires it.
The log-level task requires parameters to tell it the log level to set and on which class/package to set it.
The task may or may not return content.
Ping
http://localhost:8091/proxyAdmin/ping
Simple endpoint that will respond with the text pong and a 200 status if Stroom-Proxy is running.
This can be used by load balancers to determine if Stroom-Proxy is up or not.
Threads
http://localhost:8091/proxyAdmin/threads
Lists the currently running threads with a stack trace for each. Can be useful for debugging.
8.5 - Receipt ID
A unique identifier that is assigned to each item of data received by Stroom-Proxy.
On receipt of data, Stroom-Proxy will assign the data a unique Receipt ID.
This value will be set in the ReceiptId meta attribute.
It will also be appended to the ReceiptIdPath meta attribute, which is a comma delimited list of Receipt IDs.
The format of this attribute has been made to make it more useful to administrators, while still being unique across the environment that the Stroom and Stroom-Proxy instances are deployed in.
The format is as follows:
<timestamp>_<seq no>_<(P|S)>_<proxyId or stroom nodeName>
-
<timestamp>- The receipt timestamp in milliseconds since the Unix Epoch Unix Epoch The Unix epoch is 00:00:00 UTC on 1st January 1970. Some timestamps in Stroom are represented as the number of milliseconds since the Unix epoch, e.g.1738331628276, and may be referred to as epoch ms or epoch milliseconds.Click to see more details..., zero padded. -
<seq no>- This is zero padded four digit sequential number (starting at0000) that is used to distinguish between multiple receipt events happening during the same millisecond on the same instance. -
<P|S>- Indicates whether the item was received by Stroom (S) or Stroom-Proxy (P). -
<proxyId or stroom nodeName>- For Stroom-Proxy this will be theproxyConfig.proxyIdthat is either set in configuration to uniquely identify a proxy instance or is one of the Fully Qualified Domain Name (FQDN) Fully Qualified Domain Name (FQDN) The Fully Qualified Domain Name (FQDN) is the complete, unambiguous address of a device or service on the internet, specifying all domain levels including the hostname, domain name, and top-level domain. For exampleserver57.some.domain.com.Click to see more details.../ IP address IP address The Internet Protocol (IP) address, e.g.192.168.0.1. Typically an IP address is assumed to be an IPv4 address.Click to see more details.... For Stroom this is the node name of the Stroom instance. TheproxyIdset on each Stroom-Proxy instance must be unique across all Stroom-Proxy instances in the estate. ThenodeNameset on each Stroom instance must be unique across all Stroom instances in the estate.
An example Receipt ID is 0000001738332835967_0000_P_node1
The new format is useful for tracing the flow of data through a chain of proxies as it will be included in receive and send logs as well as being written to the meta attributes.
To ensure uniqueness of these IDs across the estate, proxyID values should be unique within the environment that data will flow.
The same is true for Stroom nodeName values.
8.6 - Proxy Architecture
An overview of the architecture of Stroom-Proxy.
Overview
Stroom-Proxy has a number of moving parts and it can be configured in a variety of ways. This document aims to describe some typical configurations of Stroom-Proxy.
Directories as Queues
Stroom-Proxy makes heavy use of multiple file system directories as work queues. These queues act as the interface between the different processing steps in Stroom-Proxy.
Data representing one queue item is placed into a directory. That directory is atomically moved into a queue directory with a new name to represent its position in the queue. The directory is consumed from the directory queue by atomically moving it to a different path, typically this will be a numbered directory that acts as a staging area where it can be worked on before moving it to a different directory queue.
These sub-directories are placed in a path structure that indicates the position in the queue, e.g.:
./50_forwarding/downstream/02_retry/2/012/345/012345678
In the above example:
./50_forwarding/downstream/02_retryrepresents the base directory of the queue./2/represents the depth of the directory tree, i.e. the queue item has two sub-directories above it./012/is a sub-directory containing items 12,000,000 to 12,999,999./345/is a sub-directory containing items 12,345,000 to 12,345,999./012345678/is the queue item containing the data to be processed. The number is the position in the queue and the number of digits is always left padded with zeros to be a multiple of three.
This structure ensures that there are never more than 999 items in each directory and the head/tail of the queue can be found quickly.
Numbered Directories
Typically between each queue is a numbered directory that acts as a staging area to work on the data. Numbered directories are sequentially numbered directories that all exist in a single parent directory. They are expected to be transient in nature, i.e. only existing until they can be move to another queue.
For example, 01_receiving_simple contains numbered directories and each one is used to stage non-ZIP data that has been received into proxy:
./01_receiving_simple/0000001407/
./01_receiving_simple/0000001408/
./01_receiving_simple/0000001409/
Each directory represents data for a single request into Stroom Proxy. Once the data has been successfully written to one of these directories, the directory will be atomically moved to one of the directory queues, e.g.
./01_receiving_simple/0000001407/ => 20_pre_aggregate_input_queue/0/382/
The directory then becomes the responsibility of the queue directory it was moved into.
Directory Structure
The following is a list of the directories used by Stroom-Proxy in its data directory (as configured by proxyConfig.path.data).
|-- 01_receiving_simple/
|-- 01_receiving_zip/
|-- 02_split_zip_input_queue/
|-- 03_split_zip_splits/
|-- 20_pre_aggregate_input_queue/
|-- 21_pre_aggregates/
|-- 22_splitting/
|-- 23_split_output/
|-- 30_aggregate_input_queue/
|-- 31_aggregates/
|-- 40_forwarding_input_queue/
|-- 50_forwarding/
| |-- <destination name 1>/
| | |-- 01_forward/
| | |-- 02_retry/
| | `-- 03_failure/
| `-- <destination name 2>/
| |-- 01_forward/
| |-- 02_retry/
| `-- 03_failure/
|-- 99_deleting/
|-- event/
`-- temp_forward_copies/
The following diagram illustrates how data flows between the various queues and numbered directories.

/01_receiving_simple/
This directory is the reception for area for data that is NOT a
ZIP
ZIP
A compressed file format for storing a one or more files with an associated directory structure. Stroom and Stroom Proxy use the ZIP format for exporting content and data as well as its Proxy ZIP format for holding multiple streams of data with associated meta data.Click to see more details... file, i.e. uncompressed or gzip compressed data.
It contains numbered directories.
Data will be written to this directory before the client receives the HTTP response.
Each numbered directory will contain two files:
/01_receiving_simple/0000002034/0000000001.meta- The meta sidecar file containing the HTTP headers./01_receiving_simple/0000002034/0000000001.dat- The file containing the received payload data.
The filenames are always the same as it is only dealing with a single stream.
/02_receiving_zip/
This directory is the reception for area for data that has been received as a ZIP ZIP A compressed file format for storing a one or more files with an associated directory structure. Stroom and Stroom Proxy use the ZIP format for exporting content and data as well as its Proxy ZIP format for holding multiple streams of data with associated meta data.Click to see more details... file which may contain one or more streams of data and associated metadata. It contains numbered directories.
Received ZIP files will be written to a numbered sub-directory in this directory before the client receives the HTTP response.
All .meta files in the ZIP file will be updated to add the HTTP headers from the request.
In order to do this, Stroom Proxy will first write the ZIP as a .zip.staging file.
It will clone all the ZIP entries in this file into a .zip file, updating the .meta entries as it goes.
The .zip.staging file will be deleted once complete.
The ZIP entries will be scanned and all valid entries will be written to a .entries sidecar file for subsequent processes to use.
This .entries file defines the entries in the ZIP that are valid for further processing and allows subsequent processing to use this file as a reference rather than having to re-scan the ZIP.
The scanning process will also establish how many groups are in the ZIP. A group is defined as a combination of the Feed and the Stream Type.
If the ZIP contains more than one group or the ZIP does not adhere to the correct [Stroom ZIP Format](/docs/sending-data/payloads/#stroom-zip-format, the directory will be moved to /02_split_zip_input_queue/ for splitting.
If the ZIP has a valid format and only contains one group, it will either be moved to the 20_pre_aggregate_input_queue queue, if aggregation is enabled, or 40_forwarding_input_queue queue if not.
/02_split_zip_input_queue/
Each directory placed into this directory queue will contain a ZIP file and a .entries file.
The ZIP may be in an invalid format, in which case a new ZIP will be created with the correct entry naming and structure.
This is to ensure that all ZIP files received downstream are in a consistent format.
Alternatively it will contain more than one group, so will need to be split into one ZIP file per group.
A numbered directory will be created in /03_split_zip_splits/ to hold each split.
For each group of entries in a split, it will create a sub-directory named after the group in the numbered directory, e.g. for two splits:
/03_split_zip_splits/0000000392/FEED_X__raw_events/proxy.zip/03_split_zip_splits/0000000392/FEED_X__raw_events/proxy.entries/03_split_zip_splits/0000000392/FEED_X__raw_events/proxy.meta/03_split_zip_splits/0000000392/FEED_Y__raw_events/proxy.zip/03_split_zip_splits/0000000392/FEED_Y__raw_events/proxy.entries/03_split_zip_splits/0000000392/FEED_Y__raw_events/proxy.meta
Once the splitting is complete, each split directory will be moved to the 20_pre_aggregate_input_queue queue, if aggregation is enabled, or 40_forwarding_input_queue queue if not.
/20_pre_aggregate_input_queue/
Each directory on this queue will contain a ZIP file that contains one or more entries for the same group (combination of Feed and Stream Type).
If proxyConfig.aggregator.splitSources is set to true, Stroom Proxy will inspect the ZIP to see if it needs to be split up into multiple parts, to meet the aggregation targets (defined by proxyConfig.aggregator.maxItemsPerAggregate and proxyConfig.aggregator.maxUncompressedByteSize), else the zip will be treated as a single split-part.
If there is just one split-part, the directory will be moved into the current aggregate directory for its group, e.g.
/21_pre_aggregates/FEED_X__raw_events/009/proxy.zip
If there are multiple split-parts the ZIP file will require splitting into multiple ZIP files with one per split-part, i.e. all entries from the input ZIP spread over multiple split-part ZIPs. Each split-part will be written like this:
/22_splitting/0000000343/009_part_1/proxy.zip/22_splitting/0000000343/009_part_2/proxy.zip/22_splitting/0000000343/009_part_3/proxy.zip
Once the splitting has been completed, the common parent directory is moved to /23_split_output/:
/23_split_output/0000000343/009_part_1/proxy.zip/23_split_output/0000000343/009_part_1/proxy.zip/23_split_output/0000000343/009_part_1/proxy.zip
Each split-part is then moved to /21_pre_aggregates/.
/21_pre_aggregates/FEED_X__raw_events/011/proxy.zip
When the aggregate for a Feed|Type group is complete (based on item count and uncompressed size), the aggregate will be closed.
Closing of the aggregate involves moving the parent directory of all the aggregate items to /30_aggregate_input_queue/.
/30_aggregate_input_queue/
Each directory on this queue will contain multiple directory groups (each containing a ZIP file and its associated files) that are to be part of a single aggregate.
If there is only one item in the queue directory, the directory will be moved to /40_forwarding_input_queue/ for forwarding.
If there are more than one items in the queue directory then a new aggregate ZIP will be created in /31_aggregates/.
The entries from each item ZIP will be written into the new aggregate ZIP.
It will also create a set of meta entries for the aggregate. This will contain only key/value entries that are present in every item in the aggregate.
Once the aggregate has been written it is moved to /40_forwarding_input_queue/.
/40_forwarding_input_queue/
Each directory on this queue will contain a single ZIP file that may contain one or more streams (plus associated files).
In addition to the ZIP file will be a combined .meta file for the aggregate.
Depending on how forwarding has been configured (using proxyConfig.forwardFileDestinations and proxyConfig.forwardHttpDestinations), there will be a pair of directory queues for each of the forwarding destinations, with the destination name in the path, e.g.:
/50_forwarding/file-dest-1/01_forward//50_forwarding/file-dest-1/02_retry//50_forwarding/file-dest-2/01_forward//50_forwarding/file-dest-2/02_retry//50_forwarding/http-dest-1/01_forward//50_forwarding/http-dest-1/02_retry//50_forwarding/http-dest-2/01_forward//50_forwarding/http-dest-2/02_retry/
Each item on the /40_forwarding_input_queue/ queue will be copied into each of the 01_forward queues, then the source item will be deleted.
This keeps each destination independent and prevents a loss of connection to one destination from impacting the others.
/50_forwarding/
This directory contains multiple directory queues, two per forward destination.
..../<destination name>/01_forward/- Items initially queued for forwarding to the destination...../<destination name>/02_retry/- Items that have failed to forward to the destination and have been queued for a retry.
Each forward destination directory also contains a failure directory:
..../<destination name>/03_failure/- Items that have failed to forward. Either they have failed too many times or have failed with an error that prevents retry. Items in this directory are now outside the control of Stroom-Proxy and will remain until moved/deleted by an administrator.
9 - Glossary
A glossary of common terms used in this documentation.
9.1 - A
9.1.1 - Account
Refers to a user account in Stroom’s internal Identity Provider.
See Also
- User Accounts.
- Identity Provider (IDP) Identity Provider (IDP) An Identity Provider is a system or service that can authenticate a user and assert their identity. Identity providers can support single sign on (SSO), which allows the user to sign in once to the Identity Provider so they are then authenticated to all systems using that IDP.Click to see more details...
9.1.2 - API
Application Programming Interface. An interface that one system can present so other systems can use it to communicate. Stroom has a number of APIs, e.g. its many REST APIs and its
/datafeed interface for data receipt.See Also
REST
REST
REST (Representational State Transfer) is essentially an architectural style that dictates how data should be handled and “transferred” across a network. REST APIs typically use JSON to send data between the client and the server, and the HTTP methods GET, PUT, PATCH, POST and DELETE.Click to see more details...
9.1.3 - API Key
API Keys are a form of authentication token that are created within Stroom for use by Stroom-Proxy instances or other clients that want to use Stroom’s API. It is an encrypted string that contains details of the user and the expiration date of the token. Possession of a valid API Key for a user account means that you can do anything that the user can do in the user interface via the API.
API Keys should therefore be protected carefully and treated like a password. If you are using an external Identity Provider Identity Provider (IDP) An Identity Provider is a system or service that can authenticate a user and assert their identity. Identity providers can support single sign on (SSO), which allows the user to sign in once to the Identity Provider so they are then authenticated to all systems using that IDP.Click to see more details... then tokens for use with the Identity Provider Identity Provider (IDP) An Identity Provider is a system or service that can authenticate a user and assert their identity. Identity providers can support single sign on (SSO), which allows the user to sign in once to the Identity Provider so they are then authenticated to all systems using that IDP.Click to see more details... are generated by the external Identity Provider Identity Provider (IDP) An Identity Provider is a system or service that can authenticate a user and assert their identity. Identity providers can support single sign on (SSO), which allows the user to sign in once to the Identity Provider so they are then authenticated to all systems using that IDP.Click to see more details....
See Also
-
API
API
Application Programming Interface. An interface that one system can present so other systems can use it to communicate. Stroom has a number of APIs, e.g. its many REST APIs and its
/datafeedinterface for data receipt.Click to see more details... - Token Token Typically refers to an authentication token that may be used for user authentication. A Stroom API Key is a form of authentication token.Click to see more details...
- Identity Provider (IDP) Identity Provider (IDP) An Identity Provider is a system or service that can authenticate a user and assert their identity. Identity providers can support single sign on (SSO), which allows the user to sign in once to the Identity Provider so they are then authenticated to all systems using that IDP.Click to see more details...
9.1.4 - Application permission
This is a permission that is not specific to a single document. It applies to all documents or is not related to documents in any way.
Application permissions are generally associated with a screen or functional area of the Stroom application. A lot of the application permissions tend to be more applicable to system administrators but allow fine grained control of the different functional areas in Stroom so these functions can be devolved to other users.
Examples of application permissions are Manage Users, Pipeline Stepping and Data - View.
See Also
9.2 - B
9.2.1 - Byte order mark
A special Unicode character at the start of a text stream that indicates the byte order (or endianness) of the stream.
See Also
9.3 - C
9.3.1 - Character encoding
Character Encoding is the means of encoding character data (i.e. text) into binary form. Therefore to decode character data from a stream of bytes, the character encoding must be known (or guessed).
Common examples of character encodings are ASCII, UTF-8 and UTF-16.
Each Feed Feed A Feed is a means of organising and categorising data in Stroom. A Feed contains multiple Streams of data that have been ingested into Stroom or output by a Pipeline. Typically a Feed will contain Streams of data that are all from one system and have a common data format.Click to see more details... has a defined character encoding for the data and context Context data This is an additional stream of contextual data that is sent along side the main event stream. It provides a means for the sending system to send additional data that relates only to the event stream it is sent alongside.Click to see more details.... This allows Stroom to decode the data sent into that Feed.
See Also
9.3.2 - Condition
A Condition in an query expression term, e.g.
=, >, in, etc.9.3.3 - Content
Content in Stroom typically means the user created documents/entities created in Stroom and as seen in the explorer tree. Content can be created/modified by Stroom users and imported/exported for sharing between different Stroom instances.
See Also
9.3.4 - Context data
This is an additional stream of contextual data that is sent along side the main event stream. It provides a means for the sending system to send additional data that relates only to the event stream it is sent alongside.
This can be useful where the sending system has no control over the data in the event stream and the event stream does not contain contextual information such as what machine it is running on or the location of that machine.
The contextual information (such as hostname, FQDN, physical location, etc.) can be sent in a Context Stream so that the two can be combined together during pipeline processing using stroom:lookup().
See Also
9.3.5 - Cron
Cron is a command line utility found on most linux/unix systems that is used for scheduling background tasks. Cron expressions (or variants of them) are widely used in other schedulers.
Stroom uses a scheduler called Quartz which supports cron expressions for scheduling. The full details of the cron syntax supported by Quartz can be found here .
See Also
9.3.6 - CSV
Comma Separated Values is a file format with typically one record per line and fields delimited by a
,. Fields may be optionally enclosed with double quotes, though there is no fixed standard for CSV data, particularly when it comes to escaping of double quotes and/or commas.9.4 - D
9.4.1 - Dashboard
A Dashboard is a configurable entity for querying one or more Data Sources and displaying the results as a table, a visualisation or some other form.
See Also
- Dashboard User Guide
- Data source Data source The source of data for a Query, e.g. a Lucene based Index, a SQL Statistics Data source, etc.Click to see more details...
9.4.2 - Data source
The source of data for a Query, e.g. a Lucene based Index, a SQL Statistics Data source, etc.
There are three types of Data source:
- Lucene based search index data sources.
- Stroom’s SQL Statistics data sources.
- Searchable data sources for searching the internals of Stroom.
A data source will have a Doc Ref Doc Ref A Doc Ref (or Document Reference) is an identifier used to identify most documents/entities in Stroom, e.g. an XSLT will have a Doc Ref.Click to see more details... to identify it and will define the set of Fields Field A named data Field within some form of record or entity, and where each Field can have an associated value. In Stroom, Fields can be the Fields in an Index (or other queryable Data Source or the fields of Metadata associated with a Stream, e.g. Stream ID, Feed, creation time, etc.Click to see more details... that it presents. Each Field will have:
- A name
- A set of
Conditions
Condition
A Condition in an query expression term, e.g.
=,>,in, etc.Click to see more details... that it supports. E.g. aFeedfield would likely supportisbut not>. - A flag to indicate if it is queryable or not. I.e. a queryable field could be referenced in the query expression tree and in a Dashboard Dashboard A Dashboard is a configurable entity for querying one or more Data Sources and displaying the results as a table, a visualisation or some other form.Click to see more details... table, but a non-queryable field could only be referenced in the Dashboard table.
See Also
- Query Query The search Query in a Dashboard that selects the data to display. The Query is constructed using an Expression Tree of terms.Click to see more details...
- Dashboard Dashboard A Dashboard is a configurable entity for querying one or more Data Sources and displaying the results as a table, a visualisation or some other form.Click to see more details...
- Field Field A named data Field within some form of record or entity, and where each Field can have an associated value. In Stroom, Fields can be the Fields in an Index (or other queryable Data Source or the fields of Metadata associated with a Stream, e.g. Stream ID, Feed, creation time, etc.Click to see more details...
9.4.3 - Data splitter
Data Splitter is a pipeline element for converting text data (e.g. CSV, fixed width, delimited, multi-line) into XML for onward processing.
See Also
- User Guide
- Pipeline Element Reference
- Pipeline Pipeline A Pipeline is an entity that is constructed to take a single input of stream data and process/transform it with one or more outputs. A Pipeline can have many elements within it to read, process or transform the data flowing through it.Click to see more details...
9.4.4 - Dictionary
A entity for storing static content, e.g. lists of terms for use in a query with the
in dictionary condition. They can also be used to hold arbitrary text for use in XSLT with the dictionary function.See Also
- XSLT XSLT Extensible Stylesheet Language Transformations is a language for transforming XML documents into other XML documents. XSLTs are the primary means of transforming data in Stroom.Click to see more details...
- dictionary()
9.4.5 - Doc Ref
A Doc Ref (or Document Reference) is an identifier used to identify most documents/entities in Stroom, e.g. an XSLT will have a Doc Ref.
It is comprised of the following parts:
-
UUID
UUID
A Universally Unique Identifier for uniquely identifying something. UUIDs are used as the identifier in Doc Refs. An example of a UUID is
4ffeb895-53c9-40d6-bf33-3ef025401ad3.Click to see more details... - A Universally Unique Identifier to uniquely identify the document/entity. - Type - The type of the document/entity, e.g.
Index,XSLT,Dashboard, etc. - Name - The name given to the document/entity.
Doc Refs are used heavily in the REST API for identifying the document/entity to be acted on.
See Also
Document
Document
Typically refers to an item that can be created in the Explorer Tree, e.g. a Feed, a Pipeline, a Dashboard, etc. May also be known as an Entity.Click to see more details...
9.4.6 - Document
Typically refers to an item that can be created in the Explorer Tree, e.g. a Feed, a Pipeline, a Dashboard, etc. May also be known as an Entity.
See Also
Entity
Entity
Typically refers to an item that can be created in the Explorer Tree, e.g. a Feed, a Pipeline, a Dashboard, etc. May also be known as a Document.Click to see more details...
9.4.7 - Document permission
Document permissions control the access that users and/or groups have to a Document.
See Also
- Document Document Typically refers to an item that can be created in the Explorer Tree, e.g. a Feed, a Pipeline, a Dashboard, etc. May also be known as an Entity.Click to see more details...
- Document Permissions
9.5 - E
9.5.1 - Elasticsearch
Elasticsearch is an Open Source and commercial search index product. Stroom can be connected to one or more Elasticsearch clusters so that event indexing and search is handled by Elasticsearch rather than internally.
See Also
9.5.2 - ELFF
The Extended Log File Format. A W3C standard format for log files produced by web servers.
See Also
9.5.3 - Entity
Typically refers to an item that can be created in the Explorer Tree, e.g. a Feed, a Pipeline, a Dashboard, etc. May also be known as a Document.
See Also
Document
Document
Typically refers to an item that can be created in the Explorer Tree, e.g. a Feed, a Pipeline, a Dashboard, etc. May also be known as an Entity.Click to see more details...
9.5.4 - Event
An event is a single auditable event, e.g. a user logging in to a system. A Stream typically contains multiple events.
In a
Raw Events
Raw Events
This is a Stream Type used for Streams received by Stroom. Streams received by Stroom will be in a variety of text formats (CSV, delimited, fixed width, XML, JSON, etc.). Until they have been processed by a pipeline they are essentially just unstructured character data with no concept of what is a record/event. A Parser in a pipeline is required to provide the demarcation between records/events.Click to see more details... an event is typically represented as block of XML or JSON, a single line for CSV data.
In an
Events
Events
This is a Stream Type in Stroom. An Events stream consists of processed/cooked data that has been demarcated into individual Events.Click to see more details...
Stream
Stream
A Stream is the unit of data that Stroom works with and will typically contain many Events.Click to see more details... an event is identified by its Event ID which its position in that stream (as a one-based number).
The Event ID combined with a Stream ID provide a unique identifier for an event within a Stroom instance.
See Also
- Stream Stream A Stream is the unit of data that Stroom works with and will typically contain many Events.Click to see more details...
- Raw Events Raw Events This is a Stream Type used for Streams received by Stroom. Streams received by Stroom will be in a variety of text formats (CSV, delimited, fixed width, XML, JSON, etc.). Until they have been processed by a pipeline they are essentially just unstructured character data with no concept of what is a record/event. A Parser in a pipeline is required to provide the demarcation between records/events.Click to see more details...
- Events Events This is a Stream Type in Stroom. An Events stream consists of processed/cooked data that has been demarcated into individual Events.Click to see more details...
9.5.5 - Events
This is a Stream Type in Stroom. An Events stream consists of processed/cooked data that has been demarcated into individual Events.
Typically in Stroom an Events stream will contain data conforming to the event-logging XML Schema which provides a normalised form for all Raw Events Raw Events This is a Stream Type used for Streams received by Stroom. Streams received by Stroom will be in a variety of text formats (CSV, delimited, fixed width, XML, JSON, etc.). Until they have been processed by a pipeline they are essentially just unstructured character data with no concept of what is a record/event. A Parser in a pipeline is required to provide the demarcation between records/events.Click to see more details... to be transformed into.
See Also
Stream Type
Stream Type
All Streams must have a Stream Type. The list of Stream Types is configured using the Property
stroom.data.meta.metaTypes.Click to see more details...
9.5.6 - Explorer tree
The left hand navigation tree. The Explorer Tree is used for finding, opening, creating, renaming, copying, moving and deleting Documents.
It can also be used to control the access permissions of entities and folders. The tree can be filtered using the quick filter, see Finding Things for more details.
See Also
Document
Document
Typically refers to an item that can be created in the Explorer Tree, e.g. a Feed, a Pipeline, a Dashboard, etc. May also be known as an Entity.Click to see more details...
9.5.7 - Expression tree
A tree of expression terms that each evaluate to a boolean (True/False) value. Terms can be grouped together within an expression operator (AND, OR, NOT).
For example:
AND (
Feed is CSV_FEED
Type = Raw Events
)
Expression Trees are used in Processor Filters Processor filter A Processor Filter is used to used to find Streams to process through the Pipeline associated with the Processor Filter. A Processor Filter consists of an expression tree to select which Streams to process and a tracker to track the what Streams have been processed.Click to see more details... and Query Query The search Query in a Dashboard that selects the data to display. The Query is constructed using an Expression Tree of terms.Click to see more details... expressions.
See Also
- Query Query The search Query in a Dashboard that selects the data to display. The Query is constructed using an Expression Tree of terms.Click to see more details...
- Expression functions
9.6 - F
9.6.1 - Feed
A Feed is a means of organising and categorising data in Stroom. A Feed contains multiple Streams of data that have been ingested into Stroom or output by a Pipeline. Typically a Feed will contain Streams of data that are all from one system and have a common data format.
See Also
- Stream Stream A Stream is the unit of data that Stroom works with and will typically contain many Events.Click to see more details...
- Pipeline Pipeline A Pipeline is an entity that is constructed to take a single input of stream data and process/transform it with one or more outputs. A Pipeline can have many elements within it to read, process or transform the data flowing through it.Click to see more details...
9.6.2 - Field
A named data Field within some form of record or entity, and where each Field can have an associated value. In Stroom, Fields can be the Fields in an Index (or other queryable Data Source or the fields of Metadata associated with a Stream, e.g. Stream ID, Feed, creation time, etc.
See Also
- Data source Data source The source of data for a Query, e.g. a Lucene based Index, a SQL Statistics Data source, etc.Click to see more details...
- Feed Feed A Feed is a means of organising and categorising data in Stroom. A Feed contains multiple Streams of data that have been ingested into Stroom or output by a Pipeline. Typically a Feed will contain Streams of data that are all from one system and have a common data format.Click to see more details...
- Index Index A Data Source that is backed by a Lucene based search index.Click to see more details...
- Metadata Metadata Metadata refers to the data that describes the Stream data. It is sometimes referred to as just Meta.Click to see more details...
- Stream Stream A Stream is the unit of data that Stroom works with and will typically contain many Events.Click to see more details...
9.6.3 - Filter
A Filter may refer to a Processor Filter or a Filter Element in a Pipeline.
See Also
- Processor filter Processor filter A Processor Filter is used to used to find Streams to process through the Pipeline associated with the Processor Filter. A Processor Filter consists of an expression tree to select which Streams to process and a tracker to track the what Streams have been processed.Click to see more details...
- Pipeline Pipeline A Pipeline is an entity that is constructed to take a single input of stream data and process/transform it with one or more outputs. A Pipeline can have many elements within it to read, process or transform the data flowing through it.Click to see more details...
9.6.4 - Fully Qualified Domain Name (FQDN)
The Fully Qualified Domain Name (FQDN) is the complete, unambiguous address of a device or service on the internet, specifying all domain levels including the hostname, domain name, and top-level domain. For example
server57.some.domain.com.See Also
9.7 - G
9.7.1 - Git
Git is a free and open source distributed version control system. It is used for controlling, organizing, and tracking different versions in history of computer files, typically text files but also any other type of file. It allows all changes made to a file to be viewed and tracked over time and for branching/merging of the repository for separate strands of work.
The source code for the Stroom software is stored in a Git repository. Stroom also uses Git for managing user content that is held in one or more Git repositories.
See Also
9.7.2 - Group (users)
A named group of users to which application and document permissions can be assigned. Users can belong to multiple groups. A Group can belong to multiple groups. Groups allow permissions to be assigned to the group such that members of that group inherit those permissions.
See Also
9.8 - H
9.9 - I
9.9.1 - Identity Provider (IDP)
An Identity Provider is a system or service that can authenticate a user and assert their identity. Identity providers can support single sign on (SSO), which allows the user to sign in once to the Identity Provider so they are then authenticated to all systems using that IDP.
Examples of identity providers are Google, Cognito, Keycloak and Microsoft Azure/Entra AD. Stroom has its own built in IDP or can be configured to use a 3rd party IDP.
9.9.3 - IP address
The Internet Protocol (IP) address, e.g.
192.168.0.1. Typically an IP address is assumed to be an IPv4 address.9.9.4 - ISO 8601
This is an international standard for representing dates, times and durations. By default Stroom displays date/times in ISO 8601.
Valid examples of ISO 8601 dates/times are:
2010-01-01T23:59Z
2010-01-01T23:59:59Z
2010-01-01T23:59:59.123Z
2010-01-01T23:59:59+02:00
2010-01-01T23:59:59.123+02
See Also
9.10 - J
9.10.1 - JAR
Java Archive is a file format for distributing Java class files, associated metadata and resource files. It is a compressed archive based on the {{< glossary “ZIP” >}} format, so can be inspected with any tool capable of reading a ZIP file. Stroom and Stroom-Proxy are distributed as JAR files.
9.10.2 - JSON
JavaScript Object Notation is a file/data format for storing/transmitting structured data. It has similarities to XML, is less verbose, but is more simplistic. Stroom accepts data in JSON format and can output to JSON.
See Also
9.11 - K
9.12 - L
9.13 - M
9.13.1 - Markdown
Markdown is a simple markup language for creating rich formatted text using a text editor. Due to the simplicity of the Markdown it is still very readable in its raw form that contains the markup. Markdown is used in Stroom on the Documentation tab of each Document type and in the Documentation Document type.
Stroom uses the Showdown markdown converter to render users’ markdown content into formatted text.
Note
Markdown is a somewhat loose standard so different markdown processors support different amounts of markdown syntax. For a definitive guide to the syntax supported in Stroom, see the above link.See Also
9.13.2 - Metadata
Metadata refers to the data that describes the Stream data. It is sometimes referred to as just Meta.
9.14 - N
9.14.1 - Namespace
In Stroom Namespace typically refers to an XML Namespace. Namespaces are used in XML to distinguish different elements, e.g. where an XSLT is transforming XML in the
records:2 Namespace into XML in the event-logging:3 Namespace.An XSLT will define short aliases for Namespaces to make them easier to reference within the XSLT document.
For example, in this snippet of an XML document, the aliases are: stroom, evt, xsl, xsi.
<xsl:stylesheet
xmlns="event-logging:3"
xpath-default-namespace="records:2"
xmlns:stroom="stroom"
xmlns:evt="event-logging:3"
xmlns:xsl="http://www.w3.org/1999/XSL/Transform"
xmlns:xsi="http://www.w3.org/2001/XMLSchema-instance"
version="2.0">
See Also
- XSLT XSLT Extensible Stylesheet Language Transformations is a language for transforming XML documents into other XML documents. XSLTs are the primary means of transforming data in Stroom.Click to see more details...
9.15 - O
9.16 - P
9.16.1 - Parser
A Parser is a Pipeline element for parsing Raw Events into a structured form. For example the Data Splitter Parser that parses text data into Records and Fields.
See Also
- Pipeline Element Reference
- Pipeline Pipeline A Pipeline is an entity that is constructed to take a single input of stream data and process/transform it with one or more outputs. A Pipeline can have many elements within it to read, process or transform the data flowing through it.Click to see more details...
- Raw Events Raw Events This is a Stream Type used for Streams received by Stroom. Streams received by Stroom will be in a variety of text formats (CSV, delimited, fixed width, XML, JSON, etc.). Until they have been processed by a pipeline they are essentially just unstructured character data with no concept of what is a record/event. A Parser in a pipeline is required to provide the demarcation between records/events.Click to see more details...
-
Records
Records
This is a Stream Type for Streams containing data conforming to the
records:2XML Schema. It also refers more generally to any XML conforming to therecords:2XML Schema which is used in a number of places in Stroom, including as the output format for the DSParser and input for the IndexingFilter.Click to see more details... - Field Field A named data Field within some form of record or entity, and where each Field can have an associated value. In Stroom, Fields can be the Fields in an Index (or other queryable Data Source or the fields of Metadata associated with a Stream, e.g. Stream ID, Feed, creation time, etc.Click to see more details...
9.16.2 - Pipeline
A Pipeline is an entity that is constructed to take a single input of stream data and process/transform it with one or more outputs. A Pipeline can have many elements within it to read, process or transform the data flowing through it.
See Also
9.16.3 - Pipeline element
An element within a Pipeline that performs some action on the data flowing through it.
See Also
- Pipeline Element Reference
- Pipeline Pipeline A Pipeline is an entity that is constructed to take a single input of stream data and process/transform it with one or more outputs. A Pipeline can have many elements within it to read, process or transform the data flowing through it.Click to see more details...
9.16.4 - Processor
A Processor belongs to a Pipeline. It controls the processing of data through its parent Pipeline using one or more Processor Filters.
The Processor can be enabled/disabled to enable/disable the processing of data through the Pipeline. A processor will have one or more Processor Filters Processor filter A Processor Filter is used to used to find Streams to process through the Pipeline associated with the Processor Filter. A Processor Filter consists of an expression tree to select which Streams to process and a tracker to track the what Streams have been processed.Click to see more details... associated with it.
See Also
Pipeline
Pipeline
A Pipeline is an entity that is constructed to take a single input of stream data and process/transform it with one or more outputs. A Pipeline can have many elements within it to read, process or transform the data flowing through it.Click to see more details...
Processor filter
Processor filter
A Processor Filter is used to used to find Streams to process through the Pipeline associated with the Processor Filter. A Processor Filter consists of an expression tree to select which Streams to process and a tracker to track the what Streams have been processed.Click to see more details...
9.16.5 - Processor filter
A Processor Filter is used to used to find Streams to process through the Pipeline associated with the Processor Filter. A Processor Filter consists of an expression tree to select which Streams to process and a tracker to track the what Streams have been processed.
For example a typical Processor Filter would have an Expression Tree that selected all Streams of type Raw Events in a particular Feed Feed A Feed is a means of organising and categorising data in Stroom. A Feed contains multiple Streams of data that have been ingested into Stroom or output by a Pipeline. Typically a Feed will contain Streams of data that are all from one system and have a common data format.Click to see more details.... A filter could also select a single Stream by its ID, e.g. when Re-processing Re-processing The act of repeating the processing of a set of input data (Stream) that have already been processed at least once. Re-Processing can be done for an individual Stream or multiple Streams using a Processor Filter.Click to see more details... a Stream.
A Pipeline can have multiple Processor Filters. Filters can be enabled/disabled independently of their parent Processor to control processing.
See Also
- Expression tree Expression tree A tree of expression terms that each evaluate to a boolean (True/False) value. Terms can be grouped together within an expression operator (AND, OR, NOT).Click to see more details...
- Feed Feed A Feed is a means of organising and categorising data in Stroom. A Feed contains multiple Streams of data that have been ingested into Stroom or output by a Pipeline. Typically a Feed will contain Streams of data that are all from one system and have a common data format.Click to see more details...
- Pipeline Pipeline A Pipeline is an entity that is constructed to take a single input of stream data and process/transform it with one or more outputs. A Pipeline can have many elements within it to read, process or transform the data flowing through it.Click to see more details...
- Re-processing Re-processing The act of repeating the processing of a set of input data (Stream) that have already been processed at least once. Re-Processing can be done for an individual Stream or multiple Streams using a Processor Filter.Click to see more details...
- Stream Stream A Stream is the unit of data that Stroom works with and will typically contain many Events.Click to see more details...
9.16.6 - Property
A configuration Property for configuring Stroom. Properties can be set in the user interface or via the
config.yml configuration file.See Also
9.17 - Q
9.17.1 - Query
The search Query in a Dashboard that selects the data to display. The Query is constructed using an Expression Tree of terms.
See Also
User Guide Dashboard Dashboard A Dashboard is a configurable entity for querying one or more Data Sources and displaying the results as a table, a visualisation or some other form.Click to see more details… Expression tree Expression tree A tree of expression terms that each evaluate to a boolean (True/False) value. Terms can be grouped together within an expression operator (AND, OR, NOT).Click to see more details…
9.18 - R
9.18.1 - Raw Events
This is a Stream Type used for Streams received by Stroom. Streams received by Stroom will be in a variety of text formats (CSV, delimited, fixed width, XML, JSON, etc.). Until they have been processed by a pipeline they are essentially just unstructured character data with no concept of what is a record/event. A Parser in a pipeline is required to provide the demarcation between records/events.
See Also
Stream
Stream
A Stream is the unit of data that Stroom works with and will typically contain many Events.Click to see more details...
Stream Type
Stream Type
All Streams must have a Stream Type. The list of Stream Types is configured using the Property
stroom.data.meta.metaTypes.Click to see more details...
Parser
Parser
A Parser is a Pipeline element for parsing Raw Events into a structured form. For example the Data Splitter Parser that parses text data into Records and Fields.Click to see more details...
9.18.2 - Re-processing
The act of repeating the processing of a set of input data (Stream) that have already been processed at least once. Re-Processing can be done for an individual Stream or multiple Streams using a Processor Filter.
See Also
Stream
Stream
A Stream is the unit of data that Stroom works with and will typically contain many Events.Click to see more details...
Processor filter
Processor filter
A Processor Filter is used to used to find Streams to process through the Pipeline associated with the Processor Filter. A Processor Filter consists of an expression tree to select which Streams to process and a tracker to track the what Streams have been processed.Click to see more details...
9.18.3 - Records
This is a Stream Type for Streams containing data conforming to the
records:2 XML Schema. It also refers more generally to any XML conforming to the records:2 XML Schema which is used in a number of places in Stroom, including as the output format for the DSParser and input for the IndexingFilter.See Also
-
Stream Type
Stream Type
All Streams must have a Stream Type. The list of Stream Types is configured using the Property
stroom.data.meta.metaTypes.Click to see more details... - Stream Stream A Stream is the unit of data that Stroom works with and will typically contain many Events.Click to see more details...
- records:2 XML Schema
9.18.4 - REST
REST (Representational State Transfer) is essentially an architectural style that dictates how data should be handled and “transferred” across a network. REST APIs typically use JSON to send data between the client and the server, and the HTTP methods GET, PUT, PATCH, POST and DELETE.
9.19 - S
9.19.1 - Search extraction
The process of extracting un-indexed Field values from the source Event to be used in search results.
See Also
User Guide Field Field A named data Field within some form of record or entity, and where each Field can have an associated value. In Stroom, Fields can be the Fields in an Index (or other queryable Data Source or the fields of Metadata associated with a Stream, e.g. Stream ID, Feed, creation time, etc.Click to see more details… Event Event An event is a single auditable event, e.g. a user logging in to a system. A Stream typically contains multiple events.Click to see more details…
9.19.2 - Searchable
A Searchable is the term given the special searchable data sources that appear at the root of the explorer tree picker when selecting a data source. These data sources are special internal data sources that are not user managed content, unlike an Index. They provide the means to search various aspects of Stroom’s internals, such as the Meta Store or Processor Tasks.
See Also
Index
Index
A Data Source that is backed by a Lucene based search index.Click to see more details...
9.19.3 - SQL
Structured Query Language (SQL). The language used in the MySQL database to query and manipulate the data.
SQL is used by Stroom’s database migration scripts to modify the structure of the database schema and the data contained within it. Sometimes it is necessary for Stroom administrators to manually run SQL statements/queries as part of pre-migration checks.
See Also
9.19.4 - Stepper
The Stepper is a tool in Stroom for developing and debugging a Pipeline. It allows the user to simulate passing a Stream through a pipeline with the ability to step from one record/event to the next or to jump to records/events based on filter criteria.
The parsers and translations can be edited while in the Stepper with the element output updating to show the effect of the change. The stepper will not write data to the file system or stream stores.
See Also
Pipeline
Pipeline
A Pipeline is an entity that is constructed to take a single input of stream data and process/transform it with one or more outputs. A Pipeline can have many elements within it to read, process or transform the data flowing through it.Click to see more details...
Stream
Stream
A Stream is the unit of data that Stroom works with and will typically contain many Events.Click to see more details...
9.19.5 - Stream
A Stream is the unit of data that Stroom works with and will typically contain many Events.
See Also
- Streams Concept
- Events Events This is a Stream Type in Stroom. An Events stream consists of processed/cooked data that has been demarcated into individual Events.Click to see more details...
-
Stream Type
Stream Type
All Streams must have a Stream Type. The list of Stream Types is configured using the Property
stroom.data.meta.metaTypes.Click to see more details...
9.19.6 - Stream Type
All Streams must have a Stream Type. The list of Stream Types is configured using the Property
stroom.data.meta.metaTypes.Additional Stream Types can be added however the list of Stream Types must include the following built-in types:
- Context
- Error
- Events Events This is a Stream Type in Stroom. An Events stream consists of processed/cooked data that has been demarcated into individual Events.Click to see more details...
- Meta
- Raw Events Raw Events This is a Stream Type used for Streams received by Stroom. Streams received by Stroom will be in a variety of text formats (CSV, delimited, fixed width, XML, JSON, etc.). Until they have been processed by a pipeline they are essentially just unstructured character data with no concept of what is a record/event. A Parser in a pipeline is required to provide the demarcation between records/events.Click to see more details...
- Raw Reference
- Reference
Some Stream Types, such as Meta and Context only exist as child streams within another Stream.
See Also
- Streams Concept
- Stream Stream A Stream is the unit of data that Stroom works with and will typically contain many Events.Click to see more details...
- Events Events This is a Stream Type in Stroom. An Events stream consists of processed/cooked data that has been demarcated into individual Events.Click to see more details...
- Raw Events Raw Events This is a Stream Type used for Streams received by Stroom. Streams received by Stroom will be in a variety of text formats (CSV, delimited, fixed width, XML, JSON, etc.). Until they have been processed by a pipeline they are essentially just unstructured character data with no concept of what is a record/event. A Parser in a pipeline is required to provide the demarcation between records/events.Click to see more details...
-
Property
Property
A configuration Property for configuring Stroom. Properties can be set in the user interface or via the
config.ymlconfiguration file.Click to see more details...
9.19.7 - StroomQl
Stroom Query Language is Stroom’s own query language. It has similarities with Structured Query Language (SQL) as used in databases. StroomQL is sometimes referred to as sQL to distinguish it from SQL.
See Also
9.20 - T
9.20.1 - Table
A Table is the tabular part of a Dashboard or Query that contains the data.
9.20.2 - Transport Sayer Security (TLS)
Transport Sayer Security (TLS) is the evolution of Secure Sockets Layer (SSL) and refers to the encryption of traffic between client and server.
TLS is typically used in Stroom for communications between Stroom-Proxy and Stroom, between Stroom nodes and when communicating with external systems (e.g. an Elasticsearch cluster of a HttpPostFilter destination).
9.20.3 - Token
Typically refers to an authentication token that may be used for user authentication. A Stroom API Key is a form of authentication token.
Tokens are generally set in the HTTP header Authorization with a value of the form Bearer TOKEN_GOES_HERE.
Tokens may contain information, e.g. a
JSON Web Tokens (JWT)
or simply be long strings of random characters (to essentially make a very secure password), like API Keys.
Tokens are associated with a Stroom User so have the same or less permissions than that user. Tokens also typically have an expiry time after which they will no longer work.
See Also
API Key
API Key
API Keys are a form of authentication token that are created within Stroom for use by Stroom-Proxy instances or other clients that want to use Stroom’s API. It is an encrypted string that contains details of the user and the expiration date of the token. Possession of a valid API Key for a user account means that you can do anything that the user can do in the user interface via the API.Click to see more details...
9.20.4 - Tracker
A Tracker is associated with a Processor Filter and keeps track of the Stream that the Processor Filter has already processed.
See Also
- Processor filter Processor filter A Processor Filter is used to used to find Streams to process through the Pipeline associated with the Processor Filter. A Processor Filter consists of an expression tree to select which Streams to process and a tracker to track the what Streams have been processed.Click to see more details...
- Stream Stream A Stream is the unit of data that Stroom works with and will typically contain many Events.Click to see more details...
9.21 - U
9.21.1 - Unix Epoch
The Unix epoch is 00:00:00 UTC on 1st January 1970. Some timestamps in Stroom are represented as the number of milliseconds since the Unix epoch, e.g.
1738331628276, and may be referred to as epoch ms or epoch milliseconds.9.21.2 - User
Refers to a Stroom User that is linked to either an Account in Stroom’s internal Identity Provider or a user account in an external Identity Provider. A Stroom User is only concerned with authorisation (i.e. application/document permissions and group memberships), and not authentication.
See Also
- Account Account Refers to a user account in Stroom’s internal Identity Provider.Click to see more details...
- Identity Provider (IDP) Identity Provider (IDP) An Identity Provider is a system or service that can authenticate a user and assert their identity. Identity providers can support single sign on (SSO), which allows the user to sign in once to the Identity Provider so they are then authenticated to all systems using that IDP.Click to see more details...
- Users and Groups
9.21.3 - Coordinated Universal Time (UTC)
Coordinated Universal Time (UTC), also known as Zulu time, is the international standard by which the world regulates clocks and time. It is essentially a successor to Greenwich Mean Time (GMT). UTC has the time zone offset of
+00:00 and does not change for daylight saving. All international time zones are relative to UTC.Stroom currently works internally in UTC, though it is possible to change the display time zone via User Preferences to display times in another time zone.
See Also
9.21.4 - UUID
A Universally Unique Identifier for uniquely identifying something. UUIDs are used as the identifier in Doc Refs. An example of a UUID is
4ffeb895-53c9-40d6-bf33-3ef025401ad3.See Also
- Doc Ref Doc Ref A Doc Ref (or Document Reference) is an identifier used to identify most documents/entities in Stroom, e.g. an XSLT will have a Doc Ref.Click to see more details...
- User Guide
9.22 - V
9.22.1 - Visualisation
A document comprising some Javascript code for visualising data, e.g. pie charts, heat maps, line graphs etc. Visualisations are not baked into Stroom, they are content, so can be created/modified/shared by Stroom users.
See Also
Dashboard
Dashboard
A Dashboard is a configurable entity for querying one or more Data Sources and displaying the results as a table, a visualisation or some other form.Click to see more details...
9.22.2 - Volume
In Stroom a Volume is a logical storage area that Stroom can write data to. Volumes are associated with a path on a file system that can either be local to the Stroom node or on a shared file system.
Stroom has two types of Volume; Index Volumes and Data Volumes.
- Index Volume - Where the Lucene Index Shards are written to. An Index Volume must belong to a Volume group Volume group A Volume Group is a collection of one or more Index Volumes. Index volumes must belong to a volume group and Indexes are configured to write to a particular Volume Group.Click to see more details....
- Data Volume - Where streams are written to.
When writing
Stream
Stream
A Stream is the unit of data that Stroom works with and will typically contain many Events.Click to see more details... data Stroom will pick a data volume using a volume selector as configured by the
Property
Property
A configuration Property for configuring Stroom. Properties can be set in the user interface or via the
config.ymlconfiguration file.Click to see more details...stroom.data.filesystemVolume.volumeSelector.
See Also
Volume group
Volume group
A Volume Group is a collection of one or more Index Volumes. Index volumes must belong to a volume group and Indexes are configured to write to a particular Volume Group.Click to see more details...
[User Guide](/docs/user-guide/volumes/)
9.22.3 - Volume group
A Volume Group is a collection of one or more Index Volumes. Index volumes must belong to a volume group and Indexes are configured to write to a particular Volume Group.
When Stroom is writing data to a Volume Group it will choose which of the Volumes in the group to write to using a volume selector as configured by the
Property
Property
A configuration Property for configuring Stroom. Properties can be set in the user interface or via the config.yml configuration file.Click to see more details... stroom.volumes.volumeSelector.
See Also
Volume
Volume
In Stroom a Volume is a logical storage area that Stroom can write data to. Volumes are associated with a path on a file system that can either be local to the Stroom node or on a shared file system.Click to see more details...:w
[User Guide](/docs/user-guide/volumes/)
9.23 - W
9.24 - X
9.24.1 - XML
Extensible Markup Language is a markup language for storing/transmitting structured data. It is the working format for most Pipeline processing in Stroom and is the standard normalised format for event data.
See Also
Pipeline
Pipeline
A Pipeline is an entity that is constructed to take a single input of stream data and process/transform it with one or more outputs. A Pipeline can have many elements within it to read, process or transform the data flowing through it.Click to see more details...
[XML Parser Pipeline Element](/docs/reference-section/pipeline-elements/#xmlparser)
9.24.2 - XML Schema
XML Schema is a language used to define the permitted structure of an XML document. An XML Schema can be used to validate an XML document to ensure it conforms to that schema such that onward processing of the XML document can be done with confidence that the document is correct.
The event-logging XML Schema is an example of an XML Schema.
See Also
9.24.3 - XPath
XPath is an expression language for selecting a node or nodes in an XML document. It is used heavily in XSLT to define the match criteria for templates and to select values.
9.24.4 - XSLT
Extensible Stylesheet Language Transformations is a language for transforming XML documents into other XML documents. XSLTs are the primary means of transforming data in Stroom.
All data is converted into a basic form of XML and then XSLTs are used to decorate and transform it into a common form. XSLTs are also used to transform XML Events Events This is a Stream Type in Stroom. An Events stream consists of processed/cooked data that has been demarcated into individual Events.Click to see more details... data into non-XML forms or XML with a different schema for indexing, statistics or for sending to other systems.
See Also
9.25 - Y
9.25.1 - YAML
YAML Ain’t Markup Language. A human readable data format often used for configuration files. YAML is used in stroom for various things, e.g. Stroom & Stroom Proxy’s main configuration file, Content Store definition files. YAML files will typically have the file extension
.yaml or .yml.See Also
9.26 - Z
9.26.1 - ZIP
A compressed file format for storing a one or more files with an associated directory structure. Stroom and Stroom Proxy use the ZIP format for exporting content and data as well as its Proxy ZIP format for holding multiple streams of data with associated meta data.