This is the multi-page printable view of this section. Click here to print.
Installation
- 1: Apache Httpd/Mod_JK configuration for Stroom
- 2: Database Installation
- 3: Installation
- 4: Installation of Stroom Application
- 5: Installation of Stroom Proxy
- 6: NFS Installation and Configuration
- 7: Node Cluster URL Setup
- 8: Processing User setup
- 9: SSL Certificate Generation
- 10: Testing Stroom Installation
- 11: Volume Maintenance
1 - Apache Httpd/Mod_JK configuration for Stroom
Assumptions
The following assumptions are used in this document.
- the user has reasonable RHEL/Centos System administration skills
- installations are on Centos 7.3 minimal systems (fully patched)
- the security of the HTTPD deployment should be reviewed for a production environment.
Installation of Apache httpd and Mod_JK Software
To deploy Stroom using Apache’s httpd web service as a front end (https) and Apache’s mod_jk as the interface between Apache and the Stroom tomcat applications, we also need
- apr
- apr-util
- apr-devel
- gcc
- httpd
- httpd-devel
- mod_ssl
- epel-release
- tomcat-native
- apache’s mod_jk tomcat connector plugin
Most of the required software are packages available via standard repositories and hence we can simply execute
sudo yum -y install apr apr-util apr-devel gcc httpd httpd-devel mod_ssl epel-release
sudo yum -y install tomcat-native
The reason for the distinct tomcat-native installation is that this package is from the
EPEL
repository so it must be installed first.
For the Apache mod_jk Tomcat connector we need to acquire a recent release and install it. The following commands achieve this for the 1.2.42 release.
sudo bash
cd /tmp
V=1.2.42
wget https://www.apache.org/dist/tomcat/tomcat-connectors/jk/tomcat-connectors-${V}-src.tar.gz
tar xf tomcat-connectors-${V}-src.tar.gz
cd tomcat-connectors-*-src/native
./configure --with-apxs=/bin/apxs
make && make install
cd /tmp
rm -rf tomcat-connectors-*-src
Although you could remove the gcc compiler at this point, we leave it installed as one should continue to upgrade the Tomcat Connectors to later releases.
Configure Apache httpd
We need to configure Apache as the root user.
If the Apache httpd service is ‘fronting’ a Stroom user interface, we should create an index file (/var/www/html/index.html) on all nodes so browsing to the root of the node will present the Stroom UI. This is not needed if you are deploying a Forwarding or Standalone Stroom proxy.
Forwarding file for Stroom User Interface deployments
F=/var/www/html/index.html
printf '<html>\n' > ${F}
printf '<head>\n' >> ${F}
printf '  <meta http-equiv="Refresh" content="0; URL=stroom"/>\n' >> ${F}
printf '</head>\n' >> ${F}
printf '</html>\n' >> ${F}
chmod 644 ${F}
Remember, deploy this file on all nodes running the Stroom Application.
Httpd.conf Configuration
We modify /etc/httpd/conf/httpd.conf on all nodes, but backup the file first with
cp /etc/httpd/conf/httpd.conf /etc/httpd/conf/httpd.conf.ORIG
Irrespective of the Stroom scenario being deployed - Multi Node Stroom (Application and Proxy), single Standalone Stroom Proxy or single Forwarding
Stroom Proxy, the configuration of the /etc/httpd/conf/httpd.conf file is the same.
We start by modify the configuration file by, add just before the ServerRoot directive the following directives which are designed to make the httpd service more secure.
# Stroom Change: Start - Apply generic security directives
ServerTokens Prod
ServerSignature Off
FileETag None
RewriteEngine On
RewriteCond %{THE_REQUEST} !HTTP/1.1$
RewriteRule .* - [F]
Header set X-XSS-Protection "1; mode=block"
# Stroom Change: End
That is,
...
# Do not add a slash at the end of the directory path.  If you point
# ServerRoot at a non-local disk, be sure to specify a local disk on the
# Mutex directive, if file-based mutexes are used.  If you wish to share the
# same ServerRoot for multiple httpd daemons, you will need to change at
# least PidFile.
#
ServerRoot "/etc/httpd"

#
# Listen: Allows you to bind Apache to specific IP addresses and/or
...
becomes
...
# Do not add a slash at the end of the directory path.  If you point
# ServerRoot at a non-local disk, be sure to specify a local disk on the
# Mutex directive, if file-based mutexes are used.  If you wish to share the
# same ServerRoot for multiple httpd daemons, you will need to change at
# least PidFile.
#
# Stroom Change: Start - Apply generic security directives
ServerTokens Prod
ServerSignature Off
FileETag None
RewriteEngine On
RewriteCond %{THE_REQUEST} !HTTP/1.1$
RewriteRule .* - [F]
Header set X-XSS-Protection "1; mode=block"
# Stroom Change: End
ServerRoot "/etc/httpd"

#
# Listen: Allows you to bind Apache to specific IP addresses and/or
...
We now block access to the /var/www directory by commenting out
<Directory "/var/www">
  AllowOverride None
  # Allow open access:
  Require all granted
</Directory>
that is
...
#
# Relax access to content within /var/www.
#
<Directory "/var/www">
    AllowOverride None
    # Allow open access:
    Require all granted
</Directory>

# Further relax access to the default document root:
...
becomes
...
#
# Relax access to content within /var/www.
#
# Stroom Change: Start - Block access to /var/www
# <Directory "/var/www">
#     AllowOverride None
#     # Allow open access:
#     Require all granted
# </Directory>
# Stroom Change: End

# Further relax access to the default document root:
...
then within the /var/www/html directory turn off Indexes FollowSymLinks by commenting out the line
Options Indexes FollowSymLinks
That is
...
    # The Options directive is both complicated and important.  Please see
    # http://httpd.apache.org/docs/2.4/mod/core.html#options
    # for more information.
    #
    Options Indexes FollowSymLinks

    #
    # AllowOverride controls what directives may be placed in .htaccess files.
    # It can be "All", "None", or any combination of the keywords:
...
becomes
...
    # The Options directive is both complicated and important.  Please see
    # http://httpd.apache.org/docs/2.4/mod/core.html#options
    # for more information.
    #
    # Stroom Change: Start - turn off indexes and FollowSymLinks
    # Options Indexes FollowSymLinks
    # Stroom Change: End

    #
    # AllowOverride controls what directives may be placed in .htaccess files.
    # It can be "All", "None", or any combination of the keywords:
...
Then finally we add two new log formats and configure the access log to use the new format. This is done within the <IfModule logio_module> by adding the two new LogFormat directives
LogFormat "%a/%{REMOTE_PORT}e %X %t %l \"%u\" \"%r\" %s/%>s %D %I/%O/%B \"%{Referer}i\" \"%{User-Agent}i\" %V/%p" blackboxUser
LogFormat "%a/%{REMOTE_PORT}e %X %t %l \"%{SSL_CLIENT_S_DN}x\" \"%r\" %s/%>s %D %I/%O/%B \"%{Referer}i\" \"%{User-Agent}i\" %V/%p" blackboxSSLUser
and replacing the CustomLog directive
CustomLog "logs/access_log" combined
with
CustomLog logs/access_log blackboxSSLUser
That is
...
    LogFormat "%h %l %u %t \"%r\" %>s %b" common

    <IfModule logio_module>
      # You need to enable mod_logio.c to use %I and %O
      LogFormat "%h %l %u %t \"%r\" %>s %b \"%{Referer}i\" \"%{User-Agent}i\" %I %O" combinedio
    </IfModule>

    #
    # The location and format of the access logfile (Common Logfile Format).
    # If you do not define any access logfiles within a <VirtualHost>
    # container, they will be logged here.  Contrariwise, if you *do*
    # define per-<VirtualHost> access logfiles, transactions will be
    # logged therein and *not* in this file.
    #
    #CustomLog "logs/access_log" common

    #
    # If you prefer a logfile with access, agent, and referer information
    # (Combined Logfile Format) you can use the following directive.
    #
    CustomLog "logs/access_log" combined
</IfModule>
...
becomes
...
    LogFormat "%h %l %u %t \"%r\" %>s %b" common

    <IfModule logio_module>
      # You need to enable mod_logio.c to use %I and %O
      LogFormat "%h %l %u %t \"%r\" %>s %b \"%{Referer}i\" \"%{User-Agent}i\" %I %O" combinedio
      # Stroom Change: Start - Add new logformats
      LogFormat "%a/%{REMOTE_PORT}e %X %t %l \"%u\" \"%r\" %s/%>s %D %I/%O/%B \"%{Referer}i\" \"%{User-Agent}i\" %V/%p" blackboxUser
      LogFormat "%a/%{REMOTE_PORT}e %X %t %l \"%{SSL_CLIENT_S_DN}x\" \"%r\" %s/%>s %D %I/%O/%B \"%{Referer}i\" \"%{User-Agent}i\" %V/%p" blackboxSSLUser
      # Stroom Change: End
    </IfModule>
    # Stroom Change: Start - Add new logformats without the additional byte values
    <IfModule !logio_module>
      LogFormat "%a/%{REMOTE_PORT}e %X %t %l \"%u\" \"%r\" %s/%>s %D 0/0/%B \"%{Referer}i\" \"%{User-Agent}i\" %V/%p" blackboxUser
      LogFormat "%a/%{REMOTE_PORT}e %X %t %l \"%{SSL_CLIENT_S_DN}x\" \"%r\" %s/%>s %D 0/0/%B \"%{Referer}i\" \"%{User-Agent}i\" %V/%p" blackboxSSLUser
    </IfModule>
    # Stroom Change: End

    #
    # The location and format of the access logfile (Common Logfile Format).
    # If you do not define any access logfiles within a <VirtualHost>
    # container, they will be logged here.  Contrariwise, if you *do*
    # define per-<VirtualHost> access logfiles, transactions will be
    # logged therein and *not* in this file.
    #
    #CustomLog "logs/access_log" common

    #
    # If you prefer a logfile with access, agent, and referer information
    # (Combined Logfile Format) you can use the following directive.
    #
    # Stroom Change: Start - Make the access log use a new format
    # CustomLog "logs/access_log" combined
    CustomLog logs/access_log blackboxSSLUser
    # Stroom Change: End
</IfModule>
...
Remember, deploy this file on all nodes.
Configuration of ssl.conf
We modify /etc/httpd/conf.d/ssl.conf on all nodes, backing up first,
cp /etc/httpd/conf.d/ssl.conf /etc/httpd/conf.d/ssl.conf.ORIG
The configuration of the /etc/httpd/conf.d/ssl.conf does change depending on the Stroom scenario deployed. In the following we will indicate
differences by tagged sub-headings. If the configuration applies irrespective of scenario, then All scenarios is the tag, else the tag indicated the
type of Stroom deployment.
ssl.conf: HTTP to HTTPS Redirection - All scenarios
Before the
<VirtualHost *:80>
  ServerName stroomp00.strmdev00.org
  Redirect permanent "/" "https://stroomp00.strmdev00.org/"
</VirtualHost>
That is, we change
...
## SSL Virtual Host Context
##

<VirtualHost _default_:443>
...
to
...
## SSL Virtual Host Context
##

# Stroom Change: Start - Add http redirection to https
<VirtualHost *:80>
  ServerName stroomp00.strmdev00.org
  Redirect permanent "/" "https://stroomp00.strmdev00.org/"
</VirtualHost>
# Stroom Change: End

<VirtualHost _default_:443>
ssl.conf: VirtualHost directives - Multi Node ‘Application and Proxy’ deployment
Within the stroomp.strmdev00.org
ServerName stroomp.strmdev00.org
JkMount /stroom* loadbalancer
JkMount /stroom/remoting/cluster* local
JkMount /stroom/datafeed* loadbalancer_proxy
JkMount /stroom/remoting* loadbalancer_proxy
JkMount /stroom/datafeeddirect* loadbalancer
JkOptions +ForwardKeySize +ForwardURICompat +ForwardSSLCertChain -ForwardDirectories
That is, we change
...
<VirtualHost _default_:443>

# General setup for the virtual host, inherited from global configuration
#DocumentRoot "/var/www/html"
#ServerName www.example.com:443

# Use separate log files for the SSL virtual host; note that LogLevel
# is not inherited from httpd.conf.
...
to
...
<VirtualHost _default_:443>

# General setup for the virtual host, inherited from global configuration
#DocumentRoot "/var/www/html"
#ServerName www.example.com:443
# Stroom Change: Start - Set servername and mod_jk connectivity
ServerName stroomp.strmdev00.org
JkMount /stroom* loadbalancer
JkMount /stroom/remoting/cluster* local
JkMount /stroom/datafeed* loadbalancer_proxy
JkMount /stroom/remoting* loadbalancer_proxy
JkMount /stroom/datafeeddirect* loadbalancer
JkOptions +ForwardKeySize +ForwardURICompat +ForwardSSLCertChain -ForwardDirectories
# Stroom Change: End

# Use separate log files for the SSL virtual host; note that LogLevel
# is not inherited from httpd.conf.
...
ssl.conf: VirtualHost directives - Standalone or Forwarding Proxy deployment
Within the stroomfp0.strmdev00.org
ServerName stroomfp0.strmdev00.org
JkMount /stroom/datafeed* local_proxy
JkOptions +ForwardKeySize +ForwardURICompat +ForwardSSLCertChain -ForwardDirectories
That is, we change
...
<VirtualHost _default_:443>

# General setup for the virtual host, inherited from global configuration
#DocumentRoot "/var/www/html"
#ServerName www.example.com:443

# Use separate log files for the SSL virtual host; note that LogLevel
# is not inherited from httpd.conf.
...
to
...
<VirtualHost _default_:443>

# General setup for the virtual host, inherited from global configuration
#DocumentRoot "/var/www/html"
#ServerName www.example.com:443
# Stroom Change: Start - Set servername and mod_jk connectivity
ServerName stroomfp0.strmdev00.org
JkMount /stroom/datafeed* local_proxy
JkOptions +ForwardKeySize +ForwardURICompat +ForwardSSLCertChain -ForwardDirectories
# Stroom Change: End

# Use separate log files for the SSL virtual host; note that LogLevel
# is not inherited from httpd.conf.
...
ssl.conf: VirtualHost directives - Single Node ‘Application and Proxy’ deployment
Within the stroomp00.strmdev00.org
ServerName stroomp00.strmdev00.org
JkMount /stroom* local
JkMount /stroom/remoting/cluster* local
JkMount /stroom/datafeed* local_proxy
JkMount /stroom/remoting* local_proxy
JkMount /stroom/datafeeddirect* local
JkOptions +ForwardKeySize +ForwardURICompat +ForwardSSLCertChain -ForwardDirectories
That is, we change
...
<VirtualHost _default_:443>

# General setup for the virtual host, inherited from global configuration
#DocumentRoot "/var/www/html"
#ServerName www.example.com:443

# Use separate log files for the SSL virtual host; note that LogLevel
# is not inherited from httpd.conf.
...
to
...
<VirtualHost _default_:443>

# General setup for the virtual host, inherited from global configuration
#DocumentRoot "/var/www/html"
#ServerName www.example.com:443
# Stroom Change: Start - Set servername and mod_jk connectivity
ServerName stroomp00.strmdev00.org
JkMount /stroom* local
JkMount /stroom/remoting/cluster* local
JkMount /stroom/datafeed* local_proxy
JkMount /stroom/remoting* local_proxy
JkMount /stroom/datafeeddirect* local
JkOptions +ForwardKeySize +ForwardURICompat +ForwardSSLCertChain -ForwardDirectories
# Stroom Change: End

# Use separate log files for the SSL virtual host; note that LogLevel
# is not inherited from httpd.conf.
...
ssl.conf: Certificate file changes - All scenarios
We replace the standard certificate files with the generated certificates. In the example below, we are using the multi node scenario, in
that the key file names are stroomp.crt and stroomp.key. For other scenarios, use the appropriate file names generated. We replace
SSLCertificateFile /etc/pki/tls/certs/localhost.crt
with
SSLCertificateFile /home/stroomuser/stroom-jks/public/stroomp.crt
and
SSLCertificateKeyFile /etc/pki/tls/private/localhost.key
with
SSLCertificateKeyFile /home/stroomuser/stroom-jks/private/stroomp.key
That is, change
...
# pass phrase.  Note that a kill -HUP will prompt again.  A new
# certificate can be generated using the genkey(1) command.
SSLCertificateFile /etc/pki/tls/certs/localhost.crt

#   Server Private Key:
#   If the key is not combined with the certificate, use this
#   directive to point at the key file.  Keep in mind that if
#   you've both a RSA and a DSA private key you can configure
#   both in parallel (to also allow the use of DSA ciphers, etc.)
SSLCertificateKeyFile /etc/pki/tls/private/localhost.key

#   Server Certificate Chain:
#   Point SSLCertificateChainFile at a file containing the
...
to
...
# pass phrase.  Note that a kill -HUP will prompt again.  A new
# certificate can be generated using the genkey(1) command.
# Stroom Change: Start - Replace with Stroom server certificate
# SSLCertificateFile /etc/pki/tls/certs/localhost.crt
SSLCertificateFile /home/stroomuser/stroom-jks/public/stroomp.crt
# Stroom Change: End

#   Server Private Key:
#   If the key is not combined with the certificate, use this
#   directive to point at the key file.  Keep in mind that if
#   you've both a RSA and a DSA private key you can configure
#   both in parallel (to also allow the use of DSA ciphers, etc.)
# Stroom Change: Start - Replace with Stroom server private key file
# SSLCertificateKeyFile /etc/pki/tls/private/localhost.key
SSLCertificateKeyFile /home/stroomuser/stroom-jks/private/stroomp.key
# Stroom Change: End

#   Server Certificate Chain:
#   Point SSLCertificateChainFile at a file containing the
...
ssl.conf: Certificate Bundle/NO-CA Verification - All scenarios
If you have signed your Stroom server certificate with a Certificate Authority, then change
SSLCACertificateFile /etc/pki/tls/certs/ca-bundle.crt
to be your own certificate bundle which you should probably store as ~stroomuser/stroom-jks/public/stroomp-ca-bundle.crt.
Now if you are using a self signed certificate, you will need to set the Client Authentication to have a value of
SSLVerifyClient optional_no_ca
noting that this may change if you actually use a CA. That is, changing
...
#   Client Authentication (Type):
#   Client certificate verification type and depth.  Types are
#   none, optional, require and optional_no_ca.  Depth is a
#   number which specifies how deeply to verify the certificate
#   issuer chain before deciding the certificate is not valid.
#SSLVerifyClient require
#SSLVerifyDepth  10

#   Access Control:
#   With SSLRequire you can do per-directory access control based
...
to
...
#   Client Authentication (Type):
#   Client certificate verification type and depth.  Types are
#   none, optional, require and optional_no_ca.  Depth is a
#   number which specifies how deeply to verify the certificate
#   issuer chain before deciding the certificate is not valid.
#SSLVerifyClient require
#SSLVerifyDepth  10
# Stroom Change: Start - Set optional_no_ca (given we have a self signed certificate)
SSLVerifyClient optional_no_ca
# Stroom Change: End

#   Access Control:
#   With SSLRequire you can do per-directory access control based
...
ssl.conf: Servlet Protection - Single or Multi Node scenarios (not for Standalone/Forwarding Proxy)
We now need to secure certain Stroom Application servlets, to ensure they are only accessed under appropriate control.
This set of servlets will be accessible by all nodes in the subnet 192.168.2 (as well as localhost). We achieve this by adding after the example Location directives
<Location ~ "stroom/(status|echo|sessionList|debug)" >
 Require all denied
 Require ip 127.0.0.1 192.168.2
</Location>
We further restrict the clustercall and export servlets to just the localhost. If we had multiple Stroom processing nodes, you would specify each node, or preferably, the subnet they are on. In our multi node case this is 192.168.2.
<Location ~ "stroom/export/|stroom/remoting/clustercall.rpc" >
 Require all denied
 Require ip 127.0.0.1 192.168.2
</Location>
That is, the following
...
#            and %{TIME_WDAY} >= 1 and %{TIME_WDAY} <= 5 \
#            and %{TIME_HOUR} >= 8 and %{TIME_HOUR} <= 20       ) \
#           or %{REMOTE_ADDR} =~ m/^192\.76\.162\.[0-9]+$/
#</Location>

#   SSL Engine Options:
#   Set various options for the SSL engine.
#   o FakeBasicAuth:
...
changes to
...
#            and %{TIME_WDAY} >= 1 and %{TIME_WDAY} <= 5 \
#            and %{TIME_HOUR} >= 8 and %{TIME_HOUR} <= 20       ) \
#           or %{REMOTE_ADDR} =~ m/^192\.76\.162\.[0-9]+$/
#</Location>

# Stroom Change: Start - Lock access to certain servlets
<Location ~ "stroom/(status|echo|sessionList|debug)" >
 Require all denied
 Require ip 127.0.0.1 192.168.2
</Location>
# Lock these Servlets more securely - to just localhost and processing node(s)
<Location ~ "stroom/export/|stroom/remoting/clustercall.rpc" >
 Require all denied
 Require ip 127.0.0.1 192.168.2
</Location>
# Stroom Change: End

#   SSL Engine Options:
#   Set various options for the SSL engine.
#   o FakeBasicAuth:
...
ssl.conf: Log formats - All scenarios
Finally, as we make use of the Black Box Apache log format, we replace the standard format
CustomLog logs/ssl_request_log \
        "%t %h %{SSL_PROTOCOL}x %{SSL_CIPHER}x \"%r\" %b"
with
CustomLog logs/ssl_request_log blackboxSSLUser
That is, change
...
#   Per-Server Logging:
#   The home of a custom SSL log file. Use this when you want a
#   compact non-error SSL logfile on a virtual host basis.
CustomLog logs/ssl_request_log \
          "%t %h %{SSL_PROTOCOL}x %{SSL_CIPHER}x \"%r\" %b"

</VirtualHost>
to
...
#   Per-Server Logging:
#   The home of a custom SSL log file. Use this when you want a
#   compact non-error SSL logfile on a virtual host basis.
# Stroom Change: Start - Change ssl_request log to use our BlackBox format
# CustomLog logs/ssl_request_log \
#           "%t %h %{SSL_PROTOCOL}x %{SSL_CIPHER}x \"%r\" %b"
CustomLog logs/ssl_request_log blackboxSSLUser
# Stroom Change: End

</VirtualHost>
Remember, in the case of Multi node stroom Application servers, deploy this file on all servers.
Apache Mod_JK configuration
Apache Mod_JK has two configuration files
- /etc/httpd/conf.d/mod_jk.conf - for the http server configuration
- /etc/httpd/conf/workers.properties - to configure the Tomcat workers
In multi node scenarios, /etc/httpd/conf.d/mod_jk.conf is the same on all servers, but the /etc/httpd/conf/workers.properties file is different.
The contents of these two configuration files differ depending on the Stroom deployment. The following provide the various deployment scenarios.
Mod_JK Multi Node Application and Proxy Deployment
For a Stroom Multi node Application and Proxy server,
- we configure
/etc/httpd/conf.d/mod_jk.confas per
F=/etc/httpd/conf.d/mod_jk.conf
printf 'LoadModule jk_module modules/mod_jk.so\n' > ${F}
printf 'JkWorkersFile conf/workers.properties\n' >> ${F}
printf 'JkLogFile logs/mod_jk.log\n' >> ${F}
printf 'JkLogLevel info\n' >> ${F}
printf 'JkLogStampFormat  "[%%a %%b %%d %%H:%%M:%%S %%Y]"\n' >> ${F}
printf 'JkOptions +ForwardKeySize +ForwardURICompat +ForwardSSLCertChain -ForwardDirectories\n' >> ${F}
printf 'JkRequestLogFormat "%%w %%V %%T"\n' >> ${F}
printf 'JkMount /stroom* loadbalancer\n' >> ${F}
printf 'JkMount /stroom/remoting/cluster* local\n' >> ${F}
printf 'JkMount /stroom/datafeed* loadbalancer_proxy\n' >> ${F}
printf 'JkMount /stroom/remoting* loadbalancer_proxy\n' >> ${F}
printf 'JkMount /stroom/datafeeddirect* loadbalancer\n' >> ${F}
printf '# Note: Replaced JkShmFile logs/jk.shm due to SELinux issues. Refer to\n' >> ${F}
printf '# https://bugzilla.redhat.com/bugzilla/show_bug.cgi?id=225452\n' >> ${F}
printf '# The following makes use of the existing /run/httpd directory\n' >> ${F}
printf 'JkShmFile run/jk.shm\n' >> ${F}
printf '<Location /jkstatus/>\n' >> ${F}
printf '  JkMount status\n' >> ${F}
printf '  Order deny,allow\n' >> ${F}
printf '  Deny from all\n' >> ${F}
printf '  Allow from 127.0.0.1\n' >> ${F}
printf '</Location>\n' >> ${F}
chmod 640 ${F}
- we configure
/etc/httpd/conf/workers.propertiesas per
Since we are deploying for a cluster with load balancing, we need a workers.properties file per node. Executing the following will result in two files (workers.properties.stroomp00 and workers.properties.stroomp01) which should be deployed to their respective servers.
cd /tmp
# Set the list of nodes
Nodes="stroomp00.strmdev00.org stroomp01.strmdev00.org"
for oN in ${Nodes}; do
  _n=`echo ${oN} | cut -f1 -d\.`
  (
  printf '# Workers.properties for Stroom Cluster member: %s %s\n' ${oN}
  printf 'worker.list=loadbalancer,loadbalancer_proxy,local,local_proxy,status\n'
  L_t=""
  Lp_t=""
  for FQDN in ${Nodes}; do
    N=`echo ${FQDN} | cut -f1 -d\.`
    printf 'worker.%s.port=8009\n' ${N}
    printf 'worker.%s.host=%s\n' ${N} ${FQDN}
    printf 'worker.%s.type=ajp13\n' ${N}
    printf 'worker.%s.lbfactor=1\n' ${N}
    printf 'worker.%s.max_packet_size=65536\n' ${N}
    printf 'worker.%s_proxy.port=9009\n' ${N}
    printf 'worker.%s_proxy.host=%s\n' ${N} ${FQDN}
    printf 'worker.%s_proxy.type=ajp13\n' ${N}
    printf 'worker.%s_proxy.lbfactor=1\n' ${N}
    printf 'worker.%s_proxy.max_packet_size=65536\n' ${N}
    L_t="${L_t}${N},"
    Lp_t="${Lp_t}${N}_proxy,"
  done
  L=`echo $L_t | sed -e 's/.$//'`
  Lp=`echo $Lp_t | sed -e 's/.$//'`
  printf 'worker.loadbalancer.type=lb\n'
  printf 'worker.loadbalancer.balance_workers=%s\n' $L
  printf 'worker.loadbalancer.sticky_session=1\n'
  printf 'worker.loadbalancer_proxy.type=lb\n'
  printf 'worker.loadbalancer_proxy.balance_workers=%s\n' $Lp
  printf 'worker.loadbalancer_proxy.sticky_session=1\n'
  printf 'worker.local.type=lb\n'
  printf 'worker.local.balance_workers=%s\n' ${_n}
  printf 'worker.local.sticky_session=1\n'
  printf 'worker.local_proxy.type=lb\n'
  printf 'worker.local_proxy.balance_workers=%s_proxy\n' ${_n}
  printf 'worker.local_proxy.sticky_session=1\n'
  printf 'worker.status.type=status\n'
  ) > workers.properties.${_n}
  chmod 640 workers.properties.${_n}
done
Now depending in the node you are on, copy the relevant workers.properties.nodename file to /etc/httpd/conf/workers.properties. The following command makes this simple.
cp workers.properties.`hostname -s` /etc/httpd/conf/workers.properties
If you were to add an additional node to a multi node cluster, say the node stroomp02.strmdev00.org, then you would re-run the above script with
Nodes="stroomp00.strmdev00.org stroomp01.strmdev00.org stroomp02.strmdev00.org"
then redeploy all three files to the respective servers. Also note, that for the newly created workers.properties files for the existing nodes to take effect you will need to restart the Apache Httpd service on both nodes.
Remember, in multi node cluster deployments, the following files are the same and hence can be created on one node, but copied to the others not forgetting to backup the other node’s original files. That is, the files
- /var/www/html/index.html
- /etc/httpd/conf.d/mod_jk.conf
- /etc/httpd/conf/httpd.conf
are to be the same on all nodes. Only the /etc/httpd/conf.d/ssl.conf and /etc/httpd/conf/workers.properties files change.
Mod_JK Standalone or Forwarding Stroom Proxy Deployment
For a Stroom Standalone or Forwarding proxy,
- we configure
/etc/httpd/conf.d/mod_jk.confas per
F=/etc/httpd/conf.d/mod_jk.conf
printf 'LoadModule jk_module modules/mod_jk.so\n' > ${F}
printf 'JkWorkersFile conf/workers.properties\n' >> ${F}
printf 'JkLogFile logs/mod_jk.log\n' >> ${F}
printf 'JkLogLevel info\n' >> ${F}
printf 'JkLogStampFormat  "[%%a %%b %%d %%H:%%M:%%S %%Y]"\n' >> ${F}
printf 'JkOptions +ForwardKeySize +ForwardURICompat +ForwardSSLCertChain -ForwardDirectories\n' >> ${F}
printf 'JkRequestLogFormat "%%w %%V %%T"\n' >> ${F}
printf 'JkMount /stroom/datafeed* local_proxy\n' >> ${F}
printf '# Note: Replaced JkShmFile logs/jk.shm due to SELinux issues. Refer to\n' >> ${F}
printf '# https://bugzilla.redhat.com/bugzilla/show_bug.cgi?id=225452\n' >> ${F}
printf '# The following makes use of the existing /run/httpd directory\n' >> ${F}
printf 'JkShmFile run/jk.shm\n' >> ${F}
printf '<Location /jkstatus/>\n' >> ${F}
printf '  JkMount status\n' >> ${F}
printf '  Order deny,allow\n' >> ${F}
printf '  Deny from all\n' >> ${F}
printf '  Allow from 127.0.0.1\n' >> ${F}
printf '</Location>\n' >> ${F}
chmod 640 ${F}
- we configure
/etc/httpd/conf/workers.propertiesas per
The variable N in the script below is to be the node name (not FQDN) of your sever (i.e. stroomfp0).
N=stroomfp0
FQDN=`hostname -f`
F=/etc/httpd/conf/workers.properties
printf 'worker.list=local_proxy,status\n' > ${F}
printf 'worker.%s_proxy.port=9009\n' ${N} >> ${F}
printf 'worker.%s_proxy.host=%s\n' ${N} ${FQDN} >> ${F}
printf 'worker.%s_proxy.type=ajp13\n' ${N} >> ${F}
printf 'worker.%s_proxy.lbfactor=1\n' ${N} >> ${F}
printf 'worker.local_proxy.type=lb\n' >> ${F}
printf 'worker.local_proxy.balance_workers=%s_proxy\n' ${N} >> ${F}
printf 'worker.local_proxy.sticky_session=1\n' >> ${F}
printf 'worker.status.type=status\n' >> ${F}
chmod 640 ${F}
Mod_JK Single Node Application and Proxy Deployment
For a Stroom Single node Application and Proxy server,
- we configure
/etc/httpd/conf.d/mod_jk.confas per
F=/etc/httpd/conf.d/mod_jk.conf
printf 'LoadModule jk_module modules/mod_jk.so\n' > ${F}
printf 'JkWorkersFile conf/workers.properties\n' >> ${F}
printf 'JkLogFile logs/mod_jk.log\n' >> ${F}
printf 'JkLogLevel info\n' >> ${F}
printf 'JkLogStampFormat  "[%%a %%b %%d %%H:%%M:%%S %%Y]"\n' >> ${F}
printf 'JkOptions +ForwardKeySize +ForwardURICompat +ForwardSSLCertChain -ForwardDirectories\n' >> ${F}
printf 'JkRequestLogFormat "%%w %%V %%T"\n' >> ${F}
printf 'JkMount /stroom* local\n' >> ${F}
printf 'JkMount /stroom/remoting/cluster* local\n' >> ${F}
printf 'JkMount /stroom/datafeed* local_proxy\n' >> ${F}
printf 'JkMount /stroom/remoting* local_proxy\n' >> ${F}
printf 'JkMount /stroom/datafeeddirect* local\n' >> ${F}
printf '# Note: Replaced JkShmFile logs/jk.shm due to SELinux issues. Refer to\n' >> ${F}
printf '# https://bugzilla.redhat.com/bugzilla/show_bug.cgi?id=225452\n' >> ${F}
printf '# The following makes use of the existing /run/httpd directory\n' >> ${F}
printf 'JkShmFile run/jk.shm\n' >> ${F}
printf '<Location /jkstatus/>\n' >> ${F}
printf '  JkMount status\n' >> ${F}
printf '  Order deny,allow\n' >> ${F}
printf '  Deny from all\n' >> ${F}
printf '  Allow from 127.0.0.1\n' >> ${F}
printf '</Location>\n' >> ${F}
chmod 640 ${F}
- we configure
/etc/httpd/conf/workers.propertiesas per
The variable N in the script below is to be the node name (not FQDN) of your sever (i.e. stroomp00).
N=stroomp00
FQDN=`hostname -f`
F=/etc/httpd/conf/workers.properties
printf 'worker.list=local,local_proxy,status\n' > ${F}
printf 'worker.%s.port=8009\n' ${N} >> ${F}
printf 'worker.%s.host=%s\n' ${N} ${FQDN} >> ${F}
printf 'worker.%s.type=ajp13\n' ${N} >> ${F}
printf 'worker.%s.lbfactor=1\n' ${N} >> ${F}
printf 'worker.%s.max_packet_size=65536\n' ${N} >> ${F}
printf 'worker.%s_proxy.port=9009\n' ${N} >> ${F}
printf 'worker.%s_proxy.host=%s\n' ${N} ${FQDN} >> ${F}
printf 'worker.%s_proxy.type=ajp13\n' ${N} >> ${F}
printf 'worker.%s_proxy.lbfactor=1\n' ${N} >> ${F}
printf 'worker.%s_proxy.max_packet_size=65536\n' ${N} >> ${F}
printf 'worker.local.type=lb\n' >> ${F}
printf 'worker.local.balance_workers=%s\n' ${N} >> ${F}
printf 'worker.local.sticky_session=1\n' >> ${F}
printf 'worker.local_proxy.type=lb\n' >> ${F}
printf 'worker.local_proxy.balance_workers=%s_proxy\n' ${N} >> ${F}
printf 'worker.local_proxy.sticky_session=1\n' >> ${F}
printf 'worker.status.type=status\n' >> ${F}
chmod 640 ${F}
Final host configuration and web service enablement
Now tidy up the SELinux context for access on all nodes and files via the commands
setsebool -P httpd_enable_homedirs on
setsebool -P httpd_can_network_connect on
chcon --reference /etc/httpd/conf.d/README /etc/httpd/conf.d/mod_jk.conf
chcon --reference /etc/httpd/conf/magic /etc/httpd/conf/workers.properties
We also enable both http and https services via the firewall on all nodes. If you don’t want to present a http access point, then don’t enable it in the firewall setting. This is done with
firewall-cmd --zone=public --add-service=http --permanent
firewall-cmd --zone=public --add-service=https --permanent
firewall-cmd --reload
firewall-cmd --zone=public --list-all
Finally enable then start the httpd service, correcting any errors. It should be noted that on any errors,
the suggestion of a systemctl status or viewing the journal are good, but also review information in the httpd error logs found in /var/log/httpd/.
systemctl enable httpd.service
systemctl start httpd.service
2 - Database Installation
Following this HOWTO will produce a simple, minimally secured database deployment. In a production environment consideration needs to be made for redundancy, better security, data-store location, increased memory usage, and the like.
Stroom has two databases. The first, stroom, is used for management of Stroom itself and the second, statistics is used for the Stroom Statistics capability. There are many ways to deploy these two databases. One could
- have a single database instance and serve both databases from it
- have two database instances on the same server and serve one database per instance
- have two separate nodes, each with it’s own database instance
- the list goes on.
In this HOWTO, we describe the deployment of two database instances on the one node, each serving a single database. We provide example deployments using either the MariaDB or MySQL Community versions of MySQL.
Assumptions
- we are installing the MariaDB or MySQL Community RDBMS software.
- the primary database node is ‘stroomdb0.strmdev00.org’.
- installation is on a fully patched minimal Centos 7.3 instance.
- we are installing BOTH databases (
stroomandstatistics) on the same node - ‘stroomdb0.stromdev00.org’ but with two distinct database engines. The first database will communicate on port3307and the second on3308. - we are deploying with SELinux in enforcing mode.
- any scripts or commands that should run are in code blocks and are designed to allow the user to cut then paste the commands onto their systems.
- in this document, when a textual screen capture is documented, data entry is identified by the data surrounded by ‘<’ ‘>’ . This excludes enter/return presses.
Installation of Software
MariaDB Server Installation
As MariaDB is directly supported by Centos 7, we simply install the database server software and SELinux policy files, as per
sudo yum -y install policycoreutils-python mariadb-server
MySQL Community Server Installation
As MySQL is not directly supported by Centos 7, we need to install it’s repository files prior to installation. We get the current MySQL Community release repository rpm and validate it’s MD5 checksum against the published value found on the MySQL Yum Repository site.
wget https://repo.mysql.com/mysql57-community-release-el7.rpm
md5sum mysql57-community-release-el7.rpm
On correct validation of the MD5 checksum, we install the repository files via
sudo yum -y localinstall mysql57-community-release-el7.rpm
NOTE: Stroom currently does not support the latest production MySQL version - 5.7. You will need to install MySQL Version 5.6.
Now since we must use MySQL Version 5.6 you will need to edit the MySQL repo file /etc/yum.repos.d/mysql-community.repo to
disable the mysql57-community channel and enable the mysql56-community channel. We start by, backing up the repo file with
sudo cp /etc/yum.repos.d/mysql-community.repo /etc/yum.repos.d/mysql-community.repo.ORIG
Then edit the file to change
...
# Enable to use MySQL 5.6
[mysql56-community]
name=MySQL 5.6 Community Server
baseurl=http://repo.mysql.com/yum/mysql-5.6-community/el/7/$basearch/
enabled=0
gpgcheck=1
gpgkey=file:///etc/pki/rpm-gpg/RPM-GPG-KEY-mysql

[mysql57-community]
name=MySQL 5.7 Community Server
baseurl=http://repo.mysql.com/yum/mysql-5.7-community/el/7/$basearch/
enabled=1
gpgcheck=1
gpgkey=file:///etc/pki/rpm-gpg/RPM-GPG-KEY-mysql
...
to become
...
# Enable to use MySQL 5.6
[mysql56-community]
name=MySQL 5.6 Community Server
baseurl=http://repo.mysql.com/yum/mysql-5.6-community/el/7/$basearch/
enabled=1
gpgcheck=1
gpgkey=file:///etc/pki/rpm-gpg/RPM-GPG-KEY-mysql

[mysql57-community]
name=MySQL 5.7 Community Server
baseurl=http://repo.mysql.com/yum/mysql-5.7-community/el/7/$basearch/
enabled=0
gpgcheck=1
gpgkey=file:///etc/pki/rpm-gpg/RPM-GPG-KEY-mysql
...
Next we install server software and SELinux policy files, as per
sudo yum -y install policycoreutils-python mysql-community-server
Preparing the Database Deployment
MariaDB Variant
Create and instantiate both database instances
To set up two MariaDB database instances on the one node, we will use mysql_multi and systemd service templates. The mysql_multi utility is a capability that manages multiple MariaDB databases on the same node and systemd service templates manage multiple services from one configuration file. A systemd service template is unique in that it has an @ character before the .service suffix.
To use this multiple-instance capability, we need to create two data directories for each database instance and also replace the main MariaDB configuration file, /etc/my.cnf, with one that includes configuration of key options for each instance. We will name our instances, mysqld0 and mysqld1. We will also create specific log files for each instance.
We will use the directories, /var/lib/mysql-mysqld0 and /var/lib/mysql-mysqld1 for the data directories and /var/log/mariadb/mysql-mysqld0.log and /var/log/mariadb/mysql-mysqld1.log for the log files. Note you should modify /etc/logrotate.d/mariadb to manage these log files. Note also, we need to set the appropriate SELinux file contexts on the created directories and any files.
We create the data directories and log files and set their respective SELinux contexts via
sudo mkdir /var/lib/mysql-mysqld0
sudo chown mysql:mysql /var/lib/mysql-mysqld0
sudo semanage fcontext -a -t mysqld_db_t "/var/lib/mysql-mysqld0(/.*)?"
sudo restorecon -Rv /var/lib/mysql-mysqld0

sudo touch /var/log/mariadb/mysql-mysqld0.log
sudo chown mysql:mysql /var/log/mariadb/mysql-mysqld0.log
sudo chcon --reference=/var/log/mariadb/mariadb.log /var/log/mariadb/mysql-mysqld0.log

sudo mkdir /var/lib/mysql-mysqld1
sudo chown mysql:mysql /var/lib/mysql-mysqld1
sudo semanage fcontext -a -t mysqld_db_t "/var/lib/mysql-mysqld1(/.*)?"
sudo restorecon -Rv /var/lib/mysql-mysqld1

sudo touch /var/log/mariadb/mysql-mysqld1.log
sudo chown mysql:mysql /var/log/mariadb/mysql-mysqld1.log
sudo chcon --reference=/var/log/mariadb/mariadb.log /var/log/mariadb/mysql-mysqld1.log
We now initialise the our two database data directories via
sudo mysql_install_db --user=mysql --datadir=/var/lib/mysql-mysqld0
sudo mysql_install_db --user=mysql --datadir=/var/lib/mysql-mysqld1
We now replace the MySQL configuration file to set the options for each instance. Note that we will serve mysqld0 and mysqld1 via TCP ports 3307 and 3308 respectively. First backup the existing configuration file with
sudo cp /etc/my.cnf /etc/my.cnf.ORIG
then setup /etc/my.cnf as per
sudo bash
F=/etc/my.cnf
printf '[mysqld_multi]\n' > ${F}
printf 'mysqld = /usr/bin/mysqld_safe --basedir=/usr\n' >> ${F}
printf '\n' >> ${F}
printf '[mysqld0]\n' >> ${F}
printf 'port=3307\n' >> ${F}
printf 'mysqld = /usr/bin/mysqld_safe --basedir=/usr\n' >> ${F}
printf 'datadir=/var/lib/mysql-mysqld0/\n' >> ${F}
printf 'socket=/var/lib/mysql-mysqld0/mysql.sock\n' >> ${F}
printf 'pid-file=/var/run/mariadb/mysql-mysqld0.pid\n' >> ${F}
printf '\n' >> ${F}
printf 'log-error=/var/log/mariadb/mysql-mysqld0.log\n' >> ${F}
printf '\n' >> ${F}
printf '# Disabling symbolic-links is recommended to prevent assorted security\n' >> ${F}
printf '# risks\n' >> ${F}
printf 'symbolic-links=0\n' >> ${F}
printf '\n' >> ${F}
printf '[mysqld1]\n' >> ${F}
printf 'mysqld = /usr/bin/mysqld_safe --basedir=/usr\n' >> ${F}
printf 'port=3308\n' >> ${F}
printf 'datadir=/var/lib/mysql-mysqld1/\n' >> ${F}
printf 'socket=/var/lib/mysql-mysqld1/mysql.sock\n' >> ${F}
printf 'pid-file=/var/run/mariadb/mysql-mysqld1.pid\n' >> ${F}
printf '\n' >> ${F}
printf 'log-error=/var/log/mariadb/mysql-mysqld1.log\n' >> ${F}
printf '\n' >> ${F}
printf '# Disabling symbolic-links is recommended to prevent assorted security risks\n' >> ${F}
printf 'symbolic-links=0\n' >> ${F}
exit # To exit the root shell
We also need to associate the ports with the mysqld_port_t SELinux context as per
sudo semanage port -a -t mysqld_port_t -p tcp 3307
sudo semanage port -a -t mysqld_port_t -p tcp 3308
We next create the systemd service template as per
sudo bash
F=/etc/systemd/system/mysqld@.service

printf '# Install in /etc/systemd/system\n' > ${F}
printf '# Enable via systemctl enable mysqld@0 or systemctl enable mysqld@1\n' >> ${F}
printf '[Unit]\n' >> ${F}
printf 'Description=MySQL Multi Server for instance %%i\n' >> ${F}
printf 'After=syslog.target\n' >> ${F}
printf 'After=network.target\n' >> ${F}
printf '\n' >> ${F}
printf '[Service]\n' >> ${F}
printf 'User=mysql\n' >> ${F}
printf 'Group=mysql\n' >> ${F}
printf 'Type=forking\n' >> ${F}
printf 'ExecStart=/usr/bin/mysqld_multi start %%i\n' >> ${F}
printf 'ExecStop=/usr/bin/mysqld_multi stop %%i\n' >> ${F}
printf 'Restart=always\n' >> ${F}
printf 'PrivateTmp=true\n' >> ${F}
printf '\n' >> ${F}
printf '[Install]\n' >> ${F}
printf 'WantedBy=multi-user.target\n' >> ${F}
chmod 644 ${F}
exit; # to exit the root shell
We next enable and start both instances via
sudo systemctl enable mysqld@0
sudo systemctl enable mysqld@1
sudo systemctl start mysqld@0
sudo systemctl start mysqld@1
At this we should have both instances running. One should check each instance’s log file for any errors.
Secure each database instance
We secure each database engine by running the mysql_secure_installation script. One should accept all defaults, which means the
only entry (aside from pressing returns) is the administrator (root) database password. Make a note of the password you use. In this case
we will use Stroom5User@.
The utility mysql_secure_installation expects to find the Linux socket file to access the database it’s securing at /var/lib/mysql/mysql.sock.
Since we have used other locations, we temporarily link the real socket file to /var/lib/mysql/mysql.sock for each invocation of the
utility. Thus we execute
sudo ln /var/lib/mysql-mysqld0/mysql.sock /var/lib/mysql/mysql.sock
sudo mysql_secure_installation
to see
NOTE: RUNNING ALL PARTS OF THIS SCRIPT IS RECOMMENDED FOR ALL MariaDB
      SERVERS IN PRODUCTION USE!  PLEASE READ EACH STEP CAREFULLY!

In order to log into MariaDB to secure it, we'll need the current
password for the root user.  If you've just installed MariaDB, and
you haven't set the root password yet, the password will be blank,
so you should just press enter here.

Enter current password for root (enter for none):
OK, successfully used password, moving on...

Setting the root password ensures that nobody can log into the MariaDB
root user without the proper authorisation.

Set root password? [Y/n]
New password: <__ Stroom5User@ __>
Re-enter new password: <__ Stroom5User@ __>
Password updated successfully!
Reloading privilege tables..
 ... Success!


By default, a MariaDB installation has an anonymous user, allowing anyone
to log into MariaDB without having to have a user account created for
them.  This is intended only for testing, and to make the installation
go a bit smoother.  You should remove them before moving into a
production environment.

Remove anonymous users? [Y/n]
 ... Success!

Normally, root should only be allowed to connect from 'localhost'.  This
ensures that someone cannot guess at the root password from the network.

Disallow root login remotely? [Y/n]
 ... Success!

By default, MariaDB comes with a database named 'test' that anyone can
access.  This is also intended only for testing, and should be removed
before moving into a production environment.

Remove test database and access to it? [Y/n]
 - Dropping test database...
 ... Success!
 - Removing privileges on test database...
 ... Success!

Reloading the privilege tables will ensure that all changes made so far
will take effect immediately.

Reload privilege tables now? [Y/n]
... Success!

Cleaning up...

All done!  If you've completed all of the above steps, your MariaDB
installation should now be secure.

Thanks for using MariaDB!
then we execute
sudo rm /var/lib/mysql/mysql.sock
sudo ln /var/lib/mysql-mysqld1/mysql.sock /var/lib/mysql/mysql.sock
sudo mysql_secure_installation
sudo rm /var/lib/mysql/mysql.sock
and process as before (for when running mysql_secure_installation). At this both database instances should be secure.
MySQL Community Variant
Create and instantiate both database instances
To set up two MySQL database instances on the one node, we will use mysql_multi and systemd service templates. The mysql_multi utility is a capability that manages multiple MySQL databases on the same node and systemd service templates manage multiple services from one configuration file. A systemd service template is unique in that it has an @ character before the .service suffix.
To use this multiple-instance capability, we need to create two data directories for each database instance and also replace the main MySQL configuration file, /etc/my.cnf, with one that includes configuration of key options for each instance. We will name our instances, mysqld0 and mysqld1. We will also create specific log files for each instance.
We will use the directories, /var/lib/mysql-mysqld0 and /var/lib/mysql-mysqld1 for the data directories and /var/log/mysql-mysqld0.log and /var/log/mysql-mysqld1.log for the log directories. Note you should modify /etc/logrotate.d/mysql to manage these log files. Note also, we need to set the appropriate SELinux file context on the created directories and files.
sudo mkdir /var/lib/mysql-mysqld0
sudo chown mysql:mysql /var/lib/mysql-mysqld0
sudo semanage fcontext -a -t mysqld_db_t "/var/lib/mysql-mysqld0(/.*)?"
sudo restorecon -Rv /var/lib/mysql-mysqld0

sudo touch /var/log/mysql-mysqld0.log
sudo chown mysql:mysql /var/log/mysql-mysqld0.log
sudo chcon --reference=/var/log/mysqld.log /var/log/mysql-mysqld0.log

sudo mkdir /var/lib/mysql-mysqld1
sudo chown mysql:mysql /var/lib/mysql-mysqld1
sudo semanage fcontext -a -t mysqld_db_t "/var/lib/mysql-mysqld1(/.*)?"
sudo restorecon -Rv /var/lib/mysql-mysqld1

sudo touch /var/log/mysql-mysqld1.log
sudo chown mysql:mysql /var/log/mysql-mysqld1.log
sudo chcon --reference=/var/log/mysqld.log /var/log/mysql-mysqld1.log
We now initialise the our two database data directories via
sudo mysql_install_db --user=mysql --datadir=/var/lib/mysql-mysqld0
sudo mysql_install_db --user=mysql --datadir=/var/lib/mysql-mysqld1
Disable the default database via
sudo systemctl disable mysqld
We now modify the MySQL configuration file to set the options for each instance. Note that we will serve mysqld0 and mysqld1 via TCP ports 3307 and 3308 respectively. First backup the existing configuration file with
sudo cp /etc/my.cnf /etc/my.cnf.ORIG
then setup /etc/my.cnf as per
sudo bash
F=/etc/my.cnf
printf '[mysqld_multi]\n' > ${F}
printf 'mysqld = /usr/bin/mysqld_safe --basedir=/usr\n' >> ${F}
printf '\n' >> ${F}
printf '[mysqld0]\n' >> ${F}
printf 'port=3307\n' >> ${F}
printf 'mysqld = /usr/bin/mysqld_safe --basedir=/usr\n' >> ${F}
printf 'datadir=/var/lib/mysql-mysqld0/\n' >> ${F}
printf 'socket=/var/lib/mysql-mysqld0/mysql.sock\n' >> ${F}
printf 'pid-file=/var/run/mysqld/mysql-mysqld0.pid\n' >> ${F}
printf '\n' >> ${F}
printf 'log-error=/var/log/mysql-mysqld0.log\n' >> ${F}
printf '\n' >> ${F}
printf '# Disabling symbolic-links is recommended to prevent assorted security\n' >> ${F}
printf '# risks\n' >> ${F}
printf 'symbolic-links=0\n' >> ${F}
printf '\n' >> ${F}
printf '[mysqld1]\n' >> ${F}
printf 'mysqld = /usr/bin/mysqld_safe --basedir=/usr\n' >> ${F}
printf 'port=3308\n' >> ${F}
printf 'datadir=/var/lib/mysql-mysqld1/\n' >> ${F}
printf 'socket=/var/lib/mysql-mysqld1/mysql.sock\n' >> ${F}
printf 'pid-file=/var/run/mysqld/mysql-mysqld1.pid\n' >> ${F}
printf '\n' >> ${F}
printf 'log-error=/var/log/mysql-mysqld1.log\n' >> ${F}
printf '\n' >> ${F}
printf '# Disabling symbolic-links is recommended to prevent assorted security risks\n' >> ${F}
printf 'symbolic-links=0\n' >> ${F}
exit # To exit the root shell
We also need to associate the ports with the mysqld_port_t SELinux context as per
sudo semanage port -a -t mysqld_port_t -p tcp 3307
sudo semanage port -a -t mysqld_port_t -p tcp 3308
We next create the systemd service template as per
sudo bash
F=/etc/systemd/system/mysqld@.service

printf '# Install in /etc/systemd/system\n' > ${F}
printf '# Enable via systemctl enable mysqld@0 or systemctl enable mysqld@1\n' >> ${F}
printf '[Unit]\n' >> ${F}
printf 'Description=MySQL Multi Server for instance %%i\n' >> ${F}
printf 'After=syslog.target\n' >> ${F}
printf 'After=network.target\n' >> ${F}
printf '\n' >> ${F}
printf '[Service]\n' >> ${F}
printf 'User=mysql\n' >> ${F}
printf 'Group=mysql\n' >> ${F}
printf 'Type=forking\n' >> ${F}
printf 'ExecStart=/usr/bin/mysqld_multi start %%i\n' >> ${F}
printf 'ExecStop=/usr/bin/mysqld_multi stop %%i\n' >> ${F}
printf 'Restart=always\n' >> ${F}
printf 'PrivateTmp=true\n' >> ${F}
printf '\n' >> ${F}
printf '[Install]\n' >> ${F}
printf 'WantedBy=multi-user.target\n' >> ${F}
chmod 644 ${F}
exit; # to exit the root shell
We next enable and start both instances via
sudo systemctl enable mysqld@0
sudo systemctl enable mysqld@1
sudo systemctl start mysqld@0
sudo systemctl start mysqld@1
At this we should have both instances running. One should check each instance’s log file for any errors.
Secure each database instance
We secure each database engine by running the mysql_secure_installation script. One should accept all defaults, which means the
only entry (aside from pressing returns) is the administrator (root) database password. Make a note of the password you use. In this case
we will use Stroom5User@.
The utility mysql_secure_installation expects to find the Linux socket file to access the database it’s securing at /var/lib/mysql/mysql.sock.
Since we have used other locations, we temporarily link the real socket file to /var/lib/mysql/mysql.sock for each invocation of the
utility. Thus we execute
sudo ln /var/lib/mysql-mysqld0/mysql.sock /var/lib/mysql/mysql.sock
sudo mysql_secure_installation
to see
NOTE: RUNNING ALL PARTS OF THIS SCRIPT IS RECOMMENDED FOR ALL MySQL
      SERVERS IN PRODUCTION USE!  PLEASE READ EACH STEP CAREFULLY!

In order to log into MySQL to secure it, we'll need the current
password for the root user.  If you've just installed MySQL, and
you haven't set the root password yet, the password will be blank,
so you should just press enter here.

Enter current password for root (enter for none):
OK, successfully used password, moving on...

Setting the root password ensures that nobody can log into the MySQL
root user without the proper authorisation.

Set root password? [Y/n] y
New password: <__ Stroom5User@ __>
Re-enter new password: <__ Stroom5User@ __>
Password updated successfully!
Reloading privilege tables..
 ... Success!


By default, a MySQL installation has an anonymous user, allowing anyone
to log into MySQL without having to have a user account created for
them.  This is intended only for testing, and to make the installation
go a bit smoother.  You should remove them before moving into a
production environment.

Remove anonymous users? [Y/n]
 ... Success!

Normally, root should only be allowed to connect from 'localhost'.  This
ensures that someone cannot guess at the root password from the network.

Disallow root login remotely? [Y/n]
 ... Success!

By default, MySQL comes with a database named 'test' that anyone can
access.  This is also intended only for testing, and should be removed
before moving into a production environment.

Remove test database and access to it? [Y/n]
 - Dropping test database...
ERROR 1008 (HY000) at line 1: Can't drop database 'test'; database doesn't exist
 ... Failed!  Not critical, keep moving...
 - Removing privileges on test database...
 ... Success!

Reloading the privilege tables will ensure that all changes made so far
will take effect immediately.

Reload privilege tables now? [Y/n]
 ... Success!


All done!  If you've completed all of the above steps, your MySQL
installation should now be secure.

Thanks for using MySQL!


Cleaning up...
then we execute
sudo rm /var/lib/mysql/mysql.sock
sudo ln /var/lib/mysql-mysqld1/mysql.sock /var/lib/mysql/mysql.sock
sudo mysql_secure_installation
sudo rm /var/lib/mysql/mysql.sock
and process as before (for when running mysql_secure_installation). At this both database instances should be secure.
Create the Databases and Enable access by the Stroom processing users
We now create the stroom database within the first instance, mysqld0 and the statistics database within the second
instance mysqld1. It does not matter which database variant used as all commands are the same for both.
As well as creating the databases, we also need to establish the Stroom processing users
that the Stroom processing nodes will use to access each database.
For the stroom database, we will use the database user stroomuser with a password of Stroompassword1@ and for the statistics database, we will use the database user stroomstats with a password of Stroompassword2@. One identifies a processing user as <user>@<host> on a grant SQL command.
In the stroom database instance, we will grant access for
stroomuser@localhostfor local access for maintenance etc.stroomuser@stroomp00.strmdev00.orgfor access by processing nodestroomp00.strmdev00.orgstroomuser@stroomp01.strmdev00.orgfor access by processing nodestroomp01.strmdev00.org
and in the statistics database instance, we will grant access for
stroomstats@localhostfor local access for maintenance etc.stroomstats@stroomp00.strmdev00.orgfor access by processing nodestroomp00.strmdev00.orgstroomstats@stroomp01.strmdev00.orgfor access by processing nodestroomp01.strmdev00.org
Thus for the stroom database we execute
mysql --user=root --port=3307 --socket=/var/lib/mysql-mysqld0/mysql.sock --password
and on entering the administrator’s password, we arrive at the MariaDB [(none)]> or mysql> prompt. At this we create the database with
create database stroom;
and then to establish the users, we execute
grant all privileges on stroom.* to stroomuser@localhost identified by 'Stroompassword1@';
grant all privileges on stroom.* to stroomuser@stroomp00.strmdev00.org identified by 'Stroompassword1@';
grant all privileges on stroom.* to stroomuser@stroomp01.strmdev00.org identified by 'Stroompassword1@';
then
quit;
to exit.
And for the statistics database
mysql --user=root --port=3308 --socket=/var/lib/mysql-mysqld1/mysql.sock --password
with
create database statistics;
and then to establish the users, we execute
grant all privileges on statistics.* to stroomstats@localhost identified by 'Stroompassword2@';
grant all privileges on statistics.* to stroomstats@stroomp00.strmdev00.org identified by 'Stroompassword2@';
grant all privileges on statistics.* to stroomstats@stroomp01.strmdev00.org identified by 'Stroompassword2@';
then
quit;
to exit.
Clearly if we need to add more processing nodes, additional grant commands would be used. Further, if we were installing the databases in a single node Stroom environment, we would just have the first two pairs of grants.
Configure Firewall
Next we need to modify our firewall to allow remote access to our databases which listens on ports 3307 and 3308. The simplest way to achieve this is with the commands
sudo firewall-cmd --zone=public --add-port=3307/tcp --permanent
sudo firewall-cmd --zone=public --add-port=3308/tcp --permanent
sudo firewall-cmd --reload
sudo firewall-cmd --zone=public --list-all
Note
That this allows ANY node to connect to your databases. You should give consideration to restricting this to only allowing processing node access.Debugging of Mariadb for Stroom
If there is a need to debug the Mariadb database and Stroom interaction, one can turn on auditing for the Mariadb service. To do so, log onto the relevant database as the administrative user as per
mysql --user=root --port=3307 --socket=/var/lib/mysql-mysqld0/mysql.sock --password
or
mysql --user=root --port=3308 --socket=/var/lib/mysql-mysqld1/mysql.sock --password
and at the MariaDB [(none)]> prompt enter
install plugin server_audit SONAME 'server_audit';
set global server_audit_file_path='/var/log/mariadb/mysqld-mysqld0_server_audit.log';
or
set global server_audit_file_path='/var/log/mariadb/mysqld-mysqld1_server_audit.log';
set global server_audit_logging=ON;
set global server_audit_file_rotate_size=10485760;
install plugin SQL_ERROR_LOG soname 'sql_errlog';
quit;
The above will generate two log files,
/var/log/mariadb/mysqld-mysqld0_server_audit.logor/var/log/mariadb/mysqld-mysqld1_server_audit.logwhich records all commands the respective databases run. We have configured the log file will rotate at 10MB in size./var/lib/mysql-mysqld0/sql_errors.logor/var/lib/mysql-mysqld1/sql_errors.logwhich records all erroneous SQL commands. This log file will rotate at 10MB in size. Note we cannot set this filename via the UI, but it will be appear in the data directory.
All files will, by default, generate up to 9 rotated files.
If you wish to rotate a log file manually, log into the database as the administrative user and execute either
set global server_audit_file_rotate_now=1;to rotate the audit log fileset global sql_error_log_rotate=1;to rotate the sql_errlog log file
Initial Database Access
It should be noted that if you monitor the sql_errors.log log file on a new Stooom deployment, when the Stoom Application first starts, it’s initial access to the stroom database will result in the following attempted sql statements.
2017-04-16 16:24:50 stroomuser[stroomuser] @ stroomp00.strmdev00.org [192.168.2.126] ERROR 1146: Table 'stroom.schema_version' doesn't exist : SELECT version FROM schema_version ORDER BY installed_rank DESC
2017-04-16 16:24:50 stroomuser[stroomuser] @ stroomp00.strmdev00.org [192.168.2.126] ERROR 1146: Table 'stroom.STROOM_VER' doesn't exist : SELECT VER_MAJ, VER_MIN, VER_PAT FROM STROOM_VER ORDER BY VER_MAJ DESC, VER_MIN DESC, VER_PAT DESC LIMIT 1
2017-04-16 16:24:50 stroomuser[stroomuser] @ stroomp00.strmdev00.org [192.168.2.126] ERROR 1146: Table 'stroom.FD' doesn't exist : SELECT ID FROM FD LIMIT 1
2017-04-16 16:24:50 stroomuser[stroomuser] @ stroomp00.strmdev00.org [192.168.2.126] ERROR 1146: Table 'stroom.FEED' doesn't exist : SELECT ID FROM FEED LIMIT 1
After this access the application will realise the database does not exist and it will initialise the database.
In the case of the statistics database you may note the following attempted access
2017-04-16 16:25:09 stroomstats[stroomstats] @ stroomp00.strmdev00.org [192.168.2.126] ERROR 1146: Table 'statistics.schema_version' doesn't exist : SELECT version FROM schema_version ORDER BY installed_rank DESC
Again, at this point the application will initialise this database.
3 - Installation
Assumptions
The following assumptions are used in this document.
- the user has reasonable RHEL/Centos System administration skills.
- installations are on Centos 7.3 minimal systems (fully patched).
- the term ’node’ is used to reference the ‘host’ a service is running on.
- the Stroom Proxy and Application software runs as user ‘stroomuser’ and will be deployed in this user’s home directory
- data will reside in a directory tree referenced via ‘/stroomdata’. It is up to the user to provision a filesystem here, noting sub-directories of it will be NFS shared in Multi Node Stroom Deployments
- any scripts or commands that should run are in code blocks and are designed to allow the user to cut then paste the commands onto their systems
- in this document, when a textual screen capture is documented, data entry is identified by the data surrounded by ‘<’ ‘>’ . This excludes enter/return presses.
- better security of password choices, networking, firewalls, data stores, etc. can and should be achieved in various ways, but these HOWTOs are just a quick means of getting a working system, so only limited security is applied
- better configuration of the database (e.g. more memory. redundancy) should be considered in production environments
- the use of self signed certificates is appropriate for test systems, but users should consider appropriate CA infrastructure in production environments
- the user has access to a Chrome web browser as Stroom is optimised for this browser.
Introduction
This HOWTO provides guidance on a variety of simple Stroom deployments.
for an environment where multiple nodes are required to handle the processing load.
for extensive networks where one wants to aggregate data through a proxy before sending data to the central Stroom processing systems.
for disconnected networks where collected data can be manually transferred to a Stroom processing service.
for when one needs to add an additional node to an existing cluster.
Nodename Nomenclature
For simplicity sake, the nodenames used in this HOWTO are geared towards the Multi Node Stroom Cluster deployment. That is,
- the database nodename is
stroomdb0.strmdev00.org - the processing nodenames are
stroomp00.strmdev00.org,stroomp01.strmdev00.org, andstroomp02.strmdev00.org - the first node in our cluster,
stroomp00.strmdev00.org, also has the CNAMEstroomp.strmdev00.org
In the case of the Proxy only deployments,
- the forwarding Stroom proxy nodename is
stoomfp0.strmdev00.org - the standalone nodename will be
stroomp00.strmdev00.org
Storage
Both the Stroom Proxy and Application store data. The typical requirement is
- directory for Stroom proxy to store inbound data files
- directory for Stroom application permanent data files (events, etc.)
- directory for Stroom application index data files
- directory for Stroom application working files (temporary files, output, etc.)
Where multiple processing nodes are involved, the application’s permanent data directories need to be accessible by all participating nodes.
Thus a hierarchy for a Stroom Proxy might by
- /stroomdata/stroom-proxy
and for an Application node
- /stroomdata/stroom-data
- /stroomdata/stroom-index
- /stroomdata/stroom-working
In the following examples, the storage hierarchy proposed will more suited for a multi node Stroom cluster, including the Forwarding or Standalone proxy deployments. This is to simplify the documentation. Thus, the above structure is generalised into
- /stroomdata/stroom-working-p_nn_/proxy
and
- /stroomdata/stroom-data-p_nn_
- /stroomdata/stroom-index-p_nn_
- /stroomdata/stroom-working-p_nn_
where nn is a two digit node number. The reason for placing the proxy directory within the Application working area will be explained later.
All data should be owned by the Stroom processing user. In this HOWTO, we will use stroomuser
Multi Node Stroom Cluster (Proxy and Application) Deployment
In this deployment we will install the database on a given node then deploy both the Stroom Proxy and Stroom Application software to both our processing nodes. At this point we will then integrate a web service to run ‘in-front’ of our Stroom software and then perform the initial configuration of Stroom via the user interface.
Database Installation
The Stroom capability requires access to two MySQL/MariaDB databases. The first is for persisting application configuration and metadata information, and the second is for the Stroom Statistics capability. Instructions for installation of the Stroom databases can be found here. Although these instructions describe the deployment of the databases to their own node, there is no reason why one can’t just install them both on the first (or only) Stroom node.
Prerequisite Software Installation
Certain software packages are required for either the Stroom Proxy or Stroom Application to run.
The core software list is
- java-1.8.0-openjdk
- java-1.8.0-openjdk-devel
- policycoreutils-python
- unzip
- zip
- mariadb or mysql client
Most of the required software are packages available via standard repositories and hence we can simply execute
sudo yum -y install java-1.8.0-openjdk java-1.8.0-openjdk-devel policycoreutils-python unzip zip
One has a choice of database clients. MariaDB is directly supported by Centos 7 and is simplest to install. This is done via
sudo yum -y install mariadb
One could deploy the MySQL database software as the alternative.
To do this you need to install the MySQL Community repository files then install the client. Instructions for installation of the MySQL Community repository files can be found here or on the MySQL Site . Once you have installed the MySQL repository files, install the client via
sudo yum -y install mysql-community-client
Note that additional software will be required for other integration components (e.g. Apache httpd/mod_jk). This is described in the Web Service Integration section of this document.
Note also, that Standalone or Forwarding Stroom Proxy deployments do NOT need a database client deployed.
Entropy Issues in Virtual environments
TODO
This section is likely out of date due to changes in the Linux kernal and how SecureRandom is implemented. Unless you are experiencing delays, there is no need to installhaveged.
Both the Stroom Application and Stroom Proxy currently run on Tomcat (Version 7) which relies on the Java SecureRandom class to provide random values for any generated session identifiers as well as other components. In some circumstances the Java runtime can be delayed if the entropy source that is used to initialise SecureRandom is short of entropy. The delay is caused by the Java runtime waiting on the blocking entropy souce /dev/random to have sufficient entropy. This quite often occurs in virtual environments were there are few sources that can contribute to a system’s entropy.
To view the current available entropy on a Linux system, run the command
cat /proc/sys/kernel/random/entropy_avail
A reasonable value would be over 2000 and a poor value would be below a few hundred.
If you are deploying Stroom onto systems with low available entropy, the start time for the Stroom Proxy can be as high as 5 minutes and for the Application as high as 15 minutes.
One software based solution would be to install the haveged service that attempts to provide an easy-to-use, unpredictable random number generator based upon an adaptation of the HAVEGE algorithm.
To install execute
yum -y install haveged
systemctl enable haveged
systemctl start haveged
For background reading in this matter, see this reference or this reference .
Storage Scenario
For the purpose of this Installation HOWTO, the following sets up the storage hierarchy for a two node processing cluster. To share our permanent data we will use NFS. Accept that the NFS deployment described here is very simple, and in a production deployment, a lot more security controls should be used. Further,
Our hierarchy is
- Node:
stroomp00.strmdev00.org /stroomdata/stroom-data-p00- location to store Stroom application data files (events, etc.) for this node/stroomdata/stroom-index-p00- location to store Stroom application index files/stroomdata/stroom-working-p00- location to store Stroom application working files (e.g. temporary files, output, etc.) for this node/stroomdata/stroom-working-p00/proxy- location for Stroom proxy to store inbound data files- Node:
stroomp01.strmdev00.org /stroomdata/stroom-data-p01- location to store Stroom application data files (events, etc.) for this node/stroomdata/stroom-index-p01- location to store Stroom application index files/stroomdata/stroom-working-p01- location to store Stroom application working files (e.g. temporary files, output, etc.) for this node/stroomdata/stroom-working-p01/proxy- location for Stroom proxy to store inbound data files
Creation of Storage Hierarchy
So, we first create processing user on all nodes as per
sudo useradd --system stroomuser
And the relevant commands to create the above hierarchy would be
- Node:
stroomp00.strmdev00.org
sudo mkdir -p /stroomdata/stroom-data-p00 /stroomdata/stroom-index-p00 /stroomdata/stroom-working-p00 /stroomdata/stroom-working-p00/proxy
sudo mkdir -p /stroomdata/stroom-data-p01  # So that this node can mount stroomp01's data directory
sudo chown -R stroomuser:stroomuser /stroomdata
sudo chmod -R 750 /stroomdata
- Node:
stroomp01.strmdev00.org
sudo mkdir -p /stroomdata/stroom-data-p01 /stroomdata/stroom-index-p01 /stroomdata/stroom-working-p01 /stroomdata/stroom-working-p01/proxy
sudo mkdir -p /stroomdata/stroom-data-p00  # So that this node can mount stroomp00's data directory
sudo chown -R stroomuser:stroomuser /stroomdata
sudo chmod -R 750 /stroomdata
Deployment of NFS to share Stroom Storage
We will use NFS to cross mount the permanent data directories. That is
- node
stroomp00.strmdev00.orgwill mountstroomp01.strmdev00.org:/stroomdata/stroom-data-p01and, - node
stroomp01.strmdev00.orgwill mountstroomp00.strmdev00.org:/stroomdata/stroom-data-p00.
The HOWTO guide to deploy and configure NFS for our Scenario is here
Stroom Installation
Pre-installation setup
Before installing either the Stroom Proxy or Stroom Application, we need establish various files and scripts within the Stroom Processing user’s home directory to support the Stroom services and their persistence. This is setup is described here.
Stroom Proxy Installation
Instructions for installation of the Stroom Proxy can be found here.
Stroom Application Installation
Instructions for installation of the Stroom application can be found here.
Web Service Integration
One typically ‘fronts’ either a Stroom Proxy or Stroom Application with a secure web service such as Apache’s Httpd or NGINX. In our scenario, we will use SSL to secure the web service and further, we will use Apache’s Httpd.
We first need to create certificates for use by the web service. The following provides instructions for this. The created certificates can then be used when configuration the web service.
This HOWTO is designed to deploy Apache’s httpd web service as a front end (https) (to the user) and Apache’s mod_jk as the interface between Apache and the Stroom tomcat applications. The instructions to configure this can be found here.
Other Web service capability can be used, for example, NGINX .
Installation Validation
We will now check that the installation and web services integration has worked.
Sanity firewall check
To ensure you have the firewall correctly set up, the following command
sudo firewall-cmd --reload
sudo firewall-cmd --zone=public --list-all
should result in
public (active)
  target: default
  icmp-block-inversion: no
  interfaces: enp0s3
  sources:
  services: dhcpv6-client http https nfs ssh
  ports: 8009/tcp 9080/tcp 8080/tcp 9009/tcp
  protocols:
  masquerade: no
  forward-ports:
  sourceports:
  icmp-blocks:
  rich rules:
Test Posting of data to the Stroom service
You can test the data posting service with the command
curl -k --data-binary @/etc/group "https://stroomp.strmdev00.org/stroom/datafeed" -H "Feed:TEST-FEED-V1_0" -H "System:EXAMPLE_SYSTEM" -H "Environment:EXAMPLE_ENVIRONMENT"
which WILL result in an error as we have not configured the Stroom Application as yet. The error should look like
<html><head><title>Apache Tomcat/7.0.53 - Error report</title><style><!--H1 {font-family:Tahoma,Arial,sans-serif;color:white;background-color:#525D76;font-size:22px;} H2 {font-family:Tahoma,Arial,sans-serif;color:white;background-color:#525D76;font-size:16px;} H3 {font-family:Tahoma,Arial,sans-serif;color:white;background-color:#525D76;font-size:14px;} BODY {font-family:Tahoma,Arial,sans-serif;color:black;background-color:white;} B {font-family:Tahoma,Arial,sans-serif;color:white;background-color:#525D76;} P {font-family:Tahoma,Arial,sans-serif;background:white;color:black;font-size:12px;}A {color : black;}A.name {color : black;}HR {color : #525D76;}--></style> </head><body><h1>HTTP Status 406 - Stroom Status 110 - Feed is not set to receive data - </h1><HR size="1" noshade="noshade"><p><b>type</b> Status report</p><p><b>message</b> <u>Stroom Status 110 - Feed is not set to receive data - </u></p><p><b>description</b> <u>The resource identified by this request is only capable of generating responses with characteristics not acceptable according to the request "accept" headers.</u></p><HR size="1" noshade="noshade"><h3>Apache Tomcat/7.0.53</h3></body></html>
If you view the Stroom proxy log, ~/stroom-proxy/instance/logs/stroom.log, on both processing nodes, you will see on one node,
the datafeed.DataFeedRequestHandler events running under, in this case, the ajp-apr-9009-exec-1 thread indicating the failure
...
2017-01-03T03:35:47.366Z WARN  [ajp-apr-9009-exec-1] datafeed.DataFeedRequestHandler (DataFeedRequestHandler.java:131) - "handleException()","Environment=EXAMPLE_ENVIRONMENT","Expect=100-continue","Feed=TEST-FEED-V1_0","GUID=39960cf9-e50b-4ae8-a5f2-449ee670d2eb","ReceivedTime=2017-01-03T03:35:46.915Z","RemoteAddress=192.168.2.220","RemoteHost=192.168.2.220","System=EXAMPLE_SYSTEM","accept=*/*","content-length=1051","content-type=application/x-www-form-urlencoded","host=stroomp.strmdev00.org","user-agent=curl/7.19.7 (x86_64-redhat-linux-gnu) libcurl/7.19.7 NSS/3.21 Basic ECC zlib/1.2.3 libidn/1.18 libssh2/1.4.2","Stroom Status 110 - Feed is not set to receive data"
2017-01-03T03:35:47.367Z ERROR [ajp-apr-9009-exec-1] zip.StroomStreamException (StroomStreamException.java:131) - sendErrorResponse() - 406 Stroom Status 110 - Feed is not set to receive data -
2017-01-03T03:35:47.368Z INFO  [ajp-apr-9009-exec-1] datafeed.DataFeedRequestHandler$1 (DataFeedRequestHandler.java:104) - "doPost() - Took 478 ms to process (concurrentRequestCount=1) 406","Environment=EXAMPLE_ENVIRONMENT","Expect=100-continue","Feed=TEST-FEED-V1_0","GUID=39960cf9-e50b-4ae8-a5f2-449ee670d2eb","ReceivedTime=2017-01-03T03:35:46.915Z","RemoteAddress=192.168.2.220","RemoteHost=192.168.2.220","System=EXAMPLE_SYSTEM","accept=*/*","content-length=1051","content-type=application/x-www-form-urlencoded","host=stroomp.strmdev00.org","user-agent=curl/7.19.7 (x86_64-redhat-linux-gnu) libcurl/7.19.7 NSS/3.21 Basic ECC zlib/1.2.3 libidn/1.18 libssh2/1.4.2"
...
Further, if you execute the data posting command (curl) multiple times, you will see the loadbalancer working in that,
the above WARN/ERROR/INFO logs will swap between the proxy services (i.e. first error will be in stroomp00.strmdev00.org’s
proxy log file, then second on stroomp01.strmdev00.org’s proxy log file, then back to stroomp00.strmdev00.org and so on).
Stroom Application Configuration
Although we have installed our multi node Stroom cluster, we now need to configure it. We do this via the user interface (UI).
Logging into the Stroom UI for the first time
To log into the UI of your newly installed Stroom instance, present the base URL to your
Chrome
browser. In this deployment, you should enter the URLS
http://stroomp.strmdev00.org, or https://stroomp.strmdev00.org or https://stroomp.strmdev00.org/stroom, noting the first URLs
should automatically direct you to the last URL.
If you have personal certificates loaded in your Chrome browser, you may be asked which certificate to use to authenticate yourself
to stroomp.strmdev00.org:443. As Stroom has not been configured to use user certificates, the choice is not relevant, just choose one
and continue.
Additionally, if you are using self-signed certificates, your browser will generate an alert as per
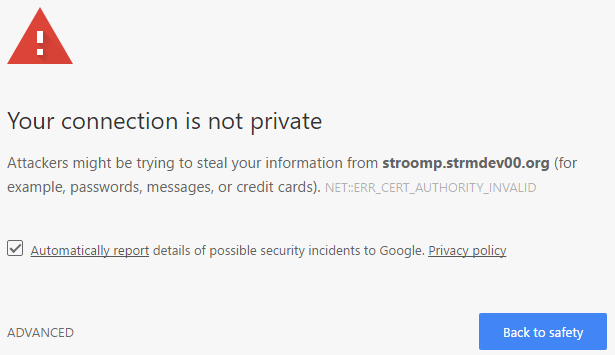
To proceed you need to select the ADVANCED hyperlink to see
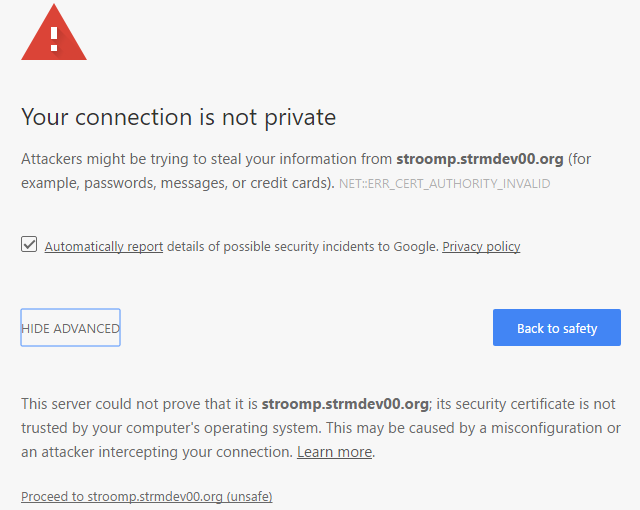
If you select the Proceed to stroomp.strmdev00.org (unsafe) hyper-link you will be presented with the standard Stroom UI login page.
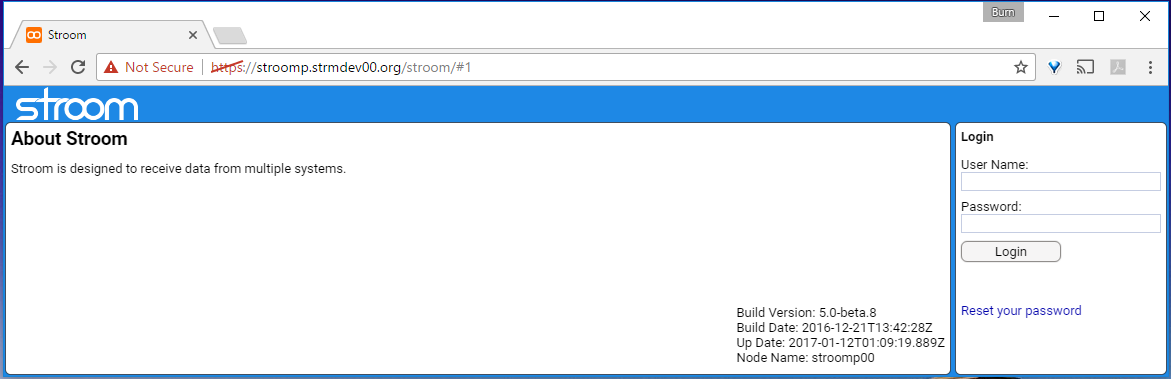
This page has two panels - About Stroom and Login.
In the About Stroom panel we see an introductory description of Stroom in the top left and deployment details in the bottom left of the panel. The deployment details provide
Build Version:- the build version of the Stroom application deployedBuild Date:- the date the version was builtUp Date:- the install dateNode Name:- the node within the Stroom cluster you have connected to
Login with Stroom default Administrative User
Each new Stroom deployment automatically creates the administrative user admin and this user’s password is initially set to admin.
We will
login as this user
which also validates that the database and UI is working correctly in that you can login and the password is admin.
Create an Attributed User to perform configuration
We should configure Stroom using an attributed user account.
That is, we should
create
a user, in our case it will be burn (the author) and once created, we login with that account then perform the initial configuration activities.
You don’t have to do this, but it is sound security practice.
Once you have created the user you should
log out
of the admin account and log back in as our user burn.
Configure the Volumes for our Stroom deployment
Before we can store data within Stroom we need to configure the volumes we have allocated in our Storage hierarchy. The Volume Maintenance HOWTO shows how to do this.
Configure the Nodes for our Stroom deployment
In a Stroom cluster, nodes are expected to communicate with each other on port 8080 over http. Our installation in a multi node environment ensures the firewall will allow this but we also need to configure the nodes. This is achieved via the Stroom UI where we set a Cluster URL for each node. The following Node Configuration HOWTO demonstrates how do set the Cluster URL.
Data Stream Processing
To enable Stroom to process data, it’s Data Processors need to be enabled. There are NOT enabled by default on installation. The following section in our Stroom Tasks HowTo shows how to do this.
Testing our Stroom Application and Proxy Installation
To complete the installation process we will test that we can send and ingest data.
Add a Test Feed
In order for Stroom to be able to handle various data sources, be they Apache HTTPD web access logs, MicroSoft Windows Event logs or Squid Proxy logs, Stroom must be told what the data is when it is received. This is achieved using Event Feeds. Each feed has a unique name within the system.
To test our installation can accept and ingest data, we will
create a test Event feed. The ’name’ of the feed will be
TEST-FEED-V1_0. Note that in a production environment is is best that a well defined nomenclature is used for feed ’names’. For our
testing purposes TEST-FEED-V1_0 is sufficient.
Sending Test Data
NOTE: Before testing our new feed, we should restart both our Stroom application services so that any volume changes are propagated. This can be achieved by simply running
sudo -i -u stroomuser
bin/StopServices.sh
bin/StartServices.sh
on both nodes. It is suggested you first log out of Stroom, if you are currently logged in and you should monitor the Stroom
application logs to ensure it has successfully restarted. Remember to use the T and Tp bash aliases we set up.
For this test, we will send the contents of /etc/group to our test feed. We will also send the file from the cluster’s database machine. The command to send this file is
curl -k --data-binary @/etc/group "https://stroomp.strmdev00.org/stroom/datafeed" -H "Feed:TEST-FEED-V1_0" -H "System:EXAMPLE_SYSTEM" -H "Environment:EXAMPLE_ENVIRONMENT"
We will test a number of features as part of our installation test. These are
- simple post of data
- simple post of data to validate load balancing is working
- simple post to direct feed interface
- simple post to direct feed interface to validate load balancing is working
- identify that the Stroom Proxy Aggregation is working correctly
As part of our testing will check the presence of the inbound data, as files, within the proxy storage area.
Now as the proxy storage area is also the location from which the Stroom application
automatically aggregates then ingests the data stored by the proxy, we can either turn off the
Proxy Aggregation task,
or attempt to
perform our tests noting that proxy aggregation occurs every 10 minutes by default. For simplicity, we will
turn off the Proxy Aggregation task.
We can now perform out tests. Follow the steps in the Data Posting Tests section of the Testing Stroom Installation HOWTO
Forwarding Stroom Proxy Deployment
In this deployment will install a Stroom Forwarding Proxy which is designed to aggregate data posted to it for managed forwarding to
a central Stroom processing system. This scenario is assuming we are installing on the fully patch Centos 7.3 host, stroomfp0.strmdev00.org.
Further it assumes we have installed, configured and tested the destination Stroom system we will be forwarding to.
We will first deploy the Stroom Proxy then configure it as a Forwarding Proxy then integrate a web service to run ‘in-front’ of Proxy.
Prerequisite Software Installation for Forwarding Proxy
Certain software packages are required for the Stroom Proxy to run.
The core software list is
- java-1.8.0-openjdk
- java-1.8.0-openjdk-devel
- policycoreutils-python
- unzip
- zip
Most of the required software are packages available via standard repositories and hence we can simply execute
sudo yum -y install java-1.8.0-openjdk java-1.8.0-openjdk-devel policycoreutils-python unzip zip
Note that additional software will be required for other integration components (e.g. Apache httpd/mod_jk). This is described in the Web Service Integration for Forwarding Proxy section of this document.
Forwarding Proxy Storage
Since we are a proxy that stores data sent to it and forwards it each minute we have only one directory.
/stroomdata/stroom-working-fp0/proxy- location for Stroom proxy to store inbound data files prior to forwarding
You will note that these HOWTOs use a consistent storage nomenclature for simplicity of documentations.
Creation of Storage for Forwarding Proxy
We create the processing user, as per
sudo useradd --system stroomuser
then create the storage hierarchy with the commands
sudo mkdir -p /stroomdata/stroom-working-fp0/proxy
sudo chown -R stroomuser:stroomuser /stroomdata
sudo chmod -R 750 /stroomdata
Stroom Forwarding Proxy Installation
Pre-installation setup
Before installing the Stroom Forwarding Proxy, we need establish various files and scripts within the Stroom Processing user’s home directory to support the Stroom services and their persistence. This is setup is described here. Although this setup HOWTO is orientated towards a complete Stroom Proxy and Application installation, it does provide all the processing user setup requirements for a Stroom Proxy as well.
Stroom Forwarding Proxy Installation
Instructions for installation of the Stroom Proxy can be found here, noting you should follow the steps for configuring the proxy as a Forwarding proxy.
Web Service Integration for Forwarding Proxy
One typically ‘fronts’ a Stroom Proxy with a secure web service such as Apache’s Httpd or NGINX. In our scenario, we will use SSL to secure the web service and further, we will use Apache’s Httpd.
We first need to create certificates for use by the web service. The SSL Certificate Generation HOWTO provides instructions for this. The created certificates can then be used when configuration the web service. NOTE also, that for a forwarding proxy we will need to establish Key and Trust stores as well. This is also documented in the SSL Certificate Generation HOWTO here
This HOWTO is designed to deploy Apache’s httpd web service as a front end (https) (to the user) and Apache’s mod_jk as the interface between Apache and the Stroom tomcat applications. The instructions to configure this can be found here. Please take note of where a Stroom Proxy configuration item is different to that of a Stroom Application processing node.
Other Web service capability can be used, for example, NGINX .
Testing our Forwarding Proxy Installation
To complete the installation process we will test that we can send data to the forwarding proxy and that it forwards the files
it receives to the central Stroom processing system. As stated earlier, it is assumed we have installed, configured and tested the destination
central Stroom processing system and thus we will have a test Feed
already established - TEST-FEED-V1_0.
Sending Test Data
For this test, we will send the contents of /etc/group to our test feed - TEST-FEED-V1_0. It doesn’t matter from which host we send the file from.
The command to send file is
curl -k --data-binary @/etc/group "https://stroomfp0.strmdev00.org/stroom/datafeed" -H "Feed:TEST-FEED-V1_0" -H "System:EXAMPLE_SYSTEM" -H "Environment:EXAMPLE_ENVIRONMENT"
Before testing, it is recommended you set up to monitor the Stroom proxy logs on the central server as well as on the Forwarding Proxy server.
Follow the steps in the Forwarding Proxy Data Posting Tests section of the Testing Stroom Installation HOWTO
Standalone Stroom Proxy Deployment
In this deployment will install a Stroom Standalone Proxy which is designed to accept and store data posted to it for manual forwarding to
a central Stroom processing system. This scenario is assuming we are installing on the fully patch Centos 7.3 host, stroomsap0.strmdev00.org.
We will first deploy the Stroom Proxy then configure it as a Standalone Proxy then integrate a web service to run ‘in-front’ of Proxy.
Prerequisite Software Installation for Forwarding Proxy
Certain software packages are required for the Stroom Proxy to run.
The core software list is
- java-1.8.0-openjdk
- java-1.8.0-openjdk-devel
- policycoreutils-python
- unzip
- zip
Most of the required software are packages available via standard repositories and hence we can simply execute
sudo yum -y install java-1.8.0-openjdk java-1.8.0-openjdk-devel policycoreutils-python unzip zip
Note that additional software will be required for other integration components (e.g. Apache httpd/mod_jk). This is described in the Web Service Integration for Standalone Proxy section of this document.
Standalone Proxy Storage
Since we are a proxy that stores data sent to it we have only one directory.
/stroomdata/stroom-working-sap0/proxy- location for Stroom proxy to store inbound data files
You will note that these HOWTOs use a consistent storage nomenclature for simplicity of documentations.
Creation of Storage for Standalone Proxy
We create the processing user, as per
sudo useradd --system stroomuser
then create the storage hierarchy with the commands
sudo mkdir -p /stroomdata/stroom-working-sap0/proxy
sudo chown -R stroomuser:stroomuser /stroomdata
sudo chmod -R 750 /stroomdata
Stroom Standalone Proxy Installation
Pre-installation setup
Before installing the Stroom Standalone Proxy, we need establish various files and scripts within the Stroom Processing user’s home directory to support the Stroom services and their persistence. This is setup is described here. Although this setup HOWTO is orientated towards a complete Stroom Proxy and Application installation, it does provide all the processing user setup requirements for a Stroom Proxy as well.
Stroom Standalone Proxy Installation
Instructions for installation of the Stroom Proxy can be found here, noting you should follow the steps for configuring the proxy as a Store_NoDB proxy.
Web Service Integration for Standalone Proxy
One typically ‘fronts’ a Stroom Proxy with a secure web service such as Apache’s Httpd or NGINX. In our scenario, we will use SSL to secure the web service and further, we will use Apache’s Httpd.
We first need to create certificates for use by the web service. The SSL Certificate Generation HOWTO provides instructions for this. The created certificates can then be used when configuration the web service. There is no need for Trust or Key stores.
This HOWTO is designed to deploy Apache’s httpd web service as a front end (https) (to the user) and Apache’s mod_jk as the interface between Apache and the Stroom tomcat applications. The instructions to configure this can be found here. Please take note of where a Stroom Proxy configuration item is different to that of a Stroom Application processing node.
Other Web service capability can be used, for example, NGINX .
Testing our Standalone Proxy Installation
To complete the installation process we will test that we can send data to the standalone proxy and it stores it.
Sending Test Data
For this test, we will send the contents of /etc/group to our test feed - TEST-FEED-V1_0. It doesn’t matter from which host we send the file from.
The command to send file is
curl -k --data-binary @/etc/group "https://stroomsap0.strmdev00.org/stroom/datafeed" -H "Feed:TEST-FEED-V1_0" -H "System:EXAMPLE_SYSTEM" -H "Environment:EXAMPLE_ENVIRONMENT"
Before testing, it is recommended you set up to monitor the Standalone Proxy logs.
Follow the steps in the Standalone Proxy Data Posting Tests section of the Testing Stroom Installation HOWTO
Addition of a Node to a Stroom Cluster Deployment
In this deployment we will deploy both the Stroom Proxy and Stroom Application software
to a new processing node we wish to add to our cluster. Once we have deploy and configured the Stroom software, we will then integrate a web
service to run ‘in-front’ of our Stroom software, and then perform the initial configuration of to add this node via the user interface. The
node we will add is stroomp02.strmdev00.org.
Grant access to the database for this node
Connect to the Stroom database as the administrative (root) user, via the command
sudo mysql --user=root -p
and at the MariaDB [(none)]> or mysql> prompt enter
grant all privileges on stroom.* to stroomuser@stroomp02.strmdev00.org identified by 'Stroompassword1@';
quit;
Prerequisite Software Installation
Certain software packages are required for either the Stroom Proxy or Stroom Application to run.
The core software list is
- java-1.8.0-openjdk
- java-1.8.0-openjdk-devel
- policycoreutils-python
- unzip
- zip
- mariadb or mysql client
Most of the required software are packages available via standard repositories and hence we can simply execute
sudo yum -y install java-1.8.0-openjdk java-1.8.0-openjdk-devel policycoreutils-python unzip zip
sudo yum -y install mariadb
In the above instance, the database client choice is MariaDB as it is directly supported by Centos 7. One could deploy the MySQL database software as the alternative. If you have chosen a different database for the already deployed Stroom Cluster then you should use that one. See earlier in this document on how to install the MySQL Community client.
Note that additional software will be required for other integration components (e.g. Apache httpd/mod_jk). This is described in the Web Service Integration section of this document.
Storage Scenario
To maintain our Storage Scenario them, the scenario for this node is
- Node:
stroomp02.strmdev00.org /stroomdata/stroom-data-p02- location to store Stroom application data files (events, etc.) for this node/stroomdata/stroom-index-p02- location to store Stroom application index files/stroomdata/stroom-working-p02- location to store Stroom application working files (e.g. tmp, output, etc.) for this node/stroomdata/stroom-working-p02/proxy- location for Stroom proxy to store inbound data files
Creation of Storage Hierarchy
So, we first create processing user on our new node as per
sudo useradd --system stroomuser
then create the storage via
sudo mkdir -p /stroomdata/stroom-data-p02 /stroomdata/stroom-index-p02 /stroomdata/stroom-working-p02 /stroomdata/stroom-working-p02/proxy
sudo mkdir -p /stroomdata/stroom-data-p00  # So that this node can mount stroomp00's data directory
sudo mkdir -p /stroomdata/stroom-data-p01  # So that this node can mount stroomp01's data directory
sudo chown -R stroomuser:stroomuser /stroomdata
sudo chmod -R 750 /stroomdata
As we need to share this new nodes permanent data directories to the existing nodes in the Cluster, we need to create mount point directories on our existing nodes in addition to deploying NFS.
So we execute on
- Node:
stroomp00.strmdev00.org
sudo mkdir -p /stroomdata/stroom-data-p02
sudo chmod 750 /stroomdata/stroom-data-p02
sudo chown stroomuser:stroomuser /stroomdata/stroom-data-p02
and on
- Node:
stroomp01.strmdev00.org
sudo mkdir -p /stroomdata/stroom-data-p02
sudo chmod 750 /stroomdata/stroom-data-p02
sudo chown stroomuser:stroomuser /stroomdata/stroom-data-p02
Deployment of NFS to share Stroom Storage
We will use NFS to cross mount the permanent data directories. That is
- node
stroomp00.strmdev00.orgwill mountstroomp01.strmdev00.org:/stroomdata/stroom-data-p01and,stroomp02.strmdev00.org:/stroomdata/stroom-data-p02and,
- node
stroomp01.strmdev00.orgwill mountstroomp00.strmdev00.org:/stroomdata/stroom-data-p00andstroomp02.strmdev00.org:/stroomdata/stroom-data-p02
- node
stroomp02.strmdev00.orgwill mountstroomp00.strmdev00.org:/stroomdata/stroom-data-p00andstroomp01.strmdev00.org:/stroomdata/stroom-data-p01
The HOWTO guide to deploy and configure NFS for our Scenario is here.
Stroom Installation
Pre-installation setup
Before installing either the Stroom Proxy or Stroom Application, we need establish various files and scripts within the Stroom Processing user’s home directory to support the Stroom services and their persistence. This is setup is described here. Note you should remember to set the N bash variable when generating the Environment Variable files to 02.
Stroom Proxy Installation
Instructions for installation of the Stroom Proxy can be found here. Note you will be deploying a Store proxy and during the setup execution ensure you enter the appropriate values for NODE (‘stroomp02’) and REPO_DIR (’/stroomdata/stroom-working-p02/proxy’). All other values will be the same.
Stroom Application Installation
Instructions for installation of the Stroom application can be found here. When executing the setup script ensure you enter the appropriate values for TEMP_DIR (’/stroomdata/stroom-working-p02’) and NODE (‘stroomp02’). All other values will be the same. Note also that you will not have to wait for the ‘first’ node to initialise the Stroom database as this would have already been done when you first deployed your Stroom Cluster.
Web Service Integration
One typically ‘fronts’ either a Stroom Proxy or Stroom Application with a secure web service such as Apache’s Httpd or NGINX. In our scenario, we will use SSL to secure the web service and further, we will use Apache’s Httpd.
As we are a cluster, we use the same certificate as the other nodes. Thus we need to gain the certificate package from an existing node.
So, on stroomp00.strmdev00.org, we replicate the directory ~stroomuser/stroom-jks to our new node. That is, tar it up, copy the tar file to
stroomp02 and untar it. We can make use of the other node’s mounted file system.
sudo -i -u stroomuser
cd ~stroomuser
tar cf stroom-jks.tar stroom-jks
mv stroom-jks.tar /stroomdata/stroom-data-p02
then on our new node (stroomp02.strmdev00.org) we extract the data.
sudo -i -u stroomuser
cd ~stroomuser
tar xf /stroomdata/stroom-data-p02/stroom-jks.tar && rm -f /stroomdata/stroom-data-p02/stroom-jks.tar
Now ensure protection, ownership and SELinux context for these files by running
chmod 700 ~stroomuser/stroom-jks/private ~stroomuser/stroom-jks
chown -R stroomuser:stroomuser ~stroomuser/stroom-jks
chcon -R --reference /etc/pki ~stroomuser/stroom-jks
This HOWTO is designed to deploy Apache’s httpd web service as a front end (https) (to the user) and Apache’s mod_jk as the interface between Apache and the Stroom tomcat applications. The instructions to configure this can be found here. You should pay particular attention to the section on the Apache Mod_JK configuration as you MUST regenerate the Mod_JK workers.properties file on the existing cluster nodes as well as generating it on our new node.
Other Web service capability can be used, for example, NGINX .
Note that once you have integrated the web services for our new node, you will need to restart the Apache systemd process on the existing two nodes that that the new Mod_JK configuration has taken place.
Installation Validation
We will now check that the installation and web services integration has worked. We do this with a simple firewall check and later perform complete integration tests.
Sanity firewall check
To ensure you have the firewall correctly set up, the following command
sudo firewall-cmd --reload
sudo firewall-cmd --zone=public --list-all
should result in
public (active)
  target: default
  icmp-block-inversion: no
  interfaces: enp0s3
  sources:
  services: dhcpv6-client http https nfs ssh
  ports: 8009/tcp 9080/tcp 8080/tcp 9009/tcp
  protocols:
  masquerade: no
  forward-ports:
  sourceports:
  icmp-blocks:
  rich rules:
Stroom Application Configuration - New Node
We will need to configure this new node’s volumes, set it’s Cluster URL and enable it’s Stream Processors. We do this by logging into the Stroom User Interface (UI) with an account with Administrator privileges. It is recommended you use a attributed user for this activity. Once you have logged in you can configure this new node.
Configure the Volumes for our Stroom deployment
Before we can store data on this new Stroom node we need to configure it’s volumes we have allocated in our Storage hierarchy. The section on adding new volumes in the Volume Maintenance HOWTO shows how to do this.
Configure the Nodes for our Stroom deployment
In a Stroom cluster, nodes are expected to communicate with each other on port 8080 over http. Our installation in a multi node environment ensures the firewall will allow this but we also need to configure the new node. This is achieved via the Stroom UI where we set a Cluster URL for our node. The section on Configuring a new node in the Node Configuration HOWTO demonstrates how do set the Cluster URL.
Data Stream Processing
To enable Stroom to process data, it’s Data Processors need to be enabled. There are NOT enabled by default on installation. The following section in our Stroom Tasks HowTo shows how to do this.
Testing our New Node Installation
To complete the installation process we will test that our new node has successfully integrated into our cluster.
First we need to ensure we have restarted the Apache Httpd service (httpd.service) on the original nodes so that the new workers.properties configuration files take effect.
We now test the node integration by running the tests we use to validate a Multi Node Stroom Cluster Deployment found
here noting we should
monitor all three nodes proxy and application log files. Basically we are looking to see that this new node participates in the
load balancing for the stroomp.strmdev00.org cluster.
4 - Installation of Stroom Application
Assumptions
- the user has reasonable RHEL/Centos System administration skills
- installation is on a fully patched minimal Centos 7.3 instance.
- the Stroom
stroomdatabase has been created and resides on the hoststroomdb0.strmdev00.orglistening on port 3307. - the Stroom
stroomdatabase user isstroomuserwith a password ofStroompassword1@. - the Stroom
statisticsdatabase has been created and resides on the hoststroomdb0.strmdev00.orglistening on port 3308. - the Stroom
statisticsdatabase user isstroomuserwith a password ofStroompassword2@. - the application user
stroomuserhas been created - the user is or has deployed the two node Stroom cluster described here
- the user has set up the Stroom processing user as described here
- the prerequisite software has been installed
- when a screen capture is documented, data entry is identified by the data surrounded by ‘<’ ‘>’ . This excludes enter/return presses.
Confirm Prerequisite Software Installation
The following command will ensure the prerequisite software has been deployed
sudo yum -y install java-1.8.0-openjdk java-1.8.0-openjdk-devel policycoreutils-python unzip zip
sudo yum -y install mariadb
or
sudo yum -y install mysql-community-client
Test Database connectivity
We need to test access to the Stroom databases on stroomdb0.strmdev00.org. We do this using the client mysql utility. We note that we
must enter the stroomuser user’s password set up in the creation of the database earlier (Stroompassword1@) when connecting to
the stroom database and we must enter the stroomstats user’s password (Stroompassword2@) when connecting to the statistics database.
We first test we can connect to the stroom database and then set the default database to be stroom.
[burn@stroomp00 ~]$ mysql --user=stroomuser --host=stroomdb0.strmdev00.org --port=3307 --password
Enter password: <__ Stroompassword1@ __>
Welcome to the MariaDB monitor.  Commands end with ; or \g.
Your MariaDB connection id is 2
Server version: 5.5.52-MariaDB MariaDB Server

Copyright (c) 2000, 2016, Oracle, MariaDB Corporation Ab and others.

Type 'help;' or '\h' for help. Type '\c' to clear the current input statement.

MariaDB [(none)]> use stroom;
Database changed
MariaDB [stroom]> exit
Bye
[burn@stroomp00 ~]$
In the case of a MySQL Community deployment you will see
[burn@stroomp00 ~]$ mysql --user=stroomuser --host=stroomdb0.strmdev00.org --port=3307 --password
Enter password: <__ Stroompassword1@ __>
Welcome to the MySQL monitor.  Commands end with ; or \g.
Your MySQL connection id is 9
Server version: 5.7.18 MySQL Community Server (GPL)

Copyright (c) 2000, 2017, Oracle and/or its affiliates. All rights reserved.

Oracle is a registered trademark of Oracle Corporation and/or its
affiliates. Other names may be trademarks of their respective
owners.

Type 'help;' or '\h' for help. Type '\c' to clear the current input statement.

mysql> use stroom;
Database changed
mysql> quit
Bye
[burn@stroomp00 ~]$
We next test connecting to the statistics database and verify we can set the default database to be statistics.
[burn@stroomp00 ~]$ mysql --user=stroomstats --host=stroomdb0.strmdev00.org --port=3308 --password
Enter password: <__ Stroompassword2@ __>
Welcome to the MariaDB monitor.  Commands end with ; or \g.
Your MariaDB connection id is 2
Server version: 5.5.52-MariaDB MariaDB Server

Copyright (c) 2000, 2016, Oracle, MariaDB Corporation Ab and others.

Type 'help;' or '\h' for help. Type '\c' to clear the current input statement.

MariaDB [(none)]> use statistics;
Database changed
MariaDB [stroom]> exit
Bye
[burn@stroomp00 ~]$
In the case of a MySQL Community deployment you will see
[burn@stroomp00 ~]$ mysql --user=stroomstats --host=stroomdb0.strmdev00.org --port=3308 --password
Enter password:  <__ Stroompassword2@ __>
Welcome to the MySQL monitor.  Commands end with ; or \g.
Your MySQL connection id is 9
Server version: 5.7.18 MySQL Community Server (GPL)

Copyright (c) 2000, 2017, Oracle and/or its affiliates. All rights reserved.

Oracle is a registered trademark of Oracle Corporation and/or its
affiliates. Other names may be trademarks of their respective
owners.

Type 'help;' or '\h' for help. Type '\c' to clear the current input statement.

mysql> use statistics;
Database changed
mysql> quit
Bye
[burn@stroomp00 ~]$
If there are any errors, correct them.
Get the Software
The following will gain the identified, in this case release 5.0-beta.18, Stroom Application software release from github, then deploy it. You should regularly monitor the site for newer releases.
sudo -i -u stroomuser
App=5.0-beta.18
wget https://github.com/gchq/stroom/releases/download/v${App}/stroom-app-distribution-${App}-bin.zip
unzip stroom-app-distribution-${App}-bin.zip
chmod 750 stroom-app
Configure the Software
We install the application via
stroom-app/bin/setup.sh
during which one is prompted for a number of configuration settings. Use the following
TEMP_DIR should be set to '/stroomdata/stroom-working-p00' or '/stroomdata/stroom-working-p01' etc depending on the node we are installing on
NODE to be the hostname (not FQDN) of your host (i.e. 'stroomp00' or 'stroomp01' in our multi node scenario)
RACK can be ignored, just press return
PORT_PREFIX should use the default, just press return
JDBC_CLASSNAME should use the default, just press return
JDBC_URL to 'jdbc:mysql://stroomdb0.strmdev00.org:3307/stroom?useUnicode=yes&characterEncoding=UTF-8'
DB_USERNAME should be our processing user, 'stroomuser'
DB_PASSWORD should be the one we set when creating the stroom database, that is 'Stroompassword1@'
JPA_DIALECT should use the default, just press return
JAVA_OPTS can use the defaults, but ensure you have sufficient memory, either change or accept the default
STROOM_STATISTICS_SQL_JDBC_CLASSNAME should use the default, just press return
STROOM_STATISTICS_SQL_JDBC_URL to 'jdbc:mysql://stroomdb0.strmdev00.org:3308/statistics?useUnicode=yes&characterEncoding=UTF-8'
STROOM_STATISTICS_SQL_DB_USERNAME should be our processing user, 'stroomstats'
STROOM_STATISTICS_SQL_DB_PASSWORD should be the one we set when creating the stroom database, that is 'Stroompassword2@'
STATS_ENGINES should use the default, just press return
CONTENT_PACK_IMPORT_ENABLED should use the default, just press return
CREATE_DEFAULT_VOLUME_ON_START should use the default, just press return
At this point, the script will configure the application. There should be no errors, but review the output. If you made an error then just re-run the script.
You will note that TEMP_DIR is the same directory we used for our STROOM_TMP environment variable when we set up the processing user scripts. Note that if you are deploying a single node environment, where the database is also running on your Stroom node, then the JDBC_URL setting can be the default.
Start the Application service
Now we start the application. In the case of multi node Stroom deployment, we start the Stroom application on the first node in the cluster, then wait until it has initialised the database commenced it’s Lifecycle task. You will need to monitor the log file to see it’s completed initialisation.
So as the stroomuser start the application with the command
stroom-app/bin/start.sh
Now monitor stroom-app/instance/logs for any errors. Initially you will see the log files localhost_access_log.YYYY-MM-DD.txt
and catalina.out. Check them for errors and correct (or post a question). The log4j warnings in catalina.out can be ignored.
Eventually the log file stroom-app/instance/logs/stroom.log will appear. Again check it for errors and then wait for the application to
be initialised. That is, wait for the Lifecycle service thread to start. This is indicated by the message
INFO [Thread-11] lifecycle.LifecycleServiceImpl (LifecycleServiceImpl.java:166) - Started Stroom Lifecycle service
The directory stroom-app/instance/logs/events will also appear with an empty file with
the nomenclature events_YYYY-MM-DDThh:mm:ss.msecZ. This is the directory for storing Stroom’s application event logs. We will return to this
directory and it’s content in a later HOWTO.
If you have a multi node configuration, then once the database has initialised, start the application service on all other nodes. Again with
stroom-app/bin/start.sh
and then monitor the files in its stroom-app/instance/logs for any errors. Note that in multi node configurations,
you will see server.UpdateClusterStateTaskHandler messages in the log file of the form
WARN [Stroom P2 #9 - GenericServerTask] server.UpdateClusterStateTaskHandler (UpdateClusterStateTaskHandler.java:150) - discover() - unable to contact stroomp00 - No cluster call URL has been set for node: stroomp00
This is ok as we will establish the cluster URL’s later.
Multi Node Firewall Provision
In the case of a multi node Stroom deployment, you will need to open certain ports to allow Tomcat to communicate to all nodes participating
in the cluster. Execute the following on all nodes. Note you will need to drop out of the stroomuser shell prior to execution.
exit; # To drop out of the stroomuser shell

sudo firewall-cmd --zone=public --add-port=8080/tcp --permanent
sudo firewall-cmd --zone=public --add-port=9080/tcp --permanent
sudo firewall-cmd --zone=public --add-port=8009/tcp --permanent
sudo firewall-cmd --zone=public --add-port=9009/tcp --permanent
sudo firewall-cmd --reload
sudo firewall-cmd --zone=public --list-all
In a production environment you would improve the above firewall settings - to perhaps limit the communication to just the Stroom processing nodes.
5 - Installation of Stroom Proxy
Assumptions
The following assumptions are used in this document.
- the user has reasonable RHEL/Centos System administration skills.
- installation is on a fully patched minimal Centos 7.3 instance.
- the Stroom database has been created and resides on the host
stroomdb0.strmdev00.orglistening on port 3307. - the Stroom database user is
stroomuserwith a password ofStroompassword1@. - the application user
stroomuserhas been created. - the user is or has deployed the two node Stroom cluster described here.
- the user has set up the Stroom processing user as described here.
- the prerequisite software has been installed.
- when a screen capture is documented, data entry is identified by the data surrounded by ‘<’ ‘>’ . This excludes enter/return presses.
Confirm Prerequisite Software Installation
The following command will ensure the prerequisite software has been deployed
sudo yum -y install java-1.8.0-openjdk java-1.8.0-openjdk-devel policycoreutils-python unzip zip
sudo yum -y install mariadb
or
sudo yum -y install mysql-community-client
Note that we do NOT need the database client software for a Forwarding or Standalone proxy.
Get the Software
The following will gain the identified, in this case release 5.1-beta.10, Stroom Application software release from github, then deploy it. You should regularly monitor the site for newer releases.
sudo -i -u stroomuser
Prx=v5.1-beta.10
wget https://github.com/gchq/stroom-proxy/releases/download/${Prx}/stroom-proxy-distribution-${Prx}.zip
unzip stroom-proxy-distribution-${Prx}.zip
Configure the Software
There are three different types of Stroom Proxy
- Store
A store proxy accepts batches of events, as files. It will validate the batch with the database then store the batches as files in a configured directory.
- Store_NoDB
A store_nodb proxy accepts batches of events, as files. It has no connectivity to the database, so it assumes all batches are valid, so it stores the batches as files in a configured directory.
- Forwarding
A forwarding proxy accepts batches of events, as files. It has indirect connectivity to the database via the destination proxy, so it validates the batches then stores the batches as files in a configured directory until they are periodically forwarded to the configured destination Stroom proxy.
We will demonstrate the installation of each.
Store Proxy Configuration
In our Store Proxy description below, we will use the multi node deployment scenario. That is we are deploying the Store proxy on multiple Stroom nodes (stroomp00, stroomp01) and we have configured our storage as per the Storage Scenario which means the directories to install the inbound batches of data are /stroomdata/stroom-working-p00/proxy and /stroomdata/stroom-working-p01/proxy depending on the node.
To install a Store proxy, we run
stroom-proxy/bin/setup.sh store
during which one is prompted for a number of configuration settings. Use the following
NODE to be the hostname (not FQDN) of your host (i.e. 'stroomp00' or 'stroomp01' depending on the node we are installing on)
PORT_PREFIX should use the default, just press return
REPO_DIR should be set to '/stroomdata/stroom-working-p00/proxy' or '/stroomdata/stroom-working-p01/proxy' depending on the node we are installing on
REPO_FORMAT can be left as the default, just press return
JDBC_CLASSNAME should use the default, just press return
JDBC_URL should be set to 'jdbc:mysql://stroomdb0.strmdev00.org:3307/stroom'
DB_USERNAME should be our processing user, 'stroomuser'
DB_PASSWORD should be the one we set when creating the stroom database, that is 'Stroompassword1@'
JAVA_OPTS can use the defaults, but ensure you have sufficient memory, either change or accept the default
At this point, the script will configure the proxy. There should be no errors, but review the output. If you make a mistake in the above, just re-run the script.
NOTE: The selection of the REPO_DIR above and the setting of the STROOM_TMP environment variable earlier ensure that not only inbound files are placed in the REPO_DIR location but the Stroom Application itself will access the same directory when it aggregates inbound data for ingest in it’s proxy aggregation threads.
Forwarding Proxy Configuration
In our Forwarding Proxy description below, we will deploy on a host named stroomfp0 and it will store the files in /stroomdata/stroom-working-fp0/proxy. Remember, we are being consistent with our Storage hierarchy to make documentation and scripting simpler. Our destination host to periodically forward the files to will be stroomp.strmdev00.org (the CNAME for stroomp00.strmdev00.org).
To install a Forwarding proxy, we run
stroom-proxy/bin/setup.sh forward
during which one is prompted for a number of configuration settings. Use the following
NODE to be the hostname (not FQDN) of your host (i.e. 'stroomfp0' in our example)
PORT_PREFIX should use the default, just press return
REPO_DIR should be set to '/stroomdata/stroom-working-fp0/proxy' which we created earlier.
REPO_FORMAT can be left as the default, just press return
FORWARD_SERVER should be set to our stroom server. (i.e. 'stroomp.strmdev00.org' in our example)
JAVA_OPTS can use the defaults, but ensure you have sufficient memory, either change or accept the default
At this point, the script will configure the proxy. There should be no errors, but review the output.
Store No Database Proxy Configuration
In our Store_NoDB Proxy description below, we will deploy on a host named stroomsap0 and it will store the files in /stroomdata/stroom-working-sap0/proxy. Remember, we are being consistent with our Storage hierarchy to make documentation and scripting simpler.
To install a Store_NoDB proxy, we run
stroom-proxy/bin/setup.sh store_nodb
during which one is prompted for a number of configuration settings. Use the following
NODE to be the hostname (not FQDN) of your host (i.e. 'stroomsap0' in our example)
PORT_PREFIX should use the default, just press return
REPO_DIR should be set to '/stroomdata/stroom-working-sap0/proxy' which we created earlier.
REPO_FORMAT can be left as the default, just press return
JAVA_OPTS can use the defaults, but ensure you have sufficient memory, either change or accept the default
At this point, the script will configure the proxy. There should be no errors, but review the output.
Apache/Mod_JK change
For all proxy deployments, if we are using Apache’s mod_jk then we need to ensure the proxy’s AJP connector specifies a 64K packetSize. View the file stroom-proxy/instance/conf/server.xml to ensure the Connector element for the AJP protocol has a packetSize attribute of 65536. For example,
grep AJP stroom-proxy/instance/conf/server.xml
shows
<Connector port="9009" protocol="AJP/1.3" connectionTimeout="20000" redirectPort="8443" maxThreads="200" packetSize="65536" />
This check is required for earlier releases of the Stroom Proxy. Releases since v5.1-beta.4 have set the AJP packetSize.
Start the Proxy Service
We can now manually start our proxy service. Do so as the stroomuser with the command
stroom-proxy/bin/start.sh
Now monitor the directory stroom-proxy/instance/logs for any errors. Initially you will see the log files localhost_access_log.YYYY-MM-DD.txt and catalina.out. Check them for errors and correct (or pose a question to this arena).
The context path and unknown version warnings in catalina.out can be ignored.
Eventually (about 60 seconds) the log file stroom-proxy/instance/logs/stroom.log will appear. Again check it for errors.
The proxy will have completely started when you see the messages
INFO [localhost-startStop-1] spring.StroomBeanLifeCycleReloadableContextBeanProcessor (StroomBeanLifeCycleReloadableContextBeanProcessor.java:109) - ** proxyContext 0 START COMPLETE **
and
INFO [localhost-startStop-1] spring.StroomBeanLifeCycleReloadableContextBeanProcessor (StroomBeanLifeCycleReloadableContextBeanProcessor.java:109) - ** webContext 0 START COMPLETE **
If you leave it for a while you will eventually see cyclic (10 minute cycle) messages of the form
INFO [Repository Reader Thread 1] repo.ProxyRepositoryReader (ProxyRepositoryReader.java:170) - run() - Cron Match at YYYY-MM-DD ...
If a proxy takes too long to start, you should read the section on Entropy Issues.
Proxy Repository Format
A Stroom Proxy stores inbound files in a hierarchical file system whose root is supplied during the proxy setup (REPO_DIR) and as files arrive they are given a repository id that is a one-up number starting at one (1). The files are stored in a specific repository format.
The default template is ${pathId}/${id} and this pattern will produce the following output files under REPO_DIR for the given repository id
| Repository Id | FilePath |
|---|---|
| 1 | 000.zip |
| 100 | 100.zip |
| 1000 | 001/001000.zip |
| 10000 | 010/010000.zip |
| 100000 | 100/100000.zip |
Since version v5.1-beta.4, this template can be specified during proxy setup via the entry to the Stroom Proxy Repository Format prompt
...
@@REPO_FORMAT@@ : Stroom Proxy Repository Format [${pathId}/${id}] >
...
The template uses replacement variables to form the file path. As indicated above, the default template is ${pathId}/${id} where ${pathId} is the automatically generated directory for a given repository id and ${id} is the repository id.
Other replacement variables can be used to in the template including http header meta data parameters (e.g. ‘${feed}’) and time based parameters (e.g. ‘${year}’). Replacement variables that cannot be resolved will be output as ‘_’. You must ensure that all templates include the ‘${id}’ replacement variable at the start of the file name, failure to do this will result in an invalid repository.
Available time based parameters are based on the file’s time of processing and are zero filled (excluding ms).
| Parameter | Description |
|---|---|
| year | four digit year |
| month | two digit month |
| day | two digit day |
| hour | two digit hour |
| minute | two digit minute |
| second | two digit second |
| millis | three digit milliseconds value |
| ms | milliseconds since Epoch value |
Proxy Repository Template Examples
For each of the following templates applied to a Store NoDB Proxy, the resultant proxy directory tree is shown after three posts were sent to the test feed TEST-FEED-V1_0 and two posts to the test feed FEED-NOVALUE-V9_0
Example A - The default - ${pathId}/${id}
[stroomuser@stroomsap0 ~]$ find /stroomdata/stroom-working-sap0/proxy/
/stroomdata/stroom-working-sap0/proxy/
/stroomdata/stroom-working-sap0/proxy/001.zip
/stroomdata/stroom-working-sap0/proxy/002.zip
/stroomdata/stroom-working-sap0/proxy/003.zip
/stroomdata/stroom-working-sap0/proxy/004.zip
/stroomdata/stroom-working-sap0/proxy/005.zip
[stroomuser@stroomsap0 ~]$
Example B - A feed orientated structure - ${feed}/${year}/${month}/${day}/${pathId}/${id}
[stroomuser@stroomsap0 ~]$ find /stroomdata/stroom-working-sap0/proxy/
/stroomdata/stroom-working-sap0/proxy/
/stroomdata/stroom-working-sap0/proxy/TEST-FEED-V1_0
/stroomdata/stroom-working-sap0/proxy/TEST-FEED-V1_0/2017
/stroomdata/stroom-working-sap0/proxy/TEST-FEED-V1_0/2017/07
/stroomdata/stroom-working-sap0/proxy/TEST-FEED-V1_0/2017/07/23
/stroomdata/stroom-working-sap0/proxy/TEST-FEED-V1_0/2017/07/23/001.zip
/stroomdata/stroom-working-sap0/proxy/TEST-FEED-V1_0/2017/07/23/002.zip
/stroomdata/stroom-working-sap0/proxy/TEST-FEED-V1_0/2017/07/23/003.zip
/stroomdata/stroom-working-sap0/proxy/FEED-NOVALUE-V9_0
/stroomdata/stroom-working-sap0/proxy/FEED-NOVALUE-V9_0/2017
/stroomdata/stroom-working-sap0/proxy/FEED-NOVALUE-V9_0/2017/07
/stroomdata/stroom-working-sap0/proxy/FEED-NOVALUE-V9_0/2017/07/23
/stroomdata/stroom-working-sap0/proxy/FEED-NOVALUE-V9_0/2017/07/23/004.zip
/stroomdata/stroom-working-sap0/proxy/FEED-NOVALUE-V9_0/2017/07/23/005.zip
[stroomuser@stroomsap0 ~]$
Example C - A date orientated structure - ${year}/${month}/${day}/${pathId}/${id}
[stroomuser@stroomsap0 ~]$ find /stroomdata/stroom-working-sap0/proxy/
/stroomdata/stroom-working-sap0/proxy/
/stroomdata/stroom-working-sap0/proxy/2017
/stroomdata/stroom-working-sap0/proxy/2017/07
/stroomdata/stroom-working-sap0/proxy/2017/07/23
/stroomdata/stroom-working-sap0/proxy/2017/07/23/001.zip
/stroomdata/stroom-working-sap0/proxy/2017/07/23/002.zip
/stroomdata/stroom-working-sap0/proxy/2017/07/23/003.zip
/stroomdata/stroom-working-sap0/proxy/2017/07/23/004.zip
/stroomdata/stroom-working-sap0/proxy/2017/07/23/005.zip
[stroomuser@stroomsap0 ~]$
Example D - A feed orientated structure, but with a bad parameter - ${feed}/${badparam}/${day}/${pathId}/${id}
[stroomuser@stroomsap0 ~]$ find /stroomdata/stroom-working-sap0/proxy/
/stroomdata/stroom-working-sap0/proxy/
/stroomdata/stroom-working-sap0/proxy/TEST-FEED-V1_0
/stroomdata/stroom-working-sap0/proxy/TEST-FEED-V1_0/_
/stroomdata/stroom-working-sap0/proxy/TEST-FEED-V1_0/_/23
/stroomdata/stroom-working-sap0/proxy/TEST-FEED-V1_0/_/23/001.zip
/stroomdata/stroom-working-sap0/proxy/TEST-FEED-V1_0/_/23/002.zip
/stroomdata/stroom-working-sap0/proxy/TEST-FEED-V1_0/_/23/003.zip
/stroomdata/stroom-working-sap0/proxy/FEED-NOVALUE-V9_0
/stroomdata/stroom-working-sap0/proxy/FEED-NOVALUE-V9_0/_
/stroomdata/stroom-working-sap0/proxy/FEED-NOVALUE-V9_0/_/23
/stroomdata/stroom-working-sap0/proxy/FEED-NOVALUE-V9_0/_/23/004.zip
/stroomdata/stroom-working-sap0/proxy/FEED-NOVALUE-V9_0/_/23/005.zip
[stroomuser@stroomsap0 ~]$
and one would also see a warning for each post in the proxy’s log file of the form
WARN [ajp-apr-9009-exec-4] repo.StroomFileNameUtil (StroomFileNameUtil.java:133) - Unused variables found: [badparam]
6 - NFS Installation and Configuration
Assumptions
The following assumptions are used in this document.
- the user has reasonable RHEL/Centos System administration skills
- installations are on Centos 7.3 minimal systems (fully patched)
- the user is or has deployed the example two node Stroom cluster storage hierarchy described here
- the configuration of this NFS is NOT secure. It is highly recommended to improve it’s security in a production environment. This could include improved firewall configuration to limit NFS access, NFS4 with Kerberos etc.
Installation of NFS software
We install NFS on each node, via
sudo yum -y install nfs-utils
and enable the relevant services, via
sudo systemctl enable rpcbind
sudo systemctl enable nfs-server
sudo systemctl enable nfs-lock
sudo systemctl enable nfs-idmap
sudo systemctl start rpcbind
sudo systemctl start nfs-server
sudo systemctl start nfs-lock
sudo systemctl start nfs-idmap
Configuration of NFS exports
We now export the node’s /stroomdata directory (in case you want to share the working directories) by configuring /etc/exports. For simplicity sake, we will allow all nodes with the hostname nomenclature of stroomp*.strmdev00.org to mount the /stroomdata directory. This means the same configuration applies to all nodes.
# Share Stroom data directory
/stroomdata	stroomp*.strmdev00.org(rw,sync,no_root_squash)
This can be achieved with the following on both nodes
sudo su -c "printf '# Share Stroom data directory\n' >> /etc/exports"
sudo su -c "printf '/stroomdata\tstroomp*.strmdev00.org(rw,sync,no_root_squash)\n' >> /etc/exports"
On both nodes restart the NFS service to ensure the above export takes effect via
sudo systemctl restart nfs-server
So that our nodes can offer their filesystems, we need to enable NFS access on the firewall. This is done via
sudo firewall-cmd --zone=public --add-service=nfs --permanent
sudo firewall-cmd --reload
sudo firewall-cmd --zone=public --list-all
Test Mounting
You should do test mounts on each node.
- Node:
stroomp00.strmdev00.org
sudo mount -t nfs4 stroomp01.strmdev00.org:/stroomdata/stroom-data-p01 /stroomdata/stroom-data-p01
- Node:
stroomp01.strmdev00.org
sudo mount -t nfs4 stroomp00.strmdev00.org:/stroomdata/stroom-data-p00 /stroomdata/stroom-data-p00
If you are concerned you can’t see the mount with a df try a df --type=nfs4 -a or a sudo df. Irrespective, once the mounting works, make the mounts permanent by adding the following to each node’s /etc/fstab file.
- Node:
stroomp00.strmdev00.org
stroomp01.strmdev00.org:/stroomdata/stroom-data-p01 /stroomdata/stroom-data-p01 nfs4 soft,bg
achieved with
sudo su -c "printf 'stroomp01.strmdev00.org:/stroomdata/stroom-data-p01 /stroomdata/stroom-data-p01 nfs4 soft,bg\n' >> /etc/fstab"
- Node:
stroomp01.strmdev00.org
stroomp00.strmdev00.org:/stroomdata/stroom-data-p00 /stroomdata/stroom-data-p00 nfs4 soft,bg
achieved with
sudo su -c "printf 'stroomp00.strmdev00.org:/stroomdata/stroom-data-p00 /stroomdata/stroom-data-p00 nfs4 soft,bg\n' >> /etc/fstab"
At this point reboot all processing nodes to ensure the directories mount automatically. You may need to give the nodes a minute to do this.
Addition of another Node
If one needs to add another node to the cluster, lets say, stroomp02.strmdev00.org, on which /stroomdata follows the same storage hierarchy
as the existing nodes and all nodes have added mount points (directories) for this new node, you would take the following steps in order.
-
Node:
stroomp02.strmdev00.org- Install NFS software as above
- Configure the exports file as per
sudo su -c "printf '# Share Stroom data directory\n' >> /etc/exports"
sudo su -c "printf '/stroomdata\tstroomp*.strmdev00.org(rw,sync,no_root_squash)\n' >> /etc/exports"
- Restart the NFS service and make the firewall enable NFS access as per
sudo systemctl restart nfs-server
sudo firewall-cmd --zone=public --add-service=nfs --permanent
sudo firewall-cmd --reload
sudo firewall-cmd --zone=public --list-all
- Test mount the existing node file systems
sudo mount -t nfs4 stroomp00.strmdev00.org:/stroomdata/stroom-data-p00 /stroomdata/stroom-data-p00
sudo mount -t nfs4 stroomp01.strmdev00.org:/stroomdata/stroom-data-p01 /stroomdata/stroom-data-p01
- Once the test mounts work, we make them permanent by adding the following to the /etc/fstab file.
stroomp00.strmdev00.org:/home/stroomdata/stroom-data-p00 /home/stroomdata/stroom-data-p00 nfs4 soft,bg
stroomp01.strmdev00.org:/home/stroomdata/stroom-data-p01 /home/stroomdata/stroom-data-p01 nfs4 soft,bg
achieved with
sudo su -c "printf 'stroomp00.strmdev00.org:/stroomdata/stroom-data-p00 /stroomdata/stroom-data-p00 nfs4 soft,bg\n' >> /etc/fstab"
sudo su -c "printf 'stroomp01.strmdev00.org:/stroomdata/stroom-data-p01 /stroomdata/stroom-data-p01 nfs4 soft,bg\n' >> /etc/fstab"
-
Node:
stroomp00.strmdev00.organdstroomp01.strmdev00.org- Test mount the new node’s filesystem as per
sudo mount -t nfs4 stroomp02.strmdev00.org:/stroomdata/stroom-data-p02 /stroomdata/stroom-data-p02
- Once the test mount works, make the mount permanent by adding the following to the /etc/fstab file
stroomp02.strmdev00.org:/stroomdata/stroom-data-p02 /stroomdata/stroom-data-p02 nfs4 soft,bg
achieved with
sudo su -c "printf 'stroomp02.strmdev00.org:/stroomdata/stroom-data-p02 /stroomdata/stroom-data-p02 nfs4 soft,bg\n' >> /etc/fstab"
7 - Node Cluster URL Setup
In a Stroom cluster, Nodes are expected to communicate with each other on port 8080 over http. To facilitate this, we need to set each node’s Cluster URL and the following demonstrates this process.
Assumptions
- an account with the
AdministratorApplication Permission is currently logged in. - we have a multi node Stroom cluster with two nodes,
stroomp00andstroomp01 - appropriate firewall configurations have been made
- in the scenario of adding a new node to our multi node deployment, the node added will be
stroomp02
Configure Two Nodes
To configure the nodes, move to the Monitoring item of the Main Menu and select it to bring up the Monitoring sub-menu.
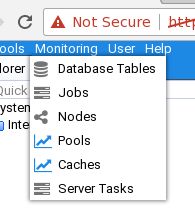
then move down and select the Nodes sub-item to be presented with the Nodes configuration tab as seen below.

To set stroomp00’s Cluster URL, move the it’s line in the display and select it. It will be highlighted.

Then move the cursor to the Edit Node icon
 in the top left of
the
in the top left of
the Nodes tab and select it. On selection the Edit Node configuration window will be displayed and into
the Cluster URL: entry box, enter the first node’s URL of http://stroomp00.strmdev00.org:8080/stroom/clustercall.rpc
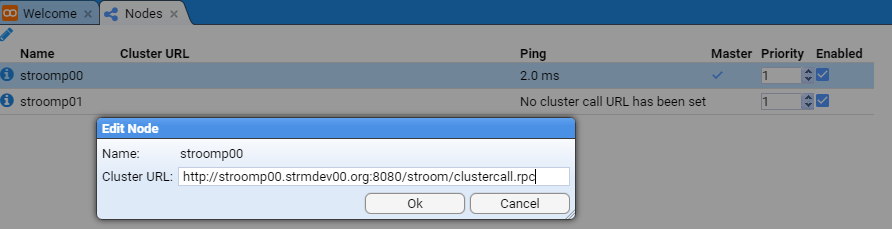
then press the at which we see the Cluster URL has been set for the first node as per

We next select the second node

then move the cursor to the Edit Node icon
in the top left of
the Nodes tab and select it. On selection the Edit Node configuration window will be displayed and into
the Cluster URL: entry box, enter the second node’s URL of http://stroomp01.strmdev00.org:8080/stroom/clustercall.rpc

then press the button.
At this we will see both nodes have the Cluster URLs set.
.

You may need to press the Refresh icon
 found at top left of
 Nodes configuration tab, until both nodes show healthy pings.
.

If you do not get ping results for each node, then they are not configured correctly. In that situation, review all log files and processes that you have performed.
Once you have set the Cluster URLs of each node you should also set the master assignment priority for each node to
be different to all of the others. In the image above both have been assigned equal priority - 1. We will
change stroomp00 to have a different priority - 3. You should note that the node with the highest
priority gains the Master node status.
.

Configure New Node
When one expands a Multi Node Stroom cluster deployment, after the installation of the Stroom Proxy and Application software and services on the new node, one has to configure the new node’s Cluster URL.
To configure the new node, move to the Monitoring item of the Main Menu and select it to bring up the Monitoring sub-menu.
then move down and select the Nodes sub-item to be presented with the Nodes configuration tab as seen below.

To set stroomp02’s Cluster URL, move the it’s line in the display and select it. It will be highlighted.

Then move the cursor to the Edit Node icon
in the top left
of the Nodes tab and select it. On selection the Edit Node configuration window will be displayed
and into the Cluster URL: entry box, enter the first node’s URL of http://stroomp02.strmdev00.org:8080/stroom/clustercall.rpc
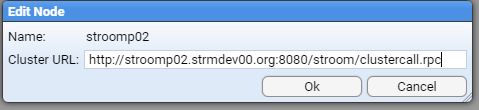
then press the button at which we see the Cluster URL has been set for the first node as per

You need to press the Refresh icon
found at top left of Nodes configuration tab, until the new node shows a healthy ping.
.

If you do not get a ping results for the new node, then it is not configured correctly. In that situation, review all log files and processes that you have performed.
Once you have set the Cluster URL you should also set the master assignment priority for each node to
be different to all of the others. In the image above both stroomp01 and the new node, stroomp02, have been
assigned equal priority - 1. We will change stroomp01 to have a different priority - 2. You should note that the node
with the highest priority maintains the Master node status.
.

8 - Processing User setup
Assumptions
- the user has reasonable RHEL/Centos System administration skills
- installation is on a fully patched minimal Centos 7.3 instance.
- the application user
stroomuserhas been created - the user is deploying for either
- the example two node Stroom cluster whose storage is described here
- a simple Forwarding or Standalone Proxy
- adding a node to an existing Stroom cluster
Set up the Stroom processing user’s environment
To automate the running of a Stroom Proxy or Application service under out Stroom processing user, stroomuser, there are a number of configuration files and scripts we need to deploy.
We first become the stroomuser
sudo -i -u stroomuser
Environment Variable files
When either a Stroom Proxy or Application starts, it needs predefined environment variables. We set these up in the stroomuser home directory.
We need two files for this. The first is for the Stroom processes themselves and the second is for the Stroom systemd service we deploy. The
difference is that for the Stroom processes, we need to export the environment variables where as the Stroom systemd service file just needs to read them.
The JAVA_HOME and PATH variables are to support Java running the Tomcat instances. The STROOM_TMP variable is set to a working area for the Stroom Application to use. The application accesses this environment variable internally via the ${stroom_tmp} context variable. Note that we only need the STROOM_TMP variable for Stroom Application deployments, so one could remove it from the files for a Forwarding or Standalone proxy deployment.
With respect to the working area, we will make use of the Storage Scenario we have defined and hence use the directory /stroomdata/stroom-working-p_nn_ where nn is the hostname node number (i.e 00 for host stroomp00, 01 for host stroomp01, etc).
So, for the first node, 00, we run
N=00
F=~/env.sh
printf '# Environment variables for Stroom services\n' > ${F}
printf 'export JAVA_HOME=/usr/lib/jvm/java-1.8.0\n' >> ${F}
printf 'export PATH=${JAVA_HOME}/bin:${PATH}\n' >> ${F}
printf 'export STROOM_TMP=/stroomdata/stroom-working-p%s\n' ${N} >> ${F}
chmod 640 ${F}

F=~/env_service.sh
printf '# Environment variables for Stroom services, executed out of systemd service\n' > ${F}
printf 'JAVA_HOME=/usr/lib/jvm/java-1.8.0\n' >> ${F}
printf 'PATH=${JAVA_HOME}/bin:${PATH}\n' >> ${F}
printf 'STROOM_TMP=/stroomdata/stroom-working-p%s\n' ${N} >> ${F}
chmod 640 ${F}
then we can change the N variable on each successive node and run the above.
Alternately, for a Stroom Forwarding or Standalone proxy, the following would be sufficient
F=~/env.sh
printf '# Environment variables for Stroom services\n' > ${F}
printf 'export JAVA_HOME=/usr/lib/jvm/java-1.8.0\n' >> ${F}
printf 'export PATH=${JAVA_HOME}/bin:${PATH}\n' >> ${F}
chmod 640 ${F}

F=~/env_service.sh
printf '# Environment variables for Stroom services, executed out of systemd service\n' > ${F}
printf 'JAVA_HOME=/usr/lib/jvm/java-1.8.0\n' >> ${F}
printf 'PATH=${JAVA_HOME}/bin:${PATH}\n' >> ${F}
chmod 640 ${F}
And we integrate the environment into our bash instantiation script as well as setting up useful bash functions. This is the same for all nodes.
Note that the T and Tp aliases are always installed whether they are of use of not. IE a Standalone or Forwarding Stroom Proxy could make
no use of the T shell alias.
F=~/.bashrc
printf '. ~/env.sh\n\n' >> ${F}
printf '# Simple functions to support Stroom\n' >> ${F}
printf '# T - continually monitor (tail) the Stroom application log\n'  >> ${F}
printf '# Tp - continually monitor (tail) the Stroom proxy log\n'  >> ${F}
printf 'function T {\n  tail --follow=name ~/stroom-app/instance/logs/stroom.log\n}\n' >> ${F}
printf 'function Tp {\n  tail --follow=name ~/stroom-proxy/instance/logs/stroom.log\n}\n' >> ${F}
And test it has set up correctly
. ./.bashrc
which java
which should return /usr/lib/jvm/java-1.8.0/bin/java
Establish Simple Start/Stop Scripts
We create some simple start/stop scripts that start, or stop, all the available Stroom services. At this point, it’s just the Stroom application and proxy.
if [ ! -d ~/bin ]; then mkdir ~/bin; fi
F=~/bin/StartServices.sh
printf '#!/bin/bash\n' > ${F}
printf '# Start all Stroom services\n' >> ${F}
printf '# Set list of services\n' >> ${F}
printf 'Services="stroom-proxy stroom-app"\n' >> ${F}
printf 'for service in ${Services}; do\n' >> ${F}
printf '  if [ -f ${service}/bin/start.sh ]; then\n' >> ${F}
printf '    bash ${service}/bin/start.sh\n' >> ${F}
printf '  fi\n' >> ${F}
printf 'done\n' >> ${F}
chmod 750 ${F}

F=~/bin/StopServices.sh
printf '#!/bin/bash\n' > ${F}
printf '# Stop all Stroom services\n' >> ${F}
printf '# Set list of services\n' >> ${F}
printf 'Services="stroom-proxy stroom-app"\n' >> ${F}
printf 'for service in ${Services}; do\n' >> ${F}
printf '  if [ -f ${service}/bin/stop.sh ]; then\n' >> ${F}
printf '    bash ${service}/bin/stop.sh\n' >> ${F}
printf '  fi\n' >> ${F}
printf 'done\n' >> ${F}
chmod 750 ${F}
Although one can modify the above for Stroom Forwarding or Standalone Proxy deployments, there is no issue if you use the same scripts.
Establish and Deploy Systemd services
Processing or Proxy node
For a standard Stroom Processing or Proxy nodes, we can use the following service script. (Noting this is done as root)
sudo bash
F=/etc/systemd/system/stroom-services.service
printf '# Install in /etc/systemd/system\n' > ${F}
printf '# Enable via systemctl enable stroom-services.service\n\n' >> ${F}
printf '[Unit]\n' >> ${F}
printf '# Who we are\n' >> ${F}
printf 'Description=Stroom Service\n' >> ${F}
printf '# We want the network and httpd up before us\n' >> ${F}
printf 'Requires=network-online.target httpd.service\n' >> ${F}
printf 'After= httpd.service network-online.target\n\n' >> ${F}
printf '[Service]\n' >> ${F}
printf '# Source our environment file so the Stroom service start/stop scripts work\n' >> ${F}
printf 'EnvironmentFile=/home/stroomuser/env_service.sh\n' >> ${F}
printf 'Type=oneshot\n' >> ${F}
printf 'ExecStart=/bin/su --login stroomuser /home/stroomuser/bin/StartServices.sh\n' >> ${F}
printf 'ExecStop=/bin/su --login stroomuser /home/stroomuser/bin/StopServices.sh\n' >> ${F}
printf 'RemainAfterExit=yes\n\n' >> ${F}
printf '[Install]\n' >> ${F}
printf 'WantedBy=multi-user.target\n' >> ${F}
chmod 640 ${F}
Single Node Scenario with local database
Should you only have a deployment where the database is on a processing node, use the following service script. The only
difference is the Stroom dependency on the database. The database dependency below is for the MariaDB database. If you had
installed the MySQL Community database, then replace mariadb.service with mysqld.service.
(Noting this is done as root)
sudo bash
F=/etc/systemd/system/stroom-services.service
printf '# Install in /etc/systemd/system\n' > ${F}
printf '# Enable via systemctl enable stroom-services.service\n\n' >> ${F}
printf '[Unit]\n' >> ${F}
printf '# Who we are\n' >> ${F}
printf 'Description=Stroom Service\n' >> ${F}
printf '# We want the network, httpd and Database up before us\n' >> ${F}
printf 'Requires=network-online.target httpd.service mariadb.service\n' >> ${F}
printf 'After=mariadb.service httpd.service network-online.target\n\n' >> ${F}
printf '[Service]\n' >> ${F}
printf '# Source our environment file so the Stroom service start/stop scripts work\n' >> ${F}
printf 'EnvironmentFile=/home/stroomuser/env_service.sh\n' >> ${F}
printf 'Type=oneshot\n' >> ${F}
printf 'ExecStart=/bin/su --login stroomuser /home/stroomuser/bin/StartServices.sh\n' >> ${F}
printf 'ExecStop=/bin/su --login stroomuser /home/stroomuser/bin/StopServices.sh\n' >> ${F}
printf 'RemainAfterExit=yes\n\n' >> ${F}
printf '[Install]\n' >> ${F}
printf 'WantedBy=multi-user.target\n' >> ${F}
chmod 640 ${F}
Enable the service
Now we enable the Stroom service, but we DO NOT start it as we will manually start the Stroom services as part of the installation process.
systemctl enable stroom-services.service
9 - SSL Certificate Generation
Assumptions
The following assumptions are used in this document.
- the user has reasonable RHEL/Centos System administration skills
- installations are on Centos 7.3 minimal systems (fully patched)
- either a Stroom Proxy or Stroom Application has already been deployed
- processing node names are ‘stroomp00.strmdev00.org’ and ‘stroomp01.strmdev00.org’
- the first node, ‘stroomp00.strmdev00.org’ also has a CNAME ‘stroomp.strmdev00.org’
- in the scenario of a Stroom Forwarding Proxy, the node name is ‘stroomfp0.strmdev00.org’
- in the scenario of a Stroom Standalone Proxy, the node name is ‘stroomsap0.strmdev00.org’
- stroom runs as user ‘stroomuser’
- the use of self signed certificates is appropriate for test systems, but users should consider appropriate CA infrastructure in production environments
- in this document, when a screen capture is documented, data entry is identified by the data surrounded by ‘<’ ‘>’ . This excludes enter/return presses.
Create certificates
The first step is to establish a self signed certificate for our Stroom service. If you have a certificate server, then certainly gain an
appropriately signed certificate. For this HOWTO, we will stay with a self signed solution and hence no certificate authorities are
involved. If you are deploying a cluster, then you will only have one certificate for all nodes. We achieve this by setting up an
alias for the first node in the cluster and then use that alias for addressing the cluster. That is, we have set up a
CNAME, stroomp.strmdev00.org for stroomp00.strmdev00.org. This means within the web service we deploy, the ServerName will be stroomp.strmdev00.org
on each node. Since it’s one certificate we only need to set it up on one node then deploy the certificate key files to other nodes.
As the certificates will be stored in the stroomuser's home directory, we become the stroom user
sudo -i -u stroomuser
Use host variable
To make things simpler in the following bash extracts, we establish the bash variable H to be used in filename generation. The variable name
is set to the name of the host (or cluster alias) your are deploying the certificates on. In our multi node HOWTO example we are using, we
would use the host CNAME stroomp. Thus we execute
export H=stroomp
Note in our the Stroom Forwarding Proxy HOWTO we would use the name stroomfp0. In the case of our Standalone Proxy we would use stroomsap0.
We set up a directory to house our certificates via
cd ~stroomuser
rm -rf stroom-jks
mkdir -p stroom-jks stroom-jks/public stroom-jks/private
cd stroom-jks
Create a server key for Stroom service (enter a password when prompted for both initial and verification prompts)
openssl genrsa -des3 -out private/$H.key 2048
as per
Generating RSA private key, 2048 bit long modulus
.................................................................+++
...............................................+++
e is 65537 (0x10001)
Enter pass phrase for private/stroomp.key: <__ENTER_SERVER_KEY_PASSWORD__>
Verifying - Enter pass phrase for private/stroomp.key: <__ENTER_SERVER_KEY_PASSWORD__>
Create a signing request. The two important prompts are the password and Common Name. All the rest can use the defaults offered.
The requested password is for the server key and you should use the host (or cluster alias) your are deploying the certificates on for
the Common Name. In the output below we will assume a multi node cluster certificate is being generated, so will use stroomp.strmdev00.org.
openssl req -sha256 -new -key private/$H.key -out $H.csr
as per
Enter pass phrase for private/stroomp.key: <__ENTER_SERVER_KEY_PASSWORD__>
You are about to be asked to enter information that will be incorporated
into your certificate request.
What you are about to enter is what is called a Distinguished Name or a DN.
There are quite a few fields but you can leave some blank
For some fields there will be a default value,
If you enter '.', the field will be left blank.
-----
Country Name (2 letter code) [XX]:
State or Province Name (full name) []:
Locality Name (eg, city) [Default City]:
Organization Name (eg, company) [Default Company Ltd]:
Organizational Unit Name (eg, section) []:
Common Name (eg, your name or your server's hostname) []:<__ stroomp.strmdev00.org __>
Email Address []:

Please enter the following 'extra' attributes
to be sent with your certificate request
A challenge password []:
An optional company name []:
We now self sign the certificate (again enter the server key password)
openssl x509 -req -sha256 -days 720 -in $H.csr -signkey private/$H.key -out public/$H.crt
as per
Signature ok
subject=/C=XX/L=Default City/O=Default Company Ltd/CN=stroomp.strmdev00.org
Getting Private key
Enter pass phrase for private/stroomp.key: <__ENTER_SERVER_KEY_PASSWORD__>
and noting the subject will change depending on the host name used when generating the signing request.
Create insecure version of private key for Apache autoboot (you will again need to enter the server key password)
openssl rsa -in private/$H.key -out private/$H.key.insecure
as per
Enter pass phrase for private/stroomp.key: <__ENTER_SERVER_KEY_PASSWORD__>
writing RSA key
and then move the insecure keys as appropriate
mv private/$H.key private/$H.key.secure
chmod 600 private/$H.key.secure
mv private/$H.key.insecure private/$H.key
We have now completed the creation of our certificates and keys.
Replication of Keys Directory to other nodes
If you are deploying a multi node Stroom cluster, then you would replicate the directory ~stroomuser/stroom-jks to each node in the cluster. That is, tar it up, copy the tar file to the other node(s) then untar it. We can make use of the other node’s mounted file system for this process. That is one could execute the commands on the first node, where we created the certificates
cd ~stroomuser
tar cf stroom-jks.tar stroom-jks
mv stroom-jks.tar /stroomdata/stroom-data-p01
then on the another node, say stroomp01.strmdev00.org, as the stroomuser we extract the data.
sudo -i -u stroomuser
cd ~stroomuser
tar xf /stroomdata/stroom-data-p01/stroom-jks.tar && rm -f /stroomdata/stroom-data-p01/stroom-jks.tar
Protection, Ownership and SELinux Context
Now ensure protection, ownership and SELinux context for these key files on ALL nodes via
chmod 700 ~stroomuser/stroom-jks/private ~stroomuser/stroom-jks
chown -R stroomuser:stroomuser ~stroomuser/stroom-jks
chcon -R --reference /etc/pki ~stroomuser/stroom-jks
Stroom Proxy to Proxy Key and Trust Stores
In order for a Stroom Forwarding Proxy to communicate to a central Stroom proxy over https, the JVM running the forwarding proxy needs relevant keystores set up.
One would set up a Stroom’s forwarding proxy SSL certificate as per above, with the change that the
hostname would be different. That is, in the initial setup, we would set the hostname variable H to be the hostname of the forwarding
proxy. Lets say it is stroomfp0 thus we would set
export H=stroomfp0
and then proceed as above.
Note that you also need the public key of the central Stroom server you will be connecting to. For the following, we will assume
the central Stroom proxy is the stroomp.strmdev00.org server and it’s public key is stored in the file stroomp.crt. We will store
this file on the forwarding proxy in ~stroomuser/stroom-jks/public/stroomp.crt.
So once you have created the forwarding proxy server’s SSL keys and have deployed the central proxy’s public key, we next need to convert the proxy server’s SSL keys into DER format. This is done by executing the following.
cd ~stroomuser/stroom-jks
export H=stroomfp0
export S=stroomp
rm -f ${H}_k.jks ${S}_t.jks
H_k=${H}
S_k=${S}
# Convert public key
openssl x509 -in public/$H.crt -inform PERM -out public/$H.crt.der -outform DER
When you convert the local server’s private key, you will be prompted for the server key password.
# Convert the local server's Private key
openssl pkcs8 -topk8 -nocrypt -in private/$H.key.secure -inform PEM -out private/$H.key.der -outform DER
as per
Enter pass phrase for private/stroomfp0.key.secure: <__ENTER_SERVER_KEY_PASSWORD__>
We now import these keys into our Key Store. As part of the Stroom Proxy release, an Import Keystore application has been provisioned. We identify where it’s found with the command
find ~stroomuser/*proxy -name 'stroom*util*.jar' -print | head -1
which should return /home/stroomuser/stroom-proxy/lib/stroom-proxy-util-v5.1-beta.10.jar or similar depending on the release version. To make execution simpler, we set this as a shell variable as per
Stroom_UTIL_JAR=`find ~/*proxy -name 'stroom*util*.jar' -print | head -1`
We now create the keystore and import the proxy’s server key
java -cp ${Stroom_UTIL_JAR} stroom.util.cert.ImportKey keystore=${H}_k.jks keypass=$H alias=$H keyfile=private/$H.key.der certfile=public/$H.crt.der
as per
One certificate, no chain
We now import the destination server’s public key
keytool -import -noprompt -alias ${S} -file public/${S}.crt -keystore ${S}_k.jks -storepass ${S}
as per
Certificate was added to keystore
We now add the key and trust store location and password arguments to our Stroom proxy environment files.
PWD=`pwd`
echo "export JAVA_OPTS=\"-Djavax.net.ssl.trustStore=${PWD}/${S}_k.jks -Djavax.net.ssl.trustStorePassword=${S} -Djavax.net.ssl.keyStore=${PWD}/${H}_k.jks -Djavax.net.ssl.keyStorePassword=${H}\"" >> ~/env.sh
echo "JAVA_OPTS=\"-Djavax.net.ssl.trustStore=${PWD}/${S}_k.jks -Djavax.net.ssl.trustStorePassword=${S} -Djavax.net.ssl.keyStore=${PWD}/${H}_k.jks -Djavax.net.ssl.keyStorePassword=${H}\"" >> ~/env_service.sh
At this point you should restart the proxy service. Using the commands
cd ~stroomuser
source ./env.sh
stroom-proxy/bin/stop.sh
stroom-proxy/bin/start.sh
then check the logs to ensure it started correctly.
10 - Testing Stroom Installation
Assumptions
- Stroom Single or Multi Node Cluster Testing
- the Multi Node Stroom Cluster (Proxy and Application) has been deployed
- a Test Feed,
TEST-FEED-V1_0has been added - Proxy aggregation has been turned off on all Stroom Store Proxies
- the Stroom Proxy Repository Format (
REPO_FORMAT) chosen was the default -${pathId}/${id - Stroom Forwarding Proxy Testing
- the Multi Node Stroom Cluster (Proxy and Application) has been deployed
- the Stroom Forwarding Proxy has been deployed
- a Test Feed,
TEST-FEED-V1_0has been added - the Stroom Proxy Repository Format (
REPO_FORMAT) chosen was the default -${pathId}/${id - Stroom Standalone Proxy Testing
- the Stroom Standalone Proxy has been deployed
- the Stroom Proxy Repository Format (
REPO_FORMAT) chosen was the default -${pathId}/${id
Stroom Single or Multi Node Cluster Testing
Data Post Tests
Simple Post tests
These tests are to ensure the Stroom Store proxy and it’s connection to the database is working along with the Apache mod_jk loadbalancer.
We will send a file to the load balanced stroomp.strmdev00.org node (really stroomp00.strmdev00.org) and each time we send the file,
it’s receipt should be managed by alternate proxy nodes. As a number of elements can effect load balancing, it is not always guaranteed
to alternate every time but for the most part it will.
Perform the following
- Log onto the Stroom database node (stroomdb0.strmdev00.org) as any user.
- Log onto both Stroom nodes and become the
stroomuserand monitor each node’s Stroom proxy service using theTpbash macro. That is, on each node, run
sudo -i -u stroomuser
Tp
You will note events of the form from
stroomp00.strmdev00.org:
...
2017-01-14T06:22:26.672Z INFO  [ProxyProperties refresh thread 0] datafeed.ProxyHandlerFactory$1 (ProxyHandlerFactory.java:96) - refreshThread() - Started
2017-01-14T06:30:00.993Z INFO  [Repository Reader Thread 1] handler.ProxyRepositoryReader (ProxyRepositoryReader.java:143) - run() - Cron Match at 2017-01-14T06:30:00.993Z
2017-01-14T06:40:00.245Z INFO  [Repository Reader Thread 1] handler.ProxyRepositoryReader (ProxyRepositoryReader.java:143) - run() - Cron Match at 2017-01-14T06:40:00.245Z
and from stroomp01.strmdev00.org:
...
2017-01-14T06:22:26.828Z INFO  [ProxyProperties refresh thread 0] datafeed.ProxyHandlerFactory$1 (ProxyHandlerFactory.java:96) - refreshThread() - Started
2017-01-14T06:30:00.066Z INFO  [Repository Reader Thread 1] handler.ProxyRepositoryReader (ProxyRepositoryReader.java:143) - run() - Cron Match at 2017-01-14T06:30:00.066Z
2017-01-14T06:40:00.318Z INFO  [Repository Reader Thread 1] handler.ProxyRepositoryReader (ProxyRepositoryReader.java:143) - run() - Cron Match at 2017-01-14T06:40:00.318Z
- On the Stroom database node, execute the command
curl -k --data-binary @/etc/group "https://stroomp.strmdev00.org/stroom/datafeed" -H "Feed:TEST-FEED-V1_0" -H "System:EXAMPLE_SYSTEM" -H "Environment:EXAMPLE_ENVIRONMENT"
If you are monitoring the proxy log of stroomp00.strmdev00.org you would see two new logs indicating the successful arrival of the file
2017-01-14T06:46:06.411Z INFO  [ajp-apr-9009-exec-1] handler.LogRequestHandler (LogRequestHandler.java:37) - log() - guid=54dc0da2-f35c-4dc2-8a98-448415ffc76b,feed=TEST-FEED-V1_0,system=EXAMPLE_SYSTEM,environment=EXAMPLE_ENVIRONMENT,remotehost=192.168.2.144,remoteaddress=192.168.2.144
2017-01-14T06:46:06.449Z INFO  [ajp-apr-9009-exec-1] datafeed.DataFeedRequestHandler$1 (DataFeedRequestHandler.java:104) - "doPost() - Took 571 ms to process (concurrentRequestCount=1) 200","Environment=EXAMPLE_ENVIRONMENT","Feed=TEST-FEED-V1_0","GUID=54dc0da2-f35c-4dc2-8a98-448415ffc76b","ReceivedTime=2017-01-14T06:46:05.883Z","RemoteAddress=192.168.2.144","RemoteHost=192.168.2.144","System=EXAMPLE_SYSTEM","accept=*/*","content-length=527","content-type=application/x-www-form-urlencoded","host=stroomp.strmdev00.org","user-agent=curl/7.29.0"
- On the Stroom database node, again execute the command
curl -k --data-binary @/etc/group "https://stroomp.strmdev00.org/stroom/datafeed" -H "Feed:TEST-FEED-V1_0" -H "System:EXAMPLE_SYSTEM" -H "Environment:EXAMPLE_ENVIRONMENT"
If you are monitoring the proxy log of stroomp01.strmdev00.org you should see a new log. As foreshadowed, we didn’t as the time delay resulted
in the first node getting the file. That is stroomp00.strmdev00.org log file gained the two entries
2017-01-14T06:47:26.642Z INFO  [ajp-apr-9009-exec-2] handler.LogRequestHandler (LogRequestHandler.java:37) - log() - guid=941d2904-734f-4764-9ccf-4124b94a56f6,feed=TEST-FEED-V1_0,system=EXAMPLE_SYSTEM,environment=EXAMPLE_ENVIRONMENT,remotehost=192.168.2.144,remoteaddress=192.168.2.144
2017-01-14T06:47:26.645Z INFO  [ajp-apr-9009-exec-2] datafeed.DataFeedRequestHandler$1 (DataFeedRequestHandler.java:104) - "doPost() - Took 174 ms to process (concurrentRequestCount=1) 200","Environment=EXAMPLE_ENVIRONMENT","Feed=TEST-FEED-V1_0","GUID=941d2904-734f-4764-9ccf-4124b94a56f6","ReceivedTime=2017-01-14T06:47:26.470Z","RemoteAddress=192.168.2.144","RemoteHost=192.168.2.144","System=EXAMPLE_SYSTEM","accept=*/*","content-length=527","content-type=application/x-www-form-urlencoded","host=stroomp.strmdev00.org","user-agent=curl/7.29.0"
- Again on the database node, execute the command and this time we see that node
stroomp01.strmdev00.orgreceived the file as per
2017-01-14T06:47:30.782Z INFO  [ajp-apr-9009-exec-1] handler.LogRequestHandler (LogRequestHandler.java:37) - log() - guid=2cef6e23-b0e6-4d75-8374-cca7caf66e15,feed=TEST-FEED-V1_0,system=EXAMPLE_SYSTEM,environment=EXAMPLE_ENVIRONMENT,remotehost=192.168.2.144,remoteaddress=192.168.2.144
2017-01-14T06:47:30.816Z INFO  [ajp-apr-9009-exec-1] datafeed.DataFeedRequestHandler$1 (DataFeedRequestHandler.java:104) - "doPost() - Took 593 ms to process (concurrentRequestCount=1) 200","Environment=EXAMPLE_ENVIRONMENT","Feed=TEST-FEED-V1_0","GUID=2cef6e23-b0e6-4d75-8374-cca7caf66e15","ReceivedTime=2017-01-14T06:47:30.238Z","RemoteAddress=192.168.2.144","RemoteHost=192.168.2.144","System=EXAMPLE_SYSTEM","accept=*/*","content-length=527","content-type=application/x-www-form-urlencoded","host=stroomp.strmdev00.org","user-agent=curl/7.29.0"
- Running the curl post command in quick succession shows the loadbalancer working … four executions result in seeing our pair of logs appearing on alternate proxies.
stroomp00:
2017-01-14T06:52:09.815Z INFO  [ajp-apr-9009-exec-3] handler.LogRequestHandler (LogRequestHandler.java:37) - log() - guid=bf0bc38c-3533-4d5c-9ddf-5d30c0302787,feed=TEST-FEED-V1_0,system=EXAMPLE_SYSTEM,environment=EXAMPLE_ENVIRONMENT,remotehost=192.168.2.144,remoteaddress=192.168.2.144
2017-01-14T06:52:09.817Z INFO  [ajp-apr-9009-exec-3] datafeed.DataFeedRequestHandler$1 (DataFeedRequestHandler.java:104) - "doPost() - Took 262 ms to process (concurrentRequestCount=1) 200","Environment=EXAMPLE_ENVIRONMENT","Feed=TEST-FEED-V1_0","GUID=bf0bc38c-3533-4d5c-9ddf-5d30c0302787","ReceivedTime=2017-01-14T06:52:09.555Z","RemoteAddress=192.168.2.144","RemoteHost=192.168.2.144","System=EXAMPLE_SYSTEM","accept=*/*","content-length=527","content-type=application/x-www-form-urlencoded","host=stroomp.strmdev00.org","user-agent=curl/7.29.0"
stroomp01:
2017-01-14T06:52:11.139Z INFO  [ajp-apr-9009-exec-2] handler.LogRequestHandler (LogRequestHandler.java:37) - log() - guid=1088fdd8-6869-489f-8baf-948891363734,feed=TEST-FEED-V1_0,system=EXAMPLE_SYSTEM,environment=EXAMPLE_ENVIRONMENT,remotehost=192.168.2.144,remoteaddress=192.168.2.144
2017-01-14T06:52:11.150Z INFO  [ajp-apr-9009-exec-2] datafeed.DataFeedRequestHandler$1 (DataFeedRequestHandler.java:104) - "doPost() - Took 289 ms to process (concurrentRequestCount=1) 200","Environment=EXAMPLE_ENVIRONMENT","Feed=TEST-FEED-V1_0","GUID=1088fdd8-6869-489f-8baf-948891363734","ReceivedTime=2017-01-14T06:52:10.861Z","RemoteAddress=192.168.2.144","RemoteHost=192.168.2.144","System=EXAMPLE_SYSTEM","accept=*/*","content-length=527","content-type=application/x-www-form-urlencoded","host=stroomp.strmdev00.org","user-agent=curl/7.29.0"
stroomp00:
2017-01-14T06:52:12.284Z INFO  [ajp-apr-9009-exec-4] handler.LogRequestHandler (LogRequestHandler.java:37) - log() - guid=def94a4a-cf78-4c4d-9261-343663f7f79a,feed=TEST-FEED-V1_0,system=EXAMPLE_SYSTEM,environment=EXAMPLE_ENVIRONMENT,remotehost=192.168.2.144,remoteaddress=192.168.2.144
2017-01-14T06:52:12.289Z INFO  [ajp-apr-9009-exec-4] datafeed.DataFeedRequestHandler$1 (DataFeedRequestHandler.java:104) - "doPost() - Took 5.0 ms to process (concurrentRequestCount=1) 200","Environment=EXAMPLE_ENVIRONMENT","Feed=TEST-FEED-V1_0","GUID=def94a4a-cf78-4c4d-9261-343663f7f79a","ReceivedTime=2017-01-14T06:52:12.284Z","RemoteAddress=192.168.2.144","RemoteHost=192.168.2.144","System=EXAMPLE_SYSTEM","accept=*/*","content-length=527","content-type=application/x-www-form-urlencoded","host=stroomp.strmdev00.org","user-agent=curl/7.29.0"
stroomp01:
2017-01-14T06:52:13.374Z INFO  [ajp-apr-9009-exec-3] handler.LogRequestHandler (LogRequestHandler.java:37) - log() - guid=55dda4c9-2c76-43c8-9b48-dcdb3a1f459b,feed=TEST-FEED-V1_0,system=EXAMPLE_SYSTEM,environment=EXAMPLE_ENVIRONMENT,remotehost=192.168.2.144,remoteaddress=192.168.2.144
2017-01-14T06:52:13.378Z INFO  [ajp-apr-9009-exec-3] datafeed.DataFeedRequestHandler$1 (DataFeedRequestHandler.java:104) - "doPost() - Took 3.0 ms to process (concurrentRequestCount=1) 200","Environment=EXAMPLE_ENVIRONMENT","Feed=TEST-FEED-V1_0","GUID=55dda4c9-2c76-43c8-9b48-dcdb3a1f459b","ReceivedTime=2017-01-14T06:52:13.374Z","RemoteAddress=192.168.2.144","RemoteHost=192.168.2.144","System=EXAMPLE_SYSTEM","accept=*/*","content-length=527","content-type=application/x-www-form-urlencoded","host=stroomp.strmdev00.org","user-agent=curl/7.29.0"
At this point we will see what the proxies have received.
- On each node run the command
ls -l /stroomdata/stroom-working*/proxy
On stroomp00 we see
[stroomuser@stroomp00 ~]$ ls -l /stroomdata/stroom-working*/proxy
total 16
-rw-rw-r--. 1 stroomuser stroomuser 785 Jan 14 17:46 001.zip
-rw-rw-r--. 1 stroomuser stroomuser 783 Jan 14 17:47 002.zip
-rw-rw-r--. 1 stroomuser stroomuser 784 Jan 14 17:52 003.zip
-rw-rw-r--. 1 stroomuser stroomuser 783 Jan 14 17:52 004.zip
[stroomuser@stroomp00 ~]$
and on stroomp01 we see
[stroomuser@stroomp01 ~]$ ls -l /stroomdata/stroom-working*/proxy
total 12
-rw-rw-r--. 1 stroomuser stroomuser 785 Jan 14 17:47 001.zip
-rw-rw-r--. 1 stroomuser stroomuser 783 Jan 14 17:52 002.zip
-rw-rw-r--. 1 stroomuser stroomuser 784 Jan 14 17:52 003.zip
[stroomuser@stroomp01 ~]$
which corresponds to the seven posts of data and the associated events in the proxy logs. To see the contents of one of these files we execute on either node, the command
unzip -c /stroomdata/stroom-working*/proxy/001.zip
to see
Archive:  /stroomdata/stroom-working-p00/proxy/001.zip
  inflating: 001.dat
root:x:0:
bin:x:1:
daemon:x:2:
sys:x:3:
adm:x:4:
tty:x:5:
disk:x:6:
lp:x:7:
mem:x:8:
kmem:x:9:
wheel:x:10:burn
cdrom:x:11:
mail:x:12:postfix
man:x:15:
dialout:x:18:
floppy:x:19:
games:x:20:
tape:x:30:
video:x:39:
ftp:x:50:
lock:x:54:
audio:x:63:
nobody:x:99:
users:x:100:
utmp:x:22:
utempter:x:35:
input:x:999:
systemd-journal:x:190:
systemd-bus-proxy:x:998:
systemd-network:x:192:
dbus:x:81:
polkitd:x:997:
ssh_keys:x:996:
dip:x:40:
tss:x:59:
sshd:x:74:
postdrop:x:90:
postfix:x:89:
chrony:x:995:
burn:x:1000:burn
mysql:x:27:

  inflating: 001.meta
content-type:application/x-www-form-urlencoded
Environment:EXAMPLE_ENVIRONMENT
Feed:TEST-FEED-V1_0
GUID:54dc0da2-f35c-4dc2-8a98-448415ffc76b
host:stroomp.strmdev00.org
ReceivedTime:2017-01-14T06:46:05.883Z
RemoteAddress:192.168.2.144
RemoteHost:192.168.2.144
StreamSize:527
System:EXAMPLE_SYSTEM
user-agent:curl/7.29.0

[stroomuser@stroomp00 ~]$
Checking the /etc/group file on stroomdb0.strmdev00.org confirms the above contents. For the present, ignore
the metadata file present in the zip archive.
If you execute the same command on the other files, all that changes is the value of the ReceivedTime: attribute in the .meta file.
For those curious about the file size differences, this is a function of the compression process within the proxy.
Using stroomp01’s files and extracting them manually and renaming them results in the six files
[stroomuser@stroomp01 xx]$ ls -l
total 24
-rw-rw-r--. 1 stroomuser stroomuser 527 Jan 14 17:47 A_001.dat
-rw-rw-r--. 1 stroomuser stroomuser 321 Jan 14 17:47 A_001.meta
-rw-rw-r--. 1 stroomuser stroomuser 527 Jan 14 17:52 B_001.dat
-rw-rw-r--. 1 stroomuser stroomuser 321 Jan 14 17:52 B_001.meta
-rw-rw-r--. 1 stroomuser stroomuser 527 Jan 14 17:52 C_001.dat
-rw-rw-r--. 1 stroomuser stroomuser 321 Jan 14 17:52 C_001.meta
[stroomuser@stroomp01 xx]$ cmp A_001.dat B_001.dat
[stroomuser@stroomp01 xx]$ cmp B_001.dat C_001.dat
[stroomuser@stroomp01 xx]$
We have effectively tested the receipt of our data and the load balancing of the Apache mod_jk installation.
Simple Direct Post tests
In this test we will use the direct feed interface of the Stroom application, rather than sending data via the proxy. One would normally use this interface for time sensitive data which shouldn’t aggregate in a proxy waiting for the Stroom application to collect it. In this situation we use the command
curl -k --data-binary @/etc/group "https://stroomp.strmdev00.org/stroom/datafeeddirect" -H "Feed:TEST-FEED-V1_0" -H "System:EXAMPLE_SYSTEM" -H "Environment:EXAMPLE_ENVIRONMENT"
To prepare for this test, we monitor the Stroom application log using the T bash alias on each node. So on each node run the command
sudo -i -u stroomuser
T
On each node you should see LifecyleTask events, for example,
2017-01-14T07:42:08.281Z INFO  [Stroom P2 #7 - LifecycleTask] spring.StroomBeanMethodExecutable (StroomBeanMethodExecutable.java:47) - Executing nodeStatusExecutor.exec
2017-01-14T07:42:18.284Z INFO  [Stroom P2 #2 - LifecycleTask] spring.StroomBeanMethodExecutable (StroomBeanMethodExecutable.java:47) - Executing SQLStatisticEventStore.evict
2017-01-14T07:42:18.284Z INFO  [Stroom P2 #10 - LifecycleTask] spring.StroomBeanMethodExecutable (StroomBeanMethodExecutable.java:47) - Executing activeQueriesManager.evictExpiredElements
2017-01-14T07:42:18.285Z INFO  [Stroom P2 #7 - LifecycleTask] spring.StroomBeanMethodExecutable (StroomBeanMethodExecutable.java:47) - Executing distributedTaskFetcher.execute
To perform the test, on the database node, run the posting command a number of times in rapid succession. This will result in server.DataFeedServiceImpl events in both log files. The Stroom application log is quite busy, you may have to look for these logs.
In the following we needed to execute the posting command three times before seeing the data arrive on both nodes. Looking at the arrival
times, the file turned up on the second node twice before appearing on the first node.
strooomp00:
2017-01-14T07:43:09.394Z INFO [ajp-apr-8009-exec-6] server.DataFeedServiceImpl (DataFeedServiceImpl.java:133) - handleRequest response 200 - 0 - OK
and on stroomp01:
2017-01-14T07:43:05.614Z INFO  [ajp-apr-8009-exec-1] server.DataFeedServiceImpl (DataFeedServiceImpl.java:133) - handleRequest response 200 - 0 - OK
2017-01-14T07:43:06.821Z INFO  [ajp-apr-8009-exec-2] server.DataFeedServiceImpl (DataFeedServiceImpl.java:133) - handleRequest response 200 - 0 - OK
To confirm this data arrived, we need to view the Data pane of our TEST-FEED-V1_0 tab. To do this, log onto the Stroom UI then
move the cursor to the TEST-FEED-V1_0 entry in the Explorer tab and select the item with a left click

and double click on the entry to see our TEST-FEED-V1_0 tab.
and it is noted that we are viewing the Feed’s attributes as we can see the Setting hyper-link highlighted. As we want to see the Data we have received for this feed, move the cursor to the Data hyper-link and select it to see .


These three entries correspond to the three posts we performed.
We have successfully tested direct posting to a Stroom feed and that the Apache mod_jk loadbalancer also works for this posting method.
Test Proxy Aggregation is Working
To test that the Proxy Aggregation is working, we need to enable on each node.
By enabling the Proxy Aggregation process, both nodes immediately performed the task as indicated by each node’s Stroom application logs as per
stroomp00:
2017-01-14T07:58:58.752Z INFO  [Stroom P2 #3 - LifecycleTask] server.ProxyAggregationExecutor (ProxyAggregationExecutor.java:138) - exec() - started
2017-01-14T07:58:58.937Z INFO  [Stroom P2 #2 - GenericServerTask] server.ProxyAggregationExecutor$2 (ProxyAggregationExecutor.java:203) - processFeedFiles() - Started TEST-FEED-V1_0 (4 Files)
2017-01-14T07:58:59.045Z INFO  [Stroom P2 #2 - GenericServerTask] server.ProxyAggregationExecutor$2 (ProxyAggregationExecutor.java:265) - processFeedFiles() - Completed TEST-FEED-V1_0 in 108 ms
2017-01-14T07:58:59.101Z INFO  [Stroom P2 #3 - LifecycleTask] server.ProxyAggregationExecutor (ProxyAggregationExecutor.java:152) - exec() - completedin 349 ms
and stroomp01:
2017-01-14T07:59:16.687Z INFO  [Stroom P2 #10 - LifecycleTask] server.ProxyAggregationExecutor (ProxyAggregationExecutor.java:138) - exec() - started
2017-01-14T07:59:16.799Z INFO  [Stroom P2 #5 - GenericServerTask] server.ProxyAggregationExecutor$2 (ProxyAggregationExecutor.java:203) - processFeedFiles() - Started TEST-FEED-V1_0 (3 Files)
2017-01-14T07:59:16.909Z INFO  [Stroom P2 #5 - GenericServerTask] server.ProxyAggregationExecutor$2 (ProxyAggregationExecutor.java:265) - processFeedFiles() - Completed TEST-FEED-V1_0 in 110 ms
2017-01-14T07:59:16.997Z INFO  [Stroom P2 #10 - LifecycleTask] server.ProxyAggregationExecutor (ProxyAggregationExecutor.java:152) - exec() - completed in 310 ms
And on refreshing the top pane of the TEST-FEED-V1_0 tab we see that two more batches of data have arrived.
.

This demonstrates that Proxy Aggregation is working.
Stroom Forwarding Proxy Testing
Data Post Tests
Simple Post tests
This test is to ensure the Stroom Forwarding proxy and it’s connection to the central Stroom Processing system is working.
We will send a file to our Forwarding proxy (stroomfp0.strmdev00.org) and monitor this nodes’ proxy log files as well as all the
destination nodes proxy log files. The reason for monitoring all the destination system’s proxy log files is that the destination system is
probably load balancing and hence the forwarded file may turn up on any of the destination nodes.
Perform the following
- Log onto any host where you will perform the
curlpost - Monitor all proxy log files
- Log onto the Forwarding Proxy node and become the
stroomuserand monitor the Stroom proxy service using theTpbash macro. - Log onto the destination Stroom nodes and become the
stroomuserand monitor each node’s Stroom proxy service using theTpbash macro. That is, on each node, run
sudo -i -u stroomuser
Tp
- On the ‘posting’ node, run the command
curl -k --data-binary @/etc/group "https://stroomfp0.strmdev00.org/stroom/datafeed" -H "Feed:TEST-FEED-V1_0" -H "System:EXAMPLE_SYSTEM" -H "Environment:EXAMPLE_ENVIRONMENT"
In the Stroom Forwarding proxy log, ~/stroom-proxy/instance/logs/stroom.log, you will see the arrival of the
file as per the datafeed.DataFeedRequestHandler$1 event running under, in this case, the ajp-apr-9009-exec-1 thread.
...
2017-01-01T23:17:00.240Z INFO  [Repository Reader Thread 1] handler.ProxyRepositoryReader (ProxyRepositoryReader.java:143) - run() - Cron Match at 2017-01-01T23:17:00.240Z
2017-01-01T23:18:00.275Z INFO  [Repository Reader Thread 1] handler.ProxyRepositoryReader (ProxyRepositoryReader.java:143) - run() - Cron Match at 2017-01-01T23:18:00.275Z
2017-01-01T23:18:12.367Z INFO  [ajp-apr-9009-exec-1] datafeed.DataFeedRequestHandler$1 (DataFeedRequestHandler.java:104) - "doPost() - Took 782 ms to process (concurrentRequestCount=1) 200","Environment=EXAMPLE_ENVIRONMENT","Expect=100-continue","Feed=TEST-FEED-V1_0","GUID=9601198e-98db-4cae-8b71-9404722ef1f9","ReceivedTime=2017-01-01T23:18:11.588Z","RemoteAddress=192.168.2.220","RemoteHost=192.168.2.220","System=EXAMPLE_SYSTEM","accept=*/*","content-length=1051","content-type=application/x-www-form-urlencoded","host=stroomfp0.strmdev00.org","user-agent=curl/7.19.7 (x86_64-redhat-linux-gnu) libcurl/7.19.7 NSS/3.21 Basic ECC zlib/1.2.3 libidn/1.18 libssh2/1.4.2"
And then at the next
periodic interval (60 second intervals) this file will be forwarded to the main stroom proxy
server stroomp.strmdev00.org as shown by the handler.ForwardRequestHandler events running under the pool-10-thread-2 thread.
2017-01-01T23:19:00.304Z INFO  [Repository Reader Thread 1] handler.ProxyRepositoryReader (ProxyRepositoryReader.java:143) - run() - Cron Match at 2017-01-01T23:19:00.304Z
2017-01-01T23:19:00.586Z INFO  [pool-10-thread-2] handler.ForwardRequestHandler (ForwardRequestHandler.java:109) - handleHeader() - https://stroomp00.strmdev00.org/stroom/datafeed Sending request {ReceivedPath=stroomfp0.strmdev00.org, Feed=TEST-FEED-V1_0, Compression=ZIP}
2017-01-01T23:19:00.990Z INFO  [pool-10-thread-2] handler.ForwardRequestHandler (ForwardRequestHandler.java:89) - handleFooter() - b5722ead-714b-411b-a09f-901fb8b20389 took 403 ms to forward 1.4 kB response 200 - {ReceivedPath=stroomfp0.strmdev00.org, Feed=TEST-FEED-V1_0, GUID=b5722ead-714b-411b-a09f-901fb8b20389, Compression=ZIP}
2017-01-01T23:20:00.064Z INFO  [Repository Reader Thread 1] handler.ProxyRepositoryReader (ProxyRepositoryReader.java:143) - run() - Cron Match at 2017-01-01T23:20:00.064Z
...
On one of the central processing nodes, when the file is send by the Forwarding Proxy, you will see the file’s arrival as per the datafeed.DataFeedRequestHandler$1 event in the ajp-apr-9009-exec-3 thread.
...
2017-01-01T23:00:00.236Z INFO  [Repository Reader Thread 1] handler.ProxyRepositoryReader (ProxyRepositoryReader.java:143) - run() - Cron Match at 2017-01-01T23:00:00.236Z
2017-01-01T23:10:00.473Z INFO  [Repository Reader Thread 1] handler.ProxyRepositoryReader (ProxyRepositoryReader.java:143) - run() - Cron Match at 2017-01-01T23:10:00.473Z
2017-01-01T23:19:00.787Z INFO  [ajp-apr-9009-exec-3] handler.LogRequestHandler (LogRequestHandler.java:37) - log() - guid=b5722ead-714b-411b-a09f-901fb8b20389,feed=TEST-FEED-V1_0,system=null,environment=null,remotehost=null,remoteaddress=null
2017-01-01T23:19:00.981Z INFO  [ajp-apr-9009-exec-3] datafeed.DataFeedRequestHandler$1 (DataFeedRequestHandler.java:104) - "doPost() - Took 196 ms to process (concurrentRequestCount=1) 200","Cache-Control=no-cache","Compression=ZIP","Feed=TEST-FEED-V1_0","GUID=b5722ead-714b-411b-a09f-901fb8b20389","ReceivedPath=stroomfp0.strmdev00.org","Transfer-Encoding=chunked","accept=text/html, image/gif, image/jpeg, *; q=.2, */*; q=.2","connection=keep-alive","content-type=application/audit","host=stroomp00.strmdev00.org","pragma=no-cache","user-agent=Java/1.8.0_111"
2017-01-01T23:20:00.771Z INFO  [Repository Reader Thread 1] handler.ProxyRepositoryReader (ProxyRepositoryReader.java:143) - run() - Cron Match at 2017-01-01T23:20:00.771Z
...
Stroom Standalone Proxy Testing
Data Post Tests
Simple Post tests
This test is to ensure the Stroom Store NODB or Standalone proxy is working.
We will send a file to our Standalone proxy (stroomsap0.strmdev00.org) and monitor this nodes’ proxy log files as well the directory the
received files are meant to be stored in.
Perform the following
- Log onto any host where you will perform the
curlpost - Log onto the Standalone Proxy node and become the
stroomuserand monitor the Stroom proxy service using theTpbash macro. That is run
sudo -i -u stroomuser
Tp
- On the ‘posting’ node, run the command
curl -k --data-binary @/etc/group "https://stroomsap0.strmdev00.org/stroom/datafeed" -H "Feed:TEST-FEED-V1_0" -H "System:EXAMPLE_SYSTEM" -H "Environment:EXAMPLE_ENVIRONMENT"
In the stroom proxy log, ~/stroom-proxy/instance/logs/stroom.log, you will see the arrival of the file via both the handler.LogRequestHandler and datafeed.DataFeedRequestHandler$1 events running under, in this case, the ajp-apr-9009-exec-1 thread.
...
2017-01-02T02:10:00.325Z INFO  [Repository Reader Thread 1] handler.ProxyRepositoryReader (ProxyRepositoryReader.java:143) - run() - Cron Match at 2017-01-02T02:10:00.325Z
2017-01-02T02:11:34.501Z INFO  [ajp-apr-9009-exec-1] handler.LogRequestHandler (LogRequestHandler.java:37) - log() - guid=ebd11215-7d4c-4be6-a524-358015e2ac38,feed=TEST-FEED-V1_0,system=EXAMPLE_SYSTEM,environment=EXAMPLE_ENVIRONMENT,remotehost=192.168.2.220,remoteaddress=192.168.2.220
2017-01-02T02:11:34.528Z INFO  [ajp-apr-9009-exec-1] datafeed.DataFeedRequestHandler$1 (DataFeedRequestHandler.java:104) - "doPost() - Took 33 ms to process (concurrentRequestCount=1) 200","Environment=EXAMPLE_ENVIRONMENT","Expect=100-continue","Feed=TEST-FEED-V1_0","GUID=ebd11215-7d4c-4be6-a524-358015e2ac38","ReceivedTime=2017-01-02T02:11:34.501Z","RemoteAddress=192.168.2.220","RemoteHost=192.168.2.220","System=EXAMPLE_SYSTEM","accept=*/*","content-length=1051","content-type=application/x-www-form-urlencoded","host=stroomsap0.strmdev00.org","user-agent=curl/7.19.7 (x86_64-redhat-linux-gnu) libcurl/7.19.7 NSS/3.21 Basic ECC zlib/1.2.3 libidn/1.18 libssh2/1.4.2"
...
Further, if you check the proxy’s storage directory, you will see the file 001.zip. The file names number upwards from 001.
ls -l /stroomdata/stroom-working-sap0/proxy
shows
[stroomuser@stroomsap0 ~]$ ls -l /stroomdata/stroom-working-sap0/proxy
total 4
-rw-rw-r--. 1 stroomuser stroomuser 1107 Jan  2 13:11 001.zip
[stroomuser@stroomsap0 ~]$
On viewing the contents of this file we see both a .dat and .meta file.
[stroomuser@stroomsap0 ~]$ (cd /stroomdata/stroom-working-sap0/proxy; unzip 001.zip)
Archive:  001.zip
  inflating: 001.dat
  inflating: 001.meta
[stroomuser@stroomsap0 ~]$
The .dat file holds the content of the file we posted - /etc/group.
[stroomuser@stroomsap0 ~]$ (cd /stroomdata/stroom-working-sap0/proxy; head -5 001.dat)
root:x:0:
bin:x:1:bin,daemon
daemon:x:2:bin,daemon
sys:x:3:bin,adm
adm:x:4:adm,daemon
[stroomuser@stroomsap0 ~]$
The .meta file is generated by the proxy and holds information about the posted file
[stroomuser@stroomsap0 ~]$ (cd /stroomdata/stroom-working-sap0/proxy; cat 001.meta)
content-type:application/x-www-form-urlencoded
Environment:EXAMPLE_ENVIRONMENT
Feed:TEST-FEED-V1_0
GUID:ebd11215-7d4c-4be6-a524-358015e2ac38
host:stroomsap0.strmdev00.org
ReceivedTime:2017-01-02T02:11:34.501Z
RemoteAddress:192.168.2.220
RemoteHost:192.168.2.220
StreamSize:1051
System:EXAMPLE_SYSTEM
user-agent:curl/7.19.7 (x86_64-redhat-linux-gnu) libcurl/7.19.7 NSS/3.21 Basic ECC zlib/1.2.3 libidn/1.18 libssh2/1.4.2
[stroomuser@stroomsap0 ~]$ (cd /stroomdata/stroom-working-sap0/proxy; rm 001.meta 001.dat)
[stroomuser@stroomsap0 ~]$
11 - Volume Maintenance
Stroom stores data in volumes. These are the logical link to the Storage hierarchy we setup on the operating system. This HOWTO will demonstrate how one first sets up volumes and also how to add additional volumes if one expanded an existing Stroom cluster.
Assumptions
- an account with the
AdministratorApplication Permission is currently logged in. - we will add volumes as per the Multi Node Stroom deployment Storage hierarchy
Configure the Volumes
We need to configure the volumes for Stroom. The follow demonstrates adding the volumes for two nodes, but demonstrates the process for a single node deployment as well the volume maintenance needed when expanding a Multi Node Cluster when adding in a new node.
To configure the volumes, move to the Tools item of the Main Menu and select it to bring up the Tools sub-menu.
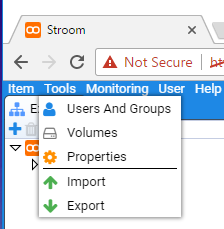
then move down and select the Volumes sub-item to be presented with the Volumes configuration window as seen below.

The attributes we see for each volume are
- Node - the processing node the volume resides on (this is just the node name entered when configuration the Stroom application)
- Path - the path to the volume
- Volume Type - The type of volume
- Public - to indicate that all nodes would access this volume
- Private - to indicate that only the local node will access this volume
- Stream Status
- Active - to store data within the volume
- Inactive - to NOT store data within the volume
- Closed - had stored data within the volume, but now no more data can be stored
- Index Status
- Active - to store index data within the volume
- Inactive - to NOT store index data within the volume
- Closed - had stored index data within the volume, but now no more index data can be stored
- Usage Date - the date and time the volume was last used
- Limit - the maximum amount of data the system will store on the volume
- Used - the amount of data in use on the volume
- Free - the amount of available storage on the volume
- Use% - the usage percentage
If you are setting up Stroom for the first time and you had accepted the default for the CREATE_DEFAULT_VOLUME_ON_START configuration option (true) when configuring the Stroom service application, you will see two default volumes have already been created. Had you set this option to false then the window would be empty.
Add Volumes
Now from our two node Stroom Cluster example, our storage hierarchy was
- Node:
stroomp00.strmdev00.org /stroomdata/stroom-data-p00- location to store Stroom application data files (events, etc.) for this node/stroomdata/stroom-index-p00- location to store Stroom application index files/stroomdata/stroom-working-p00- location to store Stroom application working files (e.g. temporary files, output, etc.) for this node/stroomdata/stroom-working-p00/proxy- location for Stroom proxy to store inbound data files- Node:
stroomp01.strmdev00.org /stroomdata/stroom-data-p01- location to store Stroom application data files (events, etc.) for this node/stroomdata/stroom-index-p01- location to store Stroom application index files/stroomdata/stroom-working-p01- location to store Stroom application working files (e.g. temporary files, output, etc.) for this node/stroomdata/stroom-working-p01/proxy- location for Stroom proxy to store inbound data files
From this we need to create four volumes. On stroomp00.strmdev00.org we create
/stroomdata/stroom-data-p00- location to store Stroom application data files (events, etc.) for this node/stroomdata/stroom-index-p00- location to store Stroom application index files
and on stroomp01.strmdev00.org we create
/stroomdata/stroom-data-p01- location to store Stroom application data files (events, etc.) for this node/stroomdata/stroom-index-p01- location to store Stroom application index files
So the first step to configure a volume is to move the cursor to the New icon
 in the top left of
the
in the top left of
the Volumes window and select it. This will bring up the Add Volume configuration window
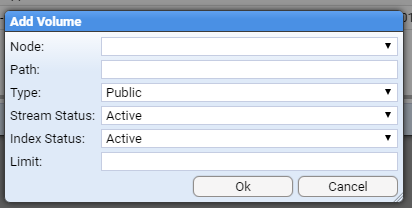
As you can see, the entry box titles reflect the attributes of a volume. So we will add the first nodes data volume
/stroomdata/stroom-data-p00- location to store Stroom application data files (events, etc.) for this node for nodestroomp00.
If you move the the Node drop down entry box and select it you will be presented with a choice of available
nodes - in this case stroomp00 and stroomp01 as we have a two node cluster with these node names.
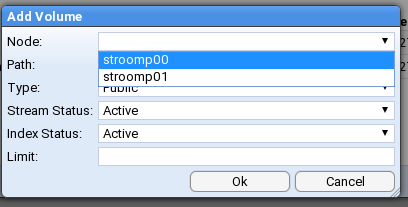
By selecting the node stroomp00 we see
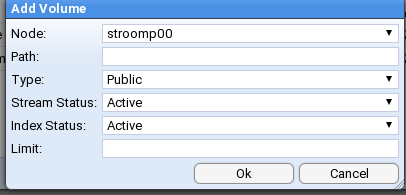
To configure the rest of the attributes for this volume, we:
- enter the Path to our first node’s data volume
- select a Volume Type of Public as this is a data volume we want all nodes to access
- select a Stream Status of Active to indicate we want to store data on it
- select an Index Status of Inactive as we do NOT want index data stored on it
- set a Limit of 12GB for allowed storage
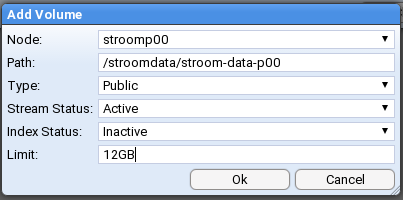
and on selection of the
we see the changes in the Volumes configuration window

We next add the first node’s index volume, as per
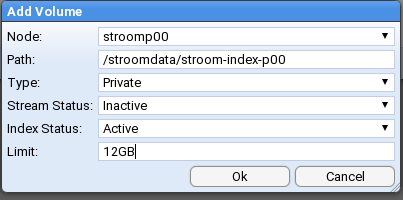
And after adding the second node’s volumes we are finally presented with our configured volumes

Delete Default Volumes
We now need to deal with our default volumes. We want to delete them.

So we move the cursor to the first volume’s line (stroomp00 /home/stroomuser/stroom-app/volumes/defaultindexVolume …) and select the line then move the cursor to the Delete icon
 in the top left of the
 Volumes window and select it. On selection you will be given a confirmation request
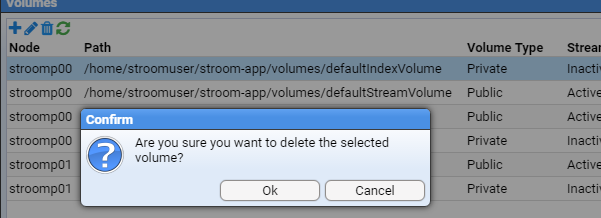
at which we press the button to see the first default volume has been deleted

and after we select then delete the second default volume( stroomp00 /home/stroomuser/stroom-app/volumes/defaultStreamVolume …), we are left with

At this one can close the Volumes configuration window by pressing the
button.
NOTE: At the time of writing there is an issue regarding volumes
Stroom Github Issue 84 -
Due to Issue 84 , if we delete volumes in a multi node environment, the deletion is not propagated to all other nodes in a cluster. Thus if we attempted to use the volumes we would get a database error. The current workaround is to restart all the Stroom applications which will cause a reload of all volume information. This MUST be done before sending any data to your multi-node Stroom cluster.
Adding new Volumes
When one expands a Multi Node Stroom cluster deployment, after the installation of the Stroom Proxy and Application software and services on the new node, one has to configure the new volumes that are on the new node. The following demonstrates this assuming we are adding
- the new node is
stroomp02 - the storage hierarchy for this node is
/stroomdata/stroom-data-p02- location to store Stroom application data files (events, etc.) for this node/stroomdata/stroom-index-p02- location to store Stroom application index files/stroomdata/stroom-working-p02- location to store Stroom application working files (e.g. tmp, output, etc.) for this node/stroomdata/stroom-working-p02/proxy- location for Stroom proxy to store inbound data files
From this we need to create two volumes on stroomp02
/stroomdata/stroom-data-p02- location to store Stroom application data files (events, etc.) for this node/stroomdata/stroom-index-p02- location to store Stroom application index files
To configure the volumes, move to the Tools item of the Main Menu and select it to bring up the Tools sub-menu.
then move down and select the Volumes sub-item to be presented with the Volumes configuration window as.
We then move the cursor to the New icon
in the top left of the Volumes window and select it.
This will bring up the Add Volume configuration window where we select our volume’s node stroomp02.
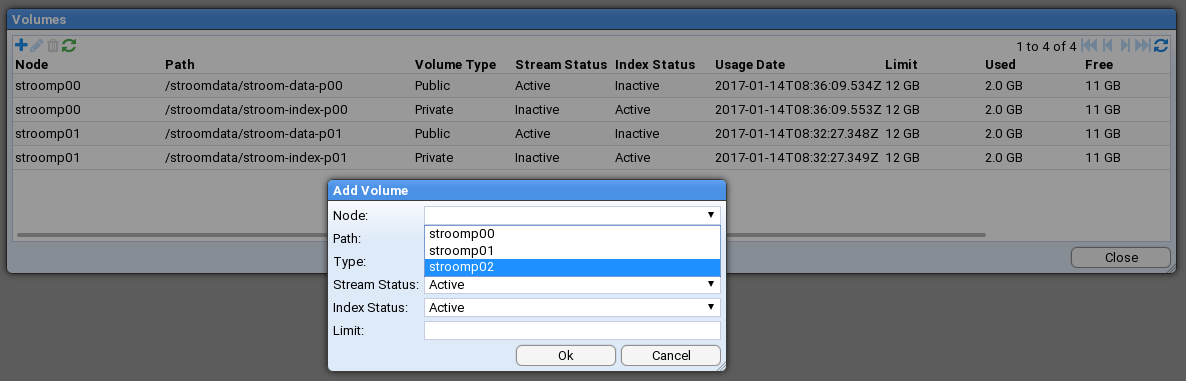
We select this node and then configure the rest of the attributes for this data volume
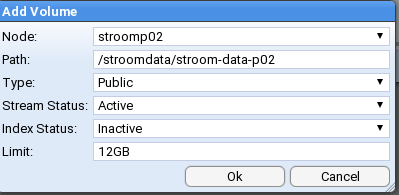
then press the button.
We then add another volume for the index volume for this node with attributes as per

And on pressing the button we see our two new volumes for this node have been added.

At this one can close the Volumes configuration window by pressing the
button.