Motivation
Visualisations are typically composed of multiple files or assets:
- Javascript
- CSS
- HTML
- Images
The Visualisation Assets system provides a way to manage these easily through the user interface.
User Interface
The Assets tab within a Visualisation allows you to upload and edit files within a folder structure. For example:
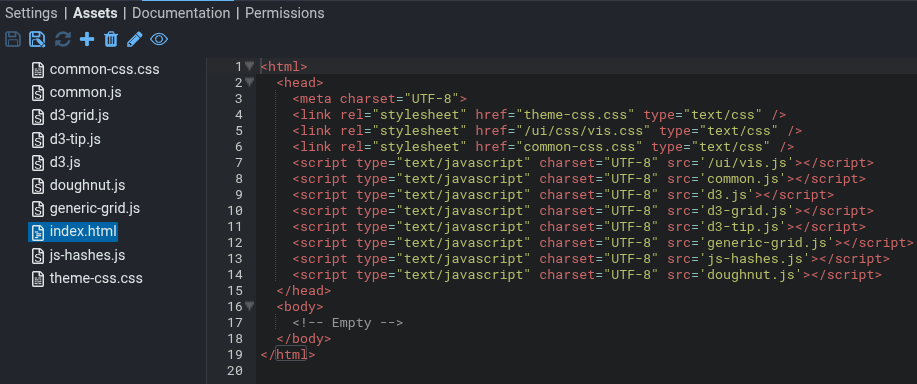
In this example, all the assets are in the same directory. However, you can create a directory structure if necessary.
Operation
- Save any changes and make them live
- Save the live and any unsaved changes to a new document
- Throw away any unsaved changes and revert to the live version
- Add an asset to the tree. The asset could be a folder, a new empty file, or an uploaded file.
- Delete an asset from the asset tree. Note that if you delete a folder, everything under the folder will also be deleted.
- View the asset in the browser in a new window. This also allows you to see the URL or path of that asset, if you need the path for another asset.
- Edit the name of an asset.
Note
Note that the extension of the file is significant as it is used for:
- The mimetype reported to the browser, and thus how the browser will present that file;
- The editor mode used for the file.
See Configuration below to find out how to customise these settings.
Editing Assets
Selecting (clicking on) an asset will display the asset in the editor, where possible.
Stroom tries to allow you to edit all assets within the browser. There are two restrictions:
- The asset must not be larger than 512KiB. The asset’s content is transferred to the user-interface in RAM and thus the size must be restricted to avoid problems.
- The asset’s content must be convertible to UTF-8 text.
Note that the file’s extension isn’t considered when attempting to load a file. As long as it is small enough and can be converted to UTF-8 text, it can be edited.
Note
Due to the potentially large size of assets, the user-interface implements a staged save where the asset is first saved to a staging area in the database. When you click the data is copied across to the live area of the database, where the asset can be downloaded. Generally this doesn’t make any difference to how you use the user-interface; however you will find that unsaved changes persist even though you’ve closed a tab or the browser.
To get back to the current live state and remove any unsaved changes, click the icon.
Import and Export, GitRepo Structure
The Import and Export or GitRepo format is designed to allow you to edit the assets within the import/export structure. If you look at the structure you’ll have something like this:
Name.Visualisation.UUID.jsonName.Visualisation.UUID.metaName.Visualisation.UUID.nodeName.Visualisation.UUID-path-assets/
Here Name is the name of the Visualisation document, and UUID is a long string that looks something like b565d110-508d-483c-95f7-69196479aee9.
The first three files (.json, .meta and .node) should not be edited.
However, under the -path-assets/ directory you’ll find your assets in the same structure as shown in the Stroom user-interface.
You may edit, add or delete files as required.
When you re-import the files or Pull from the GitRepo, the files within Stroom will be updated.
Assets and Visualisations
The assets can be used directly via links from Scripts.
Alternatively you can define an asset named index.html in the root of your asset tree.
If this exists then Stroom will load that as the visualisation.
HTTP Access
The assets are available via the URL /assets/<doc-id>/asset-path, where the <doc-id> is the
ID of the document that owns the assets.
The easy way to find the URL is by clicking the icon.
Note that this icon is only enabled when there are no unsaved changes.
In the example screenshot above, the file index.html has the URL https://localhost/assets/b565d110-508d-483c-95f7-69196479aee9/index.html.
Browser Cache
Note that your browser will cache the assets. This is a good thing as it will greatly speed up Stroom by reducing bandwidth requirements and server load.
Files will only be loaded when the Dashboard tab is opened. Changing file contents will only take effect if you close and reopen the tab. There is no need to refresh the browser or log out of Stroom.
The file /index.html will always be reloaded every time the tab is opened.
Other files will be reloaded if they have changed.
Thus the development procedure will look like this:
- Make a change and save the Visualisation.
- Open the Dashboard and click the Play button. You will see the result of your change.
- Close the Dashboard
- Go back to step 1
Links between Assets
If the assets are owned by the same document then you only need the relative path you defined within the tree.
For example, theme-css.css or images/background.png.
If the assets are owned by different document then you’ll need the document ID as well.
For example, ../b565d110-508d-483c-95f7-69196479aee9/common-css.css.
Since visualisations may be moved between servers, it is probably a good idea to avoid absolute paths and only use relative paths.
Configuration
The mappings from extension to mimetype and editor mode are configured in your local.yaml file.
appConfig:
  visualisationAsset:
    aceEditorModes:
        htm: "HTML"
        txt: "TEXT"
        css: "CSS"
        svg: "XML"
        xml: "XML"
        js: "JAVASCRIPT"
        html: "HTML"
    assetCacheDir: "asset_cache"
    clearAssetCacheOnStartup: false
    default: "application/octet-stream"
    defaultAceEditorMode: "TEXT"
    mimetypes:
        htm: "text/html"
        jpg: "image/jpeg"
        css: "text/css"
        tiff: "image/tiff"
        bmp: "image/bmp"
        apng: "image/apng"
        gif: "image/jpeg"
        svg: "image/svg+xml"
        png: "image/png"
        js: "text/javascript"
        webp: "image/webp"
        tif: "image/tiff"
        txt: "text/plain"
        xml: "application/xml"
        jpeg: "image/jpeg"
        html: "text/html"
aceEditorModes- You will normally want to leave these as the default values, but you may need to add a particular extension to suit your installation.
assetCacheDir- This is where the assets will be cached before serving them to the user interface. The master copy of the asset is kept in the database. There is a cache on each Stroom node to reduce database load.
clearAssetCacheOnStartup- If
truethen clear the asset cache each time Stroom starts up.
Note
Stroom does not clear assets from the cache by default. This could lead to a situation where the asset has been deleted within the UI, but is still available via HTTP/HTTPS. If this causes a problem you need to set this value totrue and restart Stroom.
The cache will then be recreated from valid content in the database.
default- The mimetype to send to the browser for an asset where the asset’s extension is not recognised. You probably don’t need to change this.
defaultAceEditorMode- The ACE editor mode to use when the asset’s extension is not recognised. You probably don’t need to change this.
mimetypes- The MIME type to send to the browser for each filename extension. You may need to add something to support a particular filename extension you use.