Experiment Tracking with Bailo & MLFlow
In addition to core concepts covered in previous notebooks, Bailo also offers integrations that might be useful within the wider machine learning lifecycle. This example notebook will run through experiment tracking in particular, integrating with MLFlow Tracking. The following concepts will be covered:
Creating a new experiment using a Bailo model.
Conducting experiment runs and logging parameters/metrics.
Importing existing experiments from MLFlow Tracking.
Publishing results to the Bailo service.
Prerequisites:
Completion of the basic notebooks, in particular models_and_releases_demo_pytorch.ipynb.
Python 3.10 or higher (including a notebook environment for this demo).
A local or remote Bailo service (see https://github.com/gchq/Bailo).
Dependencies for MLFlow.
A local or remote MLFlow Tracking server, if following the MLFlow steps.
Introduction
Connecting with Bailo
In order to create an Experiment() object, you will first need to have a Bailo Model() object, and thus a defined Client() too. We learned how to do this in a previous notebook, but this time we will create a new model with a custom schema which supports model metrics. More on that later…
[ ]:
# Install dependencies...
! pip install bailo[mlflow]
[ ]:
# Necessary import statements
from bailo import Model, Client, Experiment, Schema, SchemaKind
import mlflow
import random

# Instantiating the PkiAgent(), if using.
from bailo import PkiAgent
agent = PkiAgent(cert='', key='', auth='')
# Instantiating the TokenAgent(), if using.
from bailo import TokenAgent
agent = TokenAgent(access_key='', secret_key='')

# Instantiating the Bailo client
client = Client("http://127.0.0.1:8080", agent)  # <- INSERT BAILO URL (if not hosting locally)

# Creating a demo model
model = Model.create(client=client, name="YOLOv5", description="YOLOv5 model for object detection.")
print(f"Created model {model.model_id}")
Setting up MLFlow Tracking
In order to complete the integration element of this tutorial, we will need to set up a local instance of MLFlow Tracking, and create a sample experiment run. This will not contain any actual model training and is only to demonstrate the functionality of Bailo.
Run mlflow ui --port 5050 on the command line. This will run on localhost:5050 and the UI can be accessed on a browser.
Preparing a custom schema for tracking
The Bailo UI is designed to display metrics in a particular way, therefore you will need to use a schema that supports this. This is necessary to publish results.
[ ]:
# Defines the schema in an external script as it is quite large!
%run -i set_schema.py

# Assigns a random schema ID
schema_id = random.randint(1, 1000000)

# Creates the schema on Bailo
schema = Schema.create(
    client=client,
    schema_id=str(schema_id),
    name="Experiment Tracking",
    description="Demo tracking schema",
    kind=SchemaKind.MODEL,
    json_schema=json_schema,
    review_roles=["example", "reviewer"]
)

# Model cards need to be instantiated with their mandatory fields before metrics can be published.
model.card_from_schema(schema_id=str(schema_id))
print(f"Current model card version: {model.model_card_version}")
new_card = {
    'overview': {
        'tags': [],
        'modelSummary': 'YOLOv5 model for object detection.',
    }
}
model.update_model_card(model_card=new_card)

model.get_card_latest()
print(f"New model card version: {model.model_card_version}")
Creating a new experiment
Experiments with the Bailo client are created using the Model.create_experiment() method.
[ ]:
experiment = model.create_experiment()
Conducting experiment runs
Running an experiment with the Bailo python client
You can run experiments directly using the Bailo python client as follows.
NOTE: This will only work for sequential experiment runs, so if you’re running experiments in parallel then it would be better to use MLFlow Tracking. We will learn how to import completed experiments from MLFlow in the next section.
[ ]:
# Arbitrary params
params = {
    "lr": 0.01,
    "anchor_t": 4.0,
    "scale": 0.5,
}

# Arbitrary metrics
metrics = {
    "accuracy": 0.98,
}

for x in range(5):
    experiment.start_run()
    experiment.log_params(params)
    experiment.log_metrics(metrics)
    experiment.log_artifacts(["weights.txt"])
Creating a dummy MLFlow experiment run
This section conducts an arbitrary experiment run and logs the params/metrics to your local MLFlow server. We need this for the next section.
[ ]:
# Setting local tracking URI and experiment name
mlflow.set_tracking_uri(uri="http://127.0.0.1:5050")
mlflow.set_experiment("Demonstrator")

# Logging the same metrics to the local MLFlow server
with mlflow.start_run():
    mlflow.log_params(params)
    mlflow.log_metric("accuracy", 0.86)
    mlflow.log_artifact("weights.txt")
    mlflow.set_tag("Training Info", "YOLOv5 Demo Model")
Importing existing experiments from MLFlow into Bailo
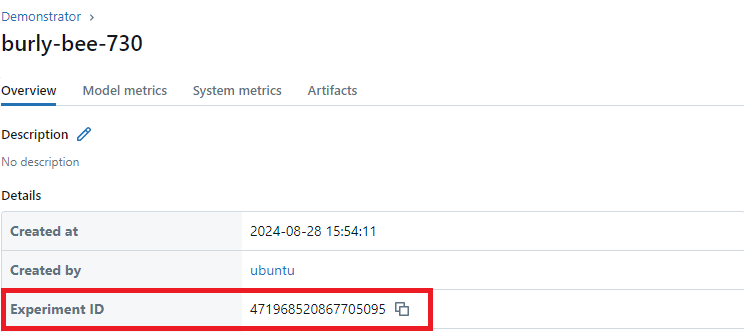
You can import existing experiments into the Experiment() class by instantiating model.create_experiment() and then calling the experiment.from_mlflow() method. You must provide the MLFlow tracking URI and the experiment ID. To get the experiment ID, go to the link provided in the cell “Creating a dummy MLFlow experiment run”. In the details section you will see “Experiment ID”, copy this ID and add it to the argument experiment_id. 
[ ]:
experiment_mlflow = model.create_experiment()
experiment_mlflow.from_mlflow(
    tracking_uri="http://127.0.0.1:5050", experiment_id="471968520867705095"
)  # <- INSERT MLFLOW EXPERIMENT ID. CAN BE FOUND ON THE UI.
Publishing results to Bailo
Experiment runs can be published to the model card using the Experiment.publish() method, one at a time. This is because the intended use is only to publish the most successful run. Therefore, you must specify the run_id to publish, or specify an order so the client can select the best result. As well as this, you must specify the location of the metrics in your schema (in this case performance.performanceMetrics as per the schema we defined earlier).
Examples for both scenarios can be seen below.
Publishing a specific run
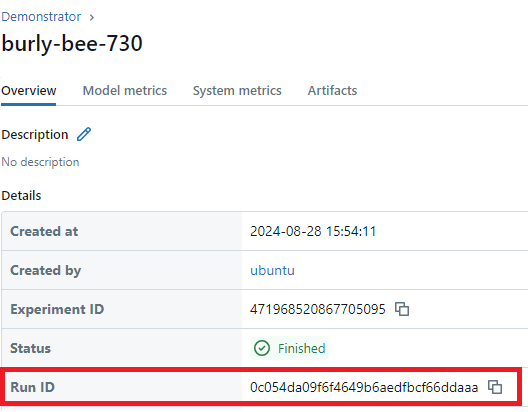
To publish a specific run, you must pass the run_id into the method. In this example, use the run ID created in one of our previous runs. We get this similarly to getting the experiment ID, by either by following the link provided in the terminal output when we create our experiment run OR by going to the mlflow uri, going to our experiment tab, which in this example is, “Demonstrator”. Then we select our chosen run, go to the details table, find “run ID” and copy the ID. We paste this ID in
the publish() function, as our run_id. The publish() method will automatically upload any artefacts as a new minor release to the model.

Note: The mc_loc parameter is specific to the schema we are using so would require updating for a different schema. It is a tuple-like path to the specific field in the schema.
[ ]:
experiment_mlflow.publish(mc_loc="performance.performanceMetrics", run_id="c531286193a5499e803ae48cc898819b")
For data integrity, it is not possible to publish the same Experiment twice as the Experiment.published flag is automatically updated by publish().
Publishing the best run
To publish the best run, you must define what the best is for your use case. This can be done using the select_by parameter with a string e.g. accuracy MIN|MAX. Depending on the requirements, accuracy could be any metric you have defined in your experiment.
In the below example, we will use accuracy MAX to publish the experiment run with the highest accuracy.
If previous publish is run, this subsequent accuracy MAX call can not be made without error.
publish() accepts either select_by or run_id but not both (nor neither) as this will raise a BailoException.
[ ]:
experiment_mlflow.publish(mc_loc="performance.performanceMetrics", select_by="accuracy MAX")
If successful, our metrics should now be under the Performance tab of your model card on the UI! Additionally, our artifact will have been published as a new release (this will have been done twice if you ran both the above steps).